
Montage- und Betriebsanleitung
Mounting and Operating Instructions
CEAG Style Industrie 40011 ... 40031 CG-S
CEAG Style Industry 40011 ... 40031 CG-S
Zielgruppe: Elektrofachkraft
Target group: Skilled electricians
Verwendungszweck: Notbeleuchtung, nicht für privaten Gebrauch
Intended Application: Emergency Lighting, not suitable for private use

2
Manual CEAG Style Industry 40011 ... 40031 CG-S 30080001632_J September 2018 www.ceag.de
Inhaltsverzeichnis
1 NORMENKONFORMITÄT ..............................3
2 AUFBAU ............................................4
2.1 Style 40011 CG-S ...........................4
2.2 Style 40031 CG-S ...........................5
2.3 Maßbilder .................................6
3 KURZBESCHREIBUNG / VERWENDUNGSBEREICH ........7
4 TECHNISCHE DATEN .................................7
4.1 Style 40011CG-S ............................7
4.2 Style 40031 CG-S ...........................8
5 INSTALLATION ......................................8
5.1 Montage ...................................8
5.2 Adressierung ..............................9
5.3 Leuchte komplettieren .....................10
5.4 Lampenwechsel ...........................10
6 WARTUNG / INSTANDHALTUNG .......................11
7 ENTSORGUNG / RECYCLING ..........................11
Contents
1 CONFORMITY WITH STANDARDS ......................3
2 CONSTRUCTION. . . . . . . . . . . . . . . . . . . . . . . . . . . . . . . . . . . . . 4
2.1 Style 40011 CG-S ...........................4
2.2 Style 40031 CG-S ...........................5
2.3 Dimensional Drawings ......................6
3 PRODUCT DESCRIPTION / SCOPE OF APPLICATION ........7
4 TECHNICAL DATA ...................................7
4.1 Style 40011 CG-S ...........................7
4.2 Style 40031 CG-S ...........................8
5 INSTALLATION ......................................8
5.1 Mounting ..................................8
5.2 Addressing ................................9
5.3 Complete luminaire ........................10
5.4 Lamp replacement .........................10
6 SERVICING / MAINTENANCE .........................11
7 DISPOSAL / RECYCLING ..............................11

3
Manual CEAG Style Industry 40011 ... 40031 CG-S 30080001632_J September 2018 ww w.ceag.de
SICHERHEITSHINWEISE
• Betreiben Sie die Leuchte bestim mungs-
gemäß in unbeschädigtem und einwand-
freiem Zustand!
• Als Ersatz dürfen nur Originalteile von
CEAG verwendet werden!
• Vor der ersten Inbetriebnahme muss die
Leuchte entsprechend den im Abschnitt
Installation genannten Anweisungen
geprüft werden!
• Bei Arbeiten an der Notleuchte ist erst die
Anlage zu blockieren, der Batteriekreis
zu unterbrechen und dann das Netz abzu-
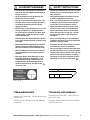
schalten. Bild 1 zeigt das Hinweisschild
auf der Notleuchte.
• Kennzeichnen Sie die Notleuchten: Strom-
kreis und Leuchtennummer zuordnen und
eintragen.
• Die Protokollführung gemäß der nationa-
len Vorschriften ist durchzuführen (ent-
fällt bei automatischer Protokollierung)!
• Alle Fremdkörper müssen vor der ersten
Inbetriebnahme aus dem Gerät entfernt
werden!
• Beachten Sie bei allen Ar beiten an dem
Gerät die nationalen Sicherheits- und
Unfallverhütungsvorschriften und die
nachfolgenden Sicherheitshinweise in
der Betriebsanleitung, die mit einem
versehen sind!
SAFETY INSTRUCTIONS
• The device shall only be used for its inten-
ded purpose and in undamaged and per-
fect condition!
• Only genuine CEAG spare parts may be
used for replacement and repair.
• Prior to its initial operation, the luminaire
will have to be checked in line with the
instructions (see installation sector).
• When working on the emergency lumi-
naire first the system must be blocked,
battery operation must be interrupted
and mains must be cut off. Fig. 1 shows
the indication label on the emergency
luminaire.
• Carry out the marking of the emergency
luminaire: Assign the circuit and the lumi-
naire No. and enter them.
• Log book records shall be kept in compli-
ance with the national regulations.
• Any foreign object shall be removed from
the luminaire prior to its initial operation!
• Observe the national safety rules and reg-
ulations to prevent accidents as well as
the safety instructions included in these
operating instruction marked with
!
Bild 1 / Fig. 1
1 Normenkonformität
Konform mit: EN 60 598-1, EN 60 598-2-22 und
DIN EN 1838.
Gemäß DIN EN ISO 9001 entwickelt, gefertigt
und geprüft.
1 Conformity with standards
Conforming to: EN 60 598-1, EN 60 598-2-22
and DIN EN 1838.
Designed, manufactured and tested according
to DIN EN ISO 9001.
* * ******
IMPORTANT
gem./acc.to IEC 60598-2-22:2014

4
Manual CEAG Style Industry 40011 ... 40031 CG-S 30080001632_J September 2018 www.ceag.de
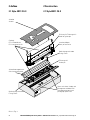
Bild 2 / Fig. 2
Scheibe
Screen
(Option)
IP 54 Zubehörsatz
IP 54 accessories kit
Schnellmontageeinsatz
Quick mounting plate
Führungsstift
Guide pin
Öffnung für Führungsstift
Hole for guide pin
Leuchtenkörper
Body of luminaire
Befestigungsschraube
Fixing screw
Befestigungsschraube
Fixing screw
Raum zwischen Haube und
Piktogrammscheibe IP41!
Area between bowl and
pictograph plate IP41!
2 Aufbau 2 Construction
2.1 Style 40011 CG-S 2.1 Style 40011 CG-S

5
Manual CEAG Style Industry 40011 ... 40031 CG-S 30080001632_J September 2018 ww w.ceag.de
2.2 Style 40031 CG-S 2.2 Style 40031 CG-S
Bild 3 / Fig. 3
Scheibe
Screen
EVG 13.3
ECG 13.3
Reflektor
Reflector
Lampenfassung
lamp socket
(Option)
IP 54 Abdeckrahmen
IP 54 cover frame
Leuchtmittel
lamp

6
Manual CEAG Style Industry 40011 ... 40031 CG-S 30080001632_J September 2018 www.ceag.de
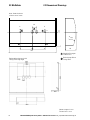
R 300
80
200
6
6
30
90
90
345
1
22
Abmessungen in mm
Dimensions in mm
ohne Abdeckrahmen
without cover frame
Deckenbefestigungswinkel
Ceiling mounting angle
2.3 Maßbilder 2.3 Dimensional Drawings
Kabeleinführungen
Cable enties
Befestigungslöcher
Fixing holes
2
1

7
Manual CEAG Style Industry 40011 ... 40031 CG-S 30080001632_J September 2018 ww w.ceag.de
3 Kurzbeschreibung /
Verwendungsbereich
Die Rettungs- und Sicher heitsleuchte ist für
den Betrieb an CEAG Sicherheitsbeleuch tungs-
anlagen nach EN 50 172, DIN VDE 0100-718
und E DIN 0108-100 geeignet. Die besondere
Schaltfunktion wird nur mit CG-S-Technologie
ermöglicht.
ACHTUNG!
In IP54 Ausführung eignen sich die Leuchten
40011 und 40031 CG-S für erhöhte Dichtig-
keits anforderungen in Innenräumen und
geschützten Außenbereichen (z.B. unter
Vordächern). Sie sind nicht geeignet für
dengenerellen Einsatz im Außenbereich!
40011 CG-S: Mit dem Zubehörsatz
(Bestellnummer 40071345975) kann die
Schutzart für den Raum unter der zusätz-
lichen Haube für das Leuchtmittel und die
Elektronik gem. EN 60529 von standard-
mäßig IP 41 auf IP 54 erhöht werden.
Der Raum zwischen der zusätzlichen Haube
und der Piktogrammscheibe bleibt IP41.
3 Product description /
Scope of application
The Exit and Safety luminaire is suitable for
operation on CEAG safety lighting systems
acc. to EN 50 172, DIN VDE 0100-718 and
E DIN VDE 0108-100. The advanced switching
mode is available only with CEAG CG-S
technology.
ATTENTION!
The luminaires 40011 CG-S and 40031 CG-S
with IP54 are suitable for increased sealing
requirements for indoor rooms and protect-
ed outdoor areas (e.g. under porches).
It is not applicable for general use in outdoor
areas.
40011 CG-S: By using the accessory kit
(Order no. 40071345975) the degree of pro-
tection can be increased from standard IP 41
to IP 54. The area between additional cover
and pictogram remains IP41.
4 Technische Daten
4.1 Style 40011 CG-S
4 Technical Data
4.1 Style 40011 CG-S
Eingangsspannung
Input voltage
230/240 V AC 50/60 Hz
176 – 275 V DC
Leistungsauf nahme (AC)
Power consumption (AC)
16 VA
Stromaufnahme (DC)
Rated current (DC)
30 mA
Leuchtmittel
Light source
8 W/T16
Nennlichtstrom der Lampe
Rated luminous flux of the lamp
450 lm
Bemessungslichtstrom
Rated luminous flux for emergency operation
75 % (Phi
Netz
)
75 % (phi
mains
)
Schutzklasse
Insulation class
II
Schutzart nach EN 60527
Protection category acc. to EN 60527
IP 41 (optional IP54)
IP 41 (IP54 option)
Umgebungstemperatur
Perm. ambient temperature:
-10 °C .. +40 °C
Netzanschlussklemmen
Supply terminals
3 x 2 x 2,5 mm² max 6 A
3 x 2 x 2.5 mm² max 6 A
Gewicht
Weight
2,3 kg
2.3 kg

8
Manual CEAG Style Industry 40011 ... 40031 CG-S 30080001632_J September 2018 www.ceag.de
4.2 Style 40031 CG-S 4.2 Style 40031 CG-S
Eingangsspannung
Input voltage
230/240 V AC 50/60 Hz
176 – 275 V DC
Leistungsauf nahme (AC)
Power consumption (AC)
18 VA
Stromaufnahme (DC)
Rated current (DC)
40 mA
Leuchtmittel
Light source
11W /TC-SEL
Nennlichtstrom der Lampe
Rated luminous flux of the lamp
900 lm
Bemessungslichtstrom
Rated luminous flux for emergency operation
75 % (Phi
Netz
)
75 % (phi
mains
)
Schutzklasse
Insulation class
I
Schutzart nach EN 60529
Protection category acc. to EN 60529
IP 41 (optional IP54)
IP 41 (IP54 option)
Umgebungstemperatur
Perm. ambient temperature:
-10 °C .. +40 °C
Netzanschlussklemmen
Supply terminals
3 x 2 x 2,5 mm² max 6 A
3 x 2 x 2.5 mm² max 6 A
Gewicht
Weight
1,8 kg
1.8 kg
5 Installation
ACHTUNG!
Halten Sie die für das Errichten und Betrei-
ben von elektrischen Betriebsmitteln gel-
tenden Sicherheitsvorschriften und das
Gerätesicherheitsgesetz sowie die allge-
mein anerkannten Regeln der Technik ein!
5.1 Montage
Kabel in den Leuchtenkörper einführen und
diesen an der Wand befestigen.
ACHTUNG!
Beigefügte Kunst stoffscheiben als Dichtung
unter den Schraubenkopf legen! Bei einer
nichtbenutzten Einführung ist der Ver-
schluss stopfen zu belassen (IP-Schutz).
STYLE 40011
Schnellmontageeinsatz mit 2 Schrauben im
Gehäuse befestigen (S.4 Bild 2).
Netzver bindung
(L(U), N(0), PE) herstellen (Bild 5). Achten Sie
auf den festen Sitz der Klemmschrauben!
5 Installation
ATTENTION!
For the mounting and operation of electrical
apparatus, the respective national safety
regulations (e. g. ElexV, equipment safety
law for Germany) as well as the general rules
of engineering will have to be observed.
5.1 Mounting
Enter cable into the luminaire and fix luminaire
atthe wall.
ATTENTION!
Use enclosed plastic washers for sealing
with the screw head. Unused cable entries
are left with their locking plug fitted
(IP protection).
STYLE 40011
Fix quick mounting plate with two screws at the
luminaire (page 4, fig. 2).
Mains connection
(L (U), N (0), PE) is to be established (fig. 5). Pay
attention to a tight fit of the terminal screws!

9
Manual CEAG Style Industry 40011 ... 40031 CG-S 30080001632_J September 2018 ww w.ceag.de
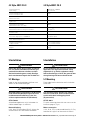
Bild 5 / Fig. 5
TOP
PE N (0) L (U)
Style 40031 CG-S
Style 40011 CG-S
Schalter 1 Schalter 2
Switch 1 Switch 2
Bild 6 / Fig. 6
Bild 6 / Fig. 6
Adressschalter / Address switch
Style 40031 CG-S
Style 40011 CG-S
5.2 Adressierung
Vor Montage der Scheibe muss die individuelle
Leuchtenadressierung eingestellt werden. Mit
einem geeigneten Schraubendreher gewünschte
Adresse (1 - 20) am Adressschalter einstellen
(Pfeil auf Zahl, Bild 6). Soll die Leuchte nicht
überwacht werden, ist immer die Stellung 0/0
einzustellen.
5.2 Addressing
Before fitting the screen or bowl, the addressing
of the individual luminaires will have to be
performed. To do so, the desired address (1 -
20) is set on the address switch by means of
a suitable screw driver (Arrowhead to No., fig.
6). If the luminaire should not be monitored the
code 0/0 has to be selected.
Adressschalter 1
address switch 1
Adressschalter 2
address switch 2
Leuchtenadresse
Luminaire address
0 0 Überwachung aus / Monitoring off
0 1 1
0 2 2
..... ..... .....
1 0 10
1 1 11
1 2 12
..... ..... .....
2 0 20
2 1 nicht zul. / not permissable
2 2 nicht zul. / not permissable
..... ..... .....
2 9 nicht zul. / not permissable
Style 40011 CG-S
Die Adressierung erfolgt am Adressschalter der
Leuchtenkörpers – bei IP 54 Haube muss diese
hierzu abgenommen werden. Hierzu müssen
die 4 Schrauben gelöst werden.
Style 40031 CG-S
Zur Adressierung am Adressschalter des EVG
13.2 muss nach dem herausnehmen der Lampe
der Reflektor aus der Leuchte gehoben werden.
Style 40011 CG-S
The address switch is placed on the quick
mounting plate - if IP 54 accessories kit is
mounted, you have to replace them. Therefore
loosen the 4 screws.
Style 40031 CG-S
For addressing the luminaire by the EVG 13.2
address switch, you have to replace lamp and
reflector of the luminaire.

10
Manual CEAG Style Industry 40011 ... 40031 CG-S 30080001632_J September 2018 www.ceag.de
5.3 Leuchte komplettieren
Style 40011 CG-S
Öffnung des Leuchteneinsatzes auf den
Führungs stift (S. 4, Bild 2) des Schnellmontage-
einsatzes aufzusetzen. Alle vier Ecken am
unteren Teil des Leuchtenkörpers sind bis zum
deutlichen Rasten auf den Schnellmontagesatz
aufzudrücken (Schnapphaken rasten am Schnell-
montageeinsatz).
Bei Schutzart IP54 Haube mit 4 Schrauben
befestigen (S.4Bild2).
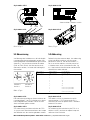
HINWEIS
Soll der Leuchtenkörper wieder vom Schnell-
montagesatz gelöst werden, so ist ein Schlitz-
schrauben dreher in die seitliche Aussparung am
Reflektor zu stecken (Bild8) und der Schnapp-
haken durch seitliche Hebelwirkung in Richtung
Außenkante zu lösen.
Mit leichtem Ziehen innen am Leuchteneinsatz
löst sich selbiger vom Schnellmontageeinsatz.
Nachdem alle vier Schnappverbindungen
gelöst sind, kann der Leuchteneinsatz vom
Schnellmontageeinsatz getrennt werden; bei
IP54 Haube müssen zusätzlich die 4 Schrauben
gelöst werden.
Style 40031 CG-S
Erdungsfahne des Reflektors im Gehäuse aufste-
cken und Reflektor einlegen. Leuchmittel in die
Fassung stecken.
Scheibe auf Leuchtengehäuse aufschnappen.
Bei Leuchten mit IP 54 Abdeckrahmen: Rahmen
mit Dichtung auf die Leuchte aufschrauben,
Schraube fest anziehen (Drehmoment 3 Nm).
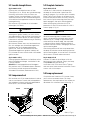
5.4 Lampenwechsel
Bei Leuchten mit IP 54 Abdeckrahmen ist dieser
zuerst zu entfernen. Danach die Schnapphaken
der Scheibe mit einem Schlitzschraubendreher
lösen (Bild 7) und Scheibe abheben.
5.3 Complete luminaire
Style 40011 CG-S
In order to fix the luminaire, the opening in
the body of the luminaire is placed on the
guide pin (page 4, fig. 2) of the quick assembly
plate. Thenall four corners of the body of the
luminaire are pushed down until they distinctly
lock in on the quick mounting plate (the snap
hooks engage in the quick mounting plate).
When installing the luminaire with IP 54
protection fix the IP54 accessories kit with 4
screws (page 4, fig. 2).
NOTE
ln order to detach the body of luminaire from
the quick mounting plate, a slotted screw
driver is inserted into the lateral recess on the
reflector (fig. 8). Through a slight lateral lever
action towards the outer edge, the snap hook
is released. When slightly pulling the body of
luminaire from the inside, it disengages from the
quick mounting plate.
After having released all four snap connections,
the body of luminaire can be removed from the
quick mounting plate; in case of the IP 54 version
the 4 screws will have to be unscrewed.
Style 40031 CG-S
Connect PE cable of the reflector with the
housing and insert reflector. Plug-in the lamp.
Snap screen onto the housing.
Luminaires with IP 54 cover frame: Tighten
seal and cover frame onto the luminaire. Fasten
screws with 3 Nm torque.
5.4 Lamp replacement
If luminaires are fitted ba a IP 54 cover frame,
you first have to remove them. For lamp
replacement, the snap hooks of the screen are
detatched with a slotted screw driver (fig. 7).
Bild 7 / Fig. 7 Bild 8 / Fig. 8

11
Manual CEAG Style Industry 40011 ... 40031 CG-S 30080001632_J September 2018 ww w.ceag.de
Bild 8 / Fig. 8
Technische Änderungen vorbehalten! We reserve the right to carry out technical
changes!
6 Wartung / Instandhaltung
Halten Sie die für Instandhaltung, Wartung und
Prüfung von elektrischen Betriebsmitteln gelten-
den Bestimmungen ein! Im Fall von Rücksendun-
gen benötigen Sie von uns eine RMA - Nummer.
Entnehmen Sie bitte weitere Infos hierzu unserer
Internetseite www.ceag.de.
Ersatzleuchtmittel erhalten Sie unter info-n@
ceag.de.
7 Entsorgung / Recycling
Beachten Sie bei der Entsorgung defekter Geräte
die gültigen Vorschriften für Recycling und Ent-
sorgung. Kunststoffteile sind mit entsprechenden
Symbolen gekennzeichnet.
6 Servicing / Maintenance
Observe the relevant national regulations app-
lying to the maintenance, servicing and checking
of electrical apparatus. In case of returns you
need a RMA - number from us. For further infor-
mation see www.ceag.de.
Contact [email protected] for replacement of light
source.
7 Disposal / Recycling
When disposing of defective devices, comply with
valid regulations for recycling and waste dispo-
sal. Plastic parts are marked with corresponding
symbols.

Eatons Ziel ist es, zuverlässige, effiziente und sichere
Stromversorgung dann zu bieten, wenn sie am meisten
benötigt wird. Die Experten von Eaton verfügen über ein
umfassendes Fachwissen im Bereich Energiemanagement
in verschiedensten Branchen und sorgen so für kundens-
pezifische, integrierte Lösungen, um anspruchsvollste
Anforderungen der Kunden zu erfüllen.
Wir sind darauf fokussiert, stets die richtige Lösung für jede
Anwendung zu finden. Dabei erwarten Entscheidungsträger
mehr als lediglich innovative Produkte. Unternehmen wen-
den sich an Eaton, weil individuelle Unterstützung und der
Erfolg unserer Kunden stets an erster Stelle stehen.
Für mehr Informationen besuchen Sie www.eaton.de.
Ihre Ansprechpartner finden Sie unter www.ceag.de.
At Eaton, we’re energized by the challenge of powering
a world that demands more. With over 100 years experi-
ence in electrical power management, we have the exper-
tise to see beyond today. From groundbreaking products
to turnkey design and engineering services, critical indus-
tries around the globe count on Eaton.
We power businesses with reliable, efficient and safe
electrical power management solutions. Combined with
our personal service, support and bold thinking, we are
answering tomorrow’s needs today. Follow the charge
with Eaton. Visit ea ton.eu.
You will find your contact partner at www.ceag.de.
Eaton
EMEA Headquarters
Route de la Longeraie 7
1110 Morges, Switzerland
Eaton.eu
CEAG Notlichtsysteme GmbH
Senator-Schwartz-Ring 26
59494 Soest, Germany
Tel.: +49 (0) 2921 69-870
Fax: +49 (0) 2921 69-617
E-mail: [email protected]
Web: www.ceag.de
© 2018 Eaton
Alle Rechte vorbehalten
Printed in Germany
Publikations-Nr. IB451003ML
Bestell-Nr. 30080001632_J
September 2018
-
 1
1
-
 2
2
-
 3
3
-
 4
4
-
 5
5
-
 6
6
-
 7
7
-
 8
8
-
 9
9
-
 10
10
-
 11
11
-
 12
12


Eaton 40011 CG-S Mounting And Operating Instructions
- Typ
- Mounting And Operating Instructions
- Dieses Handbuch eignet sich auch für
in anderen Sprachen
- English: Eaton 40011 CG-S
Verwandte Artikel
-
Eaton CEAG 3503.1 SL CG-S Mounting And Operating Instructions
-
-
-
-
-
-
-
-
Eaton V-CG-SE 4-400W Bedienungsanleitung
-

