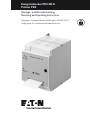
Eaton PD3 Mounting And Operating Instructions
- Typ
- Mounting And Operating Instructions

Ereignisdrucker PD3 ZB-S
Printer PD3
Montage- und Betriebsanleitung
Mounting and Operating Instructions
Zielgruppe: Erfahrene Elektrofachkräfte gem. DIN VDE 0105 T1
Target group: For trained and qualified electricians

2
Manual Printer PD3 40071860008 Februar 2016 www.ceag.de
SICHERHEITSHINWEISE
• Das Gerät ist bestim mungs gemäß in
unbeschädigtem und einwandfreiem Zu-
stand zu betreiben!
• Als Ersatz dürfen nur Originalteile von
CEAG verwendet werden!
• Bei Durchführung von Arbeiten an dem
Gerät sicherstellen, daß die Anlage span-
nungsfrei geschaltet ist!
• Beachten Sie bei allen Ar beiten an dem
Gerät die nationalen Sicherheits- und
Unfallverhütungsvorschriften und die
nachfolgenden Sicherheitshinweise in der
Betriebsanleitung, die mit einem ver-
sehen sind!
SAFETY INSTRUCTIONS
• The device shall only be used for its
intended purpose and in undamaged and
perfect condition!
• Only genuine CEAG spare parts may be
used for replacement and repair
• When working on the device make sure
that it is disconnected from the voltage!
• Observe the national safety rules and
regulations to prevent accidents as well
as the safety instructions included in
these operating instruction marked
with
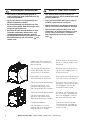
Den Ereignisdrucker durch
Lösen der beiden Schnell-
verschlüsse (1) ausbauen.
Remove the printer by releas-
ing the two snapping clips (1)
of the enclosure.
Haltefedern (2) mit einem
Schraubendreher entfernen.
Remove the securing springs (2)
with the aid of a screw driver.
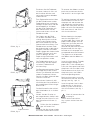
Gehäusemittelteil demontieren.
Die Gehäusehälften sind
gesteckt und können ohne
Werkzeug demontiert werden.
Dismount the first part of the
enclosure. The enclosure parts
are plugged in and can be
removed without a tool.
1
2
Melden Sie den Drucker vor
dem Ausbau am Steuerteil in
der Anlage ab.
Bild 1, fig. 1
Before removal disconect the
printer at control modul in the
enclosure.
Gehäusemittelteil demontieren.
Die Gehäusehälften sind
ge steckt und können ohne
Werk zeug demontiert werden.
Dismount the second part of
the enclosure. The enclosure
parts are plugged in and can
be removed without a tool.
Frontplatte abbauen.
Die Frontplatte ist seitlich
geführt und kann ohne Werk-
zeug demontiert werden.
Take down the front panel.
The front panel is guided on
its side and can be removed
without a tool.
Bild 2, fig. 2

3
Manual Printer PD3 40071860008 Februar 2016 www.ceag.de
Entfernen Sie die Farbband-
kassette, indem sie links auf
die Kassette drücken und
rechts die Kassette abheben
und entfernen.
Zum Papierrollenwechel lösen
Sie die Rändelmutter an der
Papierrollenachse und entfer-
nen den Seitenschutz und die
leere Papphülse. Schieben
Sie die neue Papierrolle mit
dem Seitenschutz auf die
Achse und sichern sie mit der
Rändelschraube.
Das Papier von der Rolle
ist vor dem Einfädeln recht-
winklig abzureissen und von
unten in den Papierschacht
des Druckwerkes bis vor die
Andruckrolle einzuführen. Das
Rändelrad am rechten Ende
der Andruckrolle ist bei gleich-
zeitigem, leichten Druck des
Papiers gegen die Andruckrolle
mit dem Daumen nach vorn
unten zu drehen, bis das
Papier einige Zentimeter nach
vorn transportiert wurde.
Die Farbbandkassette ist so
einzusetzen, daß das Papier
zwischen Farbband und
Kassette liegt.
Die Frontplatte einsetzen. Dabei
das Papier durch den Schlitz
führen. Das Mittelteil einsetzen
und die Frontplatte fixieren.
Danach mit dem Seitenteil den
Drucker schliessen.
Bitte achten Sie darauf, daß
alle Stifte der Kunststoffteile in
die zugehörigen Hülsen einge-
drückt sind.
Die Gehäuseteile sind mit bei-
den Haltefedern (2) zu sichern.
(Bild 1)
Setzen Sie den Drucker an
der vorgesehenen Stelle in die
Anlage ein und sichern ihn mit
den Schnellverschlüssen (1).
(Bild 1)
Schalten Sie die Anlage wieder
ein und aktivieren den Drucker.
To remove the ribbon cassette
push the cassette on the left
side and lift it on the right side.
To replace the paper roll loosen
the knurled nut at the axis of
the paper roll and remove the
side protection and the empty
paper reel. Now push the new
paper roll with the side protec-
tion onto the axis and safe it
with the knurled nut.
Before feeding in the paper
see that the paper has a
straight edge. Now insert the
paper into the paper shaft of
the printer up to the pressure
roll. By pushing the paper
towards the pressure roll must
be preturned with the right
knurled nut till the paper was
transported some centimeters.
The paper must lie between
the ribbon and the ribbon cas-
sette.
Insert the front panel. Thereby
lead the paper through the
paper slot. Fit the second part,
insert the front panel and close
the printer with the side frame.
Please observe that all pins of
the plastic parts are fixed in
the corresponding covers.
Both enclosure parts must be
secured with the two securing
springs (see fig. 1 pic. 2).
Insert the printer into his des-
tined position in the central
battery system and secure it
with the fasteners (see fig. 1
pic. 1).
Switch on the central bat-
tery system and activate the
printer.
Bild 4, fig. 4
Bild 5, fig. 5
Prüfen Sie alle Verbindun-
gen auf festen Sitz!
Papierschacht
RändelradAndruckrolle
Bild 6, fig. 6
Bild 3, fig. 3
Check all connections for
astrong fit.

Eatons Ziel ist es, zuverlässige, effiziente und sichere
Stromversorgung dann zu bieten, wenn sie am meisten
benötigt wird. Die Experten von Eaton verfügen über ein
umfassendes Fachwissen im Bereich Energiemanagement
in verschiedensten Branchen und sorgen so für kundens-
pezifische, integrierte Lösungen, um anspruchsvollste
Anforderungen der Kunden zu erfüllen.
Wir sind darauf fokussiert, stets die richtige Lösung für jede
Anwendung zu finden. Dabei erwarten Entscheidungsträger
mehr als lediglich innovative Produkte. Unternehmen wen-
den sich an Eaton, weil individuelle Unterstützung und der
Erfolg unserer Kunden stets an erster Stelle stehen.
Für mehr Informationen besuchen Sie www.eaton.de.
Ihre Ansprechpartner finden Sie unter www.ceag.de.
At Eaton, we’re energized by the challenge of powering
a world that demands more. With over 100 years experi-
ence in electrical power management, we have the exper-
tise to see beyond today. From groundbreaking products
to turnkey design and engineering services, critical indus-
tries around the globe count on Eaton.
We power businesses with reliable, efficient and safe
electrical power management solutions. Combined with
our personal service, support and bold thinking, we are
answering tomorrow’s needs today. Follow the charge
with Eaton. Visit eaton.eu.
You will find your contact partner at www.ceag.de.
Eaton
EMEA Headquarters
Route de la Longeraie 7
1110 Morges, Switzerland
Eaton.eu
CEAG Notlichtsysteme GmbH
Senator-Schwartz-Ring 26
59494 Soest, Germany
Tel.: +49 (0) 2921 69-870
Fax: +49 (0) 2921 69-617
E-mail: [email protected]
Web: www.ceag.de
© 2016 Eaton
Alle Rechte vorbehalten
Printed in Germany
Publikations-Nr. IL451014ML
Bestell-Nr. 40071860008
Februar 2016
-
 1
1
-
 2
2
-
 3
3
-
 4
4


Eaton PD3 Mounting And Operating Instructions
- Typ
- Mounting And Operating Instructions
in anderen Sprachen
- English: Eaton PD3
Verwandte Artikel
-
Eaton CEAG SL 3301 CG-S Mounting And Operating Instructions
-
-
-
-
-
-
-
-
-