
Front View - Vista frontal - Frontansicht - Vue de face
正面 - 正面 - 정면도 - フロントビュー
LED indicator
Blue = Power ON / Link established
Azul = Encendido / Conexión establecida
Blau = Eingeschaltet / Verbindung hergestellt
Bleu = Allumé / Liaison établie
藍色 = 電源開啟 / 已連線
蓝色 = 电源开启 / 已联机
파란색 = 전원 켜짐 / 링크가 구성됨
ブルー = 電源オン / 接続中
© 2017 by AKiTiO - All Rights Reserved
AKiTiO assumes no responsibility for any errors or differences between the product you may have and the one mentioned in this document
and reserves the right to make changes in the specifications and/or design of this product without prior notice. The diagrams contained in
this document are for reference and may not fully represent the real product. AKiTiO assumes no responsibility for any loss of data or files.
www.akitio.com
EN ES DE FR
J
PCH KO
California, USA
Node Pro
Setup guide - Guía de configuración - Setup-Anleitung - Guide d'installation
安裝手冊 - 安装手册 - 설치 안내서 - セットアップガイド
Version 1.0
9/26/2017
E15-574M1AA001
To download the latest version of this document, please visit our website at
https://www.akitio.com/support/user-manuals

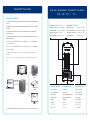
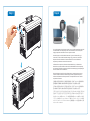
Rear View - Vista posterior - Rückansicht - Vue arrière
背面 - 背面 - 배면도 - リアビュー
Power switch (PSU)
Power switch
Netzschalter
Interruptor de alimentación
Bouton d'alimentation
電源開關
电源开关
전원 스위치
パワースイッチ
Thunderbolt™ 3 (40 Gbps)
Thunderbolt™ 3 port
Puerto de Thunderbolt™ 3
Thunderbolt™ 3 Anschluss
Port Thunderbolt™ 3
Thunderbolt™ 3 連接埠
Thunderbolt™ 3 连接端口
Thunderbolt™ 3 포트
Thunderbolt™ 3 ポート
DisplayPort 1.2 (4K at 60 Hz)
DisplayPort interface
Interfaz DisplayPort
DisplayPort-Anschluss
Interface DisplayPort
DisplayPort 連接埠
DisplayPort 连接端口
인터페이스 표시
DisplayPort ポート
Input: AC 100~240V
Power receptacle
Toma de alimentación
Netzanschluss
Prise de courant
電源插座
电源插座
전원 콘센트
電源コンセント
LED indicator (PSU)
Green = Power ON
Verde = Encendido
Grün = Eingeschaltet
Vert = Allumé
綠色 = 電源開啟
绿色 = 电源开启
녹색 = 전원 켜짐
ミドリ = 電源オン
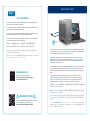
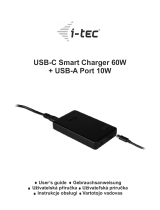
Thunderbolt™ Connectivity
Thunderbolt™ 3 (USB-C)
The second Thunderbolt 3 port supports Thunderbolt 3, USB 3.1 (10 Gbps), and DisplayPort
devices.
El segundo puerto Thunderbolt 3 admite dispositivos DisplayPort, Thunderbolt 3 y USB 3.1
(10 Gbps).
Der zweite Thunderbolt 3 Anschluss unterstützt Thunderbolt 3, USB 3.1 (10Gbps) und
DisplayPort Geräte.
Le deuxième port Thunderbolt 3 prend en charge les appareils Thunderbolt 3, USB 3.1 (10
Gbit/s) et DisplayPort.
第二個 Thunderbolt 3 連接埠,可串接 Thunderbolt 3 裝置、USB 3.1 (10 Gbps) 裝置或是具有
DisplayPort的顯示器。
第二个 Thunderbolt 3 连接端口,可串接 Thunderbolt 3 装置、USB 3.1 (10 Gbps) 装置或是具有
DisplayPort的显示器。
두번째 Thunderbolt 3 포트는 Thunderbolt 3, USB 3.1(10Gbps) 및 디스플레이 포트 장치를
지원합니다.
2つ目のサンダーボルトポートはThunderbolt 3やUSB3.1 (10Gbps)及びDisplayPortをサポートし
ます。
Thunderbolt™ 3
Computer
Display 2
Display 1
Thunderbolt 3
USB-C cable
Thunderbolt and the Thunderbolt logo are trademarks of Intel Corporation in the U.S. and/or other countries.
Thunderbolt™ 3
Device
USB 3.1 Gen 2
Device
Node Pro

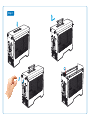
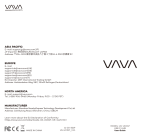
Step 1

Step 2

Step 3
Turn on the computer, plug in the power cord (1), turn on the power (2) and then connect the
Thunderbolt cable to the computer (3) to turn on the device. Note: The fan for the power
supply is temperature controlled and turns on only when needed.
Encienda el equipo, enchufe el cable de alimentación (1), active la alimentación (2) y, a
continuación, conecte el cable Thunderbolt al equipo (3) y, a continuación, encienda el
dispositivo. Nota: El ventilador de la fuente de alimentación se controla mediante la
temperatura y solamente se activa cuando es necesario.
Schalten Sie den Computer ein, schliessen Sie das Stromkabel an (1), schalten Sie den
Netzschalter ein (2) und verbinden Sie dann das Thunderbolt-Kabel mit dem Computer (3),
um das Gerät einzuschalten. Hinweis: Der Lüfter für die Stromversorgung ist temperaturges-
teuert und schaltet sich nur bei Bedarf ein.
Allumez l'ordinateur, branchez le cordon d'alimentation (1), mettez sous tension (2) puis
connectez le câble Thunderbolt à l'ordinateur (3) pour allumer l'appareil. Remarque : Le
ventilateur de l'alimentation électrique est asservi à la température et se met en marche
uniquement si nécessaire.
打開電腦,將裝置插上電源線(1),打開裝置電源開關(2),然後將 Thunderbolt 連接線接到裝
置與電腦端(3)設備啟動。備註:電源的風扇是溫度控制的,只有在需要時才會打開。
打开电脑,将装置插上电源线(1),打开装置电源开关(2),然后将 Thunderbolt 连接线接到装
置与电脑端(3)设备启动。備註:电源的风扇是温度控制的,只有在需要时才会打开。
컴퓨터 전원을 켜고, 전원 코드(1)를 연결하여 전원(2)을 켠 다음 Thunderbolt 케이블을 컴퓨터(3)에
연결하여 기기 전원을 켭니다. 참고: 전원 공급 장치의 팬은 온도를 제어하고 필요할 때만 켜집니다.
(1)お使いのパソコンの電源をオンにし、そして本製品背面の電源コンセントに電源コードを挿入
して下さい。(2)本製品のパワースイッチをオンにし、附属しているサンダーボルトケーブルと接続
すると、デバイスのパワーサプライはオンとなります。注:電源装置のファンは温度制御され、必要
なときにのみオンになります。
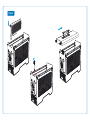
Step 4

Driver Installation
If your PCIe card requires a driver, download and install the corresponding driver for
your system from the manufacturer’s website.
Si su tarjeta PCIe necesita un controlador, descargue e instale el controlador adecuado
para su sistema desde el sitio web del fabricante.
Falls Ihre PCIe-Steckkarte einen Treiber benötigt, downloaden und installieren Sie den
entsprechenden Treiber für Ihr System von der Website des Herstellers.
Si votre carte PCIe nécessite un pilote, téléchargez et installez le pilote correspondant
pour votre système depuis le site Web du fabricant.
如果您的PCIe卡需要驅動程式,請至PCIe卡製造商的網站,下載並安裝相應的驅動程式。
如果您的PCI卡需要驱动程序,请至PCIe卡制造商的网站,下载并安装相应的驱动程序。
사용자의 PCIe 카드에 드라이버가 필요한 경우, 제조업체 웹사이트에서 사용자의 시스템에 맞는
드라이버를 다운로드하여 설치하십시오.
お使いのPCIeカードは、ドライバが必要な場合は、製造元のWebサイトからお使いのシステムに対
応するドライバをダウンロードし、インストールして下さい。
IMPORTANT NOTICE
Your PC may need updates for the Thunderbolt 3 ports to
function properly. For more information go to
https://thunderbolttechnology.net/updates
Step 5
Power Delivery (PD)
This device supports power delivery (PD), providing 60W of power to laptops that support charging
from a 20V/3A power source (e.g. Late 2016 MacBook Pro). This allows you to recharge the battery
even when the laptop is not plugged into any other power source.
Este dispositivo admite entrega de alimentación (PD), proporcionando 60W de potencia a equipos
portátiles que admiten carga de una fuente de alimentación de 20 V/3 A
(por ejemplo, Late 2016
MacBook Pro)
. Esto le permite recargar la batería aunque el equipo portátil no esté enchufado a
ninguna otra fuente de alimentación.
Dieses Gerät unterstützt Power Delivery (PD) und bietet 60W Strom an für Laptops die das Aufladen
von einer 20V/3A Stromversorgung unterstützen (z.B. Late 2016 MacBook Pro). Somit kann die
Batterie, auch wenn der Laptop an keine andere Stromversorgung angeschlossen ist, aufgeladen
werden.
Cet appareil prend en charge Power Delivery (PD), fournissant une alimentation de 27W aux
ordinateurs portables qui peuvent être chargés depuis une source d'alimentation 20 V/3 A
(par
exemple Late 2016 MacBook Pro)
. Cela vous permet de recharger la batterie même lorsque
l'ordinateur portable n'est pas branché à une autre source d'alimentation électrique.
此設備支持 20V/3A 共 60W 的電源傳輸(PD)。 即使筆記本電腦沒有插入任何其他電源,也可以為電池充電
(可對Late 2016 MacBook Pro充電)。
设备支持 20V/3A 共 60W 的电源传输(PD)。即使笔记本电脑没有插入任何其他电源,也可以为电池充电 (
可对Late 2016 MacBook Pro充电)。
이 장치는 20V/3A 전원의 충전을 지원하는 노트북에 60W의 전력을 제공하는전력 공급(PD)을 지원합니다
(예:
Late 2016 MacBook Pro)
. 따라서 노트북이 다른 전원에 연결되어 있지 않은 상태에서도 배터리를 충전할 수
있습니다.
このデバイスは電源供給機能(PD)をサポートし、20V / 3Aのパワーソースからノートブックパソコンに60Wの電
力を供給します
(例 Late 2016 MacBook Pro)
。 この機能により、ノートパソコンが他の電源に接続されていなく
てもバッテリを充電することができます。
60W
Check if your PCIe card is compatible
https://www.akitio.com/information-center/
pcie-card-compatibility-chart
Compatibility List

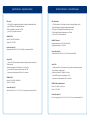
Technische Daten - CaractéristiquesSpecifications - Especificaciones
PCIe Card
1 PCIe (x16) slot supporting full-length, full-height, double-width cards
4 lane PCI Express 3.0 compliant interface
PCIe slot provides a maximum of 75W
2 x 6+2 pin PCIe power connectors
500W SFX PSU
Input: AC 100-240V, 50Hz-60Hz
Output: DC +12V/42A
Power Delivery (PD)
Supporting up to 3A at 5V, 9V, 15V, 20V with a maximum of 60W.
Tarjeta PCIe
1 ranura PCIe (x16) que admita tarjetas de longitud y altura totales y de
doble anchura
Interfaz compatible con PCI Express 3.0 de 4 carriles
La ranura de PCIe proporciona un máximo de 75W
2 conectores de alimentación PCIe de 6+2 contactos
500W SFX PSU
Entrada: CA 100-240V, 50Hz-60Hz
Salida: CC +12V/42A
Power Delivery (PD)
Admite hasta 3 A a 5 V, 9 V, 15 V, 20 V con una potencia máxima de 60 W.
PCIe-Steckkarte
1 PCIe-Steckplatz (x16) für Karten mit voller Länge (full-length), voller
Höhe (full-height) und doppelter Weite (double-width)
PCI Express 3.0 kompatible Schnittstelle mit 4 Lanes
PCIe-Steckplatz bietet ein Maximum von 75W an
2 x 6+2 pin PCIe Stromanschlüsse
500W SFX Netzteil
Eingangsspannung: AC 100-240V, 50Hz-60Hz
Ausgangsspannung: DC +12V/42A
Power Delivery (PD)
Unterstützt bis zu 3A bei 5V, 9V, 15V, 20V mit maximal 60W.
Carte PCIe
1 emplacement PCIe (x16) prenant en charge des cartes pleine longueur,
pleine hauteur, double largeur
Interface conforme PCI Express 3.0 4 voies
La fente PCIe fournit un maximum de 75 W
2 connecteurs d'alimentation PCIe 6+2 broches
500W SFX Bloc d'alimentation
Entrée : 100-240 V CA, 50-60 Hz
Sortie : 12 V CC/42 A
Power Delivery (PD)
Prise en charge jusqu'à 3A à 5 V, 9 V, 15 V, 20 V avec un maximum de 60W.

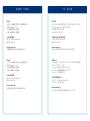
產品規格 - 产品规格 사양 - 製品仕様
PCIe 卡
1個PCIe (x16)插槽,支援全長、全高和雙寬PCIe 卡
支援PCI Express 3.0 X 4
PCIe插槽提供最大75W電量
2 組 6+2 接腳的 PCIe 電源線
500W SFX 電源
輸入:AC 100-240V, 50Hz-60Hz
輸出:DC +12V/42A
Power Delivery (PD)
支援電壓5V/9V/15V/20V,電流3A 最大 60W。
PCIe卡
1个PCIe (x16)插槽,支持全长、全高和双宽PCIe卡
支持PCI Express 3.0 X 4
PCIe插槽提供最大75W电量
2 组 6+2 接脚的 PCIe 电源线
500W SFX 电源
输入:AC 100-240V, 50Hz-60Hz
输出:DC +12V/42A
Power Delivery (PD)
支援电压5V/9V/15V/20V,电流3A 最大 60W。
PCIe 카드
하나의 PCIe(x16) 슬롯으로 전체 길이, 전체 높이, 2배 너비의 카드 지원
4 레인 PCI Express 3.0 규정 준수 인터페이스
PCIe 슬롯으로 최대 75W 제공
2 x 6+2 핀 PCIe 전원 연결
500W SFX 전원 공급 장치(PSU)
입력: AC 100~240V, 50Hz~60Hz
출력 : DC + 12V / 42A
Power Delivery (PD)
최대 60W와 함께 5V/9V/15V/20V에서 3A까지 지원됩니다.
PCIEカード
1 PCIE (X16) スロットはフルレングス、フルハイト及びダブル幅等の
PCIEカードをサポートします
4レーンのPCI Express3.0対応インタフェース
PCIE スロットの最大供給電力は75ワットです
2 x 6 + 2ピンPCIe電源コネクタ
500W SFX 電源ユニット
インプット: AC 100-240V, 50HZ-60HZ
アウトプット: DC +12V/42A
Power Delivery (PD)
5V / 9V / 15V / 20Vで最大3A、最大60Wをサポートします。
-
 1
1
-
 2
2
-
 3
3
-
 4
4
-
 5
5
-
 6
6
-
 7
7
-
 8
8


in anderen Sprachen
- English: Akitio Node Pro Installation guide
- français: Akitio Node Pro Guide d'installation
- 日本語: Akitio Node Pro インストールガイド
Verwandte Papiere
-
Akitio Node Duo Installationsanleitung
-
-
-
-
-
-
-
Sonstige Unterlagen
-
Sonnet eGFX Breakaway Box Benutzerhandbuch
-
Roline PCI-Express x4 Adapter, USB 3.2 Gen2, 2 Ports, 1x USB A + 1x USB C Benutzerhandbuch
-
-
ASROCK Z77 Extreme6/TB4 Schnellstartanleitung
-
MSI MEG Z590 ACE GOLD EDITION Bedienungsanleitung
-
MSI MEG Z590 GODLIKE Bedienungsanleitung
-
-
 i-tec CHARGER-C60W Benutzerhandbuch
-
 VAVA VA-UC017 Benutzerhandbuch
-
PNY PNYTSAL1RB Datenblatt

