Akitio Node Installationsanleitung
- Kategorie
- Schnittstellenkarten / Adapter
- Typ
- Installationsanleitung

© 2016 by AKiTiO - All Rights Reserved
AKiTiO assumes no responsibility for any errors or differences between the product you may have and the one mentioned in this document
and reserves the right to make changes in the specifications and/or design of this product without prior notice. The diagrams contained in
this document are for reference and may not fully represent the real product. AKiTiO assumes no responsibility for any loss of data or files.
www.akitio.com
PN: E15-574E1AA001
October 14, 2016 - v1.0
EN ES DE FR
J
PCH KO
California, USA
AKiTiO Node
E15-574E1AA001
Setup guide - Guía de configuración - Setup-Anleitung - Guide d'installation
安裝手冊 - 安装手册 - 설치 안내서 - セットアップガイド
To download the latest version of this document, please visit our website at
https://www.akitio.com/support/user-manuals
External GPU support
Thunderbolt™ Software > Settings > Details > External GPUs supported: Yes
Make sure that your computer supports external GPUs. If it does not or you cannot find
this function, your computer may need updates for the Thunderbolt 3 software.
Asegúrese de que el equipo admite GPU externas. Si no las admite o no puede encontrar esta
función, es posible que el equipo necesite actualizaciones para el software Thunderbolt 3.
Stellen Sie sicher, dass Ihr Computer externe GPUs unterstüzt. Falls nicht oder wenn Sie
diese Funktion nicht finden können, muss die Thunderbolt-3-Software auf Ihrem
Computer möglicherweise aktualisiert werden.
Assurez-vous que votre ordinateur prend en charge les processeurs graphiques externes.
Dans le cas contraire ou si vous ne pouvez pas trouver cette fonction, votre ordinateur
nécessite peut-être des mises à jour pour le logiciel Thunderbolt 3.
請確認您電腦的 Thunderbolt 3 有支援 eGPU 功能。如果還未啟用,或者你無法找到此項功能,
您可以先更新您電腦的Thunderbolt 3 軟體和韌體。
请确认您电脑的 Thunderbolt 3 有支援 eGPU 功能。如果还未启用,或者你无法找到此项功能,
您可以先更新您电脑的 Thunderbolt 3 软件和固体。
컴퓨터가 외장 GPU를 지원해야 합니다. 그렇지 않거나 이 기능을 찾을 수 없는 경우, 컴퓨터에
Thunderbolt 3 소프트웨어를 업데이트해야 할 수 있습니다.
お使いのコンピュータが外付けGPUをサポートしていることを確認して下さい。もしも、この機能を
見つけることができない場合は、お使いのコンピュータは、サンダーボルト3ソフトウェアのアップデ
ートが必要な場合があります。
Thunderbolt and the Thunderbolt logo are trademarks of Intel Corporation in the U.S. and/or other countries.
Check if your computer and/or GPU is compatible
https://www.akitio.com/information-center/
node-gpu-compatibility
Compatibility List

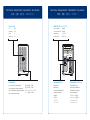
Front View - Vista frontal - Frontansicht - Vue de face
正面 - 正面 - 정면도 - フロントビュー
Rear View - Vista posterior - Rückansicht - Vue arrière
背面 - 背面 - 배면도 - リアビュー
Fan (29.6 dBA)
Fan
Ventilador
Lüfter
Ventilateur
400W SFX PSU (DC +12V/33A)
Power receptacle
Toma de alimentación
Netzanschluss
Prise de courant
電源插座
电源插座
전원 콘센트
電源コンセント
Power switch (PSU)
Power switch
Netzschalter
Interruptor de alimentación
Bouton d'alimentation
電源開關
电源开关
전원 스위치
パワースイッチ
Thunderbolt™ 3 (40 Gbps)
Thunderbolt™ 3 port
Puerto de Thunderbolt™ 3
Thunderbolt™ 3 Anschluss
Port Thunderbolt™ 3
Thunderbolt™ 3 連接埠
Thunderbolt™ 3 连接端口
Thunderbolt™ 3 포트
Thunderbolt™ 3 ポート
LED indicator
Blue = Power ON / Link established
Azul = Encendido / Conexión establecida
Blau = Eingeschaltet / Verbindung hergestellt
Bleu = Allumé / Liaison établie
藍色 = 電源開啟 / 已連線
蓝色 = 电源开启 / 已联机
파란색 = 전원 켜짐 / 링크가 구성됨
ブルー = 電源オン / 接続中
風扇
风扇
팬
ファン

Technische Daten - CaractéristiquesSpecifications - Especificaciones
PCIe Card
1 PCIe (x16) slot supporting full-length, full-height, double-width cards
4 lane PCI Express 3.0 compliant interface
PCIe slot provides a maximum of 75W
Note: The computer must support external GPUs.
PSU
Input: AC 100-240V, 50Hz-60Hz
Output: DC +12V/33A
Tarjeta PCIe
1 ranura PCIe (x16) que admita tarjetas de longitud y altura totales y de
doble anchura
Interfaz compatible con PCI Express 3.0 de 4 carriles
La ranura de PCIe proporciona un máximo de 75W
Nota: El equipo debe admitir GPU externas.
PSU
Entrada: CA 100-240V, 50Hz-60Hz
Salida: CC +12V/33A
PCIe-Steckkarte
1 PCIe-Steckplatz (x16) für Karten mit voller Länge (full-length), voller
Höhe (full-height) und doppelter Weite (double-width)
PCI Express 3.0 kompatible Schnittstelle mit 4 Lanes
PCIe-Steckplatz bietet ein Maximum von 75W an
Hinweis: Der Computer muss externe GPUs unterstützen.
Netzteil
Input: AC 100-240V, 50Hz-60Hz
Ausgang: DC +12V/33A
Carte PCIe
1 emplacement PCIe (x16) prenant en charge des cartes pleine longueur,
pleine hauteur, double largeur
Interface conforme PCI Express 3.0 4 voies
La fente PCIe fournit un maximum de 75 W
Remarque : L'ordinateur doit prendre en charge les processeurs graphiques
externes.
Bloc d'alimentation
Entrée : 100-240 V CA, 50-60 Hz
Sortie : 12 V CC/33 A

產品規格 - 产品规格 사양 - 製品仕様
PCIe 卡
1個PCIe (x16)插槽,支援全長、全高和雙寬PCIe 卡
支援PCI Express 3.0 X 4
PCIe插槽提供最大75W電量
注意:電腦端需要支援eGPU功能。
電源
輸入:AC 100-240V, 50Hz-60Hz
輸出:DC +12V/33A
PCIe卡
1个PCIe (x16)插槽,支持全长、全高和双宽PCIe卡
支持PCI Express 3.0 X 4
PCIe插槽提供最大75W电量
注意:电脑端需要支援eGPU功能。
电源
输入:AC 100-240V, 50Hz-60Hz
输出:DC +12V/33A
PCIe 카드
하나의 PCIe(x16) 슬롯으로 전체 길이, 전체 높이, 2배 너비의 카드 지원
4 레인 PCI Express 3.0 규정 준수 인터페이스
PCIe 슬롯으로 최대 75W 제공
참고: 컴퓨터가 외장 GPU를 지원해야 함.
전원 공급 장치(PSU)
입력: AC 100~240V, 50Hz~60Hz
출력 : DC + 12V / 33A
PCIEカード
1 PCIE (X16) スロットはフルレングス、フルハイト及びダブル幅等の
PCIEカードをサポートします
4レーンのPCI Express3.0対応インタフェース
PCIE スロットの最大供給電力は75ワットです
ご注意: ご使用のパソコンは外付けGPUに対応可能が必要です。
電源ユニット
インプット: AC 100-240V, 50HZ-60HZ
アウトプット: DC +12V/33A

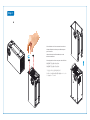
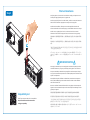
Step 1
Place the device on its front to remove the enclosure.
Coloque el dispositivo sobre su parte delantera para
quitar la carcasa.
Stellen Sie das Gerät auf die Vorderseite, um das
Gehäuse zu entfernen.
Placez l'appareil sur sa face avant pour retirer le boîtier.
將裝置面朝下直立擺放,外殼向上取出。
将装置面朝下直立摆放,外壳向上取出 。
기기를 앞면으로 놓고 인클로저를 제거합니다.
示す図のように本製品の前面を底面に縦置きにして、トップカ
バーを抜き外して下さいませ。

Step 2
PCIe Card Installation
Install your graphics card, secure it with the included screws and plug in the power connectors
from the power supply to provide power to the graphics card.
Instale la tarjeta gráfica, fíjela con los tornillos incluidos y enchufe los conectores de alimentación
desde la fuente de alimentación para proporcionar energía a dicha tarjeta gráfica.
Installieren Sie Ihre Grafikkarte , befestigen Sie sie mit den mitgelieferten Schrauben und
schliessen Sie die Kabel von der Stromversorgung an, um die Grafikkarte mit Strom zu versorgen.
Installez votre carte graphique, fixez-la avec les vis incluses et branchez les connecteurs
d'alimentation à l'alimentation électrique pour fournir une alimentation à la carte graphique.
安裝你的顯卡,將電源線連接到您的顯卡上,確認插頭方向插入並固定卡榫,以提供顯卡所需的
電源。
安装你的显卡,将电源线连接到您的显卡上,确认插头方向插入并固定卡榫,以提供显卡所需的
电源。
그래픽 카드를 설치하고, 동봉된 나사로 고정한 다음 전원 공급 장치의 전원 커넥터를 연결하여 그래픽
카드에 전원을 공급하도록 합니다.
グラフィックカードをインストールしてから附属しているネジ2本にて確り固定して下さい。そして、
パワーサプライに繋がるハーネスケーブル(黒色/黄色)でグラフィックカードのコネクタに挿入して
接続下さい。
IMPORTANT NOTICE
We strongly recommend that you uninstall graphics cards when transporting the device
as sudden movements or jarring may cause damage to the graphics card or the device.
Es muy recomendable que desinstale las tarjetas gráficas cuando transporte el disposi-
tivo, ya que los movimientos repentinos o las sacudidas pueden provocar daños en dichas
tarjetas o en el dispositivo.
Wir empfehlen dringend, Grafikkarten zu deinstallieren, wenn das Gerät transportiert
wird, da plötzliche Bewegungen oder starkes Schütteln zu Schäden an der Grafikkarte
oder am Gerät führen kann.
Nous vous conseillons fortement de désinstaller la carte graphique lors du transport de
l'appareil car des mouvements brusques ou des secousses peuvent endommager la carte
graphique ou l'appareil.
我們強烈建議您運輸設備時請先卸載顯示卡,避免突然的震動可能造成顯卡或設備損壞。
我们强烈建议您运输设备时请先卸载显示卡,避免突然的震动可能造成显卡或设备损坏。
기기를 옮길 때에는 그래픽 카드를 제거하는 것을 적극 권장합니다. 갑작스러운 움직임이나 충돌이
발생하는 경우 그래픽 카드 또는 기기가 손상될 수 있습니다.
本製品を移動する場合は運搬中の損害を防ぐ為に、必ず、一度グラフィックカードをアンインストー
ル(抜き出し)して下さいませ。
Check if your computer and/or GPU is compatible at
https://www.akitio.com/information-center/
node-gpu-compatibility
Compatibility List

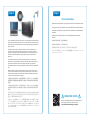
Step 3

Driver Installation
Download and install the driver for your graphics card from the manufacturer’s website.
Descargue e instale el controlador de la tarjeta gráfica desde el sitio web del fabricante.
Downloaden und installieren Sie den Treiber für Ihre Grafikkarte von der Webseite des
Herstellers.
Téléchargez et installez le pilote de votre carte graphique depuis le site Web du
fabricant.
從你的顯卡製造商的網站,下載並安裝驅動程式。
从你的显卡制造商的网站,下载并安装驱动程序。
제조업체 웹사이트에서 그래픽 카드에 맞는 드라이버를 다운로드하여 설치합니다.
グラフィックカード製造メーカーのウェブサイトから該当機種のドライバーをダウンロードして、パソ
コンにインストールして下さい。
IMPORTANT NOTICE
Your PC may need updates for the Thunderbolt 3 ports to
function properly. For more information go to
https://thunderbolttechnology.net/updates
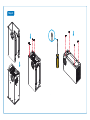
Step 5
Turn on the computer, plug in the power cord (1), turn on the power (2) and then connect the
Thunderbolt cable to the computer (3) to turn on the device. When turning off the computer,
the device goes into stand-by mode but the fan of the power supply keeps spinning until the
power is turned off.
Encienda el equipo, enchufe el cable de alimentación (1), active la alimentación (2) y, a
continuación, conecte el cable Thunderbolt al equipo (3) y, a continuación, encienda el
dispositivo. Cuando apague el equipo, el dispositivo entrará en el modo de espera pero el
ventilador de la fuente de alimentación seguirá girando hasta que la alimentación se
desconecte.
Schalten Sie den Computer ein, schliessen Sie das Stromkabel an (1), schalten Sie den
Netzschalter ein (2) und verbinden Sie dann das Thunderbolt-Kabel mit dem Computer (3),
um das Gerät einzuschalten. Wenn Sie den Computer ausschalten, geht das Gerät in
Stand-by-Betrieb aber der Lüfter des Netzteils bleibt am laufen bis der Strom ausgeschaltet
wird.
Allumez l'ordinateur, branchez le cordon d'alimentation (1), mettez sous tension (2) puis
connectez le câble Thunderbolt à l'ordinateur (3) pour allumer l'appareil. Lors de l'arrêt de
l'ordinateur, l'appareil passe en mode veille mais le ventilateur de l'alimentation électrique
continue à tourner jusqu'à la mise hors tension.
打開電腦,將裝置插上電源線(1),打開裝置電源開關(2),然後將 Thunderbolt 連接線接到裝
置與電腦端(3)設備啟動。當關閉電腦,裝置將入待機模式,但電源風扇會保持旋轉,直到將電
源關閉。
打开电脑,将装置插上电源线(1),打开装置电源开关(2),然后将 Thunderbolt 连接线接到装
置与电脑端(3)设备启动。当关闭电脑,装置将入待机模式,但电源风扇会保持旋转,直到将电
源关闭。
컴퓨터 전원을 켜고, 전원 코드(1)를 연결하여 전원(2)을 켠 다음 Thunderbolt 케이블을 컴퓨터(3)에
연결하여 기기 전원을 켭니다. 컴퓨터 전원을 끄면 기기는 대기 모드로 전환되지만 전원 공급 장치의
팬은 전원이 꺼질 때까지 계속해서 회전합니다.
(1)お使いのパソコンの電源をオンにし、そして本製品背面の電源コンセントに電源コードを挿入
して下さい。(2)本製品のパワースイッチをオンにし、附属しているサンダーボルトケーブルと接続
すると、デバイスのパワーサプライはオンとなります。(3)パソコンの電源を切ると、デバイスはスタ
ンバイモードになりますが、パワーサプライの電源が完全にオフなるまではパワーサプライの放
熱ファンが回転し続きます。
Step 4
-
 1
1
-
 2
2
-
 3
3
-
 4
4
-
 5
5
-
 6
6
-
 7
7
-
 8
8


Akitio Node Installationsanleitung
- Kategorie
- Schnittstellenkarten / Adapter
- Typ
- Installationsanleitung
in anderen Sprachen
- English: Akitio Node Installation guide
- français: Akitio Node Guide d'installation
- español: Akitio Node Guía de instalación
- 日本語: Akitio Node インストールガイド
Verwandte Artikel
-
Akitio Thunder Dock Setup Manual
-
Akitio Akitio Thunder 2 Installationsanleitung
-
-
-
-
-
-
Akitio Thunder2 Quad Mini Installationsanleitung
-
-
Andere Dokumente
-
ASROCK Z77 Extreme6/TB4 Schnellstartanleitung
-
MSI MEG Z590 ACE GOLD EDITION Bedienungsanleitung
-
Sonnet GPU-650W-TB3 Schnellstartanleitung
-
MSI MEG Z590 GODLIKE Bedienungsanleitung
-
-
MSI MEG Z490 GODLIKE Bedienungsanleitung
-
Asus G7627 Benutzerhandbuch
-