Akitio Node Lite Installationsanleitung
- Kategorie
- Schnittstellenkarten / Adapter
- Typ
- Installationsanleitung

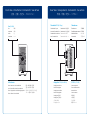
Thunderbolt connectivity
Thunderbolt™ 3 (USB-C)
The second Thunderbolt 3 port supports Thunderbolt 3, USB 3.1 (10 Gbps), and DisplayPort devices.
The Node Lite has to be turned on in order for the other devices in the daisy-chain to be recognized.
El segundo puerto Thunderbolt 3 admite dispositivos DisplayPort, Thunderbolt 3 y USB 3.1 (10
Gbps). Deberá encender el Node Lite para que otros dispositivos de la configuración en cadena sean
detectados.
Der zweite Thunderbolt 3 Anschluss unterstützt Thunderbolt 3, USB 3.1 (10Gbps) und DisplayPort
Geräte. Das Node Lite muss eingeschaltet sein, damit die anderen Geräte welche in Reihe geschaltet
sind erkannt werden.
Le deuxième port Thunderbolt 3 prend en charge les appareils Thunderbolt 3, USB 3.1 (10 Gbit/s) et
DisplayPort. L’appareil Node Lite doit être allumé pour que les autres appareils de la chaîne soient
reconnus.
第二個 Thunderbolt 3 連接埠,可串接 Thunderbolt 3 裝置、USB 3.1 (10 Gbps) 裝置或是具有DisplayPort的顯
示器。Node Lite需要接上電源才能提供串接功能。
第二个 Thunderbolt 3 连接端口,可串接 Thunderbolt 3 装置、USB 3.1 (10 Gbps) 装置或是具有DisplayPort的
显示器。Node Lite需要接上电源才能提供串接功能。
두번째 Thunderbolt 3 포트는 Thunderbolt 3, USB 3.1(10Gbps) 및 디스플레이 포트 장치를 지원합니다. Daisy
Chain 상태에 있는 다른장치들을 인식하기 위해서는 Node Lite를 켜야합니다.
2つ目のサンダーボルトポートはThunderbolt 3やUSB3.1 (10Gbps)及びDisplayPortをサポートします。本製品と
デイジーチェーンしているデバイスを正常に認識するため、本製品をパワーオンして下さい。
Thunderbolt and the Thunderbolt logo are trademarks of
Intel Corporation in the U.S. and/or other countries.
Thunderbolt 3
USB-C cable
USB 3.1 Gen 2
Device
Thunderbolt 3
Computer
Display 1
Display 2
Thunderbolt™ 3
Device
Node Lite
© 2017 by AKiTiO - All Rights Reserved
AKiTiO assumes no responsibility for any errors or differences between the product you may have and the one mentioned in this document
and reserves the right to make changes in the specifications and/or design of this product without prior notice. The diagrams contained in
this document are for reference and may not fully represent the real product. AKiTiO assumes no responsibility for any loss of data or files.
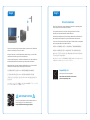
www.akitio.com
PN: E15-574U1AA001
April 17, 2017 - v1.0
EN ES DE FR
J
PCH KO
California, USA
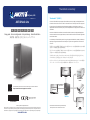
AKiTiO Node Lite
E15-574U1AA001
Setup guide - Guía de configuración - Setup-Anleitung - Guide d'installation
安裝手冊 - 安装手册 - 설치 안내서 - セットアップガイド
To download the latest version of this document, please visit our website at
https://www.akitio.com/support/user-manuals

Front View - Vista frontal - Frontansicht - Vue de face
正面 - 正面 - 정면도 - フロントビュー
Rear View - Vista posterior - Rückansicht - Vue arrière
背面 - 背面 - 배면도 - リアビュー
Fan (23 dBA)
Fan
Ventilador
Lüfter
Ventilateur
DC 12V (+12V/6A)
Power receptacle
Toma de alimentación
Netzanschluss
Prise de courant
電源插座
电源插座
전원 콘센트
電源コンセント
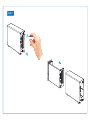
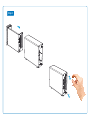
Thumbscrew
Thumbscrew
Tornillo de apriete manual
Rändelschraube
Vis moletée
手轉螺絲
手转螺丝
나비 나사
手回しネジ
DisplayPort 1.2 (4K at 60 Hz)
DisplayPort interface
Interfaz DisplayPort
DisplayPort-Anschluss
Interface DisplayPort
DisplayPort 連接埠
DisplayPort 连接端口
인터페이스 표시
DisplayPort ポート
Thunderbolt™ 3 (40 Gbps)
Thunderbolt™ 3 port
Puerto de Thunderbolt™ 3
Thunderbolt™ 3 Anschluss
Port Thunderbolt™ 3
Thunderbolt™ 3 連接埠
Thunderbolt™ 3 连接端口
Thunderbolt™ 3 포트
Thunderbolt™ 3 ポート
LED indicator
Blue = Power ON / Link established
Azul = Encendido / Conexión establecida
Blau = Eingeschaltet / Verbindung hergestellt
Bleu = Allumé / Liaison établie
藍色 = 電源開啟 / 已連線
蓝色 = 电源开启 / 已联机
파란색 = 전원 켜짐 / 링크가 구성됨
ブルー = 電源オン / 接続中
風扇
风扇
팬
ファン

Technische Daten - CaractéristiquesSpecifications - Especificaciones
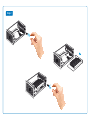
PCIe Card
1 PCIe (x16) slot supporting half-length, full-height, double-width cards
4 lane PCI Express 3.0 compliant interface
PCIe slot provides a maximum of 25W
Not designed for graphics cards
Note: PCIe card driver must be compatible with requirements for Thunderbolt
technology (e.g. hot-plug support, recovery from sleep).
PSU
Input: AC 100-240V, 50Hz-60Hz
Output: DC +12V/6A
Tarjeta PCIe
1 Ranura para PCIe (x16) compatible con tarjetas de media longitud,
altura máxima y ancho doble
Interfaz compatible con PCI Express 3.0 de 4 carriles
La ranura de PCIe proporciona un máximo de 25W
No está diseñada para tarjetas gráficas
Nota: El controlador de tarjetas PCIe debe ser compatible con los requisitos de
la tecnología Thunderbolt (por ejemplo: compatible con conexión directa,
recuperación desde modo de suspensión).
PSU
Entrada: CA 100-240V, 50Hz-60Hz
Salida: CC +12V/6A
PCIe-Steckkarte
1 PCIe-Steckplatz (x16) für Karten mit halber Länge (half-length), voller
Höhe (full-height) und doppelter Weite (double-width)
PCI Express 3.0 kompatible Schnittstelle mit 4 Lanes
PCIe-Steckplatz bietet ein Maximum von 25W an
Nicht geeignet für Grafikkarten
Hinweis: PCIe-Karte und Treiber müssen mit den Anforderungen von der
Thunderbolt-Technologie (z.B. Unterstützung für Hot-Plug, Aufwachen nach
Ruhezustand) kompatibel sein.
Netzteil
Input: AC 100-240V, 50Hz-60Hz
Ausgang: DC +12V/6A
Carte PCIe
1 fente PCIe (x16) prenant en charge les cartes de demi-longueur,
hauteur complète et double-largeur
Interface conforme PCI Express 3.0 4 voies
La fente PCIe fournit un maximum de 25 W
Non conçu pour les cartes graphiques
Remarque : le pilote de la carte PCIe doit être compatible avec la technologie
Thunderbolt (par ex. : système hot plug, récupération depuis la veille).
Bloc d'alimentation
Entrée : 100-240 V CA, 50-60 Hz
Sortie : 12 V CC/6 A

產品規格 - 产品规格 사양 - 製品仕様
PCIe 卡
1個PCIe (x16)插槽,支援半長、全高和雙寬PCIe 卡
支援PCI Express 3.0 X 4
PCIe插槽提供最大25W電量
不是為顯卡設計
注意:PCIe卡驅動程式必須要與Thunderbolt技術(例如熱插拔,從睡眠狀態恢復)
相容。
電源
輸入:AC 100-240V, 50Hz-60Hz
輸出:DC +12V/6A
PCIe卡
1个PCIe (x16)插槽,支持半长、全高和双宽PCIe卡
支持PCI Express 3.0 X 4
PCIe插槽提供最大25W电量
不是为显卡设计
注意:PCIe卡驱动程序必须要与Thunderbolt技术(例如热插入,从睡眠状态恢复)
兼容。
电源
输入:AC 100-240V, 50Hz-60Hz
输出:DC +12V/6A
PCIe 카드
PCIe(x16) 슬롯 1개(1/2 길이, 전체 높이, 2배 너비 카드 지원)
4 레인 PCI Express 3.0 규정 준수 인터페이스
PCIe 슬롯으로 최대 25W 제공
그래픽 카드용으로 설계된 것이 아닙니다
참고: PCIe 카드 드라이버는 Thunderbolt 기술 요구 사항(예: 핫플러그 지원, 절전
모드로부터 복구 등)와 호환되어야 합니다.
전원 공급 장치(PSU)
입력: AC 100~240V, 50Hz~60Hz
출력 : DC + 12V / 6A
PCIEカード
1 PCIE (X16) スロットはハフレンス
4レーンのPCI Express3.0対応インタフェース
PCIE スロットの最大供給電力は25ワットです
グラフィックスカード用に設計されていません
ご注意: ご利用のPCIEカードドライバーはサンダーボルトテクノロジと互換するこ
とが必須ですので、ご注意下さい。
電源ユニット
インプット: AC 100-240V, 50HZ-60HZ
アウトプット: DC +12V/6A

Step 1

Step 2

Step 3

Driver Installation
If your PCIe card requires a driver, download and install the corresponding driver
for your system from the manufacturer’s website.
Si su tarjeta PCIe necesita un controlador, descargue e instale el controlador
adecuado para su sistema desde el sitio web del fabricante.
Falls Ihre PCIe-Steckkarte einen Treiber benötigt, downloaden und installieren Sie
den entsprechenden Treiber für Ihr System von der Website des Herstellers.
Si votre carte PCIe nécessite un pilote, téléchargez et installez le pilote correspondant
pour votre système depuis le site Web du fabricant.
如果您的PCIe卡需要驅動程式,請至PCIe卡製造商的網站,下載並安裝相應的驅動程式。
如果您的PCI卡需要驱动程序,请至PCIe卡制造商的网站,下载并安装相应的驱动程序。
사용자의 PCIe 카드에 드라이버가 필요한 경우, 제조업체 웹사이트에서 사용자의 시스템에 맞는
드라이버를 다운로드하여 설치하십시오.
お使いのPCIeカードは、ドライバが必要な場合は、製造元のWebサイトからお使いのシステム
に対応するドライバをダウンロードし、インストールして下さい。
IMPORTANT NOTICE
Your PC may need updates for the Thunderbolt 3 ports to
function properly. For more information go to
https://thunderbolttechnology.net/updates
Turn on the computer, plug in the power adapter (1) and connect the Thunderbolt
cable to the computer (2) to turn on the device.
Encienda el ordenador, enchufe el adaptador de alimentación (1) y conecte el cable
Thunderbolt al ordenador (2) para encender el dispositivo.
Schalten Sie den Computer ein, schliessen Sie das Netzteil an (1) und verbinden Sie
das Thunderbolt-Kabel mit dem Computer (2), um das Gerät einzuschalten.
Allumez l'ordinateur, branchez l'adaptateur d'alimentation (1) et connectez le câble
Thunderbolt à l'ordinateur (2) pour mettre l'appareil sous tension.
(1)打開電腦,插入電源 (2) 透過Thunderbolt線將裝置與電腦連接起來,啟動裝置。
(1) 打开电脑,插入电源 (2) 透过Thunderbolt线将设备与电脑连接起来,启动设备。
컴퓨터를 켜고, 전원 어댑터를 꽂은 다음(1) 컴퓨터에 Thunderbolt 케이블을 연결하여(2) 장치
전원을 켭니다.
パソコンをパワーオンして、そして、附屬パワーアダプタ(1)で本体と接続して下さい。 サンダーボ
ルトケーブル(2)にて本体とパソコンと接続して下さい。
Step 4 Step 5
Check if your PCIe card is compatible
https://www.akitio.com/information-center/
pcie-card-compatibility-chart
Compatibility List
-
 1
1
-
 2
2
-
 3
3
-
 4
4
-
 5
5
-
 6
6
-
 7
7
-
 8
8


Akitio Node Lite Installationsanleitung
- Kategorie
- Schnittstellenkarten / Adapter
- Typ
- Installationsanleitung
in anderen Sprachen
- English: Akitio Node Lite Installation guide
- français: Akitio Node Lite Guide d'installation
- español: Akitio Node Lite Guía de instalación
- 日本語: Akitio Node Lite インストールガイド
Verwandte Artikel
-
Akitio Thunder Dock Setup Manual
-
Akitio Akitio Thunder 2 Installationsanleitung
-
-
-
-
-
-
-
Akitio Thunder2 Quad Mini Installationsanleitung
-
Andere Dokumente
-
MSI MEG Z590 ACE GOLD EDITION Bedienungsanleitung
-
MSI MEG Z590 GODLIKE Bedienungsanleitung
-
MSI MEG Z490 GODLIKE Bedienungsanleitung
-
MSI MS-7C73 Bedienungsanleitung
-
ASROCK Z77 Extreme6/TB4 Schnellstartanleitung
-
MSI MPG Z390 GAMING PRO CARBON Bedienungsanleitung
-
MSI MPG Z390 GAMING EDGE AC Bedienungsanleitung
-
Roline PCI-Express x4 Adapter, USB 3.2 Gen2, 2 Ports, 1x USB A + 1x USB C Benutzerhandbuch
-
-
ATEN IC320U Schnellstartanleitung