Zenner capsule meter Minolas Assembly Instructions
- Typ
- Assembly Instructions

1
1. Produktbeschreibung
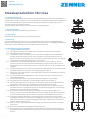
Der Minolas Messkapselzähler für das Allmess-Unterputzzählersystem besteht aus dem Messein-
satz für kaltes oder warmes Wasser und einer Rosette, die auf die Wasserzählerhaube aufgesteckt
wird. Für Einbautiefen über 55 mm kann diese Rosette mit Rosettenverlängerungsringen in
Schritten von 20 mm verlängert werden.
Der Wasserzähler Minolas ist nur für die vertikale Einbaulage bestimmt.
2. Verwendungszweck
Zur Messung des Kalt- und Warmwasserverbrauchs
3. Lieferumfang
Wasserzähler, Montageanleitung, Konformitätserklärung
4. Bemerkung
Diese Montageanleitung richtet sich nur an qualiziertes Fachpersonal. Sorgfältige Montage
gemäß dieser Anweisung und nach den geltenden technischen Regeln ist wichtig für die Betriebs-
sicherheit und Voraussetzung für eine korrekte Verbrauchserfassung.
5. Erstmontage des Messkapselzählers
5.1. Leitung sorgfältig durchspülen.
5.2. Leitung durch Zudrehen des Etagen- oder Strangventils absperren und entleeren.
5.3. Montageschutzhaube entfernen.
5.4. Sicherstellen, dass es sich tatsächlich um eine Allmess (AMS) Anschlussschnittstelle
handelt. AMS-Unterputzteile (UPT) sind zu erkennen an dem Gewindering mit vier
Klauen und dem innenliegenden Verschlussgewinde. Messkapsel Minolas nur in Allmess-
Unterputzteile mit der Bodenprägung 3/4“ verwenden!
5.5. Gewindering mit dem Montageschlüssel aus dem UPT schrauben (Abb. 1). Der Ge-
windering wird nicht wiederverwendet! Blindplatte und alten O-Ring entfernen und
nötigenfalls das UPT von Schmutz reinigen, besonders natürlich an der Dichtäche des
O-Ringes.
5.6. Minolas-Messkapsel aus der Verpackung entnehmen. Werksseitig sind Gewindering und
Aushebering bereits vormontiert, der O-Ring beigepackt. (Abb. 2).
5.7. Überprüfen, ob die Messkapsel in ihre vorgesehene Anschluss-schnittstelle hineinpasst:
Kennzeichnung = A34.
5.8. Den mit der Messkapsel mitgelieferten neuen O-Ring in das UPT einlegen (Abb.3). Er
muss gut gefettet sein.
5.9. Es sind ausschließlich die Originaldichtungen des Herstellers zu verwenden.
5.10. Die Messkapsel mit den Klauen in den Montageschlüssel stecken (Abb. 4).
5.11. Mit dem Montageschlüssel den Minolas ins UPT führen. Dabei auf Durchussrichtung
gemäß Pfeil im UPT und unten am Messeinsatz achten (Gitter am Einlauf).
5.12. Messkapsel ins UPT drücken bis das Gewinde leicht grei. Unter leichtem Andrücken
durch kurzes Drehen im Gegenuhrzeigersinn den Gewindeanfang nden und dann den
Gewindering im Uhrzeigersinn festschrauben.
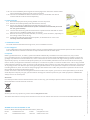
5.13. Sicherstellen, dass der Gewindering vollständig in das UPT eingeschraubt ist. Es
schauen nur noch die Kronen des Gewinderings hervor (Abb. 5). Ggf. mit einem kleinen
Schraubendreher prüfen, dass der Gewindering tiefer als die Oberkante des UPT ist.
5.14. Leitung durch Önen des Etagen- oder Strangventils vorsichtig unter Druck setzen.
Dichtigkeit und Funktion (Vorwärtslauf) sorgfältig überprüfen. Falls der Zähler rückwärts
läu, wurde das UPT nicht ießrichtungsge¬mäß installiert. Messkapsel demontieren,
um 180° drehen und montieren.
5.15. Sofern noch nicht geschehen, Zählwerksanzeige in Ableseposition drehen und Zähler
plombieren.
5.16. Anschlussschnittstelle mit Aufkleber A34 kennzeichnen.
5.17. Rosette (ggf. mit Verlängerungshülsen) auf die Zählwerkshaube bis zum Anschlag an
die Wand schieben. Für Einbautiefen unter 35 mm muss eine spezielle Rosette bestellt
werden.
Abb. 1
Abb. 2
Abb. 3
Deutsch
Abb. 4
Messkapselzähler Minolas
Montageanleitung

2
5.18. Die visuelle Ablesbarkeit der Zählwerksanzeige, aller Kenndaten des Zählers und die
Konformitäts- und Metrologiekennzeichnung dürfen nicht beeinträchtigt werden.
5.19. Für Feuchtrauminstallation mit Verlängerungshülse kann zusätzlich eine Rosetten-
scheibe eingesetzt werden, die gesondert zu bestellen ist.
6. Zählertausch
6.1. Leitung durch Zudrehen des Etagen- oder Strangventils absperren und entleeren.
6.2. Rosette (ggf. mit Verlängerungshülsen) abziehen.
6.3. Sicherstellen, dass es sich tatsächlich um ein AMS-Unterputzteil handelt (siehe Zi.
1.4). Messkapsel Minolas nur in Allmess-Unterputzteile mit der Bodenprägung 3/4″
verwenden!
6.4. Mit dem Montageschlüssel Gewindering und die Messkapsel aus dem UPT schrauben.
Der AMS-Gewindering wird nicht wiederverwendet. Alte Minolas Austauschzähler sind
an das Minol-Zentrallager zurückzuschicken.
6.5. Dichtring aus dem UPT entfernen und nötigenfalls das UPT von Schmutz reinigen,
besonders natürlich an den Dichtächen des O-Ringes.
6.6. Neue Messkapsel Minolas, wie unter Zi. 1.6 bis 1.19 beschrieben, montieren.
Dichtigkeit und Funktion sorgfältig prüfen.
7. Montageschlüssel
Zur Montage und Demontage des Messeinsatzes dient ein Universal-Montageschlüssel.
8. Benutzersicherung
Es muss eine Benutzersicherung (Klebemarke, Verplombung o. ä.) verwendet werden, um zu erkennen, ob die Messkapsel
aus der Anschlussschnittstelle ausgebaut worden ist, bzw. um einen unerlaubten Ausbau zu verhindern.
9. Entsorgung
Batteriebetriebene Geräte oder Module, die zusätzlich an mechanischen Geräten installiert sind, können nicht entnehmba-
re und nicht auadbare Lithium-Batterien enthalten. Diese sind mit dem WEEE-Richtlinien-Symbol (durchgestrichene Müll-
tonne) gekennzeichnet. Die Batterien enthalten Stoe, die bei nicht fachgerechter Entsorgung der Umwelt schaden und die
menschliche Gesundheit gefährden können. Um die Abfallmengen zu reduzieren sowie nicht vermeidbare Schadstoe aus
Elektro- und Elektronikgeräten in Abfällen zu reduzieren, sollen Altgeräte vorrangig wiederverwendet oder die Abfälle einer
stolichen oder anderen Form der Verwertung zugeführt werden. Dies ist nur möglich, wenn Altgeräte, Batterien, sonstige
Zubehörteile und Verpackungen der Produkte wieder dem Hersteller zurückgeführt oder bei Wertstohöfen abgegeben
werden. Unsere Geschäsprozesse sehen in der Regel vor, dass wir bzw. die von uns eingesetzten Fachrmen Altgeräte
inklusive Batterien, sonstigem Zubehör und Verpackungsmaterial nach deren Austausch bzw. Ende der Nutzungsdauer
wieder mitnehmen und fachgerecht entsorgen.
Sofern diesbezüglich keine andere vertragliche Regelung getroen wurde, können alternativ die Altgeräte, Zubehör und
ggf. Verpackungsmaterial auch bei unserer Betriebsstätte in D-09619 Mulda, Talstraße 2, kostenlos abgegeben werden.
ZENNER stellt in jedem Fall die fachgerechte Entsorgung sicher.
Achtung!
Die Geräte dürfen nicht über die kommunalen Abfalltonnen (Hausmüll) entsorgt werden. Sie helfen dadurch, die natürli-
chen Ressourcen zu schützen und die nachhaltige Wiederverwertung von stolichen Ressourcen zu fördern.
Fragen richten Sie bitte an [email protected]om
Die neuesten Informationen zu diesem Produkt und die aktuellste Version dieser Anleitung nden Sie im Internet
www.zenner.de
Technische Änderungen vorbehalten. Für etwaige Irrtümer und Druckfehler übernehmen wir keine Haung. SAP163685_231113_DE_EN
ZENNER International GmbH & Co. KG
Heinrich-Barth-Straße 29 | 666115 Saarbrücken | Germany
Telefon +49 681 99 676-30
Telefax +49 681 99 676-3100
E-Mail info@zenner.com
Internet www.zenner.de
Abb. 5

3
1. Product description
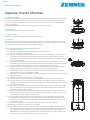
The Minolas measurement capsule meter for the Allmess ush-mounted meter system comprising
the measurement insert for cold or hot water and a rosette that is connected to the water meter
cap. For an installation depth of over 55 mm the rosette can be extended with rosette extension
rings in 20 mm steps.
The Minolas water meter is only designed for vertical installation positions.
2. Intended use
For measuring cold and hot water consumption
3. Scope of delivery
Water meter, Instruction manual, Declaration of Conformity
4. Comment
This installation manual is intended for qualied specialists only. Careful installation in line with
these instructions and in accordance with the applicable technical rules is important for safe opera-
tion and is a pre-requisite for correct consumption metering.
5. Initial assembly of the measurement capsule meter
5.1. Carefully rinse line.
5.2. Block and empty the line by closing the at or mains stop valve.
5.3. Remove installation protection cap.
5.4. Ensure it is actually a Allmess (AMS) connection interface. The AMS ush-mounted parts
(FMT) can be recognised by the threaded ring with four claws and the internal closing
thread. Only use the Minolas measurement capsule in Allmess ush-mounted parts with
the 3/4″ ground stamp!
5.5. Unscrew the threaded ring with the installation wrench from the FMT (gure 1). The
threaded ring will not be used again! Remove the blind plate and the old O-ring and clean
dirt from the FMT, particularly of course on the sealing surface of the O-ring.
5.6. Remove the Minolas measurement capsule from the packaging. The threaded ring and
liing ring are already installed at the factory, the O-ring is enclosed. (Fig. 2).
5.7. Check whether the measurement capsule ts into the intended connection interface:
Marking of new connection interfaces = A34.
5.8. Insert the new O-ring provided with the measurement capsule into the FMT (Fig. 3). It must
be well lubricated.
5.9. Only the original manufacturer seals must be used.
5.10. Insert the measurement capsule into the installation wrench by the claws (gure 4).
5.11. Use the installation wrench to guide the Minolas into the FMT. Pay attention to the ow
direction in accordance with the arrow on the FMT and on the bottom of the measurement
insert (grid at the inlet).
5.12. Press the measurement capsule into the FMT until the thread catches a little. Using slight
pressure briey turning anti-clockwise, nd the start of the thread and then tighten the
thread ring in a clockwise direction.
5.13. Make sure that the thread ring is fully screwed into the FMT. Only still the crowns of the
thread ring are visible. If necessary, check with a small screwdriver that the thread ring is
deeper than the upper edge of the FMT (Fig. 5).
5.14. Set line gently under pressure by opening the at or mains stop valve. Carefully check
seal and function (forward running). If the meter is running backwards the FMT was not
installed in accordance with the ow direction. Dismantle the measurement capsule, turn
it by 180° and install.
5.15. If not already done, turn the register to the read position and seal the meter.
5.16. Mark the connection interface with sticker A34.
5.17. Press the standard rosette (Art. 114672) onto the meter cap on the wall until the stop. A
special rosette must be ordered (Art. 100344) possibly with extension sleeves (Art. 100625),
for installation depths below 35 mm. When replacing Allmess capsule meter against
ZENNER Minolas, the existing rosette possibly can be used again. For attachment to the
meter then a separate adapter ring (Art. 153127) is required.
English
Fig. 1
Fig. 2
Fig. 3
Fig. 4
Capsule meter Minolas
Assembly instructions

4
5.18. The visual readability of the register and all key gures for the meter and the confor-
mity and metrology markings must not be concealed.
5.19. For wet room installations with an extension sleeve, a rosette disk can also be
inserted and this must be ordered separately.
6. Meter exchange
6.1. Block and empty the line by closing the at or mains stop valve.
6.2. Remove the rosette (possibly with the extension sleeves).
6.3. Ensure it is actually an AMS ush-mounted housing (see no. 1.4).
Only use the Minolas measurement capsule in Allmess ush-mounted parts with
the 3/4″ ground stamp!
6.4. Unscrew the thread ring and the measurement capsule from the FMT with an instal-
lation wrench. The AMS threaded ring is not reused.
6.5. Remove the seal ring from the FMH and, if necessary, clean dirt from it, especially on
the sealing surfaces of the O-ring.
6.6. Install the new Minolas measurement capsule, as described in No. 1.6 to 1.19.
Carefully check seal and function.
7. Installation wrench
To install and dismantle the measuring insert, use an installation wrench.
8. User safeguard
A user safeguard must be used (adhesive label, seal etc.) to detect whether the measurement capsule has been removed
from the connection interface or whether an impermissible removal has taken place.
9. Disposal
Battery-powered devices, or battery-powered modules additionally installed on mechanical devices, may contain
non-removable and non-rechargeable lithium batteries. These are marked with the WEEE directive symbol (crossed-out
garbage can). Batteries contain substances, which could harm the environment and might endanger human health if not
disposed of properly. To reduce the disposal quantity so as unavoidable pollutants from electrical and electronic equip-
ment in waste, old equipment should be reused prior or materials recycled or reused as another form. This is only possible
if old equipment, batteries, other accessories and packaging of the products are returned to the manufacturer or handed in
at recycling centres. Our business processes generally provide that we or the specialist companies we use take old devices
including batteries, other accessories and packaging material back with us aer they have been replaced or at the end of
their useful life and dispose of them properly.
Insofar as no other contractual arrangement has been made in this respect, your local or municipal authority or the local
waste disposal company can give you information relating the collection points for your used equipments. ZENNER will
always ensure correct disposal.
Attention!
Do not dispose of the devices with domestic waste. In this way, you will help to protect natural resources and to promote
the sustainable reuse of material resources.
Should you have any questions, please contact info@zenner.com
The latest information on this product and the current version of these instructions can be found at www.zenner.com
Subject to modications and errors excepted. We accept no liability for any errors or misprints.
ZENNER International GmbH & Co. KG
Heinrich-Barth-Straße 29 | 666115 Saarbrücken | Germany
Phone +49 681 99 676-30
Fax +49 681 99 676-3100
E-Mail info@zenner.com
Internet www.zenner.com
Fig. 5
-
 1
1
-
 2
2
-
 3
3
-
 4
4


Zenner capsule meter Minolas Assembly Instructions
- Typ
- Assembly Instructions
in anderen Sprachen
- English: Zenner capsule meter Minolas
Verwandte Artikel
-
Zenner Measuring capsule meters Minomess DM (DM1) Installationsanleitung
-
-
-
-
-
-
-
-
-