innovative technology CashGenic Bedienungsanleitung
- Typ
- Bedienungsanleitung

Copyright © Innovative Technology Ltd 2020
Doc: Cashgenic Quick Start Guide
Version: 1.0
Quick
S
tart
Guide

<< Back to Contents
Copyright © Innovative Technology Ltd 2020 Doc: Cashgenic Quick Start Guide
Version: 1.0
Page 1 of 19
Document Name:
Cashgenic Quick Start Guide
Document Version:
1.0
Date of Release:
20/05/2020
Table of Contents
1 DOCUMENT INTRODUCTION .................................................................................................................. 2
1.1 RELATED DOCUMENTS ................................................................................................................................... 2
1.2 MANUAL AMENDMENTS ................................................................................................................................. 2
1.3 COPYRIGHT .................................................................................................................................................. 2
1.4 LIMITED WARRANTY ...................................................................................................................................... 2
1.5 PRODUCT SAFETY INFORMATION ...................................................................................................................... 3
2 SETTING UP THE DEVICE ......................................................................................................................... 5
2.1 WHAT’S IN THE BOX ....................................................................................................................................... 5
2.2 OUT OF THE BOX CONNECTIONS ....................................................................................................................... 5
2.2.1 Spectral Payout Setup ..................................................................................................................... 5
2.2.1.1 Bezel Fitting .......................................................................................................................................... 5
2.2.1.2 Attaching the Payout module ............................................................................................................... 7
2.2.1.3 Lock Fitment ......................................................................................................................................... 9
2.2.2 SCS Setup ........................................................................................................................................ 9
2.2.2.1 Lock Fitment ......................................................................................................................................... 9
2.2.3 Cable Installation .......................................................................................................................... 10
2.3 DOWNLOADING THE COMPANION APP ............................................................................................................. 11
2.4 FIRST TIME SETUP ....................................................................................................................................... 12
2.5 PAIRING THE CASHIER DISPLAY ........................................................................................................................ 12
3 USING THE DEVICE ................................................................................................................................ 14
3.1 GENERAL TRANSACTIONS .............................................................................................................................. 14
3.2 CANCELLING A TRANSACTION ......................................................................................................................... 16
3.3 TRANSACTION LOGS ..................................................................................................................................... 16
4 ADMIN MENU ....................................................................................................................................... 18
5 TECHNICAL INFORMTION ...................................................................................................................... 19
5.1 TECHNICAL DRAWINGS ................................................................................................................................. 19
5.2 CABINET DESIGN RECOMMANDATIONS ............................................................................................................ 19

<< Back to Contents
Copyright © Innovative Technology Ltd 2020 Doc: Cashgenic Quick Start Guide
Version: 1.0
Page 2 of 19
1 DOCUMENT INTRODUCTION
1.1 Related Documents
This document should be read together with the following:
• NV200S Family Manual GA02119
• Smart Coin System Family Manual GA02085
1.2 Manual Amendments
Rev.
Date
Amendment Details
Issued by
1.0
20/05/2020
First Issue
JB
1.3 Copyright
This manual set is Copyright © Innovative Technology Ltd. 2016. No part of this
publication may be reproduced in any form or by any means used to make any
derivative such as translation, transformation, or adaptation without permission from
Innovative Technology Ltd. The contents of this manual set may be subject to
change without prior notice.
1.4 Limited Warranty
Innovative Technology Ltd warrants each of its hardware products to be free from
defects in workmanship and materials under normal use and service for a period
commencing on the date of purchase from Innovative Technology Ltd or its
Authorized Reseller, and extending for the length of time stipulated by Innovative
Technology Ltd.
A list of Innovative Technology Ltd offices can be found in every section of this
manual set. If the product proves defective within the applicable warranty period,
Innovative Technology Ltd will repair or replace the product. Innovative Technology
Ltd shall have the sole discretion whether to repair or replace, and any replacement
product supplied may be new or reconditioned.
The foregoing warranties and remedies are exclusive and are in lieu of all other
warranties, expressed or implied, either in fact or by operation of law, statutory or
otherwise, including warranties of merchantability and fitness for a particular
purpose.
Innovative Technology Ltd shall not be liable under this warranty if it’s testing and
examination disclose that the alleged defect in the product does not exist or was
caused by the customer's or any third person's misuse, neglect, improper installation
or testing, unauthorized attempts to repair, or any other cause beyond the range of
the intended use. In no event will Innovative Technology Ltd be liable for any
damages, including loss of profits, cost of cover or other incidental, consequential or
indirect damages arising out the installation, maintenance, use, performance, failure
or interruption of an Innovative Technology Ltd product, however caused.

<< Back to Contents
Copyright © Innovative Technology Ltd 2020 Doc: Cashgenic Quick Start Guide
Version: 1.0
Page 3 of 19
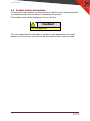
1.5 Product Safety Information
Throughout this user manual, we may draw your attention to key safety points that
you should be aware of when using or maintaining the product.
These safety points will be highlighted in a box, like this:
Caution!
This is example text.
This user manual and the information it contains is only applicable to the model
stated on the front cover, and must not be used with any other make or model.

<< Back to Contents
Copyright © Innovative Technology Ltd 2020 Doc: Cashgenic Quick Start Guide
Version: 1.0
Page 4 of 19
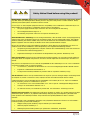
Safety Notice! Read before using this product!
Safety Notice - Warning. Ensure power is removed before allowing access to the inside of this product. Ensure
any static build up is discharged before allowing access to any part of this product or media contained. Always
earth this product/base plate in accordance with the manual.
For use only in or with complete equipment where the acceptability of the combination is determined by UL LLC.
When installed in an end-product, consideration must be given to the following:
• The power supply terminals and/or connectors are: Not investigated for field wiring
• The investigated Pollution Degree is: 2
• The following end-product enclosures are required: Mechanical, Fire
Sicherheitshinweis – Warnung: Es muss sichergestellt werden, dass das Gerät von der Versorgungsspannung
getrennt wird, bevor ein Eingriff in das Innere des Gerätes erfolgt. Es muss sichergestellt werden, dass jegliche
statische Aufladung des Gerätes entladen wird, bevor auf das Gerät oder auf innerhalb des Gerätes befindliche
Objekte zugegriffen wird. Die Erdung des Gerätes muss immer gemäß Handbuch erfolgen.
Nur für die Verwendung in oder mit kompletter Ausstattung, dessen Eignung und Kombination von der UL LLC
ermittelt wurde. Bei der Installation in einem Endproduckt, muss folgendes berücksichtigt werden:
• Die Spannungsversorgungsklemmen und/oder Verbinder sind: Feldverkabelung wurde nicht untersucht
• Der untersuchte Verschmutzungsgrad ist: 2
• Folgende Anforderungen an die Gehäuse des Endproduktes sind gefordert: Mechanisch, Feuer
Aviso de seguridad: Asegúrese de que la alimentación está desconectada y de que toda la energía estática es
descargada antes de manipular este producto. Conecte a tierra la chapa base de la manera que se indica en el
manual.
Solo para uso con dispositivos con los cuales la compatibilidad ha sido certificada por UL LLC. Tras su instalación
en producto acabado, tener en cuenta lo siguiente:
• Los conectores y terminales de alimentación son: No se ha investigado/especificado cableado externo.
• El grado de contaminación determinado es: 2
• Los siguientes manuales/certificados de producto final son requeridos: Mecánico, Fuego
Avis de sécurité : Assurez-vous que l'alimentation est coupée et que toute l'énergie statique est déchargé avant
de manipuler ce produit. Connecter à la terre, la plaque de base à la manière indiquée dans le manuel.
A utiliser Seulement avec les dispositifs dont la compatibilité a été certifiée par UL LLC. Après son installation
dans le produit fini, prendre en considération ce qui suit:-
• Les connecteurs et les bornes d'alimentation sont : cela n’a pas été étudié/spécifié câblage externe.
• Le degré de contamination déterminé est: 2
• Les manuels suivants / les certificats du produit final sont nécessaires : mécanique, incendie
Bezpečnostní upozornění. Před manipulací uvnitř tohoto produktu se ujistěte, že je produkt odpojen od zdroje
elektrického napětí. Ujistěte se, že jakýkoliv elektrostatický náboj byl vybit před manipulací s jakoukoliv částí
tohoto produktu nebo obsaženým médiem. Vždy uzemněte tento produkt/základovou desku v souladu s
návodem.
Pouze pro použití v nebo s kompletním vybavením, kde je přijatelnost kombinace určena UL LLC. Při instalaci v
konečném produktu je třeba zvážit nasledující:
• Napájecí svorky a/nebo konektory: Nejsou sledované pro externí kabeláž
• Sledovaný stupeň znečištění je: 2
• Následující krytí konečného produktu jsou požadované: Mechanické, Protipožární

<< Back to Contents
Copyright © Innovative Technology Ltd 2020 Doc: Cashgenic Quick Start Guide
Version: 1.0
Page 5 of 19
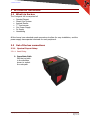
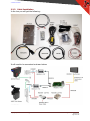
2 SETTING UP THE DEVICE
2.1 What’s in the box
The Cashgenic kit is comprised of:
• Spectral Payout
• Smart Coin System
• Android Device
• 7” Touchscreen
• 24v Power Supply
• 5v Supply
• Harnessing
All the looms have standard spade connectors to allow for easy installation, and the
power supply has separate terminals for each peripheral.
2.2 Out of the box connections
2.2.1 Spectral Payout Setup
2.2.1.1 Bezel Fitting
1. Open Note Path
Pull the top latch
in the direction
shown to unlock
the note path

<< Back to Contents
Copyright © Innovative Technology Ltd 2020 Doc: Cashgenic Quick Start Guide
Version: 1.0
Page 6 of 19
2. Open Upper
Note Path
When the note
path has
unlocked, lift the
upper part to give
clear access to
the front.
3. Attach Bezel
Cable
Plug the bezel
cable into the
connection socket
on the front.
Ensure that the
tab on the
connector aligns
with the notch on
the socket.
4. Insert Bezel
Slide the bezel
down into the
slots on the front
of the bezel
5. Close Note Path
Push the upper
note path back
down until you

<< Back to Contents
Copyright © Innovative Technology Ltd 2020 Doc: Cashgenic Quick Start Guide
Version: 1.0
Page 7 of 19
hear it click firmly
back into place
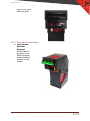
2.2.1.2 Attaching the Payout module
1. Slide NV200
Spectral
Forward
Lift the latch on
the front of the
NV200 Spectral
head and slide it
forward on the
chassis

<< Back to Contents
Copyright © Innovative Technology Ltd 2020 Doc: Cashgenic Quick Start Guide
Version: 1.0
Page 8 of 19
2. Attach the
Spectral Payout
module
Align the holes in
the Spectral
Payout with the
mounting points
on the back of the
NV200 Spectral
chassis
3. Lock Spectral
Payout into
place
Press downwards
on the Spectral
Payout to lock it
into place on the
chassis

<< Back to Contents
Copyright © Innovative Technology Ltd 2020 Doc: Cashgenic Quick Start Guide
Version: 1.0
Page 9 of 19
4. Dock the NV200
Spectral head
Firmly push the
NV200 Spectral
back along the
chassis until it
locks into place on
the Spectral
Payout
connectors.
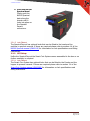
2.2.1.3 Lock Fitment
The Spectral Payout has optional locks that can be fitted to the head and the
cashbox to prevent removal. If these are required please refer to section 4.4 of the
NV200 Spectral manual (GA02119) for information on lock specifications and fitting
instructions.
2.2.2 SCS Setup
Unlike the Spectral Payout the Smart Coin System comes assembled in the box so no
further assembly is required.
2.2.2.1 Lock Fitment
The Smart Coin System has optional locks that can be fitted to the Feeder and the
hopper to prevent removal. If these are required please refer to section 3.4 of the
Smart Coin System manual (GA02085) for information on lock specifications and
fitting instructions.


<< Back to Contents
Copyright © Innovative Technology Ltd 2020 Doc: Cashgenic Quick Start Guide
Version: 1.0
Page 11 of 19
Part Name/Number
Description
Quantity
Android App
Bluetooth communication App for Android devices
1
IF17
USB Interface Converter
2
SD CARD
16GB, for Raspberry Pi, Including operating system
1
CN00397
SMART Payout to Host Cable Assembly
1
CN00385
SMART Hopper User Interface Cable Assembly
1
CN00389
Hopper Interface Power Cable
1
CN00214
USB A to B Cable Assembly
2
PA03592
Raspberry PI
1
PA03590
5V PSU
1
PA03589
24V PSU
1
PA03591
Touchscreen
1
n/a
Raspberry PI to Touchscreen Cable (part of PA03591)
1
WR02091
100-240V Mains Power Cable (Internal)
WR02228
5V PSU to Raspberry PI Cable
1
WR02229
24V to 5V PSU Cable
1
2.3 Downloading the companion app
Cashgenic allows for social distanced transactions through the use of a remote tablet
connected to the main device via Bluetooth, this secondary device can be purchased
as an add on to the Cashgenic kit or purchased separately.
The minimum requirements for the companion app are:
• Android 6.0 *Note at this time Amazon devices are not supported.
• 1gb RAM
• Bluetooth 4.0
• 100mb free space
• 7” 720p screen
If you purchase a separate device you can download the application from the link
below:
https://www.dropbox.com/sh/55up13nr1q0e27p/AACLk2gU4nLytpLyz5sq078Ea?dl=0
To install you will have to enable unknown sources on your device.
For Android versions prior to 8.0 you will need to:
1. Open the device settings. Look for a gear icon in the notification shade near
the top left corner and tap on it.
2. Scroll down to the Security section and tap to open it.
3. Scroll down to the entry labeled Unknown sources and read the subtext.
4. Read the pop-up box that tells you Google isn't responsible if you install
apps from places they do not explicitly trust and click OK to enable the
setting.

<< Back to Contents
Copyright © Innovative Technology Ltd 2020 Doc: Cashgenic Quick Start Guide
Version: 1.0
Page 12 of 19
For Android 8.0 and later:
1. Open the device settings. Look for a gear icon in the notification shade near
the top left corner and tap on it.
2. Scroll down to Apps.
3. In the top right of the screen you should see 3 dots to open the menu. Click
on it and click Special Access.
4. About ¾ of the way down you will see Install Unknown Apps.
5. Find your devices file manager and click on it, this will bring up another
menu.
6. Now enable Allow from this source.
PLEASE NOTE: Some devices may differ to the instructions listed above, if
you are unsure please contact the device manufacturer.
2.4 First Time Setup
During the first time setup you will be able to configure:
• System Language
• Time zone
• Store and device meta data
• Screen Orientation
• Float Levels
If you select the wrong option you can restart the process in the Admin menu.
Note: Some options will only take effect at the next power up
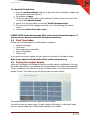
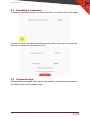
2.5 Pairing the cashier display
When you first power the Cashgenic system you will notice a red triangle in the top
left of the main display, this indicates the remote display is currently not connected.
To pair the device you will have to enter the admin menu. To do this click the G on
screen 5 times. This will bring up the login screen as shown below:
The default password is 123456, type this and hit Enter.
You will now see the admin menu, to pair a device hit ‘pairing’, at this point make
sure the remote tablet has it’s Bluetooth enabled and is visible.

<< Back to Contents
Copyright © Innovative Technology Ltd 2020 Doc: Cashgenic Quick Start Guide
Version: 1.0
Page 13 of 19
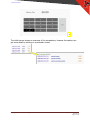
Once the remote device is ready click Scan, after around 10s you should see the
tablet’s name appear. Clicking on the device will initiate the pairing process – you
will then be prompted on the remote tablet to confirm.
Once the devices have paired you will see it appear on the left side of the main
display.
You can now exit admin mode – this is done by pressing the back button twice.
When you open the companion app it will now be able to communicate to the
Cashgenic application.

<< Back to Contents
Copyright © Innovative Technology Ltd 2020 Doc: Cashgenic Quick Start Guide
Version: 1.0
Page 14 of 19
3 USING THE DEVICE
To begin using the Cashgenic device you will need to open the companion app on
your remote tablet. The initial loading screen is shown whilst the app establish
connection to the main device:
Once a connection has been established the screen will change to a keypad to enter
values.
3.1 General Transactions
To begin enter the value to pay on the screen and hit return, this will enable both
the Spectral Payout and Smart Coin System.

<< Back to Contents
Copyright © Innovative Technology Ltd 2020 Doc: Cashgenic Quick Start Guide
Version: 1.0
Page 15 of 19
The screen on the main display will also change to reflect the transaction:
Once the customers enters cash the value accepted to date will be displayed on both
screens, once the transaction is complete the cashier can acknowledge it and close
the transaction.

<< Back to Contents
Copyright © Innovative Technology Ltd 2020 Doc: Cashgenic Quick Start Guide
Version: 1.0
Page 16 of 19
3.2 Cancelling a transaction
To cancel a transaction simply click the back button in the bottom left of the display:
If notes and coins have been entered already they will be returned to the user and
that will be reflected in the transaction log:
3.3 Transaction logs
All transactions are logged, and these can be viewed by clicking the menu button in
the bottom right of the companion app.


<< Back to Contents
Copyright © Innovative Technology Ltd 2020 Doc: Cashgenic Quick Start Guide
Version: 1.0
Page 18 of 19
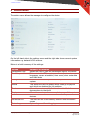
4 ADMIN MENU
The admin menu allows the manager to configure the device
On the left hand side is the settings menu and the right side shows current system
information e.g. dataset & FW versions.
Below is a brief summary of the settings:
Setting
Summary of features
Transaction Logs
Allows the user to view the transaction logs for the device.
Run Setup
This restarts the 1
st
time setup so allows you to set
languages, screen orientation, time zones, store meta data
and float levels
Pairing Device
This allows the user to pair a new companion device to the
system.
Routes
This allows the user to modify which notes go to payout
and which are destined for the cashbox.
Float
Allows the user to modify float levels and to flush the
devices down to that level
Empty
Allows the user to perform a complete purge of the system
Refill
Allows the user to enter notes and coins to replenish the
devices.
Set access PIN
The user can set a new security code to enter the admin
screen
Device Logs
System logs used for debugging.

<< Back to Contents
Copyright © Innovative Technology Ltd 2020 Doc: Cashgenic Quick Start Guide
Version: 1.0
Page 19 of 19
5 TECHNICAL INFORMTION
5.1 Technical Drawings
3D stp files are available for download, from the links below:
SCS:
https://www.dropbox.com/s/dg47hlcwpbg7hhs/SMART%20Coin%20System.zip?dl=0
Spectral Payout:
https://www.dropbox.com/s/40elqno8dk3p4o2/NV200S_SPO_1000n_StandardBezel.zip?dl=0
Cashgenic Peripherals:
https://www.dropbox.com/s/02cb9wl0171hzmi/Cashgenic%20Peripherals.zip?dl=0
5.2 Cabinet Design Recommandations
ITL provide a basic template that can be modified to suit the end user application,
this template can be downloaded from the link below:
https://www.dropbox.com/sh/0yodeb0zld9hqx6/AAA5ITkEmqtLr0-FhhIhwzjsa?dl=0
From previous experience please find below a list of recommendations when
designing a custom enclosure:
• Ensure the box and peripherals have a good earth connection
• Ensure the Raspberry PI has sufficient shielding to prevent interference from
the peripherals.
• Where the PI is mounted should have a panel that will allow the Bluetooth
signal through – this could be where the customer branding is located.
• Ensure there is a cashbox that the device can use to purge excess coins to.
• Placing metal sheets too close to the lip of the SCS can cause the devices
metal detector to trigger unexpectedly.
-
 1
1
-
 2
2
-
 3
3
-
 4
4
-
 5
5
-
 6
6
-
 7
7
-
 8
8
-
 9
9
-
 10
10
-
 11
11
-
 12
12
-
 13
13
-
 14
14
-
 15
15
-
 16
16
-
 17
17
-
 18
18
-
 19
19
-
 20
20


