Lenco DIR-250BK Bedienungsanleitung
- Kategorie
- Radios
- Typ
- Bedienungsanleitung

1
Model: DIR-250
USER MANUAL
Wifi/Lan Internet, Dab+, Fm Tuner with
Bluetooth and Spotify Connect
HANDLEIDING
Wifi/Lan Internet, Dab+, Fm-tuner met
Bluetooth en Spotify Connect
BEDIENUNGSANLEITUNG
WLAN/LAN-Internet-, DAB+- und FM-Tuner
mit Bluetooth- und Spotify-Connect
MODE D’EMPLOI
Internet Wifi/Lan, Dab+, Fm Tuner avec
Bluetooth et Spotify Connect
MANUAL DEL USUARIO
Internet Wifi/Lan, Dab+, radio FM con
conexión Bluetooth y Spotify
MANUALE D'USO
Sintonizzatore Wi-Fi/Lan Internet, Dab+, Fm
con Bluetooth e Spotify Connect

2
Index:
English........................................................................................................................................ 3
Nederlands .............................................................................................................................. 45
Deutsch .................................................................................................................................... 91
Français .................................................................................................................................. 138
Español .................................................................................................................................. 184
Italiano ................................................................................................................................... 230
Version: 2.0

3
English
DIR-250
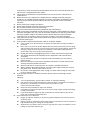
CAUTION:
Usage of controls or adjustments or performance of procedures other than those specified
herein may result in hazardous radiation exposure.
PRECAUTIONS BEFORE USE
KEEP THESE INSTRUCTIONS IN MIND:
1. Do not cover or block any ventilation openings. When placing the device on a shelf,
leave
5 cm (2”) free space around the whole device.
2. Install in accordance with the supplied user manual.
3. Keep the device away from heat sources such as radiators, heaters, stoves, candles and
other heat-generating products or naked flame. The device can only be used in
moderate climates. Extremely cold or warm environments should be avoided. Working
temperature between 0° and 35°C.
4. Avoid using the device near strong magnetic fields.
5. Electrostatic discharge can disturb normal usage of this device. If so, simply reset and
restart the device following the instruction manual. During file transmission, please
handle with care and operate in a static-free environment.
6. Warning! Never insert an object into the product through the vents or openings. High
voltage flows through the product and inserting an object can cause electric shock
and/or short circuit internal parts. For the same reason, do not spill water or liquid on
the product.
7. Do not use in wet or moist areas such as bathrooms, steamy kitchens or near
swimming pools.
8. The device shall not be exposed to dripping or splashing and make sure that no objects
filled with liquids, such as vases, are placed on or near the apparatus.
9. Do not use this device when condensation may occur. When the unit is used in a warm
wet room with damp, water droplets or condensation may occur inside the unit and
the unit may not function properly; let the unit stand in power OFF for 1 or 2 hours
before turning on the power: the unit should be dry before getting any power.
10. Although this device is manufactured with the utmost care and checked several times
before leaving the factory, it is still possible that problems may occur, as with all
electrical appliances. If you notice smoke, an excessive build-up of heat or any other
unexpected phenomena, you should disconnect the plug from the main power socket
immediately.
11. This device must operate on a power source as specified on the specification label. If
you are not sure of the type of power supply used in your home, consult your dealer or
local power company.
12. Keep away from animals. Some animals enjoy biting on power cords.
13. To clean the device, use a soft dry cloth. Do not use solvents or petrol based fluids.
To remove severe stains, you may use a damp cloth with dilute detergent.
14. The supplier is not responsible for damage or lost data caused by malfunction, misuse,
modification of the device or battery replacement.
15. Do not interrupt the connection when the device is formatting or transferring files.
Otherwise, data may be corrupted or lost.
16. If the unit has USB playback function, the USB memory stick should be plugged into the
unit directly. Don’t use an USB extension cable because it can cause interference
resulting in failing of data.
17. The rating label has been marked on the bottom or back panel of the device.
18. This device is not intended for use by people (including children) with physical, sensory
or mental disabilities, or a lack of experience and knowledge, unless they’re under

4
supervision or have received instructions about the correct use of the device by the
person who is responsible for their safety.
19. This product is intended for non professional use only and not for commercial or
industrial use.
20. Make sure the unit is adjusted to a stable position. Damage caused by using this
product in an unstable position vibrations or shocks or by failure to follow any other
warning or precaution contained within this user manual will not be covered by
warranty.
21. Never remove the casing of this device.
22. Never place this device on other electrical equipment.
23. Do not allow children access to plastic bags.
24. Only use attachments/accessories specified by the manufacturer.
25. Refer all servicing to qualified service personnel. Servicing is required when the device
has been damaged in any way, such as the power supply cord or the plug, when liquid
has been spilled or objects have fallen into the device, when the device has been
exposed to rain or moisture, does not operate normally, or has been dropped.
26. Long exposure to loud sounds from personal music players may lead to temporary or
permanent hearing loss.
27. If the product is delivered with power cable or AC power adaptor:
⚫ If any trouble occur, disconnect the AC power cord and refer servicing to qualified
personnel.
⚫ Don’t step on or pinch the power adaptor. Be very careful, particularly near the plugs
and the cable’s exit point. Do not place heavy items on the power adaptor, which may
damage it. Keep the entire device out of children’s reach! When playing with the
power cable, they can seriously injure themselves.
⚫ Unplug this device during lightning storms or when unused for a long period.
⚫ The socket outlet must be installed near the equipment and must be easily
accessible.
⚫ Do not overload ac outlets or extension cords. Overloading can cause fire or
electric shock.
⚫ Devices with class 1 construction should be connected to a main socket outlet
with a protective earthed connection.
⚫ Devices with class 2 construction do not require a earthed connection.
⚫ Always hold the plug when pulling it out of the main supply socket. Do not pull
the power cord. This can cause a short circuit.
⚫ Do not use a damaged power cord or plug or a loose outlet. Doing so may result
in fire or electric shock.
28. If the product contains or is delivered with a remote control containing coin/cell
batteries:
Warning:
⚫ “Do not ingest battery, Chemical Burn Hazard” or equivalent working.
⚫ [The remote control supplied with] This product contains a coin/button cell battery. If
the battery is swallowed, it can cause severe internal burns in just
2 hours and can lead to death.
⚫ Keep new and used batteries away from children.
⚫ If the battery compartment does not close securely, stop using the product and keep
it away from children.
⚫ If you think batteries might have been swallowed or placed inside any part of the
body, seek immediate medical attention.
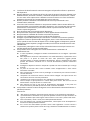
29. Caution about the use of Batteries:
⚫ Danger of explosion if battery is incorrectly replaced. Replace only with the same or
equivalent type.
⚫ Battery cannot be subjected to high or low extreme temperatures, low air pressure at
high altitude during use, storage or transportation.
⚫ Replacement of a battery with an incorrect type that can result in an explosion or the
leakage of flammable liquid or gas.

5
⚫ Disposal of a battery into fire or a hot oven, or mechanically crushing or cutting of a
battery, that can result in an explosion.
⚫ Leaving a battery in an extremely high temperature surrounding environment that can
result in an explosion or that leakage of flammable liquid or gas.
⚫ A battery subjected to extremely low air pressure that may result in an explosion or
the leakage of flammable liquid or gas.
⚫ Attention should be drawn to the environmental aspects of battery disposal.
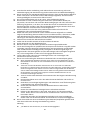
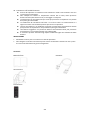
INSTALLATION
• Unpack all parts and remove protective material.
• Do not connect the unit to the mains before checking the mains voltage and before all other
connections have been made.
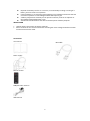
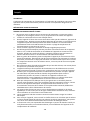
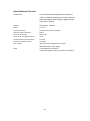
Accessories:
User manual
Power supply
Remote control
DAB/FM indoor antenna
WIFI antenna
RCA cable

6
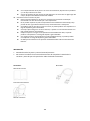
INSTALLATION
• Unpack all parts and remove protective material.
• Do not connect the unit to the mains before checking the mains voltage and before all
other connections have been made.
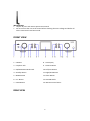
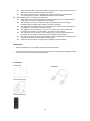
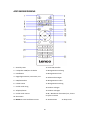
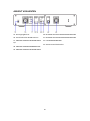
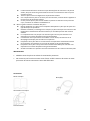
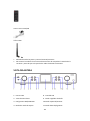
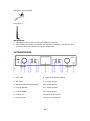
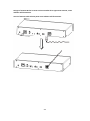
FRONT VIEW
1. USB Port
2. Earphone Jack
3. OK/NAVIGATE Swivel Knob
4. Standby Button
5. MODE Button
6. Fav. Button
7. Home Button
8. LCD Display
9. Dimmer Button
10. Left/Prev Button
11. Right/Next Button
12. Alarm Button
13. VOLUME Knob
14. Remote Control Sensor
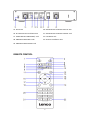
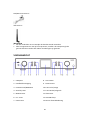
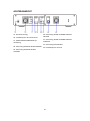
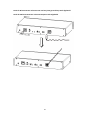
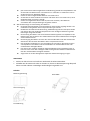
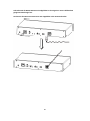
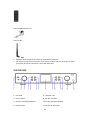
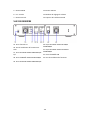
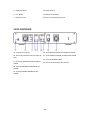
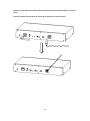
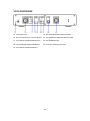
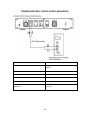
REAR VIEW

7
15. DC IN Jack
16. W-LAN Antenna Installation Port
17. AUDIO OUTPUT ANALOG R/L Jack
18. ANALOG AUDIO INPUT Jack
19. ANALOG AUDIO OUTPUT Jack
20. AUDIO OUTPUT DIGITAL OPTICAL Jack
21. AUDIO OUTPUT DIGITAL COAXIAL Jack
22. LAN INPUT Jack
23. Antenna Installation Port
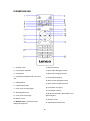
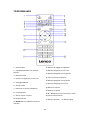
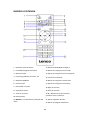
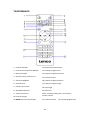
REMOTE CONTROL

8
1. Standby button
2. Switch speaker ON/OFF
3. Main menu
4. Saved stations, Favorites, etc
5. DAB/FM scan
6. Local station
7. Go back one track
8. Play/Pause
9. Go forward one track
10. Alarm button
11. MODE-Go to main menu items
12. EQ-Set button
13. Up navigation button
14. Left navigation button
15. Confirm selection
16. Right navigation button
17. Down navigation button
18. Decrease volume
19. Increase volume
20. 0.....9 Select favorites/Fav.; input letters
and numbers
21. Dimmer button
22. Sleep button
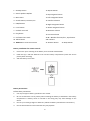
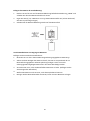
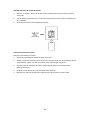
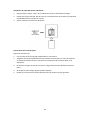
Battery installation for remote control:
1. Push on the ‘open’ marking of the battery cover and slide it downwards
2. Install two (2) x AAA size batteries 1.5V into the battery compartment (check the correct
polarity when inserting)
3. slide the battery cover back
Battery Precautions:
Follow these precautions:
1. Use only the type of battery specified in this manual.
2. Be sure to follow the correct polarity when installing the battery as indicated in the battery
compartment. A battery which is inserted in the wrong way may cause damage to the
device.
3. Do not try to recharge single use batteries. (Follow the battery manufacturer’s directions.)
4. Do not throw batteries into fire because they may explode.

9
5. Clean the battery contacts of the device prior to replacing empty batteries.
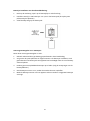
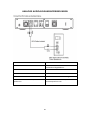
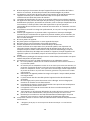
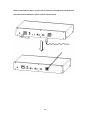
Tighten the W-lan antenna clockwise by using the proper tool as illustrated.
Plug the pig-tail antenna into the Antenna port as illustrated.

10
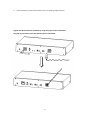
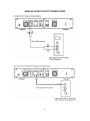
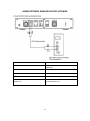
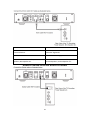
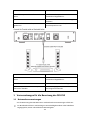
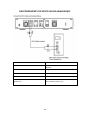
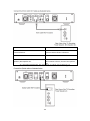
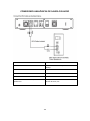
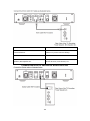
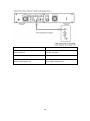
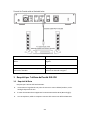
ANALOG AUDIO OUTPUT CONNECTIONS

11
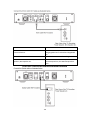
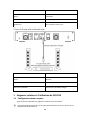
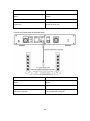
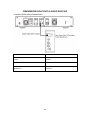
DIGITAL AUDIO OUTPUT CONNECTIONS

12
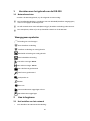
1 Requirements for using the DIR-250
1.1 Network Requirements
Before using the DIR-250, the following requirements are needed:
⚫ A broadband connection in combination with a wired/wireless access point, router or
similar network device.
⚫ The Wifi network router needs to support WIFI (802.11 b/g/n) wireless connection.
⚫ A smart phone, tablet or pc which is on the same network as the DIR-250
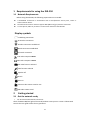
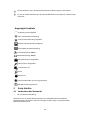
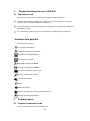
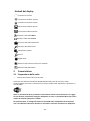
Display symbols
establishing Connection
No wireless connection
Wireless connection established
Wired connection established
No wired connection
VHF radio reception: Mono
VHF radio reception: Stereo
VHF radio function selected
AUX function selected
Speaker off
Search
Alarm on
Internet radio station saved as Fav.
FM radio station saved
2 Getting started
2.1 Get the network ready
● For wireless W-LAN network connection:
Check if WLAN LINK/ACT light of the wired/wireless access point or router is illuminated.
Consult the user guide of that for any questions.

13
Note: WiFi allows data transfer over short distances within 20 meters without the need of
cabling between the devices. Walls and ceilings may reduce WIFI range.
Therefore try to locate the DIR-250 and/or the access point within the distance above and
avoid any obstacles between two devices.
● Connect the power adaptor to the mains and plug the DC plug the adaptor into the DC-IN
socket of the DIR-250
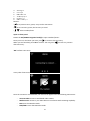
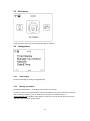
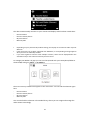
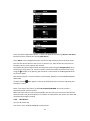
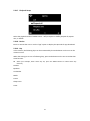
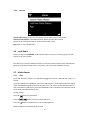
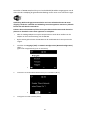
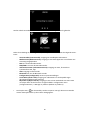
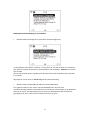
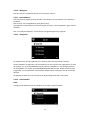
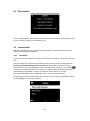
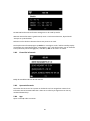
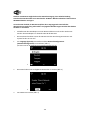
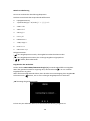
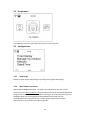
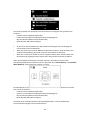
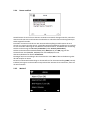
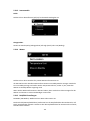
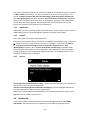
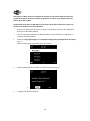
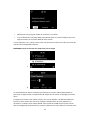
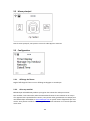
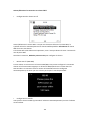
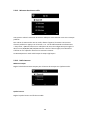
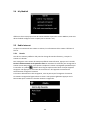
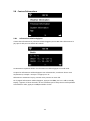
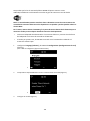
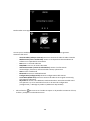
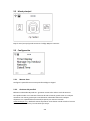
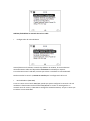
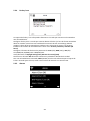
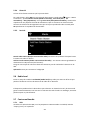
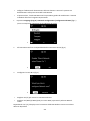
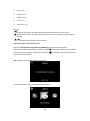
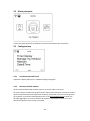
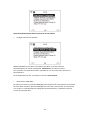
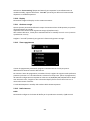
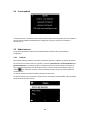
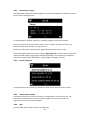
● On first use the DIR-250 will start with the installation wizard. The system will ask you to:
1 set Language and Network Configurations (fig 1.)
(use the navigation knob(3) to select)
1
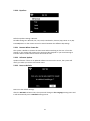
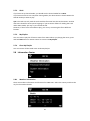
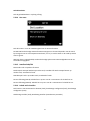
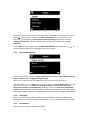
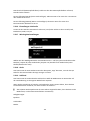
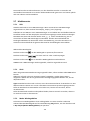
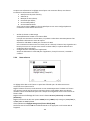
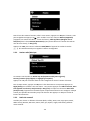
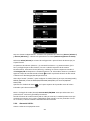
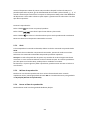
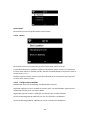
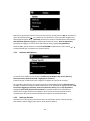
2 Check network availability on power on (fig 2.)
2
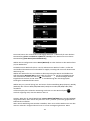
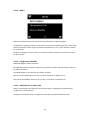
3 Configure the wifi network (fig 3.)
3
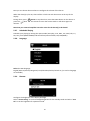
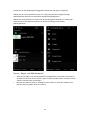
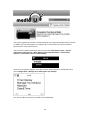
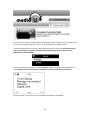
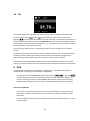
● Select Yes to establish connection to a network

14
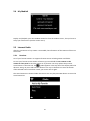
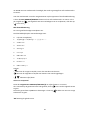
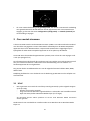
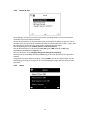
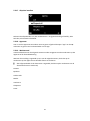
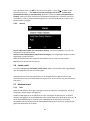
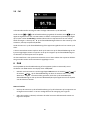
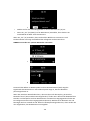
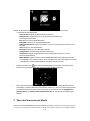
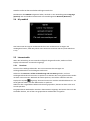
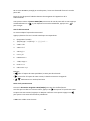
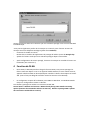
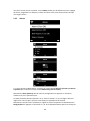
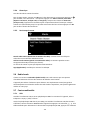
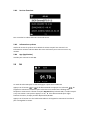
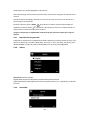
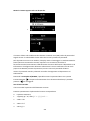
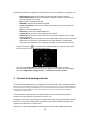
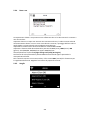
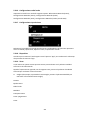
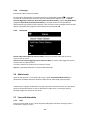
● if you Select Yes(WPS)(Only for WPS routers) and then press the WPS button on your
router.
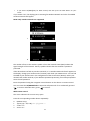
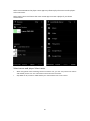
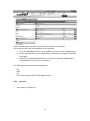
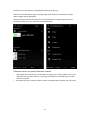
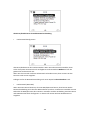
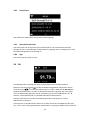
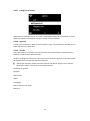
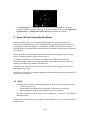
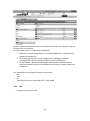
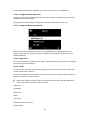
If you answer ‘Yes’, the display goes to scanning for Wireless Network and a list of available
wireless networks will appear.
NOTE: Only 2.4 Ghz networks are supported
1
2
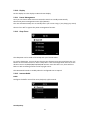
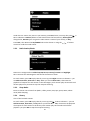
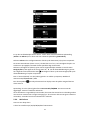
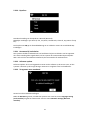
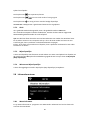
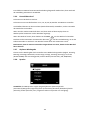
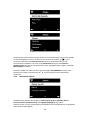
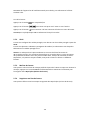
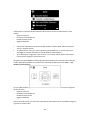
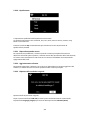
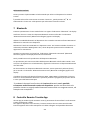
The number of bars in the wireless symbol in front the network name (SSID) indicate the
signal strength of the network. The key symbol indicates that the network is password-
protected.
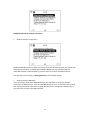
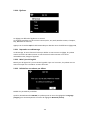
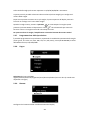
If the device does not find any wireless networks, a ‘no wireless Networks found’ appears on
the display. Change your location and if necessary and check your WLAN router. You can find
the SSID of your Access Point in the configuration of the Access Point (Router). Select your
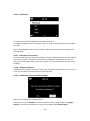
network and confirm with OK, If your WLAN is password-protected, you will be prompted to
enter the wifi password.
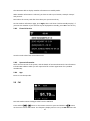
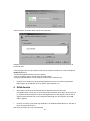
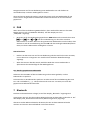
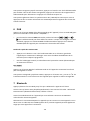
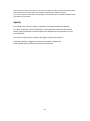
Enter the password using the navigation control buttons on the device or remote control.
You can rotate the UP/DOWN knob to input the wifi password. if it is accidentally pressed
‘ ’ to move a redundant entry, press ‘ ’ to correct.
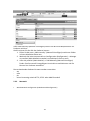
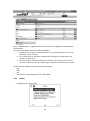
With remote control
The cursor indicates the current entry space.
Press the corresponding number button repeatedly.
0
0(delete entry)
1 1(space) @ ! ” # $ % & () * ’ + - { \ | }< >?........
2 2 A B C a b c
3 3 D E F d e f

15
4 4 G H I g h i
5 5 J K L j k l
6 6 M N O m n o
7 7 P Q R S p q r s
8 8 T U V t u v
9 9 W X Y Z w x y z
buttons:
‘ ’Go to previous entry space, entry can be overwritten
‘ ’Go to next entry space, the last entry is saved
‘ ’Select number/letter
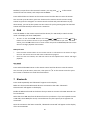
Input via front panel
Rotate the UP/DOWN navigation knob(3) to input numbers/letters.
Once you are on the letter you want, press to move to the next entry.
When you are finnished, press OK to confirm. You may press to move to a previous
character entry.
‘OK’ Confirm entire entry
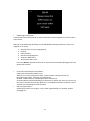
It may take a few seconds to establish the network connection.
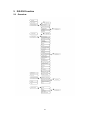
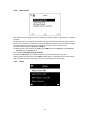
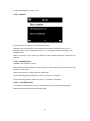
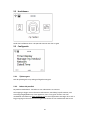
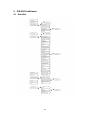
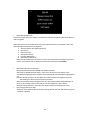
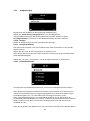
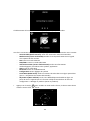
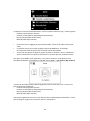
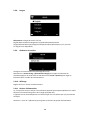
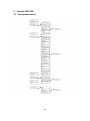
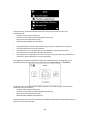
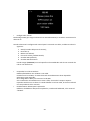
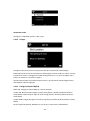
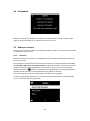
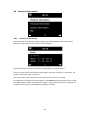
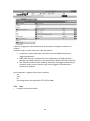
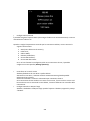
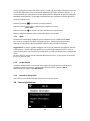
Once the connection is established, the main menu appears with the following menu items:
- Internet Radio: Access to worldwide radio stations
- Media Centre: Access to your UPnP devices via software with streaming capability.
- FM: Enter the FM radio mode
- DAB/DAB+: Enter the DAB radio mode

16
- Information Center: Access to weather, financial and system information, App
- AUX: Access to AUX mode
- Bluetooth: Enter the Bluetooth mode
- Configuration: Various system settings
- Local Radio: Access to radio stations in a particular region (e.g. only German
stations)
- My media U: Access to an online media library. This menu item only appears if the
function has already been enabled in the configuration menu -> Manage my
media U.
●
Press the button to enter the standby mode. The time, date and any active Alarm time
is shown on the screen.
●
If you configured a network connection, it will automatically connect to it when the DIR-250
is turned on again. If you need to change the network, go to the configuration - > network
menu to change the connection.
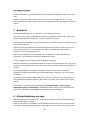
3 About Music Streaming
You can stream music to the DIR-250 with DLNA. DLNA is an industry-wide standard for sharing data
over a home network. Depending on the DLNA-compatible devices you own. With DLNA you are able to stream
mp3 music stored from your laptop/NAS or other DLNA compatible device to play on the DIR-250.
Lenco DIR-250 is the default device name on DLNA but you may rename it as you like. (See
section 5.3)
The information below is the introduction of how to setup up media steaming from PC or
other media server. Use the instruction manual of the software or hardware device you
want to use.
Make sure the music files are in on of the following formats: MP3, WMA, WAV or AAC.
Refer to section 5.7 for the details of the control on DIR-250 for music steaming playback.
3.1 UPnP
● To enjoy the streaming music form PC, the following steps are to be done on the PC:
- Connect the PC to the network.

17
- Ensure the DIR-250 is powered on and connected to the same network.
- Open the UPnP platform Windows Media Player (11 or later).
Alternatively, other platforms or server such as Windows Media Connection may be used.
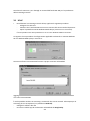
Below set up example is under windows XP and Windows Media player 11 version.
Allow to share your media to Lenco DIR-250
Add the audio files and folders you want to share with Lenco DIR-250 to the media library.
You may also enjoy the streaming music form other music server. Such as smart phone
(Android platform):
- Connect the mobile to the network
- Search and install media sharing apps from Google Play.
- Add the audio files form your mobile you want to share.
● After setup the shared server, choose the music and control playback on the DIR-250. (See
section 5.7)
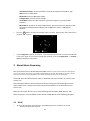
4 DLNA Function
● Besides UPnP, DIR-250 supports DLNA function, you share the music files from PC or Android
mobile, and you use your PC, Android mobile or iPhone/iPad to control music playback on

18
the DIR-250. (It is not required to control each playback on the DIR-250)
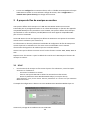
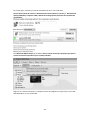
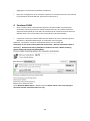
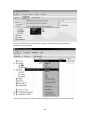
● The PC system requirement for DLNA is Windows 7 and Windows Media Player 12. Setup as
below:
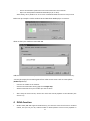
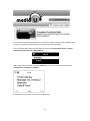
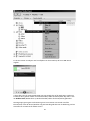
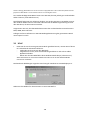
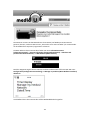
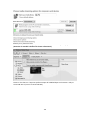
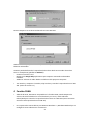
Firstly, share the media on your PC to DIR-250.
Control Panel > Network and Internet
〉
Network and sharing COK > Media streaming
options
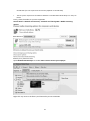
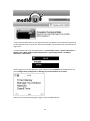
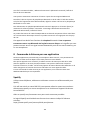
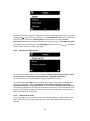
Open Windows Media Player to enable allow remote control of tried player.
Right click any music in the library and choose Play to Lenco DIR-250.

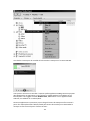
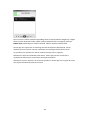
19
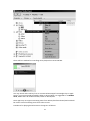
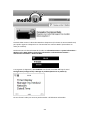
There will be a window for controlling music playback on Lenco DIR-250.
You may search and install any free or commercial DLNA apps from Google Play or Apple
Store if you are using Android mobile, tablet or iPhone/iPad. It is suggested to use Bubble
UPnP, Media Share on Android mobile, tablet or iPhone/iPad.
Some apps may not support streaming music form iPhone/iPod but iPhone/iPod could still
be used to control steaming music from other servers.
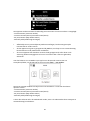
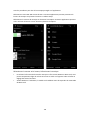
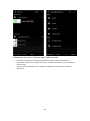
Procedures for playing shared music on the app are as follows:

20
Select Lenco DIR-250 as the player. Some apps may allow to play the music to multi players
at the same time.
Select music server and choose the music. Some app can create a playlist if you choose
several music.
Select server and player Select music
● When using DLNA music steaming function on Music Link, you can only control the volume
and standby via the unit. It is restricted to control the other functions.
● Stop DLNA on PC, mobile or tablet before you resume Music Link’s own control.
Seite wird geladen ...
Seite wird geladen ...
Seite wird geladen ...
Seite wird geladen ...
Seite wird geladen ...
Seite wird geladen ...
Seite wird geladen ...
Seite wird geladen ...
Seite wird geladen ...
Seite wird geladen ...
Seite wird geladen ...
Seite wird geladen ...
Seite wird geladen ...
Seite wird geladen ...
Seite wird geladen ...
Seite wird geladen ...
Seite wird geladen ...
Seite wird geladen ...
Seite wird geladen ...
Seite wird geladen ...
Seite wird geladen ...
Seite wird geladen ...
Seite wird geladen ...
Seite wird geladen ...
Seite wird geladen ...
Seite wird geladen ...
Seite wird geladen ...
Seite wird geladen ...
Seite wird geladen ...
Seite wird geladen ...
Seite wird geladen ...
Seite wird geladen ...
Seite wird geladen ...
Seite wird geladen ...
Seite wird geladen ...
Seite wird geladen ...
Seite wird geladen ...
Seite wird geladen ...
Seite wird geladen ...
Seite wird geladen ...
Seite wird geladen ...
Seite wird geladen ...
Seite wird geladen ...
Seite wird geladen ...
Seite wird geladen ...
Seite wird geladen ...
Seite wird geladen ...
Seite wird geladen ...
Seite wird geladen ...
Seite wird geladen ...
Seite wird geladen ...
Seite wird geladen ...
Seite wird geladen ...
Seite wird geladen ...
Seite wird geladen ...
Seite wird geladen ...
Seite wird geladen ...
Seite wird geladen ...
Seite wird geladen ...
Seite wird geladen ...
Seite wird geladen ...
Seite wird geladen ...
Seite wird geladen ...
Seite wird geladen ...
Seite wird geladen ...
Seite wird geladen ...
Seite wird geladen ...
Seite wird geladen ...
Seite wird geladen ...
Seite wird geladen ...
Seite wird geladen ...
Seite wird geladen ...
Seite wird geladen ...
Seite wird geladen ...
Seite wird geladen ...
Seite wird geladen ...
Seite wird geladen ...
Seite wird geladen ...
Seite wird geladen ...
Seite wird geladen ...
Seite wird geladen ...
Seite wird geladen ...
Seite wird geladen ...
Seite wird geladen ...
Seite wird geladen ...
Seite wird geladen ...
Seite wird geladen ...
Seite wird geladen ...
Seite wird geladen ...
Seite wird geladen ...
Seite wird geladen ...
Seite wird geladen ...
Seite wird geladen ...
Seite wird geladen ...
Seite wird geladen ...
Seite wird geladen ...
Seite wird geladen ...
Seite wird geladen ...
Seite wird geladen ...
Seite wird geladen ...
Seite wird geladen ...
Seite wird geladen ...
Seite wird geladen ...
Seite wird geladen ...
Seite wird geladen ...
Seite wird geladen ...
Seite wird geladen ...
Seite wird geladen ...
Seite wird geladen ...
Seite wird geladen ...
Seite wird geladen ...
Seite wird geladen ...
Seite wird geladen ...
Seite wird geladen ...
Seite wird geladen ...
Seite wird geladen ...
Seite wird geladen ...
Seite wird geladen ...
Seite wird geladen ...
Seite wird geladen ...
Seite wird geladen ...
Seite wird geladen ...
Seite wird geladen ...
Seite wird geladen ...
Seite wird geladen ...
Seite wird geladen ...
Seite wird geladen ...
Seite wird geladen ...
Seite wird geladen ...
Seite wird geladen ...
Seite wird geladen ...
Seite wird geladen ...
Seite wird geladen ...
Seite wird geladen ...
Seite wird geladen ...
Seite wird geladen ...
Seite wird geladen ...
Seite wird geladen ...
Seite wird geladen ...
Seite wird geladen ...
Seite wird geladen ...
Seite wird geladen ...
Seite wird geladen ...
Seite wird geladen ...
Seite wird geladen ...
Seite wird geladen ...
Seite wird geladen ...
Seite wird geladen ...
Seite wird geladen ...
Seite wird geladen ...
Seite wird geladen ...
Seite wird geladen ...
Seite wird geladen ...
Seite wird geladen ...
Seite wird geladen ...
Seite wird geladen ...
Seite wird geladen ...
Seite wird geladen ...
Seite wird geladen ...
Seite wird geladen ...
Seite wird geladen ...
Seite wird geladen ...
Seite wird geladen ...
Seite wird geladen ...
Seite wird geladen ...
Seite wird geladen ...
Seite wird geladen ...
Seite wird geladen ...
Seite wird geladen ...
Seite wird geladen ...
Seite wird geladen ...
Seite wird geladen ...
Seite wird geladen ...
Seite wird geladen ...
Seite wird geladen ...
Seite wird geladen ...
Seite wird geladen ...
Seite wird geladen ...
Seite wird geladen ...
Seite wird geladen ...
Seite wird geladen ...
Seite wird geladen ...
Seite wird geladen ...
Seite wird geladen ...
Seite wird geladen ...
Seite wird geladen ...
Seite wird geladen ...
Seite wird geladen ...
Seite wird geladen ...
Seite wird geladen ...
Seite wird geladen ...
Seite wird geladen ...
Seite wird geladen ...
Seite wird geladen ...
Seite wird geladen ...
Seite wird geladen ...
Seite wird geladen ...
Seite wird geladen ...
Seite wird geladen ...
Seite wird geladen ...
Seite wird geladen ...
Seite wird geladen ...
Seite wird geladen ...
Seite wird geladen ...
Seite wird geladen ...
Seite wird geladen ...
Seite wird geladen ...
Seite wird geladen ...
Seite wird geladen ...
Seite wird geladen ...
Seite wird geladen ...
Seite wird geladen ...
Seite wird geladen ...
Seite wird geladen ...
Seite wird geladen ...
Seite wird geladen ...
Seite wird geladen ...
Seite wird geladen ...
Seite wird geladen ...
Seite wird geladen ...
Seite wird geladen ...
Seite wird geladen ...
Seite wird geladen ...
Seite wird geladen ...
Seite wird geladen ...
Seite wird geladen ...
Seite wird geladen ...
Seite wird geladen ...
Seite wird geladen ...
Seite wird geladen ...
Seite wird geladen ...
Seite wird geladen ...
Seite wird geladen ...
Seite wird geladen ...
Seite wird geladen ...
Seite wird geladen ...
Seite wird geladen ...
Seite wird geladen ...
Seite wird geladen ...
Seite wird geladen ...
Seite wird geladen ...
Seite wird geladen ...
Seite wird geladen ...
Seite wird geladen ...
Seite wird geladen ...
Seite wird geladen ...
Seite wird geladen ...
Seite wird geladen ...
Seite wird geladen ...
Seite wird geladen ...
Seite wird geladen ...
Seite wird geladen ...
Seite wird geladen ...
Seite wird geladen ...
Seite wird geladen ...
Seite wird geladen ...
-
 1
1
-
 2
2
-
 3
3
-
 4
4
-
 5
5
-
 6
6
-
 7
7
-
 8
8
-
 9
9
-
 10
10
-
 11
11
-
 12
12
-
 13
13
-
 14
14
-
 15
15
-
 16
16
-
 17
17
-
 18
18
-
 19
19
-
 20
20
-
 21
21
-
 22
22
-
 23
23
-
 24
24
-
 25
25
-
 26
26
-
 27
27
-
 28
28
-
 29
29
-
 30
30
-
 31
31
-
 32
32
-
 33
33
-
 34
34
-
 35
35
-
 36
36
-
 37
37
-
 38
38
-
 39
39
-
 40
40
-
 41
41
-
 42
42
-
 43
43
-
 44
44
-
 45
45
-
 46
46
-
 47
47
-
 48
48
-
 49
49
-
 50
50
-
 51
51
-
 52
52
-
 53
53
-
 54
54
-
 55
55
-
 56
56
-
 57
57
-
 58
58
-
 59
59
-
 60
60
-
 61
61
-
 62
62
-
 63
63
-
 64
64
-
 65
65
-
 66
66
-
 67
67
-
 68
68
-
 69
69
-
 70
70
-
 71
71
-
 72
72
-
 73
73
-
 74
74
-
 75
75
-
 76
76
-
 77
77
-
 78
78
-
 79
79
-
 80
80
-
 81
81
-
 82
82
-
 83
83
-
 84
84
-
 85
85
-
 86
86
-
 87
87
-
 88
88
-
 89
89
-
 90
90
-
 91
91
-
 92
92
-
 93
93
-
 94
94
-
 95
95
-
 96
96
-
 97
97
-
 98
98
-
 99
99
-
 100
100
-
 101
101
-
 102
102
-
 103
103
-
 104
104
-
 105
105
-
 106
106
-
 107
107
-
 108
108
-
 109
109
-
 110
110
-
 111
111
-
 112
112
-
 113
113
-
 114
114
-
 115
115
-
 116
116
-
 117
117
-
 118
118
-
 119
119
-
 120
120
-
 121
121
-
 122
122
-
 123
123
-
 124
124
-
 125
125
-
 126
126
-
 127
127
-
 128
128
-
 129
129
-
 130
130
-
 131
131
-
 132
132
-
 133
133
-
 134
134
-
 135
135
-
 136
136
-
 137
137
-
 138
138
-
 139
139
-
 140
140
-
 141
141
-
 142
142
-
 143
143
-
 144
144
-
 145
145
-
 146
146
-
 147
147
-
 148
148
-
 149
149
-
 150
150
-
 151
151
-
 152
152
-
 153
153
-
 154
154
-
 155
155
-
 156
156
-
 157
157
-
 158
158
-
 159
159
-
 160
160
-
 161
161
-
 162
162
-
 163
163
-
 164
164
-
 165
165
-
 166
166
-
 167
167
-
 168
168
-
 169
169
-
 170
170
-
 171
171
-
 172
172
-
 173
173
-
 174
174
-
 175
175
-
 176
176
-
 177
177
-
 178
178
-
 179
179
-
 180
180
-
 181
181
-
 182
182
-
 183
183
-
 184
184
-
 185
185
-
 186
186
-
 187
187
-
 188
188
-
 189
189
-
 190
190
-
 191
191
-
 192
192
-
 193
193
-
 194
194
-
 195
195
-
 196
196
-
 197
197
-
 198
198
-
 199
199
-
 200
200
-
 201
201
-
 202
202
-
 203
203
-
 204
204
-
 205
205
-
 206
206
-
 207
207
-
 208
208
-
 209
209
-
 210
210
-
 211
211
-
 212
212
-
 213
213
-
 214
214
-
 215
215
-
 216
216
-
 217
217
-
 218
218
-
 219
219
-
 220
220
-
 221
221
-
 222
222
-
 223
223
-
 224
224
-
 225
225
-
 226
226
-
 227
227
-
 228
228
-
 229
229
-
 230
230
-
 231
231
-
 232
232
-
 233
233
-
 234
234
-
 235
235
-
 236
236
-
 237
237
-
 238
238
-
 239
239
-
 240
240
-
 241
241
-
 242
242
-
 243
243
-
 244
244
-
 245
245
-
 246
246
-
 247
247
-
 248
248
-
 249
249
-
 250
250
-
 251
251
-
 252
252
-
 253
253
-
 254
254
-
 255
255
-
 256
256
-
 257
257
-
 258
258
-
 259
259
-
 260
260
-
 261
261
-
 262
262
-
 263
263
-
 264
264
-
 265
265
-
 266
266
-
 267
267
-
 268
268
-
 269
269
-
 270
270
-
 271
271
-
 272
272
-
 273
273
-
 274
274
-
 275
275
-
 276
276


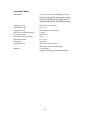
Lenco DIR-250BK Bedienungsanleitung
- Kategorie
- Radios
- Typ
- Bedienungsanleitung
in anderen Sprachen
- English: Lenco DIR-250BK Owner's manual
- français: Lenco DIR-250BK Le manuel du propriétaire
- español: Lenco DIR-250BK El manual del propietario
- italiano: Lenco DIR-250BK Manuale del proprietario
- Nederlands: Lenco DIR-250BK de handleiding
Verwandte Artikel
-
Lenco DIR-150 Benutzerhandbuch
-
Lenco MC-020 Micro System Benutzerhandbuch
-
-
-
-
-
-
-
-
Andere Dokumente
-
Sharp DR-I470(BK) Bedienungsanleitung
-
Sharp DR-I470 Pro Benutzerhandbuch
-
-
Auna 53029864 Benutzerhandbuch
-
audizio Livorno Internet Radio Adapter Bedienungsanleitung
-
One Concept 10034058 Benutzerhandbuch
-
PNI RD290 Benutzerhandbuch
-
audizio Rimini Stereo WiFi Internet Radio Wood Bedienungsanleitung
-
Denver IR-120 Benutzerhandbuch
-
Perfectpro AB1 Getting Started