Seite wird geladen ...

DOC026.98.80463
QbD1200 AutoSampler
03/2018, Edition 5
User Manual
Bedienungsanleitung
Manuale utente
Manuel de l’utilisateur
Manual del usuario
Návod k použití
Gebruikershandleiding
Instrukcja obsługi
Felhasználói kézikönyv
Manual de utilizare
Návod na použitie
Navodila za uporabo
Korisnički priručnik
Ръководство за потребителя

English..............................................................................................................................3
Deutsch.......................................................................................................................... 18
Italiano............................................................................................................................ 33
Français......................................................................................................................... 48
Español.......................................................................................................................... 63
Čeština........................................................................................................................... 78
Nederlands....................................................................................................................93
Polski............................................................................................................................ 108
Magyar......................................................................................................................... 123
Română....................................................................................................................... 138
Slovenský jazyk......................................................................................................... 153
Slovenski..................................................................................................................... 168
Hrvatski........................................................................................................................ 183
български................................................................................................................... 198
2

Table of contents
Specifications on page 3 Operation on page 13
General information on page 3 Maintenance on page 14
Installation on page 8 Troubleshooting on page 16
Startup on page 13 Replacement parts and accessories on page 16
Specifications
Specifications are subject to change without notice.
Specification Details
Dimensions (W x D x H) 36.6 x 53.7 x 45.7 cm (14.4 x 21.2 x 18.0 in.)
Enclosure Aluminum alloy, chromated with an epoxy powder layer
Sample (wetted) components Polyetherimide (PEI) and Polytetrafluoroethylene (PTFE)
Weight 21 kg (45 lb)
Installation category Power supply: II
Auto sampler: I
Pollution degree II
External power supply Input: 100–240 VAC, 47–63 Hz, 1.9 A
Output: 24 VDC, 3.33 A
Auto sampler power supply Input: 24 VDC, 3.33 A. Use only with the supplied power supply.
Operating temperature 10 to 30 ºC (50 to 85 ºF)
Storage temperature 0 to 55 ºC (32 to 131 ºF)
Altitude 3048 m (10,000 ft) maximum
Relative humidity 0 to 95% non-condensing
Certifications CE mark
Warranty 1 year (EU: 2 years)
General information
In no event will the manufacturer be liable for direct, indirect, special, incidental or consequential
damages resulting from any defect or omission in this manual. The manufacturer reserves the right to
make changes in this manual and the products it describes at any time, without notice or obligation.
Revised editions are found on the manufacturer’s website.
Safety information
N O T I C E
The manufacturer is not responsible for any damages due to misapplication or misuse of this product including,
without limitation, direct, incidental and consequential damages, and disclaims such damages to the full extent
permitted under applicable law. The user is solely responsible to identify critical application risks and install
appropriate mechanisms to protect processes during a possible equipment malfunction.
Please read this entire manual before unpacking, setting up or operating this equipment. Pay
attention to all danger and caution statements. Failure to do so could result in serious injury to the
operator or damage to the equipment.
English
3

Make sure that the protection provided by this equipment is not impaired. Do not use or install this
equipment in any manner other than that specified in this manual.
Use of hazard information
D A N G E R
Indicates a potentially or imminently hazardous situation which, if not avoided, will result in death or serious injury.
W A R N I N G
Indicates a potentially or imminently hazardous situation which, if not avoided, could result in death or serious
injury.
C A U T I O N
Indicates a potentially hazardous situation that may result in minor or moderate injury.
N O T I C E
Indicates a situation which, if not avoided, may cause damage to the instrument. Information that requires special
emphasis.
Precautionary labels
Read all labels and tags attached to the instrument. Personal injury or damage to the instrument
could occur if not observed.
This symbol, if noted on the instrument, references the instruction manual for operation and/or safety
information.
Electrical equipment marked with this symbol may not be disposed of in European domestic or public
disposal systems. Return old or end-of-life equipment to the manufacturer for disposal at no charge to
the user.
This symbol indicates that a risk of electrical shock and/or electrocution exists.
This symbol indicates a hazard that may crush a hand from above.
This symbol indicates a puncture or pinch hazard. Keep hands and fingers away.
This symbol indicates that the object is heavy.
Certification
Canadian Radio Interference-Causing Equipment Regulation, IECS-003, Class A:
Supporting test records reside with the manufacturer.
This Class A digital apparatus meets all requirements of the Canadian Interference-Causing
Equipment Regulations.
Cet appareil numérique de classe A répond à toutes les exigences de la réglementation canadienne
sur les équipements provoquant des interférences.
FCC Part 15, Class "A" Limits
4
English

Supporting test records reside with the manufacturer. The device complies with Part 15 of the FCC
Rules. Operation is subject to the following conditions:
1. The equipment may not cause harmful interference.
2. The equipment must accept any interference received, including interference that may cause
undesired operation.
Changes or modifications to this equipment not expressly approved by the party responsible for
compliance could void the user's authority to operate the equipment. This equipment has been tested
and found to comply with the limits for a Class A digital device, pursuant to Part 15 of the FCC rules.
These limits are designed to provide reasonable protection against harmful interference when the
equipment is operated in a commercial environment. This equipment generates, uses and can
radiate radio frequency energy and, if not installed and used in accordance with the instruction
manual, may cause harmful interference to radio communications. Operation of this equipment in a
residential area is likely to cause harmful interference, in which case the user will be required to
correct the interference at their expense. The following techniques can be used to reduce
interference problems:
1. Disconnect the equipment from its power source to verify that it is or is not the source of the
interference.
2. If the equipment is connected to the same outlet as the device experiencing interference, connect
the equipment to a different outlet.
3. Move the equipment away from the device receiving the interference.
4. Reposition the receiving antenna for the device receiving the interference.
5. Try combinations of the above.
Product overview
The QbD1200 AutoSampler is an automatic sample changer used in analytical laboratories for TOC
analysis of aqueous samples. This instrument has a sample tray that holds a maximum of 64 sample
vials, one calibration bottle and three system suitability bottles. The instrument operates with minimal
user-intervention and is used with the QbD1200 TOC Analyzer. Refer to Figure 1 and Figure 2 for the
overview of the instrument.
Note: The manufacturer of the instrument is Teledyne CETAC Technologies. Support services and repairs are
supplied by Hach Company.
English
5

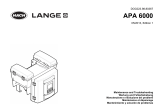
Figure 1 Product overview
1 Arm 8 Sample probe
2 Rinse station 9 Power indicator light
3 Stripper plate 10 Calibration standard holder
4 Mechanical Z-drive 11 System suitability holders
5 Sample tube (from the analyzer) 12 Sample positions (1 to 64)
6 Tube holders 13 Sample tray
7 Needle sleeve 14 Rinse station drain tube
6 English

Figure 2 Rear panel overview
1 Power switch 5 Mechanical Z-drive cable connection
2 COM port 2
1
6 COM port 1
1
3 Ethernet port
1
7 USB port
4 Mechanical Z-drive cable 8 Power connector
Product components
Make sure that all components have been received. Refer to Figure 3. If any items are missing or
damaged, contact the manufacturer or a sales representative immediately.
1
These functions are not used.
English 7

Figure 3 Product components
1 Auto sampler with sample tray 8 USB cable, 3 m
2 Mechanical Z-drive 9 Power supply
3 Vent holder 10 Drain tubing for the rinse station
4 Mechanical Z-drive installation screws (8x) 11 Needle sleeve
5 Stripper plate assembly 12 Sample probe
6 Nut extender tool 13 Power cords (240 V, 230 V, 115 V)
7 Rinse station 14 Tube holders (2x)
Installation
W A R N I N G
Multiple hazards. Only qualified personnel must conduct the tasks described in this section of the
document.
8 English

Installation guidelines
Install the instrument:
• On a level surface
• In a clean, dry, well ventilated, temperature controlled location
• In a location with minimum vibrations that has no direct exposure to sunlight
• In a location where there is sufficient clearance around it to make connections and to do
maintenance tasks
• In a location where the power switch and power cord are visible and easily accessible
Mechanical installation
Install the mechanical Z-drive
W A R N I N G
Personal injury hazard. Instruments or components are heavy. Use assistance to install or move.
W A R N I N G
Pinch hazard. Parts that move can pinch and cause injury. Do not touch moving parts.
Refer to the illustrated steps that follow to install the supplied mechanical Z-drive.
Item to collect: Phillips-head screwdriver
English 9

Install the sleeve and the sample probe
W A R N I N G
Puncture injury hazard. Exposed needles can cause puncture wounds. Use caution when bottles are
installed or removed.
Refer to the illustrated steps that follow to install the needle sleeve and the sample probe.
10
English

Plumbing
Plumb to the analyzer
Refer to the illustrated steps that follow to connect the sample tube from the analyzer to the
mechanical Z-drive on the auto sampler.
English
11

Install the rinse station
After each sample is analyzed, the reagent is flushed through the sample tube to remove the
remaining carbon. The flushed (used) reagent goes to the waste container. If an analyzer is
connected to the instrument, the analyzer controls when the rinse station operates. Refer to the
illustrated steps that follow to install the rinse station and the drain tubing. Make sure to use a
permitted waste container.
12
English

Electrical installation
Connect the analyzer and the power
Before the procedure starts, make sure that the auto sampler and the analyzer power switches are
set to off. Use the supplied USB cable to connect the auto sampler to the analyzer. Use the supplied
power cord and power supply to connect power to the auto sampler. The power for the auto sampler
must be set to on before the analyzer power is set to on. Refer to the analyzer documentation to
connect to power. Refer to the illustrated steps that follow to make the necessary connections.
Startup
Set the power to on
1. Make sure that the power connection is correctly installed. Refer to Connect the analyzer and the
power on page 13.
2. Push the power button on the rear panel of the instrument to set the power to on.
An LED indicator light shows on the front of the instrument when the power is set to on.
3. The arm and the mechanical Z-drive moves, then stops in the correct position.
4. Set the analyzer power to on.
Operation
D A N G E R
Fire hazard. This product is not designed for use with flammable liquids.
Prepare the instrument for sampling
Refer to the illustrated steps that follow to prepare the instrument for sampling. After sample
collection, put the user-supplied vials in the correct order from one to 64 in the sample tray. Each
sample position is numerically identified on the lower left side.
English
13

There must be sufficient space between the vials in the sample tray and the platform of the stripper
plate. Refer to the illustrated steps that follow (steps 4 and 5) to make adjustments to the stripper
plate, if necessary.
Carefully install or remove the sample tray to prevent spills.
Do a measurement
Make sure that the vials are correctly installed in the sample tray. Refer to Prepare the instrument for
sampling on page 13. The analyzer controls the measurement parameters. Refer to the analyzer
documentation.
Note: Make sure that all of the necessary plumbing connections are made before this procedure starts. The
analyzer controls the backflush operations to flush the sample flow path.
Maintenance
W A R N I N G
Personal injury hazard. Instruments or components are heavy. Use assistance to install or move.
C A U T I O N
Multiple hazards. Only qualified personnel must conduct the tasks described in this section of the
document.
Note: The manufacturer of the instrument is Teledyne CETAC Technologies. Support services and repairs are
supplied by Hach Company.
Shut-down procedure
Always shut down the instrument before maintenance tasks are done.
14
English

1. Set the instrument power to off.
2. Remove the power cord from the power supply.
Do a leak inspection
Inspect for leaks from the sample probe, the sample tube or the rinse station and the rinse station
tubing.
1. Shut down the auto sampler. Refer to the Shut-down procedure on page 14.
2. Examine the sample probe, the sample tube or the rinse station and the rinse station tubing for
damage and evidence of leaks.
3. Replace all of the components that show evidence of leaks or damage.
Clean the instrument
C A U T I O N
Chemical exposure hazard. Obey laboratory safety procedures and wear all of the personal protective
equipment appropriate to the chemicals that are handled. Refer to the current safety data sheets
(MSDS/SDS) for safety protocols.
N O T I C E
Clean the instrument with water. Fumes from cleaning agents can have an effect on the results. Do not let
cleaning agents come into contact with the lead screws. Do not put lubricant on the lead screws.
Spills can occur during use of the instrument. For the best operation, remove spills daily. Clean the
instrument as necessary to prevent instrument damage. Remove contaminants and abrasive material
from moving parts. Remove chemical spills according to MSDS/SDS instructions.
Items to collect:
• Dry, lint-free cloth
• Soft cloth towel
• Clean water
1. Remove the instrument from service. Refer to the Shut-down procedure on page 14.
2. Remove the sample tray.
3. Use the dry, lint-free cloth to remove loose particles from the lead screws.
4. Use the cloth towel to clean the outer surface and base of the instrument.
5. Use clean water to clean the sample tray. Remove all stains and spills.
Note: Make sure to clean the slider block and guide rails along the tube of the arm.
6. Use a dry towel to remove all moisture from the instrument.
Before the power is set to on, let the instrument fully dry.
7. Put the dry sampler tray on the base.
Replace the sample probe
If the probe has leaks or shows signs of damage, replace the probe.
1. Remove the instrument from service. Refer to the Shut-down procedure on page 14.
2. Remove the worn sample probe.
Note: Too much force can damage the mechanical Z-drive.
3. Install the new probe. Refer to Install the mechanical Z-drive on page 9.
English
15

Troubleshooting
Problem Possible cause Solution
The instrument does not
operate. The LED status
indicators are off.
The power switch is off. Set the power switch to on.
The power cord is disconnected
from the power supply or wall
outlet.
Connect the power cord.
The power cord is damaged. Replace the power cord.
The power supply is faulty. Contact technical support.
The electrical transients on the
power line are too large, which
may disrupt the USB
communication between the
analyzer and the sampler.
Install any commercially available USB
opto-isolator between the analyzer and the
auto sampler. To repair USB
communications, set the power for both
instruments to off, then to on.
The instrument does not
operate. The LED status
indicators are on.
The home position of the arm
has damage.
Contact technical support.
The sample probe is not moving
freely.
Remove the probe to clean and remove
debris. Refer to Replace the sample probe
on page 15.
Replace the sample probe. Refer to
Replace the sample probe on page 15.
The mechanical Z-drive has
damage.
Contact technical support.
The mechanical Z-drive is not
installed correctly.
Validate the installation. Refer to Install the
mechanical Z-drive on page 9.
The arm does not operate
correctly.
The instrument was physically
damaged.
Set the instrument power to off, then to on.
If the problem continues, contact technical
support.
The sample probe does not pull
up the sample.
The air flow into vial does not
correctly flow. The sample
tubing is loose.
Examine the sample probe. Make sure that
the needle is inside the metal sleeve.
Tighten the sample tubing connection.
The sample probe does not go
through the septum cap of the
vial.
The stripper plate is not aligned
correctly.
Adjust the height between the vials in the
sample tray and the platform of the stripper
plate. Refer to Prepare the instrument for
sampling on page 13.
The probe does not easily go
into the mechanical Z-drive.
The sample bottle is lifted up
after the probe retracts.
Replacement parts and accessories
W A R N I N G
Personal injury hazard. Use of non-approved parts may cause personal injury, damage to the
instrument or equipment malfunction. The replacement parts in this section are approved by the
manufacturer.
Note: Product and Article numbers may vary for some selling regions. Contact the appropriate distributor or refer to
the company website for contact information.
16
English

Replacement parts
Description Item no.
Needle sleeve 9467400
Nut extender tool 9454400
Probe, septum piercing SP6790
Power supply 9467300
Sample tray 9467200
English 17

Inhaltsverzeichnis
Technische Daten auf Seite 18 Betrieb auf Seite 28
Allgemeine Informationen auf Seite 18 Wartung auf Seite 29
Installation auf Seite 23 Fehlerbehebung auf Seite 31
Inbetriebnahme auf Seite 28 Ersatzteile und Zubehör auf Seite 32
Technische Daten
Änderungen vorbehalten.
Technische Daten Details
Abmessungen (B x T x H) 36,6 x 53,7 x 45,7 cm (14,4 x 21,2 x 18,0 Zoll)
Gehäuse Aluminiumlegierung, Epoxidharz beschichtet
Medienberührte Komponenten. Polyetherimid (PEI) und Polytetrafluoroethylen (PTFE)
Gewicht 21 kg (45 lb)
Einbaukategorie Netzteil: II
Autosampler: I
Verschmutzungsgrad II
Externes Netzteil Eingang: 100–240 V AC, 47–63 Hz, 1,9 A
Ausgang: 24 V DC, 3,33 A
Netzteil des Autosamplers Eingang: 24 V DC, 3,33 A. Nur zum Anschluss an das mitgelieferte Netzteil.
Betriebstemperatur 10 bis 30 ºC (50 bis 85 ºF)
Lagertemperatur 0 bis 55 ºC (32 bis 131 ºF)
Einsatzhöhe Maximal 3048 m (10,000 Fuß)
Relative Luftfeuchtigkeit 0 bis 95% nicht kondensierend
Zertifizierungen CE-Zeichen
Gewährleistung 1 Jahr (EU: 2 Jahre)
Allgemeine Informationen
Der Hersteller ist nicht verantwortlich für direkte, indirekte, versehentliche oder Folgeschäden, die
aus Fehlern oder Unterlassungen in diesem Handbuch entstanden. Der Hersteller behält sich
jederzeit und ohne vorherige Ankündigung oder Verpflichtung das Recht auf Verbesserungen an
diesem Handbuch und den hierin beschriebenen Produkten vor. Überarbeitete Ausgaben der
Bedienungsanleitung sind auf der Hersteller-Webseite erhältlich.
Sicherheitshinweise
H I N W E I S
Der Hersteller ist nicht für Schäden verantwortlich, die durch Fehlanwendung oder Missbrauch dieses Produkts
entstehen, einschließlich, aber ohne Beschränkung auf direkte, zufällige oder Folgeschäden, und lehnt jegliche
Haftung im gesetzlich zulässigen Umfang ab. Der Benutzer ist selbst dafür verantwortlich, schwerwiegende
Anwendungsrisiken zu erkennen und erforderliche Maßnahmen durchzuführen, um die Prozesse im Fall von
möglichen Gerätefehlern zu schützen.
18 Deutsch

Bitte lesen Sie dieses Handbuch komplett durch, bevor Sie dieses Gerät auspacken, aufstellen oder
bedienen. Beachten Sie alle Gefahren- und Warnhinweise. Nichtbeachtung kann zu schweren
Verletzungen des Bedieners oder Schäden am Gerät führen.
Stellen Sie sicher, dass die durch dieses Messgerät bereitgestellte Sicherheit nicht beeinträchtigt
wird. Verwenden bzw. installieren Sie das Messsystem nur wie in diesem Handbuch beschrieben.
Bedeutung von Gefahrenhinweisen
G E F A H R
Kennzeichnet eine mögliche oder drohende Gefahrensituation, die, wenn sie nicht vermieden wird, zum Tod oder
zu schweren Verletzungen führt.
W A R N U N G
Kennzeichnet eine mögliche oder drohende Gefahrensituation, die, wenn sie nicht vermieden wird, zum Tod oder
zu schweren Verletzungen führen kann.
V O R S I C H T
Kennzeichnet eine mögliche Gefahrensituation, die zu geringeren oder moderaten Verletzungen führen kann.
H I N W E I S
Kennzeichnet eine Situation, die, wenn sie nicht vermieden wird, das Gerät beschädigen kann. Informationen, die
besonders beachtet werden müssen.
Warnhinweise
Lesen Sie alle am Gerät angebrachten Aufkleber und Hinweise. Nichtbeachtung kann Verletzungen
oder Beschädigungen des Geräts zur Folge haben.
Dieses Symbol am Gerät weist auf Betriebs- und/oder Sicherheitsinformationen im Handbuch hin.
Elektrogeräte, die mit diesem Symbol gekennzeichnet sind, dürfen nicht im normalen öffentlichen
Abfallsystem entsorgt werden. Senden Sie Altgeräte an den Hersteller zurück. Dieser entsorgt die
Geräte ohne Kosten für den Benutzer.
Dieses Symbol weist auf die Gefahr eines elektrischen Schlages hin, der tödlich sein kann.
Dieses Symbol weist darauf hin, dass die Hand von oben gequetscht werden kann.
Dieses Symbol weist auf eine mögliche Stich- oder Klemmgefahr hin. Halten Sie Hände und Finger
fern.
Dieses Symbol weist auf einen schweren Gegenstand hin.
Zertifizierung
Kanadische Vorschriften zu Störungen verursachenden Einrichtungen, IECS-003, Klasse A:
Entsprechende Prüfprotokolle hält der Hersteller bereit.
Deutsch
19

Dieses digitale Gerät der Klasse A erfüllt alle Vorgaben der kanadischen Normen für Interferenz
verursachende Geräte.
Cet appareil numérique de classe A répond à toutes les exigences de la réglementation canadienne
sur les équipements provoquant des interférences.
FCC Teil 15, Beschränkungen der Klasse "A"
Entsprechende Prüfprotokolle hält der Hersteller bereit. Das Gerät entspricht Teil 15 der FCC-
Vorschriften. Der Betrieb unterliegt den folgenden Bedingungen:
1. Das Gerät darf keine Störungen verursachen.
2. Das Gerät muss jegliche Störung, die es erhält, einschließlich jener Störungen, die zu
unerwünschtem Betrieb führen, annehmen.
Änderungen oder Modifizierungen an diesem Gerät, die nicht ausdrücklich durch die für die
Einhaltung der Standards verantwortliche Stelle bestätigt wurden, können zur Aufhebung der
Nutzungsberechtigung für dieses Gerät führen. Dieses Gerät wurde geprüft, und es wurde
festgestellt, dass es die Grenzwerte für digitale Geräte der Klasse A entsprechend Teil 15 der FCC-
Vorschriften einhält. Diese Grenzwerte sollen einen angemessenen Schutz gegen
gesundheitsschädliche Störungen gewährleisten, wenn dieses Gerät in einer gewerblichen
Umgebung betrieben wird. Dieses Gerät erzeugt und nutzt hochfrequente Energie und kann diese
auch abstrahlen, und es kann, wenn es nicht in Übereinstimmung mit der Bedienungsanleitung
installiert und eingesetzt wird, schädliche Störungen der Funkkommunikation verursachen. Der
Betrieb dieses Geräts in Wohngebieten kann schädliche Störungen verursachen. In diesem Fall
muss der Benutzer die Störungen auf eigene Kosten beseitigen. Probleme mit Interferenzen lassen
sich durch folgende Methoden mindern:
1. Trennen Sie das Gerät von der Stromversorgung, um sicherzugehen, dass dieser die Störungen
nicht selbst verursacht.
2. Wenn das Gerät an die gleiche Steckdose angeschlossen ist wie das gestörte Gerät, schließen
Sie das störende Gerät an eine andere Steckdose an.
3. Vergrößern Sie den Abstand zwischen diesem Gerät und dem gestörten Gerät.
4. Ändern Sie die Position der Empfangsantenne des gestörten Geräts.
5. Versuchen Sie auch, die beschriebenen Maßnahmen miteinander zu kombinieren.
Produktübersicht
Der Autosampler QbD1200 ist ein automatischer Probenwechsler, der in analytischen Laboren zur
TOC-Analyse wässriger Proben verwendet wird. Das Gerät verfügt über ein Gestell mit Kapazität für
maximal 64 Küvetten, eine Kalibrierflasche und drei Flaschen für Systemeignungstests. Das Gerät
arbeitet weitgehend ohne Benutzereingriffe und wird zusammen mit dem TOC-Analysegerät
QbD1200 verwendet. Eine Übersicht über das Gerät finden Sie unter Abbildung 1 und Abbildung 2.
Hinweis: Der Hersteller des Geräts is Teledyne CETAC Technologies. Support-Dienstleistungen und Reparaturen
werden durch Hach Company bereitgestellt.
20
Deutsch
1/214