Seite wird geladen ...

1150 x 1150 Template
Page 1 of 1
100250 Motif
installation Manual
1150 x 1150 EMEA
1150 x 1150 Template
Page 1 of 1
100250 Motif
installation Manual
1150 x 1150 EMEA
1150 x 1150 Template
Page 1 of 1
100250 Motif
installation Manual
1150 x 1150 EMEA 1150mm
1150mm
1150mm
1150mm
C1
C2
C2
C2
A1
B1 B3B2
B1
B2
A1
A
A
A
A
A
B
A
D1 D4
D2 D3
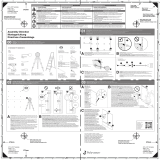
Set up laser level. Project a laser plane parallel to the wall surface and as close to the
wall as possible (A1). Using a tape measure or similar measuring tool, determine which
dual lock hook location protrudes from the wall surface the most. Make a mark on the
wall to indicate which location protrudes the most.
Note: it is important to make sure the laser plane is as parallel to the wall as possible!
Level the dual lock hooks. A wall spacer must be behind each dual lock location, and only one wall spacer is provided
per dual lock location. Measure the oset from each dual lock hook location to the laser level plane (B1). If the oset is
larger than the dual lock hook location marked in the previousstep, loosen the screw (B2) and insert the appropriate
number of provided shim spacers to match the oset of the most protruding location (B3).
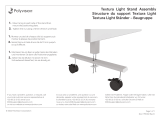
Install remaining panels. Using the magnetic
spacer tool provided to maintain the proper gap
between adjacent panels, install the remaining
panelsin the layout required (C1). One spacer
tool in each corner is recommended (C2).
Be sure to lightly strike each dual lock hook
location before moving on to the next panel.
Add marks. Add
referencesto the
CeramicSteel panel
and the wall
to align the center of
the dual lock hook
and the panel (A1)
Position an level the panel. When the rstpanel is level (B1) and in the proper
position, a lightstrike with the side of a hand will pop the panel in place (B2).
Thislightstrike should be repeated at each dual lock hook location.
WARNING: Panels are heavy and if dropped can cause seriousinjury. Follow
safety instructions at the top of template. Use at least two people to lift and
install panels. One person must hold the panel and level while a second person
seats each dual lock hook location as marked on each panel.
Drill inside each cross
Drill inside each cross
Panel edge
Gap between panels
Panel corner
Drill inside each cross
Drill inside each cross
Drill inside each cross
Cleaning + Care
Instructions
Reinigungs- und
Pegehinweise
Instructions de
nettoyage et
d’entretien
+
Level
Pencil
Wall Safe Tape
Awl
Drill + Masonry Bit #2 Philips Bit 3 Plane Leveling Alignment Laser
Ladder
Dual Lock Hook Shim Spacer
Magnet Spacer only
applicable for
CeramicSteel panels.
Drywall Anchor
#8-15 x 3" Flat Head
Tapping Screw
Wall Spacer
Motif=20mm, Motif soft=12mm
Assembly Direction 01
A B
Position drilling templates. Tape the paper drilling templates of the panels to the wall (A). Overlap panel gaps. Overlap gap lines of aligning panels (B). The characteristic 6mm gaps between the panels should
overlap while installing the drilling templates.
C D
Mark holes. Using an awl (or similar sharp object), poke a hole through the template and
into the wall surface to clearly mark each location. When all mounting locations are marked clearly,
remove templates from the wall.
Assemble. Drive drywall anchor at each location marked in the previous step (D1). Assemble mounting hardware by
screwing in one spacer (D2), one dual lock hook (D3) and one screw (D4) to each drywall anchor.
Drilling templates. The drilling templates function as a mock-up of the panels. Please hang the drilling templates level and in the right position since they are an exact replication of each panel and gap.
The drilling templates will provide you with complete references for the further installation.
00 Tooling. The following tools will be needed during the installation of the work wall.
B
A B
C
02 Leveling of dual lock hooks. It is essential for the aesthetics of the complete installation that all dual lock hooks are leveled in the same Z-Plane. Find the most protruding point of the wall to start from. 03 Mount the first panel. The rst panel should be positioned as accurate as possible.
Drill inside each cross
Drill inside each cross
Drill inside each cross
SAFETY INSTRUCTIONS
CRUSH HAZARD
WARNING
Drill inside each cross
A
Overlap
Drill inside each cross
Awl punched hole
Laser level plane
Dual lock hook
NOTICE
Panels are heavy. Falling or dropped panels can cause
serious injury. Follow all safety instructions.
Only install with trained professionals.
Use at least 2 people to lift, install or remove panels.
Read all assembly directions on installation template before
beginning installation.
Wear safety boots with protection for toes and top of foot
(metatarsal protection).
Panels and mounting hardware for use on drywall only.
Use ALL mounting dots and in required positions per assem-
bly directions.
Contact Polyvision: info@polyvision.com
or visit our website polyvision.com
Building owner or designated agent is responsible to verify
the installation is compliant to local codes and regulations.
Polyvision is not liable for installation on surfaces other than
drywall.
Stellen Sie das Laserlineal auf. Projizieren Sie eine Laserebene parallel zur Wandäche
und so nahe wie möglich an die Wand (A1). Nutzen Sie ein Maßband oder ein ähnliches
Messwerkzeug, um zu bestimmen, welche Doppelsperrhakenstelle am weitesten aus der
Wandoberäche vorspringt. Markieren Sie eine Stelle an der Wand, um zu zeigen, wo sich
der größte Vorsprung bendet.
Hinweis: Sie müssen sicherstellen, dass die Laserebene so parallel wie möglich zur Wand verläuft!
Richten Sie die Doppelsperrhaken aus. Ein Wandabstandhalter muss sich hinter jedem Doppelsperrplatz benden.
nur ein Wandabstandhalter pro Doppelsperrplatz ist vorgesehen. Messen Sie den Abstand von jedem Doppelsperrhaken
zur Laserebene (B1). Wenn der Abstand größer ist als der Ort des Doppelsperrhakens, der im vorherigen Schritt markiert
wurde, lösen Sie die Schraube (B2) und fügen Sie die passende Anzahl Unterlegscheiben-Abstandhalter ein,
um dem Abstand der am weitesten vorspringenden Stelle zu entsprechen (B3).
Installieren Sie die verbleibenden Platten.
Verwenden Sie das bereitgestellte magnetische
Abstandhalterwerkzeug, um den richtigen Abstand
zwischen aneinander angrenzenden Platten
einzuhalten, installieren Sie die verbleibenden
Platten in dem erforderlichen Layout (C1).
Ein Abstandhalterwerkzeug pro Ecke wird empfohlen (C2).
Schlagen Sie leicht auf die Stelle jedes Doppelsperrhakens,
bevor Sie mit der nächsten Platte fortfahren. Gilt nur,
wenn Keramikstahlplatten verwendet werden.
Markierungen
anbringen.
Referenzen auf die
Keramikstahlplatte
und die Wand
anbringen, um die
Mitte des
Doppelsperrhakens
und der Platte
auszurichten (A1).
Positionieren Sie die Platte und richten Sie sie aus. Wenn die erste Platte
ausgerichtet ist (B1) und sich in der korrekten Position bendet, schnappt ein
leichter Schlag mit der Handkante die Platte ein (B2). Dieser leichte Schlag
sollte an der Position jedes Doppelsperrhakens wiederholt werden.
WARNUNG: Platten können schwer sein und bei Herunterfallen schwere
Verletzungen verursachen. Beachten Sie die Sicherheitsanweisungen oben an
der Vorlage. Heben und installieren Sie die Platten mit mindestens zwei
Personen. Eine Person muss die Platte halten und ausrichten, während eine
zweite jeden Doppelsperrhaken wie auf den Platten markiert einsetzt.
In jedes Kreuz bohren
In jedes Kreuz bohren
Plattenkante
Lücke zwischen Platten
Plattenecke
In jedes Kreuz bohren
In jedes Kreuz bohren
In jedes Kreuz bohren
Ebene
Bleistift
Wandsicherheitsband
Ahle/Vorstecher
Bohrer + Steinbit #2 Philips-Bit 3-Ebenen-Ausrichtungslaser
Leiter
Doppelsperrhaken Unterlegscheiben-
Abstandhalter
Magnetischer Abstandhalter
gilt nur für Keramikstahlplatten
Trockenbauanker
#8-15 x 3" Flachkopf-
Gewindeschneidschraube
Wandabstandhalter
Motif=20mm, Motif soft=12mm
Montagerichtung
Bohrvorlagen platzieren. Die Bohrvorlagen aus Papier an die Wandplatten kleben (A).
Plattenlücken überlappen lassen. Lückenlinien angrenzender Platten überlappen lassen (B). Die typischen Lücken
von 6 mm zwischen den Platten sollten sich überlappen, wenn die Bohrvorlagen installiert werden.
Löcher markieren. Verwenden Sie eine Ahle (oder ein ähnliches scharfes Objekt), um ein Loch durch
die Vorlage und in die Wandäche zu stoßen, um jeden Punkt klar zu markieren. Wenn alle Montagestellen
klar markiert sind, entfernen Sie die Vorlagen von der Wand.
Montieren. Treiben Sie einen Trockenbauanker an jeder im vorherigen Schritt markierten Stelle ein (D1). Montieren Sie
die Montagehardware durch Einschrauben eines Abstandhalters (D2), eines Doppelsperrhakens (D3) und einer Schraube
(D4) an jedem Trockenbauanker.
Bohrvorlagen. Die Bohrvorlagen dienen als Mockup(Muster/Vorlage) der Platten. Hängen Sie die Bohrvorlagen gerade und in der richtigen Position ein, da sie die einzelnen Platten und Lücken präzise abbilden.
Die Bohrvorlagen geben Ihnen eine komplette Referenz für die weitere Installation.
Werkzeuge. Folgende Werkzeuge werden während der Installation der Arbeitswand benötigt.
Ausrichten der Doppelsperrhaken. Für ein ästhetisches Aussehen der gesamten Installation ist es wichtig, dass alle Doppelsperrhaken in derselben Z-Ebene ausgerichtet sind. Suchen Sie die am weitesten vorspringende
Stelle der Wand, um dort anzufangen. Montieren Sie die erste Platte. Die erste Platte (beginnen Sie vorzugsweise mit der Keramikstahlplatte) sollte so genau wie möglich platziert werden
In jedes Kreuz bohren
In jedes Kreuz bohren
In jedes Kreuz bohren
SICHERHEITSANWEISUNGEN
QUETSCHGEFAHR
WARNUNG
In jedes Kreuz bohren
Überlappen
In jedes Kreuz bohren
Mit der Ahle gestanztes Loch
Laserebene
Doppelsperrhaken
HINWEIS
Keramikstahlplatten sind schwer. Fallende oder herunterstürzende Keramikstahlplatten
können zu schweren Verletzungen führen. Beachten Sie die Sicherheitsanweisungen.
Nur mit ausgebildeten Fachleuten installieren.
Platten mit mindestens 2 Personen anheben, installieren, oder entfernen.
Alle Montageanleitungen an der Installationsvoralge
vor der Installation lesen.
Schutzstiefel mit Schutz der Zehen und der Oberseite des Fußes tragen
(Mittelfußschutz).
Platten und Montageteile dienen nur der Verwendung an Trockenbauwänden.
Verwenden Sie ALLE Montagepunkte in den erforderlichen Positionen laut
Montageanleitung.
Wenden Sie sich an Polyvision: info@polyvision.com
oder besuchen Sie unsere Website: www.polyvision.com
Der Gebäudeeigentümer oder der benannte Vertreter muss
prüfen, dass die Installation den örtlichen Gesetzen und
Vorschriften entspricht. Polyvision haftet nicht für die
Installation an anderen Flächen als Trockenbau.
Conguration du niveau à laser. Projetez un plan laser parallèle au mur, le plus proche
possible du mur (A1). Au moyen d'un ruban à mesurer ou d'un outil semblable,
déterminez lequel des doubles crochets de verrouillage ressort le plus du mur. Faites
une marque au mur pour indiquer l'emplacement qui ressort le plus du mur.
Remarque: Il est important de s'assurer que le plan laser soit le plus parallèle au mur possible.
Mettez les doubles crochets de verrouillage à niveau. Une cale murale doit être placée derrière chaque
emplacement des doubles crochets de verrouillage, et une seule cale murale est fournie par emplacement.
Mesurez le décalage entre chaque double crochet de verrouillage et le plan du niveau laser (B1). Si le décalage
est supérieur à l'emplacement marqué pour le double crochet de verrouillage à l'étape précédente, desserrez la vis (B2)
et insérez le nombre approprié de cales pour combler l'écart avec l'emplacement qui ressort le plus du mur (B3).
Installez les autres panneaux. En vous servant
de l'outil d'espacement magnétique fourni pour
conserver l'écart approprié entre les panneaux adjacents,
installez les autres panneaux selon la disposition appropriée (C1-).
Nous vous recommandons de placer un outil d'espacement dans chaque
coin (C2). Assurez-vous de frapper légèrement chaque emplacement de
double crochet de verrouillage avant de passer au panneau suivant. Uniquement
applicable dans le cadre de l’utilisation de panneaux CeramicSteel.
Ajoutez des
marques. Ajoutez
des références au
panneau CeramicSteel
et au mur pour aligner
le centre du double
crochet de
verrouillage et du
panneau (A1).
Positionnez le panneau et mettez-le à niveau. Lorsque le premier panneau
est à niveau (B1) et dans la position appropriée, il sut de frapper légèrement le panneau
avec le côté de la main pour le mettre en place (B2). Vous devez répéter cette opération à
chaque emplacement de double crochet de verrouillage indiqué sur chaque panneau.
AVERTISSEMENT: Les panneaux sont lourds. Un panneau qui tombe ou qui vous échappe
peut causer de graves blessures. Suivez les directives de sécurité dans le haut du gabarit.
Au moins deux personnes sont nécessaires pour soulever et installer les panneaux.
Une personne doit tenir le panneau à niveau pendant que la seconde personne le xe à
chaque double crochet de verrouillage indiqué sur chaque panneau.
Percer au centre de chaque croix
Percer au centre de chaque croix
Bord du panneau
Écart entre les panneaux
Coin du panneau
Percer au centre de chaque croix
Percer au centre de chaque croix
Percer au centre de chaque croix
Niveau
Crayon
Ruban-masque
Poinçon
Perceuse et mèche à maçonnerie Embout cruciforme n° 2 Laser de réglage de niveau triplanaire
Escabeau
Double crochet de verrouillage
Cale
Cale pour aimant, applicable
uniquement pour les
panneaux CeramicSteel
Cheville pour
cloison sèche
Vis Tête Fraisée n° 8-15 x 3
Cale murale
Motif=20mm, Motif soft=12mm
Directives d'assemblage
Placez les gabarits de perçage. Fixez les gabarits de perçage des panneaux en papier au mur
à l’aide de ruban de masquage (A).
Faites chevaucher les écarts entre les panneaux. Faites chevaucher les écarts des panneaux adjacents (B). Les écarts
caractéristiques de 6 mm entre les panneaux doivent se chevaucher au moment de l'installation des gabarits de perçage.
Marquez les trous. Au moyen d’un poinçon (ou d’un objet pointu semblable), percez un trou dans le
gabarit, puis dans le mur pour marquer clairement chaque emplacement. Une fois tous les emplacements
de montage clairement indiqués au mur, retirez les gabarits du mur.
Assemblage. Placez une cheville murale à chaque emplacement marqué à l’étape précédente (D1). Assemblez la
quincaillerie de montage en vissant une cale (D2), un double crochet de verrouillage (D3) et une vis (D4) dans chaque
cheville murale.
Gabarits de perçage. Les gabarits de perçage constituent une maquette des panneaux. Suspendez les gabarits de perçage de niveau, dans la position appropriée, puisqu'ils sont la réplique exacte de chaque panneau, écart compris.
Lesgabarits de perçage vous fournissent des références complètes pour les futures installations.
Outillage. Vous aurez besoin des outils suivants pendant l'installation du mur de travail.
Mise au niveau des doubles crochets de verrouillage. Pour assurer l’esthétisme de l’installation, il est essentiel que tous les doubles crochets de verrouillage soient à niveau dans le même plan Z.
Trouvez le point qui ressort le plus du mur pour commencer à partir de celui-ci.
Montez le premier panneau. Le premier panneau (commencez de préférence avec un panneau CeramicSteel) doit être placé le plus précisément possible.
Percer au centre de chaque croix
Percer au centre de chaque croix
Percer au centre de chaque croix
CONSIGNES DE SÉCURITÉ
RISQUE D'ÉCRASEMENT
AVERTISSEMENT
Percer au centre de chaque croix
Chevauchement
Percez au centre de chaque croix
Trou percé par le poinçon
Plan du niveau laser
Double crochet de verrouillage
AVIS
Les panneaux CeramicSteel sont lourds. La chute ou la perte de contrôle d’un panneau
CeramicSteel peut causer de graves blessures. Suivez les directives de sécurité.
Procédez uniquement à l'installation avec des professionnels bien formés.
Au moins 2 personnes sont nécessaires pour soulever, installer ou démonter les panneaux.
Lisez toutes les directives d'assemblage sur le gabarit d'installation avant de procéder à
l'installation.
Portez des chaussures de sécurité dotées d'éléments protecteurs pour les orteils et le
dessus du pied (protection du métatarse).
Les panneaux et la quincaillerie de montage conviennent uniquement pour une
utilisation sur cloison sèche.
Utilisez TOUS les points de montage, placés aux positions requises, conformément aux
directives d'assemblage.
Contactez Polyvision : info@polyvision.com ou visitez notre site internet polyvision.com
Le propriétaire de l'immeuble ou l'agent désigné est responsable de s'assurer de
la conformité de l'installation aux codes et aux règlements locaux.
Polyvision ne peut être tenue responsable de l'installation sur des surfaces autres
que les cloisons sèches.
If you have a problem, question, or request,
call your local dealer, or email to info@polyvision.com
for immediate action by people who want to help you.
Bei Problemen, Fragen oder Anfragen rufen Sie Ihren
Händler vor Ort an oder senden Sie eine E-Mail an info@polyvision.com,
um sofort mit Menschen in Kontakt zu kommen, die Ihnen helfen wollen.
Si vous avez un problème, une question à poser ou une requête à faire,
appelez votre distributeur local ou envoyez un e-mail à info@polyvision.com
pour obtenir une action immédiate de personnes prêtes à vous aider.
1/1