
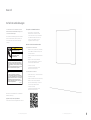
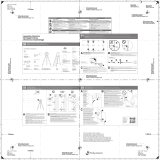
Guidelines for installing your new
a3 CeramicSteel Serif board
a³™ CeramicSteel Serif™
Installation Guide
EMEA 2019
English
Français
Deutsch
Doc # 141165 | Rev A | Page 1 of 14

a3 CeramicSteel Serif - Wall Mounted Frameless
Dry Erase Board, Non-Seismic Applications
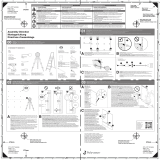
Safety Requirements
Minimum Required Wall Construction
Drywall with metal studs:
• Must be at least 25 ga. (0.018” or .5 mm thick)
33 ksi steel studs 38 mm x 89 mm (1.5” x 3.5”)
• Studs on maximum 610 mm (24”) centers
• Must be at least 16 mm (5/8”) thick Type X
gypsum drywall for the US or 12 mm (1/2”)
thickfor EU
• 32 mm (#6 x 11/4”) drywall screws on 305 mm
(12”) centers
Verify Wall Construction
• CAUTION! Adequate wall construction is
required to support the weight of the board.
Minimum wall construction must be capable
of supporting weight amounts listed in Table
1 on page 5.
Drywall with wood studs:
• Stud grade SPF, DFL or Hem-Fir 38 mm x
89mm (1.5” x 3.5”)
• Studs on 610 mm (24”) centers
• Must be at least 16 mm (5/8”) thick Type X
gypsum drywall for the US or 12 mm (1/2”)
thickfor EU
• 32 mm (#6 x 11/4”) drywall screws on 305 mm
(12”) centers
The building’s Engineer of Record must be
consulted to determine if there are any seismic
requirements.
Visit our website for a comprehensive Installation Guide:
polyvision.com/resources/installation
Or scan follow QR code:
English
Doc # 141165 | Rev A | Page 3 of 14Doc # 141165 | Rev A | Page 2 of 14

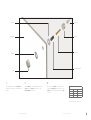
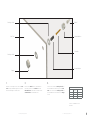
Use the predrilled holes in the Serif panel as a
template to mark the holes to be drilled into the
drywall.
Drill the anchor into the drywall until lush. Drive the
screw through the barrel into the anchor. Screw
threaded stud into the barrel.
Place a protective washer on the threaded stud
and put the Serif panel into place. Place a second
washer onto the threaded stud and thread on cap
until snug.
1. 3.
2.
* Not required for wood or metal studs
Table 1
Product # of Screws Weight (kg / lb)
Serif 2420 6 37 kg / 81.5 lb
Serif 1830 6 28 kg / 61.73 lb
Serif 1185 4 18 kg / 39.68 lb
Anchor*
Barrel
Threaded stud
Screw
Cap
Serif panel
Washer
Washer
Doc # 141165 | Rev A | Page 5 of 14Doc # 141165 | Rev A | Page 4 of 14

Exigences de sécurité
Rendez-vous sur notre site pour obtenir le guide
d’installationcomplet:
polyvision.com/resources/installation
ou scannez le code QR suivant:
a3 CeramicSteel Serif – Panneau eaçable à sec
sans cadre monté sur le mur, applications non
sismiques
L’ingénieur responsable du projet du bâtiment
doit être consulté pour déterminer les éventuelles
exigences sismiques.
RISQUE D’ÉCRASEMENT. Un panneau qui
n’est pas fixé de manière sécurisée peut
entraîner des blessures corporelles.
Lisez l’ensemble des instructions d’assemblage avant de commencer
l’installation.
La construction des bâtiments varie grandement. L’ingénieur responsable
du projet du bâtiment est responsable de la conception des murs sur
lesquels sont attachés les panneaux et doit vérifier que le matériel de
montage est adéquat, même si ce dernier est fourni par Polyvision.
Le propriétaire du bâtiment ou l’agent désigné a la responsabilité de
vérifier que l’installation est conforme à l’ensemble des codes et
réglementations locaux.
1078781001 Rev A
ATTENTION
CAUTION
CRUSH HAZARD. Failure to properly secure
board could result in personal injury.
INSTRUCTIONS DE SÉCURITÉ
SAFETY INSTRUCTIONS
Read all assembly directions before beginning installation.
Building construction varies greatly. The Building’s Engineer of Record is
responsible for the design of building walls which the boards are attached
to and must verify the adequacy of the mounting hardware, even if provided
by Polyvision.
The building owner or designated agent is responsible for verifying that the
installation is in compliance with ail local codes and regulations.
Vériication de la construction du mur
• ATTENTION! Un mur construit de manière
appropriée est requis pour supporter le
poids du panneau. Une construction de mur
minimale doit pouvoir supporter les poids
répertoriés dans le tableau1 de la page5.
Construction de mur minimale requise
Une cloison sèche dotée de montants métalliques:
• doit faire au moins 0,5mm d’épaisseur
montants métalliques de 227mPa de
38mmx89mm
• les montants doivent avoir des diamètres de
610mm maximum
• doit être une cloison sèche en gypse de
typeX d’au moins 16mm d’épaisseur pour les
États-Unis ou 12mm d’épaisseur pour l’Union
européenne
• 6vis pour cloisons sèches de 32mm à des
diamètres de 305mm
Cloison sèche dotée de montants en bois:
• montant de catégorie EPS, douglas ou mélèze
ou pruche sapin de 38mmx89mm
• les montants doivent avoir des diamètres de
610mm
• doit être une cloison sèche en gypse de
typeX d’au moins 16mm d’épaisseur pour les
États-Unis ou 12mm d’épaisseur pour l’Union
européenne
• 6vis pour cloisons sèches de 32mm à des
diamètres de 305mm
Français
Doc # 141165 | Rev A | Page 7 of 14Doc # 141165 | Rev A | Page 6 of 14

Utilisez les trous prépercés dans le panneau Serif
comme gabarit pour marquer les trous à percer
dans la cloison sèche.
Percez la cheville dans la cloison sèche jusqu’à
ce que la tête ne dépasse plus du mur. Insérez la
vis dans la cheville à travers l’entretoise. Vissez le
montant ileté dans l’entretoise.
Placez une rondelle de protection sur le montant
ileté et mettez le panneau Serif en place. Placez
une deuxième rondelle sur le montant ileté et
vissez le cache-vis jusqu’à ce qu’il soit bien serré.
1. 3.2.
Tableau1
Produit Nombre de
vis Poids (kg)
Serif2420 6 37kg
Serif1830 6 28kg
Serif1185 4 18kg
* Non requise pour les montants en bois
ou en métal
Cheville*
Entretoise
Montant ileté
Vis
Cache-vis
Panneau Serif
Rondelle
Rondelle
Doc # 141165 | Rev A | Page 9 of 14Doc # 141165 | Rev A | Page 8 of 14

Sicherheitsanforderungen
Besuchen Sie unsere Website für eine detaillierte
Installationsanleitung:
polyvision.com/resources/installation
Oder scannen Sie den nachfolgenden QR Code ein:
a3 CeramicSteel Serif – rahmenloses trocken
abwischbares Board zur Wandmontage, nicht-
seismische Anforderungen
Der verantwortliche Bauingenieur des Gebäudes
muss konsultiert werden, um festzustellen, ob
für das Gebäude seismische Anforderungen
vorliegen.
QUETSCHGEFAHR. Nicht ordnungsgemäße
Befestigung des Boards könnte zu
Personenschaden führen.
1078781001 Rev A
VORSICHT
CAUTION
CRUSH HAZARD. Failure to properly secure
board could result in personal injury.
SICHERHEITSHINWEISE
Lesen Sie alle Montageanweisungen, bevor Sie mit der Installation
beginnen.
Gebäude können sehr unterschiedlich sein. Der verantwortliche
Bauingenieur des Gebäudes ist für die Konstruktion von Gebäudewänden
verantwortlich, an denen Boards befestigt werden; er muss die Tauglichkeit
der Befestigungsmaterialien prüfen, auch wenn sie von Polyvision geliefert
werden.
Der Gebäudebesitzer oder der benannte Verantwortliche ist für die
Überprüfung der Installation verantwortlich, sodass sie mit allen örtlichen
Gesetzen und Verordnungen übereinstimmt.
SAFETY INSTRUCTIONS
Read all assembly directions before beginning installation.
Building construction varies greatly. The Building’s Engineer of Record is
responsible for the design of building walls which the boards are attached
to and must verify the adequacy of the mounting hardware, even if provided
by Polyvision.
The building owner or designated agent is responsible for verifying that the
installation is in compliance with ail local codes and regulations.
Überprüfen Sie die Wandkonstruktion
• VORSICHT! Es ist eine ausreichende
Wandkonstruktion erforderlich, um das
Gewicht des Boards zu tragen. Die minimale
erforderliche Wandkonstruktion muss im
Stande sein, die in Tabelle 1 auf Seite 5
angegebenen Gewichte zu tragen.
Minimale erforderliche Wandkonstruktion
Trockenbauwand mit Metallbolzen:
• Mindestens 25G (0,018Zoll oder 0,5mm dick)
33 KSI Stahlbolzen 38mm x 89mm (1,5Zoll x
3,5Zoll) erforderlich
• Bolzen in einem Abstand von maximal 610 mm
(24Zoll)
• Mindestens eine 16mm (5/8Zoll) dicke
Gipstrockenbauwand des TypX für die USA
oder 12mm (1/2Zoll) dick für die EU
• 32 mm (#6 x 11/4Zoll)
Trockenbauwandschrauben bei einem
Abstand von 305 mm (12Zoll)
Trockenbauwand mit Holzbolzen:
• Bolzen Qualität SPF, DFL oder Hem-Fir 38 mm
x 89 mm (1,5 x 3,5Zoll)
• Bolzen in einem Abstand von 610 mm (24Zoll)
• Mindestens eine 16mm (5/8Zoll) dicke
Gipstrockenbauwand des TypX für die USA
oder 12mm (1/2Zoll) dick für die EU
• 32 mm (#6 x 11/4Zoll)
Trockenbauwandschrauben bei einem
Abstand von 305 mm (12Zoll)
Deutsch
Doc # 141165 | Rev A | Page 11 of 14Doc # 141165 | Rev A | Page 10 of 14

Benutzen Sie die vorgebohrten Löcher in der Serif-
Tafel als Vorlage zur Markierung der Löcher, die in
die Trockenwand gebohrt werden sollen.
Bohren Sie den Dübel in die Trockenwand bis zur
Versenkung. Führen Sie die Schraube durch die
Abstandsbuchse in den Dübel. Schrauben Sie den
Gewindebolzen in die Abstandsbuchse.
Setzen Sie eine schützende Unterlegscheibe auf
den Gewindebolzen und befestigen Sie die Serif-
Tafel. Setzen Sie eine zweite Unterlegscheibe auf
den Gewindebolzen und schrauben Sie die Kappe
fest auf.
1. 3.2.
Tabelle 1
Produkt # an
Schrauben Gewicht (kg/lb)
Serif 2420 6 37kg/81,5lb
Serif 1830 6 28 kg/61,73lb
Serif 1185 4 18kg/39,68lb
* Für Holz- oder Metallbolzen nicht
erforderlich
Dübel*
Abstandsbuchse
Gewindebolzen
Schraube
Kappe
Serif-Tafel
Unterlegscheibe
Unterlegscheibe
Doc # 141165 | Rev A | Page 13 of 14Doc # 141165 | Rev A | Page 12 of 14

©2019 PolyVision Corporation. All rights reserved. Trademarks used herein are the trademarks of PolyVision
Corporation or their respective owner. PolyVision Corporation reserves the right to make changes in product
design, construction or detail, and to discontinue any product or material without notice.
polyvision.com 30102019
PolyVision Americas
10700 Abbotts Bridge Road
Suite 100
Johns Creek, GA 30097 USA
T 1 888 325 6351
E info@polyvision.com
PolyVision Europe
Zuiderring 56
3600 Genk, Belgium
T +32 89 32 31 30
PolyVision Asia-Pacific
15th Floor, Kinwick Centre
32 Hollywood Road, Central District
Hong Kong
T +852 2520 0160
E APA[email protected]
-
 1
1
-
 2
2
-
 3
3
-
 4
4
-
 5
5
-
 6
6
-
 7
7
-
 8
8


in anderen Sprachen
- English: PolyVision Serif Installation guide
- français: PolyVision Serif Guide d'installation
Verwandte Artikel
-
PolyVision FLOW Installationsanleitung
-
 PolyVision Frameless Flow Installationsanleitung
-
 PolyVision Motif Soft Installationsanleitung
-
 PolyVision Motif Soft Installationsanleitung
-
 PolyVision Boundri Soft Installationsanleitung
-
 PolyVision Mobile Installationsanleitung
-
 PolyVision Textura Light Installationsanleitung


