Eurotherm piccolo P104/P108/P116 Bedienungsanleitung
- Typ
- Bedienungsanleitung

Page 1 Piccolo Range Quick Start Guide Page 1 Guide de démarrage rapide gamme Piccolo Seite 1 Kurzinfo für die Piccolo-
Serie
GB F D
To Re-enter Quick Codes and for Further Information Pour re-saisir les codes rapides et pour plus d'information Neueingabe von Schnellcodes und weitere Informationen:
Go to www.eurotherm.co.uk and refer to the Engineering Manual HA031260 Se rendre sur www.eurotherm.co.uk et se reporter au manuel d'ingénierie HA031260 Siehe Engineering Manual HA031260 auf www.eurotherm.co.uk.
Display Affichage Anzeige
PV Process Value (Temperature) Valeur du procédé (Température) Prozesswert (Temperatur)
SP
Target Temperature (Setpoint) or other
parameter mnemonics
Consigne cible de température ou autre
mnémonique de paramètre
Zieltemperatur (Sollwert) oder andere
Parameter-Mnemonik
OP Working Output Sortie de Travail Arbeitsausgang
ALM
Alarm active (Red) Alarme active (Rouge) Alarm aktiv (rot)
Output 1 = ON (typically heating) Sortie 1 = ON (Typiquement circuit de chauffage)
Ausgang 1 = EIN (typisch bei Heizen)
Output 2 = ON (typically cooling )
Sortie 2 = ON (Typiquement circuit de
refroidissement)
Ausgang 2 = EIN (typisch bei Kühlen)
Output 3 = ON (P108 & P104 only) Sortie 3 = ON (P108 & P104 uniquement) Ausgang 3 = EIN (nur P108 & P104)
Output 4 = ON (typically alarm) Sortie 4 = ON (alarme type) Ausgang 4 = EIN (typisch bei Alarm)
SPX
Alternative setpoint in use (SP2) Point de consigne alternatif utilisé (SP2) Alternativer Sollwert in Benutzung (SP2)
REM
Communications active Communication actives Kommunikation aktiv
MAN
Manual mode selected Mode manuel sélectionné Handbetrieb ausgewählt
to adjust the value pour ajuster la valeur zum Einstellen des Werts
oP
Output power. Only shown in ‘Auto’ or
‘OFF’ mode.
Puissance de sortie. N'apparaît uniquement que
si le régulateur est en mode 'Auto' ou Tout Ou
Rien.
Ausgangsleistung. Wird nur bei
Betriebsart "Auto" oder "AUS" angezeigt.
SP
Current setpoint.
Only shown in ‘Manual’ or ‘OFF’ mode
Valeur de consigne actuelle.
Uniquement indiqué en mode ‘Manuel’ ou ‘OFF’
Aktueller Sollwert.
Wird nur bei Betriebsart "Hand" oder
"AUS" angezeigt.
SP1
Setpoint 1 value Valeur de point de consigne 1 Sollwert 1
SP2
Setpoint 2 value Valeur de point de consigne 2 Sollwert 2
Ac.AL
Alarm acknowledge
Yes or no
See Page 4 Alarme validée
Oui ou Non
Voir Page 4 Alarm quittieren
ja oder nein
Siehe Seite 4
t.St
Status of timer -
Run, Reset, Hold, End
Only shown
if the timer is
configured
Statut du temporisateur -
Marche,Réinitialisation,
Maintien,Fin
Affiché
uniquement
lorsque le
temporisateur est
configuré.
Timer-Status -
Läuft, Reset, Halten,
Ende
Wird nur bei
konfiguriertem
Timer angezeigt
t.eL
Time elapsed Temps écoulé Vergangene Zeit
t.rE
Time remaining Temps restant Restzeit
E.Par
Energy counter partial value Valeur partielle de compteur d'énergie Energiezähler-Teilwert
E.tot
Energy counter total value Valeur totale de compteur d'énergie Energiezähler-Gesamtwert
Alarms – if configured Alarmes – si configurées Alarme – falls konfiguriert
If an alarm occurs, the alarm number (AL1, AL2,
AL3) and
ALM
will flash.
To acknowledge see page 4.
Si une alarme se déclenche, le numéro d'alarme
(AL1, AL2, AL3) et
ALM
clignotent.
Pour l'acquittement, voir page 4.
Falls ein Alarm auftritt, blinkt die
Alarmnummer (AL1, AL2, AL3) und
ALM
.
Quittieren siehe Seite 4.
Switch On Allumer Einschalten
4
set1
____
Unconfigured
Non configuré
Unkonfiguriert
Increase setpoint (SP)
Augmenter la valeur de
consigne (SP)
Sollwert (SP) erhöhen
Decrease setpoint (SP)
Diminuer la valeur de
consigne (SP)
Sollwert (SP) verringern
≈ 3s
V1.01
P116
V1.01
P104
V1.01
P108
Configured Configuré Konfiguriert
6
PV
SP
OP
Operator Level 1
Niveau 1 Opérateur Bedienebene 1
7
DI1 Digital Input 1 DI1 Digital Input 1 DI1 Digitaleingang 1
8
DI2 Digital Input 2 (not P116) DI2 Digital Input 2 (not P116) DI2 Digitaleingang 2 (nicht P116)
A
Alarm acknowledge Acquittement alarme Alarmquittierung
S
Setpoint 2 select Sélection consigne 2 Sollwert 2 auswählen
L
Keylock Verrouillage du clavier Tastensperre
T
Timer reset Réinitialisation du temporisateur Timer rücksetzen (Reset)
r
Timer run Marche du temporisateur Timer läuft
U
Timer run/reset Marche/Arrêt du temporisateur Timer läuft/Reset
H
Timer hold Pause du temporisateur Timer halten
N
Manual select Sélection du mode manuel Manuelle Auswahl
b
Standby mode (outputs off) Mode veille (sorties inactives) Standby-Modus (Ausgänge aus)
n
Unconfigured Non configuré Unkonfiguriert
Quick Codes
Codes rapides Schnellcodes
Quick codes configure input type, range,
outputs, alarms and events
Les codes rapides configure le type
d'entrée, la plage, les sorties, les alarmes et
les événements
Mit den Schnellcodes können Eingangstyp,
Bereich, Ausgänge, Alarme und Ereignisse
konfiguriert werden.
Press when the SEt1 shows "_ _ _
_" to load the factory default data and to
enter the operator level.
Or
Press to select the code as shown in
the tables below.
Press to accept and scroll to the
next code.
Press to go back.
Appuyer sur quand Set1 montre "_
_ _ _" pour charger les données usine par
défaut et accéder au niveau opérateur.
Ou
Appuyer sur pour sélectionner le
code, comme indiqué dans les tableaux ci-
dessous.
Appuyer sur pour accepter et passer
au code suivant.
Appuyer sur pour revenir en arrière.
Drücken Sie sobald für Set1 „_ _ _ _“
erscheint, um die Werksdaten zu laden und die
Bedienebene aufzurufen.
Oder
Um den Code wie in den nachstehenden
Tabellen gezeigt auszuwählen, drücken Sie
.
Drücken Sie , um die Option zu
akzeptieren und zum nächsten Code zu gehen.
Mit kommen Sie zurük.
When all four characters have been
configured SET 2 is selected
Une fois les quatre caractères
configurés, SET 2 est sélectionné
Wenn alle vier Zeichen konfiguriert
worden sind, wird SET 2 ausgewählt
5
0 1 a s
Example
Exemple Beispiel
J C H C
Set1
Set2
no
done
yes
done
6
1
Input Type
Type d'Entrées
Eingangstyp
Thermocouple
Thermocouple
Thermoelement
b
B
J
J
H
K
L
L
n
N
r
R
S
S
t
T
C
C/Custom
RTD
P
Pt100
mV / mA
u
0-80mV
2
0-20mA
4
4-20mA
3
OP1 Output 1 - Alarm 3 OP1 Sortie 1 - Alarme 3 OP1 Ausgang 1 - Alarm 3
4
OP2 Output 2 - Alarm 1 OP2 Sortie 2 - Alarme 1 OP2 Ausgang 2 - Alarm 1
n
Unconfigured Non configuré Unkonfiguriert
H
PID Heating PID chaud PID Heizen
C
PID Cooling PID froid PID Kühlen
J
ON/OFF Heating ON/OFF chaud EIN/AUS Heizen
F
ON/OFF Cooling ON/OFF froid EIN/AUS Kühlen
Alarm: energised in alarm Alarme : excité en alarme Alarm: stromführend im
Alarmzustand
0
High alarm Alarme haute Maximalalarm
1
Low alarm Alarme basse Minimalalarm
2
Deviation high Déviation haute Abweichung Übersollwert
3
Deviation low Déviation basse Abweichung Untersollwert
4
Deviation band Déviation bande Abweichungsband
Alarm: de-energised in alarm Alarme : désexcité en
alarme
Alarm: stromlos im
Alarmzustand
5
High alarm Alarme haute Maximalalarm
6
Low alarm Alarme basse Minimalalarm
7
Deviation high Déviation haute Abweichung Übersollwert
8
Deviation low Déviation basse Abweichung Untersollwert
9
Deviation band Déviation bande Abweichungsband
Retransmission (analogue
outputs only)
Retransmission (sorties
analogiques uniquement)
Rückübertragung (nur
Analogausgänge)
(P116 - OP2; P108/P104 - OP3)
t
4-20mA Setpoint 4-20 mA, consigne 4-20mA Sollwert
U
4-20mA PV 4-20mA mesure 4-20mA PV
y
4-20mA output 4-20 mA, sortie 4-20mA Ausgang
A
0-20mA Setpoint 0-20 mA, consigne 0-20mA Sollwert
b
0-20mA PV 0-20mA mesure 0-20mA PV
d
0-20mA output 0-20 mA, sortie 0-20mA Ausgang
Programmer Event Evénement du
programmateur
Programmgeber-Ereignis
E
End status Fin de programme Endstatus
r
Run status
Programme
en cours
Betriebsstatus
2
Range
Plage
Bereich
C
o
C
0
0-100
1
0-200
2
0-600
3
0-400
4
0-800
5
0-1000
6
0-1200
7
0-1400
8
0-1600
9
0-1800
F
o
F
G
32-212
H
32-392
i
32-752
J
32-1112
L
32-1472
N
32-1832
n
32-2192
P
32-2552
r
32-2912
T
32-3272
set1
____
1 2 3 4
5 6 7 8
Set2
____
5 6 7 8
5
OP3 Output 3
Alarm 3 - Default
OP3 Sortie 3
Alarme 3 par défault
OP3 Ausgang 3
Alarm 3 systemvorgabe
6
OP4 Output 4
Alarm 2 - Default
OP4 Sortie 4
Alarme 2 par défault
OP4 Ausgang 4
Alarm 2 systemvorgabe
Codes are the same as OP1 (3)
and OP2 (4) in the above table
Les codes sont les mêmes pour
OP1(3) et OP2(4) dans le tableau ci-
dessus.
Die Codes entsprechen denen für OP1
(3) und OP2 (4) der obigen Tabelle.
Wiring Câblage Verdrahtung
3
P108 & P104
IP1
R <22Ω
RTD
VI
V+
V-
R <22Ω
R <22Ω
-
+
TC
V+
V-
V+
V-
V (SUB21/1V10)
V+
V-
100KΩ
806Ω
+
-
mA
-
2.49Ω
+
+
-
mV
V+
V-
8
OP1 Logic
non isolated
OP1 Logic
non isolé
OP1 Logik nicht
isoliert
OP1
OP2 - 4
300Vac
Isolation
Boundaries
Limites
d'isolation
Isolierungsgrenzen
IP1
DI1/DI2
CT
100-230V
/24V
EIA485
μP
24Vdc
0.4Nm
(3.5lb in)
0.5 – 1.5mm
(16 – 22AWG)
DI1
CT
OP4
CT
DI2 (B)
OP4
DI2
OP3
EIA485
OP1
-
+
24Vdc
IP1
OP2
COM
A(+)
B(-)
1A
1B
2A
2B
LB
LC
3A
3B
3C
3D
L
N
AA
AB
AC
HD
HE
HF
9
8
9
8
9
8
10
8
12
8
7
9
11
13
10
8
CT
C
LA
VI
V+
V-
+
-
-
+
EIA485
OP1
P116
COM
A(+)
B(-)
AA
AB
AC
VI
V+
V-
CT
C
LA
HD
HE
HF
OP4
CT
DI1
IP1
OP2
-
+
1A
1B
2A
2B
L
N
13
9
8
8
7
8
9
8
9
8
10
11
8
+
-
!
Warning
!
Avertissement
!
Warnung
Ensure that you have the
correct supply voltage for
your controller
Assurez-vous d'avoir la bonne
tension d'alimentation pour
votre régulateur
Achten Sie auf die richtige
Spannungsversorgung für
Ihren Regler.
24V
24
24
24Vac -15% +10% 48-62Hz
24Vdc -15% +20% 5% max ripple
P116 6W max. P108 & P104 8W max.
100 - 230Vac
+
15%
48 – 62Hz
L
N
*HA031173EFG*
HA031173EFG/2 CN28432 04/12
Unpacking Déballage Auspacken
X1
2.49Ω
X1
RC
1
P104 - 1/4 DIN
96mm
(3.78in)
96mm (3.78 in)
P116 - 1/16 DIN
48mm
(1.89in)
48mm
(1.89in)
P108 - 1/8 DIN
96mm
(3.78in)
48mm
(1.89in)
Installation Installation Installation
E
45mm (- 0.0 + 0.6)
1.77inch (-0.00, +0.02)
F
92mm (- 0.0 + 0.8)
3.62inch (-0.00, +0.03)
Panel Panneau Schalttafel
P104
>38mm
>10mm
P108
F
E
P116
E
F
E
2
IP65
<15mm
(0.59 inch)
0
O
C - 55
O
C
5-95%RH
90mm
(3.54inch)
12.5mm
(0.5inch)

Page 4 Operator Level 2 Examples Page 4 Niveau d'opérateur 2 Exemples Seite 4 Bedienebene 2 - Beispiele
GB F D
Sales and Service. United Kingdom,
Eurotherm Ltd, Worthing
T (+44) 1903 268500
F (+44 01903) 265982
Exemple 1 : Pour actionner les alarmes
Jusqu'à 3 alarmes sont disponibles. Elles peuvent être commandées ou configurées au moyen
des codes rapides (page 1) ou des codes 'P', page 3.
Pour ajuster le seuil d'alarme
En niveau 2 d'opérateur, sélectionner AL1, AL2 ou AL3, comme requis
Appuyer sur ou pour régler le seuil
Pour acquitter une alarme
Il existe trois moyens de s'acquitter d'une alarme :
1. Dans tous les cas, appuyer sur pour sélectionner Ac.AL. Appuyer ensuite sur
ou jusqu'à YES.
2. Actionner l'entrée numérique 1 ou 2 (si configurée)
3. Appuyer sur (si configuré, voir le code de configuration P73)
Si l'alarme est toujours présente, la balise ALM est allumée en continu.
Par défaut, les alarmes sont configurées sans maintien.
Exemple 2 : Pour actionner le temporisateur
Un temporisateur interne peut être configuré pour fonctionner en trois modes :
Dwell (palier) – pour contrôler un processus à une valeur fixe pendant une période définie.
Delayed Switch on (Départ différé) – pour une mise sous tension après un certain délai
Soft Start (Démarrage progressif) – applique une limite de puissance pour une période fixe.
Régler le délai au moyen de t.dUr
Pour un temporisateur par palier, régler t.thr pour démarrer le décompte quand le PV est
proche de SP.
Pour un temporisateur en démarrage progressif, régler la limite de puissance SS.oP et le seuil
SS.SP.
Au moyen de t.St, régler le temporisateur sur marche, pause ou réinitialiser, ou à partir d'une
entrée numérique configurée appropriée
End clignotera une fois la temporisation écoulée. La sortie de puissance passera à une valeur
définie par P43.
Exemple 3 : Pour le réglage automatique du régulateur
Régler le point de consigne aux alentours de la température nominale de fonctionnement.
Régler les limites de sortie sur une valeur sûre
Sélectionner A.tun à partir de la liste de niveau 2 et la régler sur YES
Le régulateur fait clignoter tunE sur l'affichage de l'opérateur jusqu'à ce que le réglage
automatique soit fait.
Exemple 4 : Moniteur d'énergie
Une estimation de la consommation d’énergie est mesurée à la sortie uniquement
(normalement chauffante) - configurée au moyen de P81.
Saisir la puissance de charge nominale en KW dans P82.
Aux niveaux 1 & 2, E.Par mesure la consommation d'énergie pour les lots individuels et
E.tot pour l'ensemble du processus. Ils peuvent aussi avoir été personnalisés sur les
deuxième et troisième lignes de l'écran d'opérateur au moyen de P74 et P75.
Réinitialiser ces dernières au moyen de E.rSt disponible dans le niveau 2. E.tot ne peut être
réinitialisé qu'aprés E.Par. P71, P72 ou P73 peut personnaliser un des boutons de fonctions
ou le bouton Page pour accéder à ce paramètre.
This instrument is intended for industrial temperature and process control applications within the requirements of
the European Directives on Safety and EMC.
Information contained here is subject to change without notice. While every effort has been made to ensure the
accuracy of the information, your supplier shall not be held liable for errors contained herein.
Safety and EMC protection can be seriously impaired if the unit is not used in the manner specified. The installer
must ensure the safety and EMC of the installation.
This instrument complies with the European Low Voltage Directive 2006/95/EC, by application of safety standard
EN 61010.
Unpacking and storage. If on receipt, the packaging or unit is damaged, do not install but contact your supplier.
If being stored before use, protect from humidity and dust in an ambient temperature range of -30
o
C to +75
o
C.
Electrostatic discharge precautions. Always observe all electrostatic precautions before handling the unit.
Service and repair. This instrument has no user serviceable parts. Contact your supplier for repair.
Cleaning. Isopropyl alcohol may be used to clean labels. Do not use water or water based products. A mild soap
solution may be used to clean other exterior surfaces.
Electromagnetic compatibility. This instrument conforms to the essential protection requirements of the EMC
Directive 2004/108/EC, by the application of a Technical Construction File. It satisfies the general requirements of
the industrial environment defined in EN 61326.
Caution: Charged capacitors. Before removing an instrument from its sleeve, disconnect the supply and wait at
least two minutes to allow capacitors to discharge. Avoid touching the exposed electronics of an instrument
when withdrawing it from the sleeve.
Symbols. Symbols used on the instrument have the following meaning:
Refer to manual.
Risk of electric shock.
Take precautions against static.
C-tick mark for
Australia (ACA) and New Zealand (RSM).
Complies with the 40 year Environment Friendly Usage Period.
3
RoHS
Restriction of Hazardous Substances.
Protected by DOUBLE INSULATION
Installation Category and Pollution Degree. This unit has been designed to conform to BSEN61010 installation
category II and pollution degree 2, defined as follows:-
• Installation Category II (CAT II). The rated impulse voltage for equipment on nominal 230V supply is 2500V.
• Pollution Degree 2. Normally only non-conductive pollution occurs. However, a temporary conductivity
caused by condensation must be expected.
Personnel. Installation must only be carried out by suitably qualified personnel
Enclosure of Live Parts. To prevent hands or metal tools touching parts that may be electrically live, the unit must
be installed in an enclosure.
Caution: Live sensors. The controller is designed to operate if the temperature sensor is connected directly to an
electrical heating element. However, you must ensure that service personnel do not touch connections to these
inputs while they are live. With a live sensor, all cables, connectors and switches for connecting the sensor must
be mains rated for use in 230Vac +
15%: CATII.
Wiring. It is important to connect the unit in accordance with the data in this sheet. Always use copper cables.
Wiring must comply with all local wiring regulations, i.e. UK, the latest IEE wiring regulations, (BS7671), and USA,
NEC Class 1 wiring methods.
Voltage rating. The maximum voltage applied to the following terminals must not exceed 230Vac +15%: :- relay
output to logic; dc or sensor connections; any connections to ground. The controller must not be wired to a three
phase supply with an unearthed star connection.
Electrically Conductive pollution e.g. carbon dust, MUST be excluded from the unit enclosure. Where necessary,
fit an air filter to the air intake of the enclosure. Where condensation is likely, include a thermostatically controlled
heater in the enclosure.
Grounding of the temperature sensor shield. In some installations it is common practice to replace the
temperature sensor while the controller is still powered up. Under these conditions, as additional protection
against electric shock, we recommend that the shield of the temperature sensor is grounded. Do not rely on
grounding through the framework of the machine.
Over Temperature Protection. To prevent overheating of the process under fault conditions, a separate over-
temperature protection unit should be fitted which will isolate the heating circuit. This must have an independent
temperature sensor. Alarm relays within the unit will not give protection under all failure conditions.
Installation Requirements for EMC. To comply with European EMC directive certain installation precautions are
necessary:-
• General guidance. Refer to EMC Installation Guide, Part no. HA025464.
• Relay outputs. It may be necessary to fit a suitable filter to suppress conducted emissions.
• Table top installation. If using a standard power socket, compliance with commercial and light industrial
emissions standard is usually required. To comply with conducted emissions standard, a suitable mains filter
must be installed.
Safety and EMC Sécurité et compatibilité électromagnétique (CEM) Informationen zu Sicherheit und EMV
Ce régulateur est destiné aux applications industrielles de régulation de température et des procédés et satisfait
aux exigences des directives européennes sur la sécurité et la comptabilité électromagnétique.
Les informations contenues dans ce manuel sont sujettes à des modifications sans préavis. Bien que tous les
efforts aient été consentis pour assurer l'exactitude des informations contenues dans ce manuel, le fournisseur
décline toute responsabilité pour les erreurs qui s'y seraient glissées.
Sécurité. La protection en matière de Sécurité et de CEM peut être sérieusement mise en cause si l’appareil n’est
pas utilisé de manière appropriée. L’installateur DOIT s’assurer de la Sécurité et de la compatibilité
électromagnétique de l’installation.
Ce régulateur est conforme à la directive européenne sur les basses tensions 2006/95/EC, en vertu de
l'application de la norme de sécurité EN 61010.
Déballage et stockage. Si l’emballage ou l’appareil est endommagé, NE PAS l’installer, mais contacter le
fournisseur. Stocker l’appareil à l’abri de la poussière et de l’humidité à une température ambiante comprise
entre -30ºC et +75ºC.
Décharge d’Electricité Statique. Toujours manipuler les appareils avec précautions.
Entretien et Réparation. Pas d’entretien. Pour les réparations, merci de contacter votre fournisseur.
Nettoyage. Nettoyer l’étiquette à l’alcool. L’étiquette deviendra illisible si de l’eau ou un produit à base d’eau est
utilisé. Utiliser une eau savonneuse pour les autres surfaces extérieures.
Compatibilité électromagnétique. Ce régulateur est conforme aux principales exigences de protection de la
directive EMC 2004/108/EC, sur la base d’un dossier technique de construction. Cet instrument satisfait aux
exigences générales en matière d'environnement industriel définies par la norme EN 61326.
Attention : Condensateurs chargés. Avant de retirer un instrument de son boîtier, débrancher l'alimentation et
attendre au moins deux minutes pour permettre aux condensateurs de se décharger. Eviter de toucher aux
composants électroniques de l'instrument lors de son retrait du manchon.
Signalisation de sécurité. Le régulateur peut être porteur de divers symboles, dont voici la signification :
Se reporter au manuel.
Risque de choc électrique.
Prendre des précautions contre
l'électricité statique.
Marque C-Tick pour l'Australie (ACA) et la Nouvelle-Zélande (RSM).
Conforme à la période d'utilisation de 40 ans respectueuse de l'environnement.
3
RoHS
Restriction des
substances dangereuses.
Protégé par une DOUBLE ISOLATION
Catégorie d’installation et degré de pollution. Cette unité a été conçue conformément à la norme BS EN61010
catégorie d’installation II et degré de pollution 2
• Catégorie d’Installation II (CAT II). La tension de choc pour un appareil normalement alimenté en 230 V est de
2500 V.
• Degré de Pollution 2. Normalement, seule une pollution non-conductrice peut se produire. Toutefois, on peut
s’attendre à une conductivité temporaire due à la condensation.
Personnel. Le personnel procédant à l'installation doit être titulaire de la qualification requise.
Protection des parties sous tension. Pour éviter tout contact avec les parties susceptibles d'être sous tension, le
régulateur doit être monté sous enveloppe de protection.
Attention : sondes sous tension. Ce régulateur est conçu pour fonctionner avec le capteur de température
directement relié à un élément de chauffage électrique. Veiller cependant à ce que le personnel d'entretien ne
touche pas ces connexions lorsqu'elles sont sous tension. Tous les câbles, connecteurs et commutateurs de
connexion d'un capteur sous tension devront être calibrés en fonction des caractéristiques de la tension du
réseau (230Vac +15% CATII).
Câblage. Il est important de connecter l’appareil en suivant les instructions décrites dans ce document. Utiliser
uniquement des conducteurs en cuivre pour les connexions. Le câblage DOIT respecter la norme locale en
vigueur, exemple en U.K., la norme BS7671, et aux USA, la méthode NEC classe 1.
Tension nominale. La tension maximale permanente appliquée entre les bornes suivantes ne doit pas excéder
230 Vac +15%: Sortie relais logique, connexion dc ou capteur. Toute connexion à la terre. Le régulateur ne doit
pas être raccordé à une alimentation triphasée par une connexion en étoile non mise à la terre.
Pollution conductrice. La pollution conductrice, comme la poussière de carbone, DOIT être exclue de l’endroit
où l’appareil est installé. Pour garantir une ambiance convenable, installer un filtre à air. Pour éviter la
condensation, installer un chauffage thermostatique.
Mise à la terre du blindage du capteur de température. Certaines installations prévoient généralement le
remplacement du capteur de température, alors que le régulateur est toujours sous tension. Dans ces
circonstances et afin de renforcer la protection contre les chocs électriques, il est recommandé de mettre le
blindage du capteur de température à la terre. La mise à la terre du bâti de la machine n'est pas suffisante.
Protection thermique. Pour éviter la surchauffe du procédé en cas de défaillance, une unité de protection
séparée doit être prévue, afin d’isoler le circuit de chauffe. Elle doit avoir un capteur de température
indépendant Les relais d’alarme inclus dans l’appareil ne peuvent pas assurer une protection pour tous les
défauts.
Recommandations d’installation CEM. En conformité avec la Directive Européenne CEM, certaines précautions
sont à prendre :
• Généralités. Se référer au Guide d’installation CEM, Part no. HA025464.
• Sorties Relais. Il peut être nécessaire d’installer un filtre, pour supprimer les émissions. Les caractéristiques du
filtre dépendent de la charge.
• Installation sur établi. Si une prise classique est utilisée, il est préférable d’utiliser un filtre standard.
Dieses Gerät ist für die Verwendung in industriellen Temperatur
-
und Prozessregelanlagen vorgesehen und
entspricht den Anforderungen der Europäischen Richtlinien für Sicherheit und EMV.
Die Informationen in dieser Anleitung können ohne Hinweis geändert werden. Wir bemühen uns um die Richtigkeit
der Angaben in dieser Anleitung. Der Lieferant kann nicht für in der Anleitung enthaltene Fehler verantwortlich
gemacht werden.
Verwenden Sie das Gerät nicht nach den hier gegebenen Anweisungen, können Sicherheit und EMV beeinträchtigt
werden.
Sicherheit. Dieser Regler entspricht den Europäischen Richtlinien für Sicherheit und EMV. Es liegt in der
Verantwortung des Inbetriebnehmers, diese Richtlinien bei der Installation des Geräts einzuhalten.
Auspacken und Lagerung. Ist bei Empfang die Verpackung oder das Gerät beschädigt, sollten Sie den Regler
NICHT einbauen und den Hersteller benachrichtigen. Lagern Sie das Gerät vor Feuchtigkeit geschützt bei einer
Umgebungstemperatur zwischen -30 ºC und +75 ºC.
Elektrostatische Entladung. Haben Sie den Regler aus dem Gehäuse entfernt, können einige der freiliegenden
Bauteile durch elektrostatische Entladungen beschädigt werden. Beachten Sie deshalb alle Vorsichtsmaßnahmen
bezüglich statischer Entladungen.
Service und Reparatur. Dieses Gerät ist wartungsfrei. Sollte das Gerät einen Fehler aufweisen, kontaktieren Sie bitte
die nächste Eurotherm Niederlassung.
Reinigung. Verwenden Sie für die Reinigung der Geräteaufkleber kein Wasser oder auf Wasser basierende
Reinigungsmittel sondern Isopropyl Alkohol. Die Oberfläche der Geräte können Sie mit einer milden Seifenlösung
reinigen.
Elektromagnetische Verträglichkeit. Dieser Regler ist konform zu der EMV Richtlinie 2004/108/EC, und den
erforderlichen Schutzanforderungen. Das Gerät entspricht den allgemeinen Richtlinien für industrielle Umgebung,
definiert in EN 61326.
Achtung: Geladene Kondensatoren. Bevor Sie den Regler aus dem Gehäuse entfernen, nehmen Sie das Gerät vom
Netz und warten Sie etwa 2 Minuten, damit sich Kondensatoren entladen können. Vermeiden Sie jeden Kontakt mit
der Elektronik, wenn Sie das Gerät aus dem Gehäuse entfernen.
Symbole. Im Folgenden werden die auf dem Gerät angebrachten Sicherheits-Symbole erklärt:
Siehe Handbuch.
Stromschlaggefahr.
Treffen Sie Maßnahmen gegen elektrostatische
Entladungen.
C-Tick-Kennzeichen für Australien (ACA) und Neuseeland (RSM).
Entspricht der "40 Year Environment Friendly Usage Period".
3
RoHS
Beschränkung der Verwendung
bestimmter gefährlicher Stoffe.
Durch VERSTÄRKTE ISOLIERUNG geschützt
Überspannungskategorie und Verschmutzungsgrad. Dieses Produkt entspricht EN61010, Überspannungskategorie
II und Verschmutzungsgrad 2. Diese sind wie folgt definiert:
• Überspannungskategorie II. 2500V Steh-Stoßspannung bei 230Vac Nennspannung.
• Verschmutzungsgrad 2. Übliche, nicht leitfähige Verschmutzung; gelegentlich muss mit vorübergehender
Leitfähigkeit durch Betauung gerechnet werden.
Personal. Lassen Sie die Installation des Geräts nur von qualifiziertem Fachpersonal durchführen.
Berührung. Bauen Sie den Regler zum Schutz vor Berührung in ein Gehäuse ein.
Achtung: Fühler unter Spannung. Der Regler ist so konstruiert, dass der Temperaturfühler direkt mit einem
elektrischen Heizelement verbunden werden kann. Es liegt in Ihrer Verantwortung dafür zu sorgen, dass Service-
personal nicht an unter Spannung stehende Elemente gelangen kann. Ist der Fühler mit dem Heizelement
verbunden, müssen alle Leitungen, Anschlüsse und Schalter, die mit dem Fühler verbunden sind, für 230Vac +
15%
CATII ausgestattet sein.
Verdrahtung. Die Verdrahtung muss korrekt, entsprechend dieser Anleitung und den jeweils gültigen Vorschriften
erfolgen. Verwenden Sie ausschließlich Kupferleitungen. Die Verdrahtung muss mit allen örtlichen Vorschriften, z. B.
Großbritannien, den neuesten IEE Wiring Regulations (BS7671) und USA, NEC Class 1 Verdrahtung Methoden
konform sein.
Maximalspannungen. Die maximal anliegende Spannung der folgenden Klemmen muss weniger als 230Vac +15%
betragen: Relaisausgang zu Logik-; DC Fühlerverbindungen; jede Verbindung gegen Erde. Schließen Sie den Regler
nicht an Drehstromnetze ohne geerdeten Mittelpunkt an.
Umgebung. Leitende Verschmutzungen dürfen nicht in den Schaltschrank gelangen. Um eine geeignete
Umgebungsluft zu erreichen, bauen Sie einen Luftfilter in den Lufteintritt des Schaltschranks ein. Sollte das System in
kondensierender Umgebung stehen (niedrige Temperatur), bauen Sie eine thermostatgeregelte Heizung in den
Schaltschrank ein.
Erdung des Temperaturfühlerschirms. In manchen Anwendungen wird der Sensor bei laufendem System
gewechselt. In diesem Fall sollten Sie als zusätzlichen Schutz vor Stromschlag den Schirm des Temperatursensors
erden. Verbinden Sie den Schirm nicht mit dem Maschinengehäuse.
Anlagen- und Personensicherheit. Um eine Überhitzung des Prozesses im Fehlerfall zu verhindern, sollten Sie eine
getrennte Temperatur Schutzeinheit einbauen, die den Heizkreis isolieren kann. Dies kann ein unabhängiger
Temperatursensor sein. Das Alarmrelais dient nicht zum Schutz der Anlage, sondern nur zum Erkennen und
Anzeigen der Alarme.
EMV Installationshinweise. Um sicherzustellen, dass die EMV-Anforderungen eingehalten werden, treffen Sie
folgende Maßnahmen:
• Stellen Sie sicher, dass die Installation gemäß den "EMV-Installationshinweisen", Bestellnummer HA150976,
durchgeführt wird.
• Bei Relaisausgängen müssen Sie eventuell einen Filter einsetzen, um die Störaussendung zu unterdrücken.
• Verwenden Sie den Regler in einem Tischgehäuse, sind unter Umständen die Anforderungen der Fachgrundnorm
EN 50081-1 gültig. Bauen Sie in diesem Fall einen passenden Filter in das Gehäuse ein.
Example 1: To Operate Alarms
Up to 3 alarms are available. They may be ordered or configured using the Quick Codes
(page 1) or the ‘P’ codes page 3.
To Adjust Alarm Thresholds
In Operator Level 2, select AL1, AL2 or AL3 as appropriate
Press or to set the threshold
To Acknowledge an Alarm
There are three ways in which an alarm can be acknowledged:
1. In all cases Press to select Ac.AL. Then press or to YES.
2. Operate Digital Input 1or 2 (if configured)
3. Press (if configured, see configuration code P73)
If the alarm is still present the ALM beacon will light continuously.
By default alarms are configured as non-latching.
Example 2: To Operate the Timer
An internal timer can be configured to operate in three modes:
Dwell – to control a process at a fixed value for a defined period.
Delayed Switch on – to switch the output power on after a set time.
Soft Start – applies a power limit for a fixed period of time.
Set the time period using t.dUr.
For a dwell timer set t.thr to start the countdown when the PV is close to SP.
For a soft start timer set the power limit SS.oP, and the threshold SS.SP.
Using t.St set the timer to run, hold or reset, or from a suitably configured digital input
End will flash when the timer has timed out. The power output will go to a value set by P43.
Example 3: To Self Tune the Controller
Set the setpoint to around the normal working temperature.
Set the Output limits to a safe value
Select A.tun from the Level 2 list and set to it to YES
The controller will flash tunE in the operator display until the automatic tuning is complete.
Example 4: Energy Monitor
An estimate of energy usage is measured on one output only (normally heating) - configured
using P81.
Enter the nominal load power in KW in P82.
In Levels 1 & 2, E.Par will measure the energy usage for individual batches and E.tot for the
whole process. They may also have been customised to the second and third lines of the
operator display using P74 & P75.
Reset these using E.rSt available in Level 2. E.tot can only be reset after E.Par. P71, P72 or
P73 can customise one of the function buttons or the Page button to access this parameter.
Beispiel 1: Bedienung von Alarmen
Es sind bis zu 3 Alarme verfügbar. Sie können anhand der Schnellcodes (Seite 1) oder der "P"-
Codes (Seite 3) geordert oder konfiguriert werden.
Anpassung von Alarmgrenzwerten
Auf Bedienebene 2 wählen Sie AL1, AL2 oder AL3 (wie zutreffend)
Drücken Sie oder , um die Grenze einzustellen
Quittieren eines Alarms
Ein Alarm kann auf dreierlei Weise quittiert werden:
1. In allen Fällen: Drücken Sie , um Ac.AL auszuwählen. Wählen Sie anschließend mit
oder YES.
2. Bedienen Sie Digitaleingang 1 oder 2 (falls konfiguriert)
3. Drücken Sie (falls konfiguriert, siehe Konfigurationscode P73).
Falls der Alarm immer noch ansteht, ist das ALM-Blinklicht dauerhaft eingeschaltet.
Per Systemvorgabe sind Alarme als nicht-selbsthaltend konfiguriert.
Beispiel 2: Bedienung des Timers
Ein interner Timer kann für drei Betriebsarten konfiguriert werden:
Halten – zur Regelung eines Prozesses auf einem bestimmten Wert für eine definierte Zeit.
Einschaltverzögerung – um die Ausgangsleistung nach einer festgelegten Zeit einzuschalten.
Soft Start – legt für einen festgelegten Zeitraum eine Leistungsgrenze an.
Zeitdauer über t.dUr einstellen.
Bei einem Halte-Timer stellen Sie t.thr so ein, dass der Countdown beginnt, wenn der PV nah
am SP liegt.
Bei einem Soft-Start-Timer stellen Sie die Leistungsbegrenzung SS.oP und den Grenzwert SS.SP
ein.
Stellen Sie den Timer anhand t.St auf Läuft, Halten oder Reset, oder über einen entsprechend
konfigurierten Digitaleingang.
End blinkt, wenn der Timer abgelaufen ist. Der Leistungsausgang nimmt einen durch P43
festgelegten Wert an.
Beispiel 3: Selbstoptimierung des Reglers
Stellen Sie den Sollwert ungefähr auf die normale Arbeitstemperatur ein.
Stellen Sie die Ausgangsgrenzwerte auf einen sicheren Wert ein.
Wählen Sie A.tun aus der Liste der Ebene 2 und wählen Sie YES.
Der Regler blinkt tunE im Bedienerdisplay, bis die Selbstoptimierung abgeschlossen ist.
Beispiel 4: Energieüberwachung
Eine Schätzung des Energieverbrauchs wird nur an einem Ausgang gemessen (normalerweise
Heizen) - konfiguriert anhand von P81.
Geben Sie die nominale Leistungsregelung in kW in P82 ein.
Auf Ebene 1 & 2 wird über E.Par der Energieverbrauch für einzelne Chargen und E.tot für den
gesamten Prozess gemessen. Sie können auch auf die zweite und dritte Zeile des
Bedienerdisplays eingestellt worden sein (mittels P74 & P75).
Stellen Sie diese mittels E.rSt auf Ebene 2 zurück. E.tot kann nur nach E.Par. zurückgesetzt
werden. Über P71, P72 oder P73 kann eine der Funktionstasten oder die Bild-Taste zum Aufrufen
dieses Parameters kundenspezifisch belegt werden.
© Copyright Eurotherm Ltd
TM
2012
All rights are strictly reserved. Reproduction, distribution or
storage of this document in any manner is prohibited without
prior written consent from Eurotherm.
Information in this document may change without notice and
is intended for guidance only. Eurotherm will accept no
responsibility for any loses arising from errors in this
document.
© Copyright Eurotherm Ltd
TM
2012
Alle Rechte vorbehalten. Die Vervielfältigung, Verteilung
oder Speicherung dieses Dokuments in jeglicher Form ist
ohne vorherige schriftliche Einverständniserklärung von
Eurotherm nicht gestattet.
Die Informationen in diesem Dokument können ohne
Ankündigung geändert werden und dienen lediglich der
Orientierung. Eurotherm übernimmt keine Haftung für
Verluste, die durch Fehler in diesem Dokument entstehen.
© Copyright Eurotherm Ltd
TM
2012
Tous droits strictement réservés. Aucune partie de ce
document ne peut être reproduite, diffusée ou enregistrée
sous quelque forme que ce soit sans l'autorisation préalable
écrite d'Eurotherm.
Les informations contenues dans le présent document peuvent
être modifiées à tout moment et ne sont délivrées qu'à titre
informatif. Eurotherm décline toute responsabilité quant aux
pertes éventuelles consécutives à des erreurs commises dans le
présent document.
Ventes et Services. France
Eurotherm Automation SA, Lyon
T (+33 478) 664500
F (+33 478) 352490
Verkaufs- und Servicestellen. Deutschland
Eurotherm Deutschland GmbH, Limburg
T (+49 6431) 2980
F (+49 6431) 298119

1. Press to scroll through a list of parameters. (Press to scroll back).
2. Press or to adjust the value of a selected parameter.
3. Press to accept the value
The table below shows all possible parameters. The actual list will depend on features
configured.
SP
WORKING SETPOINT
read only when the controller is in ‘Man’ or ‘Off’ mode
oP
WORKING OUTPUT
read only when the controller is in ‘Auto’ or ‘Off’ mode
Ac.AL
ALARM ACKNOWLEDGE no, yes
A-N
LOOP MODE Auto, Nan, OFF
(Off = control outputs inhibited)
t.St
TIMER STATUS res (
reset
), rUn (
counting
), HoLd (
hold
), End (
timed out
)
E.rSt
ENERGY COUNTER RESET none, (
no action
) e.par (
Reset partial value),
e.tot (
Reset total
value)
e.tot is
only available if
E.Par
has been reset and the contents are equal to zero
)
Unit
DISPLAY UNITS none,
O
C,
O
F
SP.Lo
SETPOINT LOW LIMIT
SP.Hi
SETPOINT HIGH LIMIT
SP1
SETPOINT 1
SP2
SETPOINT 2
SP.SL
SETPOINT SELECT SP1, SP2
Read only when SP selection is configured by a digital input
SP.rr
SETPOINT RATE LIMIT OFF or 0.1 to 3000 units per minute
AL1
ALARM 1 SETPOINT
A1.HS
ALARM 1 HYSTERESIS
AL2
ALARM 2 SETPOINT
A2.Hs
ALARM 2 HYSTERESIS
AL3
ALARM 3 SETPOINT
A3.Hs
ALARM 3 HYSTERESIS
A.tun
AUTO-TUNE ENABLE OFF (
disabled
), On (
enable
)
Pb
PROPORTIONAL BAND 1 to 9999 (default 20%)
Ti
INTEGRAL TIME OFF, 1 to 9999 seconds (default 360)
Td
DERIVATIVE TIME OFF, 1 to 9999 seconds (default 60)
cb.Lo
CUTBACK LOW Auto, 1 to 9999 display units (default Auto = 3*Pb)
cb.Hi
CUTBACK HIGH Auto, 1 to 9999 display units (default Auto = 3*Pb)
Nr
MANUAL RESET -100 to 100 (default 0.0)
r2G
RELATIVE SECONDARY (COOL) GAIN 0.1 to 10.0 (default 1.0)
HyS
PRIMARY OUTPUT HYSTERESIS
Sets hysteresis for all outputs configured for ON/OFF Heating.
Available if single action ON/OFF controller.
HyS.C
SECONDARY OUTPUT HYSTERESIS
Sets hysteresis for all outputs configured for ON/OFF Cooling in a double action controller
d.bnd
HEATING/COOLING DEAD BAND OFF, 0.1 to 100% of cooling Pb. (default Off = no
deadband)
1.PLS
OUTPUT 1 MINIMUM PULSE TIME Relay outputs 0.1 to 150.0 seconds (default 5.0).
Logic outputs Auto to 150.0 (default Auto = 110ms)
2.PLS
OUTPUT 2 MINIMUM PULSE TIME
3.PLS
OUTPUT 3 MINIMUM PULSE TIME
4.PLS
OUTPUT 4 MINIMUM PULSE TIME
oFS
PV INPUT OFFSET (default 0)
FiLt
PV INPUT FILTER TIME oFF 0.1 to 100.0 seconds (default 1.6 seconds)
oP.Lo
OUTPUT LOW LIMIT +100.0% (default 0.0 heat only; -100% cool)
oP.Hi
OUTPUT HIGH LIMIT 100.0% (default 100%)
Ld.A
LOAD CURRENT read only
If the CT function is configured
.
LE.A
LEAK CURRENT read only
Ld.AL
LOAD CURRENT ALARM THRESHOLD
LE.AL
LEAKAGE CURRENT ALARM THRESHOLD
Hc.AL
OVERCURRENT ALARM THRESHOLD
E.PAr
ENERGY COUNTER PARTIAL VALUE
read only
E.tot
ENERGY COUNTER TOTAL VALUE
read only
t.dUr
REQUESTED TIME DURATION
SS.SP
SOFT START SETPOINT
If timer type = soft start
SS.oP
SOFT START OUTPUT POWER LIMIT
t.tHr
TIMER START THRESHOLD
t.EL
TIME ELAPSED
read only
t.rE
TIME REMAINING
ucAL
USER CALIBRATION
Select the point for two point offset
idLe (
not calibrating
), Lo (
low point cal
), Hi (
high point cal
), rESt (
remove user cal
)
C.Adj
CALIBRATION ADJUST If uCAL=Lo or Hi. Adjust for two point offset.
Other Levels of Operation To Select Level 2
There are 3 levels:
Lev1 - Level 1 has no pass code and is a
subset of Level 2 parameters.
Lev2 - Level 2 displays a full set of
operator parameter as mnemonics.
ConF - Configuration level sets all features
of the controller. See page 3.
Level 2 and Configuration level can be
protected by pass codes.
1. Press and hold until Goto is shown.
2. Release
3. Press to choose Lev 2.
4. Press .
5. Enter the pass code (if configured) using
or . Default = ‘2’
6. Press to accept the value
To Return to Level 1 see page 3
For further information see the Engineering Manual HA031260 at www.eurotherm.co.uk.
1. Appuyer sur pour faire défiler la liste des paramètres. (Appuyer sur pour revenir).
2. Appuyer sur ou pour régler la valeur du paramètre sélectionné.
3. Appuyer sur pour accepter la valeur
Le tableau ci-dessous indique tous les paramètres possibles. La véritable liste dépendra des
fonctions configurées.
SP
CONSIGNE ACTIVE
lecture seule quand le régulateur est en mode ‘Man’ ou ‘Off’
oP
CONSIGNE ACTIVE
lecture seule quand le régulateur est en mode ‘Auto’ ou ‘Off’
Ac.AL
ACQUITTEMENT ALARME non, oui
A-N
MODE de la BOUCLE
Auto, Nan, OFF
(Off = sorties de commande inhibées)
t.St
ÉTAT DU TEMPORISATEUR res (
réinitialiser
), rUn (
Départ
), HoLd (
pause
), End (
temps écoulé
)
e.rst
RÉINITIALISATION DU COMPTEUR D'ÉNERGIE none, (
aucune action
) e.par (
Réinitialisation de
valeur partielle),
e.tot (
Réinitialisation de valeur
totale
)
e.tot est uniquement disponible si
E.Par
a
été réinitialisé et les contenus sont égal à zéro
)
Unit
UNITÉS D'AFFICHAGE none,
O
C,
O
F
SP.Lo
LIMITE BASSE DU POINT DE CONSIGNE
SP.Hi
LIMITE HAUTE DU POINT DE CONSIGNE
SP1
CONSIGNE 1
SP2
CONSIGNE 2
SP.SL
SELECTION DU POINT DE CONSIGNE SP1, SP2
Lecture seule quand la sélection SP est configurée par une entrée
numérique
SP.rr
RAMPE DE CONSIGNE OFF ou 0,1 à 3000 unités par minute
AL1
CONSIGNE D'ALARME 1
A1.HS
HYSTERESIS DE L'ALARME 1
AL2
CONSIGNE D'ALARME 2
A2.Hs
HYSTERESIS DE L'ALARME 12
AL3
CONSIGNE D'ALARME 3
A3.Hs
HYSTERESIS DE L'ALARME 3
A.tun
AUTO-TUNE ACTIVÉ OFF (
désactivé
), On (
activé
)
Pb
BANDE PROPORTIONNELLE 1 à 9999 (défaut 20%)
Ti
TEMPS D’INTÉGRALE OFF 1 à 9999 secondes (360 par défaut)
Td
TEMPS DE DERIVEE OFF 1 à 9999 secondes (60 par défaut)
cb.Lo
RÉDUCTION BASSE Auto, 1 à 9999 unités affichées (par défaut Auto = 3*Pb)
cb.Hi
RÉDUCTION HAUTE Auto, 1 à 9999 unités affichées (par défaut Auto = 3*Pb)
Nr
INTEGRALE MANUELLE -100 à 100 (par défaut 0.0)
r2G
GAIN SECONDAIRE (REFROIDISSEMENT) RELATIF 0.1 à 10.0 (1.0 par défaut)
HyS
HYSTERESIS SORTIE PRINCIPALE
Règle hystérésis pour toutes les sorties configurées pour le
chauffage ON/OFF. Disponible si le régulateur est configuré en mode ON/OFF.
HyS.C
HYSTERESIS SORTIE SECONDAIRE
Règle hystérésis pour toutes les sorties configurées pour le
refroidissement ON/OFF dans un régulateur double action
d.bnd
BANDE MORTE CHAUFFAGE/REFROIDISSEMENT OFF, 0,1 à 100% de la Pb de refroidissement.
(par défaut Off = pas de bande morte)
1.PLS
SORTIE 1 TEMPS MINIMUM D’IMPULSION Sorties relais 0.1 à 150.0 secondes – 5.0 par
défaut.
Sorties logiques Auto à 150.0 – Auto par
défaut = 110 ms
2.PLS
SORTIE 2 TEMPS MINIMUM D’IMPULSION
3.PLS
SORTIE 3 TEMPS MINIMUM D’IMPULSION
4.PLS
SORTIE 4 TEMPS MINIMUM D’IMPULSION
oFS
ÉCART ENTRÉE PV (par défaut 0)
FiLt
TEMPS DE FILTRE D’ENTRÉE PV oFF 0.1 à 100.0 secondes (1,6 secondes par défaut)
oP.Lo
LIMITE BASSE DE SORTIE +100.0% (par défaut 0,0 chauffage uniquement ; -100% refroidissement)
oP.Hi
LIMITE HAUTE DE SORTIE 100.0% (100% par défaut)
Ld.A
COURANT DE CHARGE lecture seule
Si la fonction CT est configurée
.
LE.A
COURANT DE FUITE lecture seule
Ld.AL
SEUIL D’ALARME DU COURANT DE CHARGE
LE.AL
SEUIL D’ALARME DU COURANT DE FUITE
Hc.AL
SEUIL D'ALARME DE SURINTENSITÉ
E.PAr
VALEUR PARTIELLE DU COMPTEUR D'ÉNERGIE
lecture seule
E.tot
VALEUR TOTALE DU COMPTEUR D'ÉNERGIE
lecture seule
t.dUr
DUREE DE TEMPS REQUISE
SS.SP
CONSIGNE DE DÉMARRAGE PROGRESSIF
Si type de temporisateur = démarrage
progressif
SS.oP
LIMITE DE PUISSANCE DE DÉMARRAGE PROGRESSIF
t.tHr
SEUIL DE DEMARRAGE
TIME
t.EL
TEMPS ÉCOULÉ
lecture seule
t.rE
TEMPS RESTANT
ucAL
CALIBRATION UTILISATEUR
Sélectionner le point pour un décalage en deux points
idLe (
pas d'étalonnage
), Lo (
étal. point bas
), Hi (
étal. point haut
), rESt (
supprimer étal. utilisateur
)
C.Adj
RÉGLAGE CALIBRATION Si uCAL=Lo ou Hi. Ajuster en deux point de décalage
1. drücken, um eine Liste von Parametern durchzugehen. ( drücken, um rückwärts zu
gehen).
2. oder drücken, um den Wert eines markierten Parameters zu verändern.
3. drücken, um den Wert zu akzeptieren.
In der nachstehenden Tabelle sind alle möglichen Parameter aufgeführt. Die tatsächliche Liste hängt
von den konfigurierten Elementen ab.
SP
ARBEITS
SOLLWERT
Schreibgeschützt, wenn sich der Regler in der Betriebsart "Hand" oder "AUS"
befindet.
oP
ARBEITSAUSGANG
Schreibgeschützt, wenn sich der Regler in der Betriebsart "Auto" oder "AUS"
befindet
.
Ac.AL
ALARM QUITTIEREN
no, yes
A-N
REGELKREIS-MODUS
Auto
,
Nan
,
OFF
(Off = Reglerausgänge unterdrückt)
t.St
TIMER STATUS
res
(
Reset
)
rUn
(
Zählvorgang läuft
)
HoLd
(
Halten
)
End
(
Zeitsperre
)
e.rst
ENERGIEZÄHLER RESET
none
, (keine Aktion)
e.par
(Reset Teilwert)
e.tot
(Reset Gesamtwert)
e.tot ist nur verfügbar wenn E.Par zurückgesetzt wurde und der Inhalt = Null ist
Unit
ANZEIGEEINHEITEN keine,
O
C
,
O
F
SP.Lo
SOLLWERT UNTERE GRENZE
SP.Hi
SOLLWERT OBERE GRENZE
SP1
SOLLWERT 1
SP2
SOLLWERT 2
SP.SL
SOLLWERT WÄHLEN
SP1
,
SP2
Schreibgeschützt, wenn Sollwertauswahl durch Digitaleingang konfiguriert wird
SP.rr
SOLLWERTRAMPE
OFF
oder
0
,
1
bis
3000
Einheiten pro Minute
AL1
ALARM SOLLWERT 1
A1.HS
ALARM 1 HYSTERESE
AL2
ALARM SOLLWERT 2
A2.Hs
ALARM 2 HYSTERESE
AL3
ALARM SOLLWERT 3
A3.Hs
ALARM 3 HYSTERESE
A.tun
SELBSTOPTIMIERUNG AKTIVIEREN
OFF
(
deaktiviert
),
On
(
aktivier
)
Pb
PROPORTIONALBAND 1 bis 9999 (Systemvorgabe 20%)
Ti
INTEGRALZEIT OFF, 1 bis 9999 Sekunden (Systemvorgabe 360)
Td
DIFFERENTIALZEIT OFF, 1 bis 9999 Sekunden (Systemvorgabe 60)
cb.Lo
CUTBACK LOW Auto, 1 bis 9999 Anzeigeeinheiten (Systemvorgabe Auto = 3*Pb)
cb.Hi
CUTBACK HIGH Auto, 1 bis 9999 Anzeigeeinheiten (Systemvorgabe Auto = 3*Pb)
Nr
MANUELLER RESET -100 bis 100 (Systemvorgabe 0,0)
r2G
RELATIVE SEKUNDÄRE KÜHLVERSTÄRKUNG 0,1 bis 10,0 (Systemvorgabe 1,0)
HyS
HYSTERESE PRIMÄRAUSGANG
Legt die Hysterese für alle für EIN/AUS-Heizen konfigurierten Ausgänge fest. Verfügbar bei
EIN/AUS-Reglern mit einzelner Aktion.
HyS.C
HYSTERESE SEKUNDÄRAUSGANG
Legt die Hysterese für alle für EIN/AUS-Kühlen konfigurierten Ausgänge in einem Regler mit
zweifacher Aktion fest.
d.bnd
HEIZEN/KÜHLEN TOTBAND
OFF
,
0
,
1
bis
100
% des Kühl-
Pb
. (Systemvorgabe
OFF
= kein
Totband)
1.PLS
AUSGANG 1 MINIMALE IMPULSZEIT
Relaisausgänge 0,1 bis 150,0 Sekunden
(Systemvorgabe 5,0).
Logikausgänge Auto bis 150,0
(Systemvorgabe Auto = 110ms)
2.PLS
AUSGANG 2 MINIMALE IMPULSZEIT
3.PLS
AUSGANG 3 MINIMALE IMPULSZEIT
4.PLS
AUSGANG 4 MINIMALE IMPULSZEIT
oFS
PV EINGANG OFFSET (Systemvorgabe 0)
FiLt
PV EINGANG FILTERZEIT OFF 0,1 bis 100,0 Sekunden (Systemvorgabe 1,6 Sekunden)
oP.Lo
AUSGANG UNTER GRENZE -100,0% (Systemvorgabe 0,0 nur Heizen; -100% Kühlen)
oP.Hi
AUSGANG OBERE GRENZE 100,0% (Systemvorgabe 100%)
Ld.A
LASTSTROM
Schreibgeschützt
Falls die CT-Funktion konfiguriert wurde
.
LE.A
LECKSTROM
Schreibgeschütz
t
Ld.AL
LASTSTROM ALARMGRENZWERT
LE.AL
LECKSTROM ALARMGRENZWERT
Hc.AL
ÜBERSTROM-ALARMGRENZWERT
E.PAr
ENERGIEZÄHLER
-
TEILWERT
Schreibgeschützt
E.tot
GESAMTWERT ENERGIEZÄHLER Schreibgeschützt
t.dUr
ANGEFORDERTE ZEIT
SS.SP
SOFT
-
START
-
SOLLWERT
Bei Timer
-
Typ = Soft Start
SS.oP
SOFT
-
START
-
AUSGANGSLEISTUNGSGRENZE
t.tHr
TIMER START THRESHOLD
t.EL
VERGANGENE ZEIT
Schreibgeschützt
.
t.rE
RESTZEIT
ucAL
BENUTZERKALIBRIERUNG Wählen Sie einen Punkt für 2-Punkt-Anpassung. idLe
(nicht
kalibrieren),
Lo (
unterer Kalibrierpunkt)
Hi (
oberer
Kalibrierpunkt
.), rESt (
Anpassung entfernen
)
C.Adj
KALIBRIERUNG ANPASSEN Bei uCAL = Lo oder H. Justage für 2-Punkt-Anpassung.
Pour revenir au niveau 1 voir page 3
Pour plus d'information, se reporter au Manuel d'ingénierie HA031260 à www.eurotherm.co.uk.
Um zur Ebene 1 zurückzukehren, siehe Seite 3
Weitere Informationen siehe Engineering Manual HA031260 auf www.eurotherm.co.uk.
Autres niveaux d'opérateur Pour sélectionner le niveau 2
Il existe 3 niveaux :
Lev1 - Le niveau 1 n'a pas de code de sécurité
et constitue un sous-ensemble des paramètres
de niveau 2.
Lev2 - Le niveau 2 affiche un ensemble de
paramètre d'opérateur en mnémoniques.
ConF - Le niveau de configuration règle toutes
les fonctions du régulateur. Voir Page 3.
Le niveau 2 et le niveau de configuration
peuvent être protégés par des codes de
sécurité.
1. Enfoncer et maintenir jusqu'à ce que
"Goto" (aller à) s'affiche.
2. Relâcher
3. Enfoncer pour sélectionner Lev 2.
4. Appuyer sur .
5. Saisir le code de sécurité (s'il est configuré)
au moyen de ou . Par défaut = 2
6. Appuyer sur pour accepter la valeur
Andere Betriebsebenen Auswahl von Ebene 2
Es gibt 3 Ebenen:
Lev1 – Ebene 1 Hat kein Passwort und
zeigt eine Auswahl von Parametern der
Ebene 2.
Lev2 - Ebene 2 zeigt einen vollen Satz
Bedienerparameter in Mnemonik
ConF - Konfigurationsebene stellt alle
Eigenschaften des Reglers ein. Siehe Seite
3.
Ebene 2 und die Konfigurationsebene
können durch Passwörter geschützt
werden.
1. drücken und halten, bis Goto erscheint.
2. loslassen
3. drücken, um Lev 2 auszuwählen.
4. drücken.
5. Falls konfiguriert, Passwort mittels oder
eingeben. Systemvorgabe = ‘2’
6. drücken, um den Wert zu akzeptieren.
Operator Level 2 Parameters Paramètres opérateur de niveau 2 Parameter auf Bedienebene 2
Page 2 Further Information Page 2 Information supplémentaire Seite 2 Weitere Informationen
Entrée du capteur (mesure) IP1
• Ne pas acheminer les câbles d'entrée avec les câbles d'alimentation
• Câble blindé mis à la terre en un seul point
• L'entrée du capteur est non isolé par rapport aux sorties numériques et aux entrées numériques.
• Utiliser un câble de compensation approprié pour la connection au régulateur.
Fühlereingang (Messeingang) IP1
• Verlegen Sie die Eingangskabel nicht zusammen mit Versorgungskabeln.
• Erden Sie abgeschirmte Kabel nur an einem Ende.
• Fühlereingang ist nicht von Digitalausgängen und Digitaleingängen isoliert.
• Verwenden Sie eine entsprechende Ausgleichsleitung, um die Thermoelementverkabelung
zu verlängern.
Sensor (Measuring) Input IP1
• Do not run input wires with power cables
• Ground shielded cable at one point only
• Sensor input not isolated from the digital outputs & digital inputs
• Use appropriate compensating cable to extend thermocouple cabling.
8
Digital Inputs 1 and 2 (Digital Input 2 is not available in P116)
• Not isolated from CT or sensor inputs • Contact open > 600Ω.
• Contact closed < 300 Ω
10
Entrées numériques 1 et 2 (Entrée numérique 2 indisponible en P116)
• Non isolée du CT ou des entrées du capteur • Contact ouvert > 600 Ω.
• Contact fermé < 300 Ω
Digital-Eingänge 1 und 2 (Digitaleingang 2 ist in P116 nicht verfügbar)
• Nicht von CT oder Fühlereingängen
isoliert
• Kontakt offen > 600Ω.
• Kontakt geschlossen < 300 Ω
Digital Communications
• Digital communications is EIA485 (3-wire) and uses Modbus protocol.
11 Communications numériques
• Les communications numériques sont EIA485 (3-câbles) et emploie le protocole Modbus.
24V Transmitter Power Supply (Not available in P116)
• Output 24Vdc +10% <28mA
12
Alimentation transmetteur 24V (non disponible en P116)
• Sortie 24Vcc +10% <28mA
24V Transmitter-Stromversorgung (nicht in P116 verfügbar)
• Ausgang 24Vdc +10% <28mA
Transformateur de courant
• Courant d’entrée CT (Transformateur de courant) 0-50 mA efficace (sinusoïdal, calibré) 48/62Hz
• Une résistance de shunt, d’une valeur de 10Ω, est montée à l’intérieur du régulateur
• Installer un dispositif limiteur de tension, comme deux diodes Zener tête-bêche, aux bornes du
CT, pour empêcher les courants transitoires haute tension en cas de débranchement du
régulateur.
Stromwandler
• CT-Eingangsstrom: 0-50mAeff (Sinuswelle, kalibriert) 48/62Hz.
• Ein 10W, Bürdenwiderstand, im Innern des Reglers installiert
• Bringen Sie einen Spannungsbegrenzer wie z. B. zwei Ende an Ende angeschlossene Zener-
Dioden am CT an, um hohe Spannungswerte beim Ausstöpseln des Reglers zu vermeiden.
Current Transformer
• CT input current: 0-50mA rms (sine wave, calibrated) 48/62Hz.
• A 10Ω, burden resistor, is fitted inside the controller
• Fit a voltage limiting device, such as two back to back zener diodes, across the CT, to
prevent high voltages if the controller is unplugged.
3 - 10V
50mA.
13
GB F D
Sorties OP1, OP2, OP3, OP4
Relais OP1/2/3
Relais OP4
• Pouvoir de coupure : 2 A 230V CA +15%
résistive
OP1 Logique
• État actif : 12 V CC à 40 mA maxi
• État désactivé : <300mV, <100μA
• Non isolée du l’entrée du capteur
OP2 (P116) OP3 (P108/P104)
0-20 mA ou 4-20 mA. Isolée.
• Résistance de charge maxi : 500Ω
Triac OP2
• Puissance : 0,75 A efficace (rms), 30V minimun -
230V CA +15% sur charge résistive
RC (Snubber) Lors de la commutation de charges inductives, notamment dans le cas de certains
contacteurs ou électrovannes, installer le snubber entre les contacts de relais normalement ouvert pour
prolonger la vie utile du relais.
Installer entre les bornes d'une sortie triac pour éviter les fausses alarmes en cas d'importants courants
transitoires.
Ne pas installer le snubber pour des charges ca à forte impédance. Il est possible qu'il maintienne la
sortie activée de manière permanente.
Outputs OP1, OP2, OP3, OP4
OP1/2/3 Normally open relays
OP4 Changeover relay
• Contact rating: 2A 230Vac +15% resistive
OP1 Logic
• ON state: 12Vdc at 40mA max
• OFF state: <300mV, <100μA
• Not isolated from the sensor input
OP2 (P116) OP3 (P108/P104)
0-20mA or 4-20mA. Isolated.
• Max load resistance:500Ω
OP2 Triac
• Rating: 0.75A rms, 30V minimum - 230Vac
+
15% resistive
RC (Snubber) If switching inductive loads such as some contactors and solenoids, fit the
snubber across normally open relay contacts to prolong relay life.
Fit across the output terminals of a triac to prevent false triggering due to large transients.
Do not fit the snubber for high impedance ac loads if there is a possibility that it will hold the
output permanently on.
9
Ausgänge OP1, OP2, OP3, OP4
OP1/2/3 Relais
OP4 Relais
• Kontakt-Nennwert: 230Vac +15% ohm'sch
OP1 Logik
• EIN-Zustand: 12Vdc bei 40mA max.
• AUS-Zustand: <300mV, <100mA
• Nicht vom Fühlereingang isoliert
OP2 (P116) OP3 (P108/P104)
0-20mA oder 4-20mA. Isoliert.
• Maximaler Lastwiderstand: 500
Ω
OP2 Triac
• Nennleistung: 0,75Aeff, 30V minimum -
230Vac +
15%ohm'sch
RC-Glied Beim Schalten von induktiven Lasten, wie z. B. einigen Kontaktgebern oder
Magnetventilen, installieren Sie das RC-Glied an den normalerweise offenen Relaiskontakten,
um die Relais-Lebensdauer zu verlängern. An den Ausgangsklemmen eines Triac installiert,
vermeidet das RC-Glied Fehlauslösungen aufgrund großer Überspannungen. Verwenden Sie
RC-Glieder nicht für AC-Lasten mit hoher Impedanz, falls eine Möglichkeit besteht, dass der
Ausgang so permanent eingeschaltet bleibt.
Digitale Kommunikation
• Die digitale Kommunikation ist EIA485 (3-Leiter) mit Modbus-Protokoll.
Alimentation électrique
S'assurer que l'alimentation convient à votre régulateur
1. Alimentation haute tension, code VH, 100 à 230Vca +15%, 48 – 62Hz.
2. La polarité de l'alimentation basse tension, code VL, 24Vca/cc n'est pas importante.
3. N'utiliser que des conducteurs en cuivre.
Les fusibles doivent être fournis en externe. Type de fusible conseillé :
T, 2 A 250 V. Pour une alimentation 230V et 24V
• Un interrupteur ou disjoncteur doit être inclus dans l’installation électrique
• que ce dernier doit être situé à proximité immédiate de l'équipement et facilement accessible
par l'opérateur
• qu'il doit être clairement identifié comme dispositif de sectionnement de l'équipement.
Notes : un seul interrupteur ou disjoncteur peut commander plusieurs instruments.
Un raccord à la terre (masse) n'est pas nécessaire.
!
Stromversorgung
Achten Sie auf die richtige Versorgung für Ihren Regler.
1. Hochspannungsversorgung, code VH, 100 bis 230Vac +
15%, 48 – 62Hz.
2. Niederspannungsversorgung, code, VL, 24Vac/dc. Die Polarität spielt keine Rolle.
3. Benutzen Sie ausschließlich Kupferleiter.
Sicherungen sollten extern bereitgestellt werden. Empfohlener Sicherungstyp: T, 2A 250V. Für
230V- und 24V-Versorgung
• Die Apparatur muss einen Schalter oder Unterbrecher aufweisen.
• Dieser muss sich in unmittelbarer Nähe der Apparatur befinden und für den Bediener leicht
erreichbar sein.
• Kennzeichnung als Abschaltvorrichtung für die Apparatur erforderlich.
Anmerkungen: Ein Schalter oder Unterbrecher kann für mehr als nur ein Gerät eingesetzt
werden.
Eine Erdung ist nicht erforderlich.
!
Power Supply
Ensure that the supply is correct for your controller
1. High voltage supply, code VH, 100 to 230Vac +15%, 48 – 62Hz.
2. Low voltage supply, code VL, 24Vac/dc polarity is not important.
3. Use copper conductors only.
Fuses should be provided externally. Recommended fuse type:
T rated 2A 250V. For 230V and 24V supply
24Vac -15% +10%
48-62Hz
24Vdc -15% +20%
5% max ripple.
P116 6W max. P108 &
P104 8W max.
• A switch or circuit breaker must be included in the building installation
• It shall be in close proximity to the equipment and within easy reach of the operator
• It shall be marked as the disconnecting device for the equipment.
Notes: A single switch or circuit breaker can drive more than one instrument.
An earth (ground) connection is not required.
7
!

To Select Configuration Level
To Configure the Controller
1. Press and hold until Goto is shown.
2. Release
and press to choose
Conf
3. Press . codE will be displayed
4. Press or to enter the pass code.
Default = ‘4’
5. Press . The display will show ConF
6. Press to scroll through a list of ‘P’
codes. (Press to scroll back).
7. Press or to change its value
8. Press to accept
To Return to previous levels
Repeat 1, 2, and 3 but select LEv 1 or
Lev2
Page 3 Advanced Information - Configuration Page 3 Information avancée - Configuration Seite 3 Erweiterte Informationen - Konfiguration
Pour sélectionner le niveau de conf.
Pour configurer le régulateur
1. Enfoncer et maintenir jusqu'à ce que
"Goto" (aller à) s'affiche.
2. Relâcher et appuyer sur pour
sélectionner Conf
3. Appuyer sur . codE s'affiche
4. Appuyer sur ou pour entrer le
code de sécurité. Par défaut = ’4’
5. Appuyer sur . L'écran affiche ConF
6. Appuyer sur pour faire défiler la liste
des codes 'P'. (Appuyer sur pour
revenir).
7. Appuyer sur ou pour modifier sa
valeur
8. Appuyer sur pour accepter
Pour revenir aux niveaux précédents
Répétez les étapes 1, 2 et 3 mais sélectionnez
Lev 1 ou LEv2
Auswahl der Konfigurationsebene Konfigurieren des Reglers
1. drücken und halten, bis "Goto"
erscheint.
2. loslassen und drücken, um
Conf auszuwählen.
3. drücken. Es erscheint "codE".
4. Drücken Sie oder , um das
Passwort einzugeben. Vorgabe = '4'
5. drücken. Im Display erscheint
“ConF”.
6. drücken, um eine Liste von 'P'-Codes
durchzugehen. ( drücken, um rückwärts
zu gehen).
7. oder drücken, um den Wert zu
ändern.
8. Zum Annehmen drücken.
Rückkehr zu vorigen Ebenen
1, 2 und 3 wiederholen, dabei LEv 1 oder Lev2
wählen.
GB F
D
P1 Sensor input
J .tc
Thermocouple type J (default)
cA.tc
Thermocouple type K
L .tc
Thermocouple type L
R .tc
Thermocouple type R
B .tc
Thermocouple type B
N .tc
Thermocouple type N
T .tc
Thermocouple type T
S .tc
Thermocouple type S
C .tc
Custom linearisation pre-loaded with
thermocouple type C
rtd
Pt100
Nv
-10 to +80mV linear
0.20
0 – 20mA linear
4.20
4 – 20mA linear
P2 Decimal point position
nnnn
No decimal places (default)
nnn.n
One decimal place
nn.nn
Two decimal places
P3 Low scale range value
Limited by the high scale range value
P4 High scale range value
Limited by the low scale range value
P5 Linear input millivolts low
-10mV
+80mV
P6 Linear input millivolts high
P7 Control type
None
Control action disabled
HP
PID heating (default)
Ho
ON/OFF heating
CP
PID cooling
Co
ON/OFF cooling
HP.CP
PID heat PID cool
HP.CO
PID heat ON/OFF cool
Ho.CP
ON/OFF heat PID cool
Ho.Co
ON/OFF heat ON/OFF cool
P8 Non linear cooling type
Lin
Linear (default)
H2o
Water
oiL
Oil
FAn
Forced air
P11 Output 1
P14 Output 4
nonE
Output disabled
Heat
Heat output. (P11 default).
CooL
Cool output.
AL1
Alarm 1
AL1.i
Alarm 1 inverted
AL2
Alarm 2
(P 14 default)
AL2.i
Alarm 2 inverted
AL3
Alarm 3 P11 default if heat is not
configured
AL3.i
Alarm 3 inverted
t.End
Timer end status
t.rUn
Timer run status
P12
Output 2
P13 Output 3 (not in P116)
nonE
Output disabled (default)
Heat
Heat output
CooL
Cool output
AL1
Alarm 1
AL1.i
Alarm 1 inverted
AL2
Alarm 2
AL2.i
Alarm 2 inverted
AL3
Alarm 3
AL3.i
Alarm 3 inverted
SP.rt
SP re-transmission
oP.rt
OP re-transmission
Pv.rt
PV re-transmission
t.run
Timer run status
t.End
Timer end status
P15 DC out range
0.20
0 – 20mA
4.20
4 – 20mA (default)
P16 SP Retransmission low scale value
Clipped to SP.Lo
P17 SP Retransmission high scale value
Clipped to SP.Hi
P16 & P17 are only shown for a DC
output and P12/P13 = SP.rt
P21 Alarm 1 Type
P24 Alarm 2 Type
P27 Alarm 3 Type
nonE
Unconfigured (P21 & P27 default)
Hi
Full scale high (P24 default)
Lo
Full scale low
d.Hi
Deviation high
d.Lo
Deviation low
bnd
Deviation band
P22 Alarm 1 Latching
P25 Alarm 2 Latching
P28 Alarm 3 Latching
nonE
Non latching (default)
Auto
Latching with automatic reset
Nan
Latching manual reset
no.AL
Non latching no ALM indication
P23 Alarm 1 blocking
P26 Alarm 2 blocking
P29 Alarm 3 blocking
No
No blocking (default)
Yes
Blocking
P31 Current transformer source
None
CT not used (default)
oP1
CT measure on output 1
oP2
CT measure on output 2
oP3
CT measure on output 3
oP4
CT measure on output 4
P32 Current transformer range
10.0 to 999.9 amps
P33 Current transformer alarm latching
none
Non latching (default)
AUto
Latching with automatic reset
Nan
Latching with manual reset
P34 Loop break alarm time
OFF or 1 to 9999 seconds
To Return to Level 1 see Page 3
P35 Sensor break alarm type
on
Open circuit sensor will be detected
(default)
LAt
Open circuit sensor alarm will be
latched
oFF
Open circuit sensor will not be
detected
P36 Sensor break safe output power
-100% to 0% to 100%
P37 Sensor break alarms output
none
Indication only – does not operate an
output (default)
AL1 -
AL3
Break alarms output (current
transformer, loop, sensor)
P41 Timer configuration
nonE
Timer disabled (default)
d.LL
Dwell
dELy
Delayed switch on
SS
Soft start
P42 Timer resolution
HoUr
Hours HH:MM (default)
Nin
Minutes MM:SS
P43 Timer end type
oFF
Control goes to 0% (default)
dLL
Dwell at SP1
SP2
Control switches to SP2
rES
Timer resets
P51 Digital input DI1
P52
Digital input DI2 (not in P116)
nonE
Input not used (default)
Ac.AL
Alarm acknowledge
SP.SL
Setpoit 2 select
Loc.b
Front keypad disabled (keylock)
t.reS
Timer reset
t.rUn
Timer run
t.rrS
Timer run/reset
t.HLd
Timer hold
Nan
Manual status
Sby
Standby mode
P61 Comms address
1 to 254 (default to 1)
P62 Comms baud rate
9600
9600 bps (default)
19.20
19200 bps
4800
4800 bps
2400
2400 bps
1200
1200 bps
P63 Comms parity setting
nonE
No parity (default)
Even
Even parity
odd
Odd parity
P64 Comms slave/master transmission
nonE
Master comms disabled
.SP
Broadcast working SP
.Pv
Broadcast process variable
.oP
Broadcast output power
.Err
Broadcast error
P65 Comms retransmission address
0 to 9999 (default to 0)
P71 Pushbutton F1
P72 Pushbutton F2
P73 Pushbutton Page
nonE
Pushbutton not used
Ac.AL
Alarm acknowledge
SP.SL
Setpoint 2 select (P73 default)
A-N
Manual status (P71 default)
t.St
Timer/programmer run/reset (P72
default)
e.rst
Reset energy counter
P74 Display second line content
P75 Display third line content
Std
Working setpoint (default P74)
oP
Output power (default P75)
t.rE
Time remaining
t.EL
Time elapsed
E.Par
Energy counter (partial value)
E.tot
Energy counter (total value)
nonE
Second/third line not used
P76 Lev2 Pass code.
Default value: 2
P77 Configuration mode Pass code.
Default value: 4
P81 Energy Meter Source
nonE
Energy meter disabled (default)
oP1 -
op4
Energy estimation on OP1/2/3 or 4
P82 Energy meter output rated power
0.10 – 99.99 kW (default to 1kW)
rEc.S
Recovery point save
none
Do nothing (default)
Save
Snapshot current parameters
rEc.L
Recovery point load
none
Do nothing
LoAd
Restore the saved values
Fact
Restore the factory default
coLd
Cold start
PHAS
Calibration phase
For details
see the
Engineering
manual
A description of configuration parameters is
given in the Engineering Manual HA031260
available from www.eurotherm.co.uk.
Configuration ‘P’ Codes Codes de Configuration ‘P’ Konfigurieren von ‘P’-Codes
P1 Sensoreingang
J.tc
Thermoelement Typ J (Systemvorgabe)
cA.tc
Thermoelement Typ K
L.tc
Thermoelement Typ L
r.tc
Thermoelement Typ R
b.tc
Thermoelement Typ B
n.tc
Thermoelement Typ N
t.tc
Thermoelement Typ T
S.tc
Thermoelement Typ S
Ctc
Voreinstellung der kundenspezifischen
Linearisierung auf Thermoelement Typ
C
rtd
Pt100
Nv
-10 bis +80mV linear
0.20
0 – 20mA linear
4.20
4 – 20mA linear
P2 Dezimalstellen
nnnn
Anzahl der Dezimalstellen (Systemvorgabe)
nnn.n
Eine Dezimalstelle
nn.nn
Zwei Dezimalstellen
P3 Unterer Skalenbereichswert
Begrenzt durch den hohen
Skalenbereichswert
P4 Oberer Skalenbereichswert
Begrenzt durch den niedrigen
Skalenbereichswert
P5
Lineareingang tief, mV
-
10mV
+80mV
P6
Lineareingang hoch, mV
P7 Regelungsart
None
Regelaktion deaktiviert
HP
PID Heizen (Systemvorgabe)
Ho
EIN/AUS Heizen
CP
PID Kühlen
Co
EIN/AUS Kühlen
HP.CP
PID Heizen PID Kühlen
HP.CO
PID Heizen EIN/AUS Kühlen
Ho.CP
EIN/AUS Heizen PID Kühlen
Ho.Co
EIN/AUS Heizen EIN/AUS Kühlen
P8 Nichtlinearer Kühlungstyp
Lin
Linear (Systemvorgabe)
H2o
Wasser
oiL
Öl
FAn
Zwangslüftung
P11 Ausgang 1
P14 Ausgang 4
nonE
Ausgang deaktiviert
Heat
Heizausgang. (P11 Systemvorgabe)
CooL
Kühlausgang
AL1
Alarm 1
AL1.i
Alarm 1 invertiert
AL2
Alarm 2 (P14 Systemvorgabe)
AL2.i
Alarm 2 invertiert
AL3
Alarm 3
P11 Systemvorgabe, falls Heizen
nicht konfiguriert
AL3.i
Alarm 3 invertiert
t.End
Timer
-
Endstatus
t.rUn
Timer
-
läuft
-
Status
P12 Ausgang 2
P13 Ausgang 3 (nicht in P116)
nonE
Ausgang deaktiviert (Systemvorgabe)
Heat
Heizausgang
CooL
Kühlausgang
AL1
Alarm 1
AL1.i
Alarm 1 invertiert
AL2
Alarm 2 (P14 Systemvorgabe)
AL2.i
Alarm 2 invertiert
AL3
Alarm 3, falls Heizen nicht konfiguriert
AL3.i
Alarm 3 invertiert
SP.rt
SP
-
Rückübertragung
oP.rt
OP
-
Rückübertragung
Pv.rt
PV
-
Rückübertragung
t.run
Timer
-
läuft
-
Status
t.End
Timer
-
Endstatus
P15 DC außerhalb Bereich
0.20
0 – 20mA
4.20
4 – 20mA (Systemvorgabe)
P16 SP-Rückübertragung, unterer
Bereichswert
Beschränkt auf SP.Lo
P17 SP-Rückübertragung, oberer
Bereichswert
Beschränkt auf SP.Hi
P16 & P17 werden nur bei DC-Ausgang
und P12/P13 = SP.rt angezeigt.
P21 Alarm 1 Typ
P24 Alarm 2 Typ
P27 Alarm 3 Typ
nonE
Nicht konfiguriert (P21 & P27
Systemvorgabe)
Hi
Maximalalarm (P24 Systemvorgabe)
Lo
Minimalalarm
d.Hi
Abweichungsalarm Übersollwert
d.Lo
Abweichungsalarm Untersollwert
bnd
Abweichungsbandalarm
P22 Alarm 1 selbsthaltend
P25 Alarm 2 selbsthaltend
P28 Alarm 3 selbsthaltend
nonE
Nicht selbsthaltend (Systemvorgabe)
Auto
Selbsthaltend mit automatischem Reset
Nan
Selbsthaltend, manueller Reset
no.AL
Nicht selbsthaltend, keine ALM-Anzeige
P23 Alarm 1 unterdrückt
P26 Alarm 2 unterdrückt
P29 Alarm 3 unterdrückt
No
Keine Unterdrückung (Systemvorgabe)
Yes
Unterdrückung
P31 Stromwandlerquelle
None
CT nicht verwendet (Systemvorgabe)
oP1
CT-Messung an Ausgang 1
oP2
CT-Messung an Ausgang 2
oP3
CT-Messung an Ausgang 3
oP4
CT-Messung an Ausgang 4
P32 Stromwandlerbereich
10,0 bis 999,9 A
P33 Stromwandleralarm selbsthaltend
none
Nicht selbsthaltend (Systemvorgabe)
AUto
Selbsthaltend mit automatischem Reset
Nan
Selbsthaltend, manueller Reset
P34 Regelkreisunterbrechungs-Alarmzeit
AUS oder 1 bis 9999 Sekunden
Rückkehr zu Ebene 1: siehe Seite 3
P35 Fühlerbruch-Alarmtyp
on
Fühler mit offenem Stromkreis
wird erkannt (Systemvorgabe)
LAt
Alarm für Fühler mit offenem
Stromkreis selbsthaltend
oFF
Fühler mit offenem Stromkreis
wird nicht erkannt
P36 Sichere Ausgangsleistung bei
Fühlerbruch
-100% bis 0% bis 100%
P37 Fühlerbruch-Alarmausgang
none
Nur Anzeige – betreibt keinen
Ausgang (Systemvorgabe)
AL1 -
AL3
Alarm-Ausgang im Falle des
Scheiterns (Stromwandler,
Schleife, Sensor)
P41 Timer-Konfiguration
nonE
Timer deaktiviert (Systemvorgabe)
d.LL
Haltezeit
dELy
Verzögertes Einschalten
SS
Soft Start
P42 Timer-Auflösung
HoUr
Stunden HH:MM (Systemvorgabe)
Nin
Minuten MM:SS
P43 Timer-Endtyp
oFF
Regelung geht auf 0%
(Systemvorgabe)
dLL
Halten auf SP1
SP2
Regelung schaltet auf SP2
rES
Timer rücksetzen
P51 Digital-Eingang DI1
P52
Digital-Eingang DI2 (nicht in P116)
nonE
Eingang nicht verwendet
(Systemvorgabe)
Ac.AL
Alarmquittierung
SP.SL
Sollwert 2 auswählen
Loc.b
Tastatur deaktiviert (Tastensperre)
t.reS
Timer-Reset
t.rUn
Timer läuft
t.rrS
Timer läuft/Reset
t.HLd
Timer halten
Nan
Handstatus
Sby
Standby-Modus
P61 Kommunikations-Adresse
1 bis 254 (Systemvorgabe auf 1)
P62 Kommunikations-Baudrate
9600
9600 bps (Systemvorgabe)
19.20
19200 bps
4800
4800 bps
2400
2400 bps
1200
1200 bps
P63
Kommunikations-Paritätseinstellung
nonE
Keine Parität (Systemvorgabe)
Even
Gerade Parität
odd
Ungerade Parität
P64
Kommunikations-
Slave/Masterübertragung
nonE
Master-Comms deaktiviert
.SP
Arbeits-SP senden
.Pv
PV senden
.oP
Ausgangsleistung senden
.Err
Fehler senden
P65 Kommunikations-
Rückübertragungsadresse
0 bis 9999 (Systemvorgabe auf 0)
P71 Taste F1
P72 Taste F2
P73 Bild-Taste
nonE
Taste nicht verwendet
Ac.AL
Alarmquittierung
SP.SL
Sollwert 2 auswählen (P73
Systemvorgabe)
A-N
Handstatus (P71 Systemvorgabe)
t.St
Timer/Programmgeber läuft/Reset
(P72 Systemvorgabe)
e.rst
Reset Energiezähler
P74 Inhalt der zweiten Zeile anzeigen
P75 Inhalt der dritten Zeile anzeigen
Std
Arbeitssollwert (Systemvorgabe
P74)
oP
Ausgangsleistung (Systemvorgabe
P75)
t.rE
Restzeit
t.EL
Vergangene Zeit
E.Par
Energiezähler (Teilwert)
E.tot
Energiezähler (Gesamtwert)
nonE
Zweite/dritte Zeile nicht verwendet
P76 Passwort Ebene 2
Systemvorgabe: 2
P77 Passwort Konfigurationsmodus
Systemvorgabe: 4
P81 Energiemessquelle
nonE
Energiemesser deaktiviert
(Systemvorgabe)
oP1 -
op4
Energie-Schätzung an OP1/2/3
oder 4
P82
Nennleistung des
Energiemessausgangs
0,10 – 99,99 kW (Systemvorgabe auf 1kW)
rEc.S
Speicherung Wiederherstellungspunkt
none
Nichts tun (Systemvorgabe)
Save
Momentanwerte der aktuellen
Parameter
rEc.L
Laden Wiederherstellungspunkt
none
Nichts tun
LoAd
Gespeicherte Werte wiederherstellen
Fact
Werksseitige Standardeinstellung
wiederherstellen
coLd
Kaltstart
PHAS
Kalibrierphase
Einzelheiten siehe
Engineering
manual
Eine Beschreibung der
Konfigurationsparameter finden Sie im
Engineering manual HA031260 auf
www.eurotherm.co.uk
.
P1 Entrée de capteur
J .tc
Thermocouple type J (par défaut)
cA.tc
Thermocouple type K
L .tc
Thermocouple type L
R .tc
Thermocouple type R
B .tc
Thermocouple type B
N .tc
Thermocouple type N
T .tc
Thermocouple type T
S .tc
Thermocouple type S
C .tc
Linéarisation personnalisée
préchargée avec thermocouple de
type C
rtd
Pt100
Nv
-10 to +80mV linéaire
020
0 – 20mA linéaire
420
4 – 20mA linéaire
P2 Position de point décimal
nnnn
Pas d'espace décimal (par défaut)
nnn.n
Une décimale
nn.nn
Deux décimales
P3
Valeur basse de l'échelle de mesure
Limitée par la valeur de l'échelle haute
P4
Valeur haute de l'échelle de mesure
Limitée par la valeur de l'échelle basse
P5
Valeur basse (mV) pour
entrée linéaire
-10mV
+80mV
P6
Valeur haute (mV) pour
entrée linéaire
P7 Type de régulation
Aucun
Action de commande désactivée
HP
PID chaud (par défaut)
Ho
ON/OFF chaud
CP
PID froid
Co
ON/OFF froid
HP.CP
PID chaud et PID froid
HP.CO
PID chaud et ON/OFF froid
Ho.CP
ON/OFF Chaud et PID Froid
Ho.Co
ON/OFF Chaud et ON/OFF Froid
P8 Type de refroidissement non linéaire
Lin
Linéaire (par défaut)
H2o
Eau
oiL
Huile
FAn
Air forcé
P11 Sortie 1
P14 Sortie 4
nonE
Sortie désactivée
Heat
Sortie chauffage (par défaut P11).
CooL
Sortie refroidissement
AL1
Alarme 1
AL1.i
Alarme 1 inversée
AL2
Alarme 2 (P 14 par défaut)
AL2.i
Alarme 2 inversée
AL3
Alarme 3 P11 par défaut si le
chauffage n'est pas configuré
AL3.i
Alarme 3 inversée
t.End
Etat fin de la temporisation
t.rUn
Etat temporisation en cours
P12
Sortie 2
P13 Sortie 3 (pas en P116)
nonE
Sortie désactivée (par défaut)
Heat
Sortie chauffage
AL1
Alarme 1
AL1.i
Alarme 1 inversée
AL2
Alarme 2 P12 par défaut
AL2.i
Alarme 2 inversée
AL3
Alarme 3 P13 par défaut
AL3.i
Alarme 3 inversée
SP.rt
SP retransmission
oP.rt
OP retransmission
Pv.rt
PV retransmission
t.run
Etat fin de la temporisation
t.End
Etat temporisation en cours
P15 Plage de sortie CC
0,20
0 – 20mA
420
4 – 20mA (par défaut)
P16
Valeur échelle basse retransmission SP
Fixé sur SP.Lo
P17
Valeur échelle haute retransmission SP
Fixé sur SP.Hi
P16 & P17 sont uniquement illustrés
pour une sortie CC et P12/P13 = SP.rt
P21 Alarme 1 Type
P24 Alarme 2 Type
P27 Alarme 3 Type
nonE
Non configuré (P21 & P27 par défaut)
Hi
Pleine échelle haute (P24 par défaut)
Lo
Pleine échelle basse
d.Hi
Déviation haute
d.Lo
Déviation basse
bnd
Déviation de bande
P22 Alarme 1 Maintenue
P25 Alarme 2 Maintenue
P28 Alarme 3 Maintenue
nonE
Sans maintien (par défaut)
Auto
Maintien avec réarmement
automatique
Nan
Réinitialisation manuelle du maintien
no.AL
Indication no ALM sans maintien
P23 Alarme 1 bloquante
P26 Alarme 2 bloquante
P29 Alarme 3 bloquante
No
Sans blocage (par défaut)
YES
Blocage
P31 Source du transformateur de courant
None
CT non utilisé (par défaut)
oP1
Mesure CT sur sortie 1
oP2
Mesure CT sur sortie 2
oP3
Mesure CT sur sortie 3
oP4
Mesure CT sur sortie 4
P32 Plage du transformateur de courant
10,0 à 999,9 A
P33
Maintien alarme du transformateur de
courant
none
Sans maintien (par défaut)
AUto
Maintien avec réarmement
automatique
Nan
Maintien avec réarmement manuel
P34 Temporisation
d’alarme de rupture de
boucle
OFF ou de 1 à 9999 secondes
Pour revenir au niveau 1, voir page
P35 Alarme sur rupture capteur
on
L'ouverture du circuit du capteur sera
détectée.(par défaut)
LAt
L'ouverture du circuit du capteur sera
détectée et mémorisé.
oFF
L'ouverture du circuit du capteur ne
sera pas détectée.
P36 Puissance de sortie en cas de rupture
capteur.
-100% à 0% à 100%
P37 Sortie de l’alarme rupture capteur
none
Indication seule - n'active pas une sortie
(par défaut)
AL1 -
AL3
Sortie d'alarme en cas de panne
(transformateur de courant, en boucle,
le capteur)
P41 Configuration de temporisateur
nonE
Temporisateur désactivé (par défaut)
d.LL
Dwell
dELy
Départ différé
SS
Départ progressif
P42 Résolution de temporisateur
HoUr
Heures HH:MM (par défaut)
Nin
Minutes MM:SS
P43 Type fin de temporisateur
oFF
Commande passe à 0% (par défaut)
dLL
Palier avec fin en retour sur consigne
SP1
SP2
Palier avec fin en retour sur consigne
SP2
rES
Réinitialisation du temporisateur
P51 Entrée Numérique DI1
P52
Entrée Numérique DI2 (pas sur le P116)
nonE
Entrée non utilisée (par défaut)
Ac.AL
Acquittement alarme
SP.SL
Sélection consigne 2
Loc.b
Clavier avant désactivé (verrouillage)
t.reS
Réinitialisation du temporisateur
t.rUn
Départ du temporisateur
t.rrS
Départ/Arrêt du temporisateur
t.HLd
Maintien du temporisateur
Nan
Passage en mode manuel
Sby
Passage en mode veille
P61 Adresse de Communication
1 à 254 (par défaut à 1)
P62 Vitesse de la liaison numérique
9600
9600 bps (par défaut)
19,20
19200 bps
4800
4800 bps
2400
2400 bps
1200
1200 bps
P63 Réglage de parité de communications
nonE
Pas de parité (par défaut)
Even
Parité paire
odd
Parité impaire
P64
Transmission maître/esclave par
communication
nonE
Transmission maître inactive
.SP
Diffusion de la consigne SP
.Pv
Diffusion de la mesure PV
.oP
Diffusion de la sortie OP
.Err
Diffusion de l'écart mesure-consigne ER
P65 Adresse de retransmission de
communications
0 à 9999 (par défaut à 0)
P71
Bouton-poussoir F1
P72
Bouton-poussoir F2
P73 Page Bouton-poussoir
nonE
Bouton-poussoir non utilisé
Ac.AL
Acquittement alarme
SP.SL
Sélection consigne 2 (P73 par défaut)
A-N
Passage en Manu (P71 par défaut)
t.St
Marche/Arrêt Temporisateur ou
Programmateur (P72 par défaut)
e.rst
Réinitialisation du compteur d'énergie
P74
Affiche le contenu de la deuxième ligne
P75
Affiche le contenu de la troisième ligne
Std
Point de consigne de travail (par défaut
P74)
oP
Puissance de sortie (par défaut P75)
t.rE
Temps restant
t.EL
Temps écoulé
E.Par
Compteur d'énergie (valeur partielle)
E.tot
Compteur d'énergie (valeur totale)
nonE
Deuxième/troisième ligne non utilisée
P76
Code d’accès Lev2.
Valeur par défaut : 2
P77 Code d'accès mode configuration.
Valeur par défaut : 4
P81 Source de compteur d'énergie
nonE
Compteur d'énergie désactivé (par
défaut)
oP1 -
oP4
Estimation de l'énergie sur OP1/2/3 ou
4
P82
Puissance nominale de sortie de
compteur d'énergie
010 – 9999 kW (par défaut à 1kW)
rEc.S
Sauvegarde de point de restauration
none
Ne rien faire (par défaut)
Save
Instantané des paramètres actuels
rEc.L
Chargement du point de restauration
none
Ne rien faire
LoAd
Restaurer les valeurs sauvegardées
Fact
Restaurer les
paramètres par défaut d'usine
coLd
Démarrage à froid
PHAS
Phase
d'étalonnage
Pour plus de
détails, se reporter
au manuel
d'ingénierie
Une description des paramètres de
configuration est fournie dans le manuel
d'ingénierie HA031260 disponible sur le site
www.eurotherm.co.uk.
-
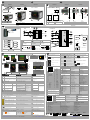 1
1
-
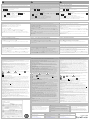 2
2
-
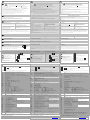 3
3
-
 4
4


Eurotherm piccolo P104/P108/P116 Bedienungsanleitung
- Typ
- Bedienungsanleitung
in anderen Sprachen
Verwandte Artikel
-
Eurotherm Piccolo Schnellstartanleitung
-
-
-
-
-
-
-
-
-
Andere Dokumente
-
Ascon tecnologic M5 Bedienungsanleitung
-
Nordcap Regler ST501-LC3JAR.XXF Hot Display Case Benutzerhandbuch
-
-
-
Ascon tecnologic X3 Bedienungsanleitung
-
red lion GMPID Benutzerhandbuch
-
-
-
-