
A2001
User Manual • Uživatelský manuál •
Užívateľský manuál • Használati utasítás •
Benutzerhandbuch

2
English
3 – 12
Čeština
13 – 22
Slovenčina
23 – 32
Magyar
33 – 42
Deutsch
43 – 53

3
Dear customer,
Thank you for purchasing our product. Please read the following instructions carefully
before first use and keep this user manual for future reference. Pay particular attention
to the safety instructions. If you have any questions or comments about the device,
please contact the customer line.
www.alza.co.uk/kontakt
✆ +44 (0)203 514 4411
Importer Alza.cz a.s., Jankovcova 1522/53, Holešovice, 170 00 Prague 7, www.alza.cz

4
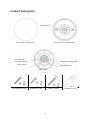
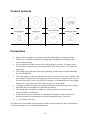
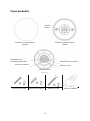
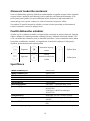
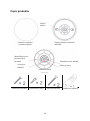
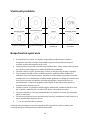
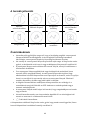
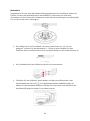
Product Description
Self-tapping screw
Expansion tube
Metric screw
Remote control
Reverse view of light body
Front view of light body
Lock switch
Self-tapping
screw mounting
Wiring hole
Base plate
Holder mounting hole
Threading hole

5
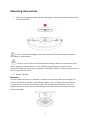
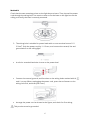
Mounting Instructions
1. Open the package and take out the ceiling light. Push the lock switch inward and
remove the base.
In order to avoid any danger, please ask and electrical professional to perform
mounting or maintenance.
(Caution, risk of electric shock) Before mounting, make sure to disconnect the
power supply to prevent electric shock. Mounting should be performed in strict
accordance with the instructions. Improper mounting is liable to cause accidents such as
fall, fire, and electric shock.
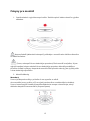
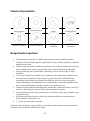
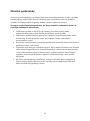
2. Mount the Base
Method A:
Use the impact drill 6mm in diameter to make two mounting holes with a length of ≥
25mm in the wall (as shown in the following figure.) Put the expansion tube into the
mounting hole, and then thread the power cord through the wiring hole. Use self-
tapping screws to fix the base on the ceiling, and verify the base is secure mounted.
(Recommended)

6
Method B:
Check that the two mounting points on the light box are intact. Then, thread the power
cord through the wiring hole. Use metric screws to fix the base on the light box on the
ceiling, and verify the base is securely mounted.
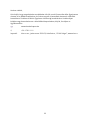
3. The wiring hole is suitable for power leads with a cross-sectional area of 1.5-
2.5mm2. Strip the power cord by 11-13 mm, and connect the neutral, live and
ground wires to the ceiling light.
• A solid or stranded hard wire is uses as the power lead.
• Connect the neutral, ground, and live wires to the wiring holes marked with N,
and L in turn. (When unplugging the power cord, press the red button on the
wiring hole first, and then pull it out.)
• Arrange the power cord as shown in the figure, and check for firm wiring.
This product must be grounded.

7
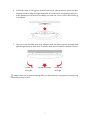
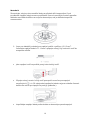
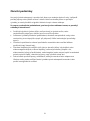
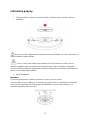
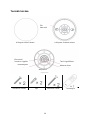
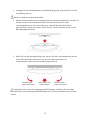
4. Hold both sides of the light body with both hands. (Be careful not press the light-
emitting surface.) Align the light body with the fixed base, and gently push both
sides upwards at the same time. When you hear the “click” sound, the mounting
is complete.
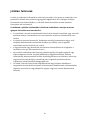
5. Once you have finished mounting, always rotate the light body left and right and
pull the light body up and down to ensure that the lock switch is locked in place.
Always check for proper mounting after you have finished. Improper mounting may
cause the product to fall.
Rotate left
and right
Pull up and down
Rotate left
and right

8
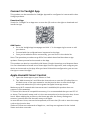
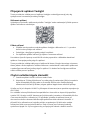
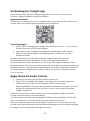
Connect to Yeelight App
This product can be controlled on Yeelight App and be configured to interact with other
Yeelight products.
Download App
Search for “Yeelight” in an App store or scan the QR code on the right to download and
install the App.
Add Device
• Go to the Yeelight App homepage and click “+” in the upper right corner to add
your device.
• Proceed with the configuration as instructed on the App.
• Once you’ve added a device successfully, you can find it in the device list.
Note: The operation procedure may differ from what’s described here due to App
updates. Please proceed as instructed on the App.
This product can also be controlled on Mi home, Google Home App, and Amazon Alexa.
You can download and install one of these Apps from an App store, and configure your
device as instructed on the App. After you have finished the configuration, you can use
the App to control the light.
Apple HomeKit Smart Control
1. Open the Home app on your iPhone or iPad.
2. Tap “Add Accessories” and follow the instructions to scan the QR code either on
the back cover of the user manual or on the junction box or enter the 8-digit
setup code above the QR code to grant the Apple Home app access.
Make sure a Wi-Fi network with Internet access is available (this product does not
support 5 GHz networks).
To control this Home-Kit-compatible accessory, it is recommended that you use iOS 9.0
or above. The HomeKit setup code is in the user manual and on the junction box, do not
lose it. When adding the product to the Home app after the factory settings are
restored, you will need the HomeKit setup code again.
In case the user is lost, remove the lampshade, and scan the QR code or enter the setup
code on the junction box.
iPad and iPhone are trademarks of Apple Inc., and they are registered in the United
States and other countries.

9
Restore to factory settings
Use the wall switch to turn the ceiling light on and off five times consecutively (turn off
the ceiling light and wait for two seconds, then turn it on and wait for two seconds, this
counts as one time.) The ceiling light then starts breathing and automatically restarts
after five seconds, and the factory settings of the ceiling light have been restored.
Note: When using the ceiling light in a new network environment, you need to restore
the factory settings and connect to the network again.
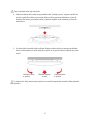
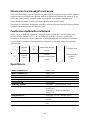
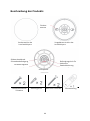
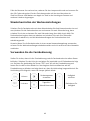
Use the Remote Control
Make sure the remote control and the ceiling light are in the same room. Turn on the
light and do the following within 60 seconds: Press the “OFF” and “M” buttons on the
remote control at the same time, and then release them immediately. At this point, the
indicator light on the remote control starts to flash, indicating that the connection is
being made. The connection is successful unit the light flashes cyclically.
Light on
Adjust colour
temperature
Increase
brightness
Reduce
brightness
Light off
Daylight/moonlight
mode
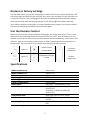
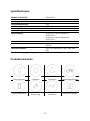
Specifications
Model YLXD032 for
A2001C450
Model YLXD031 for
A2001C550
Power Factor:
0.9
Operating Temperature:
25°C
Operating Humidity:
0-85% RH
Colour Temperature:
2700-6500 K
Rated Input:
220-240V ~ 50/60Hz Max. 0.23A
Rated Power:
50 W (81 x 1 W/LED module) for
A2101C450
50 W (84 x 1 W/LED module) for
A2101C550
Compatible with:
Android 4.4 & iOS 9.0 or above
Wireless Connectivity:
Wi-Fi IEEE 802.11 b/g/n 2.4 GHz, Bluetooth
4.2 BLE
Operating Frequency:
2412-2472 MHz (Wi-Fi) 2402-2480 MHz
(BT)
Maximum Output Power:
17.21 dBm (Wi-Fi) 5.08 dBm (BT-LE)

10
Product Features
Adjustable colour
temperature
Adjustable
brightness
Cozy moonlight
High colour
rendering index
Voice control
Quick setup
Smart interaction
Firmware upgrade
Precautions
• Make sure the voltage is consistent with the ceiling light’s operating voltage
before use. Using the mismatched voltage may damage the ceiling light and
cause safety hazards.
• Do not replace the light source of the ceiling light by yourself. The light source
should only be replaced by the manufacturer, after sales service, or a qualified
electrician.
• The ceiling light generates heat during working. Please keep it is well ventilated
for heat dissipation.
• This ceiling light can be controlled by an app or remote control (not included, sold
separately). Turing off the ceiling light by remote control or app does not cut it off
from the electricity, hence, do not touch, replace, or disassemble this ceiling light.
Otherwise, it may cause an electric shock, injury, or even death.
• The light installation requires a qualified electrician, and the wiring must comply
with IEEE electrical standards or national standards.
• The ceiling light should be installed in a stable location to prevent it from
dropping down or falling off.
• Under normal use of condition, this equipment should be kept a separation
distance at least 20 cm between the antenna and the body of the user.
• For indoor user only.
The light source contained in this luminaire shall only be replaced by the manufacturer
or his service agent or a similar qualified person.

11
Warranty Conditions
A new product purchased in the Alza.cz sales network is guaranteed for 2 years. If you
need repair or other services during the warranty period, contact the product seller
directly, you must provide the original proof of purchase with the date of purchase.
The following are considered to be a conflict with the warranty conditions, for
which the claimed claim may not be recognized:
• Using the product for any purpose other than that for which the product is intended
or failing to follow the instructions for maintenance, operation, and service of the
product.
• Damage to the product by a natural disaster, the intervention of an unauthorized
person or mechanically through the fault of the buyer (e.g., during transport,
cleaning by inappropriate means, etc.).
• Natural wear and aging of consumables or components during use (such as
batteries, etc.).
• Exposure to adverse external influences, such as sunlight and other radiation or
electromagnetic fields, fluid intrusion, object intrusion, mains overvoltage,
electrostatic discharge voltage (including lightning), faulty supply or input voltage and
inappropriate polarity of this voltage, chemical processes such as used power
supplies, etc.
• If anyone has made modifications, modifications, alterations to the design or
adaptation to change or extend the functions of the product compared to the
purchased design or use of non-original components.

12
EU Declaration of Conformity
Hereby, Qingdao Yeelink Information Technology Co., Ltd. declares that the radio
equipment type YLXD031/YLXD032 is in compliance with Directive 2014/53/EU.
WEEE
This product must not be disposed of as normal household waste in accordance with
the EU Directive on Waste Electrical and Electronic Equipment (WEEE - 2012/19 / EU).
Instead, it shall be returned to the place of purchase or handed over to a public
collection point for the recyclable waste. By ensuring this product is disposed of
correctly, you will help prevent potential negative consequences for the environment
and human health, which could otherwise be caused by inappropriate waste handling of
this product. Contact your local authority or the nearest collection point for further
details. Improper disposal of this type of waste may result in fines in accordance with
national regulations.

13
Vážený zákazníku,
děkujeme vám za zakoupení našeho produktu. Před prvním použitím si prosím pečlivě
přečtěte následující pokyny a uschovejte si tento návod k použití pro budoucí potřebu.
Zvláštní pozornost věnujte bezpečnostním pokynům. Pokud máte k přístroji jakékoli
dotazy nebo připomínky, obraťte se na zákaznickou linku.
www.alza.cz/kontakt
✆ +420 255 340 111
Dovozce Alza.cz a.s., Jankovcova 1522/53, Holešovice, 170 00 Praha 7, www.alza.cz

14
Popis produktu
Samořezný šroub
Rozšiřovací trubice
Metrický šroub
Dálkové ovládání
Pohled na světelné těleso
zezadu
Pohled na světelné těleso
zepředu
Spínač
zámku
Montáž pomocí
samořezných šroubů
Otvor pro kabeláž
Základní deska
Montážní otvor držáku
Závitový otvor

15
Pokyny pro montáž
1. Otevřete balení a vyjměte stropní světlo. Zatlačte spínač zámku dovnitř a vyjměte
základnu.
Abyste předešli jakémukoli nebezpečí, požádejte o montáž nebo údržbu odborníka
na elektroinstalace.
(Pozor, nebezpečí úrazu elektrickým proudem) Před montáží se ujistěte, že jste
odpojili napájení, abyste zabránili úrazu elektrickým proudem. Montáž provádějte v
přísném souladu s pokyny. Nesprávná montáž může způsobit nehody, jako je pád, požár
a úraz elektrickým proudem.
2. Montáž základny
Metoda A:
Pomocí příklepové vrtačky o průměru 6 mm vytvořte ve stěně
dva montážní otvory o délce ≥ 25 mm (jak je znázorněno na následujícím obrázku).
Pomocí samořezných šroubů připevněte základnu ke stropu a zkontrolujte, zda je
základna bezpečně namontována. (Doporučujeme)

16
Metoda B:
Zkontrolujte, zda jsou oba montážní body na světelné skříni neporušené. Poté
protáhněte napájecí kabel otvorem pro kabeláž. Pomocí metrických šroubů upevněte
základnu na světelné skříňce na stropě a zkontrolujte, zda je základna bezpečně
namontována.
3. Otvor pro kabeláž je vhodný pro napájecí vodiče o průřezu 1,5-2,5 mm2.
Odizolujte napájecí kabel o 11-13 mm a připojte nulový, živý a zemnicí vodič ke
stropnímu svítidlu.
• Jako napájecí vodič se používá pevný nebo laněný vodič.
• Připojte nulový, zemnicí a živý vodič postupně k otvorům pro zapojení
označeným N, a L. (Při odpojování napájecího kabelu nejprve stiskněte červené
tlačítko na otvoru pro zapojení a poté jej vytáhněte.)
• Uspořádejte napájecí kabel podle obrázku a zkontrolujte pevné zapojení.

17
Tento výrobek musí být uzemněn.
4. Oběma rukama držte obě strany lehkého těla. (Dávejte pozor, abyste netlačili na
povrch vyzařující světlo.) Vyrovnejte těleso světla s pevnou základnou a jemně
zatlačte obě strany současně nahoru. Jakmile uslyšíte zvuk cvaknutí, je montáž
dokončena.
5. Po dokončení montáže vždy otáčejte tělesem světla doleva a doprava a táhněte
těleso světla nahoru a dolů, abyste se ujistili, že je spínač zámku zajištěn na svém
místě.
Po dokončení vždy zkontrolujte správnou montáž. Nesprávná montáž může způsobit
pád výrobku.
Otáčejte vlevo
a vpravo
Táhněte nahoru
a dolů
Otáčejte vlevo
a vpravo

18
Připojení k aplikaci Yeelight
Tento produkt lze ovládat pomocí aplikace Yeelight a nakonfigurovat jej tak, aby
spolupracoval s ostatními produkty Yeelight.
Stáhnout aplikaci
Vyhledejte v obchodě s aplikacemi položku "Yeelight" nebo naskenujte QR kód vpravo a
aplikaci stáhněte a nainstalujte.
Přidat zařízení
• Přejděte na domovskou stránku aplikace Yeelight a kliknutím na "+" v pravém
horním rohu přidejte své zařízení.
• Pokračujte v konfiguraci podle pokynů v aplikaci.
• Po úspěšném přidání zařízení jej najdete v seznamu zařízení.
Poznámka: Operační postup se může lišit od zde popsaného v důsledku aktualizací
aplikace. Postupujte podle pokynů v aplikaci.
Tento produkt lze ovládat také pomocí aplikace Mi home, Google Home App a Amazon
Alexa. Jednu z těchto aplikací si můžete stáhnout a nainstalovat z obchodu s aplikacemi
a nakonfigurovat zařízení podle pokynů v aplikaci. Po dokončení konfigurace můžete
světlo ovládat pomocí aplikace.
Chytré ovládání Apple HomeKit
1. Otevřete aplikaci Home na iPhonu nebo iPadu.
2. Klepněte na "Přidat příslušenství" a podle pokynů naskenujte QR kód na zadním
krytu uživatelské příručky nebo na rozvodné skříňce nebo zadejte 8místný
nastavovací kód nad QR kódem, abyste aplikaci Apple Home umožnili přístup.
Ujistěte se, že je k dispozici síť Wi-Fi s přístupem k internetu (tento produkt nepodporuje
sítě 5 GHz).
Pro ovládání tohoto příslušenství kompatibilního s Home-Kit se doporučuje používat
systém iOS 9.0 nebo novější. Nastavovací kód HomeKit je uveden v uživatelské příručce
a na rozvodné skříňce, neztraťte jej. Při přidávání výrobku do aplikace Home po
obnovení továrního nastavení budete opět potřebovat kód nastavení HomeKit. V
případě, že ho uživatel ztratí, sejměte stínítko a naskenujte QR kód nebo zadejte
nastavovací kód na propojovací krabičce. iPad a iPhone jsou ochranné známky
společnosti Apple Inc. a jsou registrovány ve Spojených státech a dalších zemích.

19
Obnovení továrního nastavení
Pomocí nástěnného vypínače pětkrát po sobě zapněte a vypněte stropní světlo (vypněte
stropní světlo a počkejte dvě sekundy, pak ho zapněte a počkejte dvě sekundy, to se
počítá jako jeden pokus). Stropní světlo pak začne dýchat a po pěti sekundách se
automaticky znovu spustí a obnoví se tovární nastavení stropního světla.
Poznámka: Při použití stropního svítidla v novém síťovém prostředí je třeba obnovit
tovární nastavení a znovu se připojit k síti.
Použití dálkového ovládání
Ujistěte se, že se dálkový ovladač a stropní světlo nacházejí ve stejné místnosti. Zapněte
světlo a během 60 sekund proveďte následující kroky: Stiskněte současně tlačítka "OFF"
a "M" na dálkovém ovladači a poté je okamžitě uvolněte. V tomto okamžiku začne blikat
kontrolka na dálkovém ovladači, což signalizuje, že dochází k připojení. Připojení je
úspěšné, jednotka kontrolka cyklicky bliká.
Zapnout
Nastavení teploty
barev
Zvýšení jasu
Snížení jasu
Vypnout
Režim
denního/měsíčního
světla
Specifikace
Model YLXD032 pro
A2001C450
Model YLXD031 pro
A2001C550
Účiník:
0.9
Provozní teplota:
25 °C
Provozní vlhkost:
0-85 % RELATIVNÍ VLHKOSTI
Teplota barev:
2700-6500 K
Jmenovitý příkon:
220-240 V ~ 50/60 Hz Max. 0.23A
Jmenovitý výkon:
50 W (81 x 1 W/LED modul) pro
A2101C450
50 W (84 x 1 W/LED modul) pro
A2101C550
Kompatibilní s:
Android 4.4 a iOS 9.0 nebo novější
Bezdrátové připojení:
Wi-Fi IEEE 802.11 b/g/n 2,4 GHz, Bluetooth
4.2 BLE
Provozní frekvence:
2412-2472 MHz (Wi-Fi) 2402-2480 MHz
(BT)
Maximální výstupní výkon:
17,21 dBm (Wi-Fi) 5,08 dBm (BT-LE)

20
Vlastnosti produktu
Nastavitelná
teplota barev
Nastavitelný jas
Útulné měsíční
světlo
Vysoký index
podání barev
Hlasové ovládání
Rychlé nastavení
Inteligentní
interakce
Aktualizace
firmwaru
Bezpečnostní opatření
• Před použitím se ujistěte, že napětí odpovídá provoznímu napětí stropního
svítidla. Použití neodpovídajícího napětí může stropní svítidlo poškodit a způsobit
bezpečnostní rizika.
• Světelný zdroj stropního svítidla nevyměňujte sami. Výměnu světelného zdroje by
měl provádět pouze výrobce, poprodejní servis nebo kvalifikovaný elektrikář.
• Stropní světlo při práci vytváří teplo. Udržujte jej dobře větrané, aby se teplo
odvádělo.
• Toto stropní svítidlo lze ovládat pomocí aplikace nebo dálkového ovladače (není
součástí balení, prodává se samostatně). Vypnutí stropního světla dálkovým
ovladačem nebo aplikací jej neodpojí od elektřiny, proto se tohoto stropního
světla nedotýkejte, nevyměňujte ho ani nerozebírejte. V opačném případě může
dojít k úrazu elektrickým proudem, zranění nebo dokonce smrti.
• Instalace světla vyžaduje kvalifikovaného elektrikáře a elektroinstalace musí být v
souladu s elektrickými normami IEEE nebo národními normami.
• Stropní svítidlo by mělo být nainstalováno na stabilním místě, aby nespadlo nebo
se nezřítilo dolů.
• Při běžném používání tohoto zařízení by měla být vzdálenost mezi anténou a
tělem uživatele nejméně 20 cm.
• Pouze pro uživatele v interiéru.
Světelný zdroj obsažený v tomto svítidle smí vyměnit pouze výrobce nebo jeho servisní
zástupce nebo podobně kvalifikovaná osoba.
Seite wird geladen ...
Seite wird geladen ...
Seite wird geladen ...
Seite wird geladen ...
Seite wird geladen ...
Seite wird geladen ...
Seite wird geladen ...
Seite wird geladen ...
Seite wird geladen ...
Seite wird geladen ...
Seite wird geladen ...
Seite wird geladen ...
Seite wird geladen ...
Seite wird geladen ...
Seite wird geladen ...
Seite wird geladen ...
Seite wird geladen ...
Seite wird geladen ...
Seite wird geladen ...
Seite wird geladen ...
Seite wird geladen ...
Seite wird geladen ...
Seite wird geladen ...
Seite wird geladen ...
Seite wird geladen ...
Seite wird geladen ...
Seite wird geladen ...
Seite wird geladen ...
Seite wird geladen ...
Seite wird geladen ...
Seite wird geladen ...
Seite wird geladen ...
Seite wird geladen ...
-
 1
1
-
 2
2
-
 3
3
-
 4
4
-
 5
5
-
 6
6
-
 7
7
-
 8
8
-
 9
9
-
 10
10
-
 11
11
-
 12
12
-
 13
13
-
 14
14
-
 15
15
-
 16
16
-
 17
17
-
 18
18
-
 19
19
-
 20
20
-
 21
21
-
 22
22
-
 23
23
-
 24
24
-
 25
25
-
 26
26
-
 27
27
-
 28
28
-
 29
29
-
 30
30
-
 31
31
-
 32
32
-
 33
33
-
 34
34
-
 35
35
-
 36
36
-
 37
37
-
 38
38
-
 39
39
-
 40
40
-
 41
41
-
 42
42
-
 43
43
-
 44
44
-
 45
45
-
 46
46
-
 47
47
-
 48
48
-
 49
49
-
 50
50
-
 51
51
-
 52
52
-
 53
53


in anderen Sprachen
- English: YEELIGHT A2001 User manual
- slovenčina: YEELIGHT A2001 Používateľská príručka
Verwandte Artikel
-
YEELIGHT C2001S500 Benutzerhandbuch
-
YEELIGHT A2001R900 Benutzerhandbuch
-
YEELIGHT W4L Benutzerhandbuch
-
 YEELIGHT Mesh Downlight M2 Benutzerhandbuch
-
 YEELIGHT V1 PRO Benutzerhandbuch
-
YEELIGHT YLCT01YL Benutzerhandbuch
-
-
 YEELIGHT Smart LED Bulb Benutzerhandbuch
-
YEELIGHT YLTD04YL Benutzerhandbuch
-
YEELIGHT YLDP007 Benutzerhandbuch


Andere Dokumente
-
MOES WB-HA-E27 Benutzerhandbuch
-
 Gosund EP2 10A EU Wifi Smart Power Plug Socket Benutzerhandbuch
-
 Gosund EP8 Benutzerhandbuch
-
LIVARNO 368129 Bedienungsanleitung
-
Xiaomi MJCTD02YL Benutzerhandbuch
-
Baseus CAHUB-CWJ0G Benutzerhandbuch
-
MOZA Nano SE Selfie Gimbal Extendable Smartphone Gimbal Benutzerhandbuch
-
-
Connect IT CLI-3010-LG Benutzerhandbuch

