Dell Lifecycle Controller Integration Version 3.2 for Microsoft System Center Configuration Manager Benutzerhandbuch
- Typ
- Benutzerhandbuch

Dell Lifecycle Controller Integration Version
3.2 for Microsoft System Center
Configuration Manager
User's Guide

Anmerkungen, Vorsichtshinweise und
Warnungen
ANMERKUNG: Eine ANMERKUNG liefert wichtige Informationen, mit denen Sie den Computer
besser einsetzen können.
VORSICHT: Ein VORSICHTSHINWEIS macht darauf aufmerksam, dass bei Nichtbefolgung von
Anweisungen eine Beschädigung der Hardware oder ein Verlust von Daten droht, und zeigt auf,
wie derartige Probleme vermieden werden können.
WARNUNG: Durch eine WARNUNG werden Sie auf Gefahrenquellen hingewiesen, die materielle
Schäden, Verletzungen oder sogar den Tod von Personen zur Folge haben können.
Copyright © 2009 - 2015 Dell Inc. Alle Rechte vorbehalten.Dieses Produkt ist durch US-amerikanische und
internationale Urheberrechtsgesetze und nach sonstigen Rechten an geistigem Eigentum geschützt. Dell
™
und das
Dell Logo sind Marken von Dell Inc. in den Vereinigten Staaten und/oder anderen Geltungsbereichen. Alle anderen in
diesem Dokument genannten Marken und Handelsbezeichnungen sind möglicherweise Marken der entsprechenden
Unternehmen.
2015 - 12
Rev. A00

Contents
1 Introduction to Dell Lifecycle Controller Integration (DLCI) for
Microsoft System Center Configuration Manager.............................................8
What's new in this release.....................................................................................................................8
Existing features and functionalities..................................................................................................... 9
Supported operating systems............................................................................................................. 12
Supported Microsoft .NET versions.............................................................................................. 12
Unterstützte Zielsysteme.....................................................................................................................12
Windows Preinstallation Environment (Windows WinPE)-Kompatibilitäts-Matrix........................... 12
2 Use case scenarios..............................................................................................14
Common prerequisites....................................................................................................................... 14
Editing and exporting the BIOS configuration profile of a system....................................................14
Vergleich und Aktualisierung der Firmware-Bestandsliste................................................................ 15
Prerequisites ..................................................................................................................................15
Workflow sequence for comparing and updating the firmware inventory.................................15
Creating, editing, and saving a RAID profile of a system................................................................... 15
Prerequisites...................................................................................................................................15
Deploying operating system on collection........................................................................................ 16
Prerequisites...................................................................................................................................16
Exportieren von Serverprofilen auf die iDRAC vFlash-Karte oder die Netzwerkfreigabe.................17
Prerequisites...................................................................................................................................17
Bevor Sie beginnen:.......................................................................................................................17
Workflow for exporting server profile...........................................................................................17
Importieren des Serverprofils von iDRAC vFlash-Karte oder Netzwerkfreigabe.............................. 18
Prerequisites...................................................................................................................................18
Bevor Sie beginnen:.......................................................................................................................18
Workflow for importing server profile.......................................................................................... 19
Anzeigen und Exportieren von Lifecycle Controller-Protokollen.....................................................19
Prerequisites...................................................................................................................................19
Bevor Sie beginnen:.......................................................................................................................19
Workflow for viewing and exporting Lifecycle Controller logs...................................................19
Arbeit mit NIC- oder CNA-Profilen....................................................................................................20
Prerequisites.................................................................................................................................. 20
Workflow for configuring and saving NIC or CNA ..................................................................... 20
Working with Fibre Channel profiles..................................................................................................20
Selecting Fibre Channel storage area network in boot sequence.................................................... 21
3 Using Dell Lifecycle Controller Integration...................................................22
3

Lizenzierung für DLCI......................................................................................................................... 22
Dell Deployment Toolkit.....................................................................................................................22
Dell driver Cab files............................................................................................................................. 23
Importing Dell driver Cab files...................................................................................................... 23
Upgrading Dell driver Cab files..................................................................................................... 23
Configuring target systems.................................................................................................................24
To enable CSIOR for earlier server generations:..........................................................................25
To enable CSIOR for Dell’s 13th generation and 12th generation of PowerEdge servers:........ 25
Auto-Ermittlung und Handshake........................................................................................................25
Anwenden von Treibern auf die Tasksequenz...................................................................................25
Applying drivers from Lifecycle Controller.................................................................................. 26
Importing DLCI Dell server driver packages.................................................................................26
Anzeigen der Bedingung für einen Fallback-Schritt.................................................................... 27
Erstellen einer Tasksequenz................................................................................................................27
Erstellen einer Dell-spezifischen Tasksequenz..................................................................................27
Erstellen einer benutzerdefinierten Tasksequenz..............................................................................28
Bearbeiten einer Tasksequenz............................................................................................................28
Konfiguration der Tasksequenz-Schritte zur Anwendung des Betriebssystemabbilds und des
Treiberpakets.......................................................................................................................................29
Anwenden des Betriebssystemabbilds...............................................................................................29
Hinzufügen von Dell Treiberpaketen................................................................................................. 29
Deploying a task sequence.................................................................................................................30
Tasksequenz-Datenträger erstellen (Startfähiges ISO-Image)......................................................... 30
System Viewer utility...........................................................................................................................30
Configuration utility.............................................................................................................................31
Starten der Integrated Dell Remote Access Controller-Konsole......................................................32
Launching the integrated Dell Remote Access Controller Console from the Task Viewer.......32
Task Viewer..........................................................................................................................................33
Weitere Tasks, die Sie mit Dell Lifecycle Controller Integration durchführen können....................34
Configuring security......................................................................................................................34
Validierung eines durch Dell ab Werk ausgestellten Client-Zertifikats auf dem Integrated
Dell Remote Access Controller für die automatische Ermittlung...............................................34
Vorautorisierung von Systemen für Auto-Ermittlung..................................................................34
Ändern der von Dell Lifecycle Controller Integration für Configuration Manager
verwendeten Administrator-Anmeldeinformationen.................................................................. 35
Verwenden der graphischen Benutzeroberfläche.......................................................................35
Verwenden des Array Builder........................................................................................................35
4 Using the Configuration Utility........................................................................42
Creating a Lifecycle Controller boot media...................................................................................... 42
Einstellen eines freigegebenen Standard-Speicherorts für den Lifecycle Controller-
Startdatenträger.............................................................................................................................43
4

Configuring hardware and deploying the operating system............................................................ 43
Deploying operating systems....................................................................................................... 44
Hardware configuration and OS deployment workflow............................................................. 45
Aktualisierung der Firmware während der BS-Bereitstellung......................................................47
Configuring hardware during OS deployment............................................................................ 48
RAID-Konfiguration.......................................................................................................................48
Applying a NIC or CNA profile on a collection............................................................................48
Applying FC HBA profiles and FC SAN boot attributes on a collection......................................50
Applying an integrated Dell Remote Access Controller profile on a collection.........................52
Exporting the system profiles before and after hardware configuration....................................53
Vergleich und Aktualisierung der Firmware-Bestandsliste für Systeme in einer Sammlung........... 54
Viewing the hardware inventory.........................................................................................................55
Überprüfen der Kommunikation mit dem Lifecycle Controller........................................................56
Viewing and exporting Lifecycle Controller logs for a collection.....................................................56
Ändern der Anmeldeinformationen auf den Lifecycle Controllern.................................................. 57
Ändern der Anmeldeinformationen von Lifecycle Controllern in der Configuration
Manager-Datenbank..................................................................................................................... 58
Platform restore for a collection........................................................................................................ 58
Exporting the system profiles in a collection...............................................................................58
Importing the system profiles in a collection.............................................................................. 59
Configuring Part Replacement properties for a collection......................................................... 59
Vergleich von NIC/CNA-Profilen mit Systemen in einer Sammlung................................................60
5 Verwenden des Server-Import-Dienstprogramms...................................... 62
Dell-Server importieren...................................................................................................................... 62
Systemvariablen importieren..............................................................................................................63
6 Using the System Viewer Utility.......................................................................65
Viewing and editing BIOS configuration............................................................................................65
Erstellen eines neuen Profils.........................................................................................................66
Bearbeiten eines vorhandenen Profils..........................................................................................66
Hinzufügen eines neuen Attributes..............................................................................................66
Bearbeiten eines vorhandenen BIOS-Attributs............................................................................ 67
Changing the BIOS or UEFI boot sequence and hard disk drive sequence................................67
Anzeigen und Konfigurieren von RAID.............................................................................................. 68
Konfiguration von iDRAC-Profilen für ein System.............................................................................68
Erstellen eines Integrated Dell Remote Access Controller-Profils............................................. 68
Editing an integrated Dell Remote Access Controller profile..................................................... 69
NICs und CNAs für ein System konfigurieren....................................................................................70
Erstellen eines NIC oder CNA-Profils...........................................................................................70
Scanning a collection.................................................................................................................... 71
Adapter konfigurieren....................................................................................................................71
5

Konfigurieren von NIC- und iSCSI-Parametern...........................................................................72
Editing a NIC or CNA profile......................................................................................................... 73
Configuring FC HBA cards for a system.............................................................................................73
Creating an FC HBA profile........................................................................................................... 73
Editing an FC HBA profile..............................................................................................................74
Vergleich und Aktualisierung der Firmware-Bestandsliste................................................................ 75
Vergleich des Hardware-Konfigurationsprofils..................................................................................76
Lifecycle Controller-Protokolle anzeigen.......................................................................................... 77
Das Fehlermeldungsregister für PowerEdge-Server der 11. und 12. Generation
herunterladen und aktualisieren................................................................................................... 79
Downloading and updating the 13th generation message registry............................................80
Anzeigen der Hardwarebestandsaufnahme für das System............................................................. 80
Platform restore for a system.............................................................................................................80
Vorbedingungen für das Exportieren oder Importieren eines Systemprofils..............................81
Exportieren des Systemprofils.......................................................................................................81
Importieren des Systemprofils......................................................................................................83
Konfigurieren der Teilersatzeigenschaften für eine Sammlung..................................................84
Comparing FC HBA profile against a target system.......................................................................... 85
7 Fehlerbehebung..................................................................................................87
Konfigurieren der Dell Provisioning-Webdienste auf IIS................................................................... 87
Dell provisioning web services configuration for IIS 7.0 or IIS 7.5 or IIS 8.0 or IIS 8.5...............87
Dell Auto-Discovery Network Setup Specification............................................................................88
Fehlerbehebung beim Anzeigen und Exportieren von Lifecycle Controller-Protokollen...............88
Deploying the operating system on Dell’s 13th generation of PowerEdge servers using
WinPE 3.0............................................................................................................................................ 88
Probleme und Lösungen.................................................................................................................... 89
Problem 1 ..................................................................................................................................... 89
Problem 2...................................................................................................................................... 89
Problem 3...................................................................................................................................... 89
Problem 4......................................................................................................................................89
Problem 5......................................................................................................................................90
Problem 6......................................................................................................................................90
Problem 7...................................................................................................................................... 90
Problem 8......................................................................................................................................90
Problem 9......................................................................................................................................90
Problem 10.....................................................................................................................................91
Problem 11..................................................................................................................................... 91
Problem 12.....................................................................................................................................91
Problem 13.....................................................................................................................................91
Problem 14.....................................................................................................................................91
Patent 15........................................................................................................................................92
6

Problem 16.................................................................................................................................... 92
Problem 17.....................................................................................................................................92
Problem 18.................................................................................................................................... 92
Problem 19.................................................................................................................................... 93
Problem 20....................................................................................................................................93
Problem 22.................................................................................................................................... 93
Problem 22.................................................................................................................................... 93
ESXi- oder RHEL-Bereitstellung auf Windows-Systemen wird zu ESXi- oder RHEL-
Sammlungen verschoben, aber nicht aus Windows Managed Collection entfernt........................ 94
8 Relevante Dokumentation und Ressourcen..................................................95
Wie Sie technischen Support erhalten............................................................................................... 95
Zugriff auf Dokumente der Dell Support-Website............................................................................ 95
7

1
Introduction to Dell Lifecycle Controller
Integration (DLCI) for Microsoft System
Center Configuration Manager
Dell Lifecycle Controller Integration (DLCI) for Microsoft System Center Configuration Manager
(Configuration Manager) enables the administrators to leverage the remote enablement capabilities of
Dell Lifecycle Controller, available as part of the Integrated Dell Remote Access Controller (iDRAC).
Configuration Manager is used in this document with reference to the following products:
• Microsoft System Center 2012 SP2 Configuration Manager
• Microsoft System Center 2012 R2 SP1 Configuration Manager
• Microsoft System Center 2012 R2 Configuration Manager
• Microsoft System Center 2012 SP1 Configuration Manager
• Microsoft System Center 2012 Configuration Manager
NOTE: This document contains information on the prerequisites and supported software necessary
for installing the DLCI version 3.2 for Configuration Manager. If you are installing this version of
DLCI for Microsoft Configuration Manager after a long time after its release date, check to see if
there is an updated version of this document at dell.com/support/home.
At a high level, the remote enablement capabilities consist of:
• Autodiscovery
• Hardware configuration
• Firmware comparison and updates
• Remote operating system-Deployment for a collection of Dell systems
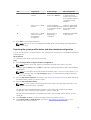
What's new in this release
This release of DLCI for Configuration Manager provides support for the following features:
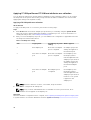
Table 1. New features and functionality
New feature Description
Support for Dell’s 13th generation of PowerEdge
servers
With this version, you can configure the 13th
generations of Dell PowerEdge servers through
Integrated Dell Remote Access Controller (iDRAC)
with Lifecycle Controller (LC).
Support for viewing, and configuring Fibre Channel
(FC) host bus adapters (HBA) for servers
Allows you to inventory, and configure FC HBA
cards.
8

New feature Description
Support for configuring Storage area network
(SAN) boot attributes
Allows you to configure SAN boot attributes.
Support for exporting the system profiles before
and after hardware configuration
Allows you to back up the system profiles for a
collection of systems by exporting the profile to an
iDRAC vFlash card or a network share.
Compare the applied FC HBA profiles against the
systems in a collection and generate comparison
reports
Allows you to view the comparison report between
a FC HBA profile and a selected server.
Support for ESXi 5.5 Update 3, ESXi 6.0 Update 1
Support for Red Hat Enterprise Linux (RHEL) 7.2
Allows you to deploy ESXi operating systems on a
collection.
Allows you to deploy RHEL operating systems on a
collection.
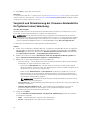
Existing features and functionalities
Table 2. Features and functionalities
Feature Functionality
Configuration Manager distributed environment Support for Configuration Manager, when the
configuration manager is set up in a distributed
environment.
Configure and deploy operating system on Dell’s
11th generation and 12th generation of PowerEdge
servers.
You can configure Dell’s 11th generation or 12th
generation of PowerEdge servers using DLCI
through Lifecycle Controller. All the features of
previous version of DLCI are supported for 12th
generation or 11th generation PowerEdge servers.
A single installer to install and configure DLCI
You can use the single installer to install DLCI 3.2
in environments (Configuration Manager 2012 SP2,
Configuration Manager 2012 R2 SP1, Configuration
2012 R2, Configuration Manager 2012 SP1, or
Configuration Manager 2012) based on the version
of Configuration Manager present in the system. If
a DLCI 3.1 is present, then the installer initiates an
upgrade. The installer deploys appropriate
components based on the Configuration Manager
version.
Automatically configure Dell Provisioning Server To automatically configure Dell Provisioning Server
for non-administrator users, select the
Automatically configure Dell Provisioning Server
user permissions option during installation.
Deploying customized images using Dell driver cab
files
You can create and deploy customized images on
Dell Enterprise servers. For more information, see
Hinzufügen von Dell Treiberpaketen.
Platform Restore You can restore a profile for a system or a
collection that includes:
• Scheduling a backup, and exporting system
profiles to an external share/vFlash.
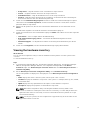
9

Feature Functionality
• Importing the saved system profiles from an
external share/vFlash.
• Configuring Part Replacement properties for a
system or a collection.
For more information, see Platform restore for a
system and Platform restore for a collection.
Viewing and exporting the Lifecycle Controller logs You can view the Lifecycle Controller logs of a
system or a collection in a readable format and
save or export the logs to a .CSV file. In addition,
you can filter logs and view the number of logs
based on the search string. For more information,
see
Lifecycle Controller-Protokolle anzeigen and
Viewing and exporting Lifecycle Controller logs for
a collection.
Configure network interface cards (NICs) and
converged network adapters (CNAs)
You can configure different attributes of specific
NICs or CNAs in the system and save them to a
profile.
The saved profiles can later be applied to the
collection as part of the hardware configuration or
operating system deployment, or both.
You can also compare the applied NIC/CNA
profiles against the NIC/CNA configurations of the
systems and generate comparison reports.
For more information, see:
• NICs und CNAs für ein System konfigurieren.
• Applying a NIC or CNA profile on a collection.
• Vergleich von NIC/CNA-Profilen mit Systemen
in einer Sammlung.
Configure iDRAC profiles for a system or collection
You can define iDRAC configurations for a system
and save it as part of the hardware configuration
profile of the system.
The saved profiles are applied later to the
collection as part of the hardware configuration or
operating system deployment, or both.
For more information, see Konfiguration von
iDRAC-Profilen für ein System.
Connect to Dell FTP for Firmware updates You can now connect to the FTP site and perform
the following:
• Download firmware updates for a system or a
collection.
• Determine the status of the firmware if the
firmware of your collection is compliant, or
needs an update.
• Schedule a firmware update for a single system
or a collection of systems.
• Export an inventory of chassis and servers from
DLCI and use this information to create
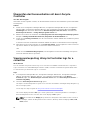
10

Feature Functionality
repository using Dell Repository Manager
(DRM).
For more information, see:
• Vergleich und Aktualisierung der Firmware-
Bestandsliste.
• Vergleich und Aktualisierung der Firmware-
Bestandsliste für Systeme in einer Sammlung..
Importing Dell Servers and System Variables You can import Dell servers, that are not auto-
discovered by DLCI for Configuration Manager.
The imported servers appear under the All Dell
Lifecycle Controller Servers. You can use the DLCI
utilities to perform the various activities on the
servers.
You can also import system variables present in
a .CSV file to systems present within a collection
on the Configuration Manager console.
For more information, see Verwenden des Server-
Import-Dienstprogramms.
Access iDRAC using Active Directory credentials
for authentication
You can provide Active Directory credentials to get
authenticated on iDRAC.
Schedule firmware updates and perform selective
firmware update
You can schedule updates for firmware. Also, you
can select the server components that need to be
updated. For more information, see Vergleich und
Aktualisierung der Firmware-Bestandsliste.
Configure certificate authority (CA) and common
name (CN) checks
You can configure CA and CN checks for DLCI
communication with the targets.
Auto-discovery and Handshake This feature enables the iDRAC on bare metal
systems to locate the provisioning service and
establish communication with the Site Server. For
more information, see Auto-Ermittlung und
Handshake.
System Viewer utility This feature enables you to configure individual
systems by using the remote enablement
capabilities of DLCI. For more information, see
Using the System Viewer Utility.
Config Utility
This feature enables you to configure a collection
of systems by using the remote enablement
capabilities of Lifecycle Controller. For more
information, see Using the Configuration Utility.
Launching the iDRAC Console This feature enables you to launch the iDRAC
console from the Task Viewer and from a system in
the collection that contains Dell’s 11th generation
to 13th generation of PowerEdge systems. For
more information, see
Starten der Integrated Dell
Remote Access Controller-Konsole.
11

Feature Functionality
Support Unified Extensible Firmware Interface
(UEFI) boot mode
This feature supports configuration of UEFI boot
mode and BIOS attribute settings. For more
information, see Changing the BIOS or UEFI boot
sequence and hard disk drive sequence.
Task Viewer This feature enables you to track the status of the
tasks handled by DLCI for Configuration Manager.
For more information, see Task Viewer.
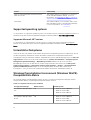
Supported operating systems
For information on supported operating systems, see the Dell Lifecycle Controller Integration Version 3.2
for Microsoft System Center Configuration Manager Installation Guide at dell.com/support/home.
Supported Microsoft .NET versions
For information on supported Microsoft .NET versions, see the Dell Lifecycle Controller Integration
Version 3.2 for Microsoft System Center Configuration Manager Installation Guide at dell.com/support/
home.
Unterstützte Zielsysteme
Lesen Sie für eine Liste mit den unterstützten Zielsystemen und Betriebssystemen (nur Windows), die Sie
auf den Zielsystemen bereitstellen können die Matrix Unified Server Configurator/Unified Server
Configurator-Lifecycle Controller Enabled- Supported Dell Systems and Operating Systems auf dell.com/
support/home. Klicken Sie auf der Seite Handbücher auf Software und Sicherheit → Enterprise System
Management (Systemverwaltung) → OpenManage Software. Wählen Sie die für Sie relevante
OpenManage-Version aus und klicken Sie auf den entsprechenden Link. Klicken Sie auf Dell System
Software Support-Matrix → Dell Systems Software Support-Matrix → Anzeige → Unterstützte Dell
Systeme und Betriebssysteme. Zeigen Sie in der Support-Matrix die durch den Unified Server
Configurator – Lifecycle Controller Enabled unterstützten Zielsysteme und Betriebssysteme an.
Windows Preinstallation Environment (Windows WinPE)-
Kompatibilitäts-Matrix
Die folgende Tabelle listet die Betriebssysteme auf, die von DLCI für Configuration Manager und den
entsprechenden WinPE-Umgebungen bereitgestellt werden können.
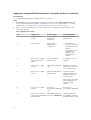
Tabelle 3. Kompatible Betriebssysteme für WinPE
Configuration Manager WinPE-Version Betriebssystem
Configuration Manager 2012
SP2
5.0
• Windows Server 2008 R2*
• Windows Server 2012
• Windows Server 2012 R2
Configuration Manager 2012
R2 SP1
5.0
• Windows Server 2008 R2*
• Windows Server 2012
• Windows Server 2012 R2
12

Configuration Manager WinPE-Version Betriebssystem
Configuration Manager 2012
R2
5.0
• Windows Server 2008 R2*
• Windows Server 2012
• Windows Server 2012 R2
Configuration Manager 2012
SP1
4.0
• Windows Server 2008 R2*
• Windows Server 2012
Configuration Manager 2012 3.0
• Windows Server 2008
• Windows Server 2008 R2
Legende:
* – Support für Windows Server 2008 R2 finden Sie unter support.microsoft.com/kb/2853726.
13

2
Use case scenarios
This section describes typical use cases and tasks that you can perform with DLCI for Microsoft System
Center Configuration Manager (Configuration Manager).
Common prerequisites
Before working on the user scenarios, it is recommended that you complete the following prerequisites.
• In Configuration Manager 2012, make sure that the system is discovered and present under Assets
and Compliance → Device Collections → All Dell Lifecycle Controller Servers. For more information,
see Auto-Ermittlung und Handshake.
• Install the latest BIOS version on the system.
• Install the latest version of Lifecycle Controller on the system.
• Install the latest version of iDRAC firmware on the system.
NOTE: Always launch the Configuration Manager console with administrator privileges.
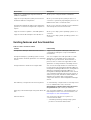
Editing and exporting the BIOS configuration profile of a
system
You can edit and export the BIOS configuration of a system as a profile and apply it when you are
deploying the operating system to a collection of systems on the Configuration Manager console. For
13th generation of Dell PowerEdge servers, you can only view the BIOS attributes and boot sequence of
currently saved boot mode.
Prerequisites
For more information, see Common prerequisites.
About this task
The following steps outline the workflow sequence:
Steps
1. Launch the System Viewer utility on the Configuration Manager console for a particular system. For
more information, see System Viewer utility.
2. Select BIOS Configuration on the System Viewer utility to load the BIOS configuration of the system.
For more information, see Viewing and editing BIOS configuration.
3. Create a profile or change an existing profile. For more information, see Erstellen eines neuen Profils
or Bearbeiten eines vorhandenen Profils.
4. Add, edit, or update the attributes in the profile. For more information, see Hinzufügen eines neuen
Attributes and Bearbeiten eines vorhandenen BIOS-Attributs.
5. (Optional) Change the BIOS or UEFI boot sequence and hard disk drive sequence. For more
information, see Changing the BIOS or UEFI boot sequence and hard disk drive sequence.
14

6. Save the profile as a .XML file to any folder location on the local system.
Vergleich und Aktualisierung der Firmware-Bestandsliste
Sie können Dell Lifecycle Controller Integration für Configuration Manager für das Vergleichen und
Aktualisieren der Firmware-Bestandsliste eines einzelnen Systems, oder einer Sammlung von Systemen
verwenden. Sie können die Firmware-Bestandsliste mit einem gegebenen Bestandslistenprofil, einer Dell
FTP-Site, oder einem durch Repository Manager erstellten PDK-Katalog vergleichen.
Prerequisites
• Common prerequisites.
• Make sure that you have access to the Common Internet File System (CIFS) share where the Plug-in
Deployment Kit (PDK) catalog is located or Dell FTP site (ftp.dell.com).
• To compare against an existing profile, create a Hardware inventory profile. For more information, see
Erstellen eines neuen Profils.
Prerequisites for CMC firmware update:
• Dell PowerEdge M1000e CMC 5.0 or later versions are supported.
• Dell CMC PowerEdge VRTX 2.0 or later versions are supported.
• The target system must have iDRAC7 with Enterprise licenses (12th generation and later versions).
• Dell Repository Manager 1.8 or later versions are supported.
Workflow sequence for comparing and updating the firmware inventory
About this task
The following steps outline the workflow sequence:
Steps
1. To compare and update the Firmware inventory of a single target system, launch the System Viewer
utility. To compare and update the Firmware inventory of a collection of systems, launch the Config
Utility. For more information, see System Viewer utility or Configuration utility.
2. Select Firmware Inventory, Compare, and Update from the System Viewer utility or Config Utility.
3. For a single system, see Vergleich und Aktualisierung der Firmware-Bestandsliste.
4. For a collection, see Vergleich und Aktualisierung der Firmware-Bestandsliste für Systeme in einer
Sammlung..
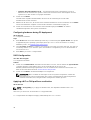
Creating, editing, and saving a RAID profile of a system
You can create, edit, and save the RAID profile of a system and apply it when you deploy an operating
system to a collection of systems on the Configuration Manager console.
Prerequisites
• Common prerequisites
• RAID controller and firmware that supports Local Key Management
The following steps outline the workflow sequence:
1. Launch the System Viewer utility on the Configuration Manager console for a particular system. For
more information, see System Viewer utility.
15

2. Select RAID Configuration on the System Viewer utility to load the RAID configuration of the
system. For more information, see Anzeigen und Konfigurieren von RAID.
3. Launch Array Builder to create a RAID profile. For more information, see Creating a RAID Profile
using Array Builder.
4. (Optional) Import and edit an existing profile. For more information, see Importieren eines Profils.
5. Save the newly created RAID profile as a .XML file to any folder location on the local system.
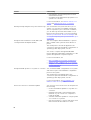
Deploying operating system on collection
You can use DLCI for Configuration Manager to deploy an operating system on a collection of systems
on the Configuration Manager console.
Prerequisites
• Common prerequisites.
• Select the Driver Cab which is compatible with the boot image (WinPE version). You can view the DTK
README to select the correct version of the cab file for specific WinPE or OS architecture, and
provide the location of the DTK Self-Extracting EXE. For more information, see Importing Dell driver
Cab files.
• Create a task sequence boot media for the collection of systems with an iDRAC to boot to the task
sequence ISO. For more information, see Tasksequenz-Datenträger erstellen (Startfähiges ISO-
Image).
• For prerequisites on the non-Windows operating systems deployment task, see section "Software
Prerequisites and Requirements" in the Dell Lifecycle Controller Integration for Microsoft System
Center Configuration Manager Version 3.2 Installation Guide.
NOTE: In Configuration Manager 2012, operating system deployment is not supported in UEFI
boot mode. For more information, see technet.microsoft.com/en-in/library/jj591552.aspx.
The following steps outline the workflow sequence:
1. In the Configuration Manager console, under Device Collections right-click on Managed Dell
Lifecycle Controllers (OS Unknown) and select Dell Lifecycle Controller Launch Config Utility.
2. In the Dell Lifecycle Controller Configuration Utility, select Deploy Operating System.
3. Update the firmware from a Dell repository. For more information, see Aktualisierung der Firmware
während der BS-Bereitstellung.
4. Configure or edit the BIOS/NIC profiles. For more information, see Configuring hardware during OS
deployment.
5. Apply FC HBA profiles, and FC SAN boot attributes on a collection. For more information, see
Applying FC HBA profiles and FC SAN boot attributes on a collection.
6. Configure or edit the RAID profiles. For more information, see RAID-Konfiguration.
7. Apply NIC/CNA profiles to the collection. For more information, see Applying a NIC or CNA profile
on a collection.
8. Apply iDRAC profiles to the collection. For more information, see Applying an integrated Dell
Remote Access Controller profile on a collection.
9. Deploy the operating system and boot the systems to the media of your choice. For more
information, see step 15 in Hardware configuration and OS deployment workflow.
16

Exportieren von Serverprofilen auf die iDRAC vFlash-
Karte oder die Netzwerkfreigabe
Sie können das Serverprofil für ein einzelnes System als Image-Datei sichern, oder indem Sie für eine
Sammlung von Systemen das Serverprofil auf eine iDRAC-vFlash-Karte, oder auf eine externe Quelle,
bzw. Netzwerkfreigabe exportieren.
Prerequisites
• Common prerequisites
• Target system with valid seven character service tag
• iDRAC vFlash card:
– Installed as a license, enabled, and initialized
NOTE: The iDRAC vFlash card is required only for Dell’s 11th generation of PowerEdge
servers. For the 12th and 13th generation of PowerEdge servers, you must have an Enterprise
license.
– With a minimum free space of 384 MB available.
• Network Share:
– Permissions and firewall settings are provided for the iDRAC to communicate with the system that
has the network share.
– With a minimum free space of 384 MB available
• Administrator privileges on the iDRAC of the target systems
Bevor Sie beginnen:
Bevor Sie mit dem Export des Systemprofils für ein einzelnes System, oder eine Sammlung von Systemen
beginnen:
• Stellen Sie sicher, dass Aufgaben wie z. B. die Firmware-Aktualisierung, die
Betriebssystembereitstellung und Firmware-Konfigurationen nicht ausgeführt werden.
• Nach der Bereitstellung des Betriebssystems unter Verwendung des Lifecycle Controllers ist das
Originalcomputerhersteller-Laufwerk (OEMDRV) für 18 Stunden zugänglich, da der Lifecycle
Controller nicht über den Status der Betriebssysteminstallation verfügt. Wenn Sie nach der
Betriebssystembereitstellung Aufgaben wie Aktualisierung, Konfiguration oder Wiederherstellung
durchführen müssen, müssen Sie die OEMDRV-Partition entfernen. Setzen Sie zum Entfernen der
Partition den iDRAC zurück, oder beenden Sie die Systemdienste.
Lesen Sie für weitere Informationen über das Zurücksetzen des iDRACs oder das Beenden der
Systemdienste das Dell Lifecycle Controller Remote Services User’s Guide (Dell Lifecycle Controller
Remote Services-Benutzerhandbuch), das unter dell.com/support/home zur Verfügung steht.
• Wenn Sie eine Sicherung eingeplant haben, dann planen Sie auf den Zielsystemen keine anderen
Remotedienst-Aufgaben, wie z. B. BIOS-Aktualisierungen oder die RAID-Konfiguration.
• Stellen Sie sicher, dass die Backup-Image-Datei während des Exports oder Imports nicht beschädigt
wird.
Workflow for exporting server profile
About this task
The following steps outline the workflow sequence:
17

Steps
1. To export the system profile of a single target system, launch the System Viewer utility. To export the
system profiles of a collection of systems, launch the Config Utility. For more information, see
System Viewer utility or Configuration utility.
2. Select the Platform Restore on the System Viewer utility or the Config Utility.
3. For a single system, see Exportieren des Systemprofils.
4. For a collection, see Exporting the system profiles in a collection.
Importieren des Serverprofils von iDRAC vFlash-Karte
oder Netzwerkfreigabe
Sie können die Sicherung eines Systemprofils für ein einzelnes System oder eine Sammlung von
Systemen von einem iDRAC-vFlash-Karte oder einer Netzwerkfreigabe aus wiederherstellen, indem Sie
DLCI für Configuration Manager verwenden.
Prerequisites
• Common prerequisites
• The service tag of the server is either blank or same as when the backup was taken.
• iDRAC vFlash card:
– Is installed as a license, enabled and has the SRVCNF partition. In Lifecycle Controller, during
backup, a partition with a label name SRVCNF is automatically created on the vFlash SD card to
store the backup image file. If a partition with the label name SRVCNF already exists, it is
overwritten. For more information, see Lifecycle Controller documentation at dell.com/support/
manuals.
– Has minimum free space of 384 MB available.
• If you are importing from an iDRAC vFlash card, make sure that the card is installed and has the
backup image in the SRVCNF partition. This image is from the same platform that you are importing.
• If you are importing from a network share, make sure that the network share where the backup image
file is stored is still accessible.
• If you replace the motherboard before performing import, make sure that the motherboard has the
latest iDRAC and BIOS installed.
Bevor Sie beginnen:
Stellen Sie folgendes sicher, bevor Sie mit dem Import der Sicherungsdatei auf ein System oder eine
Sammlung beginnen:
• Benutzerdaten sind in der Backup-Image-Datei nicht vorhanden. Wenn Sie die vorhandene
Konfiguration mit der Sicherungs-Image-Datei überschreiben, werden die Benutzerdaten nicht
wiederhergestellt.
• Während des Imports werden Aufgaben wie z. B. die Firmware-Aktualisierung, die
Betriebssystembereitstellung und Firmware-Konfigurationen nicht ausgeführt.
• Nach der Bereitstellung des Betriebssystems mithilfe des Lifecycle-Controllers ist OEMDRV für 18
Stunden zugänglich. Wenn Sie nach der Betriebssystembereitstellung weitere Aktivitäten ausführen
möchten, z. B. Aktualisierung, Konfiguration oder Import, entfernen Sie die OEMDRV-Partition. Setzen
Sie zum Entfernen der Partition iDRAC zurück, oder brechen Sie die System-Services ab.
18

Workflow for importing server profile
About this task
The following steps outline the workflow sequence:
Steps
1. To import the system profile of a single target system, launch the System Viewer utility. To import
the system profiles of a collection of systems, launch the
Config Utility. For more information, see
System Viewer utility or Configuration utility.
2. Select the Platform Restore on the System Viewer utility or the Config Utility.
3. For a single system, see Importieren des Systemprofils.
4. For a collection, see Importing the system profiles in a collection.
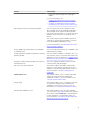
Anzeigen und Exportieren von Lifecycle Controller-
Protokollen
Sie können die Lifecycle Controller-Protokolle für ein einzelnes System oder eine Sammlung anzeigen
und diese in einem CSV-Format auch auf eine Netzwerkfreigabe exportieren. Sie können die Lifecycle
Controller-Protokolle außerdem mithilfe des Felds Suchen durchsuchen und filtern.
Prerequisites
• Common prerequisites
• Network Share:
– iDRAC can access the network share.
– iDRAC has the necessary permissions to write information to network share.
– Minimum free space of 384 MB is available.
• Configure the number of log files you want to view at a time in the DLCSystemview.exe.config or the
DLCConfigUtility.exe.config files. For more information, see Lifecycle Controller-Protokolle anzeigen.
Bevor Sie beginnen:
Bevor Sie mit der Anzeige oder dem Exportieren der Lifecycle Controller-Protokolle für ein einzelnes
System oder eine Sammlung beginnen:
• Wenn der Lifecycle Controller auf den Zielsystemen andere Aufgaben, wie z.B.
Firmwareaktualisierung, Betriebssystembereitstellung, Firmwarekonfigurationen, Export eines
Systemprofils oder Import eines Systemprofils ausführt, dann warten Sie vor dem Abrufen der
Protokolle, bis die Tasks abgeschlossen sind.
• Überprüfen Sie die Berechtigungen auf der Netzwerkfreigabe und stellen Sie sicher, dass vom
Lifecycle Controller auf den Zielsystemen auf die Freigabe zugegriffen werden kann.
Workflow for viewing and exporting Lifecycle Controller logs
About this task
The following steps outline the workflow sequence:
19

Steps
1. To view the Lifecycle Controller logs of a single target system, launch the System Viewer utility. To
view the Lifecycle Controller logs of a collection of systems, launch the Config Utility. For more
information, see System Viewer utility or Configuration utility.
2. Select View Lifecycle Controller Logs on the System Viewer utility or the Config Utility.
3. For a single system, see Lifecycle Controller-Protokolle anzeigen.
4. For a collection, see Viewing and exporting Lifecycle Controller logs for a collection.
Arbeit mit NIC- oder CNA-Profilen
Sie können die verschiedenen Attribute von spezifischen, im System integrierten NICs (Network Interface
Cards) oder CNAs (Converged Network Adapters) konfigurieren und diese in einem Profil speichern. Sie
können NIC- oder CNA-Profile unter Verwendung des Dienstprogramms System Viewer erstellen und
bearbeiten.
Prerequisites
For more information, see Common prerequisites.
Workflow for configuring and saving NIC or CNA
About this task
The following steps outline the workflow sequence:
Steps
1. Launch the System Viewer utility on the Configuration Manager console for a particular system. For
more information, see System Viewer utility.
2. Select Network Adapter Configuration.
3. Select one of the following options:
• Create a profile — to create a new NIC or CNA profile. For more information, see Erstellen eines
NIC oder CNA-Profils.
• Edit an existing profile — to edit an existing NIC/CNA profile. For more information, see Editing a
NIC or CNA profile.
• Scan collection to identify adapters — to scan the collection and list the configured adapters in
the collection. For more information, see Vergleich und Aktualisierung der Firmware-
Bestandsliste.
4. Add an adapter to the profile or remove an adapter from the profile. For more information, see
steps 3–4 in Erstellen eines NIC oder CNA-Profils.
5. Select the adapter on the grid and configure it. For more information, see Adapter konfigurieren.
6. Set the NIC and iSCSI parameters for the personalities you have chosen for each partition. For more
information, see
Konfigurieren von NIC- und iSCSI-Parametern.
7. Save the NIC or CNA profile.
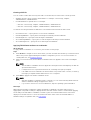
Working with Fibre Channel profiles
You can configure different attributes of Fibre Channel (FC) host bus adapter (HBA) cards in the system
and save them as a profile. You can create, and edit FC HBA profiles by using the System Viewer utility
and apply it when you are deploying the operating system to a collection of systems on the Configuration
Manager console.
Prerequisites
For more information, see Common prerequisites.
20
Seite wird geladen ...
Seite wird geladen ...
Seite wird geladen ...
Seite wird geladen ...
Seite wird geladen ...
Seite wird geladen ...
Seite wird geladen ...
Seite wird geladen ...
Seite wird geladen ...
Seite wird geladen ...
Seite wird geladen ...
Seite wird geladen ...
Seite wird geladen ...
Seite wird geladen ...
Seite wird geladen ...
Seite wird geladen ...
Seite wird geladen ...
Seite wird geladen ...
Seite wird geladen ...
Seite wird geladen ...
Seite wird geladen ...
Seite wird geladen ...
Seite wird geladen ...
Seite wird geladen ...
Seite wird geladen ...
Seite wird geladen ...
Seite wird geladen ...
Seite wird geladen ...
Seite wird geladen ...
Seite wird geladen ...
Seite wird geladen ...
Seite wird geladen ...
Seite wird geladen ...
Seite wird geladen ...
Seite wird geladen ...
Seite wird geladen ...
Seite wird geladen ...
Seite wird geladen ...
Seite wird geladen ...
Seite wird geladen ...
Seite wird geladen ...
Seite wird geladen ...
Seite wird geladen ...
Seite wird geladen ...
Seite wird geladen ...
Seite wird geladen ...
Seite wird geladen ...
Seite wird geladen ...
Seite wird geladen ...
Seite wird geladen ...
Seite wird geladen ...
Seite wird geladen ...
Seite wird geladen ...
Seite wird geladen ...
Seite wird geladen ...
Seite wird geladen ...
Seite wird geladen ...
Seite wird geladen ...
Seite wird geladen ...
Seite wird geladen ...
Seite wird geladen ...
Seite wird geladen ...
Seite wird geladen ...
Seite wird geladen ...
Seite wird geladen ...
Seite wird geladen ...
Seite wird geladen ...
Seite wird geladen ...
Seite wird geladen ...
Seite wird geladen ...
Seite wird geladen ...
Seite wird geladen ...
Seite wird geladen ...
Seite wird geladen ...
Seite wird geladen ...
Seite wird geladen ...
-
 1
1
-
 2
2
-
 3
3
-
 4
4
-
 5
5
-
 6
6
-
 7
7
-
 8
8
-
 9
9
-
 10
10
-
 11
11
-
 12
12
-
 13
13
-
 14
14
-
 15
15
-
 16
16
-
 17
17
-
 18
18
-
 19
19
-
 20
20
-
 21
21
-
 22
22
-
 23
23
-
 24
24
-
 25
25
-
 26
26
-
 27
27
-
 28
28
-
 29
29
-
 30
30
-
 31
31
-
 32
32
-
 33
33
-
 34
34
-
 35
35
-
 36
36
-
 37
37
-
 38
38
-
 39
39
-
 40
40
-
 41
41
-
 42
42
-
 43
43
-
 44
44
-
 45
45
-
 46
46
-
 47
47
-
 48
48
-
 49
49
-
 50
50
-
 51
51
-
 52
52
-
 53
53
-
 54
54
-
 55
55
-
 56
56
-
 57
57
-
 58
58
-
 59
59
-
 60
60
-
 61
61
-
 62
62
-
 63
63
-
 64
64
-
 65
65
-
 66
66
-
 67
67
-
 68
68
-
 69
69
-
 70
70
-
 71
71
-
 72
72
-
 73
73
-
 74
74
-
 75
75
-
 76
76
-
 77
77
-
 78
78
-
 79
79
-
 80
80
-
 81
81
-
 82
82
-
 83
83
-
 84
84
-
 85
85
-
 86
86
-
 87
87
-
 88
88
-
 89
89
-
 90
90
-
 91
91
-
 92
92
-
 93
93
-
 94
94
-
 95
95
-
 96
96


Dell Lifecycle Controller Integration Version 3.2 for Microsoft System Center Configuration Manager Benutzerhandbuch
- Typ
- Benutzerhandbuch
in anderen Sprachen
Verwandte Artikel
-
Dell Lifecycle Controller Integration Version 3.3 for Microsoft System Center Configuration Manager Benutzerhandbuch
-
Dell Lifecycle Controller Integration Version 2.1 for Microsoft System Center Configuration Manager Benutzerhandbuch
-
-
-
-
-
-
-
-