SICK Screw set No. 2035112 for sealing the VMS5xx Volume Measurement System Mounting instructions
- Typ
- Mounting instructions

© SICK AG · Division Auto Ident · Germany · All rights reserved 1 # 28011541/12-2005
1. Produkteigenschaften
■ Schrauben zum Verplomben der Steckerhaube und des drehba-
ren Befestigungssatzes Nr. 2030421 für VMS5xx im Austausch
mit den vorhandenen Schrauben
2. Lieferumfang
■ Schrauben verschiedener Länge mit Bohrung für Verplombungs-
draht sowie Unterlegscheiben und Muttern (s.u.)
Hinweis:
Die neueste Ausgabe dieser Montageanleitung ist als PDF erhältlich
unter www.sick.com.
3. Voraussetzungen zur Installation
■ Innensechskantschlüssel verschiedener Schlüsselweiten
■ Betriebsanleitungen für VMS5xx
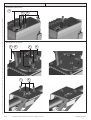
4. Montage
■ Bei Erstinstallation des VMS5xx: Schrauben vor Montage der
Steckerhaube und des Befestigungssatzes austauschen.
1. An der Steckerhaube und dem Befestigungssatz die bisherigen
Schrauben entfernen.
2. An ihrer Stelle die Schrauben gemäß Übersicht in Abb. 1 und der
Zuordnung in Abb. 2, Seite 2 einsetzen und festschrauben.
3. Steckerhaube und Befestigungssatz montieren.
4. Abschließend Verplombungsdraht gemäß Abb. 2 jeweils durch
die Bohrung im Kopf der Schrauben fädeln und am Punkt der
Zusammenführung die Plombe am Draht anbringen.
Montageanleitung
Fitting Instructions
Screw set for sealing the
VMS5xx Volume Measurement System
1. Features
■ Screws for sealing the connector hood and the rotary mounting
kit no. 2030421 for VMS5xx. Used for replacing the existing
screws.
2. Scope of delivery
■ Screws in several lengths with holes in the head for the sealing
wire as well as washers and nuts (see below)
Note:
For the latest version of these fitting instructions (PDF), see
www.sick.com.
3. Installation Requirements
■ Allen keys with several wrench sizes
■ Operating Instructions for VMS 5xx
4. Installation
■ If you install the VMS5xx the first time: replace the screws before
mounting the connector hood and the mounting kit.
1. Loosen and remove the existing screws of the connector hood
and the mounting kit.
2. Apply the new srews according to the overview in Fig. 1 and the
assignment in Fig. 2, Page 2. Tighten the screws.
3. Mount the plug connector and the mounting kit.
4. Finally thread the sealing wire through the holes in the screw
heads according to Fig. 2. Fix the seal on the wire at the point on
which the both wire ends can be crossed.
Schraubensatz
Screw set
No. 2035112
Schraubensatz zum Verplomben
eines Volumenmessystems VMS5xx
Abb. 1: Bestandteile des Schraubensatzes Nr. 2035112/Fig. 1: Parts of the screw set no. 2035112
1
2
3
4
5
6
7 8

2 # 2 © SICK AG · Division Auto Ident · Germany · All rights reserved 8011541/12-2005
Schrauben tauschen/replacing the screws:
SICK AG · Auto Ident · Waldkirch/Reute · Germany · www.sick.com · 8011541/12-2005 · 5M/TR <PM 6.5> · VD · Printed in Germany · Subject to change without prior notice · The specified product features and technical data do not represent any guarantee · AftE5505sw
Abb. 2: Austausch der Schrauben an der Steckerhaube und dem Befestigungssatz/Fig. 2: Replacing the screws on the connector hood and the mounting kit
Steckerhaube/connector hood:
Schrauben verplomben/sealing the screws:
Befestigungssatz/mounting kit:
7 8
4 5
+
46
3
1 2
+
3 x
3 x
3 x
2 x
4 x
1 x
1 x
-
 1
1
-
 2
2


SICK Screw set No. 2035112 for sealing the VMS5xx Volume Measurement System Mounting instructions
- Typ
- Mounting instructions
in anderen Sprachen
Verwandte Artikel
-
SICK Connection hoods for VMS4xx/5xx Volume Measurement System and LMS400 Laser Measurement Sensor Mounting instructions
-
-
-
-
-
-