SICK Adapter plate microScan3 to S3000 Mounting instructions
- Kategorie
- Elektrische Wandplatten
- Typ
- Mounting instructions

SICK AG | Waldkirch | Germany | www.sick.com
8019353/2016-09-22
Alle Rechte vorbehalten. Irrtümer und Änderungen vorbehalten.
Mounting instructions: Adapter plate microScan3 to S3000 (Part. No. 2085553)
Montageanleitung: Adapterplatte microScan3 zu S3000 (Mat. Nr. 2085553)
EN DE
Adapter plate for replacement of the S3000 with
the microScan3, which is used in conjunction with
mounting kit 1 (2015623) or Heavy-duty mount-
ing kit (2080350) of S3000. For mounting the
microScan3 on the adapter plate, mounting kit 1a
(2073851) for microScan3 is required.
With the use of the adapter plate the scan plane
of the microscan3 is identical to the scan plane of
the replaced S3000.
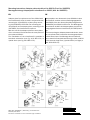
The installation of the microScan3 is possible in
standard orientation (see fig. A1 & B1 & C1) or
upside down (see fig. A2 & B2 & C2).
Adapterplatte zum Austausch eines S3000 mit dem
microScan3, welcher mit dem Befestigungssatz 1a
(2015623) oder dem Heavy Duty Mounting Bracket
(2080350) des S3000 montiert ist. Zur Montage des
microScan3 mit Hilfe der Adapterplatte wird der Be-
festigungssatz 1a des microScan3 (2073851) benö-
tigt.
Die Verwendung der Adapterplatte stellt sicher, dass
der microScan3 die Scanebene des ausgetauschten
S3000 übernimmt. Die Montage des mircoScan3
kann sowohl in Standard-Ausrichtung (s. Abb. A1 & B1
& C1) als auch kopf-über („Upside Down“) erfolgen (s.
Abb. A2 & B2 & C2)

SICK AG | Waldkirch | Germany | www.sick.com
8019353/2016-09-22
Alle Rechte vorbehalten. Irrtümer und Änderungen vorbehalten.
Required tools:
- TX20 torx wrench
- Screw-wrench internal hex M8
Scope of delivery:
- Adapter plate S3000 to microScan3
- 2 screws to mount the mounting bracket 1a of
microScan3 (2073851) on the adapter plate
Mounting steps:
1. Mount the adapter plate in place of the S3000
using the existing screws. Following the previ-
ously mounted S3000 the SICK logo will be ei-
ther upright (see A1, A2, B1, B2) or upside-
down (See C1, C2). If the S3000 was mounted
head down, the SICK logo will be so, too.
Please consider the maximum tightening
torque of threaded holes M8x9 of 16 Nm.
2. Choose the desired mounting position (stand-
ard or upside down) on the adapter plate, see
symbol on the adapter plate.
3. Make sure that the mounting bracket of the
microScan3 (2073851) is oriented correctly;
see symbol on the mounting bracket.
4. Mount the mounting bracket of the microS-
can3 (2073851) on the adapter plate, using
the supplied M5 screws of the adapter plate
(tightening torque is 4,5 Nm…5,0 Nm).
5. Push the microScan3 onto the mounting kit 1a
(2073851).
6. Use all 4 supplied M5 screws to fix the microS-
can3 onto the mounting bracket 1a
(2073851). (See mounting instructions mount-
ing bracket 1a microScan3)
Note: These instructions may also be applied when
using mounting kit 1b (2074242) instead of
mounting kit 1a (2073851).
Benötigtes Werkzeug:
- Schraubenschlüssel Innensechsrund TX20
- Schraubenschlüssel Innensechskant M8
Lieferumfang:
- Adapterplatte S3000 zu microScan3
- 2 Schrauben zur Montage des Befestigungssatz
1a des microScan3 (2073851) auf der Adap-
terplatte
Montageschritte:
1. Die Adapterplatte mit den vorhandenen Schrau-
ben an Stelle des S3000 am Befestigungssatz 1
montieren. Richtige Montageposition der Adap-
terplatte beachten (siehe SICK Logo). Wurde der
S3000 standardmäßig montiert, wird das SICK
Logo auf der Adapterplatte normal lesbar sein
(siehe A1, A2, B1, B2). Ist der S3000 über Kopf
montiert, soll das SICK Logo über Kopf lesbar
sein (siehe C1, C2). Dabei das maximale An-
zugsdrehmoment der Befestigungsgewindeboh-
rungen M8x9 von 16 Nm beachten.
2. Die gewünschte Montageposition auf der Adap-
terplatte auswählen (Standard oder Upside
Down), siehe Symbol auf der Adapterplatte.
3. Die richtige Orientierung des Befestigungssatzes
1a für microScan3 (2073851) beachten, siehe
Symbol auf dem Befestigungssatz.
4. Den Befestigungssatz
1a des microScan3
(2073851) auf der Adapterplatte montieren. Die
mitgelieferten M5 Schrauben der Adapterplatte
verwenden (Anzugsdrehmoment: 4,5 Nm … 5,0
Nm).
5. Den microScan3 auf den Befestigungssatz 1a
(2073851) schieben.
6. Den microScan3 mit allen 4 mitgelieferten M5-
Schrauben am Befestigungssatz 1a (2073851)
fixieren (Siehe Montageanleitung Befestigungs-
satz 1a microScan3)
Hinweis: Anstelle des Befestigungssatzes 1a
(2073851) des microScan3 kann auch Befesti-
gungssatz 1b (2074242) verwendet werden.
EN
DE
-
 1
1
-
 2
2


SICK Adapter plate microScan3 to S3000 Mounting instructions
- Kategorie
- Elektrische Wandplatten
- Typ
- Mounting instructions
in anderen Sprachen
Verwandte Artikel
-
SICK microScan3 mounting kits Heavy duty mounting kit Mounting instructions
-
-
-
-
-
-
-
-
-