SICK microScan3 optics cover Mounting instructions
- Typ
- Mounting instructions

microScan3 optics cover | SICK8017786/YYW7/2017-02-09/de, en, cs, es, fr, it, ja, pl. pt, zh 1
8017786/YYW7/2017-02-09
SICK AG
Erwin -Sick-Straße 1
D-79183 Waldkirch
www.sick.com
microScan3 optics cover
MONTAGEANLEITUNG de
Alle Rechte vorbehalten. Irrtümer und Änderungen vorbehalten.
Optikhaube
1. Sicherheit
a GEFAHR! Gefahr der Unwirksamkeit der Schutzeinrichtung.
Zu schützende Personen oder Körperteile werden bei Nichtbeachtung nicht
erkannt.
Der Sicherheits-Laserscanner misst während des Betriebs ständig den Grad
der Verschmutzung der Optikhaube. Für die einwandfreie Funktion muss bei
einer neuen Optikhaube zunächst ein Optikhaubenabgleich durchgeführt
werden, der als Referenz für die Verschmutzungsmessung dient (Zustand =
nicht verschmutzt).
b Führen Sie nach jedem Austausch der Optikhaube einen Optikhaubenab-
gleich mit dem Safety Designer durch.
b Führen Sie den Optikhaubenabgleich bei Raumtemperatur (10 °C bis 30 °C)
durch.
b Führen Sie den Optikhaubenabgleich nur mit einer neuen Optikhaube durch.
b Stellen Sie sicher, dass die neue Optikhaube zum Zeitpunkt des Abgleichs frei
von Verunreinigungen ist.
WICHTIG
b Die Optikhaube des Sicherheits-Laserscanners ist ein optisches Bauteil.
Achten Sie darauf, dass die Optikhaube beim Auspacken und Montieren
nicht verunreinigt oder zerkratzt wird. Vermeiden Sie Fingerabdrücke auf
der Optikhaube. Tragen Sie beim Tausch die Handschuhe, die mit der neuen
Optikhaube geliefert werden.
b Die Optikhaube darf nur von befähigten Personen in staub- und schmutzfreier
Umgebung getauscht werden.
b Tauschen Sie die Optikhaube nie im laufenden Betrieb, da Staubpartikel in
den Sicherheits-Laserscanner eindringen könnten.
b Vermeiden Sie unbedingt Verunreinigungen auf der Innenseite der Optikhau-
be, z. B. durch Fingerabdrücke.
b Verwenden Sie zum Abdichten der Optikhaube kein zusätzliches Dichtungs-
mittel wie z. B. Silikon. Entstehende Dämpfe können die optischen Bauteile
beschädigen.
b Montieren Sie die Optikhaube entsprechend der folgenden Anleitung, um die
Gehäusedichtigkeit IP65 zu gewährleisten.
b Verwenden Sie als Ersatz ausschließlich neue Optikhauben.
b Sorgen Sie während des Tauschs der Optikhaube unbedingt für ESD-Schutz.
WICHTIG
Die Schutzart IP65 gilt nur, wenn der Sicherheits-Laserscanner verschlossen
ist und der Systemstecker montiert ist.
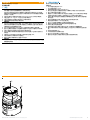
2. Optikhaube tauschen
Siehe Abbildung
A
am Ende dieses Dokuments.
Benötigtes Werkzeug:
• Drehmomentschlüssel Innensechsrund TX10
• Schraubenschlüssel Innensechsrund TX20
1. Sicherstellen, dass die Umgebung sauber und frei von Nebel, Feuchtigkeit
und Staub ist.
2. Den Sicherheits-Laserscanner zunächst von außen reinigen, damit keine
Fremdkörper in das geönete Gerät gelangen.
3. Befestigungsschrauben
1 der Optikhaube lösen.
4. Optikhaube langsam und vorsichtig vom Sicherheits-Laserscanner lösen.
Falls die Dichtung der Optikhaube am Sicherheits-Laserscanner festklebt, die
Optikhaube vorsichtig mit einem Schraubendreher lösen.
5. Verschmutzungen von der Dichtnut und der Anlageäche des Sicherheits-La-
serscanners ggf. entfernen. Rückstandsfreien Kunststoreiniger verwenden.
6. Prüfen, ob der Spiegel auf dem Motor verunreinigt ist, und Verunreinigungen
ggf. mit einem Optikpinsel entfernen.
7. Drehmomentschlüssel auf 1,0 Nm Anzugsdrehmoment einstellen.
8. Bei den folgenden Schritten die Handschuhe tragen, die mit der neuen Optik-
haube geliefert werden.
9. Neue Optikhaube aus der Verpackung nehmen und den Schutzdeckel der
Dichtung entfernen.
10. Verpackungsrückstände ggf. entfernen.
11. Optikhaube vorsichtig über den Spiegel schieben. Darauf achten, dass die
Optikhaube den Spiegel nicht berührt.
12. Optikhaube auf den Sicherheits-Laserscanner setzen. Darauf achten dass die
Optikhaube ohne Spalt vollständig auiegt.
13. Neue Befestigungsschrauben 1 ansetzen.
14. Schrauben mit dem eingestellten Anzugsdrehmoment festdrehen.
15. Darauf achten, dass die Optikhaube frei von Verunreinigungen und Beschädi-
gungen ist.
16. Sicherheits-Laserscanner wieder in Betrieb nehmen, siehe Betriebsanleitung
des Sicherheits-Laserscanners.
MOUNTING INSTRUCTIONS en
All rights reserved. Subject to change without notice.
Optics cover
1. Safety
a DANGER! Risk of ineectiveness of the protective device
Failure to observe these instructions may result in failure of the protective
device: persons or parts of the body to be protected may not be detected.
During operation, the safety laser scanner constantly measures the degree of
contamination on the optics cover. For a new optics cover to function perfect-
ly, an optics cover calibration needs to be carried out initially. This serves as a
reference for contamination measurement (status = uncontaminated).
b Carry out an optics cover calibration with Safety Designer every time the
optics cover is replaced.
b Carry out the optics cover calibration at room temperature (10 °C to 30 °C).
b Only carry out the optics cover calibration using a new optics cover.
b Make sure that the entire system is clear of contamination when the calibra-
tion is carried out.
IMPORTANT
b The safety laser scanner’s optics cover is an optical component. Make sure
that the optics cover does not become dirty or scratched during unpacking
and mounting. Prevent ngerprints on the optics cover. Wear the gloves sup-
plied with the new optics cover during replacement.
b The optics cover may only be replaced by qualied safety personnel in a dust
and dirt-free environment.
b Never replace the optics cover during continuous operation, as dust particles
could penetrate into the safety laser scanner.
b You must prevent contamination on the inside of the optics cover, for example
due to ngerprints.
b Do not use an additional sealant, such as silicone, for sealing the optics cov-
er. Any vapors that are created may damage the optical components.
b Mount the optics cover according to the following instructions, to ensure IP65
leak tightness of the housing.
b Use new optics covers exclusively as a replacement.
b You must provide ESD protection during the replacement of the optics cover.
IMPORTANT
The IP65 enclosure rating is only valid if the safety laser scanner is closed
and the system plug is mounted.
2. Replacing the optics cover
See gure
A
at the end of this document.
Tool required:
• TX10 torque wrench
• TX20 Torx wrench
1. Make sure that the environment is clean and clear of fog, moisture, and dust.
2. First, clean the safety laser scanner from the outside, so that no foreign bod-
ies penetrate into the open device.
3. Unscrew the xing screws
1 for the optics cover.
4. Slowly and carefully detach the optics cover from the safety laser scanner. If
the optics cover’s seal sticks to the safety laser scanner, carefully detach the
optics cover using a screwdriver.
5. If necessary, remove contamination from the sealing groove and the bearing
surface of the safety laser scanner. Use residue-free plastic cleaners.
6. Check whether the mirror on the motor is dirty and, if necessary, remove dirt
using an optic brush.
7. Set 1.0 Nm tightening torque on the torque wrench.
8. During the following steps, wear the gloves supplied with the new optics cover.
9. Take the new optics cover out of the packaging and remove the seal’s protec-
tive cap.
10. Remove any remaining packaging if necessary.
11. Carefully push the optics cover over the mirror. Make sure that the optics
cover does not touch the mirror.
12. Place the optics cover onto the safety laser scanner. Make sure that the
optics cover rests over the whole area without any gaps.
13. Screw in new xing screws 1.
14. Tighten the screws using the set tightening torque.
15. Make sure that the optics cover is clear of dirt and damage.
16. Recommission the safety laser scanner, see the operating instructions for the
safety laser scanner.
Seite laden ...
Seite laden ...
Seite laden ...
Seite laden ...
Seite laden ...
-
 1
1
-
 2
2
-
 3
3
-
 4
4
-
 5
5
-
 6
6


SICK microScan3 optics cover Mounting instructions
- Typ
- Mounting instructions
in anderen Sprachen
- English: SICK microScan3 optics cover
- français: SICK microScan3 optics cover
- español: SICK microScan3 optics cover
- italiano: SICK microScan3 optics cover
- português: SICK microScan3 optics cover
- polski: SICK microScan3 optics cover
- čeština: SICK microScan3 optics cover
- 日本語: SICK microScan3 optics cover
Verwandte Papiere
-
SICK nanoScan3 optics cover Mounting instructions
-
-
-
-
-
-
-
-
-