SICK outdoorScan3 weather hood Mounting instructions
- Typ
- Mounting instructions


Alle Rechte vorbehalten. Irrtümer und Änderungen vorbehalten.
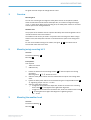
1 Überblick
Befestigungssatz 3
Mit dem Befestigungssatz 3 können Sie den Sicherheits-Laserscanner in zwei Ebenen
ausrichten (Drehung um die Querachse und um die Tiefenachse). Der maximale Aus‐
richtwinkel beträgt ±5° in jeder Ebene. Mit dem Befestigungssatz 3 wird der Sicher‐
heits-Laserscanner mit der Optikhaube nach unten montiert.
Wetterschutzhaube
Die Wetterschutzhaube dient dazu, den Sicherheits-Laserscanner beim Einsatz im
Außenbereich vor Umwelteinflüssen zu schützen.
Die Wetterschutzhaube kann nur zusammen mit Befestigungssatz 3 verwendet wer‐
den. Bei der Vewendung der Wetterschutzhaube wird der Sicherheits-Laserscanner mit
der Optikhaube nach unten montiert.
Empfohlene Leitungsführung siehe Abbildung
A , B . Leitungen können mit Kabelbin‐
dern an den Langlöchern fixiert werden.
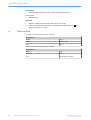
2 Montieren mit Befestigungssatz 3
Überblick
Maßzeichnung: C
Montage: D
Voraussetzungen
Benötigtes Werkzeug:
•
Schraubenschlüssel Innensechsrund TX20
•
Innensechskantschlüssel SW6
1.
Halterung mit dem Optikhaubenschutz D 1 nach unten an der Montagefläche
montieren.
Montagelöcher: C 1, 2. Schrauben: ø 8 mm.
2. Sicherheits-Laserscanner mit der Optikhaube nach unten auf die Halterung schie‐
ben.
3.
Sicherheits-Laserscanner mit 4 mitgelieferten M5-Schrauben
D 2 an der Halte‐
rung fixieren. Anzugsdrehmoment: 4,5 Nm … 5,0 Nm.
4. Sicherheits-Laserscanner ausrichten.
°
Für Ausrichtung um die Tiefenachse Schraube in Montageloch C 1 etwas
lösen und nach dem Ausrichten wieder festdrehen.
°
Für Ausrichtung um die Querachse 2 M8-Schrauben
C 3 etwas lösen und
nach dem Ausrichten wieder festdrehen. Anzugsdrehmoment: 15 … 17 Nm.
3 Wetterschutzhaube montieren
Überblick
Maßzeichnung: E
Montage: F
Voraussetzungen
•
Sicherheits-Laserscanner ist mit Befestigungssatz 3 montiert
MONTAGEANLEITUNG
8023260/160C/2019-11-14 | SICK M O N T A G E A N L E I T U N G | outdoorScan3-Wetterschutzhaube
3
Irrtümer und Änderungen vorbehalten

Benötigtes Werkzeug:
•
Innensechskantschlüssel SW6
Vorgehensweise
1. Wetterschutzhaube bis zum Anschlag auf Halterung aufschieben.
2. Wetterschutzhaube mit 4 mitgelieferten M8-Schrauben und Unterlegscheiben F
1 fixieren. Anzugsdrehmoment: 8 … 9 Nm.
4 Technische Daten
Datenblatt Befestigungssatz 3 (Artikelnummer 2103049)
Befestigungssatz 3
Gewicht 2,6 kg
Material Edelstahl
Farbe Schwarz
Datenblatt Wetterschutzhaube (Artikelnummer 2103050)
Wetterschutzhaube
Gewicht 1 kg
Material PUR
Farbe RAL 2004 (Reinorange)
MONTAGEANLEITUNG
4
M O N T A G E A N L E I T U N G | outdoorScan3-Wetterschutzhaube 8023260/160C/2019-11-14 | SICK
Irrtümer und Änderungen vorbehalten

A
B
C
126,3
ø 120
111,2
12,6
ø 8,2
8,2
56,2
1
2
3
D
1
2
2
E
403,5
ø 120
229,5324,6
56,2
F
1
1
MONTAGEANLEITUNG
8023260/160C/2019-11-14 | SICK M O N T A G E A N L E I T U N G | outdoorScan3-Wetterschutzhaube
5
Irrtümer und Änderungen vorbehalten


All rights reserved. Subject to change without notice.
1 Overview
Mounting kit 3
You can use mounting kit 3 to align the safety laser scanner in two planes (rotation
about the transverse axis and about the depth axis). The maximum alignment angle
is ± 5° in each plane. When using mounting kit 3, the safety laser scanner is mounted
with the optics cover facing downward.
Weather hood
The purpose of the weather hood is to protect the safety laser scanner against environ‐
mental influences when used outdoors.
The weather hood can only be used in conjunction with mounting kit 3. When using a
weather hood, the safety laser scanner is mounted with the optics cover facing down‐
ward.
For the recommended routing of the cables, see figure
A , B . The cables can be
secured with cable ties at the slots.
2 Mounting using mounting kit 3
Overview
Dimensional drawing: C
Mounting: D
Prerequisites
Tool required:
•
TX20 Torx wrench
•
SW6 Allen key
1.
Fasten the bracket to the mounting surface D 1 with the optics cover facing
downward.
Mounting holes: C 1, 2. Screws: ø 8 mm.
2. Slide the safety laser scanner onto the bracket with the optics cover facing down‐
ward.
3. Fasten the safety laser scanner to the bracket using the 4 supplied M5 screws D
2. Tightening torque: 4.5 Nm … 5.0 Nm.
4. Align the safety laser scanner.
°
To align the device about the depth axis, loosen the screws in the mounting
holes a little
C 1 and tighten them again after alignment.
°
To align the device about the transverse axis, loosen the 2 M8 screws a little
C 3 and tighten them again after alignment. Tightening torque:
15 … 17 Nm.
3 Mounting the weather hood
Overview
Dimensional drawing: E
Mounting: F
MOUNTING INSTRUCTIONS
8023260/160C/2019-11-14 | SICK M O U N T I N G I N S T R U C T I O N S | outdoorScan3 weather hood
7
Subject to change without notice

Prerequisites
•
The safety laser scanner has been mounted using mounting kit 3
Tool required:
•
SW6 Allen key
Approach
1. Slide the weather hood onto the bracket as far as it will go.
2.
Fasten the weather hood using the 4 supplied M8 screws and washers F 1.
Tightening torque: 8 … 9 Nm.
4 Technical data
Mounting kit 3 data sheet (part number 2103049)
Mounting kit 3
Weight 2.6 kg
Material Stainless steel
Color Black
Weather hood data sheet (part number 2103050)
Weather hood
Weight 1 kg
Material PUR
Color RAL 2004 (pure orange)
MOUNTING INSTRUCTIONS
8
M O U N T I N G I N S T R U C T I O N S | outdoorScan3 weather hood 8023260/160C/2019-11-14 | SICK
Subject to change without notice

A
B
C
126,3
ø 120
111,2
12,6
ø 8,2
8,2
56,2
1
2
3
D
1
2
2
E
403,5
ø 120
229,5324,6
56,2
F
1
1
MOUNTING INSTRUCTIONS
8023260/160C/2019-11-14 | SICK M O U N T I N G I N S T R U C T I O N S | outdoorScan3 weather hood
9
Subject to change without notice

Detailed addresses and further locations at www.sick.com
Australia
Phone +61 (3) 9457 0600
1800 33 48 02 – tollfree
E-Mail [email protected]
Austria
Phone +43 (0) 2236 62288-0
E-Mail [email protected]
Belgium/Luxembourg
Phone +32 (0) 2 466 55 66
E-Mail info@sick.be
Brazil
Phone +55 11 3215-4900
E-Mail [email protected]
Canada
Phone +1 905.771.1444
E-Mail [email protected]
Czech Republic
Phone +420 234 719 500
E-Mail [email protected]
Chile
Phone +56 (2) 2274 7430
E-Mail [email protected]
China
Phone +86 20 2882 3600
E-Mail info.c[email protected]
Denmark
Phone +45 45 82 64 00
E-Mail [email protected]
Finland
Phone +358-9-25 15 800
E-Mail [email protected]
France
Phone +33 1 64 62 35 00
E-Mail info@sick.fr
Germany
Phone +49 (0) 2 11 53 010
E-Mail info@sick.de
Greece
Phone +30 210 6825100
E-Mail [email protected]
Hong Kong
Phone +852 2153 6300
E-Mail [email protected]
Hungary
Phone +36 1 371 2680
E-Mail ertekesit[email protected]
India
Phone +91-22-6119 8900
E-Mail info@sick-india.com
Israel
Phone +972 97110 11
E-Mail info@sick-sensors.com
Italy
Phone +39 02 27 43 41
E-Mail info@sick.it
Japan
Phone +81 3 5309 2112
E-Mail [email protected]
Malaysia
Phone +603-8080 7425
E-Mail enquiry[email protected]
Mexico
Phone +52 (472) 748 9451
E-Mail [email protected]
Netherlands
Phone +31 (0) 30 229 25 44
E-Mail info@sick.nl
New Zealand
Phone +64 9 415 0459
0800 222 278 – tollfree
E-Mail [email protected]
Norway
Phone +47 67 81 50 00
E-Mail [email protected]
Poland
Phone +48 22 539 41 00
E-Mail info@sick.pl
Romania
Phone +40 356-17 11 20
E-Mail [email protected]
Russia
Phone +7 495 283 09 90
E-Mail info@sick.ru
Singapore
Phone +65 6744 3732
E-Mail [email protected]
Slovakia
Phone +421 482 901 201
E-Mail mail@sick-sk.sk
Slovenia
Phone +386 591 78849
E-Mail [email protected]
South Africa
Phone +27 10 060 0550
E-Mail info@sickautomation.co.za
South Korea
Phone +82 2 786 6321/4
E-Mail infok[email protected]
Spain
Phone +34 93 480 31 00
E-Mail info@sick.es
Sweden
Phone +46 10 110 10 00
E-Mail info@sick.se
Switzerland
Phone +41 41 619 29 39
E-Mail [email protected]
Taiwan
Phone +886-2-2375-6288
E-Mail [email protected]
Thailand
Phone +66 2 645 0009
E-Mail [email protected]
Turkey
Phone +90 (216) 528 50 00
E-Mail info@sick.com.tr
United Arab Emirates
Phone +971 (0) 4 88 65 878
E-Mail [email protected]
United Kingdom
Phone +44 (0)17278 31121
E-Mail info@sick.co.uk
USA
Phone +1 800.325.7425
E-Mail info@sick.com
Vietnam
Phone +65 6744 3732
E-Mail sales
SICK AG | Waldkirch | Germany | www.sick.com
8023260/160C/2019-11-14/en/de, en
-
 1
1
-
 2
2
-
 3
3
-
 4
4
-
 5
5
-
 6
6
-
 7
7
-
 8
8
-
 9
9
-
 10
10


SICK outdoorScan3 weather hood Mounting instructions
- Typ
- Mounting instructions
in anderen Sprachen
- English: SICK outdoorScan3 weather hood
Verwandte Artikel
-
SICK nanoScan3 optics cover Mounting instructions
-
-
-
-
-
-
-
-
-