SICK nanoScan3 mounting kits Mounting instructions
- Typ
- Mounting instructions


Alle Rechte vorbehalten. Irrtümer und Änderungen vorbehalten.
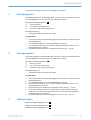
1 Befestigungssatz 1
Der Befestigungssatz ist als Befestigungssatz 1a ohne Schutz für die Optikhaube und
als Be
festigungssatz 1b mit Schutz für die Optikhaube erhältlich.
Montage mit Befestigungssatz 1:
A
1
Befestigungswinkel
2
Schrauben für Befestigungswinkel
3
Gewindebohrungen für Befestigungswinkel
Benötigtes Werkzeug:
•
Sc
hraubenschlüssel Innensechsrund TX20
Vorgehensweise
1.
Die richtige Orientierung des Befestigungswinkels 1 beachten, siehe Symbol am
Befestigungswinkel.
2.
Den Befestigungswinkel 1 an der Montagefläche montieren.
3.
Den Sicherheits-Laserscanner mit allen 2 mitgelieferten M5-Schrauben 2 am
Befestigungswinkel 1 fixieren.
4. Die M5-Schrauben festdrehen. Anzugsdrehmoment: 4,5 Nm … 5,0 Nm.
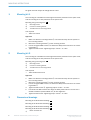
2 Befestigungssatz 2
Der Befestigungssatz ist als Befestigungssatz 2a ohne Schutz für die Optikhaube und
als Be
festigungssatz 2b mit Schutz für die Optikhaube erhältlich.
Montage mit Befestigungssatz 2: D
1
Befestigungswinkel
2
Schrauben für Befestigungswinkel
3
Gewindebohrungen für Befestigungswinkel
Benötigtes Werkzeug:
•
Sc
hraubenschlüssel Innensechsrund TX20
Vorgehensweise
1.
Die richtige Orientierung des Befestigungswinkels 1 beachten, siehe Symbol am
Befestigungswinkel.
2.
Den Befestigungswinkel 1 an der Montagefläche montieren.
3.
Den Sicherheits-Laserscanner mit allen 2 mitgelieferten M5-Schrauben 2 am
Befestigungswinkel 1 fixieren.
4.
Die M5-Schrauben 2 festdrehen. Anzugsdrehmoment: 4,5 Nm … 5,0 Nm.
5. Um den Sicherheits-Laserscanner auszurichten, zunächst die M4-Schrauben
etwas lösen. Für die Feinausrichtung können Sie einen Schlitzschraubendreher
(Klingenbreite 8 mm) verwenden.
6. Die M4-Schrauben festdrehen. Anzugsdrehmoment: 2,2 Nm … 2,5 Nm.
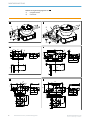
3 Maßzeichnungen
Maßzeichnung Befestigungssatz 1a:
B
Ma
ßzeichnung Befestigungssatz 1b:
C
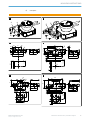
Maßzeichnung Befestigungssatz 2a: E
MONTAGEANLEITUNG
8024613/16Q0/2020-02-12 | SICK M O N T A G E A N L E I T U N G | nanoScan3-Befestigungssätze
3
Irrtümer und Änderungen vorbehalten

Maßzeichnung Befestigungssatz 2b: F
1
Spiegeldrehachse
2
Scanebene
A
1
2
3
D
1
2
3
B
15,2
105
2
31,5
15
50,8
44
1
16
17
7,5
32
70
39,5
134
7,5
149
75
E
1
2
181
1
9
8
ø 5,5
73
158
1686,5
11,5
5
58,3 44
114,3
6
6
18 31,5
59
18
6
64,5
17
6
79,8
C
16
75
108
129
105
15
44
50,8
1
2
134
31,5
56
32
17
7,5
149
70
93
ø 5,5
F
2
1
1
6
6
ø 5,5
181
98
158
1686,5
11,5
58,3
44
114,3
6
31,5
59
18
6
96
17
5
79,8
134
MONTAGEANLEITUNG
4
M O N T A G E A N L E I T U N G | nanoScan3-Befestigungssätze 8024613/16Q0/2020-02-12 | SICK
Irrtümer und Änderungen vorbehalten


All rights reserved. Subject to change without notice.
1 Mounting kit 1
The mounting kit is available as mounting kit 1a without protection for the optics cover,
and a
s mounting kit 1b with protection for the optics cover.
Mounting using mounting kit 1:
A
1
Mounting bracket
2
Screws for mounting bracket
3
Threaded holes for mounting bracket
Tool required:
•
T
X20 Torx wrench
Approach
1.
Make sure that the mounting bracket 1 is oriented correctly. See the symbol on
the mounting bracket.
2.
Mount the mounting bracket 1 on the mounting surface.
3.
Use the 2 supplied M5 screws 2 to attach the safety laser scanner to the mount‐
ing bracket 1.
4. Tighten the M5 screws. Tightening torque: 4.5 Nm … 5.0 Nm.
2 Mounting kit 2
The mounting kit is available as mounting kit 2a without protection for the optics cover,
and a
s mounting kit 2b with protection for the optics cover.
Mounting using mounting kit 2: D
1
Mounting bracket
2
Screws for mounting bracket
3
Threaded holes for mounting bracket
Tool required:
•
T
X20 hexalobular wrench
Approach
1.
Make sure that the mounting bracket 1 is oriented correctly. See the symbol on
the mounting bracket.
2.
Mount the mounting bracket 1 on the mounting surface.
3.
Use the 2 supplied M5 screws 2 to attach the safety laser scanner to the mount‐
ing bracket 1.
4.
Tighten the M5 screws 2. Tightening torque: 4.5 Nm … 5.0 Nm.
5. First loosen the M4 screws a bit to align the safety laser scanner. You can use a
slotted screwdriver (blade width 8 mm) for fine alignment.
6. Tighten the M4 screws. Tightening torque: 2.2 Nm … 2.5 Nm.
3 Dimensional drawings
Mounting kit 1a dimensional drawing:
B
Mount
ing kit 1b dimensional drawing:
C
Mounting kit 2a dimensional drawing: E
Mount
ing kit 2b dimensional drawing:
F
1
Mirror rotational axis
MOUNTING INSTRUCTIONS
6
M O U N T I N G I N S T R U C T I O N S | nanoScan3 mounting kits 8024613/16Q0/2020-02-12 | SICK
Subject to change without notice

2
Scan plane
A
1
2
3
D
1
2
3
B
15,2
105
2
31,5
15
50,8
44
1
16
17
7,5
32
70
39,5
134
7,5
149
75
E
1
2
181
1
9
8
ø 5,5
73
158
1686,5
11,5
5
58,3 44
114,3
6
6
18 31,5
59
18
6
64,5
17
6
79,8
C
16
75
108
129
105
15
44
50,8
1
2
134
31,5
56
32
17
7,5
149
70
93
ø 5,5
F
2
1
1
6
6
ø 5,5
181
98
158
1686,5
11,5
58,3
44
114,3
6
31,5
59
18
6
96
17
5
79,8
134
MOUNTING INSTRUCTIONS
8024613/16Q0/2020-02-12 | SICK M O U N T I N G I N S T R U C T I O N S | nanoScan3 mounting kits
7
Subject to change without notice

Detailed addresses and further locations at www.sick.com
Australia
Phone +61 (3) 9457 0600
1800 33 48 02 – tollfree
E-Mail [email protected]
Austria
Phone +43 (0) 2236 62288-0
E-Mail [email protected]
Belgium/Luxembourg
Phone +32 (0) 2 466 55 66
E-Mail [email protected]
Brazil
Phone +55 11 3215-4900
E-Mail [email protected]
Canada
Phone +1 905.771.1444
E-Mail [email protected]
Czech Republic
Phone +420 234 719 500
E-Mail [email protected]
Chile
Phone +56 (2) 2274 7430
E-Mail [email protected]
China
Phone +86 20 2882 3600
E-Mail info.c[email protected]
Denmark
Phone +45 45 82 64 00
E-Mail [email protected]
Finland
Phone +358-9-25 15 800
E-Mail [email protected]
France
Phone +33 1 64 62 35 00
E-Mail [email protected]
Germany
Phone +49 (0) 2 11 53 010
E-Mail [email protected]
Greece
Phone +30 210 6825100
E-Mail [email protected]
Hong Kong
Phone +852 2153 6300
E-Mail [email protected]
Hungary
Phone +36 1 371 2680
E-Mail ertekesit[email protected]
India
Phone +91-22-6119 8900
E-Mail info@sick-india.com
Israel
Phone +972 97110 11
E-Mail info@sick-sensors.com
Italy
Phone +39 02 27 43 41
E-Mail [email protected]
Japan
Phone +81 3 5309 2112
E-Mail [email protected]
Malaysia
Phone +603-8080 7425
E-Mail enquiry[email protected]
Mexico
Phone +52 (472) 748 9451
E-Mail [email protected]
Netherlands
Phone +31 (0) 30 229 25 44
E-Mail [email protected]
New Zealand
Phone +64 9 415 0459
0800 222 278 – tollfree
E-Mail [email protected]
Norway
Phone +47 67 81 50 00
E-Mail [email protected]
Poland
Phone +48 22 539 41 00
E-Mail [email protected]
Romania
Phone +40 356-17 11 20
E-Mail [email protected]
Russia
Phone +7 495 283 09 90
E-Mail [email protected]
Singapore
Phone +65 6744 3732
E-Mail [email protected]
Slovakia
Phone +421 482 901 201
E-Mail [email protected]
Slovenia
Phone +386 591 78849
E-Mail [email protected]
South Africa
Phone +27 10 060 0550
E-Mail info@sickautomation.co.za
South Korea
Phone +82 2 786 6321/4
E-Mail infok[email protected]
Spain
Phone +34 93 480 31 00
E-Mail [email protected]
Sweden
Phone +46 10 110 10 00
E-Mail [email protected]
Switzerland
Phone +41 41 619 29 39
E-Mail [email protected]
Taiwan
Phone +886-2-2375-6288
E-Mail [email protected]
Thailand
Phone +66 2 645 0009
E-Mail [email protected]
Turkey
Phone +90 (216) 528 50 00
E-Mail [email protected]
United Arab Emirates
Phone +971 (0) 4 88 65 878
E-Mail [email protected]
United Kingdom
Phone +44 (0)17278 31121
E-Mail [email protected].uk
USA
Phone +1 800.325.7425
E-Mail [email protected]
Vietnam
Phone +65 6744 3732
E-Mail [email protected]
SICK AG | Waldkirch | Germany | www.sick.com
8024613/16Q0/2020-02-12/en/de, en
-
 1
1
-
 2
2
-
 3
3
-
 4
4
-
 5
5
-
 6
6
-
 7
7
-
 8
8


SICK nanoScan3 mounting kits Mounting instructions
- Typ
- Mounting instructions
in anderen Sprachen
- English: SICK nanoScan3 mounting kits
Verwandte Artikel
-
SICK nanoScan3 optics cover Mounting instructions
-
-
-
-
-
-
-
-
-