

Language
01-07
08-14
15-21
22-28
29-35
English
Deutsch
Français
Italiano
Español
日本語 36-42

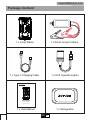
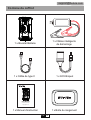
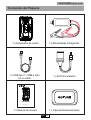
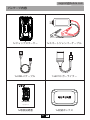
Package Content
1 x Jump Starter 1 x Smart Jumper Cables
1 x Type C Charging Cable 1 x EC5 Cigarette Lighter
1 x Storage Box1 x User Manual
User Manual
Car Battery Jump Starter
EN 01 02 03 04 05 06 07
08 09 10 11 12 13 14
15 16 17 18 19 20 21
22 23 24 25 26 27 28
29 30 31 32 33 34 35

Introduction
Key Features
Thank you for purchasing BUTURE BR400 car jump starter. Please read the user
manual carefully before you start to use the product.
A Powerful Jump Starter: Car Jump Starter with 1600 amps peak current can jump
starts 12V cars, SUV, truck or van (8L petrol or 7L diesel engine) in seconds up to 25
times.
Dual USB Charger with QC3.0 & 5V 2.4A: Ensures the fastest charging efficiency,
4x faster than conventional charger. Backward compatible with QC 1.0 and 2.0
Safety Protection: Premium cells, circuitry and safety features protect you and
your device from surge or short circuits.
LifeSaver Kits: 4 modes LED light: flashlight, strobe light, SOS signal light, and
warning light, built-in safety hammer for emergency.
EN01 02 03 04 05 06 07
08 09 10 11 12 13 14
15 16 17 18 19 20 21
22 23 24 25 26 27 28
29 30 31 32 33 34 35

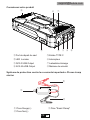
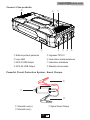
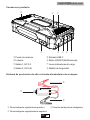
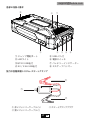
Know Your Product
Powerful Circuit Protection System - Smart Clamps
Jump Starting Port
LED Light
QC3.0 USB Output
5V/2.4A USB Output
Red Jumper Cable (+)
Black Jumper Cable (-)
TYPE-C Input
Power Switch
Battery Indicator
Safety Hammer
START
Smart Clamp Plug
EN01 02 03 04 05 06 07
08 09 10 11 12 13 14
15 16 17 18 19 20 21
22 23 24 25 26 27 28
29 30 31 32 33 34 35

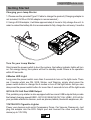
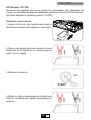
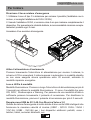
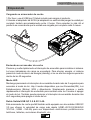
Getting Started
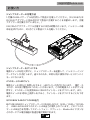
Charging your Jump Starter
1. Please use the provided Type C Cable to charge the product.(Charging adapter is
not included, 5V/2A or 9V/2A adapter is recommended )
2. Using a 9V/2A adaptor, it will take approximately 4 hours to fully charge the unit. In
order to extend the battery life it is recommended to fully charge the unit every 3 months.
Turn On your Jump Starter
Short press the power switch to boot the system, the battery indicator lights will turn
on. For energy saving, the system will turn to standby mode if there is no operation
within 20 seconds.
4 Modes LED Light
Long press the power switch more than 3 seconds to turn on the light mode. There
are 4 modes which are ON, SOS, Strobe, and Warning, simply short press the
power switch button to change the 4 modes or turn off the light mode. And you can
also press the power switch button for more than 3 seconds to turn off the light mode.
QC3.0 & 5V 2.4A Dual USB Output
This portable jump starter is also equipped with two smart USB outputs that provide
the fastest charging speed(USB1 - QC3.0:5V3A/9V2A/12V1.5A; USB2 - 5V2.4A) for
your portable electronic devices, such as phones,tablets, bluetooth earphones, etc
12V/10A EC5 Cigarette Lighter
Power your devices such as Air Compressor Pump, Car Vacuum Cleaner,etc. Just
plug the adapter into the EC5 Output port and connect the other end with the
device(up to 12V/10A)
EN01 02 03 04 05 06 07
08 09 10 11 12 13 14
15 16 17 18 19 20 21
22 23 24 25 26 27 28
29 30 31 32 33 34 35

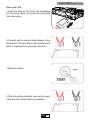
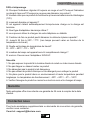
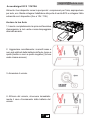
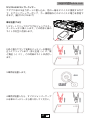
Start your Car
1.Insert the plug of the smart clip completely
into the jump starter, the green and red lights
flash alternately.
2.Correctly clip the red and black clamps to the
electrodes of the car battery (red to positive and
black to negative)(The green light stays on)
3.Start the vehicle.
4.When the vehicle is started, remove the jumper
cable from the vehicle battery immediately.
EN01 02 03 04 05 06 07
08 09 10 11 12 13 14
15 16 17 18 19 20 21
22 23 24 25 26 27 28
29 30 31 32 33 34 35

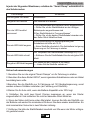
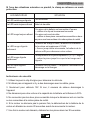
Security Indication
In any of the following situations, the smart clamp turns on protection mode:
1. Use the original smart clamp to start the car.
2. DO NOT use this unit if any cable clamp or cord is damaged.
3. Start only for 12V vehicles,or it will cause serious damages to the unit.
4. Do not jump start your car when the battery capacity of BR400 is lower than 30%.
5. Do not connect two clamps together when the starter is powered on. And do not
connect both cable clamps to the same piece of metal.
6. If the engine does not start on the first try, disconnect it from the car battery and wait
for at least 20 seconds before reconnecting. Maximize three attempts in two minutes.
7. Once the engine is successfully started, disconnect the clamps within 30 seconds.
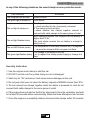
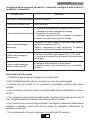
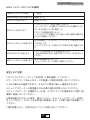
LED Indicator
The red/green led will flash
The green light is always on
The red light is always on
The red light flashes slowly
The red LED flashes quickly
The green light flashes slowly
Situations
Ready to work
Work status
1.battery clamp is reversely connected
--- check whether the clip is reversely connected
2.The clamp is short-circuited
---check whether two clamps together connect or
connect both cable clamps to the same piece of metal
Back charge protection, the voltage of the car battery is
higher than 12.6V
-No jump starter needed, the car battery is enough to
start your car
The temperature of the clamp exceeds 65(+/-5)degrees
--- remove the clamp until the red-green led flash
The voltage of the starter is too low
--try to replace the startup power supply or change it in
time
EN01 02 03 04 05 06 07
08 09 10 11 12 13 14
15 16 17 18 19 20 21
22 23 24 25 26 27 28
29 30 31 32 33 34 35

Warranty
Our company provides customers with warranty of 24 months from the date of
purchase.
Contact US
For additional assistance or warranty cover claim, please contact us:
E-Mail: suppor[email protected]
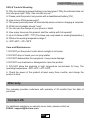
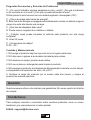
FAQ & Trouble Shooting
Q: Why the indicator is always flashing in red and green? Why the indicator does not
turn into green light? Why I can not start my car?
A: Please note this product only works with a dead/drained battery(12V).
Q: How to turn off this power pack?
A: This power pack will power off automatically when no load or charging is complete.
Q: What kind of adapter should I use?
A: You can use the charger of your phone or tablet
Q: How many times can this product start the vehicle with full capacity?
A: Up to 25 times at 25℃ / 77℉.(The times may vary based on working temperature )
Q: What is the working temperature range ?
A: -20℃~60℃ / -4℉~140℉
Care and Maintenance
1. DO NOT put the product under direct sunlight or hot areas.
2. DO NOT drop or knock your car jump starter.
3. DO NOT disassemble the equipment, it may cause damage.
4. DO NOT use chemicals or detergents to clean the product.
5. DO NOT place the products in high temperature environment for long. The
operating temperature: -20℃~60℃ / -4℉~140℉.
6. Check the power of the product at least every three months, and charge the
product in time.
EN01 02 03 04 05 06 07
08 09 10 11 12 13 14
15 16 17 18 19 20 21
22 23 24 25 26 27 28
29 30 31 32 33 34 35

DE
01 02 03 04 05 06 07
08 09 10 11 12 13 14
15 16 17 18 19 20 21
22 23 24 25 26 27 28
29 30 31 32 33 34 35
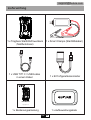
Lieferumfang
1 x Tragbare StarthilfePowerbank
Multifunktional
1 x Smart Clamps (Starthilfekabel)
1 x USB TYP C / USB A alles
in einem Kabel 1 x EC5 Zigarettenanzünder
1 x Aufbewahrungskiste1 x Bedienungsanleitung
User Manual
Car Battery Jump Starter

DE
01 02 03 04 05 06 07
08 09 10 11 12 13 14
15 16 17 18 19 20 21
22 23 24 25 26 27 28
29 30 31 32 33 34 35
Vorwort
Hauptmerkmale
Sehr geehrter Kunde, vielen Dank dass Sie sich für den Kauf einer BuTure BR400
Starthilfe-Powerbank entschieden haben. Bitte lessen Sie diese Bedienungsanlei-
tung sorgfältig bevor Sie das Produkt in Betrieb nehmen.
Leistungsstarke Auto Starthilfe:Mit 1600A Spitzenstrom kann Auto Starthilfe 12V
Fahrzeuge (bis zu 8.0L Benzinmotoren oder 7.0L Dieselmotoren) starten. Geeignet
für PKW, SUV,LKW, Motorräder, usw.
Tragbares Ladegerät mit QC3.0 und 5V 2.4A: Sie kann somit Ihre mobile
Gerat(Smartphone, Kamera, Kindle,etc.) schneller laden als ein Standard-Lade-
gerat.Kompatibel mit QC 1.0 und 2.0.
Sicherheitsschutz:der Qualität Batterie,Schaltung und Sicherheitsfunktionen
schützen Sie und Ihr Gerät vor Überspannungen und Kurzschlüssen.
LED-Technik & Sicherheitshammer : Es gib 4 LED-Leucht-Modi (“Normal’, “SOS”,
“Stroboskop” und “Warnlicht”) die sehr niitzlich sein kénnen, z. B. bei Unfallen,
Outdoor-Aktivitaten, etc. Eingebauter Sicherheitshammer.

DE
01 02 03 04 05 06 07
08 09 10 11 12 13 14
15 16 17 18 19 20 21
22 23 24 25 26 27 28
29 30 31 32 33 34 35
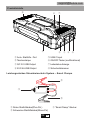
Produktdetails
Leistungsstarkes Stromkreisschutz System – Smart Clamps
Auto- Starthilfe - Port
Taschenlampe
QC 3.0 USB Output
5V/2.4A USB Output
Rotes Starthilfekabel(Plus-Pol )
Schwarzes Starthilfekabel(Minus-Pol)
USB C Input
ON/OFF Taster (multifunktional)
Ladestatus-Anzeige
Sicherheitshammer
START
“Smart Clamp”-Stecker

DE
01 02 03 04 05 06 07
08 09 10 11 12 13 14
15 16 17 18 19 20 21
22 23 24 25 26 27 28
29 30 31 32 33 34 35
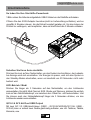
Inbetriebnahme
So laden Sie Ihre Starthilfe-Powerbank
1.Bitte nutzen Sie bitte das mitgelieferte USB-C-Kabel um die Starthilfe aufzuladen.
2.Wenn Sie den 9V/2A Adapter benutzen(nicht im Lieferumfang enthalten), wird es
ungefähr 4 Stunden dauern, bis die Einheit komplett geladen ist. Um das Leben der
Produkt zu verlängern, wird empfohlen, dass sie die Einheit alle 3 Monate vollladen.
Schalten Sie Ihren Auto starthilfe
Drücken Sie kurz auf den Netzschalter, um das System hochzufahren, der Ladesta-
tus-Anzeige wird sich einschalten. Um Energie zu sparen, wird sich das System in
den Standby-Modus abschalten, wenn es innerhalb von 20 Sekunden nicht mehr
bedient wird.
LED-Betrieb / Modi
Drücken Sie länger als 3 Sekunden auf den Netzschalter, um den Lichtmodus
einzuschalten. Es gibt 4 Modi: Normal, SOS ,Strobo und Warnung, drücken Sie einfach
kurz auf den Netzschalterknopf, um zwischen den 4 Modi hin- und herzuschalten. Und
Sie können auch den Netzschalterknopf länger als 3 Sekunden drücken, um den
Lichtmodus wieder auszuschalten.
QC3.0 & 5V 2.4A Dual USB Output
Mit zwei QC 3.0 USB-Anschlüssen (USB1 - QC3.0:5V3A/9V2A/12V1.5A; USB2 -
5V2.4A) kann er schnell zwei Geräte gleichzeitig aufladen, wie z.B. Telefone, Tablets,
Kameras, usw.

DE
01 02 03 04 05 06 07
08 09 10 11 12 13 14
15 16 17 18 19 20 21
22 23 24 25 26 27 28
29 30 31 32 33 34 35
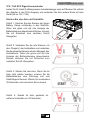
Starten Sie das Auto mit Starthilfe
Schritt 1: Stecken Sie den Stecker der Smart
Battery Clamp vollstandig in den Starthilfe.
Wenn die griine und die rote Anzeige der
Batterieklemme abwechselnd blinken, können
Sie mit Sicherheit zum nachsten Schritt
Ubergehen.
Schritt 2: Verbinden Sie die rote Klemme mit
dem Pluspol(+) der Autobatterie und verbinden
Sie die schwarze Klemme mit dem Minuspol(-)der
Autobatterie. Wenn die griine und die rote
Anzeige der Batterieklemme abwechselnd
blinken, k6dnnen Sie mit Sicherheit zum
nachsten Schritt Ubergehen.
Schritt 3: Starten Sie das Auto. Wenn Sie Ihr
Auto nicht starten konnten, mussen Sie die
Batterieklemme vom Fahrzeug und vom
Starthilfegerat trennen. Warten Sie mindestens
30 Sekunden und versuchen Sie es erneut.
Schritt 4: Sobald Ihr Auto gestartet ist,
entferne! innerhalb von 30 Sekunden.
12V / 10A EC5 Zigarettenanzünder
Laden Sie Ihr Gerät (Luftkompressor, Autostaubsauger usw) auf.Stecken Sie einfach
den Adapter in den EC5-Ausgang und verbinden Sie das andere Ende mit dem
Gerät (bis zu 12V / 10A).

DE
01 02 03 04 05 06 07
08 09 10 11 12 13 14
15 16 17 18 19 20 21
22 23 24 25 26 27 28
29 30 31 32 33 34 35
Sicherheitsanweisungen
In jeder der folgenden Situationen, schalten die “Smart Clamp” automatisch in
den Schutzmodus:
1. Benutzen Sie nur die original “Smart Clamps” um Ihr Fahrzeug zu starten.
2. Benutzen Sie diese Einheit NICHT, wenn irgendeine Kabelklemme oder ein Kabel
beschädigt sein sollte.
3.Benutzen Sie die Starthilfe nur fir Fahrzeuge mit 12V Bordnetzspannung, sonst
werden schwere Schäden entstehen (an Fahrzeug und Starthilfe).
4.Starten Sie Ihr Auto nicht, wenn die Batterie Kapazität unter 30% liegt.
5. Schließen Sie nicht zwei Smart Clamps zusammen an, wenn der Starter
eingeschaltet ist. Und schließen Sie nicht an dasselbe Stück Metall an.
6. Wenn der Motor nicht beim ersten Mal startet, trennen Sie bitte die Starthilfe von
der Batterie und warten Sie mindestens 20s bevor Sie diese wieder anschließen. Es
sind maximal drei Versuche in zwei Minuten zulässig.
7. Entfernen Sie bitte die Starthilfekabel innerhalb von 30s wenn der Motor erfolgre-
ich gestartet wurde.
LED Anzeige
Die rote/grüne LED blinkt
Die grüne LED leuchtet
Die rote LED leuchtet
permanent
Die rote LED blinkt langsam
Die rote LED blinkt schnell
Die grüne LED blinkt langsam
Situationen
Einsatzbereit
Die Starthilfe ist in Betrieb
1.Die Starthilfekabel sind verkehrt herum angeschlossen
---Prüfen Sie, ob die Starthilfekabel an den richtigen
Batteriepolen angeschlossen sind
2.Das Starthilfekabel ist “kurzgeschlossen”
---Prüfen Sie, ob die beiden Starthilfekabel einander oder
das Selbe Stück Metall berühren
Rückflusssicherung:Die Batteriespannung der
Autobatterie ist höher als 12,6V
---Keine Starthilfe erforderlich, Die Autobatterie hat genug
Spannung um Ihr Fahrzeug zu starten
Die Temperatur der Starthilfekabel Übersteigt 65(+/-5)℃
---Entfernen Sie die Starthilfekabel bis die rote/griine LED
blinkt
Die Spannung der Starthilfe ist zu niedrig
---- Laden Sie die Starthilfe zeitnah auf

DE
01 02 03 04 05 06 07
08 09 10 11 12 13 14
15 16 17 18 19 20 21
22 23 24 25 26 27 28
29 30 31 32 33 34 35
Garantie
Wir bieten den Kunden eine Garantie von 24 Monaten ab Kaufdatum.
Kontaktieren Sie uns
Fur Anfragen oder Kommentare zu unseren Produkten senden Sie bitte eine
E-Mail an support@ibuture.com, und wir werden Ihnen so schnell wie méglich
antworten.
FAQ & Trouble Shooting
F: Warum blinkt die LED-Anzeige immer rot und grün? Warum leuchtet die LED-An-
zeige nicht grün auf? Warum kann ich mein Auto nicht starten?
A:Dieses Produkt funktioniert nur mit einer leeren Batterie (12 V).
F: Wie schaltet man diese Powerbank aus?
A: Sie schaltet sich automatisch ab wenn sie nicht belastet wird oder der Ladevor-
gang abgeschlossen ist.
F:Welche Art von Adapter sollte ich verwenden?
A: Sie können das Ladegerät Ihres Smartphones oder Tablets verwenden.
F: Nach vollständiger Aufladung kann das Produkt das Auto mehrmals aufladen?
A: Ungefähr 25 Mal.
F: Arbeitstemperatur?
A:-20℃~60℃.
Pflege und Wartung
1. Benutzen Sie das Produkt NICHT unter direkter Sonneneinstrahlung oder in
heißer Umgebung.
2.NICHT auf die Starthilfe schlagen, Produkt NICHT fallen lassen.
3. Produkt NICHT auseinander bauen, es könnte beschädigt werden.
4. Keine Chemikalien oder scharfe Reinigungsmittel zur Reinigung des Produktes
verwenden.
5. Produkt NICHT länger heißen Umgebungen aussetzen. Betriebstemperatur: -20
bis +60°C
6. Überprüfen Sie den Ladestatus des Produktes bitte mindestens alle drei Monate
und laden Sie es rechtzeitig auf.

FR
01 02 03 04 05 06 07
08 09 10 11 12 13 14
15 16 17 18 19 20 21
22 23 24 25 26 27 28
29 30 31 32 33 34 35
Contenu du coffret
1 x Booster Batterie 1 x Câbles intelligents
de démarrage
1 x Câble de type C 1 x EC5 Briquet
1 x Boîte de rangement1 x Manuel d’instruction
User Manual
Car Battery Jump Starter

FR
01 02 03 04 05 06 07
08 09 10 11 12 13 14
15 16 17 18 19 20 21
22 23 24 25 26 27 28
29 30 31 32 33 34 35
Introduction
Les caractéristiques :
Vous avez choisi le <BR400 Booster Batterie>, suivez attentivement les instructions
contenues dans ce guide pour effectuer l’utilisation de votre jump starter dans les
meilleures conditions.
Un puissant Jump Starter: Ce jump starter avec un courant de pointe de 1600A
peut faire démarrer une voiture de 12V, un SUV, un camion ou une camionnette (8L
moteur à essence ou 7L moteur diesel) en quelques secondes, jusqu’à 25 fois.
Le chargeur portable avec QC3.0 & 5V2.4A assure une efficacité de charge la
plus rapide, 4 fois plus rapide que le chargeur conventionnel. Ce produit peut
également être compatible avec QC1.0 et QC2.0
Protection de sécurité : Les units, les circuits et les fonctions de sécurité vous
protègent, ainsi que votre appareil, des surcharges et court-circuits.
Kits LifeSaver: 4 modes d'éclairage LED: lampe de poche, lampe stroboscopique,
signal lumineux SOS et voyant d'avertissement, marteau de sécurité intégré en cas
d'urgence.

FR
01 02 03 04 05 06 07
08 09 10 11 12 13 14
15 16 17 18 19 20 21
22 23 24 25 26 27 28
29 30 31 32 33 34 35
Connaissez votre produit
Système de protection contre les courants importants- Pinces Jump
starter
Pince Rouge(+)
Pince Nori(-)
Prise "Smart Clamp"
Port de départ du saut
LED Lumière
QC3.0 USB Output
5V/2.4A USB Output
Entrée TYPE C
Interrupteur
Ladestatus-Anzeige
Marteau de sécurité
START

FR
01 02 03 04 05 06 07
08 09 10 11 12 13 14
15 16 17 18 19 20 21
22 23 24 25 26 27 28
29 30 31 32 33 34 35
Commencer
Recharger votre jump starter
1.Veuillez utiliser le câble de type C fourni pour charger le produit (adaptateur non
fourni, un adaptateur 5V/3A ou 9V/2A est recommandé)
2.Avec l’adaptateur 5V3A, le chargement complet de l’appareil prends environ 4
heures. Afin de prolonger la vie de batterie, il est recommandé de charger complète-
ment l’appareil tous les 3 mois.
Allumez votre Jump starter
Appuyez brièvement sur l’interrupteur pour démarrer le système, les voyants de la
batterie s’allume. Pour économiser de l’énergie, le système passera en mode veille
si aucune opération n’est effectuée dans les 20 secondes.
4 Modes d'éclairage LED
Appuyez longuement sur l'interrupteur d'alimentation pendant plus de 3secondes
pour activer le mode d'éclairage. Il y a 4 modes qui sont ON, SOS, Strobe et
Warning, il suffit d’appuyer brièvement sur le bouton de l’interrupteur pour changer
mode ou éteindre le mode d’éclairage. Et vous pouvez également appuyez sur
l’interrupteur pendant plus de 3 secondes pour éteindre le mode d’éclairage.
QC3.0 & 5V 2.4A Double sortie USB
Ce jump starter portable est également équipé de deux sorties USB qui offrent la
vitesse de charge la plus rapide(USB1 - QC3.0 : 5V3A/9V2A/12V1.5A ; USB2 -
5V2.4A) pour vos appareils électroniques portables, tels que téléphones, tablettes,
écouteurs Bluetooth, etc
Seite laden ...
Seite laden ...
Seite laden ...
Seite laden ...
Seite laden ...
Seite laden ...
Seite laden ...
Seite laden ...
Seite laden ...
Seite laden ...
Seite laden ...
Seite laden ...
Seite laden ...
Seite laden ...
Seite laden ...
Seite laden ...
Seite laden ...
Seite laden ...
Seite laden ...
Seite laden ...
Seite laden ...
Seite laden ...
Seite laden ...
Seite laden ...
Seite laden ...
-
 1
1
-
 2
2
-
 3
3
-
 4
4
-
 5
5
-
 6
6
-
 7
7
-
 8
8
-
 9
9
-
 10
10
-
 11
11
-
 12
12
-
 13
13
-
 14
14
-
 15
15
-
 16
16
-
 17
17
-
 18
18
-
 19
19
-
 20
20
-
 21
21
-
 22
22
-
 23
23
-
 24
24
-
 25
25
-
 26
26
-
 27
27
-
 28
28
-
 29
29
-
 30
30
-
 31
31
-
 32
32
-
 33
33
-
 34
34
-
 35
35
-
 36
36
-
 37
37
-
 38
38
-
 39
39
-
 40
40
-
 41
41
-
 42
42
-
 43
43
-
 44
44
-
 45
45


in anderen Sprachen
- français: BUTURE BR400 Manuel utilisateur
- español: BUTURE BR400 Manual de usuario
- italiano: BUTURE BR400 Manuale utente
- 日本語: BUTURE BR400 ユーザーマニュアル
Verwandte Papiere
Sonstige Unterlagen
-
 VRI 1000/1 Fast Charge Adapter QC3.0 Benutzerhandbuch
-
Mpow CA148 Benutzerhandbuch
-
ALLPOWERS AP-SS-007 Portable Solar Generator Benutzerhandbuch
-
Norauto 2223449 Benutzerhandbuch
-
 Topdon VS2000Plus Benutzerhandbuch
-
Apa 16443 Bedienungsanleitung
-
 Topdon JumpSurge2000 Schnellstartanleitung
-
KRAFTWERK 506.000.080 Bedienungsanleitung
-
Midland Enerjump Mini Jumpstarter 6000mA Bedienungsanleitung
-
 GOOLOO GP37-Plus Benutzerhandbuch


