
6TFS.BOVBM
BUTURE BR600 Jump Starter


Language
01-09
10-17
18-27
28-37
38-44
45-53
English
Deutsch
Français
Italiano
Español

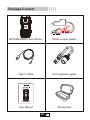
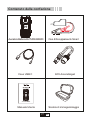
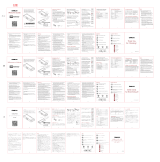
Package Content
BUTURE BR600 Jump Starter Smart Jumper Cables
Type C Cable EC5 Cigarette Lighter
User Manual Storage Box
EN 01 02 03 04 05 06 07 08 09
10 11 12 13 14 15 16 17
18 19 20 21 22 23 24 25 26 27
28 29 30 31 32 33 34 35 36 37
38 39 40 41 42 43 44
45 46 47 48 49 50 51 52 53

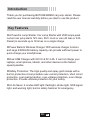
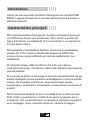
Introduction
Thank you for purchasing BUTURE BR600 car jump starter. Please
read the user manual carefully before you start to use the product.
Key Features
A Powerful Jump Starter: Car Jump Starter with 2500 amps peak
current can jump starts 12V cars, SUV, truck or van (All Gas or 8.0L
Diesel) in seconds up to 30 times on a single charge.
Power Bank & Wireless Charger:10W wireless charger function
and large 23800mAh battery capacity can provide sufficient power to
quick charge your smartphones.
Dual USB Charger with QC3.0 & 5V 2.4A: It can full charge your
laptops, smart phones, tablets, and other devices at the fastest
speed possible.
Safety Protection: The high quality and spray gold clamps with a
built-in protection circuit provides over-current protection, short circuit
protection, over-load protection, over-voltage protection, over-charge
protection. Provide ultimate protection for your safety.
A Life Saver: 4 modes LED light: flashlight, strobe light, SOS signal
light, and warning light, built-in safety hammer for emergency.
EN01 02 03 04 05 06 07 08 09
10 11 12 13 14 15 16 17
18 19 20 21 22 23 24 25 26 27
28 29 30 31 32 33 34 35 36 37
38 39 40 41 42 43 44
45 46 47 48 49 50 51 52 53

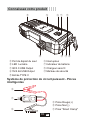
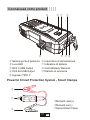
Jump Starting Port
LED Light
QC3.0 USB Output
5V/2.4A USB Output
TYPE C Input
Red Jumper Cable (+)
Black Jumper Cable (-)
Smart Clamp Plug
Power Switch
Battery Indicator
Wireless charger
Safety Hammer
Know Your Product
Powerful Circuit Protection System - Smart Clamps
EN01 02 03 04 05 06 07 08 09
10 11 12 13 14 15 16 17
18 19 20 21 22 23 24 25 26 27
28 29 30 31 32 33 34 35 36 37
38 39 40 41 42 43 44
45 46 47 48 49 50 51 52 53

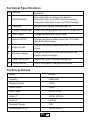
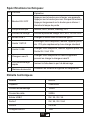
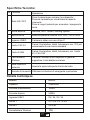
Technical Specifications
Technical Details
No
1
2
3
4
5
6
7
8
9
Function
ON/OFF Button
Flashlight
Charge indicator light
USB C input
Output 1 QC3.0
Output 2 USB
Wireless charger
Jump starting port
Safety hammer
Operation
Press the button to charge your devices.
Press the button to see the remaining capacity
Long press the button to turn on/off the flashlight
Normal, SOS, Strobe, Warning Light, off
Shows the charging press:25%,50%,75% and 100%
Charge the stater with Type c cable
Charge your phone,tablet,camera,etc.75% faster
than a standard charge
Charge your phone,tablet,camera,etc. 5V/2.4A 12W
output
Charge your phone or other devices which can
support wireless charger
Insert the plug into the jump starting port
Use in emergency or dangerous situation
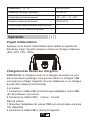
Model
Capacity
Starting Current
Peak Current
USB C Input
Output 1
Output 2
Wireless Charger
Dimensions(L*W*H)
BR600
23800mAh
1200A
2500A
9V/2A, 5V/3A
9V/2A, 5V/2.4A
5V/2.4A
10W
183*95.5*42.8
EN01 02 03 04 05 06 07 08 09
10 11 12 13 14 15 16 17
18 19 20 21 22 23 24 25 26 27
28 29 30 31 32 33 34 35 36 37
38 39 40 41 42 43 44
45 46 47 48 49 50 51 52 53

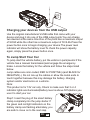
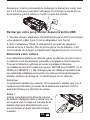
Press the power button to check the capacity of the Jump starter.Indi-
cator Lights as below picture(25%,50%,75%,100%)
NOTE: The wall charger or car charger is not included in the
package, you can use a universal USB charger to recharge the unit,
such as your phone or pad charger(2A above is suggested)
At Home:
1.Plug the USB cable into any USB wall adaptor (5V 2A above, not
included)
2.Connect the UCB C cableincluded to the unit
In Car:
1.Plug the USB car adapter(not included)into an available 12v socket
2.Connect the USB C (included ) to the unit.
Note: It is recommended to recharge the Jump starter every
3-4months to maintain the efficiency and prolong the service life of
the internal battery even if the unit has not been used.
Operation
Power indicator light
Recharge the Jump starter
Overload/Discharge Fuse
Working Temperature
Backflow Protection
Short circuit fuse protection
Reverse polarity protection
99
-20 ~60 / -4 ~140
99
¥
¥
EN01 02 03 04 05 06 07 08 09
10 11 12 13 14 15 16 17
18 19 20 21 22 23 24 25 26 27
28 29 30 31 32 33 34 35 36 37
38 39 40 41 42 43 44
45 46 47 48 49 50 51 52 53

Use the original manufacturer's USB cable that came with your
device and plug it into one of the USB output ports.You can charge
two devices at the same time.One of the ports has a maximum output
of 9V/2A while the other has a maximum output of 5V/2.4A.Press the
power button once to begin charging your device.The power level
indicator will show the battery level.To check the power capacity
again, simply press the power button once.
To jump start the vehicle battery, put the vehicle in park(neutral if the
vehicle has a manual transmission)and engage the emergency
brake. Locate the battery for the vehicle and follow the steps listed
below.
Jump cables are color-coded, RED for POSITIVE(+)and BLACK for
NEGATIVE(-). Do not mix up the cables or allow the metal ends to
touch together because this may damage the battery. charging
system and/or electronics on a vehicle.
Note:
This product is for 12V car only. Check to make sure that 3 or 4
indicator lights are illuminated(battery level is above 50%)before you
use it to start your car.
Step1: Insert the plug of the smart battery
clamp completely into the jump starter. If
the green and red light indicators on the
battery clamp are flashing alternately, you
are safe to move on to the next step.
Charging your devices from the USB output
To Jump Start Your Car
EN01 02 03 04 05 06 07 08 09
10 11 12 13 14 15 16 17
18 19 20 21 22 23 24 25 26 27
28 29 30 31 32 33 34 35 36 37
38 39 40 41 42 43 44
45 46 47 48 49 50 51 52 53

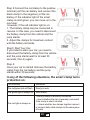
Step 2:Connect the red clamp to the positive
terminal(+)of the car battery and connect the
black clamp to the negative(-)of the car
battery. If the indicator light of the smart
clamp is solid green, you can move on to the
next step.
However, if the red indicator light is on:
1. The battery clamp may be connected in
reverse. In this case, you need to disconnect
the battery clamp from the vehicle and the
jump starter.
2. Adjust the clamps for maximum contact
with the battery terminals.
Step3: Start Your Car.
If you failed to start your car, you need to
disconnect the battery clamp from the vehicle
and the jump starter.wait for at least 30
seconds, then try again.
Step 4:
Once your car is started. Remove the battery
clamp from the car-battery and the jump
starter within 30 seconds.
In any of the following situations, the smart clamp turns
protection on:
LED indicator
The red/green led will flash
The green light is always on
The red light is always on
Situations
Ready to work
Work status
1.battery clamp is reversely connected
--check whether the clip is reversely connected
2.the clamp is short-circuited
----check whether two clamps together connect
or connect both cable clamps to the same piece
of metal
EN01 02 03 04 05 06 07 08 09
10 11 12 13 14 15 16 17
18 19 20 21 22 23 24 25 26 27
28 29 30 31 32 33 34 35 36 37
38 39 40 41 42 43 44
45 46 47 48 49 50 51 52 53

1.When jump-starting a vehicle, please ensure that the blue plug is
securely fitted into the jump start socket on your jump starter
2. Do not allow this product in water
3. Do not operate the product in explosive atmospheres, such as in
the presence of flammable liquid, gas or dust
4. Do not modify or disassemble the product
5. Do not store in locations where the temperature may exceed 140ď
60ľ
6. If battery leakage occurs, take it to your local battery recycling
center for disposal, do not attempt to use it.
7. This car jump starter is for use with 12V vehicles only.
Warnings:
The battery is self-contained and not consumer replaceable, The
battery must be disposed of properly when it no longer holds a
charge. Proper charging practices will increase the life of the product.
Battery Disposal
The red light flashes slowly
The red light LED flashes
quickly
The green light flashes
slowly
Back charge protection, the voltage of the car
battery is higher than 12.6V.
---No jump starter needed.the car battery is
enough to start your car
The temperature of the clamp exceeds
GHJUHHV
----remove the clamp until the red-green led flash
The voltage of the starter is too low
----try to replace the startup power supply or
charge it in time
EN01 02 03 04 05 06 07 08 09
10 11 12 13 14 15 16 17
18 19 20 21 22 23 24 25 26 27
28 29 30 31 32 33 34 35 36 37
38 39 40 41 42 43 44
45 46 47 48 49 50 51 52 53

Warranty
Our company provides customers with warranty of 24 months from
the date of purchase.
Contact US
For additional assistance or warranty cover claim, please contact us:
E-Mail: [email protected]
Battery Disposal
Issue
Can not jump
start
LED light keeps
flashing
No wall adaptor
Cause
Wrong connection
30-second timer to
jump start has expired
Low battery status
Protection is working
Charge the unit via
your phone charger
Remedy
Make sure to clamp the RED jumper
cable to the Positive(+)post on the
battery. And Black jumper cable to
Negative(-)post.
Disconnect the cables from the vehicle
battery and reconnect it.
Recharge the unit until at least three
solid lights
Refer to the LED Indicator Table of the
manual
Plug the USB cable into a universal
wall adapter (2A above is suggested),
such as your phone or pad charger.
EN01 02 03 04 05 06 07 08 09
10 11 12 13 14 15 16 17
18 19 20 21 22 23 24 25 26 27
28 29 30 31 32 33 34 35 36 37
38 39 40 41 42 43 44
45 46 47 48 49 50 51 52 53

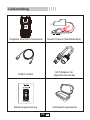
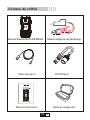
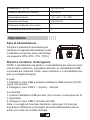
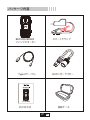
Lieferumfang
Tragbare Starthilfe Powerbank Smart Clamps (Starthilfekabel)
USB-C-Kabel EC5 Adapter für
Zigarettenanzünder
Bedienungsanleitung Aufbewahrungstasche
DE
01 02 03 04 05 06 07 08 09
10 11 12 13 14 15 16 17
18 19 20 21 22 23 24 25 26 27
28 29 30 31 32 33 34 35 36 37
38 39 40 41 42 43 44
45 46 47 48 49 50 51 52 53

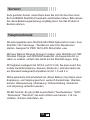
Vorwort
Sehr geehrter Kunde, vielen Dank dass Sie sich für den Kauf einer
BuTure BR600 Starthilfe-Powerbank entschieden haben. Bitte lessen
Sie diese Bedienungsanleitung sorgfältig bevor Sie das Produkt in
Betrieb nehmen.
Hauptmerkmale
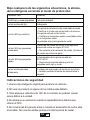
Leistungsstarke Auto Starthilfe:Mit 2500A Spitzenstrom kann Auto
Starthilfe 12V FahrzeugeAlle Benzin oder 8,0L Dieselmotor
starten. Geeignet für PKW, SUV,LKW, Motorräder, usw.
Power Bank & Wireless Charger Funktion: Auto Starthilfe mit 10W
Wireless Charger und 23800mAh kapazität .die bequemste Art zu
laden zu erleben, einfach das Gerät auf die Starthilfe legen, fertig.
Tragbares Ladegerät mit QC3.0 und 5V 2.4A: Sie kann somit Ihre
mobile Gerat(Smartphone, Kamera, Kindle,etc.) schneller laden als
ein Standard-Ladegerat.Kompatibel mit QC 1.0 und 2.0.
Die patentierte Sicherheitstechnik (Smart Battery Clip) bietet einen
Explosions- und Verpolungsschutz, wodurch Kurzschluss, Übertem-
peratur, Überspannung, Überladung, Tiefenentladung, Überstrom
und Verpolung verhindert werden.
LED-Technik: Es gib 4 LED-Leucht-Modi (“Taschenlampe’, “SOS”,
“Stroboskop”,“Warnlicht”) die sehr niitzlich sein kénnen, z. B. bei
Unfallen, Outdoor-Aktivitaten, etc.
DE
01 02 03 04 05 06 07 08 09
10 11 12 13 14 15 16 17
18 19 20 21 22 23 24 25 26 27
28 29 30 31 32 33 34 35 36 37
38 39 40 41 42 43 44
45 46 47 48 49 50 51 52 53

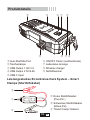
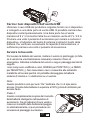
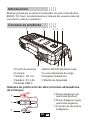
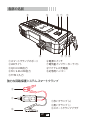
Auto-Starthilfe-Port
Taschenlampe
USB Output 1 QC 3.0
USB Output 2 5V/2.4A
USB C Input
ON/OFF Taster (multifunktional)
Ladestatus-Anzeige
Wireless charger
Notfallhammer
Rotes Starthilfekabel
(Plus-Pol )
Schwarzes Starthilfekabel
(Minus-Pol)
“Smart Clamp”-Stecker
Produktdetails
Leistungsstarkes Stromkreisschutz System – Smart
Clamps (Starthilfekabel)
DE
01 02 03 04 05 06 07 08 09
10 11 12 13 14 15 16 17
18 19 20 21 22 23 24 25 26 27
28 29 30 31 32 33 34 35 36 37
38 39 40 41 42 43 44
45 46 47 48 49 50 51 52 53

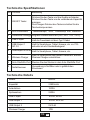
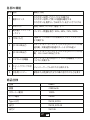
Technische Spezifikationen
Technische Details
No
1
2
3
4
5
6
7
8
9
Funktion
ON/OFF Taster
LED-Lichtmodus
Ladestatus-Anzeige
USB C Input
USB Output 1
QC 3.0
USB Output 2 5V/2.4A
Wireless Charger
Auto-Starthilfe-Port
Notfallhammer
Bedienung
Drücken Sie den Taster um Ihre Geräte aufzuladen
Drücken Sie den Taster um die verbleibende Kapazität
anzeigen
Durch langes Drücken des Tasters schalten Sie die
Taschenlampe an/aus
“Taschenlampe’, “SOS”, “Stroboskop” und “Warnlicht”
Zeigt den Ladefortschritt an (25%, 50%, 75%, 100%)
Lädt die Powerbank mit dem Typ C Kabel
Lädt Ihr Smartphone, Tablet, Kamera, etc. ca. 75%
schneller als ein Standardladegerat
Lädt Ihr Smartphone, Tablet, Kamera, etc.
Lädt Ihr Smartphone oder andere Geräte auf, die das
Wireless Charger unterstützen.
Stecken Sie den Stecker in dem Auto-Starthilfe-Port
Verwendung in Notfällen oder in gefährlichen
Situationen
Modell
Kapazität
Anlaufstrom
Spitzenstrom
USB C Input
USB Output 1
USB Output 2
Wireless Charger
BR600
23800mAh
1200A
2500A
9V/2A, 5V/3A
9V/2A, 5V/2.4A
5V/2.4A
10W
DE
01 02 03 04 05 06 07 08 09
10 11 12 13 14 15 16 17
18 19 20 21 22 23 24 25 26 27
28 29 30 31 32 33 34 35 36 37
38 39 40 41 42 43 44
45 46 47 48 49 50 51 52 53

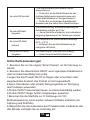
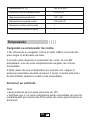
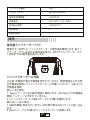
1.Im Lieferumfang bieten wir kein Ladegerät. Bitte nutzen Sie das
mitgelieferte USB-C-Kabel um die Starthilfe aufzuladen.
2.Während des AufLadevorgangs blinkt die LED, wenn die Starthilfe
vollständig aufgeladen ist, werden alle vier LEDs leuchten.
3.Bitte beachten: Bevor Sie das Produkt zum ersten Mal verwenden,
laden Sie bitte die Starthilfe für mindestens fünf Stunden auf.
Hinweis:
» Das Produkt ist nur für 12V Fahrzeuge geeignet.
» Stellen Sie sicher, dass 3 bis 4 Anzeigeleuchten leuchten( der
Batterieladestand liegt über 50%),bevor Sie damit Ihr Fahrzeug starten.
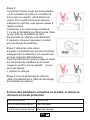
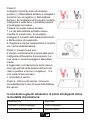
Schritt 1: Stecken Sie den Stecker der
Smart Battery Clamp vollständig in die
Starthilfe. Wenn die grüne und die rote
Anzeige der Batterieklemme abwechselnd
blinken, können Sie mit Sicherheit zum
nächsten Schritt übergehen.
Inbetriebnahme
Laden Sie die Starthilfe-Powerbank
Starten Sie das Auto
Abmaße(L*W*H)
Overload/Discharge Fuse
Working Temperature
Backflow Protection
Short circuit fuse protection
Reverse polarity protection
183*95.5*42.8mm
99
-20 ~60 / -4 ~140
99
¥
¥
DE
01 02 03 04 05 06 07 08 09
10 11 12 13 14 15 16 17
18 19 20 21 22 23 24 25 26 27
28 29 30 31 32 33 34 35 36 37
38 39 40 41 42 43 44
45 46 47 48 49 50 51 52 53

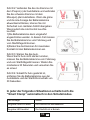
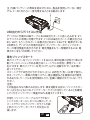
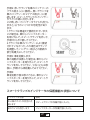
Schritt 2: Verbinden Sie die rote Klemme mit
dem Pluspol(+) der Autobatterie und verbinden
Sie die schwarze Klemme mit dem
Minuspol(-)der Autobatterie. Wenn die grüne
und die rote Anzeige der Batterieklemme
abwechselnd blinken, können Sie mit
Sicherheit zum nächsten Schritt übergehen.
Wenn jedoch die rote Kontroll Leuchte
leuchtet:
1)Die Batterieklemme kann umgekehrt
angeschloßen werden. In diesem Fall müssen
Sie die Batterieklemme vom Fahrzeug und
vom Starthilfegerät trennen.
2)Stellen Sie die Klemmen für maximalen
Kontakt mit den Batterieklemmen ein.
Schritt 3: Starten Sie das Auto.
Wenn Sie Ihr Auto nicht starten konnten,
müssen Sie die Batterieklemme vom Fahrzeug
und vom Starthilfegerät trennen. Warten Sie
mindestens 30 Sekunden und versuchen Sie
es erneut.
Schritt 4: Sobald Ihr Auto gestartet ist,
entfernen Sie die Batterieklemme aus der
Autobatterie und der Starthilfe innerhalb von
30 Sekunden.
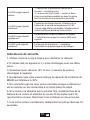
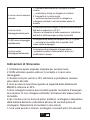
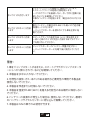
In jeder der folgenden Situationen schaltet sich die
“Smart Clamp” automatisch in den Schutzmodus.
LED Anzeige
die grüne/ rote LED blinkt
die grüne LED leuchtet
Status
Die Starthilfe ist betriebsbereit.
Die Starthilfe ist in Betrieb.
DE
01 02 03 04 05 06 07 08 09
10 11 12 13 14 15 16 17
18 19 20 21 22 23 24 25 26 27
28 29 30 31 32 33 34 35 36 37
38 39 40 41 42 43 44
45 46 47 48 49 50 51 52 53

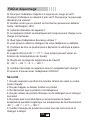
1. Benutzen Sie nur die original “Smart Clamps” um Ihr Fahrzeug zu
starten.
2. Benutzen Sie diese Einheit NICHT, wenn irgendeine Kabelklemme
oder ein Kabel beschädigt sein sollte.
3.Legen Sie das Produkt NICHT im Regen oder in feuchtem oder
eingetauchtem Zustand, das Produkt ist nicht wasserdicht.
4.Keine Chemikalien oder scharfe Reinigungsmittel zur Reinigung
des Produktes verwenden.
5.Produkt NICHT auseinander bauen, es könnte beschädigt werden.
6.Produkt NICHT länger heißen Umgebungen aussetzen.
7.Benutzen Sie die Starthilfe nur fir Fahrzeuge mit 12V
Bordnetzspannung, sonst werden schwere Schäden entstehen (an
Fahrzeug und Starthilfe).
8.Überprüfen Sie den Ladestatus des Produktes bitte mindestens alle
drei Monate und laden Sie es rechtzeitig auf.
Sicherheitsanweisungen
die rote LED leuchtet
die rote LED blinkt
langsam
die rote LED blinkt
schnell
die grüne LED blinkt
langsam
1.Die Starthilfekabel sind verkehrt herum
angeschlossen.
---- Prüfen Sie, ob die Starthilfekabel an den
richtigen Batteriepolen angeschlossen sind.
2.Das Starthilfekabel ist “kurzgeschlossen”.
---- Prüfen Sie, ob die beiden Starthilfekabel
einander oder das selbe Stück Metall berühren.
Rückflusssicherung: die Batteriespannung der
Autobatterie ist höher als 12.6V
---- Keine Starthilfe erforderlich, die Autobatterie
hat genug Spannung um Ihr Fahrzeug zu starten
Die Temperatur der Starthilfekabel übersteigt
65°C (+/-5°C)
---- Entfernen Sie die Starthilfekabel bis die
rote/grüne LED blinkt.
Die Spannung der Starthilfe ist zu niedrig.
---- Laden Sie die Starthilfe zeitnah auf.
DE
01 02 03 04 05 06 07 08 09
10 11 12 13 14 15 16 17
18 19 20 21 22 23 24 25 26 27
28 29 30 31 32 33 34 35 36 37
38 39 40 41 42 43 44
45 46 47 48 49 50 51 52 53

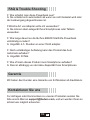
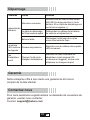
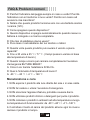
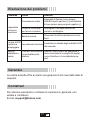
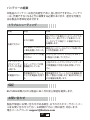
Garantie
F: Wie schaltet man diese Powerbank aus?
A: Sie schaltet sich automatisch ab wenn sie nicht belastet wird oder
der Ladevorgang abgeschlossen ist.
F:Welche Art von Adapter sollte ich verwenden?
A: Sie können das Ladegerät Ihres Smartphones oder Tablets
verwenden.
F: Wie lange dauert es die BuTure BR600 Starthilfe-Powerbank
vollständig zu laden?
A: Ungefähr 4-5 Stunden an einer 5V2A adapter.
F: Nach vollständiger Aufladung kann das Produkt das Auto
mehrmals aufladen?
A: Ungefähr 30 Mal.
F: Wie oft kann dieses Produkt mein Smartphone aufladen?
A: Dies ist abhängig von der Akku-Kapazität Ihres Smartphones.
Wir bieten den Kunden eine Garantie von 24 Monaten ab Kaufdatum.
Kontaktieren Sie uns
Fur Anfragen oder Kommentare zu unseren Produkten senden Sie
bitte eine E-Mail an [email protected], und wir werden Ihnen so
schnell wie méglich antworten.
FAQ & Trouble Shooting
DE
01 02 03 04 05 06 07 08 09
10 11 12 13 14 15 16 17
18 19 20 21 22 23 24 25 26 27
28 29 30 31 32 33 34 35 36 37
38 39 40 41 42 43 44
45 46 47 48 49 50 51 52 53
Seite wird geladen ...
Seite wird geladen ...
Seite wird geladen ...
Seite wird geladen ...
Seite wird geladen ...
Seite wird geladen ...
Seite wird geladen ...
Seite wird geladen ...
Seite wird geladen ...
Seite wird geladen ...
Seite wird geladen ...
Seite wird geladen ...
Seite wird geladen ...
Seite wird geladen ...
Seite wird geladen ...
Seite wird geladen ...
Seite wird geladen ...
Seite wird geladen ...
Seite wird geladen ...
Seite wird geladen ...
Seite wird geladen ...
Seite wird geladen ...
Seite wird geladen ...
Seite wird geladen ...
Seite wird geladen ...
Seite wird geladen ...
Seite wird geladen ...
Seite wird geladen ...
Seite wird geladen ...
Seite wird geladen ...
Seite wird geladen ...
Seite wird geladen ...
Seite wird geladen ...
Seite wird geladen ...
Seite wird geladen ...
Seite wird geladen ...
Seite wird geladen ...
Seite wird geladen ...
-
 1
1
-
 2
2
-
 3
3
-
 4
4
-
 5
5
-
 6
6
-
 7
7
-
 8
8
-
 9
9
-
 10
10
-
 11
11
-
 12
12
-
 13
13
-
 14
14
-
 15
15
-
 16
16
-
 17
17
-
 18
18
-
 19
19
-
 20
20
-
 21
21
-
 22
22
-
 23
23
-
 24
24
-
 25
25
-
 26
26
-
 27
27
-
 28
28
-
 29
29
-
 30
30
-
 31
31
-
 32
32
-
 33
33
-
 34
34
-
 35
35
-
 36
36
-
 37
37
-
 38
38
-
 39
39
-
 40
40
-
 41
41
-
 42
42
-
 43
43
-
 44
44
-
 45
45
-
 46
46
-
 47
47
-
 48
48
-
 49
49
-
 50
50
-
 51
51
-
 52
52
-
 53
53
-
 54
54
-
 55
55
-
 56
56
-
 57
57
-
 58
58


in anderen Sprachen
- English: BUTURE BR600 User manual
- français: BUTURE BR600 Manuel utilisateur
- español: BUTURE BR600 Manual de usuario
- italiano: BUTURE BR600 Manuale utente
- 日本語: BUTURE BR600 ユーザーマニュアル
Verwandte Artikel
Andere Dokumente
-
KRAFTWERK 506.000.080 Bedienungsanleitung
-
Midland Enerjump Mini Jumpstarter 6000mA Bedienungsanleitung
-
Norauto 2274031 Benutzerhandbuch
-
Norauto 2223449 Benutzerhandbuch
-
 GOOLOO GP37-Plus Benutzerhandbuch
-
 GOOLOO GP2000 Benutzerhandbuch
-
 GOOLOO GP80 Benutzerhandbuch
-
 Ventura PB80 Benutzerhandbuch
-
Mpow CA148 Benutzerhandbuch
-
 VRI 1000/1 Fast Charge Adapter QC3.0 Benutzerhandbuch


