Seite wird geladen ...

4
D
B C
A
IP30
PRI
PRI 230 V~ 50 - 60 Hz 260 mA
346000
}
BUS
2 - 1
27V 1,2A
CEBEC
N
N
F
>0,2 mm
2
BTicino
L4669
0,35 mm
2
0,28 mm
2
BTicino
C9881U/5E
AWG24 UTP5
BTicino
336904
One PTT
278 TP
0,28 mm
2
OneSYT
+ Digital
TP
5/10
OneSYT
+ Num TP
5/10
GIGA TW
CAT5E
AWG24
One SYT
+ Num TP
8/10
Cable
ARB.6060-1
6/10
Cable
EV6R
6/10
1
mm
2
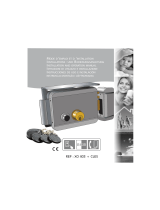
A 50 m 140 m 145 m 200 m 200 m 150 m 200 m 50 m –
B 50 m 115 m 80 m 200 m 115 m 80 m 200 m 50 m –
C 50 m 130 m 80 m 200 m 100 m 80 m 200 m 50 m –
D 30 m 30 m – 50 m 30 m – – – 100 m
• Cavi e distanze (mm
2
)
• Cables and distances (mm
2
)
• Câbles et distances (mm
2
)
• Kabeln und Abstände (mm
2
)
• Cables y distancias (mm
2
)
• Kabels en afstanden (mm
2
)
• Cabos e distâncias (mm
2
)
)2

Video Kit
7
• Schema bifamigliare 2 (366721)
• Two-family diagram 2 (366721)
• Schéma bi-familiale 2 (366721)
•
Schema Zweifamilienhaus 2 (366721)
• Esquema bifamiliar 2 (366721)
• Schema tweegezins 2 (366721)
• Esquema bifamiliar 2 (366721)
)3667212
BUS
PL S+
S-
PS
BUS TK
BUS PI
346830
BUS 2 1
230 Vac
IP30
PRI
PRI 230 V~ 50 - 60 Hz 260 mA
346000
}
BUS
2 - 1
27V 1,2A
CEBEC
N
N
F
A
N
= –
= –
T = –
S = –
P
= –
=
ON
OFF
ON
OFF
BUS
B
BUS
B
P
= –
= –
= –
= –
M
J2
J1
N
= –
= *1
P
= –
= –
= –
= –
M
J2
J1
N
= –
= –
* • Inserire il configuratore fornito a corredo.
• Connect the configurator supplied as standard.
• Mettre en place le configurateur fourni à cet effet.
• Den mitgelieferten Konfigurator einsetzen.
• Inserte el configurador suministrado.
• Breng de standaard geleverde configurator aan.
• Inserir o configurador fornecido no equipamento base.
• Inserire il configuratore fornito a corredo.

10
1 - Activação/desactivação do sinal de confirmação da
abertura da fechadura.
2 - Regulação do volume (veja as próxima página).
3 - Indicadores luminosos verde: indicação de porta aberta.
4 - Indicadores luminosos verde: comunicação activa.
5 - Indicador luminoso lampejante Verde: chamada enviada;
Indicador luminoso lampejante Vermelho: sistema cupado.
6 - Alojamento configurador.
• Posto esterno
• Entrance panel
• Poste extérieur
• Türstation
• Placa exterior
• Externe plaats
• Unidade externa
1 - Habilitación/deshabilitación del tono de confirmación de
apertura de la cerradura.
2 - Regulación del volumen (véase la pág. siguiente).
3 - Led verde: indicación puerta abierta.
4 - Led verde: comunicación activada.
5 - Led parpadenate Verde: llamada enviada;
Led parpadenate Rojo: sistema ocupado.
6 - Alojamiento configuradores.
1 - Enabling/disabling of door lock opening
confirmation tone.
2 - Adjustment volume (see the following page).
3 - Green LED: door open indication.
4 - Green LED: communication active.
5 - Green flashing LED; call forwarded;
Red flashing LED: system busy.
6 - Configurator seat.
1 - Abilitazione/disabilitazione tono conferma apertura
serratura.
2 - Regolazione del volume (vedi pag. seguente).
3 - Led verde: indicazione porta aperta.
4 - Led verde: comunicazione attiva.
5 - Led lampeggiante Verde: chiamata inoltrata; Led
lampeggiante Rosso: sistema occupato.
6 - Sede configuratori.
1 - Aktivierung/Deaktivierung des Bestätigungssignals nach
erfolgter Türöffnung.
2 - Einstellung der Lautstärke (siehe nachfolgende Seiten).
3 - Grüne Led: Meldet offene Tür.
4 - Grüne Led: Kommunikation aktiv.
5 - Grüne blinkende Led: Ruf gesendet;
Rote blinkende Led: System belegt.
6 - Sitz der Konfiguratoren.
1 - Activation/désactivation tonalité de confirmation
ouverture serrure.
2 - Réglage du volume (voir page suivante).
3 - Diode verte: indication porte ouverte.
4 - Diode verte: communication active.
5 - Témoin clignotant vert - appel passé;
Témoin clignotant rouge: système occupé.
6 - Logement configurateurs.
1 - Activering/desactivering toon bevestiging opening slot.
2 - De geluidssterkte regelen (zie de volgende pagina’s).
3 - Groene led: aanduiding open deur.
4 - Groene led: communicatie actief.
5 - Groene knipperende led: oproep doorgestuurd; Rode
knipperende led: systeem bezet.
6 - Plaats van de configuratiemodules.
ON OFF
3
4
5
1
6
2
1
2
3
4
5
6

14
• Poste interne
• Hausstation
18
21
22
2323
19
20
24252627
1 2 3 4 5 7 6
16
15
14
17
91011
12
139
8

Video Kit
15
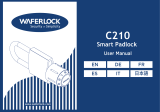
L’image représente le dispositif avec toutes les
fonctions activées. Vérifier dans le Manuel Installateur
le mode d’activation des fonctions.
Das Bild stellt eine Vorrichtung mit allen aktivierten
Funktionen dar. Sehen Sie im Installationshandbuch
nach, wie die Funktionen aktiviert werden.
1 -
Écran 7” (16:9)
2 -
Touche d’extinction
3 -
Date et heure
4 -
Exclusion sonneries
5 -
Activation Bureau
6 -
Micro
7 -
Activation Répondeur
8 -
Actions rapides
9 -
Guides tactiles pour non-voyants
10 -
Touche connexion :
l’allumage du voyant vert clignotant indique la présence
d’un appel entrant
l’allumage du voyant vert fixe indique la communication
en cours
11 -
Auto-allumage/Cyclage :
à la pression sur la touche le VOYANT rouge s’allume
12 -
Touche Favoris :
à la pression sur la touche le VOYANT rouge s’allume
(Configuration de base = LUMIÈRE ESCALIER. Pour une
configuration différente, faire référence au tableau de la
configuration physique dans les pages suivantes.)
13 -
Touche d’ouverture serrure:
à la pression sur la touche le VOYANT rouge s’allume
14 -
État Répondeur:
Voyant rouge fixe = répondeur activé
Voyant rouge clignotant = présence enregistrement(s)
non visionné(s)
15 -
État présence notes :
Voyant rouge clignotant = nouvelle(s) note(s) non lue(s)
16 -
État Exclusion sonnerie:
Voyant rouge allumé = Sonnerie appel désactivée
17 -
Fonctions (seules les icônes des fonctions configurées
s’affichent)
18 -
Logement configurateurs
19 -
Configurateur J1 : extraire pour alimentation
supplémentaire
20 -
Configurateur J2: Master/Slave, extraire pour Slave
21 -
Microinterrupteur ON/OFF de terminaison de ligne
22 -
Prise miniUSB de mise à jour Firmware dispositif
23 -
Haut-parleur
24 -
Bornes (1 – 2) d’alimentation supplémentaire
25 -
Bornes de branchement au BUS SCS 2 FILS
26 -
Bornes ( ) de branchement d’un bouton externe
d’appel à l’étage
27 -
Bornes (1 - 5M) de branchement d’une sonnerie
supplémentaire Le branchement doit être effectué point
- point sur les bornes des sonneries supplémentaires
1 -
Display 7” (16 : 9)
2 -
Ausschalttaste
3 -
Datum und Uhrzeit
4 -
Ausschluss des Läutwerks
5 -
Freigabe Büro-Funktion
6 -
Mikrofon
7 -
Freigabe Anrufbeantworter
8 -
Schnellfunktionen
9 -
Taktile Hilfe für Sehbehinderte
10 -
Anschlusstaste:
Das Blinken der grünen Led meldet einen eintreffenden
Anruf
Das Aufleuchten der grünen Led meldet Gespräch im
Gang
11 -
Selbstschaltung/Taktierung:
Durch Drücken der Taste, leuchtet die rote LED auf
12 -
Taste Favoriten:
Durch Drücken der Taste, leuchtet die rote LED
auf (Basis-Konfiguration = TREPPENLICHT. Um die
Konfiguration zu ändern, siehe Tabelle der physischen
Konfiguration auf der nachfolgenden Seite.)
13 -
Taste Schlossöffner:
Durch Drücken der Taste, leuchtet die rote LED auf
14 -
Status Anrufbeantworter:
Rote Led leuchtet = Anrufbeantworter aktiv
Rote Led blinkt = nicht abgehörte Nachricht/en
vorhanden
15 -
Status Nachrichten vorhanden:
Rote Led blinkt = neue nicht gelesene Nachricht/en
16 -
Ausschluss-Status des Läutwerks:
Rote Led leuchtet = Anrufklingel deaktiviert
17 -
Funktionen (es werden nur die Symbole der
konfigurierten Funktionen angezeigt)
18 -
Sitz der Konfiguratoren
19 -
Konfigurator J1: für eine zusätzliche Stromversorgung
abziehen
20 -
Konfigurator J2: Master/Slave, abziehen für Slave
21 -
Mikroschalter ON/OFF fur den Streckenabschluss
22 -
Mini-USB-Steckbuchse zur Aktualisierung der Firmware
der Vorrichtung
23 -
Lautsprecher
24 -
Klemmen (1 -2) für eine zusätzliche Stromversorgung
25 -
Klemmen zum Anschluss an BUS, SCS, 2-DRAHT
26 -
Klemmen ( ) zum Anschluss an eine externe
Etagenruftaste
27 -
Klemmen (1 - 5M) zum Anschluss an ein zusätzliches
Läutwerk Der Anschluss muss Punkt zu Punkt an den
Klemmen des zusätzlichen Läutwerks erfolgen

24
• Programmazione Badge
• Badge programming
• Programmation des badges
• Badge programmieren
• Programación de credenciales
• Badge Programmeren
•
Programação do Crachá
• Badge gestore impianto
Nuovo badge gestore impianto
Per motivi di sicurezza è previsto un badge “Gestore“
programmato direttamente dall’installatore, tramite il
quale è possibile l’accesso alla programmazione degli altri
badge (residenti).
Il posto esterno segnalerà l’avvenuta accettazione o
cancellazione del badge con segnali acustici e visivi dei led
presenti sul posto esterno.
La presentazione di un badge non riconosciuto o un
errore di programmazione, comporta l’interruzione della
programmazione, la segnalazione tramite un beep lungo e
l’accensione LED rosso di occupato.
• Manager master badge
New manager master badge
For safety reasons, a “MASTER” badge is required, directly
programmed by the installer, providing access to the
programming of the other badges (residents).
The entrance panel will notify that the badge has been
accepted or deleted by means of sound notifications, as well
as visual indications using the LEDs on the entrance panel.
The presentation of an unrecognised badge, or a
programming error, will cause the interruption of the
programming procedure, and an extended beep; the red
“busy” LED will also come on.
• Badge master de gestion
Nouveau badge master de gestion
Pour des raisons de sécurité, est prévu un badge “MASTER“
programmé directement par l’installateur, à travers lequel,
il est possible d’accéder à la programmation des autres
(résidents).
Le poste externe signale l’acceptation ou l’élimination du
badge par des signaux sonores et visuels et par l’allumage
des leds présents sur le poste externe.
La présentation d’un badge non reconnu ou une
erreur de programmation provoque l’interruption de la
programmation, l’émission d’un bip prolongé et l’allumage
du LED rouge occupé.
• Master-Verwaltungs-Badge
Neuer Master-Verwaltungs-Badge
Aus Sicherheitsgründen ist ein „MASTER“-Badge vorgesehen,
der direkt vom Installateur programmiert wird. Damit können
die anderen Badges (Bewohner) programmiert werden.
Die Türstation meldet die erfolgte Annahme oder Löschung
des Badges durch akustische und visuelle Led-Signale, die an
derselben vorgesehen sind.
Wenn ein Badge nicht erkannt wird oder ein Fehler bei der
Programmierung aufgetreten ist, wird letztere unterbrochen
und ein langer Piepton erzeugt sowie die rote LED (belegt)
eingeschaltet.
• Credencial maestra de administrador
Nueva credencial maestra de administrador
Por razones de seguridad se prevé una credencial
“maestra” programada directamente por el instalador
mediante la cual es posible programar las demás
credenciales (residentes).
La placa exterior indicará si acepta o cancela unacredencial
con unaseñal acústica y visual de los leds incorporados en
la placa exterior.
La presentación de una credencial no reconocida o un
error de programación interrumpe la programación, que
se señala con un bip largo y la iluminación del LED rojo
ocupado.
• Badge master beheerder
Nieuwe master beheerder badge
Wegens veiligheidsredenen wordt door de installateur een
“Master” badge geprogrammeerd die de programmering van
de andere badges (inwoners) mogelijk maakt.
Het externe punt geeft met behulp van geluids- en
lichtsignalen van de leds op het externe punt aan of de badge
geaccepteerd of gewist is.
Door de presentatie van een niet-herkende badge of een fout
in de programmering wordt de programmering onderbroken,
hoort u een lange pieptoon en gaat de rode Led bezet
branden.
• Crachá master gestor
Novo crachá master gestor
Por razões de segurança é previsto um crachá “MASTER“,
programado directamente pelo instalador, por meio do
qual é possível o acesso à programação dos outros crachás
(residentes).
A unidade externa sinalizará a ocorrida aceitação ou
cancelamento do crachá com sinais acústicos e visuais dos
led presentes na unidade externa.
A apresentação de um crachá não reconhecido ou um erro
de programação, comporta a interrupção da programação,
a sinalização por meio de um beep longo e o acendimento
do LED vermelho de ocupado.

30
• Badge residente
Nuovo badge residente
Per accedere alla programmazione di un badge
“RESIDENTE” è necessario essere in possesso di un
badge gestore impianto.
Il posto esterno segnalerà l’avvenuta accettazione o
cancellazione del badge con segnali acustici e visivi dei
led presenti sul posto esterno.
La presentazione di un badge non riconosciuto o un
errore di programmazione, comporta l’interruzione
della programmazione, la segnalazione tramite un
beep lungo e l’accensione LED rosso di occupato.
• Resident badge
New resident badge
In order to access to the programming of a “RESIDENT”
badge, a system manager badge is required.
The entrance panel will notify that the badge has been
accepted or deleted by means of sound notifications, as
well as visual indications using the LEDs on the entrance
panel.
The presentation of an unrecognised badge, or a
programming error, will cause the interruption of the
programming procedure, and an extended beep; the red
“busy” LED will also come on.
• Badge résident
Nouveau badge résident
Pour accéder à la programmation d’un badge
“RÉSIDENT”, il est nécessaire de disposer d’un badge
master de gestion installation.
Le poste externe signale l’acceptation ou l’élimination
du badge par des signaux sonores et visuels et par
l’allumage des leds présents sur le poste externe.
La présentation d’un badge non reconnu ou une
erreur de programmation provoque l’interruption de
la programmation, l’émission d’un bip prolongé et
l’allumage du LED rouge occupé.
• Bewohner-Badge
Neuer Bewohner-Badge
Um die Programmierung eines Badges „BEWOHNER“
abrufen zu können, ist das Badge des Anlagenbetreibers
erforderlich.
Die Türstation meldet die erfolgte Annahme oder
Löschung des Badges durch akustische und visuelle Led-
Signale, die an derselben vorgesehen sind.
Wenn ein Badge nicht erkannt wird oder ein Fehler
bei der Programmierung aufgetreten ist, wird letztere
unterbrochen und ein langer Piepton erzeugt sowie die
rote LED (belegt) eingeschaltet.
• Credencial de residente
Nueva credencial de residente
Para ingresar a la programación de una credencial
“RESIDENTE”, es necesario poseer una credencial de
administrador del sistema.
La placa exterior indicarási acepta o cancelala
credencial con una señal acústica y visual de los leds
incorporadosen la placa exterior.
La presentación de una credencial no reconocida o un
error de programación interrumpe la programación,
que se señala con un bip largo y la iluminación del LED
rojo ocupado.
• Inwoner badge
Nieuwe inwoner badge
Voor toegang tot de programmering van een
“INWONERBADGE” moet u in het bezit zijn van een
installatiebeheerder badge.
Het externe punt geeft met behulp van geluids- en
lichtsignalen van de leds op het externe punt aan of de
badge geaccepteerd of gewist is.
Door de presentatie van een niet-herkende badge of een
fout in de programmering wordt de programmering
onderbroken, hoort u een lange pieptoon en gaat de rode
Led bezet branden.
• Crachá residente
Novo crachá residente
Para ter acesso à programação de um crachá
“RESIDENTE” é necessário estar em posse de um
crachá gestor da instalação.
A unidade externa sinalizará que interveio a aceitação
ou o cancelamento do crachá com sinais acústicos e
visuais dos leds presentes na unidade externa.
A apresentação de um crachá não reconhecido ou
um erro de programação, comporta a interrupção
da programação, a sinalização por meio de um beep
longo e o acendimento do LED vermelho de ocupado.

Video Kit
31
• Avvicinare al lettore il badge gestore impianto fino al lampeggio del LED verde serratura e tono di conferma.
• Move the system manager badge close to the reader until the green door lock LED flashes, and a confirmation sound is heard.
•
Approcher le Badge administrateur installation du lecteur et attendre que le LED vert serrure clignote et qu’une
tonalité de confirmation soit émise.
• Dem Lesegerät das Badge des Anlagenbetreibers nähern, bis die grüne LED des Schlosses blinkt und das Bestätigungssignal
ertönt.
• Acerque al lector la credencial del administrador del sistema hasta que parpadea el LED verde de la cerradura y se
produzca el tono de confirmación.
• Houd de installatiebeheerder badge voor het leesapparaat tot de groene LED slot gaat knipperen en u ter bevestiging een
geluidssignaal hoort.
• Aproxime ao leitor o Crachá gestor da instalação até o lampejo do LED verde da fechadura e o tom de confirmação.
•
1 beep
1 beeps
1 beep
1 Pieptöne
1 bips
1 beep
1 beep
• Gestore impianto
• Manager master
• Master de gestion
• Master Verwaltung
• Credencial maestra de administrador
• Master beheerder
• Master gesto
r

36
• Reset
Nel caso si avesse la necessità di cancellare tutti i
badge (gestore impianto e residenti) precedentemente
memorizzati è possibile resettare il posto esterno.
• Reset
In order to cancel all the previously saved badges (system
manager and residents) the entrance panel can be reset.
• Réinitialisation
Dans le cas où il serait nécessaire d’éliminer tous les
badges (master de gestion installation et résidents)
précédemment mémorisés, il est possible de
réinitialiser le poste externe.
• Reset
Falls alle zuvor gespeicherten Badges (Anlagenbetreiber
und Bewohner) gelöscht werden sollen, kann die
Türstation zurückgestellt werden.
• Reset
En caso de que fuera necesario cancelar todas las
credenciales memorizadas(administrador del sistema y
residentes), es posible restablecer la placa exterior.
• Reset
U kunt alle badges (installatiebeheerder en inwonerbadges)
uit het geheugen wissen door het externe punt te resetten.
• Rearme
No caso que houvesse a necessidade de cancelar
todos os crachás (gestor da instalação e residentes),
memorizados anteriormente, será possível fazer o
rearme (reset) da unidade externa.
ON
ON
OFF
OFF
•
Togliere il BUS; tenendo premuto il pulsante di programmazione, ridare alimentazione. Mantenere premuto il pulsante di
programmazione fino all’accensione alternata dei LED serratura e connessione + beep lungo.
•
Remove the BUS; press and hold down the programming pushbutton, reconnect the power supply. Press and hold down the
programming pushbutton until the door lock and the connection LEDs start flashing in succession; a long beep is also heard.
•
Retirer le BUS ; rétablir l’alimentation en maintenant enfoncée la touche de programmation. Maintenir enfoncée la
touche de programmation jusqu’à ce que les LEDs serrure et connexion clignotent alternativement + bip long.
•
Den BUS abtrennen, die Programmierungstaste gedrückt halten und wieder Strom geben. Die Programmierungstaste gedrückt
halten, bis die LEDs des Schlosses und der Verbindung abwechselnd aufleuchten und ein langes Bestätigungssignal ertönt.
•
Desconecte el BUS, mantenga apretado el pulsador de programación y vuelva a conectar la alimentación. Mantenga
apretado el pulsador de programaciónhasta el encendido alternado de los LEDS cerradura y conexión + bip largo.
•
Verwijder de BUS, houd de programmeringsknop ingedrukt en heractiveer de voeding.
Houd de programmeringsknop ingedrukt tot de led slot en de LED verbinding gaan knipperen en u een lange pieptoon hoort.
•
Remova o BUS; mantendo carregado o botão de programação, volte a ligar a alimentação. Mantenha carregado o botão de
programação até o acendimento alternado dos LED da fechadura e da conexão + beep longo.

Video Kit
41
P
+1
MOD=9
P
+1
P
+2
MOD=9
P
+2
P
P
+1
MOD=5
P
+1
P
+1
2
3
1 32
346210
1
P
+2
MOD=5
P
+2
P
+2
2
3
1 32
346210
1
P
+3
MOD=5
P
+3
P
+3
2
3
1 32
346210
1
P
+4
MOD=5
P
+4
P
+4
2
3
1 32
346210
1
1–+ 23 4
P
+3
MOD=9
P
+3
1–+ 23 4
2
3
1 32
346210
1
P
+1
MOD=9
P
+1
P
+2
MOD=9
P
+2
P
P
+1
MOD=5
P
+1
P
+1
2
3
1 32
346210
1
P
+2
MOD=5
P
+2
P
+2
2
3
1 32
346210
1
P
+3
MOD=5
P
+3
P
+3
2
3
1 32
346210
1
P
+4
MOD=5
P
+4
P
+4
2
3
1 32
346210
1
1–+ 23 4
1–+ 23 4
P
+3
MOD=9
P
+3
1–+ 23 4
P
+1
MOD=9
P
+1
P
+2
MOD=9
P
+2
P
P
+1
MOD=5
P
+1
P
+1
2
3
1 32
346210
1
P
+2
MOD=5
P
+2
P
+2
2
3
1 32
346210
1
P
+3
MOD=5
P
+3
P
+3
2
3
1 32
346210
1
P
+4
MOD=5
P
+4
P
+4
2
3
1 32
346210
1
1–+ 23 4
1–+ 23 4
P
+3
MOD=9
P
+3
1–+ 23 4
P
+1
MOD=9
P
+1
P
+2
MOD=9
P
+2
P
P
+1
MOD=5
P
+1
P
+1
2
3
1 32
346210
1
P
+2
MOD=5
P
+2
P
+2
2
3
1 32
346210
1
P
+3
MOD=5
P
+3
P
+3
2
3
1 32
346210
1
P
+4
MOD=5
P
+4
P
+4
2
3
1 32
346210
1
1–+ 23 4
1–+ 23 4
P
+3
MOD=9
P
+3
1–+ 23 4
Attivazione del PE (configurato
con P+1) in modo diretto senza la
chiamata oppure attivazione attuatore
346200/346210 (configurato con P+1
e MOD= 9).
Apertura serratura del PE (configurato
con P+1) in modo diretto senza la
chiamata oppure attivazione attuatore
346200/346210 (configurato con P+1 e
MOD= 5) oppure attivazione attuatore
346230 (configurato con P+1).
Apertura serratura del PE (configurato
con P+2) in modo diretto senza la
chiamata oppure attivazione attuatore
346200/346210 (configurato con P+2 e
MOD=5) oppure attivazione attuatore
346230 (configurato con P+2).
Apertura serratura del PE (configurato
con P+3) in modo diretto senza la
chiamata oppure attivazione attuatore
346200/346210 (configurato con P+3 e
MOD=5) oppure attivazione attuatore
346230 (configurato con P+3).
Activating the EP (configured with P+1)
directly without the call or activating
actuator 346200/346210 (configured
with P+1 and MOD= 9).
Door lock opening of EP (configured
with P+1) directly without the call or
activating the actuator 346200/346210
(configured with P+1 and MOD= 5)
or activating the actuator 346230
(configured with P+1).
Door lock opening of EP (configured
with P+2) directly without the call
or activating the actuator 346200
(configured with P+2 and MOD= 5)
or activating the actuator 346230
(configured with P+2).
Door lock opening of EP (configured
with P+3) directly without the call or
activating the actuator 346200/346210
(configured with P+3 and MOD= 5)
or activating the actuator 346230
(configured with P+3).
Activation du PE (configuré avec P+1)
en mode direct sans l’appel ou activation
actionneur 346200/346210 (configuré
avec P+1 et MOD= 9).
Ouverture serrure du PE (configuré avec
P+1) en mode direct sans l’appel ou
activation actionneur 346200/346210
(configuré avec P+1 et MOD= 5) ou
activation actionneur 346230 (configuré
avec P+1).
Ouverture serrure du PE (configuré avec
P+2) en mode direct sans l’appel ou
activation actionneur 346200 (configuré
avec P+2 et MOD= 5) ou activation
actionneur 346230 (configuré avec P+2).
Ouverture serrure du PE (configuré avec
P+3) en mode direct sans l’appel ou
activation actionneur 346200/346210
(configuré avec P+3 et MOD= 5) ou
activation actionneur 346230 (configuré
avec P+3).
Aktivierung der Türstation (mit P+1
konfiguriert) auf direkte Weise ohne
Ruf oder Aktivierung über den Aktvator
346200/346210 (mit P+1 und MOD= 9).
Türöffnung der Türstation (mit P+1
konfiguriert) oder Aktivierung über
den Aktivator 346200/346210 (mit
P+1 und MOD= 5) oder Aktivierung
über den Aktivator 346230 (mit P+1
konfiguriert).
Türöffnung der Türstation (mit P+2
konfiguriert) oder Aktivierung über
den Aktivator 346200/346210 (mit
P+2 und MOD= 5) oder Aktivierung
über den Aktivator 346230 (mit P+2
konfiguriert).
Türöffnung der Türstation (mit P+3
konfiguriert) oder Aktivierung über
den Aktivator 346200/346210 (mit
P+3 und MOD= 5) oder Aktivierung
über den Aktivator 346230 (mit P+3
konfiguriert).
Activación del PE (configurado con
P+1) en modo directo sin llamada o
activación del actuador 346200/346210
(configurado con P+1 y MOD= 9).
Apertura cerradura del PE (configurado
con P +1) en modo directo sin llamada o
activación del actuador 346200/346210
(configurado con P+1 y MOD= 5)
o activación del actuador 346230
(configurado con P+1).
Apertura cerradura del PE (configurado
con P+2) en modo directo sin llamada o
activación del actuador 346200/346210
(configurado con P+2 y MOD= 5)
o activación del actuador 346230
(configurado con P+2).
Apertura cerradura del PE (configurado
con P+3) en modo directo sin llamada o
activación del actuador 346200/346210
(configurado con P+3 y MOD= 5)
o activación del actuador 346230
(configurado con P+3).
Rechtstreekse activering van het
deurstation (als P+1 geconfigureerd)
zonder oproep of activering van het
toestel 346200/346210 (geconfigureerd
als P+1 en MOD = 9).
Rechtstreekse opening van het deurslot
van het als P+1 geconfigureerde
deurstation, zonder oproep of activering
van het toestel 346200/346210
(geconfigureerd als P+1 en MOD= 5)
of activering van het toestel 346230
(geconfigureerd als P+1).
Rechtstreekse opening van het deurslot
van het als P+2 geconfigureerde
deurstation, zonder oproep of activering
van het toestel 346200/346210
(geconfigureerd als P+2 en MOD= 5)
of activering van het toestel 346230
(geconfigureerd als P+2).
Rechtstreekse opening van het deurslot
van het als P+3 geconfigureerde
deurstation, zonder oproep of activering
van het toestel 346200/346210
(geconfigureerd als P+3 en MOD= 5)
of activering van het toestel 346230
(geconfigureerd als P+3).
Ligação da UE (con figurada com
P+1) de maneira directa sem a cha-
ma da ou então ligação do ac tua dor
346200/346210 (configurado com P+1
e MOD=9).
Abertura da fechadura da UE (configurada
com P+1) de ma nei ra directa sem a
chamada ou então ligação do actuador
346200/346210 (configurado com P+1
e MOD=5) ou então ligação do actuador
346230 (con fi gu ra do com P+1).
Abertura da fechadura da UE (configurada
com P+2) de ma nei ra directa sem a
chamada ou então ligação do actuador
346200/346210 (configurado com P+2
e MOD=5) ou então ligação do actuador
346230 (con fi gu ra do com P+2).
Abertura da fechadura da UE (configurada
com P+3) de ma nei ra directa sem a
chamada ou então ligação do actuador
346200/346210 (configurado com P+3
e MOD=5) ou então ligação do actuador
346230 (con fi gu ra do com P+3).
P+1
346200
P+1346210
.)
P+1
346200
P+1346210
346230
5
.)P+1
P+2
346200
P+2346210
346230
5
.)P+2
P+3
346200
P+3346210
346230
5
.)P+3

42
P
+1
MOD=9
P
+1
P
+2
MOD=9
P
+2
P
P
+1
MOD=5
P
+1
P
+1
2
3
1 32
346210
1
P
+2
MOD=5
P
+2
P
+2
2
3
1 32
346210
1
P
+3
MOD=5
P
+3
P
+3
2
3
1 32
346210
1
P
+4
MOD=5
P
+4
P
+4
2
3
1 32
346210
1
1–+ 23 4
1–+ 23 4
P
+3
MOD=9
P
+3
1–+ 23 4
Apertura serratura del PE (configurato
con P+4) in modo diretto senza la
chiamata oppure attivazione attuatore
346200/346210 (configurato con P+4 e
MOD= 5) oppure attivazione attuatore
346230 (configurato con P+4)
Intercom tra appartamenti
in impianti con interfaccia
da appartamento 346850
Intercom all’interno dell’appartamento
in impianti con interfaccia di
appartamento 346850; oppure intercom
tra appartamenti in impianti senza
interfaccia di appartamento
Intercom su se stesso,
invia la chiamata a tutti
gli apparecchi con uguale
indirizzo
Intercom generale, invia
una chiamata a tutti gli
apparecchi dell’impianto
Door lock opening of EP (configured
with P+4) directly without the call or
activating the actuator 346200/346210
(configured with P+4 and MOD= 5)
or activating the actuator 346230
(configured with P+4)
Intercommunicability
between apartments in
systems with
apartment interface
346850
Intercommunicability inside
an apartment in systems with
apartment interface 346850 or
intercommunicability between
apartments in systems without
apartment interface
Intercom on itself, sends
the call to all the devices
with the same address
General intercom, sends
a call to all the system
devices
Ouverture serrure du PE (configuré avec
P+4) en mode direct sans l’appel ou
activation actionneur 346200/346210
(configuré avec P+4 et MOD= 5) ou
activation actionneur 346230 (configuré
avec P+4)
Intercommunication
entre appartements sur
installations avec interface
d’appartement 346850
Intercommunication à l’intérieur de
l’appartement sur installations avec
interface d’appartement 346850 ou
intercommunication entre appartements
sur installations sans interface
d’appartement
Intercom sur lui-même,
envoie l’appel à tous
les appareils ayant une
adresse identique
Intercom général, envoie
l’appel à tous les appareils
de l’installation
Türöffnung der Türstation (mit P+4
konfiguriert) oder Aktivierung über den
Aktivator 346200/346210 (mit P+4 und
MOD= 5) oder Aktivierung über den
Aktivator 346230 (mit P+4 konfiguriert)
Gegenseitige
Kommunikation zwischen
Wohnungen für Anlagen
mit Wohnungsschnittstelle
346850
Gegenseitige Kommunikation
innerhalb der Wohnung für Anlagen
mit Wohnungsschnittstelle 346850
oder gegenseitige Kommunikation
zwischen Wohnungen für Anlagen ohne
Wohnungsschnittstelle
Intercom mit einseitiger
Funktion: sendet den
Ruf an alle Geräte mit
derselben Adresse
Intercom mit allgemeiner
Funktion: sendet den Ruf
an alle Geräte der Anlage
Apertura cerradura del PE (configurado
con P+4) en modo directo sin llamada o
activación del actuador 346200/346210
(configurado con P+4 y MOD= 5)
o activación del actuador 346230
(configurado con P+4)
Intercomunicación
entre apartamentos en
instalaciones con interfaz
de departamento 346850
Intercomunicación en el
apartamento en instalaciones con
interfaz de apartamento 346850 o
intercomunicación entre apartamentos
en instalaciones sin interfaz de
apartamento
Intercomunicación hacia
los aparatos iguales,
envía la llamada a todos
los aparatos con igual
dirección
Intercomunicación
general, envía una
llamada a todos los
aparatos de la instalación
Rechtstreekse opening van het deurslot van
het als P+4 geconfigureerde deurstation,
zonder oproep of activering van het toestel
346200/346210 (geconfigureerd als P+4
en MOD= 5) of activering van het toestel
346230 (geconfigureerd als P+4).
Intercom tussen
appartementen in
installaties met interface
van appartement 346850
Intercom binnen in het appartement
in installaties met interface van
appartement 346850 ofwel intercom
tussen appartementen in installaties
zonder interface van appartement
Intercom op zichzelf,
verstuurt de oproep
naar alle toestellen met
hetzelfde adres
Algemene Intercom,
verstuurt een oproep naar
alle toestellen van de
installatie
Abertura da fechadura da UE (configurada
com P+4) de maneira directa sem a
chamada ou então ligação do actuador
346200/346210 (configurado com P+4
e MOD= 5) ou então ligação do actuador
346230 (configurado com P+4)
Intercom entre
apartamentos em
instalações com interface
de apartamento 346850
Intercom dentro do apartamento
em instalações com interface de
apartamento 346850 ou então intercom
entre apartamentos em instalações sem
interface de apartamento
Intercomunicador sobre si
mesmo, envia a chamada
a todos os aparelhos com
endereço igual
Intercomunicador geral,
envia uma chamada a
todos os aparelhos da
instalação
P+4
346200
P+4346210
346230
5
.)P+4
.346850
346850

Video Kit
49
• Comando luci scale
• Staircase light control
• Commande lumières escaliers
• Treppenlichtsteuerung
• Mando luces escaleras
• Bediening lichten trapzaal
• Comando das luzes da escada
BUS
PL S+
S-
ON = 3’
PS
BUS TK
BUS PI
346830
BUS 2 1
230 Vac
IP30
PRI
PRI 230 V~ 50 - 60 Hz 260 mA
346000
}
BUS
2 - 1
27V 1,2A
CEBEC
N
N
F
ON
OFF
BUS
2
3
1 32
346210
1
C
NO
NC
230V
2A
cos =0,5
6A
M
MOD
= –
M
= –
= –
N/P
= –
= –
T = 2
346210
P
= –
= –
N
= –
= –
T = –
S = –
P
= –
= –
J2
J1
N
= –
= –
M
= –
= –

50
• Suoneria supplementare
• Additional bell
• Sonnerie supplémentaire
• Zusätzliche Läutwerk
• Timbre adicional
• Supplementaire beltoon
• Toque suplementar
BUS
PL S+
S-
PS
BUS TK
BUS PI
346830
BUS 2 1
230 Vac
IP30
PRI
PRI 230 V~ 50 - 60 Hz 260 mA
346000
}
BUS
2 - 1
27V 1,2A
CEBEC
N
N
F
1 5M
P
= –
= –
N
= –
= –
T = –
S = –
P
= –
= –
J2
J1
N
= –
= –
M
= –
= –
336910
336992
336993
336994
/