Seite wird geladen ...

4
D
B C
A
>0,2 mm
2
BTicino
L4669
0,35 mm
2
0,28 mm
2
BTicino
C9881U/5E
AWG24 UTP5
BTicino
336904
One PTT
278 TP
0,28 mm
2
OneSYT
+ Digital
TP
5/10
OneSYT
+ Num
TP
5/10
GIGA TW
CAT5E
AWG24
One SYT
+ Num TP
8/10
Cable
ARB.6060-1
6/10
Cable
EV6R
6/10
1
mm
2
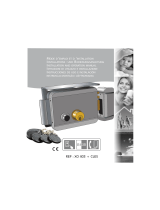
A 50 m 140 m 145 m 200 m 200 m 145 m 200 m 50 m –
B 50 m 115 m 80 m 200 m 115 m 80 m 200 m 50 m –
C 50 m 100 m 65 m 200 m 100 m 65 m 200 m 50 m –
D 30 m 30 m – 50 m 30 m – – – 100 m
• Cavi e distanze (mm
2
)
• Cables and distances (mm
2
)
• Câbles et distances (mm
2
)
• Kabeln und Abstände (mm
2
)
• Cables y distancias (mm
2
)
• Kabels en afstanden (mm
2
)
• Cabos e distâncias (mm
2
)
• Przekrój przewodu (mm
2
) a odległość

Video Kit
7
• Schema bifamiliare 2
• Two-family diagram 2
• Schéma bi-familiale 2
•
Schema Zweifamilienhaus 2
• Esquema bifamiliar 2
• Schema tweegezins 2
• Esquema bifamiliar 2
• Schemat dla domu dwurodzinnego - 2
BUS
PL S+
S-
ON
OFF
ON
OFF
P
= –
= –
= –
= –
M
J2
J1
N
= –
= *1
P
= –
= –
= –
= –
M
J2
J1
N
= –
= –
N
= –
= –
T = –
S = –
P
= –
–
=
2
1
A
B
BUS5M 21 1
B
BUS5M
2
1
1
*
* • Il secondo posto interno ed il configuratore 3501/1 devono essere acquistati separatemente.
• The second internal unit and the 3501/1 configurator must be purchased separately.
• Le deuxième poste interne et le configurateur 3501/1 doivent être achetés séparément.
• Die zweite Hausstation und der Konfigurator 3501/1 werden getrennt verkauft.
• La segunda unidad interior y el configurador 3501/1 se han de comprar por separado.
• De tweede binnenpost en de configurator 3501/1 moeten apart worden gekocht.
• A segunda unidade interna e o configurador 3501/1 devem ser adquiridos separadamente.
• Dodatkowy aparat wewnętrzny oraz konfigurator 3501/1 zamawiane oddzielnie.
1 - Monofamiliare - One family - Mono-familial
- Einfamilienhaus Monofamiliar - Eengezins
- Monofamiliar - Jednorodzinny
2 - Bifamiliare - Two family - Bi-familial
- Zweifamilienhaus Bifamiliar - Tweegezins
- Bifamiliar - Dwurodzinny
• Nota: è possibile installare un solo Classe300X per ogni rete Wi-Fi (SSID)
• Nota: It is possible to install just one Classe300X for each Wi-Fi (SSID) network
• Note : il est possible d’installer un seul dispositif Classe 300X pour chaque réseau
Wi-Fi (SSID)
• Anmerkung: es kann nur ein Gerät Classe 300X für jedes Wi-Fi-Netz (SSID) installiert
werden
• Nota: se pueden instalar un solo Classe300X por cada red Wi-Fi (SSID)
• Opmerking: per WiFi-netwerk (SSID) kan slechts één Classe300X worden
geïnstalleerd
• Nota: é possível instalar apenas um Classe300X para cada rede Wi-Fi (SSID)
• Uwaga: dla jednej sieci Wi-Fi (SSID) można zainstalować wyłącznie 1 aparat
Classe300X

Video Kit
9
194 mm
162 mm
25 mm
100 mm
190 mm
26 mm
• Altezza consigliata salvo diversa normativa vigente.
• Recommended height, unless different regulations are specified.
• Hauteur conseillée sauf autre norme en vigueur.
• Empfohlene Höhe falls die gesetzlichen Vorschriften nichts anderes vorschreiben.
• Altura recomendada salvo normativa vigente diferente.
• Aanbevolen hoogte behoudens andere normen in voege.
• Altura aconselhada a não ser se a norma em vigor for diferente.
• Zalecana wysokość montażu o ile inne wymagania lub normy nie stanowią inaczej
160 – 165 cm
90–130 cm
• Dati dimensionali
• Dimensional data
• Données dimensionnelles
• Maße
• Datos dimensionales
• Formaatgegevens
• Dados dimensionais
• Dane wymiarowe
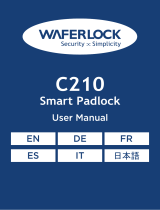
• Campo di ripresa
• Field of view
• Éclairage cadrage caméra
• Aufnahmebereich
• Campo de filmación
• Campo de filmagem
• Opnameveld
• Pole widzenia kamery
50 cm
105°
140 cm
80°
115 cm
50cm

Video Kit
11
1 - Camera
2 - Led verlichting camerabereik
3 - Aansluitklemmen
4 - Oproepknoppen
5 - Positie antenne badgelezer
6 - LED verbinding geactiveerd
7 - LED aanduiding deur geopend
8 - Microfoon
9 - Regeling microfoon
10 - Regeling luidspreker
11 - Schakelaar een-/tweegezins
12 - Knop badgeprogrammering/reset
13 - LED paneel voor verlichting oproepknop
14 - Plaats van de configuratoren
15 - Lichtsensor voor achtergrondverlichting ‘s nachts
16 - Luidspreker
1 - Câmara de vídeo
2 - LED de iluminação do campo de filmagem
3 - Bornes de conexão
4 - Botões de chamada
5 - Posição da antena do leitor de crachá
6 - LED de conexão ativa
7 - LED indicação de porta aberta
8 - Microfone
9 - Regulação do microfone
10 - Regulação do altifalante
11 - Interruptor mono/bifamiliar
12 - Botão de programação do Crachá/Rearme
13 - Painel LED para iluminação do botão de chamada
14 - Sede dos configuradores
15 -
Sensor de luminosidade para retroiluminação noturna
16 - Altifalante
1 - Kamera
2 - LED Beleuchtung des Aufnahmefelds
3 - Anschlussklemmen
4 - Ruftasten
5 - Position der Antenne Badge-Lesegerät
6 - LED Verbindung aktiv
7 - LED Anzeige Tür offen
8 - Mikrophon
9 - Einstellung des Mikrophons
10 - Einstellung des Lautsprechers
11 - Switch Ein-/Zweifamilienhaus
12 - Programmierungstaste Badge/Reset
13 - LED-Tafel zur Beleuchtung der Ruftaste
14 - Sitz der Konfiguratoren
15 - Helligkeitssensor zur nächtlichen Rückbeleuchtung
16 - Lautsprecher
1 - Telecámara
2 - LED iluminación campo de grabación
3 - Bornes de conexión
4 - Pulsadores de llamada
5 - Posición de la antena del lector credencial
6 - LED conexión activada
7 - LED indicación puerta abierta
8 - Micrófono
9 - Regulación del micrófono
10 - Regulación del altavoz
11 - Switch mono/bifamiliar
12 - Pulsador de programación credencial/Reset
13 - Panel LED para iluminación pulsador de llamada
14 - Alojamiento de los configuradores
15 -
Sensor de luminosidad para retroiluminación nocturna
16 - Altavoz
1 - Kamera
2 - LED oświetlenia pola widzenia kamery
3 - Zaciski przyłączeniowe
4 - Przyciski wywołania
5 - Pozycja anteny czytnika zbliżeniowego
6 - LED sygnalizacji połączenia
7 - LED sygnalizacji otwarcia zamka
8 - Mikrofon
9 - Regulacja mikrofonu
10 - Regulacja głośnika
11 - Mikroprzełącznik trybu jednorodzinny /
dwurodzinny
12 - Przycisk programowania / resetu breloków
13 - Podświetlenie LED dla przycisku wywołania
14 - Gniazda konfiguratorów
15 - Czujnik oświetlenia dla aktywacji podświetlenia
nocnego
16 - Głośnik

Video Kit
15
L’image représente le dispositif avec toutes les fonctions activées.Vérifier dans le Manuel Installateur le mode d’activation des fonctions.
Les manuels complets sont disponibles sur le site: www.bticino.com
Note: au moment où l’application DOOR ENTRY est connectée à l’installation (ex. réponse à un appel, visualisation d’un poste externe, etc.), aucune autre
opération ne peut être effectuée, seules la touche d’ouverture serrure et la touche des favoris (configurée pour la fonction Lumière escaliers ou Commande
directe serrure) continuent de fonctionner.
Anmerkung: wenn die App DOOR ENTRY mit der Anlage verbunden ist (z.B. einen Ruf beantworten, eine Türstation anzeigen usw.), können keine Funktionen
außer die Tasten Türöffner und Favoriten (für Treppenlicht oder direkte Schlosssteuerung konfiguriert) verwendet werden.
1 - Display 7” (Touchscreen)
2 - Ausschalttaste
3 - App: berühren, um die Informationsseite abzurufen,
in der ein QR Code enthalten ist, mit dem die App
DOOR ENTRY heruntergeladen werden kann, die
der Steuerung der Vorrichtung dient.
4 - Datum und Uhrzeit
5 - Wi-Fi-Anschluss
6 - Verbindung Vorrichtung/App und senden eines
Rufs aktivieren/deaktivieren
7 - Ausschluss des Läutwerks
8 - Freigabe Büro-Funktion
9 - Freigabe Anrufbeantworter
10 - Mikrofon
11 - Schnellfunktionen
12 - Taktile Hilfe für Sehbehinderte
13 - Anschlusstaste:
Das Blinken der grünen Led meldet einen eintref-
fenden Anruf
Das Aufleuchten der grünen Led meldet Gespräch
im Gang
14 - Selbstschaltung/Taktierung:
Durch Drücken der Taste, leuchtet die rote LED auf
15 - Taste Favoriten: durch Drücken der Taste, leuchtet
die rote LED auf (Basis-Konfiguration = TREPPEN-
LICHT. Um die Konfiguration zu ändern, siehe
Tabelle der physischen Konfiguration auf der nach-
folgenden Seite.)
16 - Taste Schlossöffner:
Durch Drücken der Taste, leuchtet die rote LED auf
17 - Wi-Fi-Status:
Rot blinkende Led = Wi-Fi aktiv aber nicht mit ei-
nem Netz verbunden
Led aus = Wi-Fi deaktiviert oder defekter Betrieb
Grüne LED fest leuchtend = das Gerät Classe 300X
tauscht Daten mit der App DOOR ENTRY aus (Ruf
senden, automatisches Einschalten, Konfiguration)
18 - Status Nachrichten vorhanden:
Rote Led blinkt = neue nicht gelesene Meldung/en
oder Meldung/en im Anrufbeantworter
19 - Ausschluss-Status des Läutwerks:
Rote Led leuchtet = Anrufklingel deaktiviert
20 - Funktionen (es werden nur die Symbole der konfi-
gurierten Funktionen angezeigt)
21 - Sitz der Konfiguratoren (Siehe „Funktion der Konfi-
guratoren“)
22 - Konfigurator J1: abziehen, wenn ein zusätzliche
Stromversorgung vorhanden ist (Klemme 1 & 2)
23 - Konfigurator J2: für einen einwandfreien Betrieb
nicht heraus nehmen
24 - Mikroschalter ON/OFF fur den Streckenabschluss
25 - Mini-USB-Steckbuchse zur Aktualisierung der Firm-
ware der Vorrichtung
26 - Lautsprecher
27 - Klemmen (1 -2) für eine zusätzliche Stromversor-
gung
28 - Klemmen zum Anschluss an BUS, SCS, 2-DRAHT
29 - Klemmen ( ) zum Anschluss an eine externe
Etagenruftaste
30 - Klemmen (1 - 5M) zum Anschluss an ein zusätzliches
Läutwerk Der Anschluss muss Punkt zu Punkt an den
Klemmen des zusätzlichen Läutwerks erfolgen
Wireless-Gerät, entspricht dem Standard 802.11/b/g/n, Frequenz 2,4 – 2.4835 GHz, Übertragungsleistung <20 dBm.
Sicherheitsprotokoll WEP/WPA/WPA2.
Das Bild stellt eine Vorrichtung mit allen aktivierten Funktionen dar. Sehen Sie im Installationshandbuch nach, wie die Funktionen aktiviert werden.
Die vollständigen Handbücher können von dieser Webseite herunter geladen werden: www.bticino.com

30
• Cancellazione di tutti i badge residenti in memoria
• Cancellation of all the residents badges saved in the
memory
• Effacement de tous les badges résidents mémorisés
• Alle gespeicherten Badges der Bewohner löschen
• Cancelación de todas las credenciales residentes
memorizadas
• Alle inwonerbadges uit het geheugen wissen
• Cancelamento de todos os crachás residentes na memória
• Kasowanie z pamięci wszystkich breloków mieszkańca
• Avvicinare al lettore il badge gestore impianto fino al
lampeggio del LED Serratura e tono di conferma.
• Move the system manager badge close to the reader until the
Door lock LED flashes, and a confirmation sound is heard.
• Approcher le Badge administrateur installation du lecteur
et attendre que le LED Serrure clignote et qu’une tonalité
de confirmation soit émise.
• Dem Lesegerät das Badge des Anlagenbetreibers nähern, bis die
LED des Schlosses blinkt und das Bestätigungssignal ertönt.
• Acerque al lector la credencial del administrador del sistema
hasta que parpadea el LED de la Cerradura y se produzca el
tono de confirmación.
• Houd de installatiebeheerder badge voor het leesapparaat tot de
LED slot gaat knipperen en u ter bevestiging een geluidssignaal hoort.
• Aproxime ao leitor o Crachá gestor da instalação até o lampejo
do LED da Fechadura e o tom de confirmação.
• Zbliżyć Brelok administratora do obszaru czytnika panelu i
zaczekać na zaświecenie się LED otwarcia zamka i pojawienie się
sygnału dźwiękowego.
1 beep
1 beep
1 beep
1 Piepton
1 bip
1 beep
1 beep
1 dźwięk
• Gestore impianto
• Manager master
• Master de gestion
• Master Verwaltung
• Credencial maestra de
administrador
• Master beheerder
• Master gestor
• Master Administratora
• Riavvicinare per 2 volte consecutive il badge gestore impianto.
Quando la cancellazione è avvenuta si accende il LED Serratura
e il dispositivo emette 2 beep.
• Move the system manager badge close twice in succession. When
the cancellation is completed, the Door lock LED comes, on and the
device emits 2 beeps.
• Approcher à nouveau 2 fois de suite le badge master de gestion
installation. Une fois l’effacement obtenu, le LED Serrure
s’allume et le dispositif émet 2 bips.
• Das Badge des Anlagetreibers 2 Mal nähern. Nach erfolgter
Löschung leuchtet die LED des Schlosses auf und die Vorrichtung
erzeugt 2 Pieptöne.
• Acerque 2 veces seguidas la credencial maestra de
administrador del sistema. Cuando se produce la cancelación,
se ilumina el LED Cerradura y el dispositivo emite 2 bips.
• Houd de installatiebeheerder badge 2 maal voor het leesapparaat.
De LED slot gaat branden en u hoort 2 pieptonen als de badges
zijn gewist.
• Voltar a aproximar, por 2 vezes consecutivas, o crachá gestor da
instalação. Uma vez que interveio o cancelamento, acendese o
LED da fechadura e o dispositivo emite 2 beep.
• Powtórnie zbliżyć Brelok administratora do obszaru czytnika
panelu 2 razy. Zaświecenie się LED otwarcia zamka i dwa krótkie
dźwięki potwierdzają zakończenie procedury powodzeniem.
• 2 volte Gestore impianto
• Twice Manager master
• 2 fois Master de gestion
• 2 Mal Master Verwaltung
• 2 veces Credencial maestra
de administrador
• 2 maal Master beheerder
• 2 vezes Master gestor
• 2 razy zbliżyć brelok Master
Administratora
2 beep
2 beep
2 beep
2 Piepton
2 bip
2 beep
2 beep
2 dźwięki

38
• Configurazione fisica
• Physical configuration
• Configuration physique
• Physische Konfiguration
• Configuración física
• Fysieke configuratie
• Configuração física
• Konfiguracja fizyczna
• Le funzioni che puoi attribuire al tasto Preferiti ( ) in modo fisico (tramite configuratore inserito nella sede
MM-(unità)) sono le seguenti:
• The functions that can be attributed to the Preferred key (
) using the physical procedure (configurator inserted in
the MM - (units) socket) are the following:
• Les fonctions qu’il est possible d’attribuer à la touche Favoris (
) en mode physique (à travers le configurateur
placé dans le logement MM-(unité) sont les suivantes :
• Die Funktionen, die der Taste Favoriten (
) physisch zugeordnet werden können (Konfigurator im Sitz MM-
(Einheit)) sind folgende:
• Las funciones a las que puede atribuir la tecla Favoritos (
) físicamente (mediante un configurador en el
alojamiento MM-(unidad)) son las siguientes:
• De volgende functies kunnen op fysieke wijze aan de toets Favorieten (
) worden toegekend (met de configuratie
in MM-(eenheden):
• As funções que você pode atribuir ao botão Preferidos (
) em modo físico (por meio de configurador inserido
no alojamento MM [unidade]) são as seguintes:
• Funkcje jakie mogą być przypisane do przycisku Ulubione (
) w konfiguracji fizycznej (konfigurator umieszczony w
prawym gnieździe (jednostek) pozycji M) są następujące:
MM =
0
• Comando Luce Scale
• Staircase Light Control
• Commande Lumières Escaliers
• Steuerung Treppenlicht
• Mando Luz Escaleras
• Bediening traphuisverlichting
• Comando da Luz das Escadas
• Sterowanie oświetleniem schodów
MM =
1
• Comando diretto Serratura del P+1
• Direct control of P+1 Door lock
• Commande directe Serrure du P+1
• Direkte Schlosssteuerung der P+1
• Mando directo Cerradura del P+1
• Directe bediening slot P+1
• Comando direto da Fechadura do P+1
• Sterowanie bezpośrednie zamkiem P+1
P
+1
MOD=9
P
+1
P
+2
MOD=9
P
+2
P
+1
MOD=5
P
+1
P
+1
2
3
1 32
346210
1
P
+2
MOD=5
P
+2
P
+2
2
3
1 32
346210
1
P
+3
MOD=5
P
+3
P
+3
2
3
1 32
346210
1
P
+3
MOD=9
P
+3
MM =
2
• Comando diretto Serratura del P+2
• Direct control of P+2 Door lock
• Commande directe Serrure du P+2
• Direkte Schlosssteuerung der P+2
• Mando directo Cerradura del P+2
• Directe bediening slot P+2
• Comando direto da Fechadura do P+2
• Sterowanie bezpośrednie zamkiem P+2
P
+1
MOD=9
P
+1
P
+2
MOD=9
P
+2
P
+1
MOD=5
P
+1
P
+1
2
3
1 32
346210
1
P
+2
MOD=5
P
+2
P
+2
2
3
1 32
346210
1
P
+3
MOD=5
P
+3
P
+3
2
3
1 32
346210
1
P
+3
MOD=9
P
+3
MM =
3
• Comando diretto Serratura del P+3
• Direct control of P+3 Door lock
• Commande directe Serrure du P+3
• Direkte Schlosssteuerung der P+3
• Mando directo Cerradura del P+3
• Directe bediening slot P+3
• Comando direto da Fechadura do P+3
• Sterowanie bezpośrednie zamkiem P+3
P
+1
MOD=9
P
+1
P
+2
MOD=9
P
+2
P
+1
MOD=5
P
+1
P
+1
2
3
1 32
346210
1
P
+2
MOD=5
P
+2
P
+2
2
3
1 32
346210
1
P
+3
MOD=5
P
+3
P
+3
2
3
1 32
346210
1
P
+3
MOD=9
P
+3
MM =
4
• Autoaccensione diretta del P+1
• P+1 direct auto-switching on
• Auto-allumage direct du P+1
• Direkte Selbstschaltung der P+1
• Autoencendido directo del P+1
• Directe automatische P+1
• Autoacendimento direto do P+1
• Autoaktywacja bezpośrednia P+1
P
+1
MOD=9
P
+1
P
2
3
132
346210
1
P
+2
MOD=9
P
+2
2
3
132
346210
1
P
+3
MOD=9
P
+3
2
3
132
346210
1
J1 J2 N
P M

40
IT - Legenda EN - Legend FR - Légende DE - Erläuterung
P
+1
MOD=9
P
+1
P
+2
MOD=9
P
+2
P
P
+1
MOD=5
P
+1
P
+1
2
3
1 32
346210
1
P
+2
MOD=5
P
+2
P
+2
2
3
1 32
346210
1
P
+3
MOD=5
P
+3
P
+3
2
3
1 32
346210
1
P
+4
MOD=5
P
+4
P
+4
2
3
1 32
346210
1
1–+ 23 4
P
+3
MOD=9
P
+3
1–+ 23 4
2
3
1 32
346210
1
Attivazione del PE (confi-
gurato con P+1) in mo do
di ret to sen za la chia mata
op pu re at tivazione at-
tua to re 346200/346210
(con fi gu rato con P+1 e
MOD=9)
Activating the EP
(configured with P+1)
directly without the call
or ac ti va ting actuator
346200/346210 (con-
fi gured with P+1 and
MOD=9)
Activation du PE (con fi-
guré avec P+1) en mode
direct sans l’appel ou
activation action-
neur 346200/346210
(configuré avec P+1 et
MOD=9)
Aktivierung der Türstati-
on (mit P+1 konfiguriert)
auf direkte Weise ohne
Ruf oder Aktivierung
über den Aktivator
346200/346210 (mit P+1
und MOD=9)
P
+1
MOD=9
P
+1
P
+2
MOD=9
P
+2
P
P
+1
MOD=5
P
+1
P
+1
2
3
1 32
346210
1
P
+2
MOD=5
P
+2
P
+2
2
3
1 32
346210
1
P
+3
MOD=5
P
+3
P
+3
2
3
1 32
346210
1
P
+4
MOD=5
P
+4
P
+4
2
3
1 32
346210
1
1–+ 23 4
1–+ 23 4
P
+3
MOD=9
P
+3
1–+ 23 4
Apertura serratura del
PE (con fi gurato con
P+1) in mo do di retto
senza la chia mata
op pu re at ti va zione at-
tuatore.346200/346210
(con figurato con P+1 e
MOD=5) op pu re at ti va-
zione attuatore 346230
(con figurato con P+1)
Door lock opening of
EP (con figured with
P+1) directly without
the call or activating the
actuator 346200/346210
(con figured with P+1
and MOD=5) or activat-
ing the actuator 346230
(configured with P+1)
Ouverture serrure du PE
(con fi gu ré avec P+1) en
mode di rect sans l’appel
ou ac ti vation ac tion neur
346200/346210 (con fi gu-
ré avec P+1 et MOD=5)
ou ac ti va tion ac tion neur
346230 (con fi gu ré avec
P+1)
Türöffnung der Türstati-
on (mit P+1 konfigu-
riert) oder Aktivierung
über den Aktivator
346200/346210 (mit
P+1 und MOD=5) oder
Aktivierung über den
Aktivato 346230 (mit
P+1 konfiguriert)
P
+1
MOD=9
P
+1
P
+2
MOD=9
P
+2
P
P
+1
MOD=5
P
+1
P
+1
2
3
1 32
346210
1
P
+2
MOD=5
P
+2
P
+2
2
3
1 32
346210
1
P
+3
MOD=5
P
+3
P
+3
2
3
1 32
346210
1
P
+4
MOD=5
P
+4
P
+4
2
3
1 32
346210
1
1–+ 23 4
1–+ 23 4
P
+3
MOD=9
P
+3
1–+ 23 4
Apertura serratura del
PE (con fi gurato con P+2)
in mo do di retto senza
la chia mata op pu re
at ti va zione attuatore
346200/346210 (con-
figurato con P+2 e
MOD=5) op pu re at ti va-
zione attuatore 346230
(con figurato con P+2)
Door lock opening of EP
(con figured with P+2)
directly without the call
or activating the actua-
tor 346200 (con figured
with P+2 and MOD=5) or
activating the actuator
346230 (configured with
P+2)
Ouverture serrure du PE
(con fi gu ré avec P+2) en
mode di rect sans l’appel
ou ac ti vation ac tion neur
346200 (con fi gu ré avec
P+2 et MOD=5) ou
ac ti va tion ac tion neur
346230 (con fi gu ré avec
P+2)
Türöffnung der Türstati-
on (mit P+2 konfigu-
riert) oder Aktivierung
über den Aktivator
346200/346210 (mit
P+2 und MOD=5) oder
Aktivierung über den
Aktivator 346230 (mit
P+2 konfiguriert)
P
+1
MOD=9
P
+1
P
+2
MOD=9
P
+2
P
P
+1
MOD=5
P
+1
P
+1
2
3
1 32
346210
1
P
+2
MOD=5
P
+2
P
+2
2
3
1 32
346210
1
P
+3
MOD=5
P
+3
P
+3
2
3
1 32
346210
1
P
+4
MOD=5
P
+4
P
+4
2
3
1 32
346210
1
1–+ 23 4
1–+ 23 4
P
+3
MOD=9
P
+3
1–+ 23 4
Apertura serratura del
PE (con fi gurato con
P+3) in mo do di retto
senza la chia mata
op pu re at ti va zione
attuatore346200/346210
(con figurato con P+3 e
MOD=5) op pu re at ti va-
zione attuatore 346230
(con figurato con P+3)
Door lock opening of
EP (con figured with
P+3) directly without
the call or activating the
actuator 346200/346210
(con figured with P+3
and MOD=5) or activat-
ing the actuator 346230
(configured with P+3)
Ouverture serrure du PE
(con fi gu ré avec P+3) en
mode di rect sans l’appel
ou ac ti vation ac tion neur
346200/346210 (con fi gu-
ré avec P+3 et MOD=5)
ou ac ti va tion ac tion neur
346230 (con fi gu ré avec
P+3)
Türöffnung der Türstati-
on (mit P+3 konfigu-
riert) oder Aktivierung
über den Aktivator
346200/346210 (mit
P+3 und MOD=5) oder
Aktivierung über den
Aktivator 346230 (mit
P+3 konfiguriert)
P
+1
MOD=9
P
+1
P
+2
MOD=9
P
+2
P
P
+1
MOD=5
P
+1
P
+1
2
3
1 32
346210
1
P
+2
MOD=5
P
+2
P
+2
2
3
1 32
346210
1
P
+3
MOD=5
P
+3
P
+3
2
3
1 32
346210
1
P
+4
MOD=5
P
+4
P
+4
2
3
1 32
346210
1
1–+ 23 4
1–+ 23 4
P
+3
MOD=9
P
+3
1–+ 23 4
Apertura serratura del
PE (con fi gurato con P+4)
in mo do di retto senza
la chia mata op pu re
at ti va zione attuatore
346200/346210 (con-
figurato con P+4 e
MOD=5) op pu re at ti va-
zione attuatore 346230
(con figurato con P+4)
Door lock opening of
EP (con figured with
P+4) directly without
the call or activating the
actuator 346200/346210
(con figured with P+4
and MOD=5) or activat-
ing the actuator 346230
(configured with P+4)
Ouverture serrure du PE
(con fi gu ré avec P+4) en
mode di rect sans l’appel
ou ac ti vation ac tion neur
346200/346210 (con fi gu-
ré avec P+4 et MOD=5)
ou ac ti va tion ac tion neur
346230 (con fi gu ré avec
P+4)
Türöffnung der Türstati-
on (mit P+4 konfigu-
riert) oder Aktivierung
über den Aktivator
346200/346210 (mit
P+4 und MOD=5) oder
Aktivierung über den
Aktivator 346230 (mit
P+4 konfiguriert)

42
IT
Intercom tra appartamenti
in impianti con interfaccia
da appartamento 346850
Intercom all’interno
dell’appartamento in
impianti con interfaccia
di appartamento 346850;
oppure intercom tra appar-
tamenti in impianti senza
interfaccia di apparta-
mento
Intercom su se stesso,
invia la chiamata a tutti
gli apparecchi con uguale
indirizzo
Cercapersone, effettua una
intercom generale, invia
una chiamata a tutti gli
apparecchi dell’impianto.
EN
Intercommunicability
between apartments in
systems with
apartment interface
346850
Intercommunicability
inside an apartment in
systems with apartment
interface 346850 or inter-
communicability between
apartments in systems
without apartment
interface
Intercom on itself, sends
the call to all the devices
with the same address
Paging, it makes general
intercom and sends a call
to all the handsets of the
system
FR
Intercommunication
entre appartements sur
installations avec interface
d’appartement 346850
Intercommunication à
l’intérieur de l’apparte-
ment sur installations avec
interface d’appartement
346850 ou intercommuni-
cation entre appartements
sur installations sans
interface d’appartement
Intercom sur lui-même,
envoie l’appel à tous les
appareils ayant une adresse
identique
Cherche-personne,
effectue une intercom
générale, envoie un appel
à tous les appareils de
l’installation
DE
Gegenseitige Kom-
munikation zwischen
Wohnungen für Anlagen
mit Wohnungsschnittstelle
346850
Gegenseitige Kommunikation
innerhalb der Wohnung für
Anlagen mit Wohnungs
-
schnittstelle 346850 oder
gegenseitige Kommunikation
zwischen Wohnungen für
Anlagen ohne Wohnungs
-
schnittstelle
Intercom mit einseitiger
Funktion: sendet den Ruf an
alle Geräte mit derselben
Adresse
Personenrufgerät, Intercom
mit allgemeiner Funktion,
sendet den Ruf an alle Geräte
der Anlage

Video Kit
47
• Impostazione Data e Ora
• Date and Time setting
• Réglage Date et Heure
• Datum und Uhrzeit einstellen
• Ajuste de Fecha y Hora
• Instelling Datum en Tijd
• Configuração de Hora e Data
• Ustawienie Daty i Czasu
11 201310
md y
11
42
m
Time and date
Back
Next
1
2
3
1. Tocca l’icona relativa al parametro da impostare.
Touch the icon for the parameter to set.
Toucher l’icône relative au paramètre à régler.
Das Symbol des einzustellenden Parameters berühren.
Toque el icono relativo al parámetro configurado.
De icoon behorende bij de in te stellen parameter aanraken.
Tocar no campo relativo ao parâmetro a configurar
Dotknąć ikony odpowiadającej wybranemu parametrowi
2. Imposta il valore attuale tramite le icone + e –.
Set the current value using the icons + and -.
Régler la valeur actuelle à l’aide des icônes + et –.
Den aktuellen Wert über die Symbole + und - einstellen.
Configure el valor actual mediante los iconos + y –.
Stel deaactuele waarde in met de iconen + en –.
Configura o valor atual por meio dos ícones + e -.
Ustawić pożądaną wartość za pomocą ikon + i –
3. Tocca per proseguire.
Touch to continue.
Toucher pour continuer.
Berühren, um fortzufahren.
Toque para continuar.
Aanraken om verder te gaan.
Tocar aqui para continuar.
Dotknąć, aby kontynuować
Info
User Manual
Android App iOS App
00
P
20
MN
00
1.0.0
Firmware ver.
Power supply
Disabled
Professional studio
Enabled
Operation
Master
Answering machine
Enabled
Banner Home Page
Back

Video Kit
49
Dans le cas où un de ces 3 facteurs ne serait pas conforme aux spécifications requises pour le fonctionne-
ment du produit, BTicino est déchargé de toute responsabilité en cas de mauvais fonctionnement. Le pro-
duit supporte en effet un système streaming VoIP, aussi il est nécessaire de s’assurer que le contrat de trans-
mission de données avec le smartphone n’en prévoit pas le blocage. En outre, il est précisé que le service
que BTicino fournit à travers l’utilisation à distance via l’APPLI prévoit l’utilisation de données, aussi le coût
lié à la consommation dépend du type de contrat que le client a passé avec le fournisseur d’accès à Internet
(IPS ou Internet Service Provider) et reste à sa charge.
• Für die Verbindung zwischen Videogegensprechanlage Classe 300X13E und Smartphone ist im Haushalt ein Wi-
Fi-Netz mit Zugriff auf Internet erforderlich.
Um die Dienstleistung verwenden zu können, muss der Kunde über technische Geräte verfügen, die den Zugriff
auf Internet aufgrund eines von ihm mit einem ISP (Internet Service Provider) abgeschlossenen Vertrags gestat-
ten, aus dem BTicino ausgeschlossen ist. Um einige Dienstleistungen zu verwenden, die von BTicino zusätzlich zu
den normalen Grundfunktionen des Geräts Classe 300X13E zur Verfügung gestellt werden, muss der Kunde die
APP auf das eigene Smartphone installieren. Durch die APP angebotenen Dienstleistungen ist es möglich mit dem
Gerät Classe300X13E von fern über das Internet-Netz zu interagieren. Die Integration und die Funktionstüchtig-
keit des Geräts Classe 300x13E und der APP sind von folgenden Faktoren abhängig:
a) Qualität des Wi-Fi-Signals
b) Typologie des Vertrags für den Zugriff auf das Internet-Netz von der eigenen Wohnung aus
c) Typologie des Vertrags für die Daten auf dem Smartphone
Wenn eines dieser 3 Faktoren nicht den für den Betrieb des Produkts erforderlichen Spezifikationen entspricht,
haftet BTicino nicht für eventuelle Probleme. Das Produkt unterstützt ein Streaming-System VoIP, weshalb sicher-
gestellt werden muss, dass der eigene Vertrag das Datennetz des Smartphones während der Verbindung nicht
blockiert. Zudem benötigt die Dienstleistung von BTicino über den Gebrauch von fern durch die APP, die Verwen-
dung von Daten, die mit Kosten verbunden ist, die von der Typologie des Vertrags abhängig sind, die der Kunde
mit einem ISP (Internet Service Provider) abgeschlossen hat und selbst trägt.
• Se requiere la presencia de una red Wi-Fi doméstica con acceso a Internet para la conexión entre el vi-
deoportero Classe 300X13E y el smartphone. Para usar el servicio, el Cliente ha de contar con equipos técni-
cos que permitan acceder a la red Internet, sobre la base de un acuerdo concluido por el mismo Cliente con
un ISP (Internet Service Provider) en el que Bticino no participa. Para asegurar algunos servicios, que Bticino
suministra como adicionales a las funciones normales de base del Classe 300X13E, el Cliente habrá de insta-
lar la APP en su smartphone. Los servicios ofrecidos mediante la APP contemplan que se pueda interactuar
con el Classe 300X13E a distancia y mediante la red Internet. En estos casos la integración y el funciona-
miento correcto entre el Classe 300X13E y APP pueden depender de:
a) calidad de la señal Wi-Fi
b) Tipología del contrato de acceso a la red Internet de la vivienda
c) tipología del contrato de datos en el smartphone.
Cuando uno de estos 3 elementos no cumpla las especificaciones requeridas para el funcionamiento del
producto, Bticino queda eximida de toda responsabilidad por funcionamientos incorrectos.
De hecho, el producto soporta un sistema streaming VOIP y, por consiguiente, se ha de comprobar que el
propio contrato para la red de datos en el smartphone no contemple el bloqueo. Asimismo, se informa que
el servicio ofrecido por BTicino mediante el uso a distancia con la APP comporta el uso de datos; por consi-
guiente, el gasto relacionado con el consumo de ellos depende de la tipología de contrato que el cliente ha
firmado con un ISP (Internet Service Provider) y corre a su cargo.
• Voor de verbinding tussen de beeldhuistelefoon Classe 300C13E en de smartphone is een WiFI-netwerk met toe-
gang tot het internet in de woning nodig. Om de service te kunnen gebruiken, moet de klant beschikken over de
technische apparatuur die toegang tot het internet mogelijk maken. Dit gebeurt aan de hand van een overeen-

Video Kit
51
• Impostazione Wi–Fi
• Wi-Fi Setting
• Réglage Wi–Fi
• Wi-Fi-Einstellung
• Ajuste del Wi-Fi
• WiFi-instelling
• Configuração Wi-Fi
• Ustawienia Wi-Fi
Quick Actions
10:36
Tuesday, 22 April
Download Door Entry App
Settings
Answering machine
Memo
Camera 1
Lock 2
Lock 1
Pager
1
Quick Actions
Conguration
Answering machine
Display
Ringtones
Settings
Generals
Time and date
Language
Info
Wi-Fi
Associated accounts
Tone buttons
Back
2

Video Kit
57
• Comando luci scale
• Staircase light control
• Commande lumières escaliers
• Treppenlichtsteuerung
• Mando luces escaleras
• Bediening lichten trapzaal
• Comando das luzes da escada
• Sterowanie oświetleniem na
klatce schodowej
A
BUS5M 21 1
BUS
PL S+
S-
ON = 3’
OFF
ON
2
3
1 32
346210
1
C
NO
NC
230V
2A
cos =0,5
6A
M
230 Vac
MOD
= –
M
= –
= –
N/P
= –
= –
T = –
346210
P
= –
= –
N
= –
= –
T = –
S = –
P
= –
= –
J2
J1
N
= –
= –
M
= –
= –

58
• Suoneria supplementare
• Additional bell
• Sonnerie supplémentaire
• Zusätzliche Läutwerk
• Timbre adicional
• Supplementaire beltoon
• Toque suplementar
• Dodatkowy dzwonek
230 Vac
BUS
PL S+
S-
1 5M
OFF
ON
A
BUS5M 21 1
P
= –
= –
N
= –
= –
T = –
S = –
P
= –
= –
J2
J1
N
= –
= –
M
= –
= –
336910
336992
336993
336994

Video Kit
59
Leggere attentamente prima dell’uso e conservare per un riferimento futuro
Divieto di toccare le unità con le mani bagnate
Divieto di utilizzo di pulitori liquidi o aerosol
Divieto di occludere le aperture di ventilazione
Diveto di modificare i dispositivi
Divieto di rimuovere parti di protezione dai dispositivi
Divieto di installare le unità in prossimità di liquidi e polveri
Divieto di installare le unità in prossimità di fonti di calore
Divieto di installare le unità in prossimità di gas nocivi, polveri metalliche o simili
Divieto di fissaggio delle unità su superfici non adatte
Pericolo di shock elettrico
Rischio caduta dei dispositivi a causa di cedimento della superficie su cui
sono installati o installazione inappropriata
Togliere l’alimentazione prima di ogni intervento sull’impianto
Attenzione: le operazioni di installazione, configurazione, messa in servizio e
manutenzione devono essere effettuate esclusivamente da personale qualifi-
cato. Assicurarsi che l’installazione a parete sia effettuata correttamente
Effettuare la posa dei cavi rispettando le normative vigenti
Collegare i cavi di alimentazione secondo le indicazioni
Per eventuali espansioni di impianto utilizzare solo gli articoli indicati
nelle specifiche tecniche
Read carefully before use and keep for future reference
Touching the units with wet hands is forbidden
Using liquid cleaners or aerosols is forbidden
Blocking the ventilation openings is forbidden
Modifying the devices is forbidden
Removing protective parts from the devices is forbidden
Installing the units near liquids and powders is forbidden
Installing the units near heat sources is forbidden
Installing the units near harmful gases, metal dusts or similar is forbidden
Fastening the units on unsuitable surfaces is forbidden
Danger of electrical shock
Risk of devices falling because the surface on which they are installed
collapses or inappropriate installation
Switch the power supply OFF before any work on the system
Caution: Installation, configuration, starting-up and maintenance must
be performed exclusively by qualified personnel.
Check that the wall installation has been carried out correctly
Lay out the wires respecting the standards in force
Connect the power supply wires as indicated
Use only the items indicated in the technical specifications for any
system expansions
Lire attentivement avant toute utilisation et installation de nos produits
et conserver pour toute consultation en cas de besoin.
Interdiction de toucher les unités avec les mains mouillées.
Interdiction d’utiliser des produits de nettoyage liquides ou des aérosols.
Interdiction de boucher les ouvertures de ventilation.
Interdiction de modifier les dispositifs.
Interdiction des retirer les parties de protection des dispositifs.
Interdiction d’installer les unités à proximité de liquides et poudres/
poussières.
Interdiction d’installer les unités à proximité de sources de chaleur.
Interdiction d’installer les unités à proximité de gaz nocifs, de poudres
métalliques ou autres matières semblables.
Interdiction de fixer les unités sur des surfaces non appropriées.
Risque d’électrocution
Risque de chute des dispositifs en cas de rupture de la surface sur
laquelle ils sont installés ou mauvaise installation.
Couper l’alimentation avant toute intervention sur l’installation.
Attention: les opérations d’installation, de configuration, de mise en
service et d’entretien doivent être confiées à un personnel qualifié.
S’assurer que l’installation murale est correctement effectuée.
Effectuer la pose des câbles dans le respect des normes en vigueur.
Brancher les câbles d’alimentation dans le respect des indications fournies.
Pour les éventuelles extensions de l’installation, utiliser uniquement les
articles indiqués dans les caractéristiques techniques.
Vor Gebrauch, die Hinweise aufmerksam durchlesen und sorgfältig auf-
bewahren, um sie auch in Zukunft nachschlagen zu können.
Verbot, die Einheiten mit nassen Händen zu berühren
Verbot, Flüssigreiniger oder Aerosol zu benutzen
Verbot, die Belüftungsschlitze abzudecken
Verbot, die Vorrichtungen zu ändern
Verbot, die Schutzbleche von den Vorrichtungen abzunehmen
Verbot, die Einheit in der Nähe von Flüssigkeiten und Staub zu in-
stallieren
Verbot, die Einheit in der Nähe von Wärmequellen zu installieren
Verbot, die Einheit in der Nähe von giftigem Gas, Metallstaub o. ä. zu in-
stallieren
Verbot, die Einheit an ungeeignete Flächen zu befestigen
Stromschlaggefahr
Risiko des Herabfallens der Vorrichtungen durch Nachlassen der Aufla-
gefläche oder wegen falscher Installation
Die Stromversorgung abtrennen, bevor an der Anlage gearbeitet wird.
Achtung: die Installation, Konfiguration, Inbetriebnahme und Wartung
dürfen nur von qualifizierten Fachleuten vorgenommen werden.
Sicherstellen, dass die Wandmontage richtig vorgenommen wird
Die Kabeln gemäß geltenden Normen verlegen
Die Stromkabeln gemäß Anweisungen anschließen
Bei eventuellen Anlagenerweiterungen ausschließlich die Artikel
verwenden, die in den technischen Spezifikationen angegeben sind
• Avvertenze e diritti del consumatore
• Warnings and consumer rights
• Avertissements et droits du consommateur
• Hinweise und Rechte der Verbraucher
• Advertencias y derechos del consumidor
• Waarschuwingen en rechten van de consument
• Advertências e direitos do consumidor
1/64