- Kategorie
- Telefone
- Typ
- Bedienungsanleitung
Seite wird geladen ...
Seite wird geladen ...
Seite wird geladen ...

4
D
B C
A
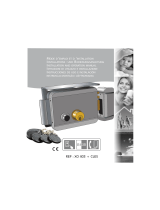
• Cavi e distanze (mm
2
)
• Cables and distances (mm
2
)
• Câbles et distances (mm
2
)
• Kabeln und Abstände (mm
2
)
• Cables y distancias (mm
2
)
• Kabels en afstanden (mm
2
)
• Cabos e distâncias (mm
2
)
>0,2 mm
2
BTicino
L4669
0,35 mm
2
0,28 mm
2
BTicino
C9881U/5E
AWG24 UTP5
BTicino
336904
One PTT
278 TP
0,28 mm
2
OneSYT
+ Digital
TP
5/10
OneSYT
+ Num
TP
5/10
GIGA TW
CAT5E
AWG24
One SYT
+ Num TP
8/10
Cable
ARB.6060-1
6/10
Cable
EV6R
6/10
1
mm
2
A 50 m 140 m 145 m 200 m 200 m 145 m 200 m 50 m –
B 50 m 115 m 80 m 200 m 115 m 80 m 200 m 50 m –
C 50 m 100 m 65 m 200 m 100 m 65 m 200 m 50 m –
D 30 m 30 m – 50 m 30 m – – – 100 m
Seite wird geladen ...
Seite wird geladen ...
Seite wird geladen ...
Seite wird geladen ...

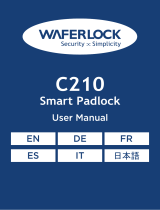
Video Kit
9
194 mm
162 mm
25 mm
100 mm
190 mm
26 mm
• Altezza consigliata salvo diversa normativa vigente.
• Recommended height, unless different regulations are specified.
• Hauteur conseillée sauf autre norme en vigueur.
• Empfohlene Höhe falls die gesetzlichen Vorschriften nichts anderes vorschreiben.
• Altura recomendada salvo normativa vigente diferente.
• Aanbevolen hoogte behoudens andere normen in voege.
• Altura aconselhada a não ser se a norma em vigor for diferente.
160 – 165 cm
90–130 cm
• Dati dimensionali
• Dimensional data
• Données dimensionnelles
• Maße
• Datos dimensionales
• Formaatgegevens
• Dados dimensionais
• Campo di ripresa
• Field of view
• Éclairage cadrage caméra
• Aufnahmebereich
• Campo de filmación
• Campo de filmagem
• Opnameveld
50 cm
105°
140 cm
80°
115 cm
50cm
Seite wird geladen ...

Video Kit
11
1 - Camera
2 - Led verlichting camerabereik
3 - Aansluitklemmen
4 - Oproepknoppen
5 - Positie antenne badgelezer
6 - LED verbinding geactiveerd
7 - LED aanduiding deur geopend
8 - Microfoon
9 - Regeling microfoon
10 - Regeling luidspreker
11 - Schakelaar een-/tweegezins
12 - Knop badgeprogrammering/reset
13 - LED paneel voor verlichting oproepknop
14 - Plaats van de configuratoren
15 - Lichtsensor voor achtergrondverlichting ‘s
nachts
16 - Luidspreker
1 - Kamera
2 - LED Beleuchtung des Aufnahmefelds
3 - Anschlussklemmen
4 - Ruftasten
5 - Position der Antenne Badge-Lesegerät
6 - LED Verbindung aktiv
7 - LED Anzeige Tür offen
8 - Mikrophon
9 - Einstellung des Mikrophons
10 - Einstellung des Lautsprechers
11 - Switch Ein-/Zweifamilienhaus
12 - Programmierungstaste Badge/Reset
13 - LED-Tafel zur Beleuchtung der Ruftaste
14 - Sitz der Konfiguratoren
15 - Helligkeitssensor zur nächtlichen
Rückbeleuchtung
16 - Lautsprecher
1 - Câmara de vídeo
2 - LED de iluminação do campo de filmagem
3 - Bornes de conexão
4 - Botões de chamada
5 - Posição da antena do leitor de crachá
6 - LED de conexão ativa
7 - LED indicação de porta aberta
8 - Microfone
9 - Regulação do microfone
10 - Regulação do altifalante
11 - Interruptor mono/bifamiliar
12 - Botão de programação do Crachá/Rearme
13 - Painel LED para iluminação do botão de
chamada
14 - Sede dos configuradores
15 - Sensor de luminosidade para retroiluminação
noturna
16 - Altifalante
1 - Telecámara
2 - LED iluminación campo de grabación
3 - Bornes de conexión
4 - Pulsadores de llamada
5 - Posición de la antena del lector credencial
6 - LED conexión activada
7 - LED indicación puerta abierta
8 - Micrófono
9 - Regulación del micrófono
10 - Regulación del altavoz
11 - Switch mono/bifamiliar
12 - Pulsador de programación credencial/Reset
13 - Panel LED para iluminación pulsador de
llamada
14 - Alojamiento de los configuradores
15 - Sensor de luminosidad para retroiluminación
nocturna
16 - Altavoz
Seite wird geladen ...
Seite wird geladen ...

14
Das Bild stellt eine Vorrichtung mit allen aktivierten Funktionen dar. Sehen Sie im Installationshandbuch
nach, wie die Funktionen aktiviert werden. Die vollständigen Handbücher können von dieser Webseite
herunter geladen werden: www.bticino.com
1 - Display 7” (16 : 9)
2 - Ausschalttaste
3 - Datum und Uhrzeit
4 - Ausschluss des Läutwerks
5 - Freigabe Büro-Funktion
6 - Freigabe Anrufbeantworter
7 - Mikrofon
8 - Schnellfunktionen
9 - Taktile Hilfe für Sehbehinderte
10 - Anschlusstaste:
Das Blinken der grünen Led meldet einen
eintreffenden Anruf
Das Aufleuchten der grünen Led meldet Gespräch
im Gang
11 - Selbstschaltung/Taktierung: durch Drücken der
Taste, leuchtet die rote LED auf
12 - Taste Favoriten: durch Drücken der Taste,
leuchtet die rote LED auf (Basis-Konfiguration =
TREPPENLICHT. Um die Konfiguration zu ändern,
siehe Tabelle der physischen Konfiguration auf der
nachfolgenden Seite.)
13 - Taste Schlossöffner: durch Drücken der Taste,
leuchtet die rote LED auf
14 - Status Anrufbeantworter:
Rote Led leuchtet = Anrufbeantworter aktiv
Rote Led blinkt = nicht abgehörte Nachricht/en
vorhanden
15 - Status Nachrichten vorhanden: rote Led blinkt =
neue nicht gelesene Nachricht/en
16 - Status Ausschluss des Anrufs:
Rote Led leuchtet = Anrufklingel deaktiviert
17 - Funktionen (es werden nur die Symbole der
konfigurierten Funktionen angezeigt)
18 - Sitz der Konfiguratoren
19 - Konfigurator J1: für eine zusätzliche
Stromversorgung abziehen
20 - Konfigurator J2: Master/Slave, abziehen für Slave
21 - Mikroschalter ON/OFF fur den Streckenabschluss
22 - Mini-USB-Steckbuchse zur Aktualisierung der
Firmware der Vorrichtung
23 - Lautsprecher
24 - Klemmen (1 -2) für eine zusätzliche
Stromversorgung
25 - Klemmen zum Anschluss an BUS, SCS, 2-DRAHT
26 - Klemmen ( ) zum Anschluss an eine externe
Etagenruftaste
27 - Klemmen (1 - 5M) zum Anschluss an ein
zusätzliches Läutwerk Der Anschluss muss Punkt
zu Punkt an den Klemmen des zusätzlichen
Läutwerks erfolgen
18
21
22
23
23
20
24252627
191 2 3
5 6 7
16
15
17
9101112139
8
4
14
Seite wird geladen ...
Seite wird geladen ...
Seite wird geladen ...
Seite wird geladen ...
Seite wird geladen ...
Seite wird geladen ...
Seite wird geladen ...
Seite wird geladen ...
Seite wird geladen ...
Seite wird geladen ...

Video Kit
25
• Avvicinare al lettore il badge gestore impianto fino al
lampeggio del LED Serratura e tono di conferma.
• Move the system manager badge close to the reader until the
Door lock LED flashes, and a confirmation sound is heard.
• Approcher le Badge administrateur installation du lecteur
et attendre que le LED Serrure clignote et qu’une tonalité
de confirmation soit émise.
• Dem Lesegerät das Badge des Anlagenbetreibers nähern, bis die
LED des Schlosses blinkt und das Bestätigungssignal ertönt.
• Acerque al lector la credencial del administrador del sistema
hasta que parpadea el LED de la Cerradura y se produzca el
tono de confirmación.
• Houd de installatiebeheerder badge voor het leesapparaat tot de
LED slot gaat knipperen en u ter bevestiging een geluidssignaal hoort.
• Aproxime ao leitor o Crachá gestor da instalação até o lampejo
do LED da Fechadura e o tom de confirmação.
1 beep
1 beep
1 beep
1 Piepton
1 bip
1 beep
1 beep
• Gestore impianto
• Manager master
• Master de gestion
• Master Verwaltung
• Credencial maestra
de administrador
• Master beheerder
• Master gestor
• Programmazione badge residente
• System management key card programming
• Programmation badge résident
• Programmierung des Badges Bewohner
• Programación de la credencial del residente
• Programmering inwonersbadge
• Programação de crachá residente
• Avvicinare al lettore il badge residente da memorizzare,
fino all’accensione del LED Serratura e tono di conferma.
Per programmare altri badge residenti, avvicinarli al
lettore entro 30 secondi dal precedente. Per confermare
la fine della programmazione avvicinare badge gestore
impianto oppure attendere 30 secondi. Due beep brevi
confermano l’avvenuta programmazione.
• Badge residente
• Resident badge
• Badge résident
• Bewohner-Badge
• Credencial residente
• Inwonerbadge
• Crechá residente
2 beep
2 beep
2 beep
2 Piepton
2 bip
2 beep
2 beep
• Move the resident badge to save close to the reader until the Door
lock LED flashes, and a confirmation sound is heard. If program-
ming other resident badges, move each one close to the reader
within 30 seconds from the previous one. To confirm that the
programming procedure has been completed move the system
manager badge close, or wait 30 seconds. Two short beeps confirm
that programming has been successful.
• Approcher le Badge résident à mémoriser du lecteur et at-
tendre que le LED Serrure clignote et qu’une tonalité de confir-
mation soit émise. Pour programmer d’autres badges résidents,
les approcher du lecteur dans les 30 secondes l’un après l’autre.
Pour confirmer la fin de la programmation, approcher le badge
master de gestion installation ou bien attendre 30 secondes.
Deux bips brefs confirment la programmation.
• Dem Lesegerät das Badge des Bewohners nähern, das gespeichert
werden soll, bis die LED des Schlosses blinkt und das Bestätigungs-
signal ertönt. Um weitere Badge zu programmieren, diese inner-
halb von 30 Sekunden nach dem vorhergehenden dem Lesegerät
nähern. Um das Ende der Programmierung zu bestätigen, das
Badge des Anlagetreibers nähern oder 30 Sekunden warten. Zwei
kurze Pieptöne bestätigen, dass die Programmierung erfolgt ist.
• Acerque al lector la credencial residente que desea memori-
zar hasta que parpadea el LED de la Cerradura y se produzca
el tono de confirmación. Para programar otras credenciales
residentes, es preciso acercarlas al lector antes de 30 segundos
Seite wird geladen ...
Seite wird geladen ...
Seite wird geladen ...
Seite wird geladen ...
Seite wird geladen ...

Video Kit
31
• Configurazione posto interno
• Internal unit configuration
• Configuration poste interne
• Konfiguration einer Hausstation
• Configuración de la unidad interior
• Het interne punt configureren
•
Configuração da unidade interna
J1 J2 N
P M
J1 = Estrai se è presente l’alimentazione
supplementare (morsetto 1 & 2)
J2 = Master/Slave (estrai per slave)
NN = Indirizzo del dispositivo
PP = Indirizzo del PE di cui apri la Serratura con PI a
riposo e a cui indirizzi l’autoaccensione
MM = Modalità di funzionamento secondo le tabelle
alle pagine seguenti.
J1 = Extraire en présence de l’alimentation
supplémentaire (bornes 1 et 2)
J2 = Master/Slave (extraire pour Slave)
NN = Adresse du dispositif
PP = Adresse du PE dont la serrure est ouverte
avec PI au repos et auquel est adressé l’auto-
allumage
MM = Modalité de fonctionnement conformément
aux tableaux des pages suivantes.
J1 = Extraiga con presencia de la alimentación
adicional (borne 1 & 2)
J2 = Master/Slave (extraiga para slave)
NN = Dirección del dispositivo
PP = Dirección PE de la que abre la Cerradura
con UI en reposo y a la que dirige el
autoencendido
MM = Modo de funcionamiento según las tablas de
las páginas siguientes.
J1 = Extrai caso esteja presente a alimentação
adicional (borne 1 & 2)
J2 = Master/Slave (extrai para Slave)
NN = Endereço do dispositivo
PP = Endereço da UE através da qual você abre
a fechadura com a UI em repouso e àqual
endereça o autoacendimento
MM = Modalidade de funcionamento segundo as
tabelas das próximas páginas.
J1 = Remove if the additional power supply is present
(clamp 1 and 2)
J2 = Master/Slave (remove for slave)
NN = Device address
PP = Address of the EP of which you can open the
Door Lock with Handset idle, and to which you
can send the auto-on command
MM = Mode of operation according to the tables on
the following pages
J1 = Abziehen, wenn ein zusätzliche
Stromversorgung vorhanden ist (Klemme 1&2)
J2 = Master/Slave (abziehen für Slave)
NN = Adresse der Vorrichtung
PP = Adresse der TS mit dem zu öffnenden Schloss,
mit HS im Ruhestand, der die Selbstschaltung
bestimmt ist
MM = Funktionsmodus laut Tabellen in den
nachfolgenden Seiten
J1 = Uitnemen als een extra voeding aanwezig is
(aansluitklem 1 & 2)
J2 = Master/Slave (uitnemen voor slave)
NN = Adres van het apparaat
PP = Adres van buitenpost waar het slot van wordt
ontgrendeld met binnenpost in ruststand en waar
de automatische inschakeling naar wordt gestuurd
MM = Functioneringswijze volgens de tabellen op de
volgende pagina’s
Seite wird geladen ...
Seite wird geladen ...
Seite wird geladen ...

Video Kit
35
DE - Erläuterung ES - Leyenda NL - Legende PT - Legenda
Aktivierung der Türstation
(mit P+1 konfiguriert) auf
direkte Weise ohne Ruf
oder Aktivierung über den
Aktivator 346200/346210
(mit P+1 und MOD=9)
Activación del PE (con-
figurado con P+1) en
modo directo sin lla ma da
o activación del actuador
346200/346210 (configura-
do con P+1 y MOD=9)
Rechtstreekse activering van
het deur station (als P+1 ge-
con fi gu reerd) zonder oproep
of ac ti ve ring van het toestel
346200/346210 (ge con-
fi gureerd als P+1 en MOD = 9)
Ligação da UE (con figurada
com P+1) de maneira
directa sem a cha ma da ou
então ligação do ac tua dor
346200/346210 (configura-
do com P+1 e MOD=9).
Türöffnung der Türstation
(mit P+1 konfiguriert)
oder Aktivierung über den
Aktivator 346200/346210
(mit P+1 und MOD=5)
oder Aktivierung über den
Aktivato 346230 (mit P+1
konfiguriert)
Apertura cerradura del PE
(con figurado con P +1) en
modo directo sin llamada
o activación del actuador
346200/346210 (con fi gurado
con P+1 y MOD=5) o ac ti-
vación del actuador 346230
(con fi gu rado con P+1)
Rechtstreekse opening van
het deurslot van het als P+1
ge con figureerde deurstation,
zonder oproep of activering
van het to e stel 346200/346210
(ge con fi gu re erd als P+1 en
MOD=5) of ac ti ve ring van
het toestel 346230 (ge con-
figureerd als P+1)
Abertura da fechadura da
UE (configurada com P+1)
de ma nei ra directa sem a
chamada ou então ligação
do actuador 346200/346210
(configurado com P+1 e
MOD=5) ou então ligação
do actuador 346230 (con fi-
gu ra do com P+1).
Türöffnung der Türstation
(mit P+2 konfiguriert)
oder Aktivierung über den
Aktivator 346200/346210
(mit P+2 und MOD=5)
oder Aktivierung über den
Aktivator 346230 (mit P+2
konfiguriert)
Apertura cerradura del PE
(con figurado con P+2) en
modo di recto sin llamada
o activación del actuador
346200/346210 (con fi gurado
con P+2 y MOD=5) o ac ti-
vación del actuador 346230
(con fi gu rado con P+2)
Rechtstreekse opening
van het deurslot van het
als P+2 ge con figureerde
deurstation, zonder oproep
of activering van het to e stel
346200/346210 (ge con fi gu re-
erd als P+2 en MOD=5) of ac ti-
ve ring van het toestel 346230
(ge con figureerd als P+2)
Abertura da fechadura da
UE (configurada com P+2)
de ma nei ra directa sem a
chamada ou então ligação
do actuador 346200/346210
(configurado com P+2 e
MOD=5) ou então ligação do
actuador 346230 (con fi gu ra-
do com P+2)
Türöffnung der Türstation
(mit P+3 konfiguriert)
oder Aktivierung über den
Aktivator 346200/346210
(mit P+3 und MOD=5)
oder Aktivierung über den
Aktivator 346230 (mit P+3
konfiguriert)
Apertura cerradura del PE
(con figurado con P+3) en
modo di recto sin llamada
o activación del actuador
346200/346210 (con fi gurado
con P+3 y MOD=5) o ac ti-
vación del actuador 346230
(con fi gu rado con P+3)
Rechtstreekse opening
van het deurslot van het
als P+3 ge con figureerde
deurstation, zonder oproep
of activering van het to e stel
346200/346210 (ge con fi gu re-
erd als P+3 en MOD=5) of ac ti-
ve ring van het toestel 346230
(ge con figureerd als P+3)
Abertura da fechadura da
UE (configurada com P+3)
de ma nei ra directa sem a
chamada ou então ligação
do actuador 346200/346210
(configurado com P+3 e
MOD=5) ou então ligação
do actuador 346230 (con fi-
gu ra do com P+3)
Türöffnung der Türstation
(mit P+4 konfiguriert)
oder Aktivierung über den
Aktivator 346200/346210
(mit P+4 und MOD=5)
oder Aktivierung über den
Aktivator 346230 (mit P+4
konfiguriert)
Apertura cerradura del PE
(con figurado con P+4) en
modo di recto sin llamada
o activación del actuador
346200/346210 (con fi-
gurado con P+4 y MOD=5)
o ac ti vación del actuador
346230 (con fi gu rado con
P+4)
Rechtstreekse opening
van het deurslot van het
als P+4 ge con figureerde
deurstation, zonder oproep
of activering van het to e stel
346200/346210 (ge con fi gu re-
erd als P+4 en MOD=5) of ac-
ti ve ring van het toeste 346230
(ge con figureerd als P+4)
Abertura da fechadura da
UE (configurada com P+4)
de ma nei ra directa sem a
chamada ou então ligação
do actuador 346200/346210
(configurado com P+4 e
MOD=5) ou então ligação
do actuador 346230 (con fi-
gu ra do com P+4)
Seite wird geladen ...

Video Kit
37
DE - Erläuterung ES - Leyenda NL - Legende PT - Legenda
Gegenseitige Kommunika-
tion zwischen Wohnungen
für Anlagen mit Wohnungs-
schnittstelle 346850.
Intercomunicación entre
apartamentos en instalacio-
nes con interfaz de departa-
mento 346850.
Intercom tussen apparte-
menten in installaties met
interface van appartement
346850.
Intercom entre apartamen-
tos em instalações com
interface de apartamento
346850.
Gegenseitige Kommunikation
innerhalb der Wohnung für
Anlagen mit Wohnungsschnitt
-
stelle 346850 oder gegenseiti-
ge Kommunikation zwischen
Wohnungen für Anlagen ohne
Wohnungsschnittstelle.
Intercomunicación en el
apartamento en insta-
laciones con interfaz de
apartamento 346850
o intercomunicación
entre apartamentos en
instalaciones sin interfaz de
apartamento.
Intercom binnen in het ap-
partement in installaties met
interface van appartement
346850 ofwel intercom
tussen appartementen in
installaties zonder interface
van appartement.
Intercom dentro do aparta-
mento em instalações com
interface de apartamento
art. 346850 ou então inter-
com entre apartamentos em
instalações sem interface de
apartamento.
Intercom mit einseitiger Funk-
tion: sendet den Ruf an alle
Geräte mit derselben Adresse.
Intercomunicación hacia los
aparatos iguales, envía la
llamada a todos los aparatos
con igual dirección
Intercom op zichzelf,
verstuurt de oproep naar
alle toestellen met hetzelfde
adres
Intercomunicador sobre si
mesmo, envia a chamada
a todos os aparelhos com
endereço igual
Personenrufgerät, Intercom mit
allgemeiner Funktion, sendet den
Ruf an alle Geräte der Anlage
Busca, realiza una intercom
general, envía una llamada
a todos los aparatos del
sistema.
Personenzoeksysteem,
verricht een algemene
intercom, stuurt een oproep
naar alle apparaten van de
installatie.
Localizador, efetua uma
intercomunicação geral,
envia uma chamada a todas
as unidades da instalação.
Seite wird geladen ...
Seite wird geladen ...
Seite wird geladen ...
Seite wird geladen ...
Seite wird geladen ...
Seite wird geladen ...

44
• Suoneria supplementare
• Additional bell
• Sonnerie supplémentaire
• Zusätzliche Läutwerk
• Timbre adicional
• Supplementaire beltoon
• Toque suplementar
230 Vac
BUS
PL S+
S-
1 5M
OFF
ON
A
BUS5M 21 1
P
= –
= –
N
= –
= –
T = –
S = –
P
= –
= –
J2
J1
N
= –
= –
M
= –
= –
336910
336992
336993
336994

Video Kit
45
Leggere attentamente prima dell’uso e conservare per un riferimento futuro
Divieto di toccare le unità con le mani bagnate
Divieto di utilizzo di pulitori liquidi o aerosol
Divieto di occludere le aperture di ventilazione
Diveto di modificare i dispositivi
Divieto di rimuovere parti di protezione dai dispositivi
Divieto di installare le unità in prossimità di liquidi e polveri
Divieto di installare le unità in prossimità di fonti di calore
Divieto di installare le unità in prossimità di gas nocivi, polveri metalliche o simili
Divieto di fissaggio delle unità su superfici non adatte
Pericolo di shock elettrico
Rischio caduta dei dispositivi a causa di cedimento della superficie su cui
sono installati o installazione inappropriata
Togliere l’alimentazione prima di ogni intervento sull’impianto
Attenzione: le operazioni di installazione, configurazione, messa in servizio e
manutenzione devono essere effettuate esclusivamente da personale qualifi-
cato. Assicurarsi che l’installazione a parete sia effettuata correttamente
Effettuare la posa dei cavi rispettando le normative vigenti
Collegare i cavi di alimentazione secondo le indicazioni
Per eventuali espansioni di impianto utilizzare solo gli articoli indicati
nelle specifiche tecniche
Read carefully before use and keep for future reference
Touching the units with wet hands is forbidden
Using liquid cleaners or aerosols is forbidden
Blocking the ventilation openings is forbidden
Modifying the devices is forbidden
Removing protective parts from the devices is forbidden
Installing the units near liquids and powders is forbidden
Installing the units near heat sources is forbidden
Installing the units near harmful gases, metal dusts or similar is forbidden
Fastening the units on unsuitable surfaces is forbidden
Danger of electrical shock
Risk of devices falling because the surface on which they are installed
collapses or inappropriate installation
Switch the power supply OFF before any work on the system
Caution: Installation, configuration, starting-up and maintenance must
be performed exclusively by qualified personnel.
Check that the wall installation has been carried out correctly
Lay out the wires respecting the standards in force
Connect the power supply wires as indicated
Use only the items indicated in the technical specifications for any
system expansions
Lire attentivement avant toute utilisation et installation de nos produits
et conserver pour toute consultation en cas de besoin.
Interdiction de toucher les unités avec les mains mouillées.
Interdiction d’utiliser des produits de nettoyage liquides ou des aérosols.
Interdiction de boucher les ouvertures de ventilation.
Interdiction de modifier les dispositifs.
Interdiction des retirer les parties de protection des dispositifs.
Interdiction d’installer les unités à proximité de liquides et poudres/
poussières.
Interdiction d’installer les unités à proximité de sources de chaleur.
Interdiction d’installer les unités à proximité de gaz nocifs, de poudres
métalliques ou autres matières semblables.
Interdiction de fixer les unités sur des surfaces non appropriées.
Risque d’électrocution
Risque de chute des dispositifs en cas de rupture de la surface sur
laquelle ils sont installés ou mauvaise installation.
Couper l’alimentation avant toute intervention sur l’installation.
Attention: les opérations d’installation, de configuration, de mise en
service et d’entretien doivent être confiées à un personnel qualifié.
S’assurer que l’installation murale est correctement effectuée.
Effectuer la pose des câbles dans le respect des normes en vigueur.
Brancher les câbles d’alimentation dans le respect des indications fournies.
Pour les éventuelles extensions de l’installation, utiliser uniquement les
articles indiqués dans les caractéristiques techniques.
Vor Gebrauch, die Hinweise aufmerksam durchlesen und sorgfältig auf-
bewahren, um sie auch in Zukunft nachschlagen zu können.
Verbot, die Einheiten mit nassen Händen zu berühren
Verbot, Flüssigreiniger oder Aerosol zu benutzen
Verbot, die Belüftungsschlitze abzudecken
Verbot, die Vorrichtungen zu ändern
Verbot, die Schutzbleche von den Vorrichtungen abzunehmen
Verbot, die Einheit in der Nähe von Flüssigkeiten und Staub zu in-
stallieren
Verbot, die Einheit in der Nähe von Wärmequellen zu installieren
Verbot, die Einheit in der Nähe von giftigem Gas, Metallstaub o. ä. zu in-
stallieren
Verbot, die Einheit an ungeeignete Flächen zu befestigen
Stromschlaggefahr
Risiko des Herabfallens der Vorrichtungen durch Nachlassen der Aufla-
gefläche oder wegen falscher Installation
Die Stromversorgung abtrennen, bevor an der Anlage gearbeitet wird.
Achtung: die Installation, Konfiguration, Inbetriebnahme und Wartung
dürfen nur von qualifizierten Fachleuten vorgenommen werden.
Sicherstellen, dass die Wandmontage richtig vorgenommen wird
Die Kabeln gemäß geltenden Normen verlegen
Die Stromkabeln gemäß Anweisungen anschließen
Bei eventuellen Anlagenerweiterungen ausschließlich die Artikel
verwenden, die in den technischen Spezifikationen angegeben sind
• Avvertenze e diritti del consumatore
• Warnings and consumer rights
• Avertissements et droits du consommateur
• Hinweise und Rechte der Verbraucher
• Advertencias y derechos del consumidor
• Waarschuwingen en rechten van de consument
• Advertências e direitos do consumidor
Seite wird geladen ...
Seite wird geladen ...
Seite wird geladen ...
-
 1
1
-
2
-
3
-
4
-
5
-
6
-
7
-
8
-
9
-
10
-
11
-
12
-
13
-
14
-
15
-
16
-
17
-
18
-
19
-
20
-
21
-
22
-
23
-
24
-
25
-
26
-
27
-
28
-
29
-
30
-
31
-
32
-
33
-
34
-
35
-
36
-
37
-
38
-
39
-
40
-
41
-
42
-
43
-
44
-
45
-
46
-
47
-
48
- Kategorie
- Telefone
- Typ
- Bedienungsanleitung
in anderen Sprachen
- English: Bticino 363611 Operating instructions
- français: Bticino 363611 Mode d'emploi
- español: Bticino 363611 Instrucciones de operación
- italiano: Bticino 363611 Istruzioni per l'uso
- Nederlands: Bticino 363611 Handleiding
- português: Bticino 363611 Instruções de operação
Verwandte Artikel
-
Bticino 363511 Bedienungsanleitung
-
-
-
-
-
-
-
-
-
Andere Dokumente
-
PRASTEL Easymini Bedienungsanleitung
-
AVS Electronics BIP 4 Benutzerhandbuch
-
Profile wireless + Benutzerhandbuch
-
Key Gates 900 SEL Bedienungsanleitung
-
CAME TSP01, 309TSP01 Installationsanleitung
-
 SCS Sentinel XO 403 + CLES Bedienungsanleitung
-
 WAFERLOCK C210 Benutzerhandbuch
-
 WAFERLOCK C210 Outdoor Weatherproof Smart Padlock Benutzerhandbuch
-
Comelit SK9020 Technical Manual
-
THEBEN ELPA 6 Bedienungsanleitung


