Celestron 22462 Benutzerhandbuch

Kategorie
Teleskope
Typ
Benutzerhandbuch
ENGLISH | 1
Unpack your telescope and verify that all parts are
present. Your StarSense Explorer DX includes:
a telescope tube, a tripod and mount head, an
accessory bag, slow motion controls, an accessory
tray, two eyepieces, an erect image diagonal, a
nderscope, a StarSense phone dock, StarSense
Explorer Powered by SkySafariTM app code card, and
a hex key (hidden inside the slot in the front of the
mount head).
To set up the tripod, spread the legs outward until
they are fully extended and push down the center
leg brace.
ITEM #22462
Extend the legs of the tripod by loosening the three
hand knobs on each leg. Pull each leg section all
the way out and tighten the hand knobs to secure
them in place.
ENGLISH
5” SCHMIDT-CASSEGRAIN
Quick Setup Guide
Place the accessory tray on top of the center brace
and line up the three holes. Insert the three thumb
screws through the bottom of the leg brace and
thread them into the tray.
To attach the slow-motion knobs to your mount,
rst locate the supplied hex key hidden inside the
slot in the front of your mount.
Place the slow-motion control knob over the
D-shaped gear shaft and push inward to make sure
it is fully seated. Use the hex key to tighten the
setscrews onto the gear shaft. Return the hex key to
its storage position in the front of the mount.
Hold the telescope tube next to the mount with the
dovetail bar on the tube facing the clamp on the top
of the mount arm.
Slide the dovetail bar into the clamp at the top of
the mount and tighten the hand knob on the bottom
of the clamp to secure the telescope in place.
Locate the erect image diagonal and remove the
plastic covers. Insert the barrel of the diagonal into
the back of the telescope tube and secure in place
by tightening the set screws.
Insert the barrel of the 25 mm eyepiece into the
diagonal and tighten the set screw.
22
44
556677
881010
11
33
99
2 | ENGLISH
To install the StarSense phone dock, insert the
bayonet mount on the side of the dock into the
port on the side of the mount opposite the dovetail
clamp.
Loosen the two Phillips head screws on the side of
the finderscope and slide the finderscope onto the
mounting dovetail on the top of the telescope tube.
The large window on the finder should be facing
the front of the telescope. Secure the bracket by
tightening the Phillips head screws on the side of
the finderscope.
Line up the arrow on the dock with the alignment
mark on the mount and press inward while turning
the dock counterclockwise until the orange release
button snaps into place in the hole on the dock.
To remove the dock, press the orange release button
and turn the dock clockwise until the bayonet mount
releases.
Remove the lens cap from the front of the
telescope. To observe, look through the eyepiece
as shown above. Focus the image by turning the
knob below the eyepiece and diagonal.
There is a small clear plastic tab inserted between the
battery and the contact. This was included to prevent
the battery from discharging during shipment. Pull
this out to allow your battery to work.
Downloading and
Activating the App
Before you take your telescope outside, download
the StarSense Explorer powered by SkySafariTM
app to your mobile device. Search for “Celestron
StarSense Explorer” in the Apple App Store or
Google Play. The app is large, so we recommend
downloading it while connected to Wi-Fi.
Download the app from the
before your first observing session
.
or
When prompted, enter the unique unlock code below to
enable telescope control on your device.
Once you have downloaded the app, locate the
orange postcard in your telescope box. Launch the
app. When prompted, enter the activation code on
the postcard to activate the app. Your code will
unlock up to 5 devices.
1414 1616
131312121111
1515
11
ENGLISH | 3
The StarSense Explorer DX mount has slip clutches
in both axes. To make large movements with the
telescope, simply hold a tripod leg with one hand
and use the other hand on the telescope tube to
push the telescope in the desired direction.
To make fi ne adjustments or to track celestial
objects, turn both slow motion knobs as required.
Moving the
Telescope
CENTER THE TARGET IN THE EYEPIECE
Look through the telescope using your lower
powered eyepiece. Move the telescope until the
object you chose lies in the center of the view. If
the image is blurry, gently turn the focus knob until it
comes into sharp focus.
NOTE: The image in your telescope may appear
inverted. This is perfectly normal in an
astronomical telescope.
Aligning the
Finderscope
The fi nder is one of the most important parts of your
telescope. It helps you locate objects and center
them in the eyepiece. The fi rst time you assemble
your telescope, you need to align the fi nder to the
telescope’s main optics. It’s best to do this during
the day*.
*SOLAR WARNING! Never attempt to
view the Sun through any telescope without
a proper solar fi lter!
CHOOSE A TARGET
Take the telescope outside during the day and fi nd
an easily recognizable object, such as a streetlight,
car license plate or sign. The object should be as far
away as possible, but at least a quarter mile away.
YOUR FINDERSCOPE IS NOW ALIGNED!
It should not require realignment unless it is bumped
or dropped.
LOOK THROUGH FINDERSCOPE
Once the object is centered in your 25 mm eyepiece,
look through the fi nderscope and locate the red dot.
25 mm Eyepiece
Focus Knob
ADJUST THE FINDERSCOPE
Without moving the telescope, use the two
adjustment knobs to move the fi nder around until
the red dot appears over the same object you are
observing in the telescope’s 25 mm eyepiece.
1122
334455
1122
4 | ENGLISH
Your First
Night Out
Congratulations! Your telescope is now set up
and you are ready to explore the cosmos. Take the
telescope outside, insert your 25 mm eyepiece,
remove the lens cap, insert your smartphone into the
holder, and launch the StarSense Explorer app. The
tutorial in the app will walk you through the steps on
finding your first astronomical target.
Attaching the
Smartphone
Remove the large cap covering the mirror on the front
of the StarSense dock.
Pull open the spring loaded slider on the top of the
phone dock and set the phone into the holder so
it is flush with the bottom lip of the phone holder.
Slowly release the slider to secure the phone in
place. Most phones fit into the dock with the case
on. However, you may need to remove your phone
case if it is especially bulky or unable to fit into the
clamp (i.e. folio style cases).
For more information on this product, please visit the respective product page on celestron.com
SOLAR WARNING:
Never attempt to view the sun through any telescope without a proper solar filter.
Need assistance?
Contact Celestron Technical Support celestron.com/pages/technical-support
©2023 Celestron. Celestron and Symbol are trademarks of Celestron, LLC.
All rights reserved. Celestron.com
2835 Columbia Street, Torrance, CA 90503 USA
This product is designed and intended for use by those 14 years of age and older.
Made in China
03-23
www.celestron.com/pages/warranty
1122
FRANÇAIS | 5
Déballez votre télescope, et vérifi ez que toutes les
pièces sont présentes. Votre StarSense Explorer DX
comprend: un tube de télescope, un trépied avec
une tête de monture, deux molette de contrôle de
mouvement ralenti, une sacoche à accessoires, un
plateau à accessoires, deux oculaires, un chercheur,
un renvoi coudé, un support pour téléphone Celestron
StarSense Explorer, rendu possible par l’application
SkySafariTM et une clef hexagonale (cachée dans le
logement situé sur l’avant de la monture).
Pour installer le trépied, écartez les pieds vers
l’extérieur jusqu’à ce qu’ils soient complètement
étendus et appuyez sur l’entretoise centrale.
ARTICLE #22462
Étendez les pieds du trépied en desserrant les trois
molettes situées sur chaque pied. Tirez chaque
section des pieds au maximum et serrez les molettes
pour les fi xer en place.
FRANÇAIS
5” SCHMIDT-CASSEGRAIN
Guide d’installation rapide
Placez le plateau à accessoires sur le dessus de
l’entretoise centrale et alignez les trois trous. Insérez
les trois vis à main dans le dessous de l’entretoise et
vissez-les dans le plateau.
Pour attacher les molettes de mouvement ralenti
à la monture, repérez d’abord la clef hexagonale qui
se trouve dans le logement situé sur l’avant de la
monture.
Installez la molette de contrôle de mouvement
ralenti sur le moyeu d’engrenage en D et appuyez
dessus pour vous assurer qu’elle est complètement
enfoncée. Utilisez la clef hexagonale pour serrer les
vis de fi xation sur la tige de l’engrenage. Remettez
la clef hexagonale dans son logement sur l’avant de
la monture.
Tenez le tube du télescope à côté de la monture, la
barre à queue d'aronde sur le tube orientée vers le rail
situé sur le dessus du bras de monture.
Faites glisser la barre à queue d’aronde dans le rail
situé sur le dessus de la monture et serrez la molette
à main située sur le dessous du rail pour fi xer le
télescope en place.
Trouvez le renvoi coudé dans la boîte et retirez les
capuchons de plastique. Insérez le canon de la
diagonale à l’arrière du tube du télescope et fi xez-le
en serrant les vis de réglage.
Insérez le barillet de l'oculaire de 25 mm dans le
renvoi coudé et serrez les vis.
77
881010
11
99
22
44
5566
33
6 | FRANÇAIS
Download the app from the
before your first observing session
.
or
When prompted, enter the unique unlock code below to
enable telescope control on your device.
Desserrez les deux vis cruciformes sur le côté du
chercheur et faites glisser le chercheur sur la queue
d’aronde de montage sur le dessus du tube du
télescope. La grande fenêtre du viseur doit faire face
à l’avant du télescope. Fixez le support en serrant les
vis à tête Phillips sur le côté du chercheur.
Pour installer le support de téléphone StarSense,
insérez la monture à baïonnette située sur le côté du
support dans le port situé sur le côté opposé au rail
de queue d'aronde.
131312121111
1616
1414 1515
11
Alignez la flèche sur le support avec la marque
d’alignement sur la monture et appuyez dessus tout
en faisant tourner le support dans le sens inverse des
aiguilles d'une montre jusqu’à ce que le bouton de
libération s’enclenche dans le trou du support.
Alignez la flèche sur le support avec la marque
d’alignement sur la monture et appuyez dessus tout
en faisant tourner le support dans le sens inverse
des aiguilles d'une montre jusqu’à ce que le bouton
de libération s’enclenche dans le trou du support.
Retirez le capuchon d’objectif de l’avant du télescope.
Pour observer, regardez à travers l’oculaire comme
indiqué ci-dessus. Mettez l’image au point en tournant
le bouton sous l’oculaire et en diagonale.
Télécharger et
activer l’application
Avant de sortir votre télescope de chez vous,
téléchargez Celestron StarSense Explorer, rendu
possible par l’application SkySafariTM sur votre
mobile. Recherchez Celestron StarSense Explorer
dans l’Apple App Store ou Google Play. L’application
est de grande taille, alors nous vous recommandons
de la télécharger via une connexion Wi-Fi.
Une fois que vous avez téléchargé l’application,
munissez-vous de la carte orange présente dans
la boîte de votre télescope. Lancez l’application.
Lorsqu’il vous est demandé de le faire, saisissez le
code indiqué sur la carte pour activer l’application.
Votre code est valable pour activer 5 appareils au
maximum.
Une petite languette de plastique est insérée entre la
pile et son contact. Cette languette est présente pour
éviter que la pile ne se décharge pendant le transport.
Retirez-la pour activer la pile.
FRANÇAIS | 7
Oculaire de 25 mm
Molette de mise
au point
La monture StarSense Explorer DX dispose de
freins de mouvement sur chaque axe. Pour effectuer
de larges mouvements avec le télescope, tenez
simplement un pied du trépied d’une main, et de
l’autre, poussez le tube du télescope dans la direction
opposée.
Pour affi ner l’orientation, ou suivre des objets célestes,
faites tourner chacune des molettes de mouvement
ralenti comme désiré.
CENTRER LA CIBLE DANS L'OCULAIRE
Regardez dans le télescope en utilisant votre oculaire
basse puissance. Déplacez le télescope jusqu’à que
l’objet choisi se trouve au centre du champ de vision.
Si l’image est fl oue, tournez doucement le molette de
mise au point jusqu’à ce qu’il soit net.
NOTE: L’image observée dans votre télescope peut
apparaître inversée. Cela est parfaitement
normal pour un télescope astronomique.
Le chercheur est l'un des composants les importants
de votre télescope. Il vous aide à localiser des objets
et à les centrer dans votre oculaire. La première fois
que vous assemblez votre télescope, vous devez
aligner le chercheur avec le système optique principal
du télescope. Il est plus facile d'effectuer cette
opération pendant la journée*.
* AVERTISSEMENT SUR LE SOLEIL!
N’essayez jamais d’observer le soleil à l’aide
d’un télescope sans utiliser un fi ltre solaire
adéquat.
CHOISIR UNE CIBLE
Installez le télescope à l’extérieur en journée, et
repérez un objet aisément reconnaissable, comme
un feu de signalisation, une plaque d’immatriculation
ou un panneau. L’objet doit se situer aussi loin que
possible, mais à au moins un quart de mile de vous.
AJUSTER LE CHERCHEUR
Sans déplacer le télescope, utilisez les deux molettes
de réglage pour orienter le chercheur, jusqu’à ce que
point rouge apparaisse en superposition avec l’objet
observé dans l’oculaire de 25 mm.
VOTRE CHERCHEUR EST MAINTENANT
ALIGNÉ !
Il n’aura pas besoin d’être aligné de nouveau tant qu’il
n’aura pas subi un choc ou qu’il sera tombé.
REGARDER DANS LE CHERCHEUR
Une fois l’objet centré dans votre oculaire de 25 mm,
regardez dans le chercheur et localisez point rouge.
Orienter le télescope
Aligner le chercheur
4455
11
11
33
22
22
8 | FRANÇAIS
Attacher le
téléphone
intelligent
Retirez le grand cache couvrant le miroir sur le devant
du support StarSense.
Ouvrez la glissière à ressort située sur le dessus du
support de téléphone et installez le téléphone pour
qu’il soit à niveau sur le rebord du bas du support
de téléphone. Relâchez la glissière en douceur pour
maintenir le téléphone en place. La plupart des
téléphones pourront être placés dans le support
avec leur étui. Il peut cependant être nécessaire de
retirer l’étui de votre téléphone, s’il est spécialement
épais ou qu’il n’est pas compatible avec la pince (par
ex. les étuis de type folio).
Félicitations! Votre télescope est maintenant configuré
et vous êtes prêt à explorer le cosmos. Sortez avec
votre télescope, insérez votre oculaire de 25 mm,
retirez le cache de lentille, insérez votre téléphone
intelligent dans le support et lancez l’application
StarSense Explorer. Le tutoriel de l’application vous
expliquera les étapes nécessaires pour trouver votre
première cible astronomique.
Votre première nuit
d’observation
Pour en savoir plus sur ce produit, visitez la page correspondante du produit sur celestron.com.
AVERTISSEMENT SUR LE SOLEIL:
N’essayez jamais d’observer le soleil à l’aide d’un télescope sans utiliser un filtre solaire adéquat.
Besoin d'assistance?
Prenez contact avec l’assistance technique de Celestron à l’adresse celestron.com/pages/technical-support
©2023 Celestron. Celestron et le Symbol sont des marques déposées de
Celestron, LLC Tous droits réservés. • Celestron.com
2835 Columbia Street, Torrance, CA 90503 É.-U.
Ce produit est conçu et prévu pour être utilisé par des personnes âgées
de 14 ans et plus.
Fabriqué en Chine
03-23
www.celestron.com/pages/warranty
1122
DEUTSCH | 9
ARTIKELNR. 22462
DEUTSCH
5” SCHMIDT-CASSEGRAIN
Kurzanleitung zur Einrichtung
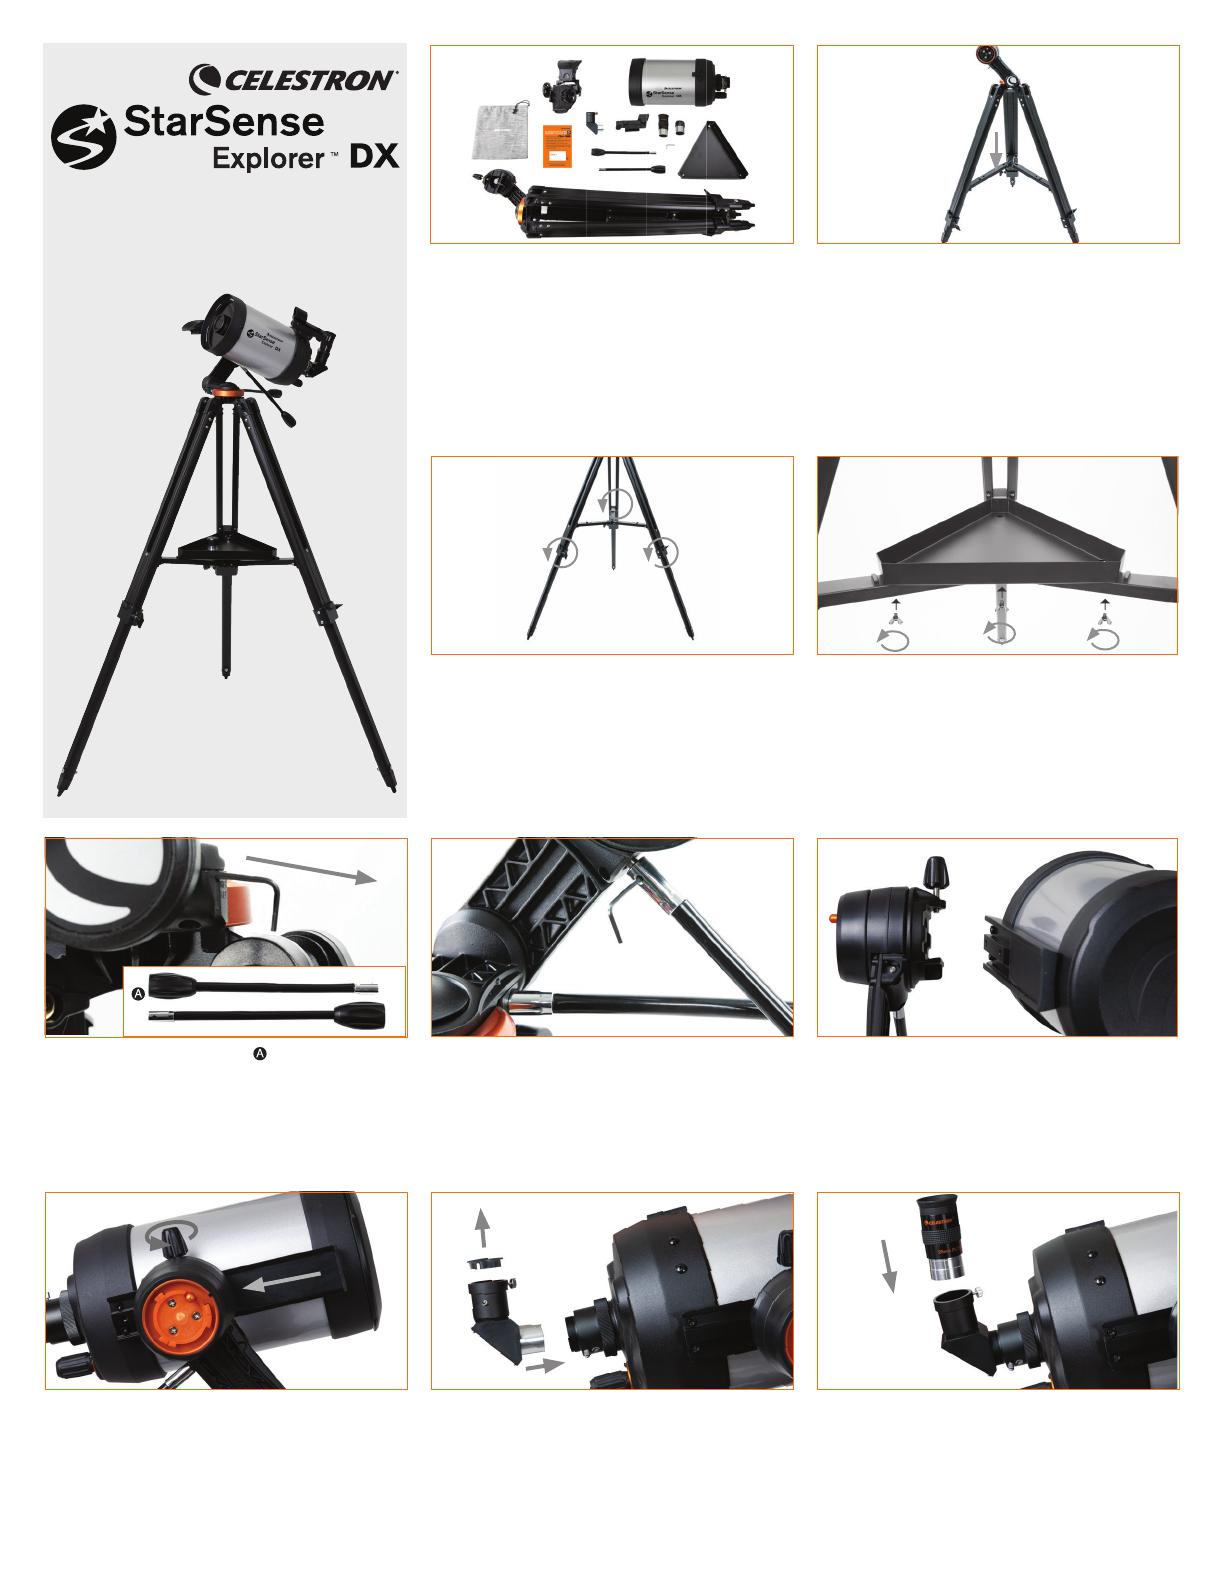
Packen Sie Ihr Teleskop aus und überprüfen sie die
Vollständigkeit aller Teile. Ihr StarSense Explorer
DX enthält: einen Teleskoptubus, ein Stativ und
einen Montierungskopf, eine Zubehörablage, zwei
Feineinstellungsregler, eine Zubehörtasche, zwei
Okulare, ein Sucherfernrohr, einen Zenitspiegel für
aufrechtes Bild, ein StarSense-Telefondock, eine
StarSense Explorer Powered by SkySafariTM App-
Codekarte und einen Inbusschlüssel (im Schlitz auf
der Vorderseite des Montierungskopfs versteckt).
Zum Aufbau des Stativs die Beine nach außen ziehen,
bis sie vollständig ausgezogen sind. Drücken Sie die
mittlere Beinstrebe nach unten.
Ziehen Sie die Beine des Stativs heraus, indem Sie
die drei Knöpfe an jedem Bein lösen. Ziehen Sie
jeden unteren Beinabschnitt ganz heraus und ziehen
Sie die Knöpfe fest, um die Beine zu sichern.
Platzieren Sie die Zubehörablage oben auf der
mittleren Stützstrebe und richten Sie sie mit den drei
Löchern aus. Führen Sie die drei Rändelschrauben
durch die Unterseite der Beinstrebe und schrauben
Sie sie in die Ablage.
Um die Feineinstellungsregler an Ihrer Montierung
zu befestigen, suchen Sie zuerst den mitgelieferten
Inbusschlüssel, der im Schlitz auf der Vorderseite Ihrer
Montierung versteckt ist.
Setzen Sie den Feineinstellungsregler auf die
D-förmige Getriebewelle und drücken Sie ihn nach
innen, um sicherzustellen, dass er fest sitzt. Ziehen
Sie die Stellschrauben mit dem Inbusschlüssel auf der
Getriebewelle fest. Stecken Sie den Inbusschlüssel
wieder in seinen Aufbewahrungsort auf der Vorderseite
der Montierung.
Halten Sie den Teleskoptubus neben die Montierung,
wobei die Schwalbenschwanzstange am Tubus zur
Klemme oben am Montierungsarm zeigt.
Schieben Sie die Schwalbenschwanzstange in die
Klemme oben an der Montierung und ziehen Sie den
Knopf unten an der Klemme fest, um das Teleskop zu
sichern.
Nehmen Sie den Zenitspiegel für aufrechtes Bild
und entfernen Sie die Kunststoffabdeckungen.
Setzen Sie die Lauf der Diagonale in die Rückseite
des Teleskoprohrs ein und sichern Sie ihn durch
Anziehen der Stellschrauben.
Setzen Sie die Steckhülse des 25-mm-Okulars in den
Zenitspiegel ein und ziehen Sie die Stellschrauben
fest.
77
881010
11
99
22
44
5566
33
10 | DEUTSCH
Download the app from the
before your first observing session
.
or
When prompted, enter the unique unlock code below to
enable telescope control on your device.
Lösen Sie die beiden Kreuzschlitzschrauben an der
Seite des Sucherfernrohrs und schieben Sie das
Sucherfernrohr auf den Schwalbenschwanz oben am
Teleskoprohr. Das große Fenster am Sucher sollte
zur Vorderseite des Teleskops zeigen. Befestigen Sie
die Halterung, indem Sie die Kreuzschlitzschrauben
an der Seite des Sucherskops festziehen.
Nehmen Sie den Objektivdeckel vorne am Teleskop
ab. Schauen Sie zum Beobachten durch das Okular,
wie oben dargestellt. Stellen Sie das Bild scharf,
indem Sie den Knopf unter dem Okular und diagonal
drehen.
Richten Sie den Pfeil auf dem Dock mit der
Ausrichtungsmarkierung auf der Montierung aus
und drücken Sie das Dock nach innen, während
Sie es gegen den Uhrzeigersinn drehen, bis der
orangefarbene Entriegelungsknopf in der Öffnung am
Dock einrastet.
Drücken Sie zum Entfernen des Docks den
orangefarbenen Entriegelungsknopf und drehen
Sie das Dock im Uhrzeigersinn, bis sich der
Bajonettverschluss löst.
Um das StarSense-Telefondock zu installieren,
stecken Sie den Bajonettverschluss an der Seite des
Docks in den Anschluss auf der Seite der Montierung
gegenüber der Schwalbenschwanzklemme ein.
App herunterladen
und aktivieren
Laden Sie die StarSense Explorer Powered by
SkySafariTM-App auf Ihr Mobilgerät herunter, bevor
Sie Ihr Teleskop mit nach draußen nehmen. Suchen
Sie im Apple App Store oder bei Google Play nach
„Celestron StarSense Explorer“. Die App ist groß.
Daher empfehlen wir, sie über eine bestehende
WLAN-Verbindung herunterzuladen.
Nehmen Sie nach dem Herunterladen der
App die orangefarbene Postkarte aus Ihrer
Teleskopverpackung. Starten Sie die App. Wenn
Sie dazu aufgefordert werden, geben Sie den
Aktivierungscode auf der Postkarte ein, um die App zu
aktivieren. Ihr Code kann bis zu 5 Geräte entsperren.
Zwischen Batterie und Kontakt befindet sich ein
kleiner durchsichtiger Kunststoff-Abstandshalter.
Dieser wurde eingesetzt, um während des Versands
ein Entladen der Batterie zu verhindern. Ziehen
Sie diesen Abstandshalter zur Inbetriebnahme der
Batterie heraus.
131312121111
1616
1414 1515
11
DEUTSCH | 11
25-mm Okular
Fokussierknöpf
Die StarSense Explorer DX-Montierung hat
Rutschkupplungen an beiden Achsen. Um mit dem
Teleskop große Bewegungen auszuführen, halten Sie
einfach ein Stativbein mit einer Hand und drücken Sie
mit der anderen Hand auf den Teleskoptubus, um das
Teleskop in die gewünschte Richtung zu bewegen.
Drehen Sie beide Feineinstellungsregler nach
Bedarf, um Feineinstellungen vorzunehmen oder
Himmelsobjekte zu verfolgen.
Bewegen des
Teleskops
ZENTRIEREN SIE DAS ZIEL IM OKULAR
Schauen Sie mit Ihrem Okular bei niedrigerer
Vergrößerungsleistung durch das Teleskop.
Schwenken Sie das Teleskop, bis das ausgewählte
Objekt im Zentrum des Sichtfelds liegt. Ist das
Bild unscharf, Drehen Sie den Fokussierknöpf
vorsichtig, bis er scharf eingestellt ist.
HINWEIS: Das Bild in Ihrem Teleskop erscheint
möglicherweise invertiert. Das ist für ein Astronomie-
Teleskop völlig normal.
Ausrichten des
Sucherfernrohrs
Das Sucherfernrohr ist eines der wichtigsten Teile
Ihres Teleskops. Es hilft Ihnen, Objekte zu suchen
und im Okular zu zentrieren. Wenn Sie Ihr Teleskop
zum ersten Mal zusammenbauen, müssen Sie das
Sucherfernrohr auf die Hauptoptik des Teleskops
ausrichten. Dies tun Sie am besten tagsüber*.
*SONNENSTRAHLEN-WARNHINWEIS!
Niemals ohne einen vorschriftsmäßigen
Sonnenfi lter durch ein Teleskop in die Sonne
schauen!
WÄHLEN SIE EIN ZIEL
Nehmen Sie das Teleskop tagsüber mit nach draußen
und suchen Sie ein leicht erkennbares Objekt wie
z.B. eine Straßenlaterne, ein Kfz-Kennzeichen oder
ein Schild. Das Objekt sollte so weit wie möglich,
aber mindestens 400 Meter entfernt sein.
STELLEN SIE DAS SUCHERFERNROHR EIN
Ohne das Teleskop zu bewegen, drehen Sie nun an
den zwei Einstellknöpfen um den Sucher zu bewegen
bis der rote Punkt über dem gleichen Objekt erscheint,
das Sie im 25-mm-Okular des Teleskops beobachten.
IHR SUCHERFERNROHR IST JETZT
AUSGERICHTET!
Es ist keine Neuausrichtung erforderlich, es sei denn,
es wurde einem Stoß ausgesetzt oder fi el um.
SCHAUEN SIE DURCH DAS
SUCHERFERNROHR
Sobald das Objekt im 25-mm-Okular zentriert ist,
schauen Sie durch das Sucherfernrohr und suchen
das den roten Punkt.
4455
11
11
33
22
22
12 | DEUTSCH
Anbringen des
Smartphones
Entfernen Sie die große Kappe, die den Spiegel auf
der Vorderseite des StarSense-Docks abdeckt.
Öffnen Sie den federgespannten Schieber oben am
Telefondock durch Ziehen und setzen Sie das Telefon
so in die Halterung ein, dass es bündig mit der unteren
Lippe der Telefonhalterung abschließt. Lassen Sie
den Schieber langsam los, um das Telefon zu sichern.
Die meisten Telefone passen mit angebrachter Hülle
in das Dock. Möglicherweise müssen Sie jedoch Ihre
Telefonhülle entfernen, wenn sie besonders sperrig
ist oder nicht in die Klemme passt (z. B. Schutzhüllen
im Folio-Stil).
Herzlichen Glückwunsch! Nun ist Ihr Teleskop
vollständig zusammengebaut und Sie sind bereit, den
Kosmos zu erforschen. Nehmen Sie das Teleskop nach
draußen, setzen Sie Ihr 25-mm-Okular ein, entfernen
Sie den Objektivdeckel, setzen Sie Ihr Smartphone
in die Halterung ein und starten Sie die StarSense
Explorer-App. Das Tutorial der App führt Sie durch die
Schritte zum Auffinden Ihres ersten astronomischen
Ziels.
Ihre erste
Nacht im Freien
Für weitere Informationen zu diesem Produkt, besuchen Sie die entsprechende
Produktseite auf celestron.com
SONNENSTRAHLEN-WARNHINWEIS:
Niemals ohne einen vorschriftsmäßigen Sonnenfilter durch ein Teleskop in die Sonne schauen.
Brauchen Sie Unterstützung?
Wenden Sie sich an die technische Unterstützung von Celestron unter celestron.com/pages/technical-support
www.celestron.com/pages/warranty
©2023 Celestron. Celestron und Logo sind Marken von Celestron, LLC.
Alle Rechte Vorbehalten. • Celestron.com
2835 Columbia Street, Torrance, CA 90503 USA
Dieses Produkt ist für Personen ab 14 Jahren konzipiert und vorgesehen.
Hergestellt in China
03-23
1122
ITALIANO | 13
ARTICOLO N. 22462
5” SCHMIDT-CASSEGRAIN
Guida rapida
ITALIANO Disimballare il telescopio e verifi care che siano
presenti tutti i componenti. Il StarSense Explorer DX
comprende: un tubo del telescopio, un treppiede
e una testa per montatura, due di controllo del
movimento lento aste, una borsa degli accessori, un
vassoio porta accessori, due oculari, un diagonale
raddrizzatore d’immagine, un cercatore, un aggancio
per telefono StarSense, scheda con codice per l’app
StarSense Explorer powered by SkySafariTM, e una
chiave a brugola (nascosta all’interno della fessura
nella parte anteriore della testa della montatura).
Per confi gurare il treppiede, allargare le gambe verso
l’esterno fi no a quando non saranno completamente
estese e spingere verso il basso il supporto centrale
delle gambe.
Posizionare il vassoio porta accessori sopra il
supporto centrale e allineare i tre fori. Inserire le tre viti
ad alette attraverso la base del supporto delle gambe
e avvitarle nel vassoio.
Per fi ssare le manopole del movimento lento alla
montatura, innanzitutto localizzare la chiave a brugola
fornita in dotazione che è nascosta all'interno della
fessura nella parte anteriore della montatura.
Sistemare la manopola di controllo del movimento
lento sull'asta a forma di D e spingere verso l'interno
per garantire che sia posizionata correttamente.
Utilizzare la chiave a brugola per serrare le viti sull'asta.
Riporre la chiave a brugola nel relativo vano nella parte
anteriore della montatura.
Tenere il tubo del telescopio a fi anco alla montatura
con la barra a coda di rondine sul tubo rivolta verso
il fermo sulla sommità del braccio della montatura.
Fare scorrere la barra a coda di rondine nel fermo
sulla sommità della montatura e serrare la manopola
manuale sulla parte inferiore del fermo per fi ssare il
telescopio in posizione.
Individuare il diagonale raddrizzatore di immagini e
rimuovere i coperchi in plastica. Inserire il barilotto del
diagonale nella parte posteriore del tubo del telescopio
e fi ssarla in posizione serrando le viti di fermo.
Inserire il barilotto dell’oculare da 25 mm nel diagonale
e serrare la vite.
Estendere le gambe del treppiede allentando le
tre manopole manuali su ciascuna gamba. Estrarre
completamente ciascuna sezione della gamba e
serrare le manopole manuali per fi ssare in posizione.
77
881010
11
99
22
44
5566
33
14 | ITALIANO
Download the app from the
before your first observing session
.
or
When prompted, enter the unique unlock code below to
enable telescope control on your device.
Allentare le due viti con testa a croce sul lato del
mirino e far scorrere il mirino sulla coda di rondine
di montaggio sulla parte superiore del tubo del
telescopio. La grande finestra sul mirino dovrebbe
essere rivolta verso la parte anteriore del telescopio.
Fissare la staffa serrando le viti con testa a croce sul
lato del cercatore.
Per installare l'aggancio per telefono StarSense,
inserire la montatura a baionetta a lato dell'aggancio
nella porta a lato della montatura sul lato opposto al
fermo a coda di rondine.
Allineare la freccia sull'aggancio con il segno presente
sulla montatura e premere verso l'interno ruotando
contemporaneamente in senso antiorario l'aggancio
fino a quando il pulsante di rilascio arancione scatta
in posizione sul foro dell'aggancio.
Per rimuovere l'aggancio, premere il pulsante di
rilascio arancione e ruotare l'aggancio in senso orario
fino al rilascio della montatura a baionetta.
Rimuovere il tappo della lente dalla parte anteriore
del telescopio. Per osservare, guardare attraverso
l'oculare come mostrato sopra. Mettere a fuoco
l'immagine ruotando la manopola sotto l’oculare e in
diagonale.
Come scaricare e
attivare l’app
Prima di portare fuori il telescopio, scarica l’app
StarSense Explorer powered by SkySafariTM sul tuo
dispositivo mobile. Cerca “Celestron StarSense
Explorer” nell’Apple App Store o in Google Play. L’app
è grande, quindi ti consigliamo di scaricarla mentre
sei connesso al Wi-Fi.
Una volta scaricata l’app, individuare la cartolina
arancione all’interno della scatola del telescopio.
Avviare l’app. Quando richiesto, inserire il codice di
attivazione presente sulla cartolina per attivare l’app. Il
codice consente di sbloccare fino a 5 dispositivi alla
volta.
È presente una piccola linguetta in plastica trasparente
tra la batteria e il contatto. Ciò è presente per impedire
che la batteria si scarichi durante il trasporto. Estrarla
per consentire il funzionamento della batteria.
131312121111
1616
1414 1515
11
ITALIANO | 15
Moving the
Telescope
Aligning the
Finderscope
Oculare da 25 mm
Manopola della
messa a fuoco
La montatura StarSense Explorer DX è dotata di frizioni
antisaltellamento su entrambi gli assi. Per fare ampi
movimenti con il telescopio, tenere semplicemente
una gamba del treppiede con una mano e utilizzare
l'altra mano sul telescopio per spostare il telescopio
nella direzione desiderata.
Per effettuare regolazioni di precisione o per tracciare
corpi celesti, ruotare entrambe le manopole del
movimento lento come desiderato.
Il cercatore è uno dei componenti più importanti del
telescopio. Aiuta a localizzare gli oggetti e a centrarli
nell'oculare. Al primo assemblaggio del telescopio
è necessario allineare il cercatore con le ottiche
principali del telescopio. È preferibile eseguire questa
operazione durante il giorno*.
* AVVERTENZA SOLARE! Non tentare
mai di osservare il Sole attraverso un
telescopio senza un fi ltro solare adeguato.
CENTRARE L'OGGETTO NELL'OCULARE
Guardare attraverso il telescopio utilizzando l’oculare
con minore ingrandimento. Muovere il telescopio
no a quando l’oggetto prescelto si trova al centro
del campo visivo. Se l’immagine è sfocata, ruotare
delicatamente la manopola di messa a fuoco fi no a
quando non viene messa a fuoco nitida.
N OTA: L’immagine del telescopio potrebbe apparire
capovolta. Ciò è perfettamente normale per
un telescopio astronomico.
SCEGLIERE UN OGGETTO DA OSSERVARE
Portare il telescopio all’esterno durante il giorno
e individuare un oggetto facilmente riconoscibile,
come ad esempio un semaforo, la targa di un’auto o
un cartello. L’oggetto dovrebbe trovarsi il più lontano
possibile, minimo a 400 metri.
REGOLARE IL CERCATORE
Senza spostare il telescopio, utilizzare due manopole
di regolazione per spostare il cercatore fi no a quando
puntino rosso appare sullo stesso oggetto che si sta
osservando nell’oculare da 25 mm.
IL CERCATORE È ORA ALLINEATO!
Non occorre effettuare un nuovo allineamento salvo
colpi o cadute.
OSSERVARE ATTRAVERSO IL CERCATORE
Una volta che l’oggetto è centrato nell’oculare da
25 mm, guardare attraverso il cercatore e localizzare
puntino rosso.
4455
11
11
33
22
22
16 | ITALIANO
Rimuovere il coperchio grande che copre lo specchio
nella parte anteriore dell'aggancio StarSense.
Tirare per aprire il binario caricato a molla in cima
all'aggancio per telefono e sistemare il telefono
nel supporto in modo che sia a contatto con il
lembo inferiore del supporto del telefono. Rilasciare
lentamente il binario per fissare il telefono in
posizione. Gran parte dei telefoni può essere inserita
con la custodia. Tuttavia, potrebbe essere necessario
rimuovere la custodia del telefono se particolarmente
ingombrante o se non è possibile inserirla nel fermo
(ad es. custodie a portafoglio).
Collegamento dello
smartphone
La prima
osservazione
notturna
Congratulazioni! Il telescopio è ora configurato e tutto
è pronto per esplorare il cosmo. Portare all'esterno il
telescopio, inserire l'oculare da 25 mm, rimuovere il
tappo dalla lente, inserire lo smartphone nel supporto
e avviare l'app StarSense Explorer. Il tutorial dell'app
guida l'utente attraverso i vari passaggi necessari per
localizzare il primo oggetto astronomico.
Per maggiori informazioni sul prodotto, visitare la pagina relativa al prodotto su
celestron.com
AVVERTENZA SOLARE:
Non tentare mai di osservare il sole attraverso un telescopio senza un filtro solare adeguato.
Bisogno di aiuto?
Contattare l'assistenza tecnica Celestron su celestron.com/pages/technical-support
www.celestron.com/pages/warranty
©2023 Celestron. Celetron e Symbol sono marchi di Celestron, LLC.
Tutti i diritti riservati. • Celestron.com
2835 Columbia Street, Torrance, CA 90503 Stati Uniti
Questo prodotto è progettato per essere utilizzato da persone di età
pari o superiore ai 14 anni.
Prodotto in Cina
03-23
1122
ESPAÑOL | 17
SCHMIDT-CASSEGRAIN DE 5”
PRODUCTO # 22462
ESPOL
Guía de instalación rápida
Desembale el telescopio y compruebe que estén
presentes todas las piezas. Su StarSense Explorer
DX incluye: un tubo de telescopio, un trípode y
cabezal de soporte, una bolsa de accesorios,, dos
mandos de control de movimiento, una bandeja de
accesorios, dos oculares, un localizador, una diagonal
de imagen recta, un conector de teléfono StarSense,
una tarjeta de código para la app Celestron SkyPortal
con tecnología de la app SkySafariTM, y una llave
hexagonal (oculta en la ranura de la parte anterior del
cabezal del soporte).
Para instalar el trípode, separe las patas hacia fuera
hasta que estén totalmente extendidas y empuje el
soporte de las patas central.
Extienda las patas del trípode desbloqueando los tres
mandos de cada pata. Tire de cada sección de pata
por completo y apriete los mandos para asegurarlas
en posición.
Coloque la bandeja de accesorios sobre el soporte
central y alinee los tres agujeros. Introduzca los tres
tornillos por la parte inferior del soporte de la pata y
enrósquelos en la bandeja.
Para instalar los mandos de movimiento lento en el
soporte, localice primero la llave hexagonal incluida,
oculta en la ranura de la parte anterior del soporte.
Coloque el mando de control de movimiento lento
sobre el eje del engranaje en forma de D y presiónelo
hacia dentro para asegurarse de que esté totalmente
introducido. Use la llave hexagonal para apretar los
tornillos en el eje del engranaje. Vuelva a colocar
la llave hexagonal en su posición de guardado en la
parte anterior del soporte.
Aguantando del tubo del telescopio al lado del
soporte, ponga la barra machihembrada sobre el
tubo, orientada a la fi jación de la parte superior del
brazo del soporte.
Deslice la barra machihembrada en la fi jación de la
parte superior del soporte y apriete el mando manual
de la parte inferior de la fi jación para asegurar el
telescopìo en posición.
Localice la diagonal de imagen recta y saque las tapas
de plástico. Inserte el cilindro de la diagonal en la parte
posterior del tubo del telescopio y fíjelo apretando los
tornillos de fi jación.
Introduzca el cañón del ocular de 25 mm en la
diagonal y apriete el tornillo.
77
881010
11
99
22
44
5566
33
18 | ESPAÑOL
Download the app from the
before your first observing session
.
or
When prompted, enter the unique unlock code below to
enable telescope control on your device.
Afloje los dos tornillos de cabeza Phillips en el costado
del localizador y deslice el localizador en la cola de
milano de montaje en la parte superior del tubo del
telescopio. La ventana grande en el localizador debe
estar orientada hacia el frente del telescopio. Asegure
el soporte apretando los tornillos de cabeza Phillips
en el costado del localizador.
Para instalar el conector de teléfono StarSense,
introduzca el soporte de bayoneta en el lateral del
conector, en el puerto del lateral del soporte al otro
lado de la fijación machihembrada.
Alinee la flecha del conector con la marca de
alineación del soporte y presione hacia dentro girando
el conector en sentido contrario a las agujas del reloj
hasta que el botón de liberación naranja encaje en
posición en el agujero del conector.
Para sacar el conector pulse el botón de liberación
naranja y gire el conector en el sentido de las agujas
del reloj hasta que el soporte de bayoneta se suelte.
Saque la tapa de la lente de la parte anterior del
telescopio. Para observar, mire por el ocular como se
indica anteriormente. Enfoque la imagen girando el
mando bajo el ocular y diagonal.
Descarga y
activación de la app
Antes de sacar el telescopio al exterior, descargue
la app StarSense Explorer en su dispositivo móvil.
Busque Celestron SkyPortal con tecnología de la
app SkySafariTM en Apple App Store o Google Play.
La app tiene un gran tamaño, recomendamos que la
descargue cuando esté conectado a WiFi.
Cuando haya descargado la app, localice la tarjeta
naranja en la caja de su telescopio. Ejecute la
app. Cuando se solicite, introduzca el código de
activación de la tarjeta para activar la app. Su código
desbloqueará hasta 5 dispositivos.
131312121111
1616
1414 1515
11
Entre la batería y el contacto hay una pequeña pestaña
de plástico transparente. Se ha incluido para evitar
que la batería se descargue durante el transporte.
Sáquela para que funcione la batería.
ESPAÑOL | 19
Ocular de 25 mm
Mando de enfoque
Para realizar ajustes precisos o seguir objetos
celestes, gire ambos mandos de movimiento lento
según sea necesario.
Movimiento del
telescopio
CENTRAR EL OBJETO EN EL OCULAR
Mire por el telescopio usando el ocular con menor
potencia. Mueva el telescopio hasta que el objeto
elegido quede en el centro del campo de visión. Si la
imagen se ve borrosa, gire suavemente el mando de
enfoque hasta que quede bien enfocado.
N OTA: La imagen del telescopio puede aparecer
invertida. Es normal en un telescopio astronómico.
Alinear el
localizador
El localizador es una de las piezas más importantes
de su telescopio. Le ayuda a localizar objetos y
centrarlos en el ocular. La primera vez que monte el
telescopio, deberá alinear el localizador con la óptica
principal del telescopio. Es preferible hacerlo de día.
* ¡AVISO SOLAR! No intente nunca
observar el sol por un telescopio sin un
ltro solar adecuado.
ELEGIR UN OBJETO
Saque el telescopio de día y localice un objeto
fácilmente reconocible, como una farola, una matrícula
de coche, o una señal. El objeto debe estar lo más
lejos posible, al menos a 400 m.
AJUSTAR EL LOCALIZADOR
Sin mover el telescopio, use los dos mandos de
ajuste para moverlo hasta que el punto de mira/punto
rojo aparezca sobre el objeto que está observando en
el ocular de 25 mm del telescopio.
SU LOCALIZADOR ESTÁ ALINEADO.
No debería realinarse a menos que reciba golpes
o caiga.
MIRAR POR EL LOCALIZADOR
Cuando el objeto esté centrado en el ocular de
25 mm, mire por el localizador y localice punto rojo.
El soporte StarSense Explorer DX tiene fi jaciones
deslizantes en ambos ejes. Para realizar movimientos
de gran tamaño con el telescopio, aguante una pata
del trípode con una mano y use la otra mano en el
tubo del telescopio para empujar el telescopio en la
dirección deseada.
4455
11
11
33
22
22
20 | ESPAÑOL
Instalación del
teléfono
Saque la tapa grande que cubre el espejo de la parte
anterior del conector StarSense.
Abra el deslizador de muelle de la parte superior
del conector del teléfono y coloque el teléfono en
el soporte de forma que quede llano con el borde
inferior del soporte del teléfono. Suelte lentamente
el deslizador para asegurar el teléfono en posición.
La mayoría de teléfonos caben en el conector con
la funda puesta. Sin embargo, puede que tenga
que sacar la funda del teléfono si es especialmente
voluminosa o no encaja en la fijación (por ejemplo,
fundas con tapa).
Su primera
noche fuera
Felicidades. El telescopio está totalmente montado
y listo para explorar el cosmos. Saque el telescopio
al exterior, introduzca el ocular de 25 mm, saque la
tapa de la lente, introduzca el teléfono en su soporte
y ejecute la app StarSense Explorer. El tutorial de la
app le guiará por los pasos para localizar su primer
objetivo astronómico.
Para obtener más información de este producto, visite la página de producto
correspondiente en celestron.com
AVISO SOLAR:
No intente nunca observar el sol por un telescopio sin un filtro solar adecuado.
¿Necesita ayuda?
Contacte con el soporte técnico de Celestron celestron.com/pages/technical-support
www.celestron.com/pages/warranty
©2023 Celestron. Celestron y su símbolo son marcas comerciales de Celestron, LLC.
Todos los derechos reservados. • Celestron.com
2835 Columbia Street, Torrance, CA 90503 EE.UU.
Este producto ha sido diseñado y está pensado para ser usado por personas
de 14 años o más de edad.
Fabricado en China
03-23
1122
  • Page 1 1
  • Page 2 2
  • Page 3 3
  • Page 4 4
  • Page 5 5
  • Page 6 6
  • Page 7 7
  • Page 8 8
  • Page 9 9
  • Page 10 10
  • Page 11 11
  • Page 12 12
  • Page 13 13
  • Page 14 14
  • Page 15 15
  • Page 16 16
  • Page 17 17
  • Page 18 18
  • Page 19 19
  • Page 20 20

Celestron 22462 Benutzerhandbuch

Kategorie
Teleskope
Typ
Benutzerhandbuch