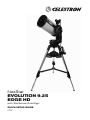
Celestron NexStar Evolution 9.25 Edge HD Benutzerhandbuch
- Kategorie
- Teleskope
- Typ
- Benutzerhandbuch

NexStar
EVOLUTION 9.25
EDGE HD
with StarSense AutoAlign
QUICK SETUP GUIDE
#12097


ENGLISH I 3
Table of Contents
System Requirements . . . . . . . . . . . . . . . . . . . . . . . . . . . . . . . . . . . . . . . . . . . .5
Solar Warning . . . . . . . . . . . . . . . . . . . . . . . . . . . . . . . . . . . . . . . . . . . . . . . . 5
Overview . . . . . . . . . . . . . . . . . . . . . . . . . . . . . . . . . . . . . . . . . . . . . . . . . . .6
Parts List . . . . . . . . . . . . . . . . . . . . . . . . . . . . . . . . . . . . . . . . . . . . . . . . . . .6
How To Use This Quick Setup Guide . . . . . . . . . . . . . . . . . . . . . . . . . . . . . . . . . . . 7
Quick Setup . . . . . . . . . . . . . . . . . . . . . . . . . . . . . . . . . . . . . . . . . . . . . . . . . 7
Important Information About Your Edge HD 9.25” Optical Tube Assembly . . . . . . . . . . . . . . . 10

4 I ENGLISH

ENGLISH I 5
System Requirements
• AC outlet to charge the telescope with the supplied AC power
adapter, works on US, UK, EU, and AU format AC outlets.
• An Apple iOS device with iOS 7.0 and later or an Android
device with Android 4.0 if used without the included
StarSense hand control.
• Free download of Celestron SkyPortal app from the App
Store or Google Play if used without the included NexStar+
hand control.
Solar Warning
• Never look directly at the Sun with the naked eye or
with a telescope (unless you have the proper solar filter).
Permanent and irreversible eye damage may result.
• Never use your telescope to project an image of the Sun
onto any surface. Internal heat build-up can damage the
telescope and any accessories attached to it.
• Never use an eyepiece solar filter or a Herschel wedge.
Internal heat build-up inside the telescope can cause these
devices to crack or break, allowing unfiltered sunlight to
pass through to the eye.
• Never leave the telescope unsupervised. Make sure an
adult who is familiar with the correct operating procedures
is with your telescope at all times, especially when children
are present.

6 I ENGLISH
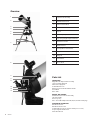
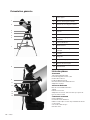
1
2
3
4
5
6
8
10
11
12
13
14
9
7
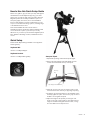
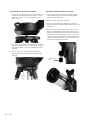
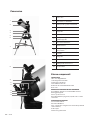
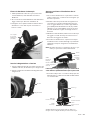
Overview
1 Optical Tube Assembly
2 Altitude Clutch Knob
3 Azimuth Clutch Knob
4 Fork Arm Mount
5 Tripod
6 Accessory Tray
7 Tripod Leg Height Adjustment Knobs
8 StarSense Camera
9 StarPointer Pro
10 Primary Mirror Clutch Knobs
11 Eyepiece
12 Diagonal
13 Visual Back
14 Focus Knob
Parts List
TELESCOPE
EdgeHD 9.25” Optical Tube Assembly
1.25” Prism Star Diagonal
25mm Plössl Eyepiece
2x Omni Barlow Lens
StarPointer Pro Illuminated Reflex Finder
Visual Back
Moon Filter
MOUNT AND TRIPOD
NexStar Evolution Fork Arm Assembly
Tripod Assembly
Accessory Tray
AC to 12 Volt DC adapter with US, UK, EU, and AU format plugs
STARSENSE AUTOALIGN
StarSense Camera
StarSense Hand control
Coiled Cable (Connects camera to AUX port on mount)
2 Nylon Tipped Thumbscrews
4mm Allen Wrench

ENGLISH I 7
How to Use this Quick Setup Guide
Refer to this guide to get your telescope setup and aligned
with StarSense and the SkyPortal app using your smart
device. Here you will also find useful information about the
EdgeHD optical tube assembly and different options for
astrophotography. From there, refer to the full NexStar
Evolution and StarSense manuals included with your tele-
scope for more advanced settings options, including usage
of the StarSense hand control.
Note that the NexStar Evolution manual refers to
Schmidt-Cassegrain optical tubes and the NexStar+ hand
control which are not part of your telescope. The key
differences in your telescope are the 9.25” EdgeHD optical
tube, StarSense AutoAlign camera, and StarSense hand
control.
Quick Setup
Download the SkyPortal App, available on the App Store
and Google Play.
SkyPortal iOS
celestron.com/SkyPortalApple
SkyPortal Android
celestron.com/SkyPortalGooglePlay
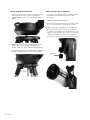
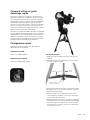
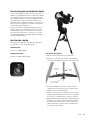
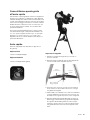
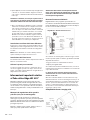
Setup the Tripod
1. Spread the tripod legs and stand the tripod upright.
2. Remove the Tripod Support Nut and Washer from the
central column attached to the top of the tripod.
3. Place the accessory tray over the central column so that
each of the three arms of the tray is supporting a tripod leg.
4. Thread the nut and washer back onto the threaded column
and firmly tighten into place. The accessory tray should not
be able to move against the tripod.
5. Adjust the height of the tripod by loosening the lock
knobs on the end of each tripod leg. Then adjust the leg
height as needed and retighten the lock knobs, one leg
at a time. Make sure the tripod is level.
Tripod Support Nut and Washer
Accessory
Tray Central Column

8 I ENGLISH
Attach the Mount to the Tripod
1. Position the fork arm mount over the center post on the
tripod head. Do not let go of the mount until it has
registered with the center post. The mount should not
wobble.
2. With the mount resting on the tripod head, rotate the
mount until the three mounting sockets align. The
sockets will click into place, indicating they are aligned.
3. Thread the three captive mounting bolts from underneath
the tripod head into the bottom of the telescope base.
Attach the Telescope to the Mount
1. Loosen the orange altitude clutch lock knob and rotate
the altitude axis until the quick release knob faces
downward.
2. Tighten the altitude clutch lock knob.
3. Loosen the quick release knob a couple of turns to allow
room for the dovetail on the telescope optical tube.
4. Slide the telescope optical tube into the quick release
slot from the back side of the telescope. The fork arm
should be on the left side of the optical tube. For correct
balance, position the telescope so that you can read the
“Evolution” nameplate. If you choose to add different
accessories to your telescope, you can rebalance it later.
1 of 3
Mounting Bolds
Quick Release
Knob

ENGLISH I 9
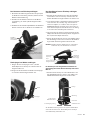
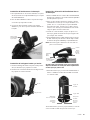
Attach StarSense to the Telescope
1. Partially thread the two nylon-tipped thumbscrews
(included in the StarSense box) onto your StarSense
camera bracket.
2. Slide the StarSense camera onto the mounting bracket
on the telescope. Lock both thumbscrews.
3. Plug the supplied coiled cable into the StarSense
camera and one of the 4 aux ports located on the fork
arm.
Insert the Star Diagonal and Eyepiece
1. Insert the Star Diagonal into the 1.25” visual back of your
telescope and tighten the thumbscrews.
2. Insert the 25mm Plössl eyepiece into the Star Diagonal
and tighten the thumbscrews.
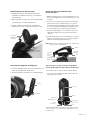
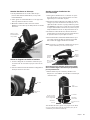
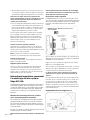
Attach and Align the StarPointer Pro
to the Telescope
1. Slide the StarPointer Pro over the dovetail base on your
telescope and tighten the two silver thumbscrews to lock
it in place.
2. Loosen the two orange ring clutch knobs and manually
point the telescope to a distant object (1000 yards or
more) during the day (NEVER point directly at the Sun!).
You can use a bright celestial object like the Moon, but
it’s easier initially to pick a stationary ground target.
3. Using the 25mm eyepiece, focus the telescope on the
object by turning the focus knob. Ensure the object is
centered.
4. Turn the StarPointer Pro on to full brightness to view the
bullseye. Center the bullseye over your target using the
up/down and left/right adjustment knobs.
Note: Remember to turn the StarPointer Pro off after each
usage to preserve battery life.
Your telescope is setup and ready to align! Here’s
how to quickly align your telescope for the first time
1. Power the scope on and connect to its WiFi network
from your phone or tablet. The WiFi network name will
begin with “Celestron-XX”.
Your NexStar Evolution generates its own WiFi network,
you do not have to be connected to anything else to use
the telescope.
Coiled Cable
(StarSense Camera
to AUX Port)
StarSense Camera
Attachment Thumbscrews
Eyepiece
Star Diagonal
Window
Left/Right
Adjustment
Knob
Attachment
Thumbscrews
On/Off Switch and
Brightness Control
Up/Down
Adjustment
Knob
Power Logo
Wifi Logo
Power Switch
5VDC Out
USB Charge Port
12VDC
Power Input Aux Accessory
Ports

10 I ENGLISH
2. Open SkyPortal, tap the scope icon, and tap “Connect
and Align”. Follow the on-screen prompts and StarSense
will automatically align your telescope.
StarSense is aligned, but there’s just one first-time-
only step before you’re ready to go: Calibrate the
camera to the telescope.
3. After the StarSense alignment is complete, select a
bright star in SkyPortal by tapping it on the screen, then
tap “GoTo”. If the star is not in the eyepiece’s field of
view, start by centering it in the StarPointer, then center
it in the eyepiece.
With the star centered in the eyepiece, tap Align, then
tap Calibrate. Once the camera is calibrated, follow the
prompts to start a new StarSense Auto alignment. You
only need to do this the first time you are using
StarSense with the telescope in SkyPortal.
Installing & Using The Barlow Lens
Your telescope also comes with a 2x Barlow lens which
doubles the magnifying power of each eyepiece. To use the
Barlow lens, insert the Barlow between the diagonal and
the eyepiece.
Note: Start by using a low power eyepiece as it will be
easier to focus.
Installing The Moon Filter
To use the moon filter, simply thread the filter to the chrome
barrel of the eyepiece.
Aligned and Ready to Observe!
Tap objects on your screen and select GoTo, or search for
a specific object in the search field. To start out, you can
choose from “Tonight’s Best” list in SkyPortal under the
Search menu.
Important Information About
Your Edge HD 9.25” Optical Tube
Assembly
Your EdgeHD is optimized for both visual astronomy and
astrophotography, delivering images free of coma or field
curvature across a large image circle. Start by using the
supplied 1.25” visual back, Star Diagonal, and eyepieces
to familiarize yourself with the telescope.
Primary Mirror Clutch Knobs
(for Astrophotography Only)
These clutch knobs (shown in overview image) hold the
mirror in place to prevent movement during a long exposure
astrophoto. Keep these loosened unless you are using a
camera for long exposures.
When using a camera, focus the telescope first, then
tighten the knobs.
Warning: Do not turn the focus knob with the
clutch knobs tightened. Anytime you refocus the
telescope, loosen the clutch knobs.
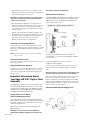
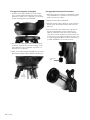
Optimum Camera Distance
The 9.25” EdgeHD was designed to work with your camera
at a specific distance from the end of the threads (of the
adapter plate shown in the diagram) on the back of the
scope to the camera’s sensor.
If you are using a DSLR, the distance is already set
correctly when you use these standard adapters available
from Celestron:
T-ring for the make and model of your camera
T-adapter for 9.25” EdgeHD
If you are using an astronomical CCD camera, you must
determine the necessary adapter length to the camera
body.
The total distance from the end of the adapter plate
threads to the camera sensor should be 146mm.
This is the total required backfocus distance. Your camera
body to the imaging sensor will take up some of this
backfocus distance. Your camera manufacturer will usually
specify the camera backfocus distance. For example, if your
camera’s backfocus distance is 55mm, then you will need
91mm of spacing to reach 146mm.
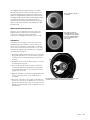
Fastar Compatibility and Imaging at f/2
EdgeHD 9.25” - Optimum Back Focus Distance
Remove Visual Back
Camera Adapter
or T-Adapter
Camera
Focal
Plane
Adapter
Plate
Secondary
Mirror
Corrector Plate
Secondary Mirror
Mount Plate
Secondary
Mirror
Retaining
Ring

ENGLISH I 11
Your EdgeHD 9.25” is equipped with a removable
secondary mirror that allows you to convert your f/10
telescope into an f/2 imaging system using an optional lens
accessory made by Starizona. This adds versatility to use
the telescope at different focal ratios for astrophotography.
Imaging at f/2 is favored for wide-angle deep sky imaging
with short exposures, well suited to large deep sky objects.
Optional Focal Reducer
A dedicated 0.7x Focal Reducer for the 9.25” EdgeHD is
available from Celestron. This focal reducer maintains the
flat-field and coma-free imaging performance specifically
designed for this telescope.
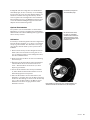
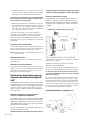
Collimation
Your telescope is factory aligned and generally should not
need collimation unless it is transported roughly. However,
you should be aware of the eventual need to collimate your
telescope to keep it operating at peak performance.
1. Using your included 25mm eyepiece (or a higher power
eyepiece if you have one), point the telescope at a
moderately bright star center it in the eyepiece.
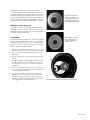
2. Defocus the star about 1 turn on the focus knob.
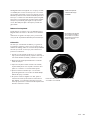
3. Inspect the star pattern. When collimated, the pattern
should look like a concentric doughnut. If the pattern is
concentric, no adjustment is necessary.
4. Adjust the telescope collimation if needed by slightly
adjusting the 3 Phillips head screws in front of the
secondary mirror.
5. If the star pattern is thin on one side, adjust the
collimation so that the star moves towards the thin side,
then adjust the position of the telescope to re-center the
star. Repeat this until you achieve correct collimation.
Secondary Mirror Collimation Adjustment Screws
A defocused star where
the secondary shadow
is not concentric to the
star pattern indicates
the telescope requires
collimation.
The telescope is
collimated if the
defocused star pattern is
concentric as shown.

© 2021 Celestron • All rights reserved
celestron.com
Torrance, CA 90503 U.S.A.
Printed in China
01-21

NexStar
EVOLUTION 9.25
EDGE HD
avec StarSense AutoAlign
GUIDE DE DÉMARRAGE RAPIDE
#12097


FRANÇAIS I 15
Sommaire
Configuration système requise . . . . . . . . . . . . . . . . . . . . . . . . . . . . . . . . . . . . . . . 17
Avertissement concernant le soleil . . . . . . . . . . . . . . . . . . . . . . . . . . . . . . . . . . . . .17
Présentation générale . . . . . . . . . . . . . . . . . . . . . . . . . . . . . . . . . . . . . . . . . . . .18
Liste des composants . . . . . . . . . . . . . . . . . . . . . . . . . . . . . . . . . . . . . . . . . . . .18
Comment utiliser ce guide démarrage rapide . . . . . . . . . . . . . . . . . . . . . . . . . . . . . . . 19
Configuration rapide. . . . . . . . . . . . . . . . . . . . . . . . . . . . . . . . . . . . . . . . . . . . .19
Informations importantes concernant l'assemblage de tube optique Edge HD 9.25» . . . . . . . . . . 22

16 I FRANÇAIS

FRANÇAIS I 17
Configuration système requise
• Port secteur CA pour recharger le télescope avec le chargeur
secteur inclus. Compatible avec les prises murales CA de
types US, UK, EU at AU.
• Un appareil Apple iOS avec iOS 7.0 ou plus récent ou
un appareil Android avec Android 4.0 si utilisé sans la
commande à main StarSense.
• Application Celestron SkyPortal en téléchargement gratuit
sur l'App Store ou sur Google Play si utilisé sans la commande
à main NexStar+.
Avertissement Concernant le Soleil
• Ne regardez jamais directement le Soleil à l'œil nu
ou avec un télescope, à moins d'utiliser un filtre adapté.
Cela pourrait entraîner des lésions oculaires permanentes
et irréversibles.
• N'utilisez jamais votre télescope pour projeter une image du
Soleil sur une surface quelconque. Une concentration de
chaleur dangereuse peut endommager le télescope et les
accessoires attachés.
• Ne jamais utiliser un filtre solaire d'oculaire ou une cale de
Herschel. La concentration de chaleur au sein du télescope
peut entraîner des dommages à ces accessoires, laissant la
lumière du Soleil non filtrée arriver directement à vos yeux.
• Ne jamais laisser le télescope sans surveillance. Le télescope
doit être supervisé par une personne familiarisée avec
son fonctionnement à tout moment, et plus spécialement
lorsque des enfants sont présents.

18 I FRANÇAIS
Présentation générale
1. Tube optique
2. Bouton de blocage de l'altitude
3. Molette de verrouillage de l’azimut
4. Bras de fourche de monture
5. Trépied
6. Plateau à accessoires
7. Molettes de réglage de la hauteur
des pieds
8. Caméra StarSense
9. StarPointer Pro
10. Molettes de verrouillage du miroir
principal
11. Oculaire
12. Diagonale
13. Adaptateur d'optique
14. Bouton de mise au point
15. Niveau à bulle
Liste des pièces
TÉLESCOPE
Tube optique EdgeHD 9.25»
Prisme de diagonale en étoile 1,25"
Oculaire Plössl 25 mm
Lentille de Barlow Omni 2x
Chercheur illuminé réflex StarPointer Pro
Adaptateur d'optique
TRÉPIED ET MONTURE
Bras de fourche NexStar Evolution
Trépied
Plateau à accessoires
Adaptateur CA vers CC 12V avec fiches pour prises de
type US, UK, EU et AU.
STARSENSE AUTOALIGN
Caméra StarSense
Commande à main StarSense
Câble accordéon (Se connecte au port AUX de la caméra
sur la monture)
2 vis à main à tête de nylon
Clef Allen 4 mm
1
2
3
4
5
6
8
10
11
12
13
14
9
7

FRANÇAIS I 19
Comment utiliser ce guide
démarrage rapide
Consultez ce guide pour configurer votre télescope et
l'aligner avec StarSense et l'application SkyPortal installée
sur votre appareil intelligent. Vous y trouverez également
des informations utiles concernant le tube optique EdgeHD
et différentes options d'astrophotographie. Cela fait,
reportez-vous aux modes d'emploi complets pour NexStar
Evolution et StarSense inclus avec votre télescope pour
obtenir des informations de configuration avancées, incluant
l'utilisation de la commande à main StarSense.
Notez que le mode d'emploi NexStar Evolution est applicable
aux tubes optiques Schmidt-Cassegrain et à la commande à
main NexStar+, qui ne font pas partie de votre télescope. Les
différences principales sont que votre télescope est équipé
d'un tube optique 9.25» EdgeHD, d'une caméra StarSense
AutoAlign et d'une commande à main StarSense.
Configuration rapide
Téléchargez l'application SkyPortal, disponible sur
l'Apple Store et sur Google Play.
SkyPortal pour iOS
celestron.com/SkyPortalApple
SkyPortal pour Android
celestron.com/SkyPortalGooglePlay
Installation du pied
1. Écartez les pieds du trépied et mettez ce dernier à la
verticale.
2. Retirez la molette et la rondelle de la colonne centrale
présente en haut du trépied.
3. Positionnez le plateau à accessoires sur la colonne centrale
de manière à ce que les trois bras du plateau supportent
chacun un pied du trépied.
4. Vissez la molette avec la rondelle dans la colonne et
serrez fermement. Le plateau à accessoires ne doit pas
pouvoir bouger dans le trépied.
5. Réglez la hauteur du trépied en ouvrant les molettes de
verrouillage situées sur le bas du pied du trépied. Réglez
ensuite la longueur de chaque pied comme nécessaire
puis resserrez les molettes, une à la fois. Vérifiez que
le trépied est à niveau.
Molette et rondelle
du support du trépied
Plateau à accessoires Colonne
centrale

20 I FRANÇAIS
Fixer la monture à votre trépied
1. Positionnez la monture du bras de fourche sur le port
central de la tête du trépied. Ne lâchez pas la monture
tant qu'elle n'est pas insérée sur le port central. La
monture doit être stable.
2. La monture posée sur la tête du trépied, faites-la
pivoter jusqu'à ce que les trois douilles de monture
correspondent. Les douillent s'enclenchent, ce qui
indique qu'elles sont alignées.
3. Vissez les trois boutons par dessous la tête du trépied,
dans la base du télescope.
Fixation du tube du télescope sur la monture
1. Desserrez le molette de verrouillage d'altitude et faites
pivoter l'axe d'altitude jusqu'à ce que la molette de
deverrouillage rapide soit orientée vers le bas.
2. Serrez la molette d'altitude.
3. Desserrez de quelques tours la molette de verrouillage
rapide pour laisser de la place à l'attache en queue
d'arronde du tube optique
4. Faites glisser le tube optique dans la fente de
verrouillage rapide présente sur l'arrière du télescope Le
bras de la fourche doit se trouver sur le côté gauche du
tube optique Pour obtenir un bon équilibre, positionnez
le télescope de manière à ce que vous puissiez lire la
plaque portant le nom « Evolution ». Si vous souhaitez
ajouter des accessoires
à votre télescope, vous pouvez effectuer l'équilibre de
nouveau plus tard.
Écrous de
monture
1 à 3
Molette de déverrouillage
rapide
Seite laden ...
Seite laden ...
Seite laden ...
Seite laden ...
Seite laden ...
Seite laden ...
Seite laden ...
Seite laden ...
Seite laden ...
Seite laden ...
Seite laden ...
Seite laden ...
Seite laden ...
Seite laden ...
Seite laden ...
Seite laden ...
Seite laden ...
Seite laden ...
Seite laden ...
Seite laden ...
Seite laden ...
Seite laden ...
Seite laden ...
Seite laden ...
Seite laden ...
Seite laden ...
Seite laden ...
Seite laden ...
Seite laden ...
Seite laden ...
Seite laden ...
Seite laden ...
Seite laden ...
Seite laden ...
Seite laden ...
Seite laden ...
Seite laden ...
Seite laden ...
Seite laden ...
Seite laden ...
-
 1
1
-
 2
2
-
 3
3
-
 4
4
-
 5
5
-
 6
6
-
 7
7
-
 8
8
-
 9
9
-
 10
10
-
 11
11
-
 12
12
-
 13
13
-
 14
14
-
 15
15
-
 16
16
-
 17
17
-
 18
18
-
 19
19
-
 20
20
-
 21
21
-
 22
22
-
 23
23
-
 24
24
-
 25
25
-
 26
26
-
 27
27
-
 28
28
-
 29
29
-
 30
30
-
 31
31
-
 32
32
-
 33
33
-
 34
34
-
 35
35
-
 36
36
-
 37
37
-
 38
38
-
 39
39
-
 40
40
-
 41
41
-
 42
42
-
 43
43
-
 44
44
-
 45
45
-
 46
46
-
 47
47
-
 48
48
-
 49
49
-
 50
50
-
 51
51
-
 52
52
-
 53
53
-
 54
54
-
 55
55
-
 56
56
-
 57
57
-
 58
58
-
 59
59
-
 60
60


Celestron NexStar Evolution 9.25 Edge HD Benutzerhandbuch
- Kategorie
- Teleskope
- Typ
- Benutzerhandbuch
in anderen Sprachen
Verwandte Papiere
-
Celestron 22462 Benutzerhandbuch
-
Celestron 11049 Benutzerhandbuch
-
Celestron 22480 Benutzerhandbuch
-
Celestron 22470 Benutzerhandbuch
-
Sharper Image Smart Tracking Telescope Bedienungsanleitung
-
-
-
Celestron 11068 Benutzerhandbuch
-
-