Pepperl+Fuchs VBG-PB-K20-DMD-EV Bedienungsanleitung
- Typ
- Bedienungsanleitung

AS-i 3.0 Profibus-Gateway in Edelstahl
Montageanweisung // Installation Instructions // Notice de montage //
18.01.2013
1
1. Montageanweisung // Installation Instructions // Notice de
montage // Istruzioni per il montaggio // Instrucciones de montaje
1.2 Produktdokumentation im Internet / Product documentation on the
Internet / Documentation du produit sur Internet / Documentazione del pro-
dotto su Internet / Documentatión del producto en Internet
1.1 VBG-PB-K20-DMD-EV
AS-i 3.0 PROFIBUS Gateway in Edelstahl
AS-i 3.0 PROFIBUS Gateway in Stainless Steel
Passerelle AS-i 3.0 PROFIBUS DP en boîtier inox
Gateway AS-i 3.0 PROFIBUS d´acciaio inox
Pasarela AS-i 3.0 PROFIBUS en acero inoxidable
External Protection
An isolated source with a secondary open circuit voltage of
≤
30 VDC with a 3 A maxi-
mum over current protection.
Die komplette Dokumentation und weitere Informationen zu Ihrem Produkt finden Sie auf
The complete documentation and additional information to your product can be found on
Vous trouverez la documentation complète, ainsi que des informations supplémentaires sur
votre produit en allant sur
La completa documentazione e altre informazioni del suo prodotto si trovano sul
La documentación completa e información adicional sobre su producto se puede
encontrar en
http://www.pepperl-fuchs.com
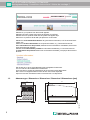
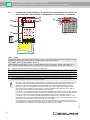
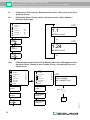
Geben Sie dazu die Produktbezeichnung VBG-PB-K20-DMD-EV, wie in der Abbildung
beschrieben, ein und klicken Sie auf Suche
Insert the product name VBG-PB-K20-DMD-EV as shown in the figure and press SEARCH
Pour ce faire, entrez la désignation du produit VBG-PB-K20-DMD-EV, comme montré sur
l’illustration, puis cliquez sur RECHERCHE
Si prega di inserire il nome del prodotto VBG-PB-K20-DMD-EV come è descritto nell’imma-
gine e clicca su RICERCA
Inserte el nombre del producto VBG-PB-K20-DMD-EV como se muestra en la figura y
presiones BUSCAR

18.01.2013
2
AS-i 3.0 Profibus-Gateway in Edelstahl
Montageanweisung // Installation Instructions // Notice de montage //
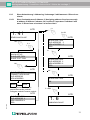
1.3 Abmessungen / Dimensions / Dimensions / Dimensioni / Dimensiones [mm]
Wählen Sie Ihr Produkt in der draufhin erscheinenden Produktliste aus.
Select then your product from the list that appears.
Sélectionnez votre produit dans la liste de produits qui s’affiche.
Selezionare il suo prodotto nella lista dei prodtti che appare dopo.
Seleccione su producto de la lista que aparece a continuación
Wählen Sie bei Produktinformationen die gewünschte Information, z.B. Technische Doku-
mente, aus.
Select from Product Information the required information, e.g. Technical Documents.
Dans Informations sur les produits, sélectionnez les informations souhaitées, Documenta-
tions techniques par exemple.
Selezionare da Informazioni prodotto le informazioni desidearti, p.e. Documenti tecnici.
En Información de producto seleccione la información deseada, por ejemplo Documentos
técnicos.
Hier finden Sie in einer Listendarstellung alle verfügbaren Dokumente.
You can find here all available documents listed.
Vous trouverez ici la liste de présentation de tous les documents disponibles.
Qui si trova una rappresentazione listino di tutti i documenti disponibili.
Aqui se encuentra una lista de todos los documentos a su disposición.
Entire Site SEA
R
VBG-PB-K20-DMD-EV
75
56 120
76
88
125
82
67

AS-i 3.0 Profibus-Gateway in Edelstahl
Montageanweisung // Installation Instructions // Notice de montage //
18.01.2013
3
1.3.1 Sicherheitshinweise / Safety notes / Indications de sécurité / Indicazioni di
sicurezza / Indicaciones de seguridad
Fachgerecht installieren:
Die elektrische Installation ist von eingewiesenem Fachpersonal durchzuführen. Bei der
Installation ist darauf zu achten, dass Versorgungs- und Signalleitungen und auch die
AS-i-Busleitung getrennt von Kraftstromleitungen verlegt sind. Im Schaltschrank ist
darauf zu achten, dass bei Schützen eine entsprechende Funkenlöschung verwendet
wird. Bei Antriebsmotoren und -bremsen ist auf die Installationshinweise in den
entsprechenden Bedienungsanleitungen zu achten. Bitte beachten Sie, dass die maxi-
male Leitungslänge für die AS-i-Busleitung 100 m beträgt. Darüber hinausgehende Lei-
tungslängen erfordern den Einsatz einer geeigneten Leitungsverlängerung.
Ensure appropiate installation:
Electrical installation is to be performed by trained expert personnel. During installation
care must be taken that supply and signal leads and also the AS-i bus cable are laid
separately from power cables. In the switchgear cabinet it must be ensured that appro-
priate spark-quenching equipment is used with contactors. Where drive motors and
brakes are used, attention must be paid to the installation instructions in the corre-
sponding operating instructions. Please note that the maximum line length of the AS-i
bus cable is 100 m. Cables above that length require the use of a suitable circuit exten-
sion.
Veuillez installer le module de manière adaptée:
L’installation électrique ne doit être effectuée que par du personnel qualifié. Pendant
l’installation verifier que les lignes d’alimentation et de signaux ainsi que la ligne de bus
AS-i sont posées séparément des câbles de courant fort. Dans l’armoire électrique, il
faut veiller à ce qu’une extinction des etincelles appropriée soit utilisée avec des con-
tacteurs. Pour les moteurs d’entraînement et les freins, les instructions d’installation
indiquées dans les instructions d’utilisation doivent être réspectées. La longueur maxi-
male autorisée pour la ligne de bus AS-i est de 100 m. Pour atteindre des lignes plus
longues il faut utiliser une extension de ligne appropriée.
Assicurarsi che l’apparecchio sia installato in modo corretto:
L'installazione e la messa in funzione devono essere eseguite solamente da personale
qualificato. Durante l’installazione, verificare che le linee di alimentazione e di segnali e
anche la linea bus AS-i vengono posate separatamente dai cavi a corrente forte.
Nell’armadio elettrico, si deve fare attenzione di utilizzare un’estinzione scintille ade-
guata con i contattori. Per i motori di propulsione e i freni bisogna badare alle istruzioni
per il montaggio indicate nelle istruzioni per l’uso. La lunghezza massima autorizzata
per la linea di bus AS-i è di 100 m. Per ottenere delle linee più lunghe si deve utilizzare
un´ estenzione di linea adatta.
Asegúrese de que la instalación se ha realizado de forma correcta:
La instalación eléctrica debe ser efectuada por personal debidamente cualificado. En la
instalación se debe tomar en consideración que los cables de alimentación, los cables
de señal y el del bus AS-i deben estar separados de los cables de alta tensión. En el
armario eléctrico se debe prestar atención en utilizar equipos con la función para extin-
guir arcos en los contactores. Para los motores y frenos del accionamiento se deben
acatar las instrucciones de instalación de los mismos. Por favor considere que la máx-
ima extensión del bus AS-i es de 100 m. Instalaciones que excedan esta longitud
requieren del uso de extensores convenientes del circuito.

18.01.2013
4
AS-i 3.0 Profibus-Gateway in Edelstahl
Montageanweisung // Installation Instructions // Notice de montage //
Sorgen Sie dafür, dass das Gerät nach seiner Verwendung der Wiederverwertung (Recy-
cling) zugeführt wird.
You are requested to make sure that the unit will be recycled by the end of its service life.
Veillez à ce que le module soit recyclé après usage.
Provvedere affinché il dispositivo, dopo l'utilizzo, sia destinato al riciclaggio.
Le solicitamos de que se asegure de que el equipo sea reciclado una vez desechado.
Anleitung lesen:
Bevor Sie mit dem Gerät arbeiten: Lesen Sie diese Anleitung komplett durch. Alle
Sicherheitshinweise und Vorgaben des Gerätehandbuchs und des Handbuchs zur Kon-
figurationssoftware sind einzuhalten!
Read instruction:
Before working with this unit: read these instructions carefully and completely. All notes
on safety and specifications of the device manual and the manual for the configuration
software are to be considered!
Lire les instructions:
Avant de travailler avec ce module, veuillez lire l’intégralité de ces instructions.
Observez les consignes de sécurité et les instructions du manuel d’utilisation de l’appa-
reil et du guide utilisateur du logiciel de configuration.
Leggere attentamente le istruzioni:
Prima di iniziare a operare sull'apparecchio, leggere attentamente le seguenti istruzioni.
Si prega di tenere conto anche delle indicazioni di sicurezza e delle istruzioni del manu-
ale d’uso dell’apparecchio e del manuale per l’utente per il software di configurazione.
Lea las instrucciones:
Antes de trabajar con el equipo lea por completo el manual de instrucciones. Todas las
notas de seguridad y especificaciones del manual del equipo y del manual del software
de configuración deben ser respetadas.
GEFÄHRLICHE SPANNUNG:
Vor Installations-, Wartungs- oder Änderungsarbeiten: Schalten Sie Ihre Anlage span-
nungsfrei. Stellen Sie sicher, dass sie nicht versehentlich wieder eingeschaltet werden
kann!
HAZARDOUS VOLTAGE:
Before any installation, maintenance or modification work: Disconnect your system from
the supply network. Ensure that it cannot be reconnected inadvertently!
TENSION DANGEREUSE:
Avant le début des travaux d'installation, d'entretien ou de modification: Commutez le
module hors tension. Assurez-vous qu'il ne peut pas être remise par erreur!
TENSIONE PERICOLOSA:
Prima di eseguire lavori di installazione, manutenzione o modifica: disinserire il sistema,
assicurarsi che sia privo di tensione e che la stessa non possa essere reinserita
inavvertitamente!
TENSIÓN PELIGROSA:
Antes de iniciar trabajos de instalación, mantenimiento o modificación: desconecte su
instalación. ¡Cerciórese de que no pueda ser conectada nuevamente por descuido!

AS-i 3.0 Profibus-Gateway in Edelstahl
Montageanweisung // Installation Instructions // Notice de montage //
18.01.2013
5
1.4 Montage / Montage / Montage / Montaggio / Montaje
• Surrounding air temperature: 0 °C
…
+55 °C
• Temperature rating for cable: 60/75 oC
• Use copper conductors only
• 1 x 0.5 - 1.5 mm² (16AWG: min. 24/max.12)
Auf Montageplatte mit 35-mm-Hutschiene // on mounting plate with 35 mm top-hat rail
// sur plaque de montage avec profilé-support 35 mm // su piastra di montaggio con
guida DIN 35 mm // sobre placa de montaje con guía simétrica de 35 mm
0,8 Nm
7 LB.IN
5 - 6 mm / PZ2
10
10
AWG 2 x 24 ...12
2 x (0,5 ... 1,5) mm2
2 x (0,5 ... 1,5) mm2
+-
+-+-
1
2
3

18.01.2013
6
AS-i 3.0 Profibus-Gateway in Edelstahl
Montageanweisung // Installation Instructions // Notice de montage //
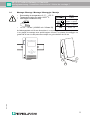
1.5 Frontansicht und Anschlüsse / Front view and connections / Vue de face et
raccordements / Vista frontale e collegamenti / Vista frontal y conexiones
+-
+-+-
+ASI
1–
+ASI
1–
+
ASI +PWR– (max. 8 A)
+ASI
2–
+ASI 1+ASI 2 ASI
+PWR
+ASI 1
+-
M4
5 mm max!
[3]
[4]
[5]
[6]
[1]
[2]
+ASI 1– | +ASI 2–
Anschluss AS-i-Kreis 1 | AS-i-Kreis 2 / Connection AS-i circuit 1 | AS-i circuit 2 / Raccordement bus 1 AS-i | bus 2 AS-i /
Collegamento circuito 1 AS-i | circuito 2 AS-i / Conexión circuito 1 AS-i | circuito 2 AS-i
ASI 1 +PWR – (max. 8 A) | ASI 2 +PWR – (max. 8 A)
Versorgungsspannung AS-i-Kreis 1 | Kreis 2 / Supply voltage AS-i circuit 1 | circuit 2 / Tension d’alimentation bus 1|
bus 2 / Tensione di alimentazione circuito 1 | AS-i circuito 2 / Tensión de alimentación circuito 1 AS-i | circuito 2
[1] Chipkarte / Chip card / Carte de puce / Chip card / Tarjeta chip
[2] Diagnose-Schnittstelle / Diagnostic interface /Interface de diagnostic/Interfaccia diagnostica/Interfaz de diagnóstico
[3] LED-Statusanzeige / LED status display / Affichage d’état LED / Visualizzazione LED / LED visualización
[4] Profibus-Anschluss / Profibus connection / Raccordement Profibus / Collegamento Profibus / Conexión Profibus
[5] LCD-Anzeige / LCD display / Affichage LCD / Visualizzazione di stato LCD / Display LCD
[6] Tasten für Handbedienung / Buttons for hand operation / Boutons pour commande manuelle / Pulsanti per le
impostazioni manuali / Teclas para accionamiento manual
AS-i-Kreis 1 und 2 werden beide aus dem Netzteil von Pepperl+Fuchs versorgt. Andere Netzteile sind nicht
freigegeben! Am Kabel für das Netzteil sollten keine Slaves oder Repeater angeschlossen werden. Am
Kabel für den AS-i-Anschluss sollten keine AS-i-Netzteile oder weitere Master angeschlossen werden.
AS-i circle 1 and 2 are both supplied from Pepperl+Fuchs power supply. Other power supplies are not
released for use! At the cable for power supply no slaves or repeaters may be attached. At the cable for
AS-i circuit no power supplies or further masters may be attached.
Les bus AS-i 1 et 2 sont tous les deux alimentés à partir de l'alimentation Pepperl+Fuchs. D'autres alimenta-
tions ne sont pas admises pour l'usage! Au câble pour l'alimentation aucun esclave ou répéteur ne peut être
raccordé. Au câble pour le circuit AS-i aucune alimentation ou autre maître ne peut être raccordé.
I circuiti AS-i 1 e 2 sono entrambi alimentati dall’alimentatore Pepperl+Fuchs. Altri alimentatori non sono
ammessi per l’uso! Al cavo per l’alimentazione nessuno slave o ripetitore può essere collegato. Al cavo per il
circuito AS-i nessun alimentatore o altro master può essere collegato.
Los circuitos AS-i 1 y 2 son alimentados de la fuente de poder Pepperl+Fuchs. Otras fuentes de poder no
son permitidas! En el cable de la alimentación AS-i no se deben conectar esclavos o repetidores. En el cable
del circuito AS-i no se debe conectar ninguna fuente de poder AS-i u otro master.

AS-i 3.0 Profibus-Gateway in Edelstahl
Montageanweisung // Installation Instructions // Notice de montage //
18.01.2013
7
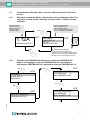
1.6 Inbetriebnahme / Startup / Mise en service / Messa in servizio / Puesta en
servicio
1.6.1 Wechsel in erweiterten Modus / Switching to advanced display mode / Pas-
sage dans le mode étendu / Passagio nel modo esteso / Cambio al modo
avanzado
1.6.2 Einstellen der PROFIBUS-DP-Adresse 14 / Setting the PROFIBUS-DP
address 14 / Réglage de l’adresse PROFIBUS-DP 14 / Impostazione
dell’indirizzo PROFIBUS-DP 14 / Ajuste de la dirección PROFIBUS-DP 14
OK
ESC
klassische Anzeige
classical display
affichage classique
display classico
indicación clásica
Menüaufbau siehe Zusatzblatt
menu structure see additional page
structure de menu voir page supplémentaire
struttura di menu vedi pagina supplementare
estructura del menu ver página adicional
LCD
1.12A
UNKNOWN SLAVE
LCD
PROFIBUS
QUICK SETUP
SETUP
SLAVE ADR TOOL
erweiterter Anzeigemodus
advanced display mode
mode d‘affichage étendu
modo di visualizzazione avanzata
modo de visualisación avanzada
LCD
PROFIBUS
OK
QUICK SETUP
ASI SAFETY
OK
LCD
PROFIBUS ADDRESS
PROFIBUS STATUS
LCD
PROFIBUS ADDRESS
OLD ADDRESS 3
2x ↓
OK
NEW ADDRESS 000
LCD
PROFIBUS ADDRESS
OLD ADDRESS 3
NEW ADDRESS 000

18.01.2013
8
AS-i 3.0 Profibus-Gateway in Edelstahl
Montageanweisung // Installation Instructions // Notice de montage //
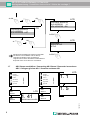
1.7 AS-i Slaves anschließen / Connecting AS-i Slaves / Raccorder les esclaves
AS-i / Collegare gli slave AS-i / Conectar esclavos AS-i
LCD
PROFIBUS
QUICK SETUP
SETUP
Das Gerät ist werkseitig auf Adresse 3 eingestellt.
The device is set to address 3 at the factory.
L’appareil est réglé en usine à l’adresse 3.
L’apparecchio è messo all’indirizzo 3 dalla fabbrica.
El aparato viene con la dirección 3 de fábrica.
LCD
PROFIBUS ADDRESS
OLD ADDRESS 14
2x ESC
NEW ADDRESS 000
2x ESC
2x OK ↑OK
LCD
PROFIBUS ADDRESS
OLD ADDRESS 3
NEW ADDRESS 010
4x ↑OK
Slave 1
AS-i
Slave 5
AS-i
LCD
0.5s
0.5s
Slave 1
AS-i
Slave 5
AS-i
AS-i
prj mode
Config error
prg enable
AS-i active
U AS-i
Profibus
Power
AS-i
prj mode
Config error
prg enable
AS-i active
U AS-i
Profibus
Power
1. 5
1. 1
AS-i Master
AS-i Master
LCD
1. 41
SEARCHING SLAVES

AS-i 3.0 Profibus-Gateway in Edelstahl
Montageanweisung // Installation Instructions // Notice de montage //
18.01.2013
9
1.8 Quick setup / Quick setup / Quick Setup / Setup veloce / Setup rápido
config error
LCD
.
CONFIGURATION OK
LCD
PROFIBUS
QUICK SETUP
SETUP
SLAVE ADR TOOL
OK ↓
LCD
WARNING:
OUTPUTS MAY BE
RESET
OK ↓
OK
LCD
STORE AS-I
CONFIGURATION
STORE +RUN
LCD
STORE AS-INTERFACE
CONFIGURATION
2x ESC
OK
LCD
1. 5
LCD
HOST ERROR
NO CONNECTION
OK
STORE +PRJ MODE
STORE +PRJ MODE

18.01.2013
10
AS-i 3.0 Profibus-Gateway in Edelstahl
Montageanweisung // Installation Instructions // Notice de montage //
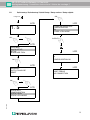
1.9 Fehlersuche / Error tracing / Recherche des erreurs / Ricerca di errori / Bús-
queda de errores
1.9.1 Fehlerhafte Slaves / Faulty slaves / Esclaves erronés / Slave difettosi /
Esclavos incorrectos
1.9.2 Fehleranzeige (letzter Fehler) / Error display (last error) / Affichage d’erreurs
(dernière erreur) / Display di errori (ultimo errore) / Visualización del error
(último error)
Slave 1
AS-i
Slave 5
AS-i
Slave 24
AS-i
1.1
AS-i
prj mode
Config error
prg enable
AS-i active
U AS-i
Profibus
Power
1.24
MISSING SLAVE
MISSING SLAVE
2s
2s
LCD
LCD
AS-i Master
Slave 1
AS-Interface
Slave 5
AS-Interface
Slave 24
AS-Interface
AS-Interface
24
LCD
set/↓
Slave 1
AS-Interface
Slave 5
AS-Interface
Slave 24
AS-Interface
AS-Interface
prj mode
Config error
prg enable
AS-i active
U AS-i
Profibus
Power
prj mode
Config error
prg enable
AS-i active
U AS-i
Profibus
Power
HOST ERROR
NO CONNECTION
AS-i Master
AS-i Master

AS-i 3.0 Profibus-Gateway in Edelstahl
Montageanweisung // Installation Instructions // Notice de montage //
18.01.2013
11
1.9.3 Slave-Adressierung / Addressing / Adressage / Indirizzamento / Direcciona-
miento
1.9.3.1 Slave 2 adressieren auf Adresse 6 / Assigning address 6 to slave currently
at address 2/ Affecter l’adresse 6 à l’esclave 2 / Impostare l’indirizzo 6 allo
slave 2 / Direccionar el esclavo 2 a la dirección 6
LCD
1. 41
SEARCHING SLAVE
QUICK SETUP
SLAVE ADR TOOL
SLAVE TEST TOOL
LCD
SLAVE ADR TOOL
CONNECT NEW SLAVE
LCD
SLAVE ADR TOOL
OLD ADDRESS 2
NEW ADDRESS 3
PRG
LCD
SLAVE ADR TOOL
OLD ADDRESS 2
NEW ADDRESS 6
LCD
1. 6
UNKNOWN SLAVE
LCD
SLAVE ADR TOOL
OK
OLD ADDRESS
NEW ADDRESS
PRG
LCD
SLAVE ADR TOOL
OLD ADDRESS 2
NEW ADDRESS 6
PRG
Master Slave
Modul anschließen/Connect
module/Raccordez module/
Collegare modulo/Conecte modulo
↓
2x
OK
OK
↓
1x
3 x OK
1x ↓
2 x ESC
OK
-
 1
1
-
 2
2
-
 3
3
-
 4
4
-
 5
5
-
 6
6
-
 7
7
-
 8
8
-
 9
9
-
 10
10
-
 11
11


Pepperl+Fuchs VBG-PB-K20-DMD-EV Bedienungsanleitung
- Typ
- Bedienungsanleitung
in anderen Sprachen
Verwandte Artikel
-
Pepperl+Fuchs VBG-PB-K20-DMD-BV Installationsanleitung
-
-
-
-
-
-
-
-
-
Andere Dokumente
-
WAGO WAGO-I/O-IPC-C6 Linux 2.6 Benutzerhandbuch
-
-
-
-
Eurotherm T940X Handbuch Bedienungsanleitung
-
IFM AC1003 Installationsanleitung