Lenco SCD-6900BK Bedienungsanleitung
- Kategorie
- CD-Spieler
- Typ
- Bedienungsanleitung

1
MODEL:SCD‐6900
PORTABLEDAB+ANDFMRADIOWITHCD,
CASSET T EANDBLUETOOTH
USERMANUALPortableDAB+andFMradiowithCD,cassetteandBluet ooth
GEBRUIKSHANDLEIDINGDraagbareDAB+enFM‐radiometcd,cassetteenBluetooth
BEDIENUNGSANLEITUNGTragbareDAB+/FM‐RadiomitCD,KassetteundBluetooth
MODED’EMPLOIRadioportableDAB+etFMavecCD,cassetteetBluetooth
MANUALDEUSUARIORadioportátilDAB+
YFMconCD,caseteyBluetooth
Version:1.0

2
Index
English ................................................................................................................................................................................. 3
Nederlands ......................................................................................................................................................................... 14
Deutsch .............................................................................................................................................................................. 27
Français ............................................................................................................................................................................. 41
Español .............................................................................................................................................................................. 54

3
English PortableDAB+andFMradiowithCD,cassetteandBluetooth
CAUTION:
Usageofcontrolsoradjustmentsorperformanceofproceduresotherthanthosespecifiedhereinmayresultin
hazardousradiationexposure.
PRECAUTIONSBEFOREUSE
KEEPTHESEINSTRUCTIONSINMIND:
1. Donotcoverorblockanyventilationopenings.Whenplacingthedeviceonashelf,leave
5cm(2”)freespacearoundthewholedevice.
2. Installinaccordancewiththesuppliedusermanual.
3. Keepthedeviceawayfromheatsourcessuchasradiators,
heaters,stoves,candlesandotherheat‐generating
productsornakedflame.Thedevicecanonlybeusedinmoderateclimates.Extremelycoldorwarm
environmentsshouldbeavoided.Workingtemperaturebetween0°and35°C.
4. Avoidusingthedevicenearstrongmagneticfields.
5. Electrostaticdischargecandisturbnormalusage
ofthisdevice.Ifso,simply resetandrestartthedevice
followingtheinstructionmanual.Duringfiletransmission,pleasehandlewithcareandoperateinastatic‐free
environment.
6. Warning!Neverinsertanobjectintotheproductthroughtheventsoropenings.Highvoltageflowsthrough
theproductandinserting
anobjectcancauseelectricshockand/orshortcircuitinternalparts.Forthesame
reason,donotspillwaterorliquidontheproduct.
7. Donotuseinwetormoistareassuchasbathrooms,steamykitchensornearswimmingpools.
8. Thedeviceshallnotbeexposedto
drippingorsplashingandmakesurethatnoobjectsfilledwithliquids,such
asvases,areplacedonorneartheapparatus.
9. Donotusethisdevicewhencondensationmayoccur.Whentheunitisusedinawarmwetroomwithdamp,
waterdropletsorcondensationmayoccurinside
theunitandtheunitmaynotfunctionproperly;lettheunit
standinpowerOFFfor1or2hoursbeforeturningonthepower:theunitshouldbedrybeforegettingany
power.
10. Althoughthisdeviceismanufacturedwiththeutmostcareandcheckedseveraltimesbefore
leavingthe
factory,itisstillpossiblethatproblemsmayoccur,aswithallelectricalappliances.Ifyounoticesmoke,an
excessivebuild‐upofheatoranyotherunexpectedphenomena,youshoulddisconnecttheplugfromthe
mainpowersocketimmediately.
11. Thisdevicemustoperateonapowersource
asspecifiedonthespecificationlabel.Ifyouarenotsureofthe
typeofpowersupplyusedinyourhome,consultyourdealerorlocalpowercompany.
12. Keepawayfromanimals.Someanimalsenjoybitingonpowercords.
13. Tocleanthedevice,useasoftdrycloth.
Donotusesolventsorpetr ol basedfluids.
Toremoveseverestains,youmayuseadampclothwithdilutedeterg ent.
14. Thesupplierisnotresponsiblefordamageorlostdatacausedbymalfunction,misuse,modificationofthe
deviceorbatteryreplacement.
15. Donotinterrupttheconnectionwhenthe
deviceisformattingortransferringfiles.Otherwise,datama ybe
corruptedorlost.
16. IftheunithasUSBplaybackfunction,theUSBmemorystickshouldbepluggedintotheunitdirectly.Don’tuse
anUSBextensioncablebecauseitcancauseinterferenceresultinginfailingofdata.
17. The
ratinglabelhasbeenmarkedonthebottomorbackpanelofthedevice.
18. Thisdeviceisnotintendedforusebypeople(includingchildren)withphysical,sensoryormentaldisabilities,
oralackofexperienceandknowledge,unlessthey’reundersupervisionorhavereceivedinstructionsabout
thecorrectuse
ofthedevicebythepersonwhoisresponsiblefortheirsafety.
19. Thisproductisintendedfornonprofessionaluseonlyandnotforcommercialorindustrialuse.
20. Makesuretheunitisadjustedtoastableposition.Damagecausedbyusingthisproductinanunstable
position
vibrationsorshocksorbyfailuretofollowanyotherwarningorprecautioncontainedwithinthisuser
manualwillnotbecoveredbywarranty .
21. Neverremovethecasingofthisdevice.
22. Neverplacethisdeviceonotherelectricalequipment.

4
23. Donotallowchildrenaccesstoplasticbags.
24. Onlyuseattachments/ accessoriesspecifiedbythemanufacturer.
25. Referallservicingtoqualifiedservicepersonnel.Servicingisrequiredwhenthedevicehasbeendamagedin
anyway,suchasthepowersupplycordortheplug,whenliquidhasbeen
spilledorobjectshavefallenintothe
device,whenthedevicehasbeenexposedtorainormoisture,doesnotoperatenormally,orhasbeen
dropped.
26. Longexposuretoloudsoundsfrompersonalmusicplayersmayleadtotemporaryorpermanenthearingloss.
27. Iftheproductisdeliveredwith
powercableor ACpoweradaptor:
Ifanytroubleoccur,disconnecttheACpowercordandreferservicingtoqualifiedpersonnel.
Don’tsteponorpinchthepoweradaptor.Beverycareful,particularlyneartheplugsandthecable’s
exitpoint.Donotplaceheavyitemsonthe
poweradaptor,whichmaydamageit.Keeptheentiredevice
outofchildren’sreach!Whenplayingwiththepowercable,theycanseriouslyinjurethemselves.
Unplugthisdeviceduringlightningstormsorwhenunusedforalongperiod.
Thesocketoutletmustbeinstalledneartheequipmentandmust
beeasilyaccessible.
Donotoverloadacoutletsorextensioncords.Overloadingcancausefireorelectricshock.
Deviceswithclass1constructionshouldbeconnectedtoamainsocketoutletwithaprotectiveearthed
connection.
Deviceswithclass2constructiondonotrequireaearthedconnection.
Alwaysholdtheplugwhenpullingitoutofthemainsupplysocket.Donotpullthepowercord.Thiscan
causeashortcircuit.
Donotuseadamagedpowercordorplugoralooseoutlet.Doingsomayresultinfireorelectricshock.
28. If
theproductcontainsorisdeliveredwitharemotecontrolcontainingcoin/cellbatteries:
Warning:
“Donotingestbattery,ChemicalBurnHazard”orequivalentworking.
[Theremotecontrolsuppliedwith]Thisproductcontainsacoin/buttoncellbattery.Ifthebatteryis
swallowed,itcancausesevereinternalburnsin
just
2hoursandcanleadtodeath.
Keepnewandusedbatteriesawayfromchildren.
Ifthebatterycompartmentdoesnotclosesecurely,stopusingtheproductandkeepitawayfrom
children.
Ifyouthinkbatteriesmighthavebeenswallowedorplacedinsideanypartof
thebody,seekimmediate
medicalattention.
29. CautionabouttheuseofBatteries:
Dangerofexplosionifbatteryisincorrectlyreplaced.Replaceonlywiththesameorequivalenttype.
Batterycannotbesubjectedtohighorlowextremetemperatures,lowairpressureathighaltitude
duringuse,storage
ortransportation.
Replacementofabatterywithanincorrecttypethatcanresultinanexplosionortheleakageof
flammableliquidorgas.
Disposalofabatteryintofireorahotoven,ormechanicallycrushingorcuttingofabattery,thatcan
resultinanexplosion.
Leavingabatteryinanextremelyhightemperaturesurroundingenvironmentthatcanresultinan
explosionorthatleakageofflammableliquidorgas.
Abatterysubjectedtoextremelylowairpressurethatmayresultinanexplosionortheleakageof
flammableliquidorgas.
Attentionshould
bedrawntotheenvironmentalaspectsofbatterydisposal.
INSTALLATION
Unpackallpartsandremoveprotectivematerial.
Donotconnecttheunittothemainsbeforecheckingthemainsvoltageandbeforeallotherconnections
havebeenmade.
*Thoseinstructionsarerelatedonlytoproductsusingpowercable
orACpoweradaptor.

5
Caution:
Use of controls or procedures other than those specified herein may result in hazardous radiation
exposure.
Thisunitshouldnotbeadjustedorrepairedbyanyoneexceptqualifiedservicepersonnel.
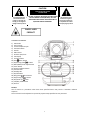
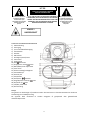
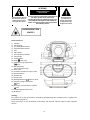
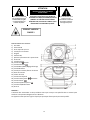
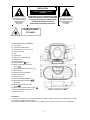
LOCATIONOFCONTROL
1) USBsocket
2) Auxinsocket
3) 3.5mmheadphonejack
4) Cassettebuttons
5) Handle
6) FMantenna
7) CDdooropen/close
8) LCDdisplay
9) Functionbutton
10) Stop /Enterbutton
11) Skip/Tuningdownbutton
12) Menu/Mem/clock‐adjustbutton
13) Timerbutton
14) Volumeup/downbutton
15) Cassettedoor
16) StandbyLED
17) On/Offbutton
18) Play/pause /Scanbutton
19) Skip/tuningupbutton
20) Pre/Fo lderup button
21) Info/Playmodebutton
22) DCJack
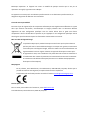
CLASS1LASER
PRODUCT
CAUTION
Thelightningflashand
arrowheadwithinthe
triangleisawarningsign
alertingyouofdangerous
voltageinsidetheproduct
RISKOFELECTRICSHOCK
DONOTOPEN
CAUTION:TOREDUCETHERISKOFELECTRICSHOCK
DONOTREMOVECOVER(ORBACK).NOUSER
SERVICIABLEPARTSINSIDE.REFERSERVICINGTO
QUALIFIEDSERVICEPERSONNEL.
Theexclamationpoint
withinthetriangleisa
warningsignalertingyou
ofimportantinstructions
accompanyingtheproduct

6
Important:
Since the sensitive circuitry may cause interference to a radio tuner nearby, switch this unit off while
operatingotherradiodevices.
DuetothecomplexityoftheMCUcontrol,pleaseun‐plugthemainpowersupplyoftheunitiftheunit
stopsduringoperation!Thisisnotamalfunction
ofthesystem!
Precautionsforuse
Installation
• Unpackallpartsandremoveprotectivematerial.
• Do not connect the unit to the mains before checking the main voltage and before all other
connectionshavebeenmade.
• Donotcoveranyventsandmakesurethatthereisaspaceofseveralcentimeters aroundtheunit
for
ventilation.
Connection
1. ConnecttheDCplugoftheincludedAC/DCadaptortoDCjack(22)thentheAC/DCadaptorconnect
totheACoutlet.
2. Whenyoufirstplugtheunitintothemains,theunitwillgointostandbymode.TheStandbyLEDwill
lightup
3. Turnontheunit
bypressing“On/Standby”button(17).IftheLCDdisplay(8)isonwithbacklighting,it
meansthepowersupplyisnormal.Nowthesystemisreadytoplaythemusic.
DCconnection
ForDCoperation,pleaseinsert8pcssizeC(UM‐2)batteriesintothe
battery compartment and remove the AC plug from AC the outlet
thendisconnecttheACcordfromtheACsocket.
PleaseremoveanybatteriesfromtheunitwhilstusingDCpower
supply.Itisrecommendedtoremove
anybatteriesfromtheunitif
unitwillnotbeusedforaperiodoftime.
Settingtheclock
1. Settheunittostandbymode.
2. Pressandholdthe“Menu/Mem/clk‐adj”button(12),thehourdigitwillflashonLCDdisplay(8)Press
the Skip down(11) or Skip up(19) button to set the correct hour. Press the
“Menu/Mem/clk‐adj”button(12)tostorethehourthen
theminutedigitwillflash.
3. PresstheSkipdown(11)orSkipup(19)buttontosetthecorrectminutes.
4. Press“Menu/Mem/Menu/clk‐adj”button(12)tostorethecorrecthour.
The preset time will be reset completely if disconnecting the main power supply. You are
recommendedto
switchthesystemintostandbymodeforconvenientuse.
The clock will synchronize to RDS/DAB clock once receiving theRDS/DAB signal if the clockwas
notsetinadvance.
Listeningtoradio
Operation
Manualtuning
1. TurnontheunitbyOn/Offbutton(17)andthenpresstheFunctionbutton(9)untilitreachesthe“FM”
mode.
2. PresstheSkipdown(11)orSkipup(19)buttontotuneyourdesiredstation.
3. Adjustvolumeup/downbutton(14)forthedesiredvolume
level.

7
Autotuning
1. SettheunittoFMmode.
2. Presstheautoscanbutton(18)once;th eunitwillstarttoscanupwardsuntilaradiostationis
received.Presstuningdownbutton(11)onceandthenpresstheautoscanbutton(18),the unitwill
scandownwards.Ifthe
radiodatasystem(RDS)broadcastingsignalisreceived,theunitwillsetthe
actualtimeautomatically.
3. Adjustvolumeknob(14)forthedesiredvolumelevel
FMscansetting
Afterautotuningiftoomanyunwantedweakradiostationsarereceived,youcanselectstrongstations
onlybyfilteringout
theweakersignals.
1. InFMmode,press“Menu/Mem/clk‐adj”button(12)toenterthe“Menu”,thenpressSkipdown
(11)orSkipup(19)buttontoselect“Scansetting”.
2. Press“Stop/Enter”button(10)toenterthe“Scansetting”,thenpressSkipdown(11)orSkipup
(19)button
toselect“St rongstationonly”.Thenpress“Stop/Enter”button(10)toconfirmthe
setting.
3. Performtheautotuningoperationagainasabove.
FM&FM‐stereoreception
TheunitwilldefaulttotheFMmodeinMono.Thus,ifFMstereosignalreceived,settheFMmodeto
StereobypressMenubutton(12),thenpressSkipdown(11)orSkipup(19)buttontoselect
Audiosetting,pressEnterbutton(10)andpressSkipdown(11)orSkipup(19)againto
selectFMstereo,thenpressEnterbutton(10)toconfirm.Whenstereosignalsareweak
andnoisy.It
ispreferabletochangetheFMmodebythesameprocedure.
Hintsforbestreception:‐
FM:thereceiverhasarodantenna(6)attherearcabinet.Itshouldbetotallyextendedforthebest
reception.
Radiodatasystem(RDS)
Thisisthefeaturewhichdisplaysthe
informationreleasedfromtheradiobroadcastandwillshowedon
theLCDdisplaystepbystepasbelowbypressingthePlaymode/infobutton(21)continuously.
Radiotextprogramtypefrequencymono/stereotimedate
Digitalaudiobroadcasting(DAB)radio
1. SettheunittoDAB
modebypressFunctionbutton(9).
2. PressthePlay/pause /Scanbutton(18)once;theunitwillstartafullscanfromrange11b‐12d.
PressSkipdown(11)orSkipup(19)buttontoselectyourdesiredDABchannelthenpress
“Stop/Enter”button(10)toconfirmtheselectedchannel.
3. PressthePlaymode/infobutton(21)continuouslytocheckthebelowinforeleasedbyDAB.
SignalstrengthprogramtypeGroupnamefr equencysignalerrortransferratetime
date
4. Adjustvolumeknob(14)forthedesiredvolumelevel.
Dynamicrangecontrol
This
apparatusprovidesthreedynamicrangemodestomatchdifferentprogramtypesinDABmode.
1. InDABmode,press“Menu/Mem/clk‐adj”button(12)toenterthe“Menu”,thenpressSkipdown
(11)orSkipup(19)buttontoselect“DRC”.
2. Press“Stop/Enter”button(10)toenterthe“DRC”setting,then
pressSkipdown(11)orSkipup
(19)buttontoselect“DRChigh/low/off”mode.Thenpress“Stop/Enter”button(10)toconfirm
thesetting.
3. Inanystatepress“Menu/Mem/clk‐adj”button(12)toquitthesettingmode

8
Languagesetting
Thisapparatusprovide4languagesforFM/DABoperationdisplay.
1. InDAB/FMmode,press“Menu/Mem/clk‐adj”button(12)toenterthe“Menu”,thenpressSkipdown
(11)orSkipup(19)buttontoselectSyetem”.
2. Press“Stop/Enter”button(10)toenterthe“System”setting,thenpressSkip
down(11)orSkip
up(19)buttontoselect“Language”thenpress“Stop/Enter ”button(10)toenterlanguagemode,
then pressSkipdown(11)orSkip up(19) buttontoselectyourdesiredlanguage between
English/French/German/Italian.Thenpress“Stop/Enter”button(10)toconfirmthesetting.
3. Inanystatepress“Menu/Mem/clk
‐adj”button(12)toquitthesettingmode
Presetstations
Youcanstoreupto20radiostationsinthememory(10‐FM/10‐DAB).
1. SettoFM/DABmode
2. Turntothedesiredradiostationby“manual”or“auto”tuningmethod.
3. Pressandholdthe“Mem/clk‐adj”button
(12)toenablememorysta te.
4. Press Skip down(11) or Skip up(19) button to select the desired station memory for
storage.
5. Press“Stop/Enter”button(10)toconfirmthesetting.
6. Repeatstep2to5tostoreotherstations.
Recallpresetstations
1. SettoFM/DABmode
2. PressPre‐upbutton(20)torecallthestoredstation.
3. PressSkipdown(11)orSkipup(19)buttontoselectthedesiredrecallstation.
4. Press“Stop/Enter”button(10)againtoconfirmtherecallstation.
DAB/FMreset:
IfyouwouldliketoerasealltheFM/DABstaionsstored.
1. SetinDABorFMmode,press“Menu/Mem/clk‐adj”button(12)toenterthe“Menu”,thenpressSkip
down(11)orSkipup(19)buttontoselect“System”.
2. Press“Stop/Enter”button(10)toenterthe“System”setting,thenpressSkipdown(11)orSkip
up(19)buttonto
select“Factoryreset”.Thenpress“Stop/Enter”button(10)toconfirmthe
factoryreset.
3. Apparatuswilltheneraseallthestoredstations.
PlayingCD/MP3disc
Gettingstarted
1. PresstheFunctionbutton(9)toselectCDmode.
2. OpentheCDdoorbypressingtheCDdooropen/close(7).PutaCDdiscintothecompartmentand
closetheCDdoor.
3. Asearchisperformedifadiscisinside.Totalnumberoftracks
isread.
Play/pausemode
1. IfPlay/Pausebutton(18)ispressedduringstopmode,thefirsttrackwillbeplayed.
2. IfPlay/Pausebutton(18)ispressedduringplayback,thesystemwillgointopausemodeandthe
pauseindicatorwilllightupintheLCDdisplay(8).Press
againtoresumenormalplayback.
Stopmode
1. IfStopbutton(10)ispressedduringplayorpausemode.Theunitwillgointostopmodeand
displaythetotalnumberoftrackintheLCDdisplay(8).
Skipmode(skipup /skipdown )
1. Duringplaymode,
ifskipup button(19)ispresseditwillgotonexttrackanddisplaythetrack
number.

9
2. Duringplaymode,ifSkipdownbutton(11)ispressed,itwillgobacktothebeginningofthe
track,sametracknumber.
3. Afterstep2,pressskipdownbutton(11)again,itwillgototheprevioustrackandplaythe
beginningofthetrack.
For
MP3disc/file
1. PlacetheMP3‐CDintheCDcompartment.Afterasearchisperformedthetotalnumberoftrackswill
beshownontheLCDdisplay(8).
2. PressSkipuporSkipdown(11/19)buttontoselectthetracknumber.
3. Whenthe desiredtrackandalbumis
beingselected, pressthe“Play/Pause ”button(18)to start
playback.
Remark
- Press“Folderup ”button(20)onthemainunittoselecttheMP3folderupwardly.
- The track number will display on the LCD (8) and then it will play that track when you press
Play/Pausebutton
(18).
Repeat/Randommode
Pressthe“Playmode”button(21)duringplay backtoselectrepeatandrandomfunctions,asingletrack,
singlefolder(MP3only)orallthetrackscanbeplayedindifferentmodesasfollows:‐
ForCD
(1) Repeat1
(2) Repeatalltrack (3) Random (4) Off
mode
Indicator
Playmode onLCDdisplay
Repeattrack Rep1
Repeatall RepA
Random Rand
Offmode ‐‐‐‐‐‐‐‐‐‐‐‐‐
ForMP3disc/file
(1) Repeat
1
(2) Repeat1
folder
(3) Repeatall
tracks
(4) Random (5) Off
mode
Indicator
Playmode onLCDdisplay
Repeatsingletrack Rep1
Repeatsinglefolder RepF
Repeatalltracks RepA
Random Rand
Offmode ‐‐‐‐‐‐‐‐‐‐‐‐‐‐‐‐‐
Repeatplay
Youcanlistentothedesiredtracksorfolderrepeatedlybyusingthisfunction.
Randomplay
Youcanlistentoallthetracksinarandomorderbyusingthisfunction
CD/MP3
discprogramming
Upto20tackscanbeprogrammedfordiscplayinanyorder.Beforeuse,besuretopressthestopbutton.
1. SetinCDmode.
2. PresstheMemorybutton(12),“P01&T000”willappearonLCDdisplay(8).
3. Selectadesiredtrackbyusingthe
Skipup /Skipdownbuttons(19/11).

10
4. PresstheMemorybutton(12)toenterthetrackintothememory.
5. Repeatsteps3and4toenteradditionaltracksintothememoryifnecessary.
6. Whenallthedesiredtrackshavebeenprogrammed,press“Play/Pause ”button(18)toplaythe
discintheorderyouhaveprogrammed.
7. Press“Stop ”button(10)toterminateprogramplay.
Press“Stop ”buttontwice(10)atCDstopmodetocancelallprogrammedmemoryuntilthe“Prog”
indicatordisappearonLCDdisplay (8).
ForMP3disc/file,pressthe“Folderup”button(20) toselectthe 1
st
trackofnextfolder directlyand
hencetospeedupthesongselection.
The programming mode will automatically stop if no button is being pressed in a per iod of about
30secondsafterpressingtheMemorybutton(12).
Remark:‐
MP3trackformatrequirement:‐
- Bitrate:32kbps~320kbps,sampling
rate:32kHz,44.1kHzand48kHzdecodable
- TheperformanceofplayingMP3discisdependentonthequalityoftherecordingdiscandthe
methodofrecording.Furthermore,thesearchinglead‐timeforMP3‐CDislongerthannormalCDdue
tothedifferentformat.
PlaybackofMP3song
viaUSBstoragemedia
Connecting
ThesystemisabletodecodeandplaybackallMP3fileswhicharestoredinmemorymediausingtheUSB
port.
1. SetthesystemtoStandbymodefirstoranyotherfunctionexceptUSBmode.
2. Plug‐intheUSBpen‐drivewiththefaceupandmakesure
itsfullyinserted.
Connecting the USB pen‐drive upside down or backwards could damage the audio system or the
storagemedia.Checktobesurethedirectioniscorrectbef oreconnection.
3. TurnontheunitagainbyOn/o ffbutton(17)andsetpressFunctionbutton(9)toselect
USBmode.
Thesystemwillstartreadingthestoragemediaautomaticallyafterconnecting,andLCDdisplay(8)
willshowthetotalnumberofMP3filesbeingdetected.
4. RepeatthesameplaybackprocedureasplayingCD/MP3discasabove.
Remark
- ThesystemcandetectandreadthefilesunderMP3
formatonlyinUSBmodebutnotothermusicfile
formats.
- IfyouconnectthesystemtoanMP3playerviatheUSBsocket,duetovariancesinfilesystem
formats,someMP3playersmaynotbeabletoplayviatheUSBsocket.Thisisnotamalfunctionof
thesys tem.
- TheUSBportdoesnotsupportconnectionwithaUSBextensioncableandisnotdesignedfor
communicationwithcomputer.
- DuetoERPstagetworequirementsandtoprotecttheenvironment(forEuropeanmarketonly).
Theunitwillswitchtostandbymodeautomaticallyifnomusicis
detectedplayingforover15
minutes.
RemovingofUSB
ToremovetheUSBstick,turnoffthepowerorswitchthefunctionmodetoeithercdortunermodefirs t,
thenun‐plugitbypullingouttheUSBsocketdirectly

11
Bluetoothconnectingandplayback
1. PresstheFunctionbutton(9)toselect“BT/AUX”mode.
2. IftheAux‐injackisnotconnected,thesystemwillswitchtoBTmodeautomaticallyand“BT“withthe
flashingof“Pairing”willbeshownontheLCDdisplay(8).ItmeanstheBluetoothisinsearching
mode.
3. Switchon theBluetoothfeatureofyourBluetoothdevice(suchasmobilephone)andselect“Lenco
SCD‐690”Bluetoothequipmenttoconnect.
4. Onceconnectedsuccessfully,theLCDdisplay(8)willshow“BTConnected“.
StartplaybackfromyourB luetoothdeviceandenjoythemusic.
5. AdjusttheVolume
Up/Downbutton(14)todesiredvolumelevel.
6. TodisconnecttheBluetoothconnection,turnofftheBluetoothfeatureofyourBluetoothdevice.The
LCDdisplaywillshow“BT“withtheflashingof“Pairing”forpairingofanewdeviceorswitchoffthe
unit.
Listeningtotape
Generaloperation
Stop/ejectkey presstostopalldeckoperation.Pressagaintoopenthecassettedoor.
Fastforwardkey&
Fastrewindkey
press to start rapid tape winding in either forward or reverse direction. Press
stop/ejectkey,thecassettespoolsstopturning.
Playkey presstostartplaying
tape.
Pausekey presstostoptapeoperationtemporarily.Pressagaintoresumeplay.
Playback
Select“Tape”byFunctionbutton(9)
Putinthecassettetape.
Pressplaykeytoactiveplayback
AdjusttheVolumeup/downcontrol(14)tothedesiredlevel.
Usepausekey
whenyouwanttostopplaybacktemporarily.
Pressstop/ejectkeywhenfinished.
Morefeatures
A. Alarmclocksetting
ThisfunctionallowsthesystemtoturnonautomaticallyandwakeyouuptoCD,FM/DAB,buzzerorUSB
mode. Setthesystem to standbymode, thenpressandholdthe“Timer” key to entertheTimersetting
mode, LCD will show Timer On time, Moreover, the
timer clock will flash thehour digit,this meansthe
unitisallreadytoentertimersettingmode.
1) Ontimesetting : Press the skip upor down(19/11) to set the hour. Then press
Timerbutton(13)tostorethetimerstartinghour,minutedigitwillflash,
press
skipupordown(19/11)tosettheminute.ThenpressTimerbutton
(13)tostorethetimerontime
2) Offtimesetting :Afterabovestep,theLCDwillshow“TimerOff”andhourdigitwasflashing.
Press skip upor down(19/11) to set the hour. Then
press Timer
button (13) to store the timer off hour, minute digit will flash, press skip up
ordown(19/11)tosettheminute.ThenpressTimerbutton(13)to
storethetimerofftime
3) Mode :Thenpressskipupordown(19/11)toselecttimeronmode.
Then
press Timer button (13) to store the timer on mode. Press skip upor
down(15/21) to select timer on volume level and press Timer button
(13)tocompletethetimersetting.TheUnitwillreturntostandbymodeand
thedisplaywillshowthetimericon“”.

12
Active/de‐activetimerfunction(Instandbymodeonly)
1. To active timer function, press the “Timer” button once the timer indicator “” will appear in the
LCDdisplay(2).
2. Tocanceltimerfunction,press“Timer”buttonagainthetimerindicator“”willdisappear.
Remark:‐
Ifthereis nomusic source
being detected(CD orUSB)whenthepresettime isreached,systemwill
default to “FM” function for wake‐up mode automatically. The system will preset to the last radio
frequencybeinglistenedtoobeforeswitchingoff.
For FM/DAB wake up, the system will preset to the last radio
frequency being listened too before
switchingoff.
Ifwakeuptobuzzerisselected,theunitwillemita“beepbeep”soundattheselectedtime.
There are about 4seconds for the alarm setting mode, this system will return to normal mode
automaticallyifnokeysarebeing
pressedinthis timeframe.
Duringthealarmonmode,pressingthe“On/off”button(17)willswitchoffthesystem.
Due to display size limitation, timer icon “” will not appear on LCD during operating in FM/DAB
mode
B. Aux‐inconnection
Connecttheunittootherdevices
byconnectingtheAuxinjack(2)witha3.5mmcable(notprovided)and
theotherendconnecttotheexternaldevicesuchasDiscman/MP3playertoperformthemusicplayback
orencodingfunctionetc.
1) Selectthe“BT/AUX“modebypressingthefunctionbutton(9)andthe
unitwillautomaticallyswitch
to“AUXIN”modeaslongastheAux‐incableisconnected
2) AdjusttheVolumeUp/Downbutton(14)todesiredvolumelevel.
3) Starttoplayyourexternaldevice.
C. UsingHeadphones
InsertingtheplugofyourheadphonesintotheHeadphonejackwillenable
youtolisteninprivate.
READTHISIMPORTANTINFORMATIONBEFOREUSINGYOURHEADPHONES
1) Avoidextendedplayatveryhighvolumeasitmayimpairyourhearing.
2) Ifyouexperienceringinginyourears,reducethevolumeorshutoffyourunit.
3) Keepthevolumeatareasonablelevel
toallowyoutohearoutsidesounds.
SPECIFICATION
ACPOWER AC 230V~50Hz
RADIOFREQUENCY FM87.5–108MHz
DAB:174.928‐239.2MHz
BLUETOOTHVERSION V2.1
NOTE:DuetoERPstagetworequirementsandtoprotecttheenvironment,theunitwillswitch
tostandbymodeautomaticallyifnomusicisplayingafter15minutes.

13
Guarantee
Lenco offers service and warranty in accordance to European law, which means that in case of repairs
(bothduringandafterthewarrantyperiod)youshouldcontactyourlocaldealer.
Importantnote:ItisnotpossibletosendproductsthatneedrepairstoLencodirectly.
Importantnote:Ifthis
unitisopenedoraccessedbyanon‐officialservicecenterinanyway,thewarranty
expires.
Thisdeviceisnotsuitableforprofessionaluse.Incaseofprofessionaluse,allwarrantyobligationsofthe
manufacturerwillbevoided.
Disclaimer
UpdatestoFirmwareand/orhardwarecomponentsaremaderegularly.Therefore
someoftheinstruction,
specifications and pictures in this documentation may differ slightly from your particular situation. All
itemsdescribedinthis guidefor illustrationpurposesonlyandmaynotapply toparticular situation.No
legalrightorentitlementsmaybeobtainedfromthedescriptionmadeinthismanual.
Disposal
oftheOldDevice
Thissymbolindicatesthattherelevantelectricalproductorbatteryshouldnotbe
disposedofasgeneralhouseholdwasteinEurope.Toensurethecorrectwaste
treatmentoftheproductandbattery,pleasedisposetheminaccordancetoany
applicablelocallawsofrequirementfordisposal
ofelectricalequipmentorbatteries.In
sodoing,youwillhelptoconservenaturalresourcesandimprovestandardsof
environmentalpr otectionintreatmentanddisposalofelectricalwaste(Waste
ElectricalandElectronicEquipmentDirective).
CEMarking
Hereby,LencoBeneluxB.V.,Thermiekstraat1a,6361HBNuth,TheNetherlands,declaresthatthis
product
isincompliancewiththeessentialEUdirectiverequirements.
Thedeclarationofconformitymaybeconsultedviatechdoc@commaxxgroup.com
Service
Formoreinformationandhelpdesksupport,pleasevisitwww.lenco.com
LencoBeneluxBV,Thermiekstraat1a,6361HB,TheNetherlands.

14
Nederlands DraagbareDAB+enFM‐radiometcd,cassetteenBluetooth
LETOP:
Hetgebruikvanafstandsbedieningenofaanpassingenofdeuitvoeringvanproceduresdienietinditdocumentzijn
gespecificeerd,kanleidentotgevaarlijkeblootstellingaanstraling.
VOORZORGSMAATREGELENVOORGEBRUIK
ONTHOUDDEVOLGENDEINSTRUCTIES:
1. Bedekofblokkeerdeventilatieopeningenniet.Wanneeruhetapparaatopeenschapplaatst,dientu5cm(2”)
vrijeruimterondomhetgeheleapparaattebehouden.
2. Installeerhetproductvolgensdemeegeleverdegebruikershandleiding.
3. Houdhetapparaatuitdebuurtvanhittebronnen,zoalsradiatoren,
verwarmingen,kachels,kaar senenandere
hittegenererendeproductenofopenvuur.Hetapparaatkanalleenwordengebruiktineengematigdklimaat.
Extreemkoudeofwarmeomgevingendienentewordenvermeden.Hetbedrijfstemperatuurbereikligttussen
0°Cen35°C.
4. Gebruikditapparaatnietindebuurtvankrachtigemagnetischevelden.
5. Elektrostatischeontladingkannormaalgebruikvanditapparaatverstoren.Uhoefthetapparaatinditgeval
slechtsteresettenenopnieuwoptestartenvolgensdegebruikershandleiding.Weesvoorzichtigtijdens
bestandsoverdrach tengebruikhetproductineenomgevingzonderstatischeinterferentie.
6. W aarschuwing!Steeknooiteenvoorwerpviadeventilatie
‐ofandereopeningeninhetproduct.Eris
hoogspanninginhetproductaanwezigenalsuereenobjectinsteekt, kandateenelektrischeschok
veroorzakenen/ofkortsluitingindeinterneonderdelen.Morsomdezelfderedengeenwaterofvloeistofop
hetproduct.
7. Gebruikhettoestelnietinvochtige
ruimtes,zoalsbadkamers,stomendekeukensofindebuurtvan
zwembaden.
8. Hetapparaatmagnietwordenblootgesteldaandruppelsenspettersenzorgervoordatergeenmetvloeistof
gevuldevoorwerpen,zoalsvazen,opofindebuurtvanhetapparaatwordengeplaatst.
9. Gebruikditapparaatnietwanneercondensatie
kanoptreden.Wanneerhetapparaatineenwarme,natte
ruimtewordtgebruikt,kunnenzichwaterdruppelsofcondensvormeninhetapparaatenkanhetapparaat
nietgoedfunctioneren.Laathetapparaat1of2uuruitstaanvoordatuhetinschakelt:hetapparaatdient
droogtezijnvoordatdez estroom
ontvangt.
10. Alhoewelditapparaatmetgrotezorggefabriceerdenverschillendekerengeïnspecteerdisvoordathetde
fabriekverlaat,ishetnogsteedsmogelijkdaterproblemenoptreden,zoalsmetalleelektrischeapparaten.Als
urook,eenovermatigehitteontwikkelingofeniganderonverwachtverschijnselopmerkt,moetuonmiddellijk
destekkervan
hetnetsnoeruithetstopcontacthalen.
11. Ditapparaatmoetwordengebruiktmeteenvoedingsbronzoalsgespecificeerdophetspecificatielabel.Alsu
twijfeltoverhettypevoedingdatgebruiktwordtinuwhuis,raadpleegdanuwdealerofplaatselijk
energiebedrijf.
12. Buitenbereikvandierenhouden.Sommigedierenkauwengraag
opvoedingskabels.
13. Gebruikeenzacht,droogdoekjeomhetapparaattereinigen.Gebruikgeenoplosmiddelenofopbenzine
gebaseerdevloeistoffen.Ukunteenvochtigdoekjemetverdundschoonmaakmiddelgebruik enom
hardnekkigevlekkenteverwijderen.
14. Deleverancierisnietverantwoordelijkvoorschadeofverlorengegevensveroorzaaktdoorstoring,misbruik,
modificatie
vanhetapparaatofbatterijvervanging.
15. Onderbreeknooitdeverbindingwanneerhetapparaatformatteertofbestandenoverdraagt.Degegevens
kunnenanderscorruptofverlorenraken.
16. IndienhetapparaateenUSB‐afspeelfunctieheeft,moetdeUSB‐geheugenstickrechtstreeksophetapparaat
wordenaangesloten.GebruikgeenUSB‐verlengkabel,omdatdiekan
leidentotstoringenmetfoutieve
gegevensalsgevolg.
17. Hetclassificatielabelbevindtzichopdeonderkantofhetachterpaneelvanhetapparaat.

15
18. Dithulpmiddelisnietbedoeldvoorgebruikdoormensen(inclusiefkinderen)meteenfysieke,zintuiglijkeof
mentalehandicap,ofeengebrekaanervaringenkennis,tenzijzijtoezichtofinstructieshebbengekregenover
hetjuistegebruikvanhethulpmiddeldooreenpersoondieverantwoordelijkisvoorhunveiligheid.
19.
Ditproductisalleenvoorniet‐professioneelgebruikbedoeldennietvoorcommercieelofindustrieelgebruik.
20. Verzekeruervandathetapparaatineenstabielepositiestaatopgesteld.Schadediewordtveroorzaaktdoor
hetgebruikvanditproductineenonstabielepositie,trillingenofschokkenofhetnietopvolgenvan
de
waarschuwingenofvoorzorgsmaatregelenindezegebruikershandleidingwordtnietgedektdoordegarantie.
21. Verwijdernooitdebehuizingvanditapparaat.
22. Plaatsditapparaatnooitopandereelektrischeapparatuur.
23. Geefkinderengeengelegenheidinaanrakingmetplasticzakkentekomen.
24. Gebruikuitsluitenduitbreidingen/accessoiresgespecificeerddoordefabrikant.
25. Laatallereparatiesoveraangekw alificeerdonderhoudspersoneel.Onderhoudisnodigalshetapparaatis
beschadigd,bijvoorbeeldalsdevoedingskabelofdestekkerisbeschadigd,alservloeistofophetapparaatis
gemorst,alservoorwerpeninhetapparaatzijngevallen,alshetapparaatisblootgesteldaanregenofvocht,
als
hetapparaatnietnormaalwerktofalshetisgevallen.
26. Langdurigeblootstellingaanhardegeluidenvanpersoonlijkemuziekspelerskanleidentottijdelijkof
permanentgehoorverlies.
27. Alshetproductwordtgeleverdmetvoedingskabelofwisselstroomvoedingsadapter:
Alserzichproblemenvoordoen,moetudevoedingskabelloskoppelenenhetter
onderhoudaanbieden
aangekwalificeerdpersoneel.
Nooitopdevoedingsadapterstappenofdez eindrukken.Weeszeervoorzichtig,vooralinhetgebied
ronddestekkersendekabelaansluitingen.Plaatsgeenzwarevoorwerpenopdevoedingsadapter,om
beschadigingervantevoorkomen.Houdhetgeheleapparaatbuitenbereikvankinderen!Wanneer
kinderenmetde
voedingskabelspelen,kunnenzijernstigletseloplopen.
Haaldestekkeruithetstopcontacttijdensonweerofwanneerudezelangeretijdnietgebruikt.
Hetstopcontactmoetindebuurtvandeapparatuurzijngeïnstalleerdeneenvoudigtebereikenzijn.
LaatAC‐stopcontactenofverlengsnoerennooitoverbelastraken.
Overbelastingkanbrandofeen
elektrischeschokveroorzaken.
ApparatenmeteenKlasse1structuurdienentewordenaangeslotenopeenstopcontactmeteen
beschermendeaardverbinding.
ApparatenmeteenKlasse2structuurvereisengeenaardverbinding.
Houdaltijddestekkervastwanneerudezeuithetstopcontacttrekt.Treknooit
aandevoedingskabel.
Ditkantoteenkortsluitingleiden.
Gebruiknooiteenbeschadigdevoedingskabelofstekkerofeenlosstopcontact.Ditvormtnamelijkeen
risicoopbrandofelektrischeschokken.
28. Indienhetproductknoopcelbatterijenbevatofwordtgeleverdmeteenafstandsbedieningdie
knoopcelbatterijenbevat:
Waarschuwing:
“Batterijniet
inslikken,chemischbrandgev aar”ofgelijkwaardigewerking.
Demeegeleverdeafstandsbedieningbevateenknoopcelbatterij.Alsdebatterijwordtingeslikt,kandeze
inslechts2uurernstigeinternebrandwondenveroorzakenentotdedoodleiden.
Houdnieuweengebruiktebatterijenbuit enbereikvankinderen.
Alsdebatterijhoudernietgoedkanworden
gesloten,dientuhetproductnietmeertegebruikenen
buitenbereikvankinderentehouden.
Alsudenktdatbatterijenzijningesliktofbinnenineenwillekeuriglichaamsdeelterechtzijngekomen,
dientuonmiddellijkmedischehulptezoeken.

16
29. W aarschuwingm.b.t.hetgebruikvanbatterijen:
Alsdebatterijonjuistwordtgeplaatst,bestaaterexplosiegevaar.Vervangdebatterijalleendooreen
zelfdeofvergelijkbaresoortbatterij.
Steldebatterijnietblootaanextreemhogeoflagetemperaturenofeenlageluchtdrukopgrotehoogte
tijdensgebruik,opslag
oftransport.
Vervangingvaneenbatterijdooreenincorrecttypekanleidentoteenontploffingofdelekkagevan
ontvlambarevloeistoffenofgas.
Hetweggooienvaneenbatterijinhetvuurofeenheteoven,ofhetmechanischverpletterenof
insnijdenvaneenbatterij,kanleidentoteenexplosie.
Hetachterlatenvaneenbatterijineenomgevingmetextreemhogetemperaturenkanleidentoteen
explosieofhetlekkenvanbrandbarevloeistofofgas.
Eenbatterijdieaaneenextreemlageluchtdrukwordtblootgesteld,kanleidentoteenexplosieofhet
lekkenvanbrandbarevloeistofofgas.
Aandachtvoorhetmilieuisnodigbijhetverwijderenvandebatterijen.
INSTALLATIE
Pakalleonderdelenuitenverwijderdebeschermendematerialen.
Sluithetapparaatnietaanophetstopcontact,voordatudenetspanninghebtgecontroleerdenvoordat
alleander eaansluitingenzijngemaakt.
*DezeinstructieszijnenkelvantoepassingopproductenmeteenvoedingskabelofeenACvoedingsadapter.

17
Letop:
Het gebruik vanbedieningenof proceduresandersdan beschrevenindezedocumentatiekan leiden tot
blootstellingaanschadelijkestraling.
Dit apparaat dient uitsluitend te worden aangepast of gerepareerd door gekwalificeerd
onderhoudspersoneel.
PLAATSINGVANBEDIENINGSELEMENTEN
1) USB‐aansluiting
2) Aux‐ingang
3) 3,5mmhoofdtelefoonuitgang
4) Cassettetoets
5) Handvat
6) FM‐antenne
7) CD‐klepjeopenen/sluiten
8) LCD‐scherm
9) knopFunctie
10)Stop /Entertoets
11)Vorige/Tuneromlaag‐toets
12)Menu/Mem/clock‐adjust‐toets
13)Timer‐toets
14)Volumeomhoog /omlaagtoets
15)Cassettedeurtje
16)Stand
‐by‐led
17)Aan/uittoets
18)Start/Pauze /Scantoets
19)Volgende/Tuneromhoog‐toets
20)Pre/Folderup‐toets
21)Info/Playmode‐toets
22)DC‐aansluiting
KLASSE1
LASERPRODUCT
LETOP
Debliksemschichtbinnenin
dedriehoekisbestemdu
tewaarschuwenopde
aanwezigheidvangevaarlijke
spanningbinneninhet
product.
RISICOOPELEKTRISCHESCHOKKEN
OPENHETAPPARAATNIET
LETOP:OMHETRISICOOPELEKTRISCHESCHOKKENTE
VOORKOMEN,NOOITDEBEHUIZING(OFACHTERZIJDE)
OPENEN.GEENINTERNEONDERDELENDIEUZELFKUNT
REPAREREN.LAATALLEREPARATIESDOORBEVOEGD
ONDERHOUDSPERSONEELUITVOEREN.
Hetuitroeptekenbinnenin
dedriehoekisbedoeldomu
tewijzenopdeaanwezigheid
vanbelangrijkeinstructies
meegeleverdmet
hetproduct

18
Belangrijk:
Omdat het gevoelige circuit interferentie kan veroorzaken in radiotuners in de buurt van het apparaat,
dientuditapparaatuitteschakelenwanneeruandereradioapparatuurgebruikt.
WegensdecomplexiteitvandeMCU‐bediening,koppelhetapparaata.u.b.losvandevoedingsbronals
hetapparaatstopttijdensgebruik!Ditduidt
nietopeenstoringvanhetsysteem!
Voorzorgsmaatregelenvoorgebruik
Installatie
• Pakalleonderdelenuitenverwijderdebeschermendematerialen.
• Sluit hetapparaatniet aan ophetstopcontactvoordat u denetspanninghebtgecontroleerd en alle
andereverbindingentotstandhebtgebracht.
• Bedek geen van de ventilatieopeningen en zorg voor enkele centimeters vrije ruimte rondom het
apparaatvoor
ventilatie.
Aansluiting
1. Sluit de DC‐stekker van de meegeleverde AC/DC‐adapter aan op de DC‐aansluiting (22) en sluit de
AC/DC‐adaptervervolgensaanophetAC‐stopcontact.
2. Wanneer u het apparaat voor het eerst aansluit op het stopcontact, zet het zich automatisch op
stand‐byenzaldestand‐by
‐ledoplichten.Destand‐by‐ledzaloplichten
3. Schakel het apparaat in door op de toets “Aan/Stand‐by” (17) te drukken. Als de lcd‐display (8) is
ingeschakeld met achtergrondverlichting, betekent dit dat de voeding in orde is. Het systeem is nu
gereedommuziekaftespelen.
DC
‐aansluiting
Voor gebruik op DC‐voeding, installeera.u.b.8 stuks typeC(UM‐2)
batterijen in de batterijhouder, trek de AC‐stekker uit het
stopcontactenkoppeldeAC‐kabelvervolgenslosvandeAC‐ingang.
Haala.u.b.allebatterijenuithetapparaatwanneerudezeop
DC‐voedinggebruikt.Hetis
raadzaamallebatterijenuithetapparaat
teverwijderenwanneerudezevoorlangeretijdnietgebruikt.
Deklokinstellen
1. Zethetapparaatindestandby‐modus.
2. Houddetoets“Menu/Mem/clk‐adj”(12)ingedruktendeuuraanduidingzalbeginnenteknipperenop
deLCD‐display (8). Druk opdetoets Vorige/Omlaag(11) of Volgende/Omhoog(19)omde
juiste uren in te stellen. Druk op de toets “Menu/Mem/clk‐adj” (12)
om de uren op te slaan, de
minutenzullenvervolgensbeginnenteknipperen.
3. DrukopdetoetsVorige/Omlaag(11)ofVolgende/Omhoog(19)omdejuisteminuteninte
stellen.
4. Drukopdetoets“Menu/Mem/clk‐adj”(12)omdeminutenopteslaan.
Alsu de netvoeding onderbreekt,
zal de ingestelde tijd volledig worden teruggesteld. Wij raden u
aanhetsysteemopstand‐byteschakelenvooreenvoudiggebruik.
De klok zal zichzelf met de RDS‐/DAB‐klok synchroniseren zodra het RDS‐/DAB‐signaal wordt
ontvangenalsdekloknognietisingesteld.

19
Naarderadioluisteren
Bediening
Handmatigafstemmen
1. SchakelhetapparaatindoormiddelvandeAan/uittoets(17)endrukopdeFunctietoets(9)totude
“FM”‐modusbereikt.
2. DrukopdetoetsenVorige/Omlaag(11)ofVolgende/Omhoog(19)omaftestemmenopde
gewenstezender.
3. PasdeVolumeknop(14)aantot
hetgewenstevolumeniveau.
Automatischafstemmen
1. ZethetapparaatinFM‐modus.
2. DrukeenmaalopdetoetsScan(18)omhetapparaatinoplopendefrequentietelatenscannentotdat
ereenradiostationwordtontvangen.DrukeenmaalopdetoetsVorige/Omlaag(11)envervolgensop
detoetsScan(18)om
hetapparaatinaflopendefrequentietelatenscannen.Alshet
RDS‐uitzendsignaal(RadioDataSysteem)wordtontvangen,zalhetsysteemdehuidigetijd
automatischinstellen.
3. PasdeVolumeknop(14)aantothetgewenstevolumeniveau
FM‐scaninstelling
Alsernadeautomatischescanteveelongewensteradiostationsmeteenzwaksignaal
wordenontvangen,
dankuntualleensterkestationsselecterendoordezwakkeresignalenteverwijderen.
1. DrukinFM‐modusopdetoets“Menu/Mem/clk‐adj”(12)omhet“Menu”teopenenendruk
vervolgensopdeVorige/Omlaagtoets(11)ofVolgende/Omhoogtoets(19)om“Scansetting”
(Scaninstelling)teselecteren.
2. Drukop
detoets“Stop/Enter”(10)omde“Scansetting”(Scaninstelling)teopenenendruk
vervolgensopdeVorige/Omlaagtoets(11)ofVolgende/Omhoogtoets(19)om“Strong
stationsonly”(alleenkrachtigestations)teselecteren.Drukvervolgensopdetoets“Stop/Enter”(10)
omuwinstellingtebevestigen.
3. Voeropnieuwdeautomatischeafstemprocedureuitzoalshierboven
staatbeschreven.
FM‐enFM‐stereo‐ontvangst
HetapparaatzalinMonostandaardopFM‐modusschakelen.ZetdaaromalsueenFM‐stereosignaal
ontvangt,deFM‐modusopStereodoortedrukk enopdeMenu‐toets(12),drukdanopdetoetsen
Vorige/Omlaag(11)ofVolgende/Omhoog(19)om
deAudiosetting(Audio‐instellingen)te
selecteren,drukopdeEnter‐toets(10)endrukopnieuwopdetoetsenVorige/Omlaag(11)of
Volgende/Omhoog(19)omFMstereoteselecteren,drukvervolgensopdeEnter‐toets(10)om
tebevestigen.Alshetstereosignaalzwakenlawaaierigis.Schakelbijvoorkeuropde
FM‐modusvia
deze lfdeprocedure.
Tipsvooroptimaleontvangst:‐
FM:deontvangerheefteenstaafantenne(6)opdeachterbehuizing.Trekdezevollediguitvooreen
optimaleontvangst.
RadioDataSysteem(RDS)
DezefunctietoontstapsgewijsdevolgendeinformatieopdeLCD‐displaydiewordtverstrektdoorde
radiozenderalsu
meerderekerenopdetoetsInfo/Playmode(21)drukken.
Radiotekstprogrammatypefrequentiemono/stereotijddatum
Digitalaudiobroadcasting(DAB)radio
1. SchakelhetapparaatinDAB‐modusdooropdeFunctietoets(9)tedrukken.
2. DrukeenmaalopdetoetsPlay/Pause /Scan(18);hetapparaat
zaleenvolledigescanstarten
binnenhetbereik11b‐12d.DrukopdetoetsenVorige/Omlaag(11)ofVolgende/Omhoog
(19)omhetgewensteDAB‐kanaalteselecterenendrukdanopdetoets“Stop/Enter”(10)om het
gekozenkanaaltebevestigen.

20
3. DrukmeerderekerenopdePlaymode/Infotoets(21)omdeinformatieuitgezondendoorDABte
controleren,indevolgordehieronderbeschreven.
SignaalsterkteprogrammatypeGroepsnaamfrequentiesignaalstoring
overdrachtsnelheidtijddatum
4. Pasdevolumeknop(14)aantothetgewenstevolumeniveau.
Dynamischebereikcontrole
Dit apparaat
heeft drie dynamische bereikmodi die overeenkomen met verschillende soorten
programmatypesindeDAB‐modus.
1. DrukindeDAB‐modusopdetoets“Menu/Mem/clk‐adj”(12)omhet“Menu”teopenenendruk
vervolgensopdetoetsenVorige/Omlaag(11)ofVolgende/Omhoog(19)om“DRC”te
selecteren.
2. Drukopde
toets“Stop/Enter”(10)omdeinstelling“DRC”teopenenendrukvervolgensopde
Vorige/Omlaagtoets(11)ofVolgende/Omhoogtoets(19)omdemodus“DRChigh/low/off”
(DRChoog/laag/uit)teselecteren.Drukvervolgensopdetoets“Stop/Enter”(10)om uwinstellingte
bevestigen.
3. Drukineenwillekeurigemodusopdetoets“Menu/Mem/clk‐adj”
(12)omdeinstellingsmoduste
verlaten.
Taalinstelling
Ditapparaatstelt4talenbeschikbaarvoordeweergaveinFM/DAB‐modus.
1. Druk in DAB/FM‐modus op de toets “Menu/Mem/clk‐adj” (12) om het “Menu” te openen en druk
vervolgens op de Vorige/Omlaagtoets(11) of Volgende/Omhoogtoets(19) om “System”
(Systeem)teselecteren.
2. Drukop de toets “Stop/Enter” (10)om de instelling “System”(Systeem) teopenen,druk vervolgens
op de toets Vorige/Omlaag(11) of Volgende/Omhoog(19) om “Language” (Taal) te
selecteren,drukopdetoets“Stop/Enter”(10)omdetaalmodusteopenenendrukvervolgensopde
toets Vorige/Omlaag(11)of Volgende/Omhoog(19)
om de gewenste taal te kiezen uit de
opties English/French/German/Italian (Engels/Frans/Duits/Italiaans). Druk vervolgens op de toets
“Stop/Enter”(10)omuwinstellingtebevestigen.
3. Drukineenwillekeurigemodusopdetoets“Menu/Mem/clk‐adj”(12)omdeinst ellingsmoduste
verlaten.
Voorkeuzezenders
Ukuntto20radiostationsopslaaninhetgeheugen
(10‐FM/10‐DAB).
1. StelhetapparaatinopFM/DAB‐modus
2. Stemafopdegewensteradiozenderviade“handmatige”of“automatische”afstemmethode.
3. Houddetoets“Mem/clk‐adj”(12)ingedruktomdegeheugenmodusteopenen.
4. Druk op de toetsen Vorige/Omlaag(11) of Volgende/Omhoog(19) om het gewenste
stationsgeheugenteselecterenvoordegeheugenopslag.
5. Drukopdetoets“Stop/Enter”(10)omuwinstellingtebevestigen.
6. Herhaalstappen2tot5omanderezendersopteslaan.
Voorkeuzezendersoproepen
1. StelhetapparaatinopFM/DAB‐modus
2. DrukopdePre‐up‐toets(20)omdeopgeslagen
zendersteopenen.
3. Druk op de toetsen Vorige/Omlaag(11) of Volgende/Omhoog(19) om de zender te
selecterendieuwiltoproepen.
4. Druknogmaalsopdetoets“Stop/Enter”(10)omhetoproepenvandezendertebevestigen.
DAB/FMterugstellen:
AlsualleopgeslagenFM‐/DAB‐stationswiltwissen.
1.
Stel het apparaat in op DAB‐ of FM‐modus, druk op de toets “Menu/Mem/clk‐adj” (12) om het
“Menu”teopenenendrukvervolgensopdetoetsenVorige/Omlaag(11)ofVolgende/Omhoog
(19)om“System”(Sy steem)teselecteren.
Seite wird geladen ...
Seite wird geladen ...
Seite wird geladen ...
Seite wird geladen ...
Seite wird geladen ...
Seite wird geladen ...
Seite wird geladen ...
Seite wird geladen ...
Seite wird geladen ...
Seite wird geladen ...
Seite wird geladen ...
Seite wird geladen ...
Seite wird geladen ...
Seite wird geladen ...
Seite wird geladen ...
Seite wird geladen ...
Seite wird geladen ...
Seite wird geladen ...
Seite wird geladen ...
Seite wird geladen ...
Seite wird geladen ...
Seite wird geladen ...
Seite wird geladen ...
Seite wird geladen ...
Seite wird geladen ...
Seite wird geladen ...
Seite wird geladen ...
Seite wird geladen ...
Seite wird geladen ...
Seite wird geladen ...
Seite wird geladen ...
Seite wird geladen ...
Seite wird geladen ...
Seite wird geladen ...
Seite wird geladen ...
Seite wird geladen ...
Seite wird geladen ...
Seite wird geladen ...
Seite wird geladen ...
Seite wird geladen ...
Seite wird geladen ...
Seite wird geladen ...
Seite wird geladen ...
Seite wird geladen ...
Seite wird geladen ...
Seite wird geladen ...
-
 1
1
-
 2
2
-
 3
3
-
 4
4
-
 5
5
-
 6
6
-
 7
7
-
 8
8
-
 9
9
-
 10
10
-
 11
11
-
 12
12
-
 13
13
-
 14
14
-
 15
15
-
 16
16
-
 17
17
-
 18
18
-
 19
19
-
 20
20
-
 21
21
-
 22
22
-
 23
23
-
 24
24
-
 25
25
-
 26
26
-
 27
27
-
 28
28
-
 29
29
-
 30
30
-
 31
31
-
 32
32
-
 33
33
-
 34
34
-
 35
35
-
 36
36
-
 37
37
-
 38
38
-
 39
39
-
 40
40
-
 41
41
-
 42
42
-
 43
43
-
 44
44
-
 45
45
-
 46
46
-
 47
47
-
 48
48
-
 49
49
-
 50
50
-
 51
51
-
 52
52
-
 53
53
-
 54
54
-
 55
55
-
 56
56
-
 57
57
-
 58
58
-
 59
59
-
 60
60
-
 61
61
-
 62
62
-
 63
63
-
 64
64
-
 65
65
-
 66
66


Lenco SCD-6900BK Bedienungsanleitung
- Kategorie
- CD-Spieler
- Typ
- Bedienungsanleitung
in anderen Sprachen
- English: Lenco SCD-6900BK Owner's manual
- français: Lenco SCD-6900BK Le manuel du propriétaire
- español: Lenco SCD-6900BK El manual del propietario
- Nederlands: Lenco SCD-6900BK de handleiding
Verwandte Artikel
-
Lenco SCD-6800 FM RADIO CD CASSETTE USB PORT Benutzerhandbuch
-
Lenco SCD-6800GY Bedienungsanleitung
-
Lenco SCD-6800 Benutzerhandbuch
-
Lenco SCD-680 Benutzerhandbuch
-
-
Lenco DAR-050 Benutzerhandbuch
-
-
Lenco SCD-580SI Bedienungsanleitung
-
-
Andere Dokumente
-
Denver MRD-165 Benutzerhandbuch
-
Muse MD-208 DBW Benutzerhandbuch
-
Roadstar CLR-2950DAB plus Benutzerhandbuch
-
Roadstar HIF-6850USMP Bedienungsanleitung
-
-
Roadstar HIF-8899BT Benutzerhandbuch
-
Soundmaster UR2160 Benutzerhandbuch
-
Auna 10031948 Benutzerhandbuch
-
Soundmaster RCD1350WS Benutzerhandbuch
-
Soundmaster SCD1800 Benutzerhandbuch