Lenco SCD-6800GY Bedienungsanleitung
- Kategorie
- CD-Spieler
- Typ
- Bedienungsanleitung

1
Version:1.0
MODEL:SCD‐6800
PORTABLEDAB+ANDFMRADIOWITHCD,
CASSETTEANDUSBPORT
USERMANUAL PortableDAB+andFMradiowithCD,CassetteandUSBport
HANDLEIDING DraagbareDAB+enFM‐radiometCD,CassetteenUSBingang
BENUTZERHANDBUCH TragbareDAB+/FM‐radiomitCD,KassetteundUSB‐Anschluss
MODED'EMPLOI RadioPortableDAB+etFMavecCD,cassetteetportUSB
MANUALDELUSUARIO
RadioportátilDAB+yFMconCD,caseteypuretoUSB

2
Version:1.0
Index
English ................................................................................................................................................................................... 3
Nederlands .......................................................................................................................................................................... 13
Deutsch ............................................................................................................................................................................... 24
Français ............................................................................................................................................................................... 35
Español ................................................................................................................................................................................ 46

3
Version:1.0
English PortableDAB+andFMradiowithCD,CassetteandUSBport
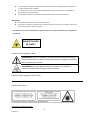
CAUTION:
Usageofcontrolsoradjustmentsorperformanceofproceduresotherthanthosespecifiedhereinma yresultin
hazardousradiationexposure.
PRECAUTIONSBEFOREUSE
KEEPTHESEINSTRUCTIONSINMIND:
1. Donotcoverorblockanyventilationopenings.Whenplacingthedeviceonashelf,leave
5cm(2”)freespacearoundthewholedevice.
2. Installinaccordancewiththesuppliedusermanual.
3. Keepthedeviceawayfromheatsourcessuchasradiators,
heaters,stoves,candlesandotherheat‐generating
productsornakedflame.Thedevicecanonlybeusedinmoderateclimates.Extremelycoldorwarm
environmentsshouldbeavoided.Workingtemperaturebetween0°and35°C.
4. Avoidusingthedevicenearstrongmagneticfields.
5. Electrostaticdischargecandisturbnormalusage
ofthisdevice.Ifso,simply resetandrestartthedevice
followingtheinstructionmanual.Duringfiletransmission,pleasehandlewithcareandoperateinastatic‐free
environment.
6. Warning!Neverinsertanobjectintotheproductthroughtheventsoropenings.Highvoltageflowsthrough
theproductandinserting
anobjectcancauseelectricshockand/orshortcircuitinternalparts.Forthesame
reason,donotspillwaterorliquidontheproduct.
7. Donotuseinwetormoistareassuchasbathrooms,steamykitchensornearswimmingpools.
8. Thedeviceshallnotbeexposedto
drippingorsplashingandmakesurethatnoobjectsfilledwithliquids,such
asvases,areplacedonorneartheapparatus.
9. Donotusethisdevicewhencondensationmayoccur.Whentheunitisusedinawarmwetroomwithdamp,
waterdropletsorcondensationmayoccurinside
theunitandtheunitmaynotfunctionproperly;lettheunit
standinpowerOFFfor1or2hoursbeforeturningonthepower:theunitshouldbedrybeforegettingan y
power.
10. Althoughthisdeviceismanufactur edwiththeutmostcareandcheckedseveraltimesbefore
leavingthe
factory,itisstillpossiblethatproblemsmayoccur,aswithallelectricalappliances.Ifyounoticesmoke,an
excessivebuild‐upofheatoranyotherunexpectedphenomena,youshoulddisconnecttheplugfromthe
mainpowersocketimmediately.
11. Thisdevicemustoperateonapowersource
asspecifiedonthespecificationlabel.Ifyouarenotsureofthe
typeofpowersupplyusedinyourhome,consultyourdealerorlocalpowercompany.
12. Keepawayfromanimals.Someanimalsenjoybitingonpowercords.
13. Tocleanthedevice,useasoftdrycloth.
Donotusesolventsorpetr ol basedfluids.
Toremoveseverestains,youmayuseadampclothwithdilutedetergen t.
14. Thesupplierisnotresponsiblefordamageorlostdatacausedbymalfunction,misuse,modificationofthe
deviceorbatteryreplacement.
15. Donotinterrupttheconnectionwhenthe
deviceisformattingortransferringfiles.Otherwise,datamaybe
corruptedorlost.
16. IftheunithasUSBplaybackfunction,theUSBmemorystickshouldbepluggedintotheunitdirectly.Don’tuse
anUSBextensioncablebecauseitcancauseinterferenceresultinginfailingofdat a.
17. The
ratinglabelhasbeenmarkedonthebottomorbackpanelofthedevice.
18. Thisdeviceisnotintendedforusebypeople(includingchildren)withphysical,sensoryormentaldisabilities,
oralackofexperienceandknowledge,unlessthey’reundersupervisionorhavereceivedinstructionsabout
thecorrectuse
ofthedevicebythepersonwhoisresponsiblefortheirsafety.
19. Thisproductisintendedfornonprofessionaluseonlyandnotforcommercialorindustrialuse.
20. Makesuretheunitisadjustedtoastableposition.Damagecausedbyusingthisproductinanunstable
position
vibrationsorshocksorbyfailuretofollowanyotherwarningorprecautioncontainedwithinthisuser
manualwillnotbecoveredbywarranty .

4
Version:1.0
21. Neverremovethecasingofthisdevice.
22. Neverplacethisdeviceonotherelectricalequipment.
23. Donotallowchildrenaccesstoplasticbags.
24. Onlyuseattachments/accessoriesspecifiedbythemanufacturer.
25. Referallservicingtoqualifiedservicepersonnel.Servicingisrequiredwhenthedevicehas
beendamagedin
anyway,suchasthepowersupplycordortheplug,whenliquidhasbeenspilledorobjectshavefallenintothe
device,whenthedevicehasbeenexposedtorainormoisture,doesnotoper atenormally,orhasbeen
dropped.
26. Longexposuretoloudsounds
frompersonalmusicplayersmayleadtotemporaryorpermanenthearingloss.
27. IftheproductisdeliveredwithpowercableorACpoweradaptor:
Ifanytroubleoccur,disconnecttheACpowercordandreferservicingtoqualifiedpersonnel.
Don’tsteponorpinchthepoweradaptor.Be
verycareful,particularlyneartheplugsandthecable’s
exitpoint.Donotplaceheavyitemsonthepoweradaptor,whichmaydamageit.Keeptheentiredevice
outofchildren’sreach!Whenplayingwiththepowercable,theycanseriouslyinjurethemselves.
Unplugthisdeviceduringlightningstorms
orwhenunusedforalongperiod.
Thesocketoutletmustbeinstalledneartheequipmentandmustbeeasilyaccessible.
Donotoverloadacoutletsorextensioncords.Overloadingcancausefireorelectricshock.
Deviceswithclass1constructionshouldbeconnectedtoamainsocket
outletwithapr otectiveearthed
connection.
Deviceswithclass2constructiondonotrequireaearthedconnection.
Alwaysholdtheplugwhenpullingitoutofthemainsupplysocket.Donotpullthepowercord.Thiscan
causeashortcircuit.
Donotuseadamaged
powercordorplugoralooseoutlet.Doingsomayresultinfireorelectricshock.
28. Iftheproductcontainsorisdeliveredwitharemotecontrolcontainingcoin/cellbat teries:
Warning:
“Donotingestbattery,ChemicalBurnHazard”orequivalentworking.
[Theremotecontrolsuppliedwith]This
productcontainsacoin/buttoncellbattery.Ifthebatteryis
swallowed,itcancausesevereinternalburnsinjust
2hoursandcanleadtodeath.
Keepnewandusedbatteriesawayfromchildren.
Ifthebatterycompartmentdoesnotclosesecurely,stopusingtheproductandkeep
itawayfrom
children.
Ifyouthinkbatteriesmighthavebeenswallowedorplacedinsideanypartofthebody,seekimmediate
medicalattention.
29. CautionabouttheuseofBatteries:
Dangerofexplosionifbatteryisincorrectlyreplaced.Replaceonlywiththesameorequivalenttype.
Battery
cannotbesubjectedtohighorlowextremetemperatures,lowairpressureathighaltitude
duringuse,storageortransportation.
Replacementofabatterywithanincorrecttypethatcanresultinanexplosionortheleakageof
flammableliquidorgas.
Disposalofabatteryintofire
orahotoven,ormechanicallycrushingorcuttingofabattery,thatcan
resultinanexplosion.
Leavingabatteryinanextremelyhightemperaturesurroundingenvironmentthatcanresultinan
explosionorthatleakageofflammableliquidorgas.
Abatterysubjectedtoextremelylowair
pressurethatmayresultinanexplosionortheleakageof
flammableliquidorgas.
Attentionshouldbedrawntotheenvironmentalaspectsofbatterydisposal.

5
Version:1.0
INSTALLATION
Unpackallpartsandremoveprotectivematerial.
Donotconnecttheunittothemainsbeforecheckingthemainsvoltageandbeforeallotherconnections
havebeenmade.
* ThoseinstructionsarerelatedonlytoproductsusingpowercableorACpoweradaptor.
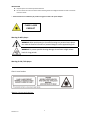
CLASSILASER
PRODUCT
WarningforMP3player:
WARNING:Whenparticipatinginthetrafficlisteningtoapersonalmusicplayer
canmakethelistenerlessawareofpotentialdangerssuchasapproachingcars.
WARNING:Topreventpossiblehearingdamage,donotlistenathighvolume
levelsforlongperiods.
WarningforCD/DVDplayer:
WARNING
Class1LaserProduct
Warning:Donottouchthelens.

6
Version:1.0
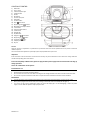
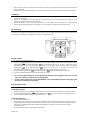
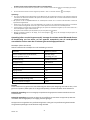
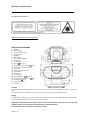
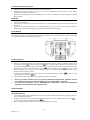
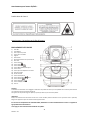
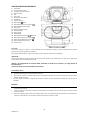
LOCATIONOFCONTROL
1) USBsocket
2) Auxinsocket
3) 3.5mmheadphonejack
4) Cassettebutton
5) Handle
6) FMantenna
7) CDdooropen/close
8) LCDdisplay
9) Functionbutton
10) Stop /Enterbutton
11) Skip/Tuningdownbutton
12) Menu/Mem/clock‐adjustbutton
13) Timerbutton
14) Volumeup/downbutton
15) Cassettedoor
16) StandbyLED
17) On/Offbutton
18) Play/pause /Scanbutton
19) Skip/tuningupbutton
20) Pre/Folderup button
21) Info/Playmodebutton
22) DCjack
Caution:
Usage of controls or adjustments or performance of procedures other than those specified herein may result in hazardous
radiationexposure.
Thisunitshouldnot
beadjustedorrepairedbyanyoneexceptqualifiedservicepersonnel.
Important:
Since movementof thecd mechanism andthe sensitivecircuitry maycause interferencetotheradio tuner nearby,switchthis
unitoffwhileoperatingotherradiodevices.
DuetothecomplexityofMCUcontrol,pleaseun‐plugthemainpowersupplyoftheunitiffoundtheunithangup
duringoperation!
Thisisnotamalfunctionofthesystem!
Precautionsforuse
Installation
Unpackallpartsandremoveprotectivematerial.
Donotconnecttheunittothemainsbeforecheckingthemainvoltageandbeforeallotherconnectionshavebeenmade.
Donotcoveranyventsandmakesurethatthereisaspaceofseveralcentimetersaroundtheunitfor
ventilation.
Connection
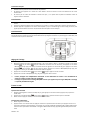
1. ConnecttheDCplugoftheincludedAC/DCadaptortoDCjack(22)thentheAC/DCadaptorconnecttotheACoutlet.
2. Whenyoufirstplugtheunitintothemains,theunitwillgointostandbymode.TheStandbyLEDwilllightup
3. Turn onthe unit
bypressing“On/Standby” button (17). If the LCD display (8) isonwith backlighting, it means thepower
supplyisnormal.Nowthesystemisreadytoplaythemusic.

7
Version:1.0
DCconnection
ForDCoperation,pleaseinsert8pcssizeC(UM‐2)batterytobatterycompartmentandremovetheACplugfromACoutletthen
disconnecttheACcordfromACsocket.Sinceunitwilldrawlittlepowerconsumptionduringstandbymode,suggestuninstallthe
batteryduringstandbymode.
Settingtheclock
1. Setunitinstandbymode.
2. Pressand holdthe “Menu/Mem/clk‐adj” button(12),display willshow 24hour, press Skip down(11) or Skip up
(19)but tontoselect12or24hrsformat,thenpress“Menu/Mem/clk‐adj”button(12)toconfirm,thehourdigitwillflashon
LCD display (8) Press the Skip down(11) or Skip up(19) button to set the correct hour. Press the
“Menu/Mem/clk‐adj”button(12)tostorethehourthenminutedigitwillflash.
3. PresstheSkipdown(11)orSkipup(19)buttontosetthecorrectminutes.
4. Press“Menu/Mem/Menu/clk‐
adj”button(12)tostorethecorrecthour.
Thepresettimewillberesetcompletelyifdisconnecting themainpowersupply.Youarerecommendedto
switchthesystemintostandbymodeforconvenienceusage.
The clock will synchronous to RDS/DAB clock once receive the RDS/D AB signal if clock did not setting in
advance.
Listeningtoradio
Operation
Manualtuning
1. TurnontheunitbyOn/Offbutton(17)&thenpresstheFunctionbutton(9)untilitreachthe“FM”mode.
2. PresstheSkipdown(11)orSkipup(19)buttontotuneyourdesiredstation.
3. Adjustvolumeup/downbutton(14)forthedesiredvolumelevel.
Autotuning
1. SettheunittoFMmode.
2. Presstheautoscanbutton(18)once,unitwillstarttoscanattuningupdirectuntilradiostationreceived.Presstuningdown
button(11)onceandthenpresstheautoscanbutton(18),theunitwillscantotuningdowndirection.If
theradiodata
system(RDS)broadcastingsignalreceived,theunitwillsettheactualtimeautomatically.
3. Adjustvolumeknob(14)forthedesiredvolumelevel
FMscansetting
Afterautotuningifmanyunwantedweaknessradiostationreceived,youcanselectstrongstationonlytofiltertheweakness
signal
station.
1. InFMmode,press“Menu/Mem/clk‐adj”button(12)toenterthe“Menu”,thenpressSkipdown(11)orSkipup
(19)buttontoselect“Scansetting”.
2. Press“Stop/Enter”button(10)toenterthe“Scansetting”,thenpressSkipdown(11)orSkipup(19)buttonto
select“Strong
stationonly”.Thenpress“Stop/Enter”button(10)toconfirmthesetting.
3. Performtheautotuningoperationagainasabove.
FM&FM‐stereoreception
TheunitwilldefaulttheFMmodeatMono.Thus,ifFMstereosignalreceived,settheFMmodetoStereobypressMenu
button(12),thenpressSkipdown(11)orSkipup(19)buttontoselectAudiosetting,pressEnterbutton(10)and
pressSkipdown(11)or
Skipup(19)againtoselectFMstereo,thenpressEnterbutton(10)toconfirm.When
stereosignalsareweakandnoisy.ItispreferabletochangetheFMmodebysameprocedure.
Hintsforbestreception:‐
FM:thereceiverhasrodantenna(6)hangingattherearcabinet.Itshouldbetotallyextendedforbestreception.

8
Version:1.0
Radiodatasystem(RDS)
ThisisthefeaturestodisplaytheinformationwhichreleasedfromtheradiobroadcastandwillshowedonLCDdisplaystepby
stepasbelowbypressingthePlaymode/infobutton(21)continuously.
Radiotextprogramtypefrequencymono/stereotimedate
Digitalaudiobroadcasting(DAB)radio
1. SettheunittoDABmodebypressFunctionbutton(9).
2. PressthePlay/pause /Scanbutton(18)once,unitwillstarttofullscanfromrange11b‐12donetime.PressSkipdown
(11)orSkipup(19)buttontoselectyourdesiredDABchannelthenpress“Stop/Enter”
button(10)toconfirmthe
selectedchannel.
3. PressthePlaymode/infobutton(21)continuouslytocheckthebelowinforeleasedbyDAB.
signalstrengthprogramtypeGroupnamefrequencysignalerrortransferratetimedate
4. Adjustvolumeknob(14)forthedesired
volumelevel.
Dynamicrangecontrol
ThisapparatusprovidethreedynamicrangemodetomatchdifferentprogramtypeinDABmode.
1. InDABmode,press“Menu/Mem/clk‐adj”button(12)toenterthe“Menu”,thenpressSkipdown(11)orSkipup
(19)buttontoselect“DRC”.
2. Press“Stop/Enter”button(10)toenterthe“DRC”setting,
thenpressSkipdown(11)orSkipup(19)buttonto
select“DRChigh/low/off”mode.Thenpress“Stop/Enter”button(10)toconfirmthesetting.
3. Inanystatepress“Menu/Mem/clk‐adj”button(12)toquitthesettingmode
Languagesetting
Thisapparatusprovide4languageforFM/DABoperationdisplay.
1. InDAB/FMmode,press“Menu/Mem/clk‐adj”butt on(12)toenterthe“Menu”,thenpressSkipdown(11)orSkipup
(19)buttontoselect“Language”.
2. Press“Stop/Enter”button(10)toenterthe“language”setting,thenpressSkipdown(11)
orSkipup(19)button
toselectyourdesiredbetweenEnglish/French/German/Italian.Thenpress“Stop/Enter”button(10)toconfirmthesetting.
3. Inanystatepress“Menu/Mem/clk‐adj”button(12)toquitthesettingmode
Presetstations
Youcanstoreuptototalof20radiostationsinthememory(10‐FM/10‐DAB).
1. SettoFM/DABmode
2. Turntothedesiredradiostationby“manual”or“auto”tuningmethod.
3. Pressandholdthe“Mem/clk‐adj”button(12)toenablememorystate.
4. PressSkipdown
(11)orSkipup(19)buttontoselectthedesiredstationmemoryforstorage.
5. Press“Stop/Enter”button(10)toconfirmthesetting.
6. Repeatstep2to5tostoreotherstations.
Recallpresetstations
1. SettoFM/DABmode
2. PressPre‐upbutton(20)torecallthestoredstation.
3. PressSkipdown(11)orSkipup(19)buttontoselectthedesiredrecallstation.
4. Press“Stop/Enter”button(10)ag aintoconfirmtherecallstation.
DAB/FMreset:
IfcasewouldliketoerasealltheFM/DABprogramedmemorystation,operationasbelow.
1. SetinDABorFMmode,press“Menu/Mem/clk‐adj”button(12)toenterthe“Menu”,thenpressSkipdown(11)or
Skipup(19)buttontoselect“System”.
2. Press“Stop/Enter”button(10)toenter
the“System”setting,thenpressSkipdown(11)orSkipup(19)buttonto
select“Factoryreset”.Thenpress“Stop/Enter”button(10)toconfirmthefactoryreset.
3. Apparatuswillerasealltheprogramedmemorystation,performthepresetstationagainasabove.
PlayingCD/MP3disc
Gettingstart
1. PressFunctionbutton(9)toselectCDmode.
2. OpentheCDdoorbypressingtheCDdooropen/close(7).PutaCDdiscintothecompartmentandclosetheCDdoor.
3. Focussearchisperformanceifdiscisinside.Totalnumberoftracksisread.
Play/pausemode
1. IfPlay/Pausebutton(18)ispressedduringstopmode,thefirsttrackwillbeplayed.
2. IfPlay/Pausebutton(18)ispressedduringplayback,systemgotopausemodeandthepauseindicatorwilllightupat
theLCDdisplay(8).Pressagaintoresumenormalplayback.

9
Version:1.0
Stopmode
1. IfStopbutton(10)ispressedduringplayorpausemode.GotostopmodeanddisplaytotalnumberoftrackontheLCD
display(8).
Skipmode(skipup /skipdown )
1. Duringplaymode,ifskipupbutton(19)ispresseditwillgotonexttrackanddisplaythetrackno.
2. Duringplaymode,ifSkipdownbutton(11)ispressed,itwillgobacktothebeginningofthetrack,sametrackno.
3. Afterstep2,press
skipdownbutton(11)again,itwillgototheprevioustrackandplaybeginningofthetr ack.
ForMP3disc/file
1. PlacetheMP3‐CDtoCDcompartment.Afterfocussearch isperforming,thetotalnumberoftrackwillbeshownontheLCD
display(8).
2. PressSkipup orSkipdown(11/19)buttontoselectthetracknumber.
3. Whenthedesiredtrackandalbum isbeingselected,press
the“Play/Pause ”button(18)tostartplayback.
Remark
- Press“Folderup ”button(20)onmainunitcanselecttheMP3folderupwarddirectly.
- ThetracknumberwilldisplayonLCD(8)andthenitwillplaytothenumberofthetrackwhenpressPlay/Pausebutton
(18).
Repeat/Randommode
Pressthe“Playmode”button(21)duringplaybacktoselectrepeatandrandomfunction,asingletrack,singlefolder(MP3only)
orallthetrackscanbeplayedindifferencemodeasfollow:‐
ForCD
(1) Repeat1
(2) Repeatalltrack (3) Random (4) Offmode
Indicator
Playmode onLCDdisplay
Repeattrack Rep1
Repeatall RepA
Random Rand
Offmode ‐‐‐‐‐‐‐‐‐‐‐‐‐
ForMP3disc/file
(1) Repeat1(2) Repeat1folder (3) Repeatalltracks (4) Random (5) Offmode
Indicator
Playmode onLCDdisplay
Repeatsingletrack Rep1
Repeatsinglefolder RepF
Repeatalltracks RepA
Random Rand
Offmode ‐‐‐‐‐‐‐‐‐‐‐‐‐‐‐‐‐
Repeatplay
Youcanlistenthedesiredtracksorfolderrepeatedlybythisfunction.
Randomplay
Youcanlistenallthetracksinarandomorderbythisfunction
CD/MP3discprogramming
Upto20tackscanbeprogrammedfordiscplayinanyorder.Beforeuse,besuretopressthestopbutton.
1. SetinCDmode.
2. PresstheMemorybutton(12),“P01&T000”willappearonLCDdisplay(8).
3. SelectadesiredtrackbyusingtheSkipup
/Skipdownbuttons(19/11).
4. PresstheMemorybutton(12)toenterthetrackintothememory.
5. Repeatsteps3and4toenteradditionaltracksintothememoryifnecessary.
6. Whenallthedesiredtrackshavebeenprogrammed,press“Play/Pause ”button(18)toplaythedisc
intheorderyou
haveprogrammed.
7. Press“Stop ”button(10)toterminateprogramplay.

10
Version:1.0
Press“Stop ”buttontwice(10)atCDstopmodetocancelallprogrammedmemoryuntilthe“Prog”indicatordisappear
onLCDdisplay(8).
ForMP3disc/file,pressthe“Folderup”button(20)toselectthe1
st
trackofnextfolderdirectlyandhencetospeedupthe
songselection.
Theprogrammingmodewillautomaticallystopifnobuttonisbeingpressedinaperiodofabout30secondsafterpressing
theMemorybutton(12).
Remark:‐
MP3trackformatrequirement:‐
- Bitrate:32kbps~320kbps,sampli ngrate:32kHz,44.1kHzand48kHzdecodable
- TheperformanceofplayingMP3discisvariousfromthequalityofrecordingdiscandthemethodofrecording.Furthermore,
thesearchinglead‐timeforMP3‐CDislongerthannormalCDduetodifferenceformat.
PlaybackofMP3songviaUSBstoragemedia
Connecting
ThesystemisabletodecodeandplaybackallMP3filewhichstoredinthememorymediawithUSBconnectingport.
1. SetthesystematStandbymodefirstorotherfunctionexceptUSBmode.
2. Plug‐intheUSBpen‐drivewiththefaceup&makesureitgoing
intocompletely.
ConnectingtheUSBupsidedownorbackwardscoulddamagetheaudiosystemorthestoragemedia(USBthumbdriver).
Checktobesurethedirectioniscorrectbeforeconnection.
3. TurnontheunitagainbyOn/offbutton(17)andsetpressFunctionbutton(9)toselect
USBmode.Thesystemwillstart
readingthestoragemediaautomaticallyafterconnecting,andLCDdisplay(8)willshowthetotalnumberofMP3filesbeing
detected.
4. RepeatthesameplaybackprocedureasplayingCD/MP3discasabove.
Remark
- ThesystemcandetectandreadthefileunderMP3formatonlyatUSBmodebutnotothermusicfileformat.
- IfconnectthesystemtoMP3playerviatheUSBsocket,duetovariancesinfilesystemformat,someMP3playermaynot
beabletoplayviathe
USBsocket.Thisisnotamalfunctionofthesystem.
- USBportdoesnotsupportconnectionwithUSBextensioncableandisnotdesignedforcommunicationwithcomputer
directly
- DuetoErPstagetworequirementandprotecttheenvironment(forEuropeanmarketonly).Theunitwillswitchto
standby
modeautomaticallyoncenoanymusicplayingover15minutes.
RemovingofUSB
ToremovetheUSBturnoffthepowerorswitchthefunctionmodetoeithercdortunermodefirst.ForUSBport–un‐plugitby
pullingouttheUSBsocketdirectly
Listeningtotape
Generaloperation
Stop/ejectkey presstostopalldeckoperation.Pressagaintoopenthecassettedoor.
Fast forward key &
Fastrewindkey
press to start rapid tape winding in either forward or reverse direction. Press stop/eject key, the
cassettespoolsstopturning.
Playkey presstostartplayingtape.
Pause
key presstostoptapeoperationtemporarily.Pressagaintoresumeplay.
Playback
Select“Tape”byFunctionbutton(9)
Putinthecassettetape.
Pressplaykey toactiveplayback
AdjusttheVolumeup/downcontrol(14)tothedesiredlevel.
Usepausekeywhenyouwanttostopplaybackt emporarily.
Pressstop/ejectkeywhenfinished.

11
Version:1.0
Morefeatures
A. Alarmclocksetting
This function allows the system to turn on automatically and wake youup CD, FM/DAB, Tape or USB mode. Set the system at
standbymode,thenpressandholdthe“Timer”keytoentertheTimersettingmode,LCDwillshowTimerOntime,Moreover,the
timerclockwillflashthe
hourdigit,meanstheunitalreadyentertimersettingmode.
1) Ontimesetting
:Presstheskip up ordown(19/11)to set the hour. ThenpressTimerbutton(13)to
storethetimerstartinghour,minutedigitwillflash,pressskipup ordown(19/11)to
setthe
minute.ThenpressTimerbutton(13)tostorethetimerontime
2) Offtimesetting :Afterabovestep,theLCDwillshow“TimerOff”andhourdigitwasflashing.Pressskipup
ordown(19/11)tosetthehour.ThenpressTimerbutton(13)tostorethetimeroff
hour,
minute digitwill flash, press skip up or down(19/11) to set theminute. Then press
Timerbutton(13)tostorethetimerofftime
3) Mode
: Then press skip up or down(19/11) to select timer on mode. Then press Timer
button(13)tostorethetimeron
mode.Pressskipup ordown(15/21)toselecttimer
onvolumelevelandpressTimer button(13) to complete the timer setting.Unit will returnto
standbymodedisplaywillshowtimericon“”.
Active/de‐activetimerfunction(Inst andbymodeonly)
1. Toactivetimerfunction,pressthe“Timer”buttononcethetimerindicator“”isappearonLCDdisplay(2).
2. Tocanceltimerfunction,pressagain“Timer”buttonagainthetimerindicator“”disappear.
Remark:‐
Ifthereisnomusicsourcebeingdetected(CDorUSB)whenthepresettimeisreached,systemwilldefaultto“FM”function
forwak eupmodeautomatically.Thesystemwillpresetatthelatestradiofrequencybeinglistenedbeforeswitchingoff
ForFM/DABwakeup,thesystemwill
presetatthelatestradiofrequencybeinglistenedbeforeswitchingoff.
ForTapewakeup,plsensurecassettetapemustinsertedtocassettecompartmentand cassetteplaykeymustbepressed.
Otherwise,therewasnomusicwillplayingoncereachthetimerontime.
Thereare about 4
seconds for alarmsetting mode, this system will return to normal mode automatically if no keys being
pressedinthistimeframe.
Duringthealarmonmode,pressthe“On/off”button(17)willswitchoffthesystem.
Duetodisplaysizelimitation,timericon“”willnotappearon
LCDduringoperateFM/DABmode
Remark (for Europe market only): Due to ErP stage two requirement and protect the
environment. The unitwill switch tostandby mode automatically once no anymusic playing
over15minutes.
Powersupplyadaptor(ForEUonly)
Useonlythepowersupplylistedintheuserinstructions
Information Valueandandprecision
Manufacturersnameortrademark,commercial
registrationandaddress
ShenzhenGuijin
TechnologyCo.,Ltd
ModelIdentifier AK18WG‐1200150V
Inputvoltage 100‐240Volts
InputACfrequency 50‐60Hz
Outputvoltage DC12V
Outputcurrent 1.5A
OutputPower 18W
Averageactiveefficiency 75%
Efficiencyatlowload(10%) 50%
NoloadPowerconsumption 0.05W

12
Version:1.0
Guarantee
LencooffersserviceandwarrantyinaccordancetoEuropeanlaw,whichmeansthatincaseofrepairs
(bothduringandafterthewarrantyperiod)youshouldcontactyourlocaldealer.
Importantnote:ItisnotpossibletosendproductsthatneedrepairstoLencodirectly.
Importantnote:Ifthisunit
isopenedoraccessedbyanon‐officialservicecenterinanyway,thewarranty
expires.
Thisdeviceisnotsuitableforprofessionaluse.Incaseofprofessionaluse,allwarrantyobligationsofthe
manufacturerwillbevoided.
Disclaimer
UpdatestoFirmwareand/or hardwarecomponentsaremaderegularly.Therefore
someoftheinstruction,
specificationsandpicturesinthisdocumentationmaydifferslightlyfromyourparticularsituation.All
itemsdescribedinthisguideforillustrationpurposesonlyandmaynotapplytoparticularsituation.No
legalrightorentitlementsmaybeobtainedfromthedescriptionmadeinthismanual.
Disposal
oftheOldDevice
Thissymbolindicatesthattherelevantelectricalproductorbatteryshouldnotbedisposedofas
general householdwasteinEurope.Toensurethe correctwaste treatmentof theproductand
battery, please dispose them in accordance to any applicable local laws of requirement for
disposal
of electrical equipment or batteries. In so doing, you will help to conserve natural
resources and improve standards of environmental protection in treatment and disposal of
electricalwaste(WasteElectricalandElectronicEquipmentDirective).
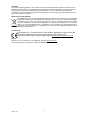
CEMarking
Hereby, Lenco Benelux B.V., Thermiekstraat 1a, 6361 HB Nuth, The Netherlands,declares that
thisproductisincompliancewiththeessentialEUdirectiverequirements.
Thedeclarationofconf ormitymaybeconsultedviatechdoc@commaxxgroup.com
Service
Formoreinformationandhelpdesksupp ort,pleasevisitwww.lenco.com
LencoBeneluxBV,Thermiekstraat1a,6361HB,TheNetherlands.

13
Versie:1.0
Nederlands DraagbareDAB+enFM‐radiometCD,CassetteenUSBingang
LETOP:
Hetgebruikvanafstandsbedieningenofaanpassingenofdeuitvoeringvanproceduresdienietinditdocumentzijn
gespecificeerd,kanleidentotgevaarlijkeblootstellingaanstraling.
VOORZORGSMAA TREGELENVOORGEBRUIK
ONTHOUDDEVOLGENDEINSTRUCTIES:
1. Bedekofblokkeerdeventilatieopeningenniet.Wanneeruhetapparaatopeenschapplaatst,dientu5cm(2”)
vrijeruimterondomhetgeheleapparaattebehouden.
2. Installeerhetproductvolgensdemeegeleverdegebruikershandleiding.
3. Houdhetapparaatuitdebuurtvanhittebronnen,zoalsradiatoren,
verwarmingen,kachels,kaarsenenandere
hittegenererendeproductenofopenvuur.Hetapparaatkanalleenwordengebruiktineengematigdklimaat.
Extreemkoudeofwarmeomgevingendienentewordenvermeden.Hetbedrijfstemper atuurbereikligttussen
0°Cen35°C.
4. Gebruikditapparaatnietindebuurtvankrachtigemagnetischevelden.
5. Elektrostatischeontladingkannormaalgebruikvanditapparaatverstoren.Uhoefthetapparaatinditgeval
slechtsteresettenenopnieuwoptestartenvolgensdegebruikershandleiding.Weesvoorzichtigtijdens
bestandsoverdrachtengebruikhetproductineenomgevingzonderstatischeinterferentie.
6. W aarschuwing!Steeknooiteenvoorwerpviadeventilatie
‐ofandereopeningeninhetproduct.Eris
hoogspanninginhetproductaanwezigenalsuereenobjectinsteekt,kandateenelektrischeschok
veroorzakenen/ofkortsluitingindeinterneonderdelen.Morsomdezelfderedengeenwaterofvloeistofop
hetproduct.
7. Gebruikhettoestelnietinvochtige
ruimtes,zoalsbadkamers,stomendekeukensofindebuurtvan
zwembaden.
8. Hetapparaatmagnietwordenblootgesteldaandruppelsenspettersenzorgervoordatergeenmetvloeistof
gevuldevoorwerpen,zoalsvazen,opofindebuurtvanhetapparaatwordengeplaatst.
9. Gebruikditapparaatnietwanneercondensatie
kanoptreden.Wanneerhetapparaatineenwarme,natte
ruimtewordtgebruikt,kunnenzichwaterdruppelsofcondensvormeninhetapparaatenkanhetapparaat
nietgoedfunctioneren.Laathetapparaat1of2uuruitstaanvoordatuhetinschak elt:hetapparaatdient
droogtezijnvoordatdezestroom
ontvangt.
10. Alhoewelditapparaatmetgrotezorggefabriceerdenverschillendekerengeïnspecteerdisvoordathetde
fabriekverlaat,ishetnogsteedsmogelijkdaterproblemenoptreden,zoalsmetalleelektrischeapparaten.Als
urook,eenovermatigehitteontwikkelingofeniganderonverwachtverschijnselopmerkt,moetuonmiddellijk
destekkervan
hetnetsnoeruithetstopcontacthalen.
11. Ditapparaatmoetwordengebruiktmeteenvoedingsbronzoalsgespecificeerdophetspecificatielabel.Alsu
twijfeltoverhettypevoedingdatgebruiktwordtinuwhuis,raadpleegdanuwdealerofplaatselijk
energiebedrijf.
12. Buitenbereikvandierenhouden.Sommigedierenkauwengraag
opvoedingskabels.
13. Gebruikeenzacht,droogdoekjeomhetapparaattereinigen.Gebruikgeenoplosmiddelenofopbenzine
gebaseerdevloeistoffen.Ukunteenvochtigdoekjemetverdundschoonmaakmiddelgebruikenom
hardnekkigevlekkenteverwijderen.
14. Deleverancierisnietverantwoordelijkvoorschadeofverlorengegevensveroorzaaktdoorstoring,misbruik,
modificatie
vanhetapparaatofbatterijvervanging.
15. Onderbreeknooitdeverbindingwanneerhetapparaatformatteertofbestandenoverdraagt.Degegevens
kunnenanderscorrupt ofverlorenraken.
16. IndienhetapparaateenUSB‐afspeelfunctieheeft,moetdeUSB‐geheugenstickrechtstreeksophetapparaat
wordenaangesloten.GebruikgeenUSB‐verlengkabel,omdatdiekan
leidentotstoringenmetfoutieve
gegevensalsgevolg.
17. Hetclassificatielabelbevindtzichopdeonderkantofhetachterpaneelvanhetapparaat.

14
Versie:1.0
18. Dithulpmiddelisnietbedoeldvoorgebruikdoormensen(inclusiefkinderen)meteenfysieke,zintuiglijkeof
mentalehandicap,ofeengebrekaanervaringenkennis,tenzijzijtoezichtofinstructieshebbengekregenover
hetjuistegebruikvanhethulpmiddeldooreenpersoondieverantwoordelijkisvoorhunveiligheid.
19. Ditproductisalleenvoorniet‐professioneelgebruikbedoeldennietvoorcommercieelofindustrieelgebruik.
20. Verzekeruervandathetapparaatineenstabielepositiestaatopgesteld.Schadediewordtveroorzaaktdoor
hetgebruikvanditproductineenonstabielepositie,trillingenofschokkenofhetniet
opvolgenvande
waarschuwingenofvoorzorgsmaatregelenindezegebruikershandleidingwordtnietgedektdoordegarantie.
21. Verwijdernooitdebehuizingvanditapparaat.
22. Plaatsditapparaatnooitopander eelektrischeapparatuur.
23. Geefkinderengeengelegenheidinaanrakingmetplasticzakkentekomen.
24. Gebruikuitsluitenduitbreidingen/accessoiresgespecificeerddoorde
fabrikant.
25. Laatallereparatiesoveraangekwalificeerdonderhoudspersoneel.Onderhoudisnodigalshetapparaatis
beschadigd,bijvoorbeeldalsdevoedingskabelofdestekkerisbeschadigd,alservloeistofophetapparaatis
gemorst,alservoorwerpeninhetapparaatzijngevallen,alshetapparaatisblootgesteldaanregenof
vocht,
alshetapparaatnietnormaalwerktofalshetisgevallen.
26. Langdurigeblootstellingaanhardegeluidenvanpersoonlijkemuziekspelerskanleidentottijdelijkof
permanentgehoorverlies.
27. Alshetproductwordtgeleverdmetvoedingskabelofwisselstroomvoedingsadapter:
Alserzichproblemenvoordoen,moetudevoedingskabelloskoppelenenhet
teronderhoudaanbieden
aangekwalificeerdpersoneel.
Nooitopdevoedingsadapterstappenofdezeindrukken.Weeszeervoorzichtig,vooralinhetgebied
ronddestekkersendekabelaansluitingen.Plaatsgeenzwarevoorwerpenopdevoedingsadapter,om
beschadigingervantevoorkomen.Houdhetgeheleapparaatbuitenbereikvankinderen!Wanneer
kinderen
metdevoedingskabelspelen,kunnenzijernstigletseloplopen.
Haaldestekkeruithetstopcontacttijdensonweerofwanneerudezelangeretijdnietgebruikt.
Hetstopcontactmoetindebuurtvandeapparatuurzijngeïnstalleerdeneenvoudigtebereikenzijn.
LaatAC‐stopcontactenofverlengsnoerennooitoverbelast
raken.Overbelastingkanbrandofeen
elektrischeschokveroorzaken.
ApparatenmeteenKlasse1structuurdienentewordenaangeslotenopeenstopcontactmeteen
beschermendeaardverbinding.
ApparatenmeteenKlasse2structuurvereisengeenaardverbinding.
Houdaltijddestekkervastwanneerudezeuithetstopcontacttrekt.
Treknooitaandevoedingskabel.
Ditkantoteenkortsluitingleiden.
Gebruiknooiteenbeschadigdevoedingskabelofstekk erofeenlosstopcontact.Ditvormtnamelijkeen
risicoopbrandofelektrischeschokk en.
28. Indienhetproductknoopcelbatterijenbevatofwordtgeleverdmeteenafstandsbedieningdie
knoopcelbatterijenbevat:
Waarschuwing:
“Batterij
nietinslikken,chemischbrandgevaar”ofgelijkwaardigewerking.
Demeegeleverdeafstandsbedieningbevateenknoopcelbatterij.Alsdebatterijwordtingeslikt,kandeze
inslechts2uurernstigeinternebrandwondenveroorzakenentotdedoodleiden.
Houdnieuweengebruiktebatterijenbuitenbereikvankinderen.
Alsdebatterijhoudernietgoed
kanwordengesloten,dientuhetproductnietmeertegebruik enen
buitenbereikvankinderentehouden.
Alsudenktdatbatterijenzijningesliktofbinnenineenwillekeuriglichaamsdeelterechtzijngekomen,
dientuonmiddellijkmedischehulptezoeken.

15
Versie:1.0
29. Waarschuwingm.b.t.hetgebruikvanbatterijen:
Alsdebatterijonjuistwordtgeplaatst,bestaaterexplosiegevaar.Vervangdebatterijalleendooreen
zelfdeofvergelijkbaresoortbatterij.
Steldebatterijnietblootaanextreemhogeoflagetemperaturenofeenlageluchtdrukopgrotehoogte
tijdensgebruik,
opslagoftransport.
Vervangingvaneenbatterijdooreenincorrecttypekanleidentoteenontploffingofdelekkagevan
ontvlambarevloeistoffenofgas.
Hetweggooienvaneenbatterijinhetvuurofeenhet eoven,ofhetmechanischverpletterenof
insnijdenvaneenbatterij,kanleidentot
eenexplosie.
Hetachterlatenvaneenbatterijineenomgevingmetextreemhogetemperaturenkanleidentoteen
explosieofhetlekkenvanbrandbarevloeistofofgas.
Eenbatterijdieaaneenextreemlageluchtdrukwordtblootgesteld,kanleidentoteenexplosieofhet
lekkenvanbrandbar evloeistofof
gas.
Aandachtvoorhetmilieuisnodigbijhetverwijderenvandebatterijen.
INSTALLATIE
Pakalleonderdelenuitenverwijderdebeschermendematerialen.
Sluithetapparaatnietaanophetstopcontact,voordatudenetspanninghebtgecontroleerdenvoordat
alleandereaansluitingenzijngemaakt.
* Deze
instructieshebbenalleenbetrekkingopproductenmeteennetsnoerofAC‐voedingsadapter.
KLASSE1
LASERPRODUCT
WaarschuwingvoorMP3‐speler:
WAARSCHUWING:Wanneeruzichopdestraatbevindt,kanhetgebruikvaneen
persoonlijkemuziekspelerdeluisteraarafleidenvandepotentiëlegevaren,zoals
naderendeauto's.
WAARSCHUWING:Luisternooitvoorlangetij dophogevolumeniveaus,om
mogelijkegehoorbeschadigingtevoorkomen.

16
Versie:1.0
Waarschuwingvoorcd‐/dvd‐speler:
WAARSCHUWING
Klasse1Laserproduct
Waarschuwing:Raakdelensnietaan.
PLAATSINGVANBEDIENINGSELEMENTEN
1) USB‐aansluiting
2) Aux‐ingang
3) 3,5mmhoofdtelefoonuitgang
4) Cassettetoets
5) Handvat
6) FM‐antenne
7) CD‐klepjeopenen/sluiten
8) LCD‐scherm
9) Functietoets
10) Stop /Entertoets
11) Vorige/Tuneromlaag‐toets
12) Menu/Mem/clock‐adjust‐toets
13) Timer‐toets
14) Volumeomhoog/omlaagtoets
15) Cassettedeurtje
16) Stand‐by‐led
17) Aan/uittoets
18) Start/Pauze /Scantoets
19) Volgende/Tuneromhoog‐toets
20) Pre/Folderup‐toets
21) Info/Playmode‐toets
22) DC‐aansluiting
Letop:
Gebruikvanbedieningenofafstellingenofuitvoervanproceduresandersdangespecificeerdindezedocumentatiekanleidentot
blootstellingaanschadelijkestraling.
Ditapparaatdientuitsluitendtewordenaangepastof
gerepareerddoorgekwalificeerdonderhoudspersoneel.
Belangrijk:
Omdatdebewegingvanhetcd‐mechanismeendege voeligeschakelingeninterferentiekunnenveroorzakeninradiotunersinde
buurt,dientuditapparaatuitteschakelenterwijluandereradioapparatuurgebruikt.
Gelieve vanwege de complexiteit van de MCU‐besturing de stekker van het apparaat uit te trekken als het
apparaatvastloopttijdenshetgebruik!
Ditduidtnietopeenstoringvanhetsysteem!
Voorzorgsmaatregelenvoorgebruik
Installatie
Pakalleonderdelenuitenverwijderdebeschermendematerialen.

17
Versie:1.0
Sluithetapparaatnietaanophetstopcontactvoordatudenetspanninghebtgecontroleerdenalleandereverbindingentot
standhebtgebracht.
Bedekgeenvandeventilatieopeningenenzorgvoorenkelecentimetersvrijeruimterondomhetapparaatvoorventilatie.
Aansluiting
1. SluitdeDC‐stekk ervandemeegeleverdeAC/DC‐adapteraanopdeDC‐aansluiting(22)ensluitdeAC/DC‐adaptervervolgens
aanophetAC‐stopcontact.
2. Wanneer u het apparaat voor het eerst aansluit op het stopcontact, zet het zich automatisch op stand‐by en zal de
stand‐by
‐ledoplichten.Destand‐by‐ledzaloplichten
3. Schakel het apparaat in door op de toets “Aan/Stand‐by” (17) te drukken. Als de lcd‐display (8) is ingeschakeld met
achtergrondverlichting,betekentditdatdevoedinginordeis.Hetsysteemisnugereedommuziekaftespelen.
DC‐aansluiting
Gelieve voor DC‐werking 8 batterijen met maat C (UM‐2) in het batterijcompartiment in te voegen, en haal de stekker uit het
stopcontactenverwijderdenetsnoerstekkeruithetstopcontact.Gezienhetappar aatinstand‐bymodusookstroomverbruikt,is
hetaangeradendebatterijenteverwijderenwanneerhetinstand
‐bymodusstaat.
Deklokinstellen
1. Zethetapparaatindestand‐bymodus.
2. Houd de toets “Menu/Mem/clk‐adj” (12) ingedrukt, op de display verschijnt “24hour” (24 uur), druk op de toetsen
Vorige/Omlaag(11) of Volgende/Omhaag(19) om het formaat 12 of 24 uur te kiezen, druk dan op de toets
“Menu/Mem/clk‐adj” (12) om te
bevestigen, het uurcijfer op de lcd‐display (8) zal knipperen. Druk op de toetsen
Vorige/Omlaag(11) of Volgende/Omhoog(19) om het correcte uur in te stellen. Druk op de toets
“Menu/Mem/clk‐adj”(12)omdeurenopteslaan,deminutenzullenvervolgensbeginnenteknipperen.
3. Drukopde
toetsVorige/Omlaag(11)ofVolgende/Omhoog(19)omdejuisteminutenintestellen.
4. Drukopdetoets“Menu/Mem/clk‐adj”(12)omdeminutenopteslaan.
Als u de netvoeding onderbreekt, zal de ingesteldetijd volledigworden teruggesteld. Wijraden u aan het
systeemopstand‐byteschakelenvooreenvoudiggebruik.
De klok zal zichsynchroniseren met de RDS/DAB‐klokzodra een RDS/DAB‐signaal wordt ontvangen indien
dekloknietopvoorhandwerdingesteld.
Naarderadioluisteren
Bediening
Handmatigafstemmen
1. SchakelhetapparaatindoormiddelvandeAan/uittoets(17)endrukopdeFunctietoets(9)totude“FM”‐modusbereikt.
2. DrukopdetoetsenVorige/Omlaag(11)ofVolgende/Omhoog(19)omaftestemmenopdegewenstezender.
3. PasdeVolumeknop(14)aantothetgewenstevolumeniveau.
Automatischafstemmen
1. ZethetapparaatinFM‐modus.
2. DrukeenmaalopdeScantoets(18)enhetapparaatzalzoekentotheteenradiozenderontvangt.Drukeenmaalopdetoets
Vorige/Omlaag(11)envervolgensopdeautomatischeScantoets(18),omhetapparaatinaflopendefrequentierichtingte
latenscannen.AlshetRDS‐uitzendsignaal
(RadioDataSysteem)wordtontvangen,zalhetsysteemdehuidigetijd
automatischinstellen.
3. PasdeVolumeknop(14)aantothetgewenstevolumeniveau

18
Versie:1.0
FM‐scaninstelling
Alsunadeautomatischeafstellingveelradiozendersmeteenzwaksignaalvindt,kuntudezendersmeteensterksignaalkiezen
endiemeteenzwaksignaaluitfilteren.
1. DrukindeFM‐modusopdetoets“Menu/Mem/clk‐adj”(12)omhet“Menu”,teopenenendrukvervolgens
opdetoetsen
Vorige/Omlaag(11)ofVolgende/Omhoog(19)om“Scansetting”(Scaninstelling)teselecteren.
2. Drukopdetoets“Stop/Enter”(10)omde“Scansetting”(Scaninstelling)teopenenendrukvervolgensopdetoetsen
Vorige/Omlaag(11)ofVolgende/Omhoog(19)om“Strongstationonly”(Alleensterk ezenders)teselecteren.
Drukvervolgens
opdetoets“Stop/Enter”(10)omuwinstellingtebevestigen.
3. Voeropnieuwdeautomatischeafstemprocedureuitzoalshierbovenstaatbeschreven.
FM‐enFM‐stereo‐ontv angst
HetapparaatstaatstandaardopMonoindeFM‐modus.ZetdaaromalsueenFM‐stereosignaalontvangt,deFM‐modusop
StereodoortedrukkenopdeMenu‐toets(12),drukdanopdetoetsenVorige/Omlaag(11)ofVolgende/Omhoog
(19)omdeAudiosetting(Audio‐instellingen)teselecteren ,druk
opdeEnter‐toets(10)endrukopnieuwopdetoetsen
Vorige/Omlaag(11)ofVolgende/Omhoog(19)omFMstereoteselecteren,drukvervolgensopdeEnter‐toets(10)
omtebevestigen.Alshetstereosignaalzwakenlawaaierigis.HetisbestdeFM‐modusviadezelfdeproceduretewijzigen.
Tipsvooroptimaleontvangst:‐
FM:deontvangerheefteeningebouwdefm‐draadantenne(6)dieaandeachterkanthangt.Dezemoetvolledigwordenuitgerold
vooroptimaleontvangst.
RadioDataSysteem(RDS)
Ditisdeinformatiediewordtmeegestuurdmeteenradiosignaalenopdelcd‐displayverschijntenstapvoorstapgetoondkan
wordendoormeerderekerenopdetoetsPlaymode/info(21)tedrukken.
Radiotekstprogrammatypefrequentiemono/stereotijddatum
Digitalaudiobroadcasting(DAB)radio
1. SchakelhetapparaatinDAB‐modusdooropdeFunctietoets(9)tedrukken.
2. DrukeenmaalopdetoetsStart/Pauze /Scan(18)enhetapparaatzaleenmaaleenvolledigescanstartenvanafhet
bereik11b‐12d.DrukopdetoetsenVorige/Omlaag(11)ofVolgende/Omhoog(19)omhetgewensteDAB‐kanaal
teselecterenendrukdanopdetoets“Stop/Enter”(10)omhetgekozenkanaaltebevestigen.
3. DrukmeerderekerenopdetoetsPlaymode/info(21)omdeinformatieuitgezondendoorDABtecontroleren,inde
hieronderbeschrevenvolgorde.
SignaalsterkteprogrammatypeGroepsnaamfrequentiesignaalstoringoverdrachtsnelheid
tijddatum
4. Pasdevolumeknop(14)aantothetgewenstevolumeniveau.
Dynamischebereikcontrole
DitapparaatheeftdriedynamischebereikmodidieovereenkomenmetverschillendesoortenprogrammatypesindeDAB‐modus.
1. DrukindeDAB‐modusopdetoets“Menu/Mem/clk‐adj”(12)omhet“Menu”teopenenendrukvervolgensopdetoetsen
Vorige/Omlaag(11)ofVolgende/Omhoog(19)om“DRC”teselecteren.
2. Drukop
detoets“Stop/Enter”(10)omdeinstelling“DRC”teopenenendrukvervolgensopdetoetsenVorige/Omlaag
(11)ofVolgende/Omhoog(19)omdemodus“DRChigh/low/off”(DRChoog/laag/uit)teselecteren.Drukvervolgens
opdetoets“Stop/Enter”(10)omuwinstellingtebevestigen.
3. Drukineenwillekeurigemodusopde
toets“Menu/Mem/clk‐adj”(12)omdeinstellingsmodusteverlaten
Taalinstelling
Ditapparaatstelt4talenbeschikbaarvoordeweergaveinFM/DAB‐modus.
1. DrukindeDAB/FM‐modusopdetoets“Menu/Mem/clk‐adj”(12)omhet“Menu”teopenenendrukvervolgensopde
toetsenVorige/Omlaag(11)ofVolgende/Omhoog(19)omde“Language”(Taal)teselecteren.
2. Drukopdetoets
“Stop/Enter”(10)omde“language”(Taal)‐instellingteopenenendrukopdetoetsenVorige/Omlaag
(11)ofVolgende/Omhoog(19)omdegewenstetaaltekiezenuitEnglish/French/German/Italian
(Engels/Frans/Duits/Italiaans).Drukvervolgensopdetoets“Stop/Enter”(10)omuwins tellingtebevestigen.
3. Drukineenwillekeurigemodusopdetoets“Menu/Mem/clk‐
adj”(12)omdeinstellingsmodusteverlaten
Voorkeuzezenders
Ukunteentotaalvan20radiozendersopslaaninhetgeheugen(10‐FM/10‐DAB).
1. StelhetapparaatinopFM/DAB‐modus
2. Stemafopdegewensteradiozenderviade“handmatige”of“automatische”afstemmethode.
3. Houddetoets“Mem/clk‐adj”(12)ingedruktomdegeheugenmodusteopenen.
4. Druk op
de toetsen Vorige/Omlaag(11) of Volgende/Omhoog(19) om het gewenste stationsgeheugen te
selecterenvoordegeheugenopslag.
5. Drukopdetoets“Stop/Enter”(10)omuwinstellingtebevestigen.
6. Herhaalstappen2tot5omanderezendersopteslaan.

19
Versie:1.0
Voorkeuzezendersoproepen
1. StelhetapparaatinopFM/DAB‐modus
2. DrukopdePre‐up‐toets(20)omdeopgeslagenzendersteopenen.
3. Druk op de toetsen Vorige/Omlaag(11) of Volgende/Omhoog(19) om de zender te selecteren die u wilt
oproepen.
4. Druknogmaalsopdetoets“Stop/Enter”(10)omhet
oproepenvandezendertebevestigen.
DAB/FMterugstellen:
AlsugraagalleFM/DAB‐geprogrammeerdestationsgeheugenswiltwissen,volgdandevolgendeinstructies.
1. StelhetapparaatinopDAB‐ofFM‐modus,drukopdetoets“Menu/Mem/ clk‐adj”(12)omhet“Menu”teopenenendruk
vervolgensopdetoetsenVorige/Omlaag(11)ofVolgende/Omhoog(19)om“System”(Systeem)te
selecteren.
2. Drukopdetoets“Stop/Enter”(10)omdeinstelling“System”(Systeem)teopenenendrukvervolgensopdetoetsen
Vorige/Omlaag(11)ofVolgende/Omhoog(19)om“Factoryreset”(Fabrieksinstelling)teselecteren.Druk
vervolgensopdetoets“Stop/Enter”(10)omdefabrieksinstellingtebevestigen.
3. Hetapparaatzalallegeprogra mmeerde
stationsgeheugenswissen;ukuntdestationsprogrammeringvervolgensopnieuw
uitvoerenzoalshierbovenbeschreven.
CD/mp3‐disksafspelen
Aandeslag
1. DrukopFunctieknop(9)om“CD”teselecteren.
2. Drukopcd‐klepjeopenen/sluiten(7)omhetcd‐klepjeteopenen.Plaatseencd‐diskindehouderensluithetcd‐klepje.
3. Degeplaatstediskwordtautomatischgelezen.Hettotaleaantaltrackswordtgelezen.
Start/Pauzemodus
1. DrukingestoptemodusopdetoetsStart/Pauze(18)omdeeerstetrackaftespelen.
2. DrukinafspeelmodusopdetoetsStart/Pauze(18)omtepauzerenendepauze‐indicatorzalopdelcd‐display(8)
oplichten.Druknogmaalsinomdenormaleafspeelmodustehervatten.
Stopmodus
1. Drukinafspeel‐ofpauzemodusopdetoetsStop(10).omnaardestopmodusoverteschakelen,hettotaleaantaltracks
zalopdelcd‐display(8)verschijnen.
Overslaanmodus(volgende/omhoog /vorige/omlaag )
1. DrukindeafspeelmodusopdetoetsVolgende/Omhoog(19)omnaardevolgendetracktegaanenhettracknummer
weertegeven.
2. DrukindeafspeelmodusopdetoetsVorige/Omlaag(11)omterugtekerennaarhetbeginvandetrack,hetzelfde
tracknummer.
3. Drukhiernanogmaalsopde
toetsVorige/Omlaag(11)omnaardevorigetracktegaanendezevanafhetbeginafte
spelen.
Voormp3‐disks/bestanden
1. Plaats de mp3‐cd in de cd‐houder. Nadat de disk is ingeleze n, wordt het totale aantal tracks op de lcd‐display (8)
weergegeven.
2. DrukopdetoetsenVolgende/Omhoog ofVorige/Omlaag(11/19)omhetgewenstetracknummerteselecteren.
3. Wanneer de gewenste track en het album zijn geselecteerd, kunt
u op de toets “Start/Pauze ” (18) drukken om het
afspelentestarten.
Opmerking
- Drukopdetoets“Folderup ”(20)ophetapparaatomdebovenliggendemp3‐mapteselecteren.
- Het tracknummer zal op de lcd‐display (8) worden weergegeven en dit tracknummer zal vervolgens worden
weergegeven wanneer
uopdeStart/Pauzetoets(18)drukt.
Herhaalmodus/willekeurigeafspeelmodus
Drukopdetoets“Playmode”(21)tijdenshetafspelenomdefunctiesherhalenenwillekeurigaf spelen,éénenkeletrack,één
map(enkelvoormp3)ofalletracksteselecterenalsvolgt:‐
Voorcd
(1) Herhaal1
(2) Herhaalalletracks (3) Random (4) Uitgeschakeldemodus

20
Versie:1.0
Indicator
Afspeelmodus opdelcd‐display
Herhaaltrack Rep1
Herhaalalles RepA
Random Rand
Uitgeschakeldemodus ‐‐‐‐‐‐‐‐‐‐‐‐‐
Voormp3‐disks/bestanden
(1) Herhaal1 (2) Herhaal1map (3) Herhaalalle
tracks
(4) Random (5) Uitgeschak elde
modus
Indicator
Afspeelmodus opdelcd‐display
Herhaalenkeletrack Rep1
Herhaalenkelemap RepF
Herhaalalletracks RepA
Random Rand
Uitgeschakeldemodus ‐‐‐‐‐‐‐‐‐‐‐‐‐‐‐‐‐
Herhaaldafspelen
Ukuntmetdezefunctiedegewenstetracksofmapherhaaldafspelen.
Willekeurigafspelen
Ukuntmetdezefunctiealletracksineenwillekeurigevolgordeafspelen.
CD/mp3‐disksprogrammeren
Ukuntbijhetgebruikvaneendisktot20tracksprogrammerenominelkevolgordeaftespelen.ZorgervooropdeStoptoetste
drukkenvoordatudezefunctiegebruikt.
1. Stelhetapparaatinopcd‐modus.
2. DrukopdeGeheugentoets(12),“P01&T000”zalopde
lcd‐display(8)verschijnen.
3. SelecteerdegewenstetrackmetdetoetsenVolgende/Omhoog /Vorige/Omlaag(19/11).
4. DrukopdeGeheugentoets(12)omdetrackinhetgeheugenopteslaan.
5. Herhaalindiengewenststappen3en4ommeerderetracksinhetgeheugenopteslaan.
6. Wanneeralle
gewenstetrackszijngeprogrammeerd,kuntuopdetoets“Start/Pauze ”(18)drukkenomdediskinde
geprogrammeerdevolgordeaftespelen.
7. Drukopdetoets“Stop ”(10)omhetafspelenvanhetprogrammatebeëindigen.
Druk tweemaal op de toets “Stop ” (10) in de cd
‐stopmodus om het hele geprogrammeerde geheugen te annuleren
totdatde“Prog”‐indicatorverdwijntvandelcd‐display(8).
Voormp3‐disks/bestanden,drukopdetoets“Folderup”(20)omde1
ste
trackvandevolgendemapdirectteselecterenen
zodetrackselectieteversnellen.
De programmeermodus zal automatisch stoppen als u voor ca. 30 seconden op geen enkele toets drukt nadat u op de
Geheugentoets(12)hebtgedrukt.
Opmerking:‐
Eisenvoordemp3‐tracks:‐
- Bitsnelheid:32kbps~320kbps,samplesnelheid:32kHz,44,1kHzen48kHzdecodeerbaar
- Dekwaliteitvanhetafspelenvandemp3‐diskisafhankelijkvandekwaliteitvandeopgenomendiskendeopnamemethode.
Bovendienzijnvanwegedeverschillendeformatendezoek‐enlaadtijdenbijeenmp3‐disklangerdanbijeennormalecd.
MP3‐tracksafspelenviaUSB‐opslagmedia
Aansluiten
Hetsysteemkanallemp3‐bestandendecoderenenafspelendiezijnopgeslagenindegeheugenmediaaangeslotenopde
USB‐poort.
1. Zethetsysteemeerstindestand‐bymodusofineenanderefunctie,maarnietindeUSB‐modus.
2. StopdeUSB‐stickerinmetdebovenkantnaarboven
enzorgervoordathijervolledigingaat.
Als u de USB ondersteboven of achterstevoren aansluit, kunt u het audiosysteem of de geheugenmedia (USB‐stick)
beschadigen.Controleervoorallezekerheidofderichtingcorrectis,vóórhetaansluiten.
3. SchakelhetapparaatweerindoormiddelvandeAan/uittoets(17)
endrukopdeFunctietoets(9)omUSB‐moduste
selecteren.Hetsysteemzalnadeaansluitingdeopslagmediaautomatischbeginnentelezenendelcd‐display(8)zalhet
totaalaantalgevondenmp3‐bestandenweergeven.
4. Deafspeelprocedureisdezelfdealsbijhetaf spelenvancd/mp3‐diskshierboven.
Seite wird geladen ...
Seite wird geladen ...
Seite wird geladen ...
Seite wird geladen ...
Seite wird geladen ...
Seite wird geladen ...
Seite wird geladen ...
Seite wird geladen ...
Seite wird geladen ...
Seite wird geladen ...
Seite wird geladen ...
Seite wird geladen ...
Seite wird geladen ...
Seite wird geladen ...
Seite wird geladen ...
Seite wird geladen ...
Seite wird geladen ...
Seite wird geladen ...
Seite wird geladen ...
Seite wird geladen ...
Seite wird geladen ...
Seite wird geladen ...
Seite wird geladen ...
Seite wird geladen ...
Seite wird geladen ...
Seite wird geladen ...
Seite wird geladen ...
Seite wird geladen ...
Seite wird geladen ...
Seite wird geladen ...
Seite wird geladen ...
Seite wird geladen ...
Seite wird geladen ...
Seite wird geladen ...
Seite wird geladen ...
Seite wird geladen ...
-
 1
1
-
 2
2
-
 3
3
-
 4
4
-
 5
5
-
 6
6
-
 7
7
-
 8
8
-
 9
9
-
 10
10
-
 11
11
-
 12
12
-
 13
13
-
 14
14
-
 15
15
-
 16
16
-
 17
17
-
 18
18
-
 19
19
-
 20
20
-
 21
21
-
 22
22
-
 23
23
-
 24
24
-
 25
25
-
 26
26
-
 27
27
-
 28
28
-
 29
29
-
 30
30
-
 31
31
-
 32
32
-
 33
33
-
 34
34
-
 35
35
-
 36
36
-
 37
37
-
 38
38
-
 39
39
-
 40
40
-
 41
41
-
 42
42
-
 43
43
-
 44
44
-
 45
45
-
 46
46
-
 47
47
-
 48
48
-
 49
49
-
 50
50
-
 51
51
-
 52
52
-
 53
53
-
 54
54
-
 55
55
-
 56
56


Lenco SCD-6800GY Bedienungsanleitung
- Kategorie
- CD-Spieler
- Typ
- Bedienungsanleitung
in anderen Sprachen
- English: Lenco SCD-6800GY Owner's manual
- français: Lenco SCD-6800GY Le manuel du propriétaire
- español: Lenco SCD-6800GY El manual del propietario
- Nederlands: Lenco SCD-6800GY de handleiding
Verwandte Artikel
-
Lenco SCD-6900BK Bedienungsanleitung
-
Lenco DAR-050 Benutzerhandbuch
-
-
Lenco SCD-6800 Benutzerhandbuch
-
Lenco CD-200 Benutzerhandbuch
-
-
-
-
-
Lenco SCD-580SI Bedienungsanleitung
Andere Dokumente
-
Denver MRD-165 Benutzerhandbuch
-
Muse MD-208 DBW Benutzerhandbuch
-
Roadstar CLR-2950DAB plus Benutzerhandbuch
-
Roadstar HIF-6850USMP Bedienungsanleitung
-
Soundmaster UR2160 Benutzerhandbuch
-
Denver MDA-240 Benutzerhandbuch
-
Soundmaster RCD1350WS Benutzerhandbuch
-
Roadstar HIF-8899BT Benutzerhandbuch
-
MPMan CSU384PLL Spezifikation
-
Soundmaster MCD5550 Stereo hifi music center DAB radio encoding Benutzerhandbuch