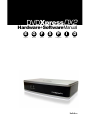
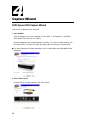
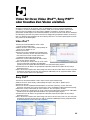
ADS Technologies USBAV-709-EF Hardware And Software Manual
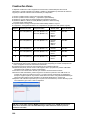
- Kategorie
- DVD Spieler
- Typ
- Hardware And Software Manual
Dieses Handbuch eignet sich auch für

P
Portuguese
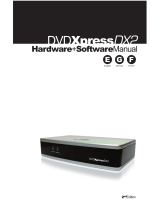
DVDXpressDX2
I
Italian
D
Dutch
1
st
Edition
Hardware+SoftwareManual
E
English
G
German
F
French
S
Spanish


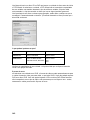
Table of Contents
1
Quick Setup Steps 1
Ways to Capture and Edit Video 3
Installation Guide 4
Capture Wizard 10
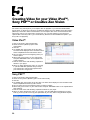
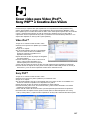
Creating Video for your Video iPod™,
Sony PSP™ or Creative Zen Vision 20
Direct to Disc 22
German Manual 30
French Manual 59
Spanish Manual 88
Portuguese Manual 117
2
3
4
G
F
5
6
S
P

1
I
Italian Manual 146
Dutch Manual 175
Service & Warranty 204
D
© 2006 ADS Technologies. All Rights Reserved
First Edition: February 2006
Microsoft, MS-DOS, Windows, Windows 95, Windows 98SE, Windows 2000, Windows ME and Windows XP are registered trademarks of Microsoft Corporation.
IBM is a registered trademark of the International Business Machines, Inc.
Adobe is a registered trademark of Adobe Inc.
ADS is a registered trademark of ADS Technologies Inc.
ADS Technologies (ADS) makes no warranty of any kind with regard to this material, including but not limited to, the implied warranties of merchantability and fitness for a particular
purpose. The information furnished within this written document is for information purposes only and is subject to change without notice. ADS Technologies assumes no responsibility
or liability for any errors or inaccuracies that may appear herein. ADS makes no commitment to update or to keep current information contained within this document. (rtt)

1
1
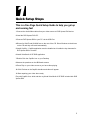
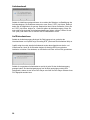
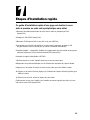
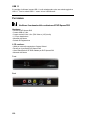
Quick Setup Steps
This is a One Page Quick Setup Guide to help you get up
and running fast
1 Connect the Audio/Video cables from your video source to DVD Xpress DX2 device.
2 Load the DVD Xpress DX2 CD.
3 Connect DVD Xpress DX2 to your PC via the USB Port.
4 Drivers for WinXP and Win2000 are on the root of the CD. Direct Windows to the drivers
on the CD and they will install automatically.
5 Install CapWiz – CapWiz application must be installed as it installs the key elements for
DVD Xpress DX2 to function.
6 Install VideoStudio 9 SE DVD application.
7 Double Click the CapWiz icon on your Desktop.
8 Answer the questions on the 5 Wizard screens.
9 Press Play on your video source so you have video playing.
10 Click Preview on the CapWiz interface and video will appear.
11 Start capturing your video when ready.
Play with CapWiz for a while and then try Ulead VideoStudio 9 SE DVD included with DVD
Xpress DX2.

2
3
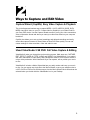
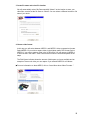
DVD Xpress DX2 Overview
DVD Xpress DX2 supports today’s most popular video formats including MPEG4 and
DivX video. All of the video formats are supported by an advanced video encoding chipset
inside the DVD Xpress DX2 which means that DVD Xpress DX2 does all the work instead
of your PC. Not only does this take the work load off your PC, but hardware compression
of the video results in better quality with smaller file sizes. This means that you get more
video on a disc, and with better quality.
Want more control? Ulead® VideoStudio™ 9 SE DVD is easy-to-use software that turns
home videos into fun-to-watch movies! Preserve your precious movies on DVD or CD.
Create video for the Web or mobile devices to share with family and friends. Enhance your
movies with customizable effects, filters and transitions. From Chroma Key effects to Flash
animation overlays, you can easily create fun-to-watch movies.
DVD Xpress DX2 is your best solution for creating video for your Sony® PSP™
(PlayStation® Portable) or Video iPod. CapWiz application makes it easy to capture
video in the right format for your Sony® PSP or Video iPod. Just select the type of video
you want to capture in the Audio/video Format screen and you can start capturing in the
specific video format. Then transfer the video file to your Memory Stick Duo™ for your
Sony® PSP™ or use iTunes to Sync to your Video iPod. It couldn’t be easier than that.
The videos that you capture are also compatible with the Creative Zen Vision Portable
Media Player. Just follow the video resolution standards for the Creative Zen Vision.
DVD Xpress DX2 is a DivX Certified Encoder device; this means that you can capture
video in DivX video format and playback the video in DivX Certified DVD Players. Just
burn the captured video into a CD or DVD and insert the disc in a DVD Players that is
DivX Certified.
Powerful Software Bundle
We want to be sure you receive the greatest benefits from your DVD Xpress DX2
purchase so we have included software to meet your various project goals. Some times
you may just want to archive video to disc in the fastest way possible. Other times you
may want to get a bit creative, but you’ll save most of the video editing for a later time. And
for the big project you want to have a full featured video editor that gives you the freedom
to be creative.
DVD Xpress DX2 includes these software tools for your video projects:
• Capture Wizard application (with Direct To Disc feature)
• Ulead® VideoStudio™ 9 SE DVD

2
3
2
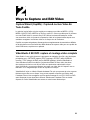
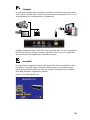
Ways to Capture and Edit Video
Capture Wizard (CapWiz): Easy Video Capture & Playback
This is the fastest and easiest way to capture MPEG-1 (VCD), MPEG-2 (SVCD, DVD),
MPEG-4 and DivX video on your PC. Create video for playback in your Video iPod® or
your Sony PSP device. Use the Capture Wizard screens to verify your video connections,
video compression format and where you want your video files stored on your computer
hard drive.
CapWiz also allows you to set up timed recordings and delayed recordings and easily
select video capture bit rates for Good, Better or Best DVD video quality. You can set
custom settings for video resolution, video and audio bit rate.
Ulead VideoStudio 9 SE DVD: Full Video Capture & Editing
VideoStudio 9 takes you through the movie making process. Main steps are: CAPTURE,
EDIT, EFFECT, OVERLAY, TITLE, AUDIO and SHARE. Use VideoStudio 9 if you want to
edit video, add effects or video filters, titles, background music or voice-overs to create a
unique video production. With VideoStudio 9 you can capture, edit or publish your movie
to disc.
VideoStudio 9 includes a Movie Wizard that lets you easily author and burns your movie
to disc. You can export any single file to the Movie Wizard, or save your edited movies to
a VCD, SVCD or DVD movie and then export it to the Movie Wizard. Movie Wizard can be
selected when you double-click the VideoStudio icon in your Desktop.

4
5
3
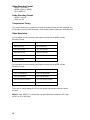
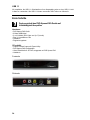
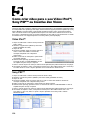
Installation Guide
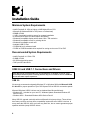
Minimum System Requirements
• Intel® Pentium® III 1GHz or higher or AMD Athlon/Duron CPU
• Microsoft ® Windows® 2000 or XP (Home or Professional)
• 256MB of RAM
• 1.2GB of available hard drive space for program installation
• 4 GB hard drive space for video capture and editing
• Windows® compatible display with at least 1024 x 768 resolution
• Windows® compatible mouse or pointing device
• Windows® compatible sound card
• Available USB 2.0 Port
• CD-ROM drive for software install
• CD-RW or DVD-Recordable drive required for saving movies onto CD or DVD
Recommended System Requirements
• Intel® Pentium® 4 1.5GHz CPU
• 512MB of RAM
• 20 GB free hard drive space
• 7200 rpm IDE Hard Drive
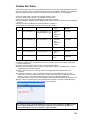
USB 2.0 and USB 1.1 Connections and Drivers
USB 2.0
We strongly recommend using only Windows XP or Windows 2000 with Microsoft USB
2.0 drivers for proper operation of your DVD Xpress DX2 at USB 2.0 connection speeds.
Microsoft Windows USB 2.0 drivers can be obtained from Microsoft directly:
• Windows XP – Included on your new PC, Windows Update, Download Windows XP
Service Pack 1
• Windows 2000 – Download Windows 2000 Service Pack 3
Many USB 2.0 upgrade cards ship with non-Microsoft, third party drivers. These drivers
have many revisions and may have compatibility issues with some USB 2.0 devices. In
many cases the USB 2.0 driver you have may work fine, but we cannot guarantee proper
operation with third party USB 2.0 drivers.
Note: We strongly recommend that you use the USB Ports on the back of your PC, some
front USB ports will not perform correctly because they act as a Hub. Do not use a USB Hub
for the best video capture experience.

4
5
USB 1.1
We recommend using the USB 1.1 port on your motherboard or from a USB 1.1 add-in
card. All USB 1.1 cards use the Microsoft USB drivers. Do not use a USB Hub to connect
the DVD Xpress DX2 to your PC.
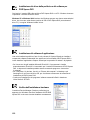
Getting Started
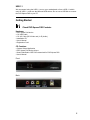
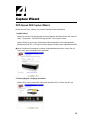
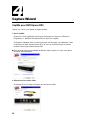
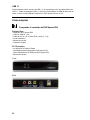
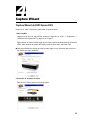
Check DVD Xpress DX2 Contents
Hardware:
• DVD Xpress DX2 device
• 6 ft. USB Cable
• 6 ft. A/V Cable (RCA Video and (L+ R) Audio)
• Installation CD
• User’s Manual
• Registration Card
CD Contains:
• Capture Wizard Application
• DVD Xpress DX2 device drivers
• Ulead VideoStudio 9 SE DVD customized for DVD Xpress DX2
• User’s Manual
1
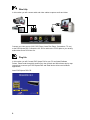
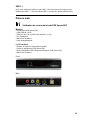
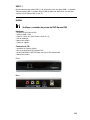
Front
Back

6
7
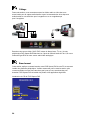
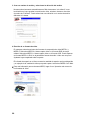
Wire It Up
In this section you will connect audio and video cables to capture audio and video.
2
Connect your video source (VHS, DVD Player, Laser Disc Player, Camcorders, TV, etc.)
to the DVD Xpress DX2. Connect the 6 ft. A/V In cable to the 3 RCA jacks to your analog
audio/video source RCA Line Out.
Plug It In
In this section you will Connect DVD Xpress DX2 to your PC and Install Software
Drivers. Please read through this section first, then go back and follow these step by step
instructions to connect your DVD Xpress DX2 and install device drivers and software
applications:
Insert DVD Xpress DX2 CD.
3

6
7
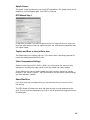
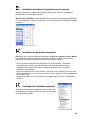
Install Device Drivers
Now, plug your USB cable into DVD Xpress DX2 and your PC. Windows will recognize the
device and ask you for the device drivers.
Windows XP or Windows 2000 Let Windows conduct an automatic search for the drivers.
The drivers are located in the root directory of your DVD Xpress DX2 CD, usually your “D”
drive. Windows will install the drivers.
4
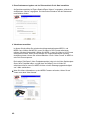
Install Software Applications
Now that you have installed the device, click the Capture Wizard button to install the
Capture Wizard capture and playback application.
• If you do not have Microsoft’s DirectX 9.0c installed, it will install automatically. DirectX
9.0c is required for proper operation of your DVD Xpress DX2. Installation of DirectX 9.0c
may require a re-start of your computer.
• If your computer restarted, click “My Computer” on your desktop. Double click the CD
Drive icon to bring back the DVD Xpress DX2 Installation screen.
• Continue installing the key bundled software on to your system:
Ulead VideoStudio 9 SE DVD.
5
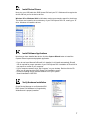
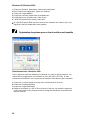
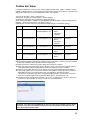
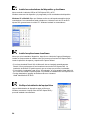
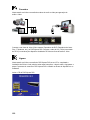
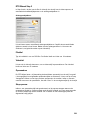
Verify Hardware Installation
Check Device Manager to verify that the ADS
DVD Xpress DX2 hardware is recognized by
Windows and is properly installed.
6

8
9
Windows XP or Windows 2000:
1 Click Start, Settings, Control Panel.
2 In Control Panel, click System.
3 Click on the Hardware Tab.
4 Click Device Manager Button.
5 Double click the Sound, Video and Game Controllers Device.
6 ADS DVD Xpress DX2 should be listed.
If ADS DVD Xpress DX2 is listed under the Sound, Video and Game Controllers
heading, then the device was properly installed.
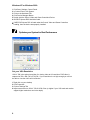
Optimize your System for Best Performance
7
Set your VGA Resolution
1024 X 768 is the optimal resolution for viewing video at full resolution. DVD video is
captured at 720 x 480 (720 x 576) PAL. If your resolution is not high enough you will not
be able to view the video at full resolution.
1 Right click on your desktop
2 Click Properties
3 Click on Settings Tab
4 Adjust screen area to 1024 X 768 & 16 Bit Color (or higher if your VGA card and monitor
support higher resolutions and color depth).

8
9
Defragment your Hard Drive for best performance
Disk Defragmentation consolidates files and folders on your Hard Disk and allows for
better system access of files and folders. It will also help when you are capturing and
writing new files into your Hard Disk. Please keep in mind that this process requires some
amount of time which depends on several factors, including the size of the Hard Disk,
number and size of files and how fragmented your local disk is. Before you Defragment
your Hard Disk, you can Analyze a volume to see if this step is required.
1 Double-click My Computer
2 Right Click and Select Properties on the Hard Disk you want to Save your captured Videos
3 Click on Tools tab
4 Click Defragment Now button
5 Click Analyze button to see if you need to Defragment the Hard Disk
Installation Summary
By now you should have completed the following:
1 Made all of the Audio and Video connections between DVD Xpress DX2 and your
Audio/Video source.
2 Connected DVD Xpress DX2 to the USB Port on your PC.
3 Installed the drivers and verified that the device is properly installed
4 Installed all necessary software applications required for proper operation.
5 Optimized your System for best performance.
6 Now you are ready to Start Capturing Videos to your PC.
8
Start Capturing Videos
9
Don’t forget to Turn On and press “PLAY” on your video source (VCR, Camcorder, etc.)
so you can capture the video contents.
Now you are ready to start capturing video. We have created the Capture Wizard
(CapWiz) application to allow you to quickly capture video on your PC without learning
how to edit video or author a DVD. Use the Capture Wizard application to test video
capture and playback of video before moving on to VideoStudio 9 SE DVD.
We have created a simple getting started Wizard that allows you to verify your connections
and make the proper setup choices before capturing video.

10
11
4
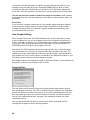
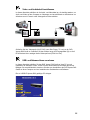
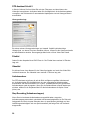
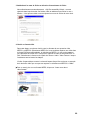
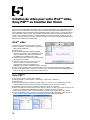
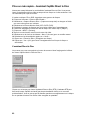
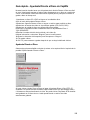
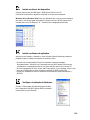
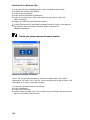
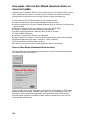
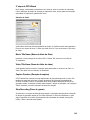
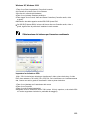
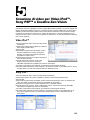
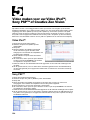
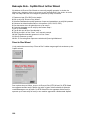
Capture Wizard
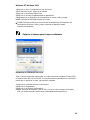
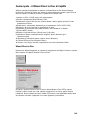
DVD Xpress DX2 Capture Wizard
Click “Next” to advance to the next step.
1 Open CapWiz
Click the CapWiz icon on your Desktop or Click “Start” > “All Programs” > “ADSTech
DVD Xpress DX2” and click on “Capwiz”
Choose worldwide video standard based on country – For Users in North America, you
will select NTSC. For Users in Europe and many other countries you will select PAL.
For more information on these standards, click on “Learn More about Worldwide Video
Standards…”
2 Select Video Inputs
Choose RCA or S-Video based on your video source.

10
11
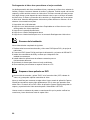
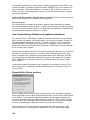
3 Create file name and select file location
We will automatically select “My Documents\My Videos\” as the location to store your
video files, we also set the file name to “Movies. You can select a different location or file
name if you desire.
4 Choose video format
In this step you will select between MPEG-1 and MPEG-2 video compression formats.
Select MPEG-2 if you wish to capture video in the highest quality DVD format. Select
MPEG-1 if you want to capture video in the VCD format. You can capture in MPEG-4
or DivX format in the Audio / Video Format screen when the Wizard completes all the
steps.
The Disk Space indicator shows the amount of disk space you have available and an
example of how much video you can capture if you selected MPEG-2 at 3 Mb/sec.
For more information on these MPEG, click on “Learn More about Video Formats…”

12
13
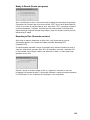
5 Ready
Now you are ready to start viewing and capturing video. You will need to start your
Camcorder or VCR playing. Press Play on your video source (VCR, DVD player, etc.).
Click Finish and the Wizard screen will disappear and you will see the full Capture
Wizard interface.
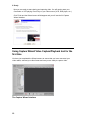
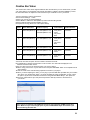
Using Capture Wizard Video Capture/Playback tool for the
first time
You have just completed the Wizard screens to ensure that you have connected your
video cables, selected your video format and now you are ready to capture video.
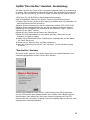
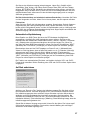
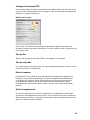
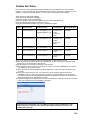
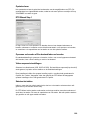
The Capture Wizard Interface

12
13
Preview and Record Video
1 Be sure your video device is playing a video
2 Click “Preview” and you will see video playing in the preview window. You will notice the
status indicator displaying “Preview”.
3 Click the “Stop” ( ■ ) button or press the “Esc” key on your keyboard to stop video preview.
4 If you Click the Red “Record” ( ● ) button while previewing video, the video will stop
momentarily, then start again. When the video preview starts again, you are recording.
You will notice the status indicator displaying “Recording” and the Time count start.
5 To Stop recording, press the “Stop” ( ■ ) button or press the “Esc” key on your keyboard.
6 You will notice that the file name has been added to the playback list box.
Ways to Begin Recording
1 You can start recording from the Stop or idle status in CapWiz or while you are
previewing video.
2 Click the red Record ( ● ) button to begin recording at any time.
3 To Stop recording, Click the “Stop” ( ■ ) button or the “Esc” key on your keyboard.
4 The video will be displayed in the resolution you selected for the video capture.
Playback
Captured video files can be displayed on your computer monitor. Use this option to
Playback the files you captured. Video will be played back at the resolution it was
captured in.
1 Click on the file name in the Playback List Box, then click on the “Play” ( ► ) button. You
may also double click on the file name for Instant Playback. You will notice that the
status indicator turns Green and the display changes to Play.
2 To Stop Playback, Click the Stop ( ■ ) button or press the “Esc” key on your keyboard.
Seek through the video
If you have recorded a long video, you may want to jump ahead to a specific point in the
video file and continue playback from that point. This feature is possible for MPEG-2
files only.
1 Double-click on the file you want to Playback in your computer.
2 As the video is playing in the screen, use your mouse to drag the playback position
slider to the point you desire.
3 Once you release the mouse, the file will resume playback.
Keyboard Short Cuts:
Preview = Enter key
Record = “R” key
Instant Playback = double click file name
Play/Pause = space bar
Stop Record = Esc key
Stop Preview = Esc key
Advance 1 second (in Pause mode) = right arrow key
Rewind 1 second (in Pause mode) = left arrow key

14
15
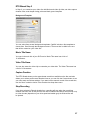
Capture Wizard Features and Functions
Recording File Name
Before Recording check the Recording Filename box in the upper left hand corner of the
application. The file name you selected in the Wizard Screen is listed here.
1 Keep this file name if you wish or run the Wizard to use a new file name.
2 Check the “Auto Naming” box and CapWiz will automatically name each captured file
in sequential order; i.e. if your video file is “Movie”, the first file captured will be named
“Movie-0000”, the second “Movie-0001” and so on.
3 Every time you stop a capture, the new file name will be displayed in Playback List box.
4 You can also uncheck “auto-naming” and click the “Unique” button and CapWiz will use
the file name you enter in the filename box. You need to provide a new file name for
each video clip captured. If you do multiple captures without changing the unique file
name, the file will be written over each time you capture.
Playback List Box
The Playback list box shows the file names of your video captures. This list will match the
directory location you selected in the Capture Wizard screens. If you are unsure of the
location you selected, run the Wizard again.
Browse
The Browse button will allow you to browse to other file directories or hard drives. If you
select another directory, any MPEG video files located there will appear in the Playback
list box.
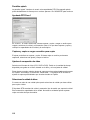
Details
The Details button will allow you examine the details of the files in the Playback List box.
Click on the Details Button and a dialog box will open showing detailed information about
each file such as: Date, File Size, File Name and location on your system.
Click on any file in this dialog box and then click Details again and you will see more
details about this individual files such as:
1 Video bit rate
2 Audio sampling rate
3 Audio bit rate
4 Frame rate
Deleting a File
From the detailed information box you can delete a file by clicking the “Remove” button.
CapWiz will ask you if you are sure, click OK and the file is deleted from your system.

14
15
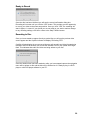
Application Links
The icons at the side of the CapWiz screen allow you to easily jump from CapWiz to the
bundled application that came with your DVD Xpress DX2. You can quickly jump to Ulead
VideoStudio 9 SE DVD application. When you click on the application button, CapWiz will
automatically close.
CapWiz also allows you to capture MPEG1 or MPEG2 video straight to Disc, just click the
Direct to Disc button to start the application, you will need to have the correct media disc
for the type of project you want in your DVD burner.
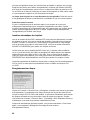
Menu Options
This section will describe all settings and choices for all of the menu options along the top
of the CapWiz Interface.
Inputs
This dialog box allows you to quickly change your video input choices. Here you can
choose between RCA and S-Video Input. These settings can also be changed by running
the Capture Wizard Screens.
Audio/Video Format
Country Setting The Audio/Video Format dialog screen allows you to select your video
standard based on your location. Based on the country select, the system will set to NTSC
of PAL video format. If you are not sure of the correct selection, run the Capture Wizard
and read the document called “Learn More about Worldwide Video Standards”.
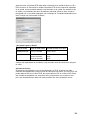
Video Quality
Select the Video Format of your choice. You can choose:
• DVD (MPEG-2)
• Super Video CD (SVCD)
• Video CD (VCD)
• iPod™ (MPEG-4)
• Sony PSP™ (MPEG-4)
• DivX (MPEG-4)
Custom User Defined Video Settings
CapWiz lets you set custom capture settings. The custom settings give you lots of
flexibility in creating capture settings to meet your individual needs. To access the Custom
Settings dialog box, click on the “Custom Settings…” button.
Regional Settings
Select the country you are located to set the proper Video Standard.

16
17
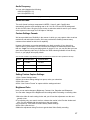
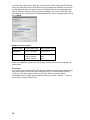
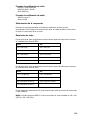
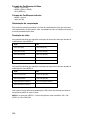
NTSC
325 x 240 (VCD)
352 x 480 (1/2 D1)
480 x 480 (SVCD)
640 x 480 (DVD)
720 x 480 (DVD)
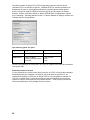
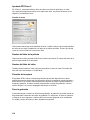
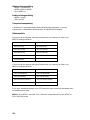
Video Encoding Format
• MPEG-1 (VCD only)
• MPEG-2 (DVD or SVCD)
• DivX (MPEG-4)
Audio Encoding Format
• MPEG-1 Layer-2
• WAV (LPCM)
Compression Tuning
This section allows you to customize the Video Encoding Format you have selected. You
will be able to set the Video Resolution, Video Quality, Audio Frequency or Audio Bit Rate.
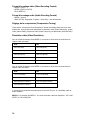
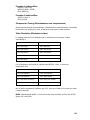
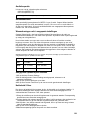
Video Resolution
You can select from the following video capture resolutions for MPEG-2 Video
Encoding Format:
PAL
352 x 288 (VCD)
352 x 576 (1/2 D1)
480 x 576 (SVCD)
720 x 576 (DVD)
You can select from the following video capture resolutions for MPEG-4 Video
Encoding Format:
NTSC
176 x 144 (Handheld)
352 x 240 (Portable)
640 x 480 (Home Theater 2)
720 x 480 (Home Theater 1)
PAL
176 x 144 (Handheld)
352 x 288 (Portable)
720 x 576 (Home Theater)
There are no quality settings for VCD as this format has standard video and audio
bit rates.
MPEG-1 When MPEG-1 is selected the only Video Resolution allowed is 352 x 240
(NTSC) or 352 x 288 (PAL).
Seite wird geladen ...
Seite wird geladen ...
Seite wird geladen ...
Seite wird geladen ...
Seite wird geladen ...
Seite wird geladen ...
Seite wird geladen ...
Seite wird geladen ...
Seite wird geladen ...
Seite wird geladen ...
Seite wird geladen ...
Seite wird geladen ...
Seite wird geladen ...
Seite wird geladen ...
Seite wird geladen ...
Seite wird geladen ...
Seite wird geladen ...
Seite wird geladen ...
Seite wird geladen ...
Seite wird geladen ...
Seite wird geladen ...
Seite wird geladen ...
Seite wird geladen ...
Seite wird geladen ...
Seite wird geladen ...
Seite wird geladen ...
Seite wird geladen ...
Seite wird geladen ...
Seite wird geladen ...
Seite wird geladen ...
Seite wird geladen ...
Seite wird geladen ...
Seite wird geladen ...
Seite wird geladen ...
Seite wird geladen ...
Seite wird geladen ...
Seite wird geladen ...
Seite wird geladen ...
Seite wird geladen ...
Seite wird geladen ...
Seite wird geladen ...
Seite wird geladen ...
Seite wird geladen ...
Seite wird geladen ...
Seite wird geladen ...
Seite wird geladen ...
Seite wird geladen ...
Seite wird geladen ...
Seite wird geladen ...
Seite wird geladen ...
Seite wird geladen ...
Seite wird geladen ...
Seite wird geladen ...
Seite wird geladen ...
Seite wird geladen ...
Seite wird geladen ...
Seite wird geladen ...
Seite wird geladen ...
Seite wird geladen ...
Seite wird geladen ...
Seite wird geladen ...
Seite wird geladen ...
Seite wird geladen ...
Seite wird geladen ...
Seite wird geladen ...
Seite wird geladen ...
Seite wird geladen ...
Seite wird geladen ...
Seite wird geladen ...
Seite wird geladen ...
Seite wird geladen ...
Seite wird geladen ...
Seite wird geladen ...
Seite wird geladen ...
Seite wird geladen ...
Seite wird geladen ...
Seite wird geladen ...
Seite wird geladen ...
Seite wird geladen ...
Seite wird geladen ...
Seite wird geladen ...
Seite wird geladen ...
Seite wird geladen ...
Seite wird geladen ...
Seite wird geladen ...
Seite wird geladen ...
Seite wird geladen ...
Seite wird geladen ...
Seite wird geladen ...
Seite wird geladen ...
Seite wird geladen ...
Seite wird geladen ...
Seite wird geladen ...
Seite wird geladen ...
Seite wird geladen ...
Seite wird geladen ...
Seite wird geladen ...
Seite wird geladen ...
Seite wird geladen ...
Seite wird geladen ...
Seite wird geladen ...
Seite wird geladen ...
Seite wird geladen ...
Seite wird geladen ...
Seite wird geladen ...
Seite wird geladen ...
Seite wird geladen ...
Seite wird geladen ...
Seite wird geladen ...
Seite wird geladen ...
Seite wird geladen ...
Seite wird geladen ...
Seite wird geladen ...
Seite wird geladen ...
Seite wird geladen ...
Seite wird geladen ...
Seite wird geladen ...
Seite wird geladen ...
Seite wird geladen ...
Seite wird geladen ...
Seite wird geladen ...
Seite wird geladen ...
Seite wird geladen ...
Seite wird geladen ...
Seite wird geladen ...
Seite wird geladen ...
Seite wird geladen ...
Seite wird geladen ...
Seite wird geladen ...
Seite wird geladen ...
Seite wird geladen ...
Seite wird geladen ...
Seite wird geladen ...
Seite wird geladen ...
Seite wird geladen ...
Seite wird geladen ...
Seite wird geladen ...
Seite wird geladen ...
Seite wird geladen ...
Seite wird geladen ...
Seite wird geladen ...
Seite wird geladen ...
Seite wird geladen ...
Seite wird geladen ...
Seite wird geladen ...
Seite wird geladen ...
Seite wird geladen ...
Seite wird geladen ...
Seite wird geladen ...
Seite wird geladen ...
Seite wird geladen ...
Seite wird geladen ...
Seite wird geladen ...
Seite wird geladen ...
Seite wird geladen ...
Seite wird geladen ...
Seite wird geladen ...
Seite wird geladen ...
Seite wird geladen ...
Seite wird geladen ...
Seite wird geladen ...
Seite wird geladen ...
Seite wird geladen ...
Seite wird geladen ...
Seite wird geladen ...
Seite wird geladen ...
Seite wird geladen ...
Seite wird geladen ...
Seite wird geladen ...
Seite wird geladen ...
Seite wird geladen ...
Seite wird geladen ...
Seite wird geladen ...
Seite wird geladen ...
Seite wird geladen ...
Seite wird geladen ...
Seite wird geladen ...
Seite wird geladen ...
Seite wird geladen ...
Seite wird geladen ...
Seite wird geladen ...
Seite wird geladen ...
Seite wird geladen ...
Seite wird geladen ...
Seite wird geladen ...
Seite wird geladen ...
Seite wird geladen ...
Seite wird geladen ...
Seite wird geladen ...
Seite wird geladen ...
Seite wird geladen ...
Seite wird geladen ...
Seite wird geladen ...
-
 1
1
-
 2
2
-
 3
3
-
 4
4
-
 5
5
-
 6
6
-
 7
7
-
 8
8
-
 9
9
-
 10
10
-
 11
11
-
 12
12
-
 13
13
-
 14
14
-
 15
15
-
 16
16
-
 17
17
-
 18
18
-
 19
19
-
 20
20
-
 21
21
-
 22
22
-
 23
23
-
 24
24
-
 25
25
-
 26
26
-
 27
27
-
 28
28
-
 29
29
-
 30
30
-
 31
31
-
 32
32
-
 33
33
-
 34
34
-
 35
35
-
 36
36
-
 37
37
-
 38
38
-
 39
39
-
 40
40
-
 41
41
-
 42
42
-
 43
43
-
 44
44
-
 45
45
-
 46
46
-
 47
47
-
 48
48
-
 49
49
-
 50
50
-
 51
51
-
 52
52
-
 53
53
-
 54
54
-
 55
55
-
 56
56
-
 57
57
-
 58
58
-
 59
59
-
 60
60
-
 61
61
-
 62
62
-
 63
63
-
 64
64
-
 65
65
-
 66
66
-
 67
67
-
 68
68
-
 69
69
-
 70
70
-
 71
71
-
 72
72
-
 73
73
-
 74
74
-
 75
75
-
 76
76
-
 77
77
-
 78
78
-
 79
79
-
 80
80
-
 81
81
-
 82
82
-
 83
83
-
 84
84
-
 85
85
-
 86
86
-
 87
87
-
 88
88
-
 89
89
-
 90
90
-
 91
91
-
 92
92
-
 93
93
-
 94
94
-
 95
95
-
 96
96
-
 97
97
-
 98
98
-
 99
99
-
 100
100
-
 101
101
-
 102
102
-
 103
103
-
 104
104
-
 105
105
-
 106
106
-
 107
107
-
 108
108
-
 109
109
-
 110
110
-
 111
111
-
 112
112
-
 113
113
-
 114
114
-
 115
115
-
 116
116
-
 117
117
-
 118
118
-
 119
119
-
 120
120
-
 121
121
-
 122
122
-
 123
123
-
 124
124
-
 125
125
-
 126
126
-
 127
127
-
 128
128
-
 129
129
-
 130
130
-
 131
131
-
 132
132
-
 133
133
-
 134
134
-
 135
135
-
 136
136
-
 137
137
-
 138
138
-
 139
139
-
 140
140
-
 141
141
-
 142
142
-
 143
143
-
 144
144
-
 145
145
-
 146
146
-
 147
147
-
 148
148
-
 149
149
-
 150
150
-
 151
151
-
 152
152
-
 153
153
-
 154
154
-
 155
155
-
 156
156
-
 157
157
-
 158
158
-
 159
159
-
 160
160
-
 161
161
-
 162
162
-
 163
163
-
 164
164
-
 165
165
-
 166
166
-
 167
167
-
 168
168
-
 169
169
-
 170
170
-
 171
171
-
 172
172
-
 173
173
-
 174
174
-
 175
175
-
 176
176
-
 177
177
-
 178
178
-
 179
179
-
 180
180
-
 181
181
-
 182
182
-
 183
183
-
 184
184
-
 185
185
-
 186
186
-
 187
187
-
 188
188
-
 189
189
-
 190
190
-
 191
191
-
 192
192
-
 193
193
-
 194
194
-
 195
195
-
 196
196
-
 197
197
-
 198
198
-
 199
199
-
 200
200
-
 201
201
-
 202
202
-
 203
203
-
 204
204
-
 205
205
-
 206
206
-
 207
207
-
 208
208
-
 209
209
-
 210
210
-
 211
211
-
 212
212
-
 213
213


ADS Technologies USBAV-709-EF Hardware And Software Manual
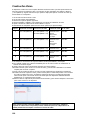
- Kategorie
- DVD Spieler
- Typ
- Hardware And Software Manual
- Dieses Handbuch eignet sich auch für
in anderen Sprachen
- English: ADS Technologies USBAV-709-EF
- français: ADS Technologies USBAV-709-EF
- español: ADS Technologies USBAV-709-EF
- italiano: ADS Technologies USBAV-709-EF
- Nederlands: ADS Technologies USBAV-709-EF
- português: ADS Technologies USBAV-709-EF
Verwandte Artikel
-
 ADS Technologies DVD XPRESS DX2 USBAV-714 Benutzerhandbuch
-
ADS Tech Mini DualTV Benutzerhandbuch
-
 ADS Technologies MINI TV USB Bedienungsanleitung
-
 ADS Technologies USBAV-711-EF Bedienungsanleitung
-
 ADS Technologies USBAV-709-EF Software Manual
-
ADS Tech INSTANT DVD + DV Benutzerhandbuch
-
 ADS Technologies PTV-334 Benutzerhandbuch
-
 ADS Technologies VIDEO XPRESS Benutzerhandbuch
-
 ADS Technologies PYRO AV LINK Benutzerhandbuch
-
 ADS Technologies DLX-181 Benutzerhandbuch


Andere Dokumente
-
iON VIDEO 2 PC Schnellstartanleitung
-
Radio Shack Ion VCR2PC Benutzerhandbuch
-
-
 Santeg 69632 Installationsanleitung
-
Samsung DVD-SH830 Benutzerhandbuch
-
Sony PSP version 4.2 Benutzerhandbuch
-
-
Hercules Smart TV Bedienungsanleitung
-
Lindy 32898 Benutzerhandbuch
-
Trust XPress Benutzerhandbuch
