Seite wird geladen ...

Installation des Treibers
Driver Installation
Specifications and Features
Spezifikationen und Funktionsumfang
Service and Warranty
Service:
If you require assistance with the installation, operation, or application of your ADS Technologies, Inc. product there are several options available to you as described in the technical support
section of this manual. Your primary source for information and assistance is always your computer store or computer parts dealer. If your ADS product needs repair or replacement, contact
your dealer for on-site repair service.
The ADS Technologies technical support and customer service staff can aid in solving many problems. Our technical support department is available to repair any ADS Technologies product.
You or your dealer must return products to our factory for repair or warranty replacement.
Return/Replacement:
If you need to return your ADS Technologies product you should return the product directly to the dealer or store where you purchased the product. Each individual computer store or dealer sets product returns
policies for their customers. ADS Technologies, Inc. cannot be responsible for the actions or policies set by our dealers. If you desire to return the product for a refund, you must get the refund from the dealer or store
you purchased the product from. If you purchased the product directly from ADS please see the “Terms and Conditions of Sale” on the reverse side of your sales invoice.
Returns to ADS Technologies, Inc. are for repair or warranty replacement only. If you need to return product to ADS Technologies, Inc. for repair or replacement you must follow these steps:
1. Call our Technical Support department at (562) 926-4338 in the USA or +353-61-702042 in Europe to obtain a Return Merchandise Authorization (RMA) number.
2. The RMA number is valid for 30 days.
3. Ship the product to the ADS factory with the RMA number marked on the inside and outside of the package. If there is no RMA number on the package or the RMA number has expired, the shipment will be
refused. ADS will not be liable for lost or mis-shipped products.
4. Replacement product cannot be shipped to you until the defective product has been received by ADS.
5. Once the product is received at the factory it will be tested and then repaired or replaced.
6. Turn around time is approximately one week. A repaired or replacement product will be shipped back to you.
Warranty:
This ADS Technologies, Inc. product comes with a One (1) year hardware warranty. ADS Technologies, Inc. (ADS) warrants this product against defects in material and workmanship for a period of One (1) year from
the date of original purchase from ADS or an authorized ADS dealer. This warranty applies only to the original purchase of the product and is not transferable. This warranty does not cover any incompatibilities due to
the user’s computer, hardware, software or other related system configuration in which the product interfaces. Proof of purchase will be required before any warranty consideration by ADS occurs. This warranty does
not cover any damage caused by negligence, non-authorized modifications, or parts installed without prior written permission from ADS. This warranty does not apply if the product has been damaged by accident,
abuse, or misapplication, nor as a result of service to the product by anyone other than ADS. If your ADS product is not in working order, your only recourse is repair or warranty replacement, as described above.
UNDER NO CIRCUMSTANCES will ADS Technologies, Inc. be liable for consequential damages, including but not limited to any lost savings, lost profits, or any other damages, caused by the use of any ADS
Technologies, Inc. product or inability to use the product, even if the dealer or ADS Technologies, Inc. has been advised of such liability or other claims. This includes damage to property and, to the extent permitted
by law, damages for personal injury. This warranty is in lieu of all other warranties including implied warranties of merchantability and fitness for a particular purpose.
FCC Information
Federal Communications Commission Radio Frequency Interference Statement
Note: This equipment has been tested and found to comply with the limits for a class B digital device, pursuant to Part 15 of the FCC Rules. These limits are designed to provide reasonable protection against harmful
interference when the equipment is operated in a residential installation. This equipment generates, uses and can radiate radio frequency energy and if not installed and used in accordance with the instruction
manual may cause harmful interference to radio communications. However, there is no guarantee that interference will not occur in a particular installation. If this equipment does cause harmful interference to radio
or television reception, which can be determined by turning the equipment off and on, the user is encouraged to try to correct the interference by one or more of the following measures:
* Reorient or relocate the receiving antenna
* Increase the separation between the equipment and receiver.
* Connect the equipment into an outlet on a circuit different from that to which the receiver is connected.
* Consult the dealer or an experienced radio TV technician for help.
Notice:
(1) The changes or modifications not expressly approved by the party responsible for compliance could void the user’s authority to operate the equipment.
(2) Shielded interface cables and AC power cord, if any, must be used in order comply with the emission limits.
Mindest-Systemvoraussetzungen:
• Windows XP (Home oder Professional)
• CPU mit 2,0 GHz oder schneller
• 256 MB RAM (512 empfohlen)
• Für Softwareinstallation 600 MB auf Festplatte
• Für Videoaufnahmen mindestens 4 GB auf Festplatte
• Freier USB 2.0 Port
• Grafikkarte eingestellt auf 1024 x 768
• Soundkarte für Audiowiedergabe
• CD Laufwerk für Softwareinstallation
• CD Brenner für Video CD Erstellung
Lieferumfang:
• Video Xpress mit integriertem USB Kabel
• CD mit:
• Video Studio Movie Wizard
• Muvee AutoProducer CE
• Photo Show Express
• Audio/Video RCA Anschlusskabel
PC Requirements:
• Windows XP (Home or Professional)
• CPU Speed of 2.0 GHz or faster
• 256 MB of RAM (512 recommended)
• 600 MB of hard drive space for software installation
• 4 GB+ of hard disk for video capture space
• Available USB 2.0 port
• Graphic card set to 1024 x 768
• Sound Card for audio playback
• CD drive for software installation
• CD burner for VideoCD production
Includes:
• Video Xpress w/integrated USB cable
• CD containing:
• Video Studio Movie Wizard
• Muvee AutoProducer CE
• Photo Show Express
• Audio Video RCA connection cable
Funktionsumfang:
• Videoaufnahme mit Auflösungen bis 720 x 480 (NTSC) oder 720 x 576 (PAL/SECAM)
• Anschluss an Windows XP über USB 2.0 Port
• Integrierte Eingangsanschlüsse mit RCA und S-Video und RCA Audio rechts und links
• Video wird über USB unkomprimiert übertragen, um die höchstmögliche Qualität zu erreichen
• Video kann unmittelbar als .AVI, compressed .AVI, MPEG-1 oder Windows Media Video
aufgenommen werden
• Nehmen Sie Ihre eigenen Filme aus jeder beliebigen analogen Videoquelle auf die
Festplatte Ihres Computers auf
• Zuerst Clips schneiden, Hintergrundmusik hinzufügen, Filmthema wählen, danach
übergeben Sie den Videoschnitt an Movie Wizard oder Muvee autoProducer.
• Brennen Sie Video im Video CD Format auf CD
Spezifikationen:
• Eingang:
• RCA (Composite)
• S-Video (Y/C)
• Audio RCA rechts und links (RCA rot und weiß)
• PC-Anschluss:
• Integriertes USB 2.0 Kabel
Features:
• Captures video at resolutions up to 720 x 480 (NTSC) or
720 x 576 (PAL/SECAM)
• Connects to Windows XP machines USB 2.0 port
• Integrated input connections with RCA and S-Video and
Right and Left audio RCA
• Video is sent over the USB cable uncompressed so you have
the highest quality possible.
• Video can be directly captured as .AVI, compressed AVI,
MPEG-1 or Windows Media Video
• Capture home movies from any analog video source to your
computer hard drive
• Trim clips, add music background, and select a movie theme
then let Movie Wizard or Muvee autoProducer do the video
editing for you.
• Burn Video to disc in VideoCD format
Specifications:
• Input:
• RCA (Composite)
• S-video (Y/C)
• Right and Left Audio RCA (Red and White RCA)
• Connection to PC:
• Integrated USB 2.0 cable
User Guide
191-528
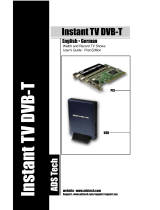
VideoXpress
North American Office
ADS Tech Inc, USA
12627 Hidden Creek Way
Cerritos, CA 90703, USA
WebSite: www.adstech.com
Email: productinfo@adstech.com
Southern Europe | MEA Office
ADS Tech SARL France
51/55 Rue Hoche
94200 - Ivry Sur Seine, France
WebSite: www.adstech.fr
Email: infofrance@adstech.com
Central | Eastern | Northern Europe Office
ADS Tech GmbH
Adolf-Lehne-Weg 8
D-85598 Baldham, Germany
WebSite: www.adstech.com/de/
Email: infogermany@adstech.com
UK and Ireland Office
ADS Tech
Unit 1b, Shannon Industrial Estate
Shannon, County Clare, Ireland
Tech Support:
USA: +1.562.926.4338
EUROPE: +353.61.702042
Deutschland: 01802 000 532
2
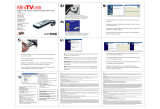
Machen Sie einen Schnappschuss!
Grab a Snap Shot!
5
Audio/Video Anschlüsse
Audio/Video Connections
3
Fangen Sie gleich an!
Use it Now!
4
1 Legen Sie die Video Xpress CD in das CD-ROM Laufwerk Ihres PCs ein.
2 Verbinden Sie den Video Xpress mit einem freien USB Port.
3 Folgen Sie den Schritten für die Treiberinstallation, um den Hardwaretreiber zu installieren.
1 Doppelklicken Sie auf das Video Xpress Icon.
2 Drücken Sie die Leertaste auf Ihrer Tastatur. Ein Bitmap-Bild wird auf Ihrem Desktop gespeichert. Sie haben
einen Video-Schnappschuss. Doppelklicken Sie auf das Bild-Icon, um den Schnappschuss zu sehen. Mit
Paint oder einer anderen Bildverarbeitungssoftware können Sie den Schnappschuss in einem anderen Format
speichern oder editieren.
3 Um ein qualitativ besseres, progressives (deinterlaced) Bild zu erhalten, klicken Sie mit der rechten Maustaste
und selektieren Sie "Snapshot Deinterlacing".
1 Double Click the Video Xpress icon.
2 Press the Space bar on your keyboard. A bitmap image will be saved on your desktop. You have a Video Snap Shot.
Double click the image icon to view. Use Paint or other image editing software to save in other format or edit the snapshot.
3 To get a better quality, progressive (deinterlaced) image, right click, select Snapshot Deinterlacing.
Installation der Softwareanwendungen
Installing Software Applications
6
7
1 Legen Sie die Video Xpress CD in das CD-ROM
Laufwerk Ihres PCs ein
2 Aus dem Auto-Run Menü können Sie installieren:
a Video Studio Movie Wizard (Filmassistent) *
b Muvee AutoProducer CE
c Photo Show Express
3 Klicken Sie auf die Schaltflächen im Auto-Run Menü
und folgen Sie den Installationsanleitungen für die
einzelnen Anwendungen.
*Der Video Studio Editor wird als 30-Tage Testversion ebenfalls auf Ihrem
System installiert. Der Video Studio Movie Wizard (Filmassistent) wird nie
ablaufen.
1 Insert the Video Xpress CD into your PC CD Rom drive.
2 From the Auto-Run menu you can install:
a Video Studio Movie Wizard (Filmassistent) *
b Muvee AutoProducer CE
c Photo Show Express
3 Click each button on the Auto-Run menu and follow the
installation instructions for each application.
*The Video Studio Editor is also installed on your system as a 30 day
trial. The Video Studio Movie Wizard (Filmassitent) will never expire.
1 Insert the Video Xpress CD into your PC CD-ROM drive.
2 Connect the Video Xpress to an available USB Port.
3 Follow driver installation steps to complete hardware driver installation.
Verbinden Sie die Audio- (rechts und links) und Video- (RCA oder S-Video) Anschlüsse Ihrer
Videoquelle (VCR, Camcorder, DVD Spieler, Spielkonsolte, usw.) mit den A/V Eingängen
des Video Express. Verwenden Sie dazu die mitgelieferten Audio/Video-Kabel.
Während der Hardwareinstallation wird die USB 2.0 Video Grabber
Anwendung auf Ihren PC Desktop kopiert. Mit diesem Programm können Sie
Video Previews aufrufen und Schnappschüsse machen.
During the hardware installation the USB 2.0 Video Grabber application was copied to your
computer desktop. This program allows you to preview video and grab snapshots.
Use the included audio/video cables to connect audio (Right and Left Audio) and video (RCA or S-Video)
from your video source (VCR, camcorder, DVD player, Game console, etc.) to the A/V inputs on the
Video Xpress.
1 Doppelklicken Sie auf das Instant VideoXpress Icon.
2 Klicken Sie mit der rechten Maustate irgendwo im Preview Bereich, um
die Menü-Optionen zu sehen.
3 Mit den Menü-Optionen können Sie selektieren:
a Die Videonorm (NTSC, PAL, SECAM)
b Das Videoformat (Bildgröße)
c Die Videoquelle (TV, Spielkonsole, DVD Spieler)
d Den Videoeingang (Composite Video, S-Video) auf Ihrem Video Xpress
1 Double Click the Instant VideoXpress icon
2 Right Click anywhere in the preview area to view the menu options.
3 Menu Options allow you to select:
a Video Standard (NTSC, PAL, SECAM)
b Video format (image size)
c Video Source (TV, Game machine, DVD player)
d Video Input (Composite video, S-Video) on your Video Xpress
Sobald Sie die richtige Videonorm und den richtigen Videoeingang selektiert haben, können Sie im
Preview Bereich Video sehen und hören
As soon as you select the correct Video Standard and Video Input you will see and hear video in the preview area.
Movie Wizard (Filmassistent)
Beim Starten von Video Studio erscheint das Menüfenster.
• Klicken Sie auf "Filmassistent", um den Movie Wizard zu starten.
• Klicken Sie auf "Video Studio Editor", um die 30-Tage-Testversion
von Video Studio Editor auszuprobieren.
Movie Wizard Schnittstelle
Sie finden unten eine Kurzanleitung für den Einstieg in den Filmassistenten.
Das vollständige Benutzerhandbuch im Adobe Reader Format (.pdf)
befindet sich auf der CD. Sie können jederzeit die "F1"-Taste auf Ihrer
Tastatur drücken, um sich schnelle Hilfe aus dem Benutzerhandbuch zu
holen.
Movie Wizard Interface
Below is a brief tutorial on getting started with Movie Wizard.
The complete user guide is on the CD in Adobe reader (.pdf) format. For quick
help, press the "F1" button on your keyboard for the user guide at any time.
Movie Wizard (Filmassistent)
When starting Video Studio the menu box will appear.
• Click Filmassistent to start the Movie Wizard.
• Click Video Studio Editor to try out the Video Studio editor 30 day trial!
Video, Fotos oder DVD Inhalte einfügen:
1 Klicken Sie auf die Icons, um Filmclips, Fotos oder sogar DVD Inhalte einzufügen.
Video aufnehmen:
2 Klicken Sie auf den Tab "Aufnahme", um die Videoaufnahme zu starten.
Import Video, Photos or DVD content:
1 Click the icons to add film clips, photos or even add DVD content.
Capture Video:
2 Click the Capture Tab to begin video capture.
Video aufnehmen:
3 Die Videoquelle zeigt "Instant VideoXpress" an.
4 Klicken Sie auf das Icon "Optionen", um das TV System und den Eingang zu selektieren (Composite oder
S-Video).
5 Klicken Sie auf "Format", um das Videokomprimierungsformat zu wählen (AVI, VCD, WMV)
6 Klicken Sie auf "Capture Video" (Video aufnehmen), um die Videoaufnahme zu starten.
7 Klicken Sie auf "Stop Capture" (Aufnahme stoppen), um die Videoaufnahme anzuhalten oder stellen Sie
den Timer für die Laufzeit auf die gewünschte Aufnahmedauer ein.
8 Klicken Sie auf "Capture Image" (Bild aufnehmen), um einen Video-Schnappschuss zu machen.
9 Klicken Sie auf "Next" (Weiter).
Filmvorlage wählen:
10 Selektieren Sie eine Filmvorlage für Ihre Videoproduktion.
11 Fügen Sie Hintergrundmusik aus Ihrer Musiksammlung hinzu.
12 Geben Sie Ihrem Film einen Titel.
13 Klicken Sie auf "Next" (Weiter).
Film fertig stellen:
14 Geben Sie den Film in eine Filmdatei oder auf Video Disc aus, oder editieren Sie den Film in Video Studio.
15 Folgen Sie den Schritten im Assistenten, um Ihre Filmdatei fertig zu stellen oder auf Disc zu brennen.
Capture Video:
3 Video source will display "Instant VideoXpress.
4 Click the "Options" icon to select TV-System and input (Composite or S-Video).
5 Click the Format box to choose the video compression format (AVI, VCD, WMV)
6 Click Capture Video to start video recording.
7 Click Stop Capture to stop video recording or set the duration timer for desired capture time limit.
8 Click Capture Image to grab a video snap shot.
9 Click Next
Select Movie Template:
10 Select from one of the movie templates for your video production.
11 Add background music from your music collection
12 Add a title to your Movie
13 Click Next
Finalize your Movie:
14 Output to a movie file, video disc or edit the movie in Video Studio.
15 Follow the Wizard steps to complete your movie file or disc burning.
1/1