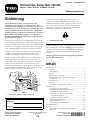
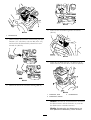
Toro Power Max 726 OE Snowthrower Benutzerhandbuch
- Typ
- Benutzerhandbuch

FormNo.3375-2RevB
PowerMax726OESnowthrower
ModelNo.38816—SerialNo.313000001andUp
Operator'sManual
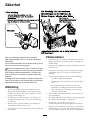
Introduction
Thismachineisintendedtobeusedbyresidential
homeownersorprofessional,hiredoperators.Itis
designedprimarilyforremovingsnowfrompaved
surfaces,suchasdrivewaysandsidewalks,andother
surfacesfortrafconresidentialorcommercial
properties.Itisnotdesignedforremovingmaterials
otherthansnow,norisamodelwithapivotingscraper
designedforclearingoffgravelsurfaces.
Readthisinformationcarefullytolearnhowtooperateand
maintainyourmachineproperlyandtoavoidinjuryand
machinedamage.Youareresponsibleforoperatingthe
machineproperlyandsafely.
YoumaycontactTorodirectlyatwww.Toro.comformachine
andaccessoryinformation,helpndingadealer,ortoregister
yourmachine.
Wheneveryouneedservice,genuineToroparts,oradditional
information,contactanAuthorizedServiceDealerorToro
CustomerServiceandhavethemodelandserialnumbersof
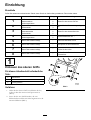
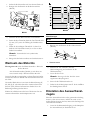
yourmachineready.Figure1identiesthelocationofthe
modelandserialnumbersonthemachine.Writethenumbers
inthespaceprovided.
g018884
Figure1
1.Modelandserialnumberlocation
ModelNo.
SerialNo.
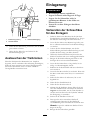
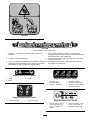
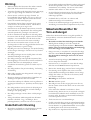
Thismanualidentiespotentialhazardsandhassafety
messagesidentiedbythesafetyalertsymbol(Figure2),
whichsignalsahazardthatmaycauseseriousinjuryordeath
ifyoudonotfollowtherecommendedprecautions.
Figure2
1.Safetyalertsymbol
Thismanualuses2wordstohighlightinformation.
Importantcallsattentiontospecialmechanicalinformation
andNoteemphasizesgeneralinformationworthyofspecial
attention.
ReplacementEngineOwner’sManualsmaybeordered
throughtheenginemanufacturer.
Contents
Introduction..................................................................1
Training.................................................................3
Preparation.............................................................3
Operation...............................................................4
MaintenanceandStorage..........................................4
ToroSnowthrowerSafety.........................................4
SoundPressure.......................................................5
SoundPower..........................................................5
Vibration................................................................5
SafetyandInstructionalDecals.................................5
Setup............................................................................8
1InstallingtheUpperHandle....................................8
2InstallingtheTractionControlLinkage....................9
3InstallingtheChute..............................................10
4InstallingtheChuteControlRod............................10
5FillingtheEnginewithOil.....................................11
6CheckingtheTirePressure....................................11
7CheckingtheSkids...............................................12
8CheckingtheTractionDriveOperation...................12
ProductOverview.........................................................13
Operation....................................................................13
FreewheelingorUsingtheSelf-propelDrive...............13
FillingtheFuelTank...............................................14
StartingtheEngine.................................................15
StoppingtheEngine...............................................16
OperatingtheTractionDrive...................................17
OperatingtheSpeedSelector...................................17
OperatingtheAuger/ImpellerDrive.........................17
OperatingtheQuickStick
®
......................................18
©2012—TheToro®Company
8111LyndaleAvenueSouth
Bloomington,MN55420
Registeratwww.Toro.com.
OriginalInstructions(EN)
PrintedintheUSA
AllRightsReserved
*3375-2*B

UncloggingtheDischargeChute..............................18
PreventingFreeze-up..............................................18
OperatingTips......................................................19
Maintenance.................................................................20
RecommendedMaintenanceSchedule(s)......................20
PreparingforMaintenance.......................................21
CheckingtheEngineOilLevel.................................21
CheckingandAdjustingtheSkidsand
Scraper..............................................................21
CheckingandAdjustingtheTractionCable................21
CheckingandAdjustingtheAuger/Impeller
Cable................................................................22
CheckingtheAugerGearboxOilLevel......................22
ChangingtheEngineOil.........................................23
AdjustingtheDischargeChuteLatch........................23
ReplacingtheDriveBelts.........................................24
Storage........................................................................24
PreparingtheMachineforStorage............................24
RemovingtheMachinefromStorage.........................25
Troubleshooting...........................................................26
2

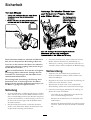
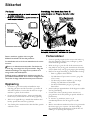
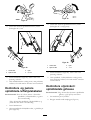
Safety
BeforeOperating
?
?
Readandunderstandthecontentsofthis
manualbeforeoperatingthesnowthrower .
Becomefamiliarwithallcontrolsandknow
howtostoptheenginequickly .
Operator 's
Position
Thelow-speedaugerhasamovingpinch
pointclosetotheopening.
Caution:Improperusemayresultin
lossoffingers,hands,orfeet.
Thereisahigh-speed
impellerclosetothe
opening.
ThismachinemeetsorexceedstheISOstandard8437
ineffectatthetimeofproduction.
Readandunderstandthecontentsofthismanualbefore
theengineiseverstarted.
Thisisthesafetyalertsymbol.Itisusedtoalertyou
topotentialpersonalinjuryhazards.Obeyallsafety
messagesthatfollowthissymboltoavoidpossibleinjury
ordeath.
Improperlyusingormaintainingthismachinecould
resultininjuryordeath.Toreducethispotential,
complywiththefollowingsafetyinstructions.
Training
•Readtheoperatingandserviceinstructionmanual
carefully.Bethoroughlyfamiliarwiththecontrolsand
theproperuseofthemachine.Knowhowtostopthe
machineanddisengagethecontrolsquickly.
•Neverallowchildrentooperatethemachine.Neverallow
adultstooperatethemachinewithoutproperinstruction.
•Keeptheareaofoperationclearofallpersons,particularly
smallchildren,andpets.
•Exercisecautiontoavoidslippingorfalling,especially
whenoperatinginreverse.
Preparation
•Thoroughlyinspecttheareawherethemachineistobe
usedandremovealldoormats,sleds,boards,wires,and
otherforeignobjects.
•Disengageallclutchesandshiftintoneutralbefore
startingtheengine.
•Donotoperatethemachinewithoutwearingadequate
wintergarments.Wearfootwearwhichwillimprove
footingonslipperysurfaces.
•Handlefuelwithcare;itishighlyammable.
–Useanapprovedfuelcontainer.
–Neveraddfueltoarunningorhotengine.
–Fillfueltankoutdoorswithextremecare.Neverll
fueltankindoors.
–Replacegasolinecapssecurelyandwipeupspilled
fuel.
•Adjustthecollectorhousingheighttocleargravelor
crushedrocksurface.
•Neverattempttomakeanyadjustmentswhiletheengine
isrunning(exceptwherespecicallyrecommendedby
manufacturer).
•Letengineandmachineadjusttooutdoortemperatures
beforestartingtoclearsnow.
•Theoperationofanypoweredmachinecanresultin
foreignobjectsbeingthrownintotheeyes.Alwayswear
safetyglassesoreyeshieldsduringoperationorwhile
performinganadjustmentorrepair.
3

Operation
•Donotputhandsorfeetnearorunderrotatingparts.
Keepclearofthedischargeopeningatalltimes.
•Exerciseextremecautionwhenoperatingonorcrossing
graveldrives,walks,orroads.Stayalertforhidden
hazardsortrafc.
•Afterstrikingaforeignobject,stoptheengine,remove
thewirefromthespark-plug,thoroughlyinspectthe
machineforanydamage,andrepairthedamagebefore
restartingandoperatingthemachine.
•Ifthemachineshouldstarttovibrateabnormally,stopthe
engineandcheckimmediatelyforthecause.Vibrationis
generallyawarningoftrouble.
•Stoptheenginewheneveryouleavetheoperating
position,beforeuncloggingthecollector/impeller
housingordischargeguide,andwhenmakinganyrepairs,
adjustments,orinspections.
•Whencleaning,repairing,orinspecting,makecertainthe
collector/impellerandallmovingpartshavestopped.
Disconnectthespark-plugwire,andkeepthewireaway
fromtheplugtopreventaccidentalstarting.
•Donotruntheengineindoors,exceptwhenstartingit
andformovingthemachineinoroutofthebuilding.
Opentheoutsidedoors;exhaustfumesaredangerous.
•Donotclearsnowacrossthefaceofslopes.Exercise
extremecautionwhenchangingdirectiononslopes.Do
notattempttoclearsteepslopes.
•Neveroperatethemachinewithoutproperguards,plates,
orothersafetyprotectivedevicesinplace.
•Neveroperatethemachinenearglassenclosures,
automobiles,windowwells,drop-offs,etc.withoutproper
adjustmentofthesnowdischargeangle.Keepchildren
andpetsaway.
•Donotoverloadthemachinecapacitybyattemptingto
clearsnowattoofastarate.
•Neveroperatethemachineathightransportspeedson
slipperysurfaces.Usecarewhenreversing.
•Neverdirectdischargeatbystandersorallowanyonein
frontofthemachine.
•Disengagepowertothecollector/impellerwhenmachine
istransportedornotinuse.
•Useonlyattachmentsandaccessoriesapprovedby
themanufacturerofmachine(suchaswheelweights,
counterweights,cabs,etc.).
•Neveroperatethemachinewithoutgoodvisibilityor
light.Alwaysbesureofyourfooting,andkeeparm
holdonthehandles.Walk;neverrun.
•Neveroperatethemachinewithoutgoodvisibilityor
light.
•Takeallpossibleprecautionswhenleavingthemachine
unattended.Shiftintoneutral,settheparkingbrake,stop
theengineandremovethekey.
MaintenanceandStorage
•Checkallfastenersatfrequentintervalsforproper
tightnesstobesurethemachineisinsafeworking
condition.
•Neverstorethemachinewithfuelinthefueltankinsidea
buildingwhereignitionsourcesarepresentsuchashot
waterandspaceheaters,clothesdryers,etc.Allowthe
enginetocoolbeforestoringinanyenclosure.
•Alwaysrefertoowner’sguideinstructionsforimportant
detailsifthemachineistobestoredforanextended
period.
•Maintainorreplacesafetyandinstructionslabels,as
necessary.
•Runthemachineafewminutesafterthrowingsnowto
preventfreeze-upofthecollector/impeller.
ToroSnowthrowerSafety
ThefollowinglistcontainssafetyinformationspecictoToro
productsorothersafetyinformationthatyoumustknow.
•Rotatingrotorbladescaninjurengersorhands.
Staybehindthehandlesandawayfromthedischarge
openingwhileoperatingthemachine.Keepyourface,
hands,feet,andanyotherpartofyourbodyor
clothingawayfrommovingorrotatingparts.
•Beforeadjusting,cleaning,repairing,andinspectingthe
machine,andbeforeuncloggingthedischargechute,stop
theengine,removethekey,andwaitforallmoving
partstostop.
•Usethesnowcleanouttool,notyourhands,toremove
obstructionsfromthedischargechute.
•Beforeleavingtheoperatingposition,stoptheengine,
removethekey,andwaitforallmovingpartstostop.
•Donotwearloose-ttingclothingthatcouldgetcaught
inmovingparts.
•Ifashield,safetydevice,ordecalisdamaged,illegible,or
lost,repairorreplaceitbeforebeginningoperation.Also,
tightenanyloosefasteners.
•Donotsmokewhilehandlinggasoline.
•Donotusethemachineonaroof.
•Donottouchtheenginewhileitisrunningorsoonafter
ithasstoppedbecausetheenginemaybehotenoughto
causeaburn.
•Performonlythosemaintenanceinstructionsdescribedin
thismanual.Beforeperforminganymaintenance,service,
oradjustment,stoptheengine,removethekey,and
disconnectthewirefromthesparkplug.Ifmajorrepairs
areeverneeded,contactanAuthorizedServiceDealer.
•Donotchangethegovernorsettingsontheengine.
•Whenstoringthemachineformorethan30days,drain
thefuelfromthefueltanktopreventapotentialhazard.
4

Storefuelinanapprovedfuelcontainer.Removethekey
fromtheignitionswitchbeforestoringthemachine.
•PurchaseonlygenuineTororeplacementpartsand
accessories.
SoundPressure
Thismachinehasasoundpressurelevelattheoperator’sear
of86dBA,whichincludesanUncertaintyValue(K)of1
dBA.Thesoundpressurelevelwasdeterminedaccordingto
theproceduresoutlinedinENISO11201.
SoundPower
Thismachinehasaguaranteedsoundpowerlevelof102
dBA,whichincludesanUncertaintyValue(K)of3.75dBA.
Thesoundpowerlevelwasdeterminedaccordingtothe
proceduresoutlinedinENISO3744.
Vibration
Measuredvibrationlevelforthelefthand=3.3m/s
2
.
Measuredvibrationlevelfortherighthand=3.1m/s
2
.
UncertaintyValue(K)=1.6m/s
2
.
Themeasuredvaluesweredeterminedaccordingtothe
proceduresoutlinedinENISO20643.
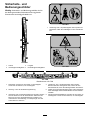
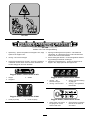
SafetyandInstructional
Decals
Important:Safetyandinstructiondecalsarelocated
nearareasofpotentialdanger.Replacedamageddecals.
121–6823
1.Fast
3.Slow
2.Forwardspeeds4.Reversespeeds
121–6817
1.Cuttingdismemberment,impellerandcutting
dismemberment,augerhazards—keepbystandersasafe
distancefromthesnowthrower.
5

121–1239
121–1240
Reorderpartno.120–7194
1.Tractiondrive—squeezethelevertoengage;releasethe
levertodisengage.
4.Cuttingdismembermenthazard,impeller—keepaway
frommovingparts;removetheignitionkeyandreadthe
instructionsbeforeservicingorperformingmaintenance.
2.Warning—readtheOperator’sManual.5.Thrownobjecthazard—keepbystandersasafedistancefrom
thesnowthrower.
3.Cutting/dismembermenthazard,impeller—donotplace
yourhandinthechute;stoptheenginebeforeleavingthe
operatingposition,usethetooltoclearthechute.
6.Auger/impellerdrive—squeezethelevertoengage;release
thelevertodisengage.
Briggs&StrattonPartNo.273676
1.Stop
3.Fast
2.Slow
Briggs&StrattonPartNo.275949
1.Chokeon(Choke)2.Chokeoff(Run)
Briggs&StrattonPartNo.276925
1.Warning—readthe
Operator'sManual.
3.Warning—toxicgas
inhalationhazard.
2.Warning—rehazard.
4.Warning—hot
surface/burnhazard.
Briggs&StrattonPartNo.277566
1.Whenstartingacold
engine,closethechoke
andpresstheprimertwo
times.
2.Whenstartingawarm
engine,openthechoke
anddonotpressthe
primer.
6

Briggs&StrattonPartNo.277588
1.Primer3.Ignitionkeyout
(Engine—Stop)
2.Ignitionkeyin
(Engine—Run)
Briggs&StrattonPartNo.278866
1.Fuel—On2.Fuel—Off
7

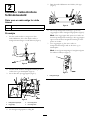
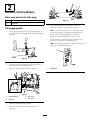
Setup
LooseParts
Usethechartbelowtoverifythatallpartshavebeenshipped.
ProcedureDescription
Qty.
Use
Handlebolts2
Curvedwashers
2
1
Locknuts2
Installtheupperhandle.
Hairpincotter2
2
Flatwasher3
Installthetractioncontrollinkage.
Nut2
Carriagebolt
2
3
Flatwasher2
Installthechute.
Carriagebolts
2
4
Locknuts2
Installthechutecontrolrod.
5
Nopartsrequired
–
Filltheenginewithoil.
6
Nopartsrequired
–
Checkthetirepressure.
7
Nopartsrequired
–
Checktheskids.
8
Nopartsrequired
–
Checktheoperationofthetractiondrive.
1
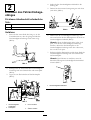
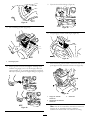
InstallingtheUpperHandle
Partsneededforthisprocedure:
2Handlebolts
2
Curvedwashers
2Locknuts
Procedure
1.Liftandrotatetheupperhandleandpositionitover
thelowerhandle(
Figure3).
2.Install2handlebolts,2curvedwashers,and2locknuts
inthelowerhandleholes(
Figure3).
Figure3
8

2
InstallingtheTractionControl
Linkage
Partsneededforthisprocedure:
2Hairpincotter
3Flatwasher
Procedure
1.Insertthelowerendoftherodintothelowerlinkarm
sothatthebentendofthespeedcontrolrodfaces
rearward(Figure4).
Figure4
2.Securethelowerendofthespeedcontrolrodwitha
atwasherandahairpincotter(Figure4).
3.Placeaatwasheronthetrunnion(Figure5).
Figure5
1.Speedselectorlever
3.Innerwasher
2.Trunnion
4.Outerwasher
4.ShiftthespeedselectorleverintoPositionR2.
5.Rotatethelowerlinkarmfullyupward
(counterclockwise)(Figure6).
Figure6
6.Pushdownonthespeedcontrolrodandinsertthe
trunnionintotheholeinthespeedselectorlever
(Figure5).
Note:Ifthetrunniondoesnottintothehole
whenyouliftuponthespeedcontrolrod,rotatethe
trunnionupwardordownwardonthespeedcontrol
roduntilitts.
7.Securethetrunnionandupperendofthespeedcontrol
rodwithawasherandahairpincotter.
Note:Foreasierinstallation,lookdownthroughthe
openinginthespeedselector(Figure7).
Figure7
1.Speedselector
9

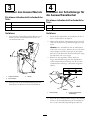
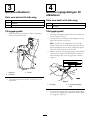
3
InstallingtheChute
Partsneededforthisprocedure:
2Nut
2
Carriagebolt
2Flatwasher
Procedure
1.Placethechuteontheframeandthealignthedischarge
chutemounttothechutesupport.
3
1
2
g019379
Figure8
1.Carriagebolt
3.Nut
2.Flatwasher
2.Securethedischargechutemountusing2bolts,2nuts,
and2atwashers.
4
InstallingtheChuteControl
Rod
Partsneededforthisprocedure:
2
Carriagebolts
2Locknuts
Procedure
1.UnwraptheQuickStickandrotateitsothatitis
uprightandinthecenter.
2.Holdthebluetriggercapdownandpulltheleverfully
rearward.
Note:Thedischargechuteanddeectorshouldface
forward.Iftheydonot,holdthebluetriggercap
down(butdonotmovetheQuickStick)androtatethe
dischargechuteuntiltheydo.
3.Aligntheattenedbackendofthelongchutecontrol
rodwiththeattenedfrontendoftheshortrod
thatextendsfromthecontrolpanelsothattheynest
together(
Figure9).
Figure9
1.Shortrod
2.Longchutecontrolrod
4.Insertthefrontendoftherodintotheopeningin
thebackofthechutegearcoveruntilitslidesintothe
chutegear(Figure10).
10

g018885
Figure10
5.Aligntheholesinthenestedendsoftherodsand
insert2carriagebolts(intheloosepartsbag)through
theshortrodfromtheleftsideofthemachine(from
theoperatingposition).
6.Insertthecableclipthatsupportsthedeector
cableontotheforwardcarriagebolt,andsecurethe
carriageboltswithlocknutsfromtheloosepartsbag
(Figure11).
Figure11
1.Cableclip2.Deectorcable
7.HoldthebluetriggercapdownandrotatetheQuick
Stickinacircletoensurethatthechuteanddeector
operatesmoothly.
5
FillingtheEnginewithOil
NoPartsRequired
Procedure
Yourmachinecomeswithoilintheenginecrankcase.
Note:Beforestartingtheengine,checktheoilleveland
addoilifnecessary.
UseautomotivedetergentoilwithanAPIserviceclassication
ofSF,SG,SH,SJ,SL,orhigher.Refertoyourengineowner's
manual.
Use
Figure12belowtoselectthebestoilviscosityforthe
outdoortemperaturerangeexpected:
g019049
Figure12
EngineOilCapacities
Model
EngineOilCapacity
38816
18to20oz.(0.53to0.59l)
1.Removethedipstickandslowlypouroilintothe
oillltubetoraisetheoilleveltotheFullmarkon
thedipstick.Donotoverll(Figure13).Referto
CheckingtheEngineOilLevelinMaintenance.
g018886
Figure13
2.Installthedipsticksecurely.
Note:Donotspilloilaroundtheoillltube;oilcould
leakontotractionpartsandcausethetractiontoslip.
11

6
CheckingtheTirePressure
NoPartsRequired
Procedure
Thetiresareoverinatedatthefactoryforshipping.Reduce
thepressureequallyinbothtirestobetween17and20psi
(116and137kPa).
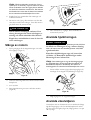
7
CheckingtheSkids
NoPartsRequired
Procedure
RefertoCheckingandAdjustingtheSkidsinMaintenance.
8
CheckingtheTractionDrive
Operation
NoPartsRequired
Procedure
CAUTION
Ifthetractiondriveisnotproperlyadjusted,the
machinemaymoveinthedirectionoppositeof
whatyouintended,causinginjuryand/orproperty
damage.
Carefullycheckthetractiondriveandadjustit
properly,ifnecessary.
1.Starttheengine;refertoStartingtheEngine.
2.MovethespeedselectortoPositionR1;referto
OperatingtheSpeedSelector.
3.Squeezethelefthand(traction)levertothehand-grip
(
Figure14).
Figure14
Themachineshouldmoverearward.Ifthemachine
doesnotmoveormovesforward,completethe
following:
A.Releasethetractionleverandstoptheengine.
B.Disconnectthetrunnionfromthespeedselector
lever(Figure5).
C.Turnthetrunniondownward(clockwise)onthe
speedcontrolrod(Figure5).
D.Connectthetrunniontothespeedselectorlever
(Figure5).
4.Releasethetractionlever.
5.MovethespeedselectortothePosition1;referto
OperatingtheSpeedSelector.
6.Squeezethelefthand(traction)levertothehand-grip
(
Figure14).
Themachineshouldmoveforward.Ifthemachine
doesnotmoveormovesrearward,completethe
following:
A.Releasethetractionleverandstoptheengine.
B.Disconnectthetrunnionfromthespeedselector
lever(Figure5).
C.Turnthetrunnionupward(counterclockwise)on
thespeedcontrolrod(Figure5).
D.Connectthetrunniontothespeedselectorlever
(Figure5).
7.Ifyoumadeanyadjustments,repeatthisprocedure
untilnoadjustmentsarerequired.
Important:Ifthemachinemoveswhenthetraction
leverisinthereleasedposition,checkthetractioncable
(refertoCheckingandAdjustingtheTractionCable)or
takethemachinetoanAuthorizedServiceDealerfor
service.
12

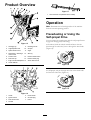
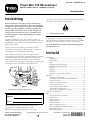
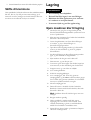
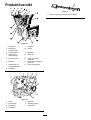
ProductOverview
g018887
Figure15
1.Hand-grip(2)
9.Dischargechute
2.Auger/impellerlever10.Scraper
3.Speedselectorlever
11.Auger
4.QuickStick™discharge
chutecontrol
12.Skid(2)
5.Tractionlever13.Electricstarterbutton
6.Fueltankcap14.Electricstarterplug
7.Engineoillltube/dipstick15.Snowcleanouttool
8.Chutedeector
g018888
Figure16
1.Choke
5.Recoilstarter
2.Ignitionswitch
6.Oildrainplug
3.Fuelshutoffvalve
7.Primer
4.Throttle
Figure17
1.Snowcleanouttool(attachedtothehandle)
Operation
Note:Determinetheleftandrightsidesofthemachine
fromthenormaloperatingposition.
FreewheelingorUsingthe
Self-propelDrive
Youcanoperatethesnowthrowerwiththeself-propelfeature
engagedordisengaged(freewheeling).
Tofreewheel,slidethewheelsinwardandinserttheaxle
pinsthroughtheaxleholes,butnotthroughthewheelhubs
(Figure18).
g019015
Figure18
Toself-propel,axlepinthroughtheholesinthewheelhubs
andtheinneraxleholes(Figure19).
g019014
Figure19
13

FillingtheFuelTank
DANGER
Gasolineisextremelyammableandexplosive.A
reorexplosionfromgasolinecanburnyouand
others.
•Topreventastaticchargefromignitingthe
gasoline,placethecontainerand/ormachine
onthegroundbeforelling,notinavehicleor
onanobject.
•Fillthetankoutdoorswhentheengineiscold.
Wipeupspills.
•Donothandlegasolinewhensmokingoraround
anopenameorsparks.
•Storegasolineinanapprovedfuelcontainer,out
ofthereachofchildren.
•Forbestresults,useonlyclean,fresh,unleadedgasoline
withanoctaneratingof87orhigher((R+M)/2rating
method).
•Oxygenatedfuelwithupto10%ethanolor15%MTBE
byvolumeisacceptable.
•DoNotuseethanolblendsofgasoline(suchasE15
orE85)withmorethan10%ethanolbyvolume.
Performanceproblemsand/orenginedamagemayresult
whichmaynotbecoveredunderwarranty.
•DoNotusegasolinecontainingmethanol.
•DoNotstorefueleitherinthefueltankorfuelcontainers
overthewinterunlessafuelstabilizerisused.
•DoNotaddoiltogasoline.
Important:Toreducestartingproblems,addfuel
stabilizertothefuelallseason,mixingitwithgasoline
lessthan30daysold.
Do not add oil to the gasoline.
g018889
Figure20
1.1-1/2inch(3.8cm)
14

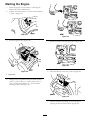
StartingtheEngine
1.Checktheengineoillevel.RefertoCheckingthe
EngineOilLevelinMaintenance.
2.Turnthefuelshutoffvalve1/4turncounterclockwise
toopenit(Figure21).
Figure21
3.Inserttheignitionkey(Figure22).
g018890
Figure22
1.Ignitionkey
4.Firmlypushintheprimerwithyourthumb2times
(15°For-9°Corabove)or4times(below15°For
-9°C),holdingtheprimerinforasecondbefore
releasingiteachtime(Figure23).
g018891
Figure23
5.RotatethechoketotheChokeposition(Figure24).
g018892
Figure24
6.MovethethrottletotheFastposition(Figure25).
Figure25
7.Startthemachinebypullingtherecoilstarteror
pressingtheelectric-starterbutton(Figure26).
15

g018893
Figure26
1.Electric-starterbutton3.Recoilstarter
2.Electricstarterplug
Note:Tousetheelectricstarter,connectapower
cordtotheelectricstarterplugrstandthentoa
poweroutlet.
Important:Topreventdamagingtheelectric
starter,runitinshortcycles(5secondsmaximum,
thenwaitoneminutebeforetryingtostartit
again).Iftheenginestilldoesnotstart,take
themachinetoanAuthorizedServiceDealerfor
service.
8.Disconnectthepowercordfromthepoweroutletrst
andthenfromthemachine.
9.Allowtheenginetowarmupforseveralminutes,move
thechoketowardtheRunposition.Waitfortheengine
torunsmoothlybeforeeachchokeadjustment.
CAUTION
Ifyouleavethemachinepluggedintoa
poweroutlet,someonecaninadvertentlystart
themachineandinjurepeopleordamage
property.
Unplugthepowercordwheneveryouarenot
startingthemachine.
StoppingtheEngine
1.MovethethrottletotheSlowposition,andthentothe
Stopposition(Figure27).
Figure27
2.Waitforallmovingpartstostopbeforeleavingthe
operatingposition.
3.Removetheignitionkey.
4.Closethefuelshutoffvalvebyrotatingitclockwise
(Figure28).
Figure28
5.Pulltherecoilstarter3or4times.Thishelpsprevent
therecoilstarterfromfreezingup.
16

OperatingtheTractionDrive
CAUTION
Ifthetractiondriveisnotproperlyadjusted,the
machinemaymoveinthedirectionoppositeof
whatyouintended,causinginjuryand/orproperty
damage.
Carefullycheckthetractiondriveandadjustit
properly,ifnecessary;refertoCheckingtheTraction
DriveOperationinSetupformoreinformation.
Important:Ifthemachinemoveswhenthetraction
leverisinthereleasedposition,checkthetractioncable
(refertoCheckingandAdjustingtheTractionCable)or
takethemachinetoanAuthorizedServiceDealerfor
service.
1.Toengagethetractiondrive,squeezethelefthand
(traction)levertothehand-grip(Figure29).
Figure29
2.Tostopthetractiondrive,releasethetractionlever.
OperatingtheSpeedSelector
Thespeedselectorhas6forwardand2reversegears.To
changespeeds,releasethetractionleverandshiftthespeed
selectorlevertothedesiredposition(Figure30).Thelever
locksinanotchateachspeedselection.
Figure30
OperatingtheAuger/Impeller
Drive
1.Toengagetheauger/impellerdrive,squeezethe
righthand(auger/impeller)levertothehandgrip
(Figure31).
Figure31
2.Tostoptheaugerandimpeller,releasetherighthand
lever.
Important:Whenyouengageboththe
auger/impellerleverandthetractionlever,the
tractionleverlockstheauger/impellerleverdown,
freeingyourrighthand.Toreleasebothlevers,
simplyreleasethelefthand(traction)lever.
3.Iftheaugerandimpellercontinuetorotatewhenyou
releasetheauger/impellerlever,donotoperatethe
machine.Checktheauger/impellercable(referto
CheckingandAdjustingtheAuger/ImpellerCable)
andadjustitifnecessary.Otherwise,takethemachine
toanAuthorizedDealerforservice.
17

WARNING
Iftheaugerandimpellercontinuetorotate
whenyoureleasetheauger/impellerlever,you
couldseriouslyinjureyourselforothers.
Donotoperatethemachine.Takeittoan
AuthorizedServiceDealerforservice.
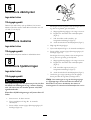
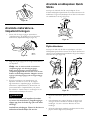
OperatingtheQuickStick
®
HoldthebluetriggercapdowntousetheQuickStickto
movethedischargechuteandthechutedeector.Releasethe
triggercaptolockthedischargechuteandchutedeector
intoposition(Figure32).
Figure32
MovingtheDischargeChute
HoldthebluetriggercapdownandmovetheQuickStick
tothelefttomovethedischargechutetotheleft;movethe
QuickSticktotherighttomovethedischargechutetothe
right(Figure33).
g018894
Figure33
•Ifthechutedoesnotmove,refertoAdjustingthe
DischargeChuteLatch.
•Ifthechutedoesnotturnasfartotheleftasitdoesto
theright,ensurethatthecableisroutedtotheinsideof
thehandles.RefertoInstallingtheUpperHandle.
•Ifthechutedoesnotlockintoplacewhenyoureleasethe
triggercap,refertoAdjustingtheDischargeChuteLatch.
MovingtheChuteDeector
HoldthebluetriggercapdownandmovetheQuickStick
forwardtolowerthechutedeector;moveitrearwardtoraise
thechutedeector(
Figure34).
Figure34
UncloggingtheDischarge
Chute
Iftheauger/impellerisrunningbutthereisnosnowcoming
outofthedischargechute,thedischargechutemaybe
clogged.
•Tounclogthedischargechute,stayintheoperating
positionandreleasethelefthand(traction)lever.While
runningtheauger/impeller,pushdownonthehandlesto
raisethefrontofthemachineafewinches(centimeters)
offthepavement.Thenliftthehandlesquicklytobump
thefrontofthemachineonthepavement.Repeatif
necessaryuntilastreamofsnowcomesoutthedischarge
chute.
•Ifyoucannotunclogthedischargechutebybumping
thefrontofthemachine,stoptheengine,waitforall
movingpartstostop,anduseastick;neveruseyour
hand.
Important:Uncloggingthedischargechuteby
bumpingthefrontofthemachineonthepavement
maycausetheskidstomove.Adjusttheskidsand
tightentheskidboltssecurely.
PreventingFreeze-up
•Insnowyandcoldconditions,somecontrolsandmoving
partsmayfreeze.Donotuseexcessiveforcewhen
tryingtooperatefrozencontrols.Ifyouhavedifculty
18

operatinganycontrolorpart,starttheengineandletit
runforafewminutes.
•Afterusingthemachine,lettheenginerunforafew
minutestopreventmovingpartsfromfreezing.Engage
theauger/impellertoclearanyremainingsnowfrom
insidethehousing.RotatetheQuickSticktopreventit
fromfreezing.Stoptheengine,waitforallmovingparts
tostop,andremovealliceandsnowfromthemachine.
•Withtheengineoff,pulltherecoilstarterhandleseveral
timesandpushtheelectric-starterbuttononcetoprevent
therecoilandelectricstartersfromfreezingup.
OperatingTips
DANGER
Whenthemachineisinoperation,theimpellerand
augercanrotateandcutofforinjurehandsandfeet.
•Beforeadjusting,cleaning,inspecting,
troubleshooting,orrepairingthemachine,stop
theengineandwaitforallmovingpartstostop.
Disconnectthewirefromthesparkplugand
keepitawayfromtheplugtopreventsomeone
fromaccidentallystartingtheengine.
•Removeanobstructionfromthedischarge
chute;refertoUncloggingtheDischargeChute.
Ifnecessary,useastick,notyourhands,to
removeanobstructionfromthedischargechute.
•Staybehindthehandlesandawayfromthe
dischargeopeningwhileoperatingthemachine.
•Keepface,hands,feet,andanyotherpartof
yourbodyorclothingawayfromconcealed,
moving,orrotatingparts.
WARNING
Therotorbladescanthrowstones,toys,andother
foreignobjectsandcauseseriouspersonalinjuryto
theoperatorortobystanders.
•Keeptheareatobeclearedfreeofallobjects
thattherotorbladescouldpickupandthrow.
•Keepallchildrenandpetsawayfromthearea
ofoperation.
•AlwayssetthethrottletotheFastpositionwhenthrowing
snow.
•Iftheengineslowsdownunderaloadorthewheelsslip,
shiftthemachineintoalowergear.
•Ifthefrontofthemachineridesup,shiftthemachine
intoalowergear.Ifthefrontcontinuestorideup,liftup
onthehandles.
19

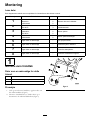
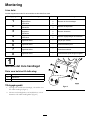
Maintenance
Note:Determinetheleftandrightsidesofthemachinefromthenormaloperatingposition.
RecommendedMaintenanceSchedule(s)
MaintenanceService
Interval
MaintenanceProcedure
Aftertherst2hours
•Inspectthetractioncableandadjustitifnecessary.
•Inspecttheauger/impellercableandadjustitifnecessary.
Aftertherst5hours
•Changetheengineoil.
Beforeeachuseordaily
•Checktheengineoillevelandaddoilifnecessary.
Every25hours
•Changetheengineoil.
Yearly
•Checktheskidsandthescraperandadjustthemifnecessary.
•Inspectthetractioncableandadjustorreplaceitifnecessary.
•Inspecttheauger/impellercableandadjustorreplaceitifnecessary.
•Checktheaugergearboxoilandaddoilifnecessary.
Yearlyorbeforestorage
•Checktheairpressureinthetiresandinatethemto17–20psi(116–137kPa).
•Drainthegasolineandruntheenginetodryoutthefueltankandthecarburetorat
theendoftheseason.
•HaveanAuthorizedServiceDealerinspectandreplacethetractiondrivebeltand/or
theauger/impellerdrivebelt,ifnecessary.
Important:Youcanndmoreinformationaboutmaintainingandservicingyourmachineatwww.Toro.com.
Important:Refertoyourengineoperator'smanualforadditionalmaintenanceprocedures.Forengineadjustments,
repairs,orwarrantyservicenotcoveredinthismanual,contactanAuthorizedBriggs&StrattonServicingDealer.
20
Seite wird geladen ...
Seite wird geladen ...
Seite wird geladen ...
Seite wird geladen ...
Seite wird geladen ...
Seite wird geladen ...
Seite wird geladen ...
Seite wird geladen ...
Seite wird geladen ...
Seite wird geladen ...
Seite wird geladen ...
Seite wird geladen ...
Seite wird geladen ...
Seite wird geladen ...
Seite wird geladen ...
Seite wird geladen ...
Seite wird geladen ...
Seite wird geladen ...
Seite wird geladen ...
Seite wird geladen ...
Seite wird geladen ...
Seite wird geladen ...
Seite wird geladen ...
Seite wird geladen ...
Seite wird geladen ...
Seite wird geladen ...
Seite wird geladen ...
Seite wird geladen ...
Seite wird geladen ...
Seite wird geladen ...
Seite wird geladen ...
Seite wird geladen ...
Seite wird geladen ...
Seite wird geladen ...
Seite wird geladen ...
Seite wird geladen ...
Seite wird geladen ...
Seite wird geladen ...
Seite wird geladen ...
Seite wird geladen ...
Seite wird geladen ...
Seite wird geladen ...
Seite wird geladen ...
Seite wird geladen ...
Seite wird geladen ...
Seite wird geladen ...
Seite wird geladen ...
Seite wird geladen ...
Seite wird geladen ...
Seite wird geladen ...
Seite wird geladen ...
Seite wird geladen ...
Seite wird geladen ...
Seite wird geladen ...
Seite wird geladen ...
Seite wird geladen ...
Seite wird geladen ...
Seite wird geladen ...
Seite wird geladen ...
Seite wird geladen ...
Seite wird geladen ...
Seite wird geladen ...
Seite wird geladen ...
Seite wird geladen ...
Seite wird geladen ...
Seite wird geladen ...
Seite wird geladen ...
Seite wird geladen ...
Seite wird geladen ...
Seite wird geladen ...
Seite wird geladen ...
Seite wird geladen ...
Seite wird geladen ...
Seite wird geladen ...
Seite wird geladen ...
Seite wird geladen ...
Seite wird geladen ...
Seite wird geladen ...
Seite wird geladen ...
Seite wird geladen ...
Seite wird geladen ...
Seite wird geladen ...
Seite wird geladen ...
Seite wird geladen ...
Seite wird geladen ...
Seite wird geladen ...
Seite wird geladen ...
Seite wird geladen ...
Seite wird geladen ...
Seite wird geladen ...
Seite wird geladen ...
Seite wird geladen ...
Seite wird geladen ...
Seite wird geladen ...
Seite wird geladen ...
Seite wird geladen ...
-
 1
1
-
 2
2
-
 3
3
-
 4
4
-
 5
5
-
 6
6
-
 7
7
-
 8
8
-
 9
9
-
 10
10
-
 11
11
-
 12
12
-
 13
13
-
 14
14
-
 15
15
-
 16
16
-
 17
17
-
 18
18
-
 19
19
-
 20
20
-
 21
21
-
 22
22
-
 23
23
-
 24
24
-
 25
25
-
 26
26
-
 27
27
-
 28
28
-
 29
29
-
 30
30
-
 31
31
-
 32
32
-
 33
33
-
 34
34
-
 35
35
-
 36
36
-
 37
37
-
 38
38
-
 39
39
-
 40
40
-
 41
41
-
 42
42
-
 43
43
-
 44
44
-
 45
45
-
 46
46
-
 47
47
-
 48
48
-
 49
49
-
 50
50
-
 51
51
-
 52
52
-
 53
53
-
 54
54
-
 55
55
-
 56
56
-
 57
57
-
 58
58
-
 59
59
-
 60
60
-
 61
61
-
 62
62
-
 63
63
-
 64
64
-
 65
65
-
 66
66
-
 67
67
-
 68
68
-
 69
69
-
 70
70
-
 71
71
-
 72
72
-
 73
73
-
 74
74
-
 75
75
-
 76
76
-
 77
77
-
 78
78
-
 79
79
-
 80
80
-
 81
81
-
 82
82
-
 83
83
-
 84
84
-
 85
85
-
 86
86
-
 87
87
-
 88
88
-
 89
89
-
 90
90
-
 91
91
-
 92
92
-
 93
93
-
 94
94
-
 95
95
-
 96
96
-
 97
97
-
 98
98
-
 99
99
-
 100
100
-
 101
101
-
 102
102
-
 103
103
-
 104
104
-
 105
105
-
 106
106
-
 107
107
-
 108
108
-
 109
109
-
 110
110
-
 111
111
-
 112
112
-
 113
113
-
 114
114
-
 115
115
-
 116
116


Toro Power Max 726 OE Snowthrower Benutzerhandbuch
- Typ
- Benutzerhandbuch
in anderen Sprachen
Verwandte Artikel
-
Toro Power Max 724 OE Snowthrower Benutzerhandbuch
-
Toro Power Max Heavy Duty 1028 OHXE Snowthrower Benutzerhandbuch
-
Toro Power Max 826 OE 71 cm Snowblower (38819) Benutzerhandbuch
-
Toro Power Max Heavy Duty 928 OAE Snowthrower Benutzerhandbuch
-
Toro Power Max Heavy Duty 1428 OHXE Snowthrower Benutzerhandbuch
-
Toro SnowMax 724 ZXR Snowthrower Benutzerhandbuch
-
Toro SnowMax 724 QXE Snowthrower Benutzerhandbuch
-
-
Toro Powerlite Snowthrower Benutzerhandbuch
-
Toro CCR 6053 R Quick Clear Snowthrower Benutzerhandbuch
Andere Dokumente
-
Simplicity SNOWTHROWER, MURRAY CE SINGLE STAGE SNOW 8.0TP 22 INCH Benutzerhandbuch
-
Murray 629104X61 Instruction book
-
-
KLIPPO S400B Benutzerhandbuch
-
Meec tools 002781 Benutzerhandbuch
-
-
-
-
GGP ITALY 38HD Bedienungsanleitung
-
 Klippo AB Pro 17 Benutzerhandbuch
