SICK SENSICK DS60 ObSB R Bedienungsanleitung
- Typ
- Bedienungsanleitung

DEUTSCH
Distanz-Sensor
Objekt zwischen Sensor und Hintergrund (ObSB)
Betriebsanleitung
LASER RADIATION
DO NOT STARE INTO BEAM
CLASS 2 LASER PRODUCT
LASER APERTURE
MAX. OUTPUT RADIATION ≤ 22 mW
PULSE DURATION = 4 ns
WAVELENGTH = 655 nm
IEC 60825-1:2007
Complies with 21 CFR 1040.10 and
1040.11 except for deviations
pursuant to laser notice No. 50,
dated June 24, 2007
Sicherheitshinweise
‡ Vor der Inbetriebnahme die Betriebsanleitung lesen.
‡ Anschluss, Montage und Einstellung nur durch Fachpersonal.
‡ Gerät bei Inbetriebnahme vor Feuchte und Verunreinigung
schützen.
‡ Kein Sicherheitsbauteil gemäß EU-Maschinenrichtlinie.
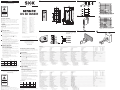
A 1
3
2
Bestimmungsgemäße Verwendung
Der Distanz-Sensor DS 60 ist ein optoelektronischer Sensor
und wird zum optischen, berührungslosen Erfassen von Sachen,
Tieren und Personen eingesetzt.
Inbetriebnahme
1 A=festes Objekt im Hintergrund (z.B. Fußboden).
Q: Ausgang schaltet, wenn ein Objekt zwischen Sensor und
dem eingestellten Hintergrund ist.
Q: Ausgang schaltet, wenn kein Objekt zwischen Sensor
und dem eingestellten Hintergrund ist.
2 Leitungsdose spannungsfrei aufstecken und festschrauben.
Für Anschluss in B gilt: brn=braun, blu=blau, blk=schwarz,
gra=grau, wht=weiß.
Leitungen anschließen.
Sensor mit Befestigungsbohrungen an Halter montieren.
Lichttaster an Betriebsspannung legen (s. Typenaufdruck).
3 Einsatzbedingungen wie Tastweite, Objektgröße und
Remissionsvermögen des Tastgutes sowie des Hintergrun-
des überprüfen und mit der Kennlinie im Diagramm
vergleichen. (x=Tastweite, y=% der Tastweite,
Ro=Remission Objekt, Rh=Remission Hintergrund).
Remission: 6%=schwarz, 18%=grau, 90%=weiß (bezogen
auf Standardweiß nach DIN 5033).
4
Justage Lichtempfang:Justage Lichtempfang:
Justage Lichtempfang:Justage Lichtempfang:
Justage Lichtempfang:
Objekt positionieren. Lichtfleck auf Objekt ausrichten.
Sichtbarer roter Sendelichtfleck auf Objekt erkennbar.
Einstellung Schaltausgänge QEinstellung Schaltausgänge Q
Einstellung Schaltausgänge QEinstellung Schaltausgänge Q
Einstellung Schaltausgänge Q
11
11
1
/Q/Q
/Q/Q
/Q
22
22
2
::
::
:
Sensor auf gewünschten Ort (Hintergrund) ausrichten.
Drehknopf auf [Q
1
] oder [Q
1
] stellen.
Teach-in-Taste drücken, Empfangsanzeigen müssen kurz
blinken.
Funktionsanzeige Q
1
leuchtet nicht=Schaltschwelle ist
nichtflüchtig gespeichert.
Funktionsanzeigen blinken permanent, Einsatzbedingungen
überprüfen, neu justieren und Teach-in-Taste drücken.
Drehknopf auf [Q
2
] oder [Q
2
] stellen. Einstellung Schaltaus-
gänge wiederholen.
Drehknopf auf Stellung [Run] stellen.
DS 60 erkennt, ob ein Objekt zwischen Sensor und
Hintergrund ist.
Wartung
SICK-Sensoren sind wartungsfrei. Wir empfehlen, in regelmäßi-
gen Abständen
- die optischen Grenzflächen zu reinigen,
- Verschraubungen und Steckverbindungen zu überprüfen.
B
ß
à
4
Subject to change without notice
Irrtümer und Änderungen vorbehalten
Sujet à modification sans préavis
Alterações poderão ser feitas sem prévio aviso
Med forbehold for ændringer og fejl
Contenuti soggetti a modifiche senza preavviso
Wijzigingen en correcties voorbehouden
Sujeto a cambio sin previo aviso
8009145.US30 1011 GO
DS 60 ObSB R
DS 60-P/N__ _3_
Optional: External Teach (ET)
ENGLISH
Distance Sensor
Object between Sensor and Background (ObSB)
Operating Instructions
LASER RADIATION
DO NOT STARE INTO BEAM
CLASS 2 LASER PRODUCT
LASER APERTURE
MAX. OUTPUT RADIATION ≤ 22 mW
PULSE DURATION = 4 ns
WAVELENGTH = 655 nm
IEC 60825-1:2007
Complies with 21 CFR 1040.10 and
1040.11 except for deviations
pursuant to laser notice No. 50,
dated June 24, 2007
Safety Specifications
‡ Read the operating instructions before starting operation.
‡ Connection, assembly, and settings only by competent
technicians.
‡ Protect the device against moisture and soiling when
operating.
‡ No safety component in accordance with EU machine
guidelines.
‡
CC
CC
C
AA
AA
A
UTION:UTION:
UTION:UTION:
UTION: Use of controls or adjustments or performance
of procedures other than those specified herein may result in
hazardous radiation exposure.
Proper Use
The DS 60 Distance Sensor is an optoelectronic sensor and is
used for optical, non-contact detection of objects, animals, and
people.
Starting Operation
1 A=Fixed object in background, e.g. floor.
Q: Output switches when there is an object between the
sensor and the set background.
Q: Output when there is no object between the sensor
and the set background.
2 Connect and secure cable receptacle tension-free.
The following apply for connection in B: brn=brown,
blu=blue, blk=black, gra=gray, wht=white.
Connect cables.
Mount sensor to suitable holders.
Connect photoelectric proximity switch to operating
voltage (see type label).
3 Check application conditions such as scanning distance, size
and reflectance of object to be detected as well as of
background, and compare with characteristic in diagram.
(x=scanning distance, y=% of scanning distance,
Ro=reflectance of object, Rh=reflectance of back-ground).
Reflectance: 6%=black, 18%=gray, 90%=white (based on
standard white to DIN 5033).
4
Adjustment of light reception:Adjustment of light reception:
Adjustment of light reception:Adjustment of light reception:
Adjustment of light reception:
Position object. Position light spot on object. Red sender
light spot visible on object.
Set the QSet the Q
Set the QSet the Q
Set the Q
11
11
1
/Q/Q
/Q/Q
/Q
22
22
2
switching outputs: switching outputs:
switching outputs: switching outputs:
switching outputs:
Align the sensor with the desired location (background).
Turn the knob to [Q
1
] or [Q
1
].
Press the Teach-in button. Reception indicators must flash
for a brief period.
The function indicator Q1 lights up = switching threshold is
stored permanently.
Function indicator flashes permanently, check the operating
conditions, re-adjust and press the Teach-in button.
Turn the knob to [Q
2
] or [Q
2
].
Repeat the setting procedure for switch outputs.
Set the knob to position [Run].
DS 60 detects whether an object is present between
sensor and background.
Maintenance
SICK sensors do not require any maintenance. We recommend
that you clean the optical interfaces and check the screw
connections and plug-in connections at regular intervals.
Key:
DS 60- _ _ _ 5 3 _
P=PNP 3=50/s ET
N=NPN 5=10/s 5: small ET
lightspot
Typenschlüssel:
DS 60- _ _ _ 5 3 _
P=PNP 3=50/s ET
N=NPN 5=10/s 5: kleiner ET
Lichtfleck
Australia
Phone +61 3 9497 4100
Belgium/Luxembourg
Phone +32 (0)2 466 55 66
Brasil
Phone +55 11 3215-4900
Canada
Phone +1(952) 941-6780
Ceská Republika
Phone +420 2 57 91 18 50
China
Phone +852-2763 6966
Danmark
Phone +45 45 82 64 00
Deutschland
Phone +49 211 5301-301
España
Phone +34 93 480 31 00
France
Phone +33 1 64 62 35 00
Great Britain
Phone +44 (0)1727 831121
India
Phone +91–22–4033 8333
Israel
Phone +972-4-999-0590
Italia
Phone +39 02 27 43 41
Japan
Phone +81 (0)3 3358 1341
Magyarország
Phone +36 1 371 2680
Nederlands
Phone +31 (0)30 229 25 44
Österreich
Phone +43 (0)22 36 62 28 8-0
Norge
Phone +47 67 81 50 00
Polska
Phone +48 22 837 40 50
România
Phone +40 356 171 120
Russia
Phone +7 495 775 05 30
Schweiz
Phone +41 41 619 29 39
Singapore
Phone +65 6744 3732
Slovenija
Phone +386 (0)1-47 69 990
South Africa
Phone +27 11 472 3733
South Korea
Phone +82-2 786 6321/4
Suomi
Phone +358-9-25 15 800
Sverige
Phone +46 10 110 10 00
Taiwan
Phone +886 2 2375-6288
Türkiye
Phone +90 216 528 50 00
United Arab Emirates
Phone +971 4 8865 878
USA/México
Phone +1(952) 941-6780
BZ int37
Please find detailed addresses and additional representatives and agencies in
all major industrial nations at www.sick.com
Seite wird geladen ...
-
 1
1
-
 2
2


SICK SENSICK DS60 ObSB R Bedienungsanleitung
- Typ
- Bedienungsanleitung
in anderen Sprachen
- English: SICK SENSICK DS60 ObSB R Operating instructions
- français: SICK SENSICK DS60 ObSB R Mode d'emploi
- español: SICK SENSICK DS60 ObSB R Instrucciones de operación
- italiano: SICK SENSICK DS60 ObSB R Istruzioni per l'uso
- Nederlands: SICK SENSICK DS60 ObSB R Handleiding
- português: SICK SENSICK DS60 ObSB R Instruções de operação
- dansk: SICK SENSICK DS60 ObSB R Betjeningsvejledning
Verwandte Artikel
-
SICK SENSICK DS60DtO-R Bedienungsanleitung
-
-
-
-
-
-
-
-
-