SICK WTB4SL-3H Photoelectric proximity sensor Bedienungsanleitung
- Typ
- Bedienungsanleitung

ENGLISH
Photoelectric proximity sensor
with visible redlight (laser)
Operating Instructions
EN/IEC 60825-1:2014
IEC60825-1:2007
LASERKLASSE 1
Laser
1
Maximum pulse power < 2,5 mW
Puls length: 4 µs
Wavelength: 650 - 670 nm
Complies with 21 CFR 1040.10
and 1040.11 except for deviations
pursuant to Laser Notice No. 50,
dated June 24, 2007
Safety specifications
> Read the operating instructions before starting operation.
> Connection, assembly and settings only by competent technicians.
> Protect the device against moisture and soiling when operating.
> No safety component in accordance with EU machine guidelines.
Proper use
The WTB4SL-3H photoelectric proximity sensor is an opto-electronic sensor
for the optical, non-contact detection of objects.
Starting operation
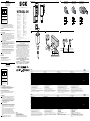
1 Fit the sensor in a suitable bracket. Suitable mounting brackets can
be found in the SICK accessories range, for example.
If using a plug version, connect the sensor to a cable socket without
switching on the mains. If using a version with a connecting cable,
connect the cables without switching on the power. The PIN/cable
laying can be found in diagram B (brn = brown, blu = blue, blk = black,
wht = white). Then switch the operating voltage on.
2 Setting sensing distance:
Checkthemaximumsensingdistanceandreectivityoftheobjects
being scanned as well as the background. Note direction of object
movement relative to sensor. Press teach-in pushbutton for > 2
seconds. Position object. Align light spot onto the object to be probed.
The light receiver display comes on.
Ifthelightreceiverdisplaydoesnotcomeonorjustashes,readjust
the light scanner, clean it or check the application conditions.
The light receiver indicator must go out when the object is removed.
Ifthelightreceiverindicatorcontinuestolightuporashes,the
backgroundinuenceistoogreat.Ifthisisthecase,adjustthe
photoelectric proximity sensor, in other words, shorten the sensing
distance between the sensor and object and re-teach it.
3 PNP(Load→M):lightpathfree,output(Q)HIGH
NPN(Load→L+):lightpathfree,output(Q)LOW
Q inverted
Maintenance
SICK sensors are maintenance-free.
We recommend doing the following regularly
- clean the external lens surfaces.
- check the screw connections and plug-in connections.
Nomodicationsmaybemadetodevices.
DEUTSCH
Reflexions-Lichttaster
mit sichtbarem Rotlicht (Laser)
Betriebsanleitung
EN/IEC 60825-1:2014
IEC60825-1:2007
LASERKLASSE 1
Laser
1
Maximale Pulsleistung: < 2,5 mW
Impulsdauer: 4 µs
Wellenlänge: 650 - 670 nm
Entspricht 21 CFR 1040.10
und 1040.11 mit Ausnahme von
Abweichungen nach
Laser-Hinweis 50, 24. Juni 2007
Sicherheitshinweise
> Vor der Inbetriebnahme die Betriebsanleitung lesen.
> Anschluss,MontageundEinstellungnurdurchFachpersonal.
> GerätbeiInbetriebnahmevorFeuchteundVerunreinigungschützen.
> KeinSicherheitsbauteilgemäßEU-Maschinenrichtlinie.
Bestimmungsgemäße Verwendung
DerReexions-LichttasterWTB4SL-3HisteinoptoelektronischerSensor
undwirdzumoptischen,berührungslosenErfassenvonObjekten
eingesetzt.
Inbetriebnahme
1 MontierenSiedenSensoraneinergeeignetenHalterung.Geeignete
HaltewinkelndenSiez.B.imZubehör-ProgrammvonSICK.
Bei Stecker-Versionen verbinden Sie den Sensor spannungsfrei mit
einerLeitungsdose.BeiVersionenmitAnschlussleitungschließenSie
die Leitungen spannungsfrei an. Die PIN-/Leitungs belegung
entnehmen Sie Bild B(brn=braun,blu=blau,blk=schwarz,wht=
weiß).DannBetriebsspannunganlegen.
2 Einstellung Lichtempfang:
MaximaleTastweiteundRemissionsvermögendesTastgutessowie
desHintergrundesbeachten.BewegungsrichtungdesObjektesrelativ
zumSensoreinhalten.Teach-inTaste>2sdrücken.Objektposition-
ieren.LichteckaufObjektausrichten.DieLichtempfangsanzeige
leuchtet.
LeuchtetdieLichtempfangsanzeigenichtoderblinktsie,Lichttaster
neujustieren,reinigenbzw.Einsatzbedingungenüberprüfen.
Objektentfernen,dieLichtempfangsanzeigemusserlöschen.
LeuchtetdieLichtempfangsanzeigeweiterhinoderblinktsie,istder
Hintergrundeinusszugroß.IstdiesderFall,Lichttasterneujustieren,
d.h.SchaltabstandzwischenSensorundObjektverringern,sowieneu
teachen.
3 PNP(Last→M):Lichtwegfrei,Ausgang(Q)HIGH
NPN(Last→L+):Lichtwegfrei,Ausgang(Q)LOW
Q jeweils invertiert
Morerepresentativesandagenciesatwww.sick.com∙Subjecttochange
withoutnotice∙Thespeciedproductfeaturesandtechnicaldatadonot
represent any guarantee.
WeitereNiederlassungenndenSieunterwww.sick.com∙Irrtümer
undÄnderungenvorbehalten∙AngegebeneProdukteigenschaftenund
technischeDatenstellenkeineGarantieerklärungdar.
Plusdereprésentationsetd’agencesàl’adressewww.sick.com∙Sujetà
modicationsanspréavis∙Lescaractéristiquesdeproduitettechniques
indiquéesneconstituentpasdedéclarationdegarantie.
Paramaisrepresentanteseagências,consultewww.sick.com∙Alterações
poderãoserfeitassemprévioaviso∙Ascaracterísticasdoprodutoeos
dadostécnicosapresentadosnãoconstituemdeclaraçãodegarantia.
Altrirappresentantiedagenziesitrovanosuwww.sick.com∙Contenuti
soggettiamodichesenzapreavviso∙Lecaratteristichedelprodottoei
datitecnicinonrappresentanounadichiarazionedigaranzia.
Másrepresentantesyagenciasenwww.sick.com∙Sujetoacambiosin
previoaviso∙Lascaracterísticasylosdatostécnicosespecicadosno
constituyenningunadeclaracióndegarantía.
欲了解更多代表机构和代理商信息,请登录 www.sick.com∙
如有更改 , 不另行通知∙对所给出的产品特性和技术参数
的正确性不予保证。
その他の営業所は www.sick.com よりご覧ください∙予告なし
に変更されることがあります∙ 記載されている製品機能およ
び技術データは保証を明示するものではありません。
WTB4SL-3H
BZ int48
Please find detailed addresses and further locations in all major industrial
nations at www.sick.com
Australia
Phone +61 (3) 9457 0600
Austria
Phone +43 (0) 2236 62288-0
Belgium/Luxembourg
Phone +32 (0) 2 466 55 66
Brazil
Phone +55 11 3215-4900
Canada
Phone +1 905.771.1444
Czech Republic
Phone +420 2 57 91 18 50
Chile
Phone +56 (2) 2274 7430
China
Phone +86 20 2882 3600
Denmark
Phone +45 45 82 64 00
Finland
Phone +358-9-25 15 800
France
Phone +33 1 64 62 35 00
Germany
Phone +49 (0) 2 11 53 01
Hong Kong
Phone +852 2153 6300
Hungary
Phone +36 1 371 2680
India
Phone +91-22-6119 8900
Israel
Phone +972-4-6881000
Italy
Phone +39 02 27 43 41
Japan
Phone +81 3 5309 2112
Malaysia
Phone +603-8080 7425
Mexico
Phone +52 (472) 748 9451
Netherlands
Phone +31 (0) 30 229 25 44
New Zealand
Phone +64 9 415 0459
Norway
Phone +47 67 81 50 00
Poland
Phone +48 22 539 41 00
Romania
Phone +40 356-17 11 20
Russia
Phone +7 495 283 09 90
Singapore
Phone +65 6744 3732
Slovakia
Phone +421 482 901 201
Slovenia
Phone +386 591 78849
South Africa
Phone +27 (0)11 472 3733
South Korea
Phone +82 2 786 6321
Spain
Phone +34 93 480 31 00
Sweden
Phone +46 10 110 10 00
Switzerland
Phone +41 41 619 29 39
Taiwan
Phone +886-2-2375-6288
Thailand
Phone +66 2 645 0009
Turkey
Phone +90 (216) 528 50 00
United Arab Emirates
Phone +971 (0) 4 88 65 878
United Kingdom
Phone +44 (0)17278 31121
USA
Phone +1 800.325.7425
Vietnam
Phone +65 6744 3732
-------------------------------------------------------8015539.ZM241118COMAT -----------------------------------------------------
SICKAG,Erwin-Sick-Strasse1,D-79183Waldkirch
A WTB4SL-3xxxxH
1
Wartung
SICK-Sensoren sind wartungsfrei.
Wirempfehlen,inregelmäßigenAbständen
–dieoptischenGrenzächenzureinigen,
–VerschraubungenundSteckverbindungenzuüberprüfen.
VeränderungenanGerätendürfennichtvorgenommenwerden.
2 3
WTB4SL -3Pxx6xH
-3Nxx6xH
Laser class Laserklasse Laser de classe Classe de laser 1
Sensing range Schaltabstand Distance de commutation Distânciadecomutação 25 … 300 mm
1)
Light spot diameter/distance Lichtfleckdurchmesser/Entfernung Diamètre de la tache lumineuse/distance Diâmetrodopontodeluz/distância <1.0mm/170mm
Supply voltage V
S
Versorgungsspannung U
V
Tension d’alimentation U
V
TensãodeforçaU
V
10 ... 30 V DC
2)
OutputcurrentI
max
Ausgangsstrom I
max.
Courant de sortie I
maxi
CorrentedesaídaI
máx.
≤100mA
Signalsequencemin. Signalfolge min. Fréquencemini Sequênciamín.desinais 1000/s
Response time Ansprechzeit Temps de réponse Tempodereação ≤0.5ms
Enclosure rating Schutzart Type de protection Tipodeproteção IP66,IP67,IP68,IP69K
Protection class Schutzklasse Classe de protection Classedeproteção
Circuit protection Schutzschaltungen Circuits de protection Circuitos protetores A, B, C
3)
Ambient operating temperature Betriebsumgebungstemperatur Température ambiante Temperaturaambientedeoperação –10…+50°C
Extended ambient operating temperature Erweiterte Betriebsumgebungstemperatur Température ambiante de service étendue Temperatura ambiente operacional ampliada –30...+55°C
4)
1)
Object90%reflectionaccordingtoDIN5033
2)
Limits, reverse polarity protected,
Operationinshort-circuitprotectednetworkmax.8A
3)
A = V
S
connections reverse polarity protected
B = inputs/outputs reverse polarity protected
C = interference pulse suppression
4)
As of T
U
=50°CasupplyvoltageofV
max
= 24 V and max. output current
of I
max
= 50 mA is permissible.
OperationbelowT
U
=–10°Cispossibleifthesensorisalreadyswitchedonat
T
U
>–10°C,thencoolsdownandthesupplyvoltageissubsequentlynotswitched
off. Switching on below T
U
=–10°Cisnotpermissible.
1)
Objekt90%RemissionnachDIN5033
2)
Grenzwerte,verpolsicher,
BetriebinkurzschlussgeschütztemNetzmax.8A
3)
A = U
V
-Anschlüsseverpolsicher
B=Ein-undAusgängeverpolsicher
C=Störimpulsunterdrückung
4)
Ab T
U
=50°CisteineVersorgungsspannungV
max
= 24 V
und ein max. Ausgangsstrom I
max
=50mAzulässig.
Ein Betrieb unter T
U
=–10°Cistmöglich,wennderSensorbereitsbeiT
U
>–10°C
eingeschaltetwird,dannabkühltundnichtmehrvonderVersorgungsspannung
getrennt wird. Ein Einschalten unter T
U
=–10°Cistnichtzulässig.
1)
ObjetLuminancede90%selonDIN5033
2)
Valeurs limites, protégé contre l'inversion de polarité,
Service dans un réseau protégé contre les courts-circuits 8 A au maximum
3)
A = Raccordements U
V
protégés contre les inversions de polarité
B = Entrées/sorties protégées contre les inversions de polarité
C = Suppression des impulsions parasites
4)
Apartird’unetempératurede50°C,unetensiond’alimentationdeV
maxi
= 24 V
et un courant de sortie maxi. I
maxi
= 50 mA sont autorisés.
Unfonctionnementàunetempératureinf.à–10°Cestpossiblesilecapteuravait
déjàétéalluméàunetemp.>–10°C,s’ils’estensuiterefroiditets’iln’apasété
entre temps débranché de la tension d’alimentation. Une mise en marche à une
températureinf.à–10°Cn’estpasautorisée.
1)
Objeto:90%deremissãosegundoDIN5033
2)
Valores limite, protegido contra polaridade reversa,
Operaçãoemredeprotegidacontracurto-circuitosmáx.8A
3)
A=ConexõesU
V
protegidas contra inversão de polos
B=Entradas/saídasprotegidascontrainversãodepolos
C = Supressão de impulsos parasitas
4)
Apartirdeumatemperaturaambientede50°Cépermitidaumatensãode
alimentaçãoV
máx
=24VeumacorrentemáximadesaídaI
máx
= 50 mA.
Umfuncionamentoabaixodatemperaturaambientede–10°Cépossívelquando
osensoréligadoaumatemperaturaambiente>–10°C,emseguidaéarrefecido
enãomaisdesconectadodatensãodealimentação.Nãoépermitidoligá-loauma
temperaturaabaixode–10°C.
WTB4SL -3Pxx6xH
-3Nxx6xH
Laser classe Clasedeláser
级激光产品 クラスレーザ製品
1
Distanzadicommutazione Distancia de conmutación
开关间距
スイッチ間隔
25 … 300 mm
1)
Diametropuntoluminoso/distanza Diámetro/distanciademanchadeluz
光点直径 / 距离 スポット径 / 距離
<1.0mm/170mm
TensionedialimentazioneU
V
Tensión de alimentación U
V
电源电压 U
V
供給電圧 U
V
10 ... 30 V DC
2)
Corrente di uscita max. I
max.
Corriente de salida I
máx.
输出电流 I
max.
最大出力電流 I
max.
≤100mA
Sequenzasignalimin. Secuencia de señales mini.
信号流 min 信号伝達時間 min.
1000/s
Tempo di risposta Tiempo de reacción
触发时间 応答時間
≤0.5ms
Tipodiprotezione Tipo de protección
保护种类 保護等級
IP66,IP67,IP68,IP69K
Classediprotezione Protección clase
保护级别 保護クラス
Commutazionidiprotezione Circuitos de protección
保护电路 保護回路
A, B, C
3)
Temperatura ambiente circostante Temperatura ambiente de servicio
工作环境-温度 動作周囲温度
–10…+50°C
Temperaturadifunzionamentoambientaleestesa Temperatura ambiente de servicio ampliada
更大的运行环境温度范围 動作周囲温度の拡大
–30...+55°C
4)
1)
Oggetto90%,remissionesec.DIN5033
2)
Valorilimite,Conprotezionedall’inversionedipolarità.
Funzionamentoinreteconprotezionedaicortocircuitimax.8A
3)
A = U
V
-collegamenticonprotez.controinversionedipoli
B=entrate/usciteconprotezionecontroinvesionedipoli
C = soppressione impulsi di disturbo
4)
Apartiredaunatemperaturadi50°Csonoconsentiteunatensionedi
approvvigionamento V
max
= 24 V e una corrente in uscita massima I
max
= 50 mA.
Èpossibileunfunzionamentosottoi–10°C,seilsensorevieneaccesoauna
temperatura>–10°C,quindivieneraffreddatoenonvienepiùstaccatodallatensi-
onediapprovvigionamento.Nonèconsentital’accensionesottoi–10°C.
1)
Objeto90%deremissionenbaseaDIN5033
2)
Valoreslímite,Proteccióncontrapolarizacióninversa,
Funcionamientoenlaredprotegidacontracortocircuito,máx.8A
3)
A = Conexiones U
V
a prueba de inversión de polaridad
B = Entradas/salidad a prueba de inversión de polaridad
C = Represión de impulso de interferencia
4)
A partir de T
U
=50°CsepermiteunatensióndealimentaciónV
máx
= 24 V
y una corriente de salida I
máx
= 50 mA. Puede funcionar con T
U
=–10°Csielsensor
se conecta con T
U
>–10°C,acontinuaciónseenfríaynosevuelveasepararde
latensióndealimentación.Noestápermitidalaconexiónavaloresinferioresde
T
U
=–10°C.
1)
90 % 漫反射比物体按照 DIN 5033
2)
极限值,反极性保护,
在防短路电路中运行,最大 8 A。
3)
A = U
V
-接头防反接
B = 输入/输出防反接
C = 消除干扰脉冲
4)
超过 50 °C 时允许的最大电源电压 V
max
为 24 V,
最大输出电流 I
max
为 50 mA。
可在低于 –10 °C 时运行,前提是传感器已在高于 –10 °C 时开启,然
后降温且不断电。不得在低于 –10 °C 时开启。
1)
対象物 90 % の反射率 DIN 5033 に準拠
2)
限界値、逆極保護、
短絡保護された回路での使用最大 8 A
3)
A = U
V
電源電圧逆接保護
B = 出力回路逆接保護
C = 干渉パルス抑制
4)
T
U
(周囲温度) = 50 °C 以上は、供給電圧 V
max
= 24 V
および最大出力電流 I
max
= 50 mA が許可されています。
T
U
= -10 °C 以下での動作は、センサがすでに T
U
> -10 °C でオンに
された後冷却され、供給電源から切断されていない場合に可能とな
ります。T
U
= -10 °C 以下でスイッチをオンにすることは許可され
ていません。
L+
Q
Q
M
brn
blk
wht
blu
1
L+
Q
Q
M
4
2
3
brn
blk
wht
blu
1
L+
Q
Q
M
4
2
3
brn
blk
wht
blu
75%
0%
100% 125%
Q
s
A B
WTB4SL-3P-NxxxxH: 25 … 300 mm/90%
Q (PNP)
Q (NPN)
B WTB4SL-3P4xx2H WTB4SL-3P5xx2H WTB4SL-3P7xx2H
WTB4SL-3N4xx2H WTB4SL-3N5xx2H WTB4SL-3N7xx2H
63.2 (2.48)
23.5 (0.93)
7.5
(0.30)
7.9
(0.31)
22.2 (0.87)
16.2 (0.64)
7.1
(0.28)
0.4
(0.02)
15.3 (0.60)
2.7 (0.11)

FRANÇAIS
Détecteur réflex
avec lumière de rouge (laser)
Instructions de service
EN/IEC 60825-1:2014
IEC60825-1:2007
LASERKLASSE 1
Laser
1
Maximum pulse power < 2,5 mW
Puls length: 4 µs
Wavelength: 650 - 670 nm
Complies with 21 CFR 1040.10
and 1040.11 except for deviations
pursuant to Laser Notice No. 50,
dated June 24, 2007
Conseils de sécurité
> Lire les Instructions de Service avant la mise en marche.
> Installation,raccordementetréglagenedoiventêtreeectuésque
pardupersonnelqualié.
> Lors de la mise en service, protéger l’appareil de l’humidité et des
saletés.
> N’est pas un composant de sécurité au sens de la directive européenne
concernant les machines.
Utilisation correcte
LabarrièrelumineuseàréexionWTB4SL-3Hestuncapteur
opto-électroniquequisertàladétectionvisuelled’objets,d’animaux
ou de personnes sans contact direct.
Mise en service
1 Monterlecapteursurunsupportapproprié.Chercherdeséquerres
adaptées, par exemple dans la gamme d’accessoires de SICK.
Surlesversionsenchables,brancherlecapteurhorstensionsurun
boîtier de connecteurs. Sur les versions avec câble de raccordement,
raccorder les câbles, appareil hors tension. Le branchement des
câbles/broches est disponible dans le schéma B (brn = brun,
blu = bleu, blk = noir, wht = blanc). Puis mettre l’appareil sous tension.
2 Réglage Distance de détection
Respecterlaportéededétectionmaximale,lescapacitésderéexion
del’objetetdel’arrière-plan.Maintenirlesensdedéplacementde
l’objet en relation avec le capteur. Appuyer > 2 s sur la touche Teach-in.
Mettrel’objetenposition.Orienterlespotlumineuxsurl’objet.
Le témoin de réception lumineuse s’allume.
Siletémoind’achagederéceptionlumineusenes’allumepasou
s’il clignote, le nettoyer ou contrôler les conditions d’utilisation.
Enlever l’objet, le témoin de réception doit s’éteindre.
Si le témoin de réception reste allumé ou s’il continue de clignoter,
celasigniequel’inuencedel’arrière-planesttropforte.Sitelétait
le cas, régler à nouveau le détecteur, autrement dit réduire la distance
de commutation entre le capteur et l’objet comme pour un nouveau
réglage de l’appareil.
3 PNP(charge→M):L’objetestdétecté,sortie(Q)HIGH
NPN(charge→L+):L’objetestdétecté,entrée(Q)LOW
Qinverséàchaquepositon
Maintenance
Les barrières lumineuses SICK ne nécessitent pas d’entretien.
Nous recommandons, à intervalles réguliers
–denettoyerlessurfacesoptiques,
–decontrôlerlesassemblagesvissésetlesconnectionsàcheetàprise.
Iln’estpaspermisd’eectuerdesmodicationssurlesappareils.
PORTUGUÊS
Foto-célula de reflexão no objeto
comluzvermelhavisível(docampoespectralvisível,laser)
Instruções de operação
EN/IEC 60825-1:2014
IEC60825-1:2007
LASERKLASSE 1
Laser
1
Maximum pulse power < 2,5 mW
Puls length: 4 µs
Wavelength: 650 - 670 nm
Complies with 21 CFR 1040.10
and 1040.11 except for deviations
pursuant to Laser Notice No. 50,
dated June 24, 2007
Instruções de segurança
> Antesdocomissionamentodevlerasinstruçõesdeoperação.
> Conexões,montagemeajustedevemserexecutadosexclusivamente
porpessoaldevidamentequalicado.
> Guardaroaparelhoaoabrigodeumidadeesujidade.
> NãosetratadeelementodesegurançasegundoaDiretivaMáquinas
> da União Europêa.
Utilização devida
AbarreiradeluzcomreexãoWTB4SL-3Héumsensoroptoeletrônico
utilizadoparaadetecçãoóptica,semcontato,deobjetos.
Comissionamento
1 Instaleosensoremumsuporteadequado.Ângulosdexaçãoade-
quadospodemserencontradosp.ex.noprogramadeacessóriosda
SICK.
Paraversõescomconector,conecteosensorcomumacaixade
linhasemestarligadoàtensão.Paraversõescomcabodeconexão
conecteoscabossemtensão.Aconguraçãodospinos/cabospode
serencontradanailustraçãoB(brn=marrom,blu=azul,blk=preto,
wht = branco). Em seguida, aplicar a tensão operacional.
2 Ajuste do alcance de detecção:
Observaroalcancemáximodedetecçãoeareetividadedoobjeto
aserdetectado,bemcomooplanodefundo.Manteradireçãodo
movimentodoobjetoemrelaçãoaoobjeto.Pressionarbotãode
Teach-in > 2 seg. Posicionar o objeto. Alinhar o ponto luminoso sobre
oobjeto.Oindicadorderecepçãodeluzacende.
Seoindicadorderecepçãodeluznãoacenderousepiscar,ajustar,
limpare/ouvericarascondiçõesdeoperaçãodosensorluminoso.
Removeroobjeto,osinalderecepçãodeluzdeveapagar.
Seoindicadorderecepçãodeluzpermaneceracesooupiscar,
signicaqueainterferênciadefundoestámuitoforte.Seforesse
ocaso,regularointerruptorfotoelétriconovamente,ouseja,reduzir
adistânciadecomutaçãoentresensoreobjeto,eefetuarnova
aprendizagem.
3 PNP(carga→M):objetoédetectado,saída(Q)HIGH
NPN(carga→L+):objetoédetectado,saída(Q)LOW
Q respectivamente invertido
Manutenção
AsbarreirasdeluzSICKnãorequeremmanutenção.
Recomendamosquesefaça,emintervalosregulares,
–alimpezadassuperfíciesóticas,
–eumcontroleàsconexõesroscadaseuniõesdeconetores.
Nãoépermitidoprocederaalteraçõesnosequipamentos.
ITALIANO
Sensore luminosa a riflessione
con luce rossa visibile (laser)
Istruzioni per l’uso
EN/IEC 60825-1:2014
IEC60825-1:2007
LASERKLASSE 1
Laser
1
Maximum pulse power < 2,5 mW
Puls length: 4 µs
Wavelength: 650 - 670 nm
Complies with 21 CFR 1040.10
and 1040.11 except for deviations
pursuant to Laser Notice No. 50,
dated June 24, 2007
Avvertimenti di sicurezza
> Leggereprimadellamessainesercizio.
> Allacciamento,montaggioeregolazionesolodapartedipersonale
qualicato.
> Durantelamessainesercizioproteggeredaumiditàesporcizia.
> NoncomponentedisicurezzasecondolaDirettivamacchineEN.
Impiego conforme allo scopo
LafotocellulaariessioneWTB4SL-3Hèunsensoreoptoelettronico
utilizzatoperilrilevamentootticosenzacontattodioggetti.
Messa in esercizio
1 Montareilsensoreaunsupportoidoneo.Leinformazionirelative
agliangolidiinclinazionecorrettisonoreperibiliades.nelcatalogo
accessori SICK.
Per le versioni a spina, collegare il sensore non ancora in tensione a
unacassettadiconduzione.Perleversioniconcavodicollegamento,
collegareicavinonancoraintensione.Ladisposizionedeicontattie
deicavièreperibilenellaguraB (brn = marrone, blu = blu, blk = nero,
wht=bianco).Oraèpossibilemettereintensionel’apparecchio.
2 Impostazione della distanza di ricezione:
Rispettareladistanzamassimadiricezioneelacapacitàdiriettenza
dell’oggettoedellosfondo.Rispettareladirezionedell’oggettoin
relazionealsensore.PremereilpulsanteTeach-in>2s.
Posizionarel’oggetto.Orientareilpuntoluminosoindirezione
dell’oggetto.L’indicatorediricezionedellaluceèacceso.
Sel’indicatorediricezionedellalucenonsiaccendeolampeggia,
regolaredinuovolafotocellula,pulirlaevericarnelecondizionidi
impiego.
Rimuoverel’oggetto,l’indicatorediricezionedevespegnersi.
Sel’indicatorediricezionerestaaccesoolampeggia,l’inuenzadello
sfondoèeccessiva.Inquesticasi,regolarenuovamenteiltastatore
luminoso,ovverodiminuireladistanzadicommutazionetrasensore
e oggetto e impostare nuovamente il teach.
3 PNP(carico→M):percorsolucelibero,uscita(Q)HIGH
NPN(carico→L+):percorsolucelibero,uscita(Q)LOW
Q rispettivamente invertito
Manutenzione
LebarriereluminoseSICKnonrichiedonomanutenzione.
Si consiglia
–dipulireregolarmentelesuperciottichelimite,
– di controllare regolarmente gli avvitamenti e i collegamenti a spina.
Nonèconsentitoapportaremodicheagliapparecchi.
ESPAÑOL
Palpador fotoeléctrico de reflexión
conluzrojavisible(láser)
Manual de Servicio
EN/IEC 60825-1:2014
IEC60825-1:2007
LASERKLASSE 1
Laser
1
Maximum pulse power < 2,5 mW
Puls length: 4 µs
Wavelength: 650 - 670 nm
Complies with 21 CFR 1040.10
and 1040.11 except for deviations
pursuant to Laser Notice No. 50,
dated June 24, 2007
Observaciones sobre seguridad
> LeerelManualdeServicioantesdelapuestaenmarcha.
> Conexión, montaje y ajuste solo por personal técnico.
> A la puesta en marcha proteger el aparato contra humedad y suciedad.
> No es elemento constructivo de seguridad según la Directiva UE sobre
maquinaria.
Empleo para usos debidos
ElsensorluminosodereexiónWTB4SL-3Hesunsensoroptoelectrónico
empleado para la detección óptica y sin contacto de objetos.
Puesta en marcha
1 Monteelsensorenunsoporteadecuado.Haydisponiblesángulos
de sujeción adecuados en el programa de accesorios de SICK.
En las versiones con conector, conecte el sensor a una toma de red sin
tensión. En las versiones con cable de conexión, conecte los cables
sintensión.EnlaguraB puede consultar la asignación de los cables
ylaspatillas(brn=marrón,blu=azul,blk=negro,wht=blanco).
Establezcalatensióndefuncionamiento.
2 Ajuste de la amplitud de exploración:
Observarlaamplituddeexploraciónycapacidaddereexióndifusa
delobjetoexplorado,asícomoelfondo.Respeteladirecciónde
movimiento del objeto en relación al sensor. Pulsar el botón de
programación>2s.Posicioneelobjeto.Orienteelpuntoluminoso
hacia el objeto. Se ilumina el indicador de recepción.
Si el indicador de recepción no se ilumina o parpadea, vuelva a
ajustarelpalpadorluminoso,límpieloocompruebelascondiciones
de uso.
Retireelobjeto:elindicadorderecepcióndebeapagarse.
Sielindicadorderecepcióncontinúailuminadooparpadea,signica
quelainuenciadelfondoesexcesiva.Enesecaso,ajustarelsensor
deluzdenuevo,esdecirreducirladistanciadeconmutaciónentreel
sensoryelobjetoyprocederaunaprendizajenuevo.
3 PNP(carga→M):trayectoriadelaluzlibre,salida(Q)HIGH
NPN(carga→L+):trayectoriadelaluzlibre,salida(Q)LOW
Q invertida respectivamente
Mantenimiento
LasbarrerasfotoeléctricasSICKestánlibresdemantenimiento.
Recomendamos a intérvalos regulares
–limpiarlassuperciesópticaslimítrofes,
– limpiar los prensaestopas y las conexiones de enchufe.
Nodebenrealizarsecambiosenlosaparatos.
中文
镜面反射型光电传感器
直光束光电开关 (带激光)
操作规程
EN/IEC 60825-1:2014
IEC60825-1:2007
LASERKLASSE 1
Laser
1
Maximum pulse power < 2,5 mW
Puls length: 4 µs
Wavelength: 650 - 670 nm
Complies with 21 CFR 1040.10
and 1040.11 except for deviations
pursuant to Laser Notice No. 50,
dated June 24, 2007
安全使用说明
> 使用前阅读操作规程。
> 只允许专业人员进行接线,安装及调整。
> 使用时应防潮湿防污染。
> 按照EU-机器规程无保护元件。
参量使用
反射光传感器 WTB4SL-3H 是一种光电传感器,用于对物体进行非接触式的
光学探测。
投入使用
1 将传感器安装在一个合适的支架上。合适的固定角板请参见 SICK 配件
产品系列。
如果是插接版本,则将传感器与导线插孔连接(确保无应力)。
如果是带连接导线的版本,则连接导线(确保无应力)。
布置 PIN/布线时请参照图 B(brn = 棕色、blu = 蓝色、blk = 黑色、wht
= 白色)。然后接通工作电压。.
2 扫描范围设置:
注意最大扫描范围以及扫描对象和背景的反射能力。 以传感器为参照
物,保持目标物体的运动方向。按住示教按键超过 2 秒 。 定位物体。
将光点对准物体。光接收指示灯亮起。
如果光接收指示灯未亮起或闪烁,则重新校准光学传感器,并进行清
洁,或者检查使用条件。
移除物体,则光接收指示灯熄灭。
如果光接收指示灯继续亮起或者闪烁,则说明背景干扰过大。如果出现
此类情况,重新校准光电传感器,即,缩短传感器与物体之间的开关间
距,并重新示教。
3 PNP(负载 → M):光路畅通,输出端 (Q) HIGH
NPN(负载 → L+):光路畅通,输出端 (Q) LOW
Q 始终可逆
维护
SICK-光电器全部免维护。
我们建议 定期地
– 定期地清洁光学反光面,
– 检查螺丝拧紧和插头。
不得对设备进行任何改装。
日本語
反射形光電スイッチ
赤色光源タイプ (レーザー光使用)
取扱説明書
EN/IEC 60825-1:2014
IEC60825-1:2007
LASERKLASSE 1
Laser
1
Maximum pulse power < 2,5 mW
Puls length: 4 µs
Wavelength: 650 - 670 nm
Complies with 21 CFR 1040.10
and 1040.11 except for deviations
pursuant to Laser Notice No. 50,
dated June 24, 2007
安全上の注意事項
> 使用を開始する前に取扱説明書をお読みください。
> 接続、取付けおよび設定できるのは専門技術者に限ります。
> 装置を使用開始する際には、濡れたり汚れたりしないように保護して
ください。
> 本製品は EU 機械指令の要件を満たす安全コンポーネントではありま
せん。
用途
反射形光電スイッチ WTB4SL-3H は光電センサで、対象物を光学技術によ
り非接触で検知するための装置です。
操作の開始
1 適切なホルダーにセンサを取り付けてください。適切なギュメ
は、SICK の付属品プログラムで見つけることができます。
コネクター式の場合、センサに張力がかからないようにケーブルプラ
グに接続します。接続ケーブル式の場合は、ケーブルに張力がかから
ないように接続します。PIN 割り当て/配線割り当ては、図 B を参照し
てください (brn = 茶、blu = 青、blk = 黒、wht = 白)。続いて動作電圧
を供給します。
2 検出範囲の設定:
最大検出距離や対象物および背景の反射率に注意します。 対象物の移
動方向がセンサに対し、相対的になるように維持します。表示が再び
点灯するまで 2 秒間押します。 対象物を所定の位置に置きます。対象
物に光点を合わせます。受光表示灯が点灯します。
受光表示灯が点灯しないまたは点滅する場合は、光センサを改めて調
節し、汚れを取り除くか、あるいは使用条件を確認してください。
対象物を取り除くと、受光表示灯が消灯するはずです。
受光表示灯が引き続き点灯するかまたは点滅する場合、背景の影響力
が強すぎます。この場合、光電センサを新たに調整します、したがっ
てセンサと対象物の間のスイッチング距離を短縮し、新たにティーチ
します。
3 PNP(负载 → M):光路畅通,输出端 (Q) HIGH
NPN(负载 → L+):光路畅通,输出端 (Q) LOW
Q それぞれ転置
メンテナンス
SICK のセンサーはメンテナンス不要です。
推奨する定期的な保全作業
– レンズ境界面の清掃
– ネジ締結と差込み締結の点検.
デバイスを改造することは許可されていません。
-
 1
1
-
 2
2


SICK WTB4SL-3H Photoelectric proximity sensor Bedienungsanleitung
- Typ
- Bedienungsanleitung
in anderen Sprachen
- français: SICK WTB4SL-3H Photoelectric proximity sensor Mode d'emploi
- español: SICK WTB4SL-3H Photoelectric proximity sensor Instrucciones de operación
- italiano: SICK WTB4SL-3H Photoelectric proximity sensor Istruzioni per l'uso
- português: SICK WTB4SL-3H Photoelectric proximity sensor Instruções de operação
- 日本語: SICK WTB4SL-3H Photoelectric proximity sensor 取扱説明書
Verwandte Artikel
-
SICK WSE4SL-3H Through-beam photoelectric sensor Bedienungsanleitung
-
-
-
-
-
-
SICK WSE4SL-3 Through-beam photoelectric sensor Bedienungsanleitung
-
-
-