Sames Volurex spiral valve Benutzerhandbuch
- Typ
- Benutzerhandbuch

DOCUMENTATION - DOKUMENTATION - DOCUMENTACIÓN
VOLUREX
VANNE DE SPIRALISATION
SPIRAL VALVE
WIRBELSTRAHLVENTIL
VÁLVULA DE ESPIRALIZACIÓN
# 107 323
Notice / Manual / Betriebsanleitung / Libro : 574.348.110 - 1906
Date / Datum / Fecha : 19/06/19
Annule / Supersede / Ersetzt / Anula : 26/01/16
Modif. / Änderung : Mise à jour / Update / Aktualisierung / Actualización
NOTICE ORIGINALE / TRANSLATION FROM THE ORIGINAL MANUAL
/ ÜBERSETZUNG DER ORIGINAL BETRIEBSANLEITUNG
/ TRADUCCIÓN DEL LIBRO ORIGINAL
IMPORTANT : Lire attentivement tous les documents avant le stockage, l'installation ou la mise en service du
matériel concerné (à usage strictement professionnel).
Before assembly and start-up, please read and clearly understand all the documents relating to this equipment
(professional use only).
WICHTIGER HINWEIS : Vor Lagerung, Installation oder Inbetriebnahme des Geräts bitte sämtliche Dokumente
sorgfältig lesen (Einsatz nur von geschulten Personal).
IMPORTANTE : Lea con atención todos los documentos antes de almacenar, instalar o poner en marcha el
equipo (uso exclusivamente profesional).
PHOTOS ET ILLUSTRATIONS NON CONTRACTUELLES. MATERIELS SUJETS A MODIFICATION(S) SANS PREAVIS.
THE PICTURES AND DRAWINGS ARE NON CONTRACTUAL. WE RESERVE THE RIGHT TO MAKE CHANGES WITHOUT PRIOR NOTICE.
ALLE IN DIESEM DOKUMENT ENTHALTENEN SCHRIFTLICHEN ANGABEN UND ABBILDUNGEN STELLEN DIE NEUESTEN
PRODUKTINFORMATIONEN DAR. WIR BEHALTEN UNS DAS RECHT VOR, JEDERZEIT OHNE VORANKÜNDIGUNG ÄNDERUNGEN
VORZUNEHMEN.
LAS FOTOGRAFÍAS E ILUSTRACIONES NO SON VINCULANTES. LOS MATERIALES ESTÁN SUJETOS A CAMBIOS SIN PREVIO AVISO.
SAMES KREMLIN SAS
l
13, chemin de Malacher
38 240 - MEYLAN - France
: 33 (0)4 76 41 60 60
www.sames-kremlin.com

SAMES KREMLIN 1 Doc. / Dok. : 574.348.110
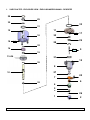
1. VUE ECLATEE - EXPLODED VIEW - EXPLOSIONSZEICHNUNG - DESPIEZE
10
13+34
14
18
19
30
28
35
15
32
16
31
29
32
20
31
12
28
9
30
29
11
17
33
6
5
7
27
8
4
3
1 2
26
4
5
C 1
C 2
C 2

SAMES KREMLIN 2 Doc. / Dok. : 574.348.110
2. NOMENCLATURES - SPARE PARTS' LIST - ERSATZTEILLISTE - LISTA DE RECAMBIOS
VOLUREX VANNE DE SPIRALISATION / SPIRAL VALVE
WIRBELSTRAHLVENTIL / VÁLVULA DE ESPIRALIZACIÓN # 107 323
Ind # Désignation Description Bezeichnung Denominación Qté
1 210 097 Chapeau réglable Adjusting hat Regulierbarer Kopf Tapa regulable 1
2 - Buse spiralisation Ø 0,8 Nozzle, model Ø 0,8 Wirbelstrahldüse Ø 0,8 Boquilla espiralización
tipo Ø 0,8
1
*3 210 773 Embout de buse Ø 0,8 Nozzle end,
model Ø 0,8
Düsenendstück Ø 0,8 Terminal de boquilla,
tipo Ø 0,8
1
4 210 774 Porte-buse Nozzle holder Düsenhalter Porta aguja 1
*5 210 778 Joint de buse Nozzle seal Düsendichtung Junta de boquilla 1
6 211 511 Bague Ring Ring Anillo 1
7 211 800 Diffuseur Diffuser Diffusor Difusor 1
8 211 798 Chapeau Cap Oberteil Protección aguja 1
*9 211 799 Aiguille Needle Nadel Aguja 1
*10 211 826 Porte-aiguille Needle holder Nadelhalterung Soporte aguja 1
11 210 943 Flasque Flange Flansch Brida 1
12 933 151 385 Vis CHc 5x30 Screw, model CHc 5x30 Schraube CHc 5x30 Tornillo, tipo CHc 5x30 4
13 211 825 Piston Piston Kolben Pistón 1
14 92 085 Ressort Spring Feder Muelle 1
15 88 653 Circlips Ring Sicherungsring Anillo tuerca 1
16 211 824 Cylindre Cylinder Zylinder Cilindro 1
17 88 680 Vis 90°, M 5x15 Screw,
model 90°, M 5x15
Senkkopfschraube 90°,
M 5x15
Tornillo,
tipo 90° M 5 x 15
1
18 933 151 668 Vis CHc 6x75 Screw, model CHc 6x75 Schraube CHc 6x75 Tornillo, tipo CHc 6x75 4
19 552 260 Raccord coudé
M5 - T 2,5x4
Elbow fitting,
model M5 - T 2,5x4
Winkelnippel,
M5 - T 2,5x4
Racor codo,
tipo M5 - T 2,5x4
2
20 552 262 Raccord coudé
1/8G - T 4x6
Elbow fitting,
model 1/8G - T 4x6
Winkelnippel,
1/8G - T 4x6
Racor codo,
tipo 1/8G - T 4x6
1
*25 107 337 Pochette de joints
(rep. 26, 27, 28x2, 29x2,
30x2, 31x2, 32x2, 33,
34, 35)
Package of seals
(Ind. 26, 27, 28x2, 29x2,
30x2, 31x2, 32x2, 33,
34, 35)
Dichtungssatz
(Pos. 26, 27, 28x2, 29x2,
30x2, 31x2, 32x2, 33,
34, 35)
Bolsa de juntas
(Índ. 26, 27, 28x2, 29x2,
30x2, 31x2, 32x2, 33,
34, 35)
1
* Pièces de maintenance préconisées
* Preceding the index number denotes a suggested spare part.
* Bezeichnete Teile sind empfohlene Ersatzteile.
* Piezas de mantenimiento preventivas.
N C : Non commercialisé.
N S : Denotes parts are not serviceable.
N S : Bezeichnete Teile gibt es nicht einzeln, sondern nur
komplett.
N S : no suministrado.

SAMES KREMLIN 3 Doc. / Dok. : 574.348.110
OPTIONS - ON REQUEST - OPTIONEN - OPCIONES
Ind. # Désignation Description Bezeichnung Denominación Qté
*3 210 779 Embout de buse Ø 1 Nozzle end, model Ø 1 Düsenendstück Ø 1 Terminal de boquilla,
tipo Ø 1
1
POUR APPLICATION COLLES A BASE DE BILLE DE VERRE
FOR GLUES BASED ON GLASS PARTICULES APPLICATION
FÜR DIE VERARBEITUNG VON KLEBERN MIT GLASKUGELN
PARA APLICACIÓN ADHESIVO CON MICROSFERA DE VIDRIO
Ind. # Désignation Description Bezeichnung Denominación Qté
*36 210 781 Chemise
pour application BV
(bille de verre)
Lining
for GP application
(Glass particules)
Hülse zur Auskleidung
bei Verarbeitung von GK
(Glas Kugeln)
Camisa
para aplicación BV
(microsfera de vidrio)
1
Nota : Pour éviter l’accumulation de billes, le chemisage nous permet de réduire le volume dans la vanne de sortie et
de régénérer complètement le produit en évitant la stagnation de celui-ci dans les zones mortes.
Nota : To avoid the accumulation of particules, the lining allows us to reduce the volume in the valve outlet and to
regenerate the product completly avoiding the stagnation of it in the dead zones.
Hinweis: Um eine gleichmäßge Förderung der Glaspartikel zu erreichen, wird eine Hülse zur Auskleidung eingesetzt.
Sie reduziert das Volumen im Ventilausgang und verhindert eine Verklumpung des Materials in den Toträumen
Nota : Para impedir la acumulación de bolas, esta camisa nos permite reducir el volumen en la válvula de salida y
regenerar completamente el producto evitando el almacenamiento de la microsfera en las zonas muertas.

SAMES KREMLIN 4 Doc. / Dok. : 574.348.110
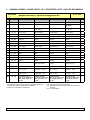
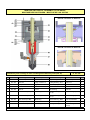
MONTAGE DES JOINTS - ASSEMBLY OF THE SEALS
MONTAGE DER DICHTUNGEN - MONTAJE DE LAS JUNTAS
Detail A / Einzelheit A / Detalle A
Detail B / Einzelheit B / Detalle B
Pochette de joints / Package of seals / Dichtungssatz / Bolsa de juntas (Ind. 25) # 107 337
Ind # Désignation Description Bezeichnung Denominación Qté
26 NC / NS Joint de chapeau Cap seal Kopfdichtung Junta de capucha 1
27 NC / NS Joint R13 O-Ring, model R 13 O-Ring Dichtung, R13 Junta R 13 1
28 NC / NS Circlips Ring Sicherungsring Anillo tuerca 2
29 NC / NS Rondelle Washer Scheibe Arandela 2
30 NC / NS Joint GT GT seal GT-Dichtring Junta GT 2
31 NC / NS Joint FKM noir ( 30) FKM O-Ring O-Ring Dichtung, FKM
( 30)
Junta FKM negra (Ø 30) 2
32 NC / NS Joint FKM noir ( 14) FKM O-Ring O-Ring Dichtung, FKM
( 14)
Junta FKM negra (Ø 14) 2
33 NC / NS Joint de flasque, NBR NBR O-Ring Flanschdichtung, NBR Junta de brida NBR 1
34 NC / NS Joint de piston, NBR NBR seal Kolbendichtung, NBR Junta de pistón NBR 1
35 NC / NS Joint FKM noir ( 15,6) FKM O-Ring O-Ring Dichtung, FKM Junta FKM negra
(Ø 15;6)
1

SAMES KREMLIN 5 Doc. / Dok. : 574.348.110
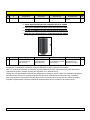
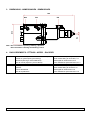
3. DIMENSIONS - ABMESSUNGEN - DIMENSIONES
186
D.4
D.78
RC2 RC1 RS
Nota : RC1 = Ouverture / Opening / Öffnung / Apertura
RC2 = Fermeture / Closing / Schließung / Cierre
4. RACCORDEMENTS - FITTINGS - NIPPEL - RACORES
RC1 / RC2 Air de commande (Ouverture et fermeture vanne)
Control air (Valve opening and closing)
Steuerluft (Öffnungs- und Schließventil)
Aire de mando (Apertura y cierre válvula)
Raccord instantané pour tuyau Ø 2,5 x 4
Quick release fitting for hose Ø 2,5 x 4
Stecknippel für Schlauch Ø 2,5 x 4
Racor instantáneo para tubería Ø 2,5 x 4
RS Air de spiralisation
Spiral air
Luft für Wirbelstrahl
Aire de espiralización
Raccord instantané pour tuyau Ø 4 x 6
Quick release fitting for hose Ø 4 x 6
Stecknippel für Schlauch Ø 4 x 6
Racor instantáneo para tubería Ø 4 x 6

SAMES KREMLIN 6 Doc. / Dok. : 574.348.110
5. MONTAGE - ASSEMBLY - MONTAGE - MONTAJE
MONTAGE
Avant de démonter une vanne de spiralisation, il faut :
- Arrêter l'installation (couper l'air comprimé et les chauffes),
- Décomprimer les circuits et effectuer une purge du doseur.
Démontage :
Dévisser les 4 vis (18) pour désolidariser la vanne de spiralisation du doseur Volurex.
Dévisser les 4 vis (12) pour séparer la partie avant de la partie arrière de la vanne.
Dévisser l'aiguille (9) du porte-aiguille (10) en maintenant le porte-aiguille par les 2 plats prévus à cet effet.
Nettoyage :
Nettoyer toutes les pièces avec le solvant de nettoyage préconisé.
Au remontage, changer tous les joints (voir pochette) et autres pièces, si nécessaire.
Remontage :
Mettre de la graisse sur les joints (30, 32) et les monter :
- dans le cylindre (16) - voir dessin (Détail A).
- dans le flasque (11) - voir dessin (Détail B).
Mettre de la graisse sur les joints (34, 35) et les monter sur le piston (13).
Mettre de la graisse sur le joint (33) et le monter sur le flasque.
Mettre de la graisse sur le joint (31) et le monter.
Introduire le porte-aiguille (10) dans le flasque (11)
Faire glisser le piston (13) sur le porte-aiguille (10) pour arriver en butée et fixer l'ensemble avec le circlips (15).
Monter le ressort dans le piston.
Mettre de la graisse à l'intérieur du cylindre (16) et placer celui-ci sur le flasque (11).
Placer la vis (17) dans le flasque (11).
Aligner le flasque (11) et le cylindre (16) en vissant la vis (17) - (colle : Loctite 222).
Mettre de la colle sur le filetage de l'aiguille (9) - (colle : Loctite 577).
Visser l'aiguille (9) dans le porte-aiguille (10) en maintenant le porte-aiguille par les 2 plats prévus à cet effet
Insérer le chemisage (36) dans le chapeau (8) (uniquement en cas d’application de colles à base de bille de verre).
Fixer le chapeau (8), le flasque (11) et le cylindre (16) par l'intermédiaire des 4 vis (12).
Monter le joint (27) et la bague (6) dans le diffuseur (7).
Monter le diffuseur sur le chapeau (8), puis la buse de spiralisation (2), puis le chapeau réglable (1).
Pour remonter la vanne de spiralisation sur le doseur, faire glisser la résistance chauffante dans le trou prévu à cet
effet, mettre de la colle sur le filetage des vis (18) - (colle : Loctite 222), puis visser ces 4 vis. ( Voir notice générale
du doseur spiralisation).

SAMES KREMLIN 7 Doc. / Dok. : 574.348.110
ASSEMBLY
Before removing a spiral valve, you must :
- Stop the installation (shut off the compressed air and the heated elements),
- Depressurize the systems and drain the proportioning system.
Disassembly :
Unscrew the 4 screws (18) to separate the spiral valve from the proportioning system.
Unscrew the 4 screws (12) to separate the front part from the rear part of the valve.
Unscrew the needle (9) of the needle holder (10) holding the needle holder by means of the 2 flats.
Cleaning :
Clean the parts with the appropriate cleaning solvent.
During the assembly, change the seals (refer to package) and the other parts, if necessary.
Assembly :
Grease the seals (30, 32) and install them :
- into the cylinder (16) - refer to drawing (Detail A).
- into the flange (11) - refer to drawing (Detail B).
Grease the seals (34, 35) and install them on the piston (13).
Grease the seal (33) and install it on the flange.
Grease the seal (31) and install it.
Insert the needle holder (10) into the flange (11)
Make the piston (13) slide on the needle holder 10) and tighten the whole with the ring (15).
Install the spring in the piston.
Lubricate the inside of the cylinder (16) and install it on the flange (11).
Place the screw (17) in the flange (11).
Line up the flange (11) and the cylinder (16) tightening the screw (17) - (glue : Loctite 222).
Applicate glue on the threading of the needle (9) - (glue : Loctite 577).
Screw the needle (9) in the needle holder (10) holding the needle holder by means of the 2 flats.
Install the lining (36) in the cap (8) (only in case of using glues based on glass particules).
Fix the hat (8), the flange (11) and the cylinder (16) by means of the 4 screws (12).
Install the seal (27) and the ring (6) in the diffuser (7).
Install the diffuser on the hat (8), then the spiral nozzle (2), then the adjusting hat (1).
To reinstall the spiral valve on the proportioning system, make the heated resistance slide on the hole, applicate glue
on the treading of the screws (18) - (glue : Loctite 222), then screw these 4 screws ( Refer to spiral proportioning
system instruction manual).

SAMES KREMLIN 8 Doc. / Dok. : 574.348.110
MONTAGE
Um das Wirbelstrahlventil zu demontieren, müssen Sie wie folgt vorgehen:
- Die Anlage stoppen (Druckluft und Heizelemente abschalten)
- Das System druckentlasten und den Volumendosierer entleeren.
Demontage:
Die 4 Schrauben (18) abschrauben, um das Wirbelstrahlventil vom Dosierer zu trennen.
Die 4 Schrauben (12) abschrauben, um das vordere Teil des Ventils vom hinteren Teil zu trennen.
Halten sie die Nadelhalterung an den beiden Flächen fest, um die Nadel (9) von der Nadelhalterung (10)
abzuschrauben.
Reinigung:
Alle Teile mit einem passenden Reinigungsmittel reinigen.
Vor der Montage: Alle Dichtungen (siehe Dichtungssatz) und falls nötig andere verschlissene Teile ersetzen.
Montage:
Die Dichtungen (30, 32) fetten und dann:
- in den Zylinder (16) einsetzen - siehe die Zeichnung (Einzelheit A).
- in den Flansch (11) einsetzen - siehe die Zeichnung (Einzelheit B).
Die Dichtungen (34, 35) fetten und auf den Kolben (13) montieren.
Dichtung (33) fetten und auf den Flansch montieren.
Dichtung (31) fetten und montieren.
Die Nadelhalterung (10) in den Flansch (11) einführen.
Den Kolben (13) auf die Nadelhalterung (10) bis zum Anschlag schieben. Diese Einheit mit dem Sicherungsring (15)
fixieren.
Die Feder in den Kolben stecken.
Die Innenseite des Zylinders (16) fetten und mit dem Flansch (11) verbinden.
Die Schraube (17) in den Flansch (11) einstecken.
Den Flansch (11) und den Zylinder (16) ausrichten und die Schraube (17) festziehen (Loctite 222).
Klebstoff (Loctite 577) auf das Gewinde der Nadel (9) auftragen.
Halten sie die Nadelhalterung an den beiden Flächen fest, um die Nadel (9) in die Nadelhalterung (10) zu schrauben.
Setzen Sie die Hülse (36) in das Oberteil (8) ein (Nur wenn Kleber mit Glaskugelanteilen verarbeitet wird).
Das Oberteil (8), den Flansch (11) und den Zylinder (16) mit dem 4 Schrauben (12) befestigen.
Die Dichtung (27), den Ring (6) und den Diffusor (7) montieren.
Den Diffusor auf das Oberteil (8) stecken, die Wirbelstrahldüse (2) einsetzen und danach den regulierbaren
Düsenkopf (1) montieren.
Um das Wirbelstrahlventil auf den Dosierer zu montieren, müssen Sie zuerst den Heizwiderstand durch das Loch
schieben, Klebstoff (Loctite 222) auf das Gewinde der Schrauben (18) auftragen und dann mit diesen 4 Schrauben
das Ventil befestigen.( Siehe die Betriebsanleitung des Wirbelstrahldosierers).

SAMES KREMLIN 9 Doc. / Dok. : 574.348.110
MONTAJE
Antes de desmontar una válvula de espiralización, Vd. tiene que :
- Parar la instalación (cortar el aire comprimido y los calentadores),
- Descomprimir los circuitos y llevar a cabo una purga del dosificador.
Desmontaje :
Desenroscar los 4 tornillos (18) para separar la válvula de espiralización del dosificador Volurex.
Desenroscar los 4 tornillos (12) para separar la parte delantera de la parte trasera de la válvula.
Desenroscar la aguja (9) del soporte aguja (10) manteniendo el soporte aguja mediante los 2 planos previstos.
Limpieza :
Limpiar todas las piezas con el disolvente de limpieza apropriado.
Durante el montaje, cambiar todas las piezas (consultar bolsa) y otras piezas, si necesario.
Montaje :
Lubricar las juntas (30, 32) y montarlas :
- en el cilindro (16) - consultar dibujo (Detalle A).
- en la brida (11) - consultar dibujo (Detalle B).
Lubricar las juntas (34, 35) e instalarlas en el pistón (13).
Lubricar la junta (33) e instalarla en la brida.
Lubricar la junta (31) y montarla.
Introducir el soporte aguja (10) en la brida (11)
Hacer deslizar el pistón (13) en el soporte aguja (10) para llegar a tope y fijar el conjunto mediante el anillo tuerca
(15).
Montar el muelle en el pistón.
Lubricar dentro el cilindro (16) y situarlo en la brida (11).
Montar el tornillo (17) en la brida (11).
Alinear la brida (11) y el cilindro (16) roscando el tornillo (17) - (cola : Loctite 222).
Aplicar cola en el roscado de la aguja (9) - (cola : Loctite 577).
Roscar la aguja (9) en el soporte aguja (10) manteniendo el soporte aguja mediante los 2 planos previstos.
Montar la camisa (36) en la protección aguja (8) (exclusivamente con aplicación de adhesive a base de microsfera
de vidrio).
Sujetar la protección aguja (8), la brida (11) y el cilindro (16) mediante los 4 tornillos (12).
Montar la junta (27) y el anillo (6) en el difusor (7).
Montar el difusor en la protección aguja (8), pués la boquilla de espiralización (2), pués la protección ajustable (1).
Para volver a montar la válvula de espiralización en el dosificador, sacar la resistencia calefactora en el agujero
previsto, aplicar cola en el roscado de los tornillos (18) - (cola : Loctite 222), y apretarlos
( Consultar el libro de instrucciones general de dosificador espiralización).

SAMES KREMLIN 10 Doc. / Dok. : 574.348.110
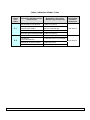
Colles / Adhesives/ Kleber / Colas
Repère
/ Index
/ Pos.
/ Índice
Instructions / Montage-Hinweis
/ Instrucciones
Désignation / Description
/ Bezeichnung / Descripción
Référence
/ Part number
/ Artikel-Nr.
/ Referencia
C 1
Colle Anaérobie Tube étanche Loctite 577 (250 ml)
554.180.015
Medium strength
Aneorobic Pipe sealant
Loctite 577
(250 ml / 0.066 US gal)
Mittelfester anaerober Kleber Loctite 577 (250 ml)
Cola PTFE (para la estanqueidad) Loctite 577 (250 ml)
C 2
Colle Anaérobie frein filet faible Loctite 222 (50 ml)
554.180.010
Low strength
- Anaerobic Adhesive
Loctite 222 (50 ml / 0.013 US gal)
Niedrigfester anaerober Kleber Loctite 222 (50 ml)
Cola freno suave Loctite 222 (50 ml)
-
 1
1
-
 2
2
-
 3
3
-
 4
4
-
 5
5
-
 6
6
-
 7
7
-
 8
8
-
 9
9
-
 10
10
-
 11
11


Sames Volurex spiral valve Benutzerhandbuch
- Typ
- Benutzerhandbuch
in anderen Sprachen
Verwandte Artikel
-
Sames Support assembly for proportioning system Bedienungsanleitung
-
Sames Volurex outlet valve Benutzerhandbuch
-
-
-
-
-
-
-
-