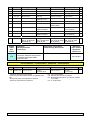
Sames Volurex Heated airspray gun Benutzerhandbuch
- Typ
- Benutzerhandbuch

DOCUMENTATION - DOKUMENTATION - DOCUMENTACIÓN
VOLUREX
PISTOLET AUTOMATIQUE CHAUFFANT
HEATED AIRSPRAY GUN
AUTOMATIK-HEIZPISTOLE
PISTOLA AUTOMÁTICA CALEFACTORA
200 bar / 2901 psi - 80°C - 230V - 100W
# 107 333 - 107 343 - 107 344
Notice / Manual / Betriebsanleitung / Libro: 574.334.110 - 2109
Date / Datum / Fecha : 13/09/21
Annule / Supersede / Ersetzt / Anula : 29/07/14
Modif. / Änderung : Mise à jour / Update / Aktualisierung / Actualización
NOTICE ORIGINALE / TRANSLATION FROM THE ORIGINAL MANUAL
/ ÜBERSETZUNG DER ORIGINAL BETRIEBSANLEITUNG
/ TRADUCCIÓN DEL LIBRO ORIGINAL
IMPORTANT : Lire attentivement tous les documents avant le stockage, l'installation ou la mise en
service du matériel concerné (à usage strictement professionnel).
Before assembly and start-up, please read and clearly understand all the documents relating to this
equipment (professional use only).
WICHTIGER HINWEIS: Vor Lagerung, Installation oder Inbetriebnahme des Geräts bitte sämtliche
Dokumente sorgfältig lesen (Einsatz nur von geschultem Personal).
IMPORTANTE : Lea con atención todos los documentos antes de almacenar, instalar o poner en
marcha el equipo (uso exclusivamente profesional).
PHOTOS ET ILLUSTRATIONS NON CONTRACTUELLES. MATERIELS SUJETS A MODIFICATION(S) SANS PREAVIS.
THE PICTURES AND DRAWINGS ARE NON CONTRACTUAL. WE RESERVE THE RIGHT TO MAKE CHANGES WITHOUT PRIOR
NOTICE. ALLE IN DIESEM DOKUMENT ENTHALTENEN SCHRIFTLICHEN ANGABEN UND ABBILDUNGEN STELLEN DIE NEUESTEN
PRODUKTINFORMATIONEN DAR. WIR BEHALTEN UNS DAS RECHT VOR, JEDERZEIT OHNE VORANKÜNDIGUNG ÄNDERUNGEN
VORZUNEHMEN.
LAS FOTOGRAFÍAS E ILUSTRACIONES NO SON VINCULANTES. LOS MATERIALES ESTÁN SUJETOS A CAMBIOS SIN PREVIO
AVISO.
SAMES KREMLIN SAS
l
13, chemin de Malacher
38 240 - MEYLAN - France
: 33 (0)4 76 41 60 60
www.sames-kremlin.com

SAMES KREMLIN 1 Doc. / Dok. : 574.334.110
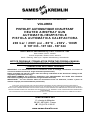
1. NOMENCLATURE - SPARE PARTS' LIST - TEILLISTE - NOMENCLATURA
PISTOLET AVEC SUPPORT / GUN WITH SUPPORT / PISTOLE MIT HALTERUNG / PISTOLA CON SOPORTE
1
3 4
2
6
5
1
7
Mod. A # 107 344 Mod. B # 107 333
Pistolet + support avec EV, sans AU
/ Gun + support with EV, without AU
/ Pistole + Halterung mit Elektroventil und ohne Notanhalten
/ Pistola + soporte con EV, sin AU
# 107 344
Ind. # Désignation Description Bezeichnung Denominación Qté
*1 107 343 Pistolet chauffant Heated gun Heizpistole Pistola calefactora 1
2 107 342 Support avec EV, sans
AU
Support with EV,
without AU
Halterung mit
Elektroventil und ohne
Notanhalten
Soporte con EV, sin
AU
1
3 90 516 Electrovanne Electrovalve Elektroventil Electroválvula 1
4 88 151 Vis CHC M 8x20 Screw,
model CHC M 8x20
Schraube,
CHC M 8x20
Tornillo,
tipo CHC M 8x20
4
Pistolet + support avec EV et AU
/ Gun + support with EV and AU
/ Pistole +Halterung mit Elektroventil und Notanhalten
/ Pistola + soporte con EV y AU
# 107 333
Ind. # Désignation Description Bezeichnung Denominación Qté
*1 107 343 Pistolet chauffant Heated gun Heizpistole Pistola calefactora 1
5 107 335 Support avec EV & AU Support with EV,
without AU
Halterung mit
Elektroventil und
Notanhalten
Soporte con EV & AU 1
6 107 342 Support avec EV,
sans AU
Support with EV,
without AU
Halterung mit
Elektroventil und ohne
Notanhalten
Soporte con EV, sin
AU
1
7 PNS 100 Module AU AU module Notanhaltenmodul Modulo AU 1

SAMES KREMLIN 2 Doc. / Dok. : 574.334.110
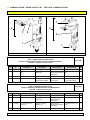
PISTOLET AUTOMATIQUE CHAUFFANT / HEATED AUTOMATIC GUN
/ AUTOMATIK-HEIZPISTOLE / PISTOLA AUTOMÁTICA CALEFACTORA # 107 343
38
5
3
1
10
2
9
4
R 1/2
Ind. # Désignation Description Bezeichnung Denominación Qté
*1 107 334 Pistolet auto Automatic gun Automatik-Pistole Pistola automática 1
*2 107 336 Bloc chauffant
230V - 100W
Heated unit,
model 230V - 100W
Heizblock
230V - 100W
Bloque calefactor,
tipo 230V - 100W
1
*3 80 014 Joint FKM noir O Ring, black O-Ring Dichtung Junta FKM negra 1
4 211 905 Bloc d'entrée Inlet unit Eingangsblock Bloque de entrada 1
5 211 903 Plaque isolante Isolating plate Isolierplatte Placa aislante 1
9 930 151 500 Vis CHc M 8x40 Screw,
model CHc M8x40
Schraube, CHc M8x40 Tornillo,
tipo CHc M8x40
2
10 933 151 441 Vis CHc M 5x35 Screw,
model CHc M5x35
Schraube, CHc M5x35 Tornillo,
tipo CHc M5x35
2

SAMES KREMLIN 3 Doc. / Dok. : 574.334.110
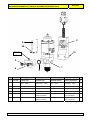
PISTOLET AUTOMATIQUE NU / BARE AUTOMATIC GUN
/ NACKTE AUTOMATIK-PISTOLE / PISTOLA AUTOMATICA SOLA # 107 334
Ind. # Désignation Description Bezeichnung Denominación Qté
12 211 811 Tête de pistolet Gun aircap Luftkappe Cabezal de pistola 1
13 211 815 Ecrou de buse Nozzle nut Düsenmutter Tuerca de boquilla 1
*14 906 313 603 Ressort Spring Feder Muelle 1
15 211 836 Bague de
positionnement
Location ring Positionierungsring Anillo de posición 1
16 NC / NS Joint cuivre Copper seal Dichtung aus Kupfer Junta de cobre 1
*17 211 813 Siège Seat Düsennadelsitz Asiento 1
*18 107 338 Pointeau Needle Nadel Aguja 1
19 211 818 Tige de pointeau Needle rod Nadelstange Eje de aguja 1
*20 NC / NS Rondelle presse-joint
male
Male washer Stützring konvex Arandela prensa
junta macho
1
*21 NC / NS Joint chevron Chevron seal Packungsring Junta chevrón 3
*22 NC / NS Rondelle presse-joint
femelle
Female washer Stützring konkav Arandela prensa
junta hembra
1
23 211 822 Guide tige pistolet Gun rod guide Stangenführer der
Pistole
Guía eje pistola 1
24 210 805 Presse-étoupe Wetting cup Kabeldurchführung Prensa estopa 1
25 NC / NS Joint FKM noir O Ring, black FKM O-Ring Dichtung Junta FKM negra 1
26 203 576 Corps de pistolet Gun body Pistolenkörper Cuerpo de pistola 1
27 203 016 Piston Piston Kolben Pistón 1
*28 NC / NS Joint de piston, FKM FKM piston seal FKM O-Ring Dichtung Junta de pistón FKM 1
C 3

SAMES KREMLIN 4 Doc. / Dok. : 574.334.110
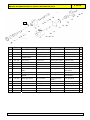
Ind. # Désignation Description Bezeichnung Denominación Qté
29 906 011 502 Ecrou Nut Mutter Tuerca 1
30 050 319 511 Ressort de piston Piston spring Kolbenfeder Muelle de pistón 1
*31 NC / NS Joint papier Paper seal Dichtung aus Papier Junta papel 1
32 211 812 Butée arrière Rear stop Hinterer Anschlag Tope trasero 1
33 552 251 Raccord 1/8G - D4 Fitting,
model 1/8 G - D4
Nippel 1/8G - D4 Racor, tipo 1/8 G - D4 1
34 552 261 Coude M5- D4 Elbow, model M5 - D4 Winkelnippel M5 - D4 Codo, tipo M5 - D4 1
35 211 816 Cadran d'indexage Index dial Indexierte
Skalenscheibe
Disco de indexación 1
36 930 151 275 Vis, CHc M5x20 Screw,
model CHc M5x20
Schraube, CHc M5x20 Tornillo,
tipo CHc M5x20
4
37 933 011 277 Vis, H 6x20 Screw, model H 6x20 Schraube, H 6x20 Tornillo, tipo H 6x20 2
38 933 151 385 Vis, CHc M5x30 Screw,
model CHc M5x30
Schraube, CHc M5x30 Tornillo,
tipo CHc M5x30
2
* 107 351 Pochette de joints
(rep. 3, 16, 20, 21x3,
22, 25, 28, 31)
Package of seals
(Ind. 3, 16, 20, 21x3,
22, 25, 28, 31)
Dichtungssatz
(Pos. 3, 16, 20, 21x3,
22, 25, 28, 31)
Bolsa de juntas
(Índ. 3, 16, 20, 21x3,
22, 25, 28, 31)
1
Repère
Index
Pos.
Índice
Instruction
/ Montage-Hinweis
/ Instrucción
Désignation / Description
/ Bezeichnung / Descripción
Référence
/ Part number
/ Artikel-Nr.
/ Referencia
C 3
Colle Anaérobie frein filet fort
/ Aneorobic Adhesive strong thread
/ Hochfester anaerober Kleber
/ Cola freno alta
Loctite 270 (50 ml / 1.7 oz)
554.180.004
ACCESSOIRES - ACCESSORIES - ZUBEHÖR - ACCESORIOS
Ind. # Désignation Description Bezeichnung Denominación Qté
41 998 837 351 Buse 04-02-20 Nozzle,
model 04-02-20
Düse 04-02-20 Boquilla,
tipo 04-02-20
1
* Pièces de maintenance préconisées
* Preceding the index number denotes a suggested spare
part.
* Bezeichnete Teile sind empfohlene Ersatzteile.
* Piezas de mantenimiento preventivas.
N C : Non commercialisé.
N S : Denotes parts are not serviceable.
N S : Bezeichnete Teile gibt es nicht einzeln, sondern
nur komplett.
N S : no suministrado.

SAMES KREMLIN 5 Doc. / Dok. : 574.334.110
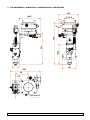
2. ENCOMBREMENT / DIMENSIONS / ABMESSUNGEN / DIMENSIONES
166,5
247
334
153
D. 76,2
158,3
107
232
98
D.9
D.5 prof.13
50
3

SAMES KREMLIN 6 Doc. / Dok. : 574.334.110
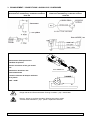
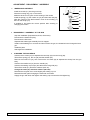
3. BRANCHEMENT / CONNECTIONS / ANSCHLUSS / CONEXIONES
Câblage pneumatique / Pneumatic cabling
Pneumatische Verkabelung / Cableado neumático
EV & AU
Câblage électrique / Electric cabling
Elektrische Verkabelung / Cableado eléctrico
AU & EV
Branchement électrique du bloc
chauffant du pistolet
Electric connection of the gun heated
unit
Elektrischer Anschluss des
Pistolenheizblocks
Conexión eléctrica del bloque calefactor
de la pistola
230V - 100W
R
SONDE
1
2
3
4
5
6
Fiche JAEGER 6 br.
N
Danger électricité / Electrical hazard / Erdung Vorsehen / ¡Ojo! : electricidad
Q
Danger : pièces ou surfaces chaudes / Warning hot parts or areas
Vorsicht heiße Oberfläche / ¡Ojo! : partes o superficies calientes

SAMES KREMLIN 7 Doc. / Dok. : 574.334.110
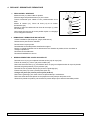
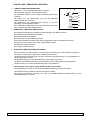
4. REGLAGE - DEMONTAGE / REMONTAGE
REGLAGE DE L'INDEXAGE
Monter la buse (41) dans la tête du pistolet.
Placer la bague de positionnement (15) sur la buse.
Tourner l'ensemble pour obtenir le bon positionnement de la
buse.
Monter le ressort (14), l'écrou de buse (13) et le cadran
d'orientation (36).
Relever le chiffre du cadran situé en face de la marque () faite
sur la tête (12).
Cela permet de retrouver la bonne position après un nettoyage
ou un changement de buse.
12
41
15
14
13
36
DEMONTAGE / REMONTAGE DU PISTOLET
Arrêter l'installation (Décomprimer, purger, débrancher).
Débrancher la prise du bloc chauffant.
Déconnecter le tuyau produit.
Désolidariser l'ensemble pistolet chauffant du support.
Monter un pistolet chauffant neuf ou démonter le bloc d'entrée du pistolet, le bloc chauffant et
changer le pistolet nu.
Remonter tous les éléments.
Remettre l'installation en service.
REMPLACEMENT DES JOINTS DU PISTOLET
Dévisser les 4 vis (37) pour séparer la butée arrière (33) du corps (26).
Enlever le ressort (31), l'écrou (30) et la rondelle (29).
Démonter l'écrou de buse (13), puis dévisser les 2 vis (39) pour séparer la tête du corps de pistolet.
Dévisser la tige de pointeau (19) du pointeau (18).
Dévisser l'écrou de presse-étoupe (24) et sortir le guide tige (23).
Extraire les joints (21) et les 2 presse-joints (20 & 22).
Changer les joints (21) et les 2 presse-joints (20 & 22).
Remonter le guide tige, puis visser l'écrou de presse-étoupe modérément.
Remonter toutes les autres pièces en remplaçant tous les joints par des joints neufs.
Alimenter le pistolet en produit, puis resserrer le presse-étoupe pour assurer l'étanchéité produit.

SAMES KREMLIN 8 Doc. / Dok. : 574.334.110
ADJUSTMENT - DISASSEMBLY / ASSEMBLY
INDEXING ADJUSTMENT
Install the nozzle (41) into the gun aircap.
Place the locating ring (15) on the nozzle.
Make the whole turn to get a correct locating of the nozzle.
Install the spring (14), the nozzle nut (13) and the index dial (36).
Note the number of the dial located in front of the marking ()
done on the aircap (12).
It enables to find again the correct position after cleaning or
changing the nozzle.
12
41
15
14
13
36
DISASSEMBLY / ASSEMBLY OF THE GUN
Stop the installation (Depressurize, drain, disconnect).
Disconnect the heated unit plug.
Disconnect the fluid hose.
Separate the heated gun assembly from its support.
Install a new heated gun or remove the inlet unit from the gun, the heated unit and change the bare
gun.
Install the parts.
Start again the installation.
CHANGING THE GUN SEALS
Unscrew the 4 screws (37) to separate the rear stop (33) from the body (26).
Take off the spring (31), the nut (30) and the washer (29).
Remove the nozzle nut (13), then unscrew the 2 screws (39) to separate the aircap from the gun
body.
Unscrew the needle rod (19) from the needle (18).
Unscrew the wetting cup nut (24) and take off the rod guide (23).
Take off the seals (21) and the 2 washers (20 & 22).
Change the seals (21) and the 2 washers (20 & 22).
Reinstall the rod guide, then screw slightly the wetting cup nut
Reinstall the other parts changing the seals with new seals.
Supply the gun with fluid, then tighten the wetting cup to ensure the fluid tightening.

SAMES KREMLIN 9 Doc. / Dok. : 574.334.110
EINSTELLUNG - DEMONTAGE / MONTAGE
EINSTELLUNG DER INDEXIERUNG
Die Düse (41) in die Luftkappe der Pistole montieren.
Den Positionierungsring (15) auf die Düse stellen.
Die Gesamtheit drehen, um die richtige Positionierung der Düse
zu haben.
Die Feder (14), die Düsenmutter (13) und die indexierte
Skalenscheibe (36) montieren.
Die Graduierung, die gegenüber dem Zeichen () auf der
Luftkappe (12) sich befindet, ablesen.
Dies erlaubt die richtige Stelle nach einer Reinigung oder nach
dem Austausch der Düse wiederzufinden.
12
41
15
14
13
36
DEMONTAGE / MONTAGE DER PISTOLE
Die Anlage (Druckentlastung, Entleerung, Abschaltung) außer Betrieb nehmen.
Die Steckdose des Heizblocks abschalten.
Den Materialschlauch abschalten.
Die Heizpistole von dem Halterung trennen.
Eine neue Heizpistole montieren oder den Eingangsblocks und den Heizblock der Pistole
demontieren und in diesem Fall nur die nackte Pistole ersetzen.
Alle Elemente wieder montieren.
Die Anlage in Betrieb nehmen.
AUSTAUSCH DER PISTOLENDICHTUNGEN
Die 4 Schrauben (37) abschrauben, um den hinteren Anschlag (33) von dem Körper (26) trennen.
Die Feder (31), die Mutter (30) und die Scheibe (29) abnehmen.
Die Düsenmutter (13) demontieren und die 2 Schrauben (39) abschrauben, um die Luftkappe von
dem Pistolenkörper trennen.
Die Nadelstange (19) bei der Abschraubung von der Nadel (18) trennen.
Die Mutter der Kabeldurchführung (24) abschrauben und den Stangenführer (23) abnehmen.
Die Dichtungen (21) und die beide Stützringe (20 & 22) abnehmen.
Die Dichtungen (21) und die beiden Stützringe (20 & 22) ersetzen.
Den Stangenführer montieren, die Mutter der Kabeldurchführung maßvoll schrauben.
Alle anderen Stücke montieren und alle Dichtungen ersetzen.
Die Pistole mit Material versorgen und dann die Kabeldurchführung festschrauben, um die
Materialabdichtung zu sichern.

SAMES KREMLIN 10 Doc. / Dok. : 574.334.110
AJUSTE - DESMONTAJE / MONTAJE
AJUSTE DEL INDEXADO
Montar la boquilla (41) en el cabezal de la pistola.
Instalar el anillo de posición (15) en la boquilla.
Hacer girar el conjunto para obtener una correcta posición de la
boquilla.
Montar el muelle (14), la tuerca de boquilla (13) y el disco de
indexación (36).
Apuntar la cifra del disco que está frente al marcado () en el
cabezal (12).
Eso permite buscar la correcta posición después de limpiar o
cambiar la boquilla.
12
41
15
14
13
36
DESMONTAJE / MONTAJE DE LA PISTOLA
Parar la instalación (descomprimir, purgar, desconectar).
Desconectar la toma del bloque calefactor.
Desconectar la tubería producto.
Separar el conjunto pistola calefactor del soporte.
Montar una pistola calefactora nueva o desmontar el bloque de entrada de la pistola, el bloque
calefactor y cambiar la pistola sola.
Volver a montar todos los elementos.
Poner en marcha de nuevo la instalación.
CAMBIO DE LAS JUNTAS DE LA PISTOLA
Desenroscar los 4 tornillos (37) para separar el tope trasero (33) del cuerpo (26).
Quitar el muelle (31), la tuerca (30) y la arandela (29).
Desmontar la tuerca de boquilla (13), pues desenroscar los 2 tornillos (39) para separar el cabezal del
cuerpo de pistola.
Desenroscar el eje de aguja (19) de la aguja (18).
Desenroscar la tuerca de prensa estopa (24) y sacar la guía eje (23).
Sacar las juntas (21) y las 2 prensa juntas (20 & 22).
Cambiar las juntas (21) y las 2 prensa juntas (20 & 22).
Volver a montar la guía eje, pues roscar un poco la tuerca de prensa estopa.
Volver a montar todas las otras piezas cambiando las juntas por juntas nuevas.
Alimentar la pistola con producto, pues apretar de nuevo la prensa estopa para asegurar la
estanqueidad producto
-
 1
1
-
 2
2
-
 3
3
-
 4
4
-
 5
5
-
 6
6
-
 7
7
-
 8
8
-
 9
9
-
 10
10
-
 11
11


Sames Volurex Heated airspray gun Benutzerhandbuch
- Typ
- Benutzerhandbuch
in anderen Sprachen
Verwandte Artikel
-
Sames Support assembly for proportioning system Bedienungsanleitung
-
-
-
-
-
-
-
-
-
