Toro Cordless Hedge Trimmer 60V Flex-Force Power System 51855T - Tool Only Benutzerhandbuch
- Kategorie
- Elektrowerkzeuge
- Typ
- Benutzerhandbuch

Form No. 3457-674 Rev A
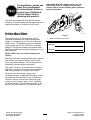
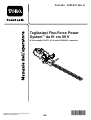
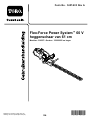
Flex-Force Power System™ 24in 60V Hedge T rimmer
51855T
60 V Flex-Force Power System™ Heckenschere, 61 cm
51855T
Cortasetos Flex-Force Power System™ de 61 cm de 60V
51855T
T aille-haie de 60 V et 61 cm avec système d’alimentation Force
Power System™
51855T
T agliasiepi Flex-Force Power System™ da 61 cm 60 V
51855T
Flex-Force Power system™61 cm 60 V hekktrimmer
51855T
Flex-Force Power System™ 60 V heggenschaar van 61 cm
51855T
Nożyce do żywopłotu Flex-Force Power System™ o szerokości
61 cm, z zasilaniem 60V
51855T
Flex-Force Power System™ 60 V häcktrimmer på 61 cm
51855T
www .T oro.com.
*3457-674*


Form No. 3457-625 Rev A
Flex-Force Power System
™
24in
60V Hedge T rimmer
Model No. 51855T —Serial No. 323000001 and Up
Register at www .T oro.com.
Original Instructions (EN)
*3457-625*

For assistance, please see
www .T oro.com/support
for instructional videos or
contact your Authorized
Service Dealer before
returning this product.
This product complies with all relevant European
directives; for details, please see the separate product
specic Declaration of Conformity (DOC) sheet.
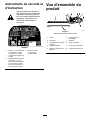
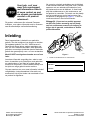
Introduction
This hedge trimmer is intended to be used by
residential homeowners to maintain bushes and
hedges. It is designed to use T oro 60V lithium-ion
battery packs. These battery packs are designed
to be charged only by T oro 60V lithium-ion battery
chargers. Using these products for purposes other
than their intended use could prove dangerous to you
and bystanders.
Model 51855T does not include a battery or a
charger .
Read this information carefully to learn how to operate
and maintain your product properly and to avoid
injury and product damage. Y ou are responsible for
operating the product properly and safely .
V isit www .T oro.com for more information, including
safety tips, training materials, accessory information,
help nding a dealer , or to register your product.
Whenever you need service, genuine the
manufacturer parts, or additional information, contact
an Authorized Service Dealer or the manufacturer
Customer Service and have the model and serial
numbers of your product ready . Figure 1 identies
the location of the model and serial numbers on the
product. W rite the numbers in the space provided.
Important: W ith your mobile device, you can
scan the QR code (if equipped) on the serial
number plate to access warranty , parts, and other
product information.
g308284
Figure 1
1. Model and serial number location
Model No.
Serial No.
© 2023—The T oro® Company
81 1 1 L yndale A venue South
Bloomington, MN 55420
2
Contact us at www .T oro.com.
Printed in China
All Rights Reserved

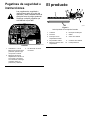
Safety-Alert Symbol
The safety-alert symbol ( Figure 2 ) shown in this
manual and on the machine identies important safety
messages that you must follow to prevent accidents.
g000502
Figure 2
Safety-alert symbol
The safety-alert symbol appears above information
that alerts you to unsafe actions or situations and
is followed by the word DANGER ,W ARNING , or
CAUTION .
DANGER indicates an imminently hazardous situation
which, if not avoided, will result in death or serious
injury .
W ARNING indicates a potentially hazardous situation
which, if not avoided, could result in death or serious
injury .
CAUTION indicates a potentially hazardous situation
which, if not avoided, may result in minor or moderate
injury .
This manual uses two other words to highlight
information. Important calls attention to special
mechanical information and Note emphasizes general
information worthy of special attention.
Safety
W ARNING
Read all safety warnings, instructions,
illustrations and specications provided with
this power tool.
Failure to follow all instructions listed below
may result in electric shock, re and/or
serious injury .
Save all warnings and instructions for future
reference.
The term “power tool” in all the warnings refers
to your mains-operated (corded) power tool or
battery-operated (cordless) power tool.
IMPORT ANT SAFETY
INSTRUCTIONS
I. W ork area safety
1. Keep work area clean and well lit. Cluttered
or dark areas invite accidents.
2. Do not operate power tools in explosive
atmospheres, such as in the presence of
ammable liquids, gases, or dust. Power
tools create sparks which may ignite the dust
or fumes.
3. Keep children and bystanders away while
operating a power tool. Distractions can cause
you to lose control.
II. Electrical safety
1. Power tool plugs must match the outlet.
Never modify the plug in any way . Do not use
any adapter plugs with earthed (grounded)
power tools. Unmodied plugs and matching
outlets will reduce risk of electric shock.
2. A void body contact with earthed or grounded
surfaces, such as pipes, radiators, ranges
and refrigerators. There is an increased risk
of electric shock if your body is earthed or
grounded.
3. Do not expose power tools to rain or wet
conditions. W ater entering a power tool will
increase the risk of electric shock.
4. Do not abuse the cord. Never use the cord
for carrying, pulling or unplugging the power
tool. Keep cord away from heat, oil, sharp
edges or moving parts. Damaged or entangled
cords increase the risk of electric shock.
3

5. When operating a power tool outdoors, use
an extension cord suitable for outdoor use.
Use of a cord suitable for outdoor use reduces
the risk of electric shock.
6. If operating a power tool in a damp location
is unavoidable, use a residual current device
(RCD) protected supply . Use of an RCD
reduces the risk of electric shock.
III. Personal safety
1. Stay alert, watch what you are doing and use
common sense when operating a power tool.
Do not use a power tool while you are tired
or under the inuence of drugs, alcohol, or
medication. A moment of inattention while
operating power tools may result in serious
personal injury .
2. Use personal protective equipment. Always
wear eye protection. Protective equipment
such as dust mask, non-skid safety shoes, hard
hat, or hearing protection used for appropriate
conditions reduces personal injuries.
3. Prevent unintentional starting. Ensure
the switch is in the O FF -position before
connecting to power source and/or battery
pack, picking up or carrying the tool. Carrying
power tools with your nger on the switch or
energizing power tools that have the switch on
invites accidents.
4. Remove any adjusting key or wrench before
turning the power tool on. A wrench or a key
left attached to a rotating part of the power tool
may result in personal injury .
5. Do not overreach. Keep proper footing and
balance at all times. This enables better control
of the power tool in unexpected situations.
6. Dress properly . Do not wear loose clothing
or jewelry . Keep your hair and clothing away
from moving parts. Loose clothes, jewelry , or
long hair can be caught in moving parts.
7. If devices are provided for the connection
of dust extraction and collection facilities,
ensure these are connected and properly
used. Use of dust collection can reduce
dust-related hazards.
8. Do not let familiarity gained from frequent
use of tools allow you to become complacent
and ignore tool safety principles. A careless
action can cause severe injury within a fraction
of a second.
IV . Power tool use and care
1. Do not force the power tool. Use the correct
power tool for your application. The correct
power tool will do the job better and safer at the
rate for which it was designed.
2. Do not use the power tool if the switch
does not turn it on and off. Any power tool
that cannot be controlled with the switch is
dangerous and must be repaired.
3. Disconnect the plug from the power source
and/or remove the battery pack, if detachable,
from the power tool before making any
adjustments, changing accessories, or
storing power tools. Such preventive safety
measures reduce the risk of starting the power
tool accidentally .
4. Store idle power tools out of the reach of
children and do not allow persons unfamiliar
with the power tool or these instructions
to operate the power tool. Power tools are
dangerous in the hands of untrained users.
5. Maintain power tools and accessories.
Check for misalignment or binding of moving
parts, breakage of parts, and any other
condition that may affect the power tool’ s
operation. If damaged, have the power tool
repaired before use. Many accidents are
caused by poorly maintained power tools.
6. Keep cutting tools sharp and clean. Properly
maintained cutting tools with sharp cutting edges
are less likely to bind and are easier to control.
7. Use the power tool, accessories, and tool bits
etc. in accordance with these instructions,
taking into account the working conditions
and the work to be performed. Use of the
power tool for operations different from those
intended could result in a hazardous situation.
8. Keep handles and grasping surfaces dry ,
clean and free from oil and grease. Slippery
handles and grasping surfaces do not allow
for safe handling and control of the tool in
unexpected situations.
4

V . Battery tool use and care
1. Recharge only with the charger specied by
the manufacturer . A charger that is suitable for
one type of battery pack may create a risk of re
when used with another battery pack.
2. Use power tools only with specically
designated battery packs. Use of any other
battery packs may create a risk of injury and re.
3. When battery pack is not in use, keep it away
from other metal objects, like paper clips,
coins, keys, nails, screws or other small
metal objects, that can make a connection
from one terminal to another . Shorting the
battery terminals together may cause burns or
a re.
4. Under abusive conditions, liquid may be
ejected from the battery; avoid contact. If
contact accidentally occurs, ush with water .
If liquid contacts eyes, additionally seek
medical help. Liquid ejected from the battery
may cause irritation or burns.
5. Do not use a battery pack or tool that is
damaged or modied. Damaged or modied
batteries may exhibit unpredictable behavior
resulting in re, explosion or risk of injury .
6. Do not expose a battery pack or tool to re
or excessive temperature. Exposure to re or
temperature above 130 °C (265 °F) may cause
explosion.
7. Follow all charging instructions and do
not charge the battery pack or tool outside
the temperature range specied in the
instructions. Charging improperly or at
temperatures outside the specied range may
damage the battery and increase the risk of re.
VI. Service
1. Have your power tool serviced by a
qualied repair person using only identical
replacement parts. This will ensure that the
safety of the power tool is maintained.
2. Never service damaged battery packs.
Service of battery packs should only be
performed by the manufacturer or authorized
service providers.
VII. Hedge trimmer safety warnings
1. Do not use the hedge trimmer in bad weather
conditions, especially when there is a risk
of lightning. This decreases the risk of being
struck by lightning.
2. Keep all power cords and cables away from
cutting area. Power cords or cables may
be hidden in hedges or bushes and can be
accidentally cut by the blade.
3. W ear ear protection. Adequate protective
equipment will reduce the risk of hearing loss.
4. Hold the hedge trimmer by insulated gripping
surfaces only , because the blade may
contact hidden wiring. Blades contacting a
"live" wire may make exposed metal parts of the
hedge trimmer "live" and could give the operator
an electric shock.
5. Keep all parts of the body away from the
blade. Do not remove cut material or hold
material to be cut when blades are moving.
Blades continue to move after the switch is
turned off. A moment of inattention while
operating the hedge trimmer may result in
serious personal injury .
6. When clearing jammed material or servicing
the hedge trimmer , make sure all power
switches are off and the battery pack is
removed or disconnected. Unexpected
actuation of the hedge trimmer while clearing
jammed material or servicing may result in
serious personal injury .
7. Carry the hedge trimmer by the handle with
the blade stopped and taking care not to
operate any power switch. Proper carrying
of the hedge trimmer will decrease the risk of
inadvertent starting and resultant personal injury
from the blades.
8. When transporting or storing the hedge
trimmer , always use the blade cover . Proper
handling of the hedge trimmer will decrease the
risk of personal injury from the blades.
SA VE THESE
INSTRUCTIONS
5

Safety and Instructional
Decals
Safety decals and instructions are
easily visible to the operator and are
located near any area of potential
danger . Replace any decal that is
damaged or missing.
decal139-5253
139-5253
1. W arning—read the
Operator ’ s Manual ; wear
eye protection; do not
expose to rain.
3. Do not dispose improperly .
2. Keep hands away from
blade—stay away from
moving parts; keep all
guards and shields in
place.
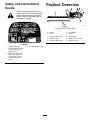
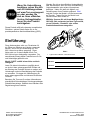
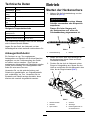
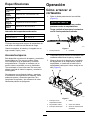
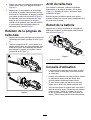
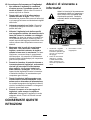
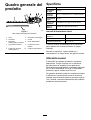
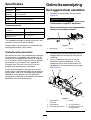
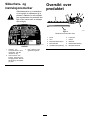
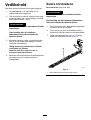
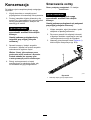
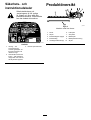
Product Overview
g426749
Figure 3
Left side of the machine shown.
1. Blades 6. Lock switch
2. Guard
7. T rigger
3. Auxiliary-handle switch 8. Battery latch
4. Auxiliary handle 9. Battery pack connection
5. Handle-rotation button 10. Protective cover
6

Specications
Model 51855T
Cutting
Length
610 mm (24 inches)
Rated
V oltage
60V DC maximum, 54 VDC nominal usage
Cutting
width
19 mm (3/4 inch)
Charger
T ype
T oro 60V lithium-ion chargers
Battery T ype T oro 60V lithum-ion batteries
Appropriate T emperature Ranges
Charge/store the battery pack
at
5°C (41°F) to 40°C (104°F)*
Use the battery pack at
-30°C (-22°F) to 49°C (120°F)*
Use the machine at
0°C (32°F) to 49°C (120°F)*
*Charging time will increase if you do not charge the
battery pack within this range.
Store the machine, battery pack, and battery charger
in an enclosed clean, dry area.
Attachments/Accessories
A selection of T oro approved attachments and
accessories is available for use with the machine
to enhance and expand its capabilities. Contact
your Authorized Service Dealer or authorized T oro
distributor or go to www .T oro.com for a list of all
approved attachments and accessories.
T o ensure optimum performance and continued safety
certication of the machine, use only genuine T oro
replacement parts and accessories. Replacement
parts and accessories made by other manufacturers
could be dangerous.
Operation
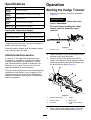
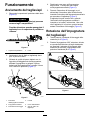
Starting the Hedge T rimmer
1. Remove the protective cover from the blades
(Figure 4 ).
W ARNING
The hedge trimmer blades can cause
cuts or amputation.
Be careful when handling the hedge
trimmer with the protective cover
removed.
g308414
Figure 4
1. Protective cover 2. Blades
2. Make sure that the vents on the hedge trimmer
are clear of any dust and debris.
3. Align the cavity of the battery pack with the
tongue in the handle housing, grasp the handle,
and push the battery pack into the handle until
the latch locks into place ( Figure 5 ).
g308413
Figure 5
1. Auxiliary-handle switch 4. T rigger
2. Auxiliary handle 5. Battery latch
3. Lock switch 6. Hedge trimmer venting
areas
4. Place 1 hand on the trigger handle. Place the
other hand on the auxiliary handle ( Figure 5 ).
7

5. Press the lock switch and then squeeze
the trigger switch while engaging the
auxiliary-handle switch to turn on the hedge
trimmer ( Figure 5 ).
The trimmer stays on as long as the
auxiliary-handle switch is engaged and the
trigger is squeezed. Y ou may release the
lock switch once the hedge trimmer is running
(Figure 5 ).
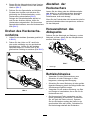
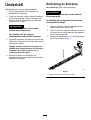
Rotating the Hedge T rimmer
Handle
1. Press and hold the rotational lock button (A of
Figure 6 ).
2. Rotate the handle 90° to the right or left
depending on desired cutting direction, then
release the rotational lock button to lock the
handle in the desired position (B of Figure 6 ).
g308389
Figure 6
Shutting Off the Hedge
T rimmer
T o shut of f the hedge trimmer , release the trigger ,
auxiliary-handle switch, or both ( Figure 5 ). Allow at
least 5 seconds for the cutting blade to stop moving.
Whenever you are not using the trimmer or are
transporting the trimmer to or from the work area,
remove the battery pack.
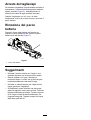
Removing the Battery Pack
Press the battery latch on the tool to release the
battery pack and slide the battery pack out of the tool
(Figure 7 ).
g308388
Figure 7
1. Battery latch
Operating T ips
•Use the power tool for cutting in either direction in
a slow , sweeping action.
•When trimming new growth, use a wide sweeping
action so that the stems are fed directly into the
cutting blade.
•Use a dif ferent tool to trim stems that are too large
for the trimmer .
•If desired, you can use a string to help cut your
hedge level. Decide how high you want the hedge.
Stretch a piece of string along the hedge at the
desired height as a guideline. T rim the hedge just
above the string guideline.
8

Maintenance
After each use of the trimmer , complete the following:
1. Remove the battery pack from the trimmer
before maintaining or cleaning.
2. Wipe the trimmer clean with a damp cloth any
time there is an accumulation of debris. Do not
hose the trimmer down or submerge it in water .
W ARNING
The hedge trimmer blades can cause
cuts or amputation.
Be careful when handling the hedge
trimmer with the protective cover
removed.
3. Inspect the machine, check and tighten all
fasteners. If any part is damaged or lost, repair
or replace it.
Important: Use only the manufacturer ’ s
recommended replacement parts and
accessories.
Have the product repaired only by an
Authorized Service Dealer .
4. Brush debris away from air intake vents and
exhaust on motor housing to prevent the motor
from overheating.
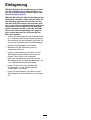
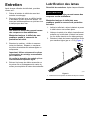
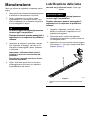
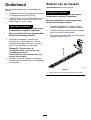
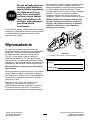
Lubricating the Blades
Service Interval : After each use
W ARNING
The hedge trimmer blades can cause cuts or
amputation.
Be careful when handling the hedge trimmer
with the protective cover removed.
1. Shut of f the trimmer , remove the battery pack,
and place the trimmer on a at surface.
2. Clean dirt and debris from the hedge trimmer ,
using a brush or a damp cloth with a mild
detergent.
3. Apply light weight machine oil (such as #10)
along the edge of the top blades ( Figure 1 ).
g426760
Figure 8
1. Apply machine oil to the top edge of the blades.
9

Storage
Important: Store the tool, battery pack, and
charger only in temperatures that are within the
appropriate range; refer to Specications ( page 7 ) .
Important: If you are storing the battery pack for
the off-season, remove the battery pack from the
tool and charge the battery pack until 2 or 3 LED
indicators turn green on the battery . Do not store
a fully charged or fully depleted battery . When you
are ready to use the tool again, charge the battery
pack until the left indicator light turns green on
the charger or all 4 LED indicators turn green on
the battery .
•Disconnect the product from the power supply
(i.e., remove the plug from the power supply or the
battery pack) and check for damage after use.
•Clean all foreign material from the product.
•Do not store the tool with the battery pack installed.
•When not in use, store the tool, battery pack, and
battery charger out of the reach of children.
•Keep the tool, battery pack, and battery charger
away from corrosive agents, such as garden
chemicals and de-icing salts.
•T o reduce the risk of serious personal injury , do
not store the battery pack outside or in vehicles.
•Store the tool, battery pack, and battery charger
in an enclosed clean, dry area.
10

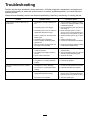
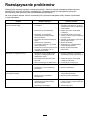
T roubleshooting
Perform only the steps described in these instructions. All further inspection, maintenance, and repair work
must be performed by an authorized service center or a similarly qualied specialist if you cannot solve the
problem yourself.
Always remove the battery from the tool when troubleshooting, inspecting, maintaining, or cleaning the tool.
Problem
Possible Cause Corrective Action
1. The battery is not fully installed in the
tool.
1. Remove and then replace the battery
into the tool, making sure that it is fully
installed and latched.
2. The battery pack is not charged.
2. Remove the battery pack from the tool
and charge it.
3. The battery pack is over or under the
appropriate temperature range.
3. Move the battery pack to a place
where it is dry and the temperature is
between 5°C (41°F) and 40°C (104°F).
4. There is moisture on the leads of the
battery pack.
4. Allow the battery pack to dry or wipe it
dry .
5. The battery pack is damaged. 5. Replace the battery pack.
6. There is another electrical problem
with the tool.
6. Contact an Authorized Service Dealer .
The tool does not run or does not run
continuously .
7. Both the auxiliary handle switch and
the trigger are not pressed.
7. Press both the trigger and the auxiliary
handle switch simultaneously .
1. The speed switch is in the low speed
or anti-jam position.
1. T urn the speed switch to the high
speed position.
2. The battery pack charge capacity is
too low .
2. Remove the battery pack from the tool
and fully charge the battery pack.
The tool does not reach full power .
3. The air vents are blocked.
3. Clean the air vents.
1. The air vents are blocked.
1. Clean the air vents.The gearbox is hot.
2. The gearbox is not being lubricated
properly .
2. Lubricate the gearbox.
1. The blades are dull or damaged.
1. Contact an Authorized Service Dealer .The tool is producing excessive vibration
or noise.
2. The machine is not being lubricated
properly .
2. Lubricate the blades and gearbox.
1. The battery pack is over or under the
appropriate temperature range.
1. Move the battery pack to a place
where it is dry and the temperature is
between 5°C (41°F) and 40°C (104°F).
The battery pack loses charge quickly .
2. The trimmer is overloaded 2. T rim at a slower pace.
1 1

EEA/UK Privacy Notice
T oro’ s Use of Y our Personal Information
The T oro Company (“T oro”) respects your privacy . When you purchase our products, we may collect certain personal information about you, either directly
from you or through your local T oro company or dealer . T oro uses this information to full contractual obligations - such as to register your warranty ,
process your warranty claim or to contact you in the event of a product recall - and for legitimate business purposes - such as to gauge customer
satisfaction, improve our products or provide you with product information which may be of interest. T oro may share your information with our subsidiaries,
af liates, dealers or other business partners in connection these activities. W e may also disclose personal information when required by law or in
connection with the sale, purchase or merger of a business. W e will never sell your personal information to any other company for marketing purposes.
Retention of your Personal Information
T oro will keep your personal information as long as it is relevant for the above purposes and in accordance with legal requirements. For more information
T oro’ s Commitment to Security
Y our personal information may be processed in the US or another country which may have less strict data protection laws than your country of residence.
Whenever we transfer your information outside of your country of residence, we will take legally required steps to ensure that appropriate safeguards are
in place to protect your information and to make sure it is treated securely .
Access and Correction
Y ou may have the right to correct or review your personal data, or object to or restrict the processing of your data. T o do so, please contact us by email
at [email protected]. If you have concerns about the way in which T oro has handled your information, we encourage you to raise this directly with us.
Please note that European residents have the right to complain to your Data Protection Authority .
374-0282 Rev C

Form No. 3457 - 627 Rev A
60 V Flex - Force Power System
™
Heckenschere, 61 cmModellnr . 51855T —Seriennr . 323000001 und höher
Registrieren Sie Ihr Produkt unter www .T oro.com.
Originaldokuments (DE)
*3457 - 627*

W enn Sie Unterstützung
benötigen, sehen Sie sich
erst die Anleitungsvideos
auf www .T oro.com/support
an oder wenden Sie
sich an Ihren ofziellen
Service - V ertragshändler ,
bevor Sie das Produkt
zurückgeben.
Dieses Produkt erfüllt alle relevanten europäischen
Richtlinien; weitere Details nden Sie in der
produktspezischen Konformitätserklärung (DOC).
Einführung
Diese Heckenschere sollte von Privatleuten für
die Pege von Büschen und Hecken verwendet
werden. Sie ist für die V erwendung mit T oro
60V Lithium - Ionen - Akkus ausgelegt. Diese
Akkus sind nur für das Auaden durch T oro
60V Lithium - Ionen - Ladegeräte vorgesehen. Der
zweckfremde Einsatz dieser Produkte kann für Sie
und Unbeteiligte gefährlich sein.
Modell 51855T enthält keinen Akku und kein
Ladegerät.
Lesen Sie diese Informationen sorgfältig durch,
um sich mit dem ordnungsgemäßen Einsatz und
der W artung des Produkts vertraut zu machen und
V erletzungen und eine Beschädigung des Produkts
zu vermeiden. Sie tragen die V erantwortung für
einen ordnungsgemäßen und sicheren Einsatz des
Produkts.
Besuchen Sie T oro.com für weitere Informationen,
einschließlich Sicherheitstipps, Schulungsunterlagen,
Zubehörinformationen, Standort eines Händlers oder
Registrierung Ihres Produkts.
W enden Sie sich an den of ziellen V ertragshändler
oder Kundendienst, wenn Sie eine Serviceleistung,
Originalersatzteile oder weitere Informationen
benötigen. Halten Sie dafür die Modell - und
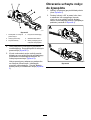
Seriennummern Ihres Produkts grif fbereit. Bild 1
zeigt die Position der Modell - und Seriennummern
am Produkt. T ragen Sie hier die Modell - und
Seriennummern des Geräts ein.
W ichtig: Scannen Sie mit Ihrem Mobilgerät den
QR - Code (falls vorhanden) auf dem T ypenschild,
um auf Garantie -, Ersatzteil - oder andere
Produktinformationen zuzugreifen.
g308284
Bild 1
1. T ypenschild mit Modell - und Seriennummer
Modellnr .
Seriennr .
© 2023—The T oro® Company
81 1 1 L yndale A venue South
Bloomington, MN 55420
2
Kontaktieren Sie uns unter www .T oro.com.
Druck: China
Alle Rechte vorbehalten

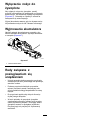
Sicherheitswarnsymbol
Dieses Sicherheitswarnsymbol ( Bild 2 ) in diesem
Handbuch und an der Maschine weißt auf wichtige
Sicherheitshinweise hin, die Sie beachten müssen,
um Unfälle zu vermeiden.
g000502
Bild 2
Sicherheitswarnsymbol
Das Sicherheitswarnsymbol wird über Information
dargestellt, die Sie vor unsicheren Handlungen oder
Situationen warnen, gefolgt von dem W ort GEF AHR ,
W ARNUNG oder VORSICHT .
GEF AHR bezeichnet eine unmittelbar drohende
Gefahr . W enn sie nicht gemieden wird, sind T od oder
schwerste V erletzungen die Folge.
W ARNUNG bezeichnet eine möglicherweise
drohende Gefahr . W enn sie nicht gemieden wird,
können T od oder schwerste V erletzungen die Folge
sein.
VORSICHT bezeichnet eine möglicherweise
drohende Gefahr . W enn sie nicht gemieden wird,
können leichte oder geringfügige V erletzungen die
Folge sein.
In dieser Anleitung werden zwei weitere Begrif fe zur
Hervorhebung von Informationen verwendet. W ichtig
weist auf spezielle mechanische Informationen hin,
und Hinweis hebt allgemeine Informationen hervor ,
die Ihre besondere Beachtung verdienen.
Sicherheit
W ARNUNG:
Lesen Sie alle Sicherheits- und
W arnhinweise, Anweisungen, Abbildungen
und Spezikationen, die mit diesem
Elektrowerkzeug geliefert werden.
Das Nichtbeachten aller unten aufgeführten
Anweisungen kann zu Stromschlag, Brand
und/oder schweren V erletzungen führen.
Bewahren Sie alle W arnungen und Anweisungen
für einen späteren Bezug auf.
Der Begriff „Elektrowerkzeuge“ in allen W arnungen
bezieht sich auf Elektrowerkzeuge mit Stromkabel
oder Akku.
W ichtige Sicherheits -
ANWEISUNGEN
I. Arbeitsbereichssicherheit
1. Der Arbeitsbereich sollte sauber und gut
beleuchtet sein. Unaufgeräumte oder dunkle
Bereiche führen leicht zu Unfällen.
2. V erwenden Sie Elektrowerkzeuge
nicht in explosiven Umgebungen,
u. a. V orhandensein von brennbaren
Flüssigkeiten, Gasen oder Staub.
Elektrowerkzeuge erzeugen Funken, die den
Staub oder die Dämpfe entzünden können.
3. Halten Sie Kinder und Unbeteiligte fern,
wenn Sie das Elektrowerkzeug verwenden.
Ablenkungen können zu einem Kontrollverlust
führen.
II. Elektrische Sicherheit
1. Stecker des Elektrowerkzeugs müssen mit
der Stechdose übereinstimmen. Modizieren
Sie den Stecker auf keinen Fall. V erwenden
Sie keine Adapterstecker mit geerdeten
Elektrowerkzeugen. Nicht modizierte Stecker
und passende Steckdosen verringern einen
möglichen Stromschlag.
2. Fassen Sie keine geerdeten Oberächen,
u. a. Rohre, Kühler , Herde oder Kühlschränke
an. Die Gefahr eines Stromschlags ist höher ,
wenn Ihr Körper geerdet ist.
3. Setzen Sie Elektrowerkzeuge nicht Regen
oder nassen Bedingungen aus. W asser , das
in ein Elektrowerkzeug eindringt, erhöht die
Gefahr eines Stromschlags.
4. Missbrauchen Sie das Kabel nicht.
V erwenden Sie das Kabel nicht, um das
Elektrowerkzeug zu tragen, zu ziehen
3

oder von der Steckdose abzuschließen.
Bringen Sie das Kabel nicht mit Hitze,
scharfen Kanten oder beweglichen T eilen
in V erbindung. Beschädigte oder verwickelte
Kabel erhöhen die Gefahr eines Stromschlags.
5. W enn Sie ein Elektrowerkzeug
außen verwenden, verwenden Sie
ein V erlängerungskabel, das für den
Außeneinsatz geeignet ist. Die V erwendung
eines für den Außeneinsatz geeigneten Kabels
verringert die Gefahr eines Stromschlags.
6. W enn Sie es nicht vermeiden können, ein
Elektrowerkzeug an einem nassen Ort
einzusetzen, verwenden Sie eine durch
eine Fehlerstromeinrichtung geschützte
Stromzufuhr . Die V erwendung einer
Fehlerstromeinrichtung verringert die Gefahr
eines Stromschlags.
III. Persönliche Sicherheit
1. Bleiben Sie wachsam, passen Sie auf und
setzen Sie gesunden Menschenverstand ein,
wenn Sie ein Elektrowerkzeug verwenden.
V erwenden Sie kein Elektrowerkzeug,
wenn Sie müde sind oder unter Drogen -,
Alkohol - oder Medikamenteneinuss stehen.
Eine kurze Unaufmerksamkeit beim Einsatz
eines Elektrowerkzeugs kann zu schweren
V erletzungen führen.
2. T ragen Sie Schutzkleidung. T ragen Sie immer
eine Schutzbrille. Passende Schutzkleidung
wie eine Staubschutzmaske, rutschfeste
Sicherheitsschuhe, ein Schutzhelm oder
Gehörschutz verringern die V erletzungsgefahr .
3. V erhindern Sie unabsichtliches Anlassen.
Stellen Sie sicher , dass der Schalter in der
AUS - Stellung ist, bevor Sie das Stromkabel
oder das Akkupack anschließen, das
W erkzeug hochheben und tragen. Das
T ragen von Elektrowerkzeugen mit dem
Finger am Schalter oder das Einschalten
von Elektrowerkzeugen mit eingeschaltetem
Schalter führen schnell zu Unfällen.
4. Entfernen Sie Einstellschlüssel oder
Schraubenschlüssel, bevor Sie das
Elektrowerkzeug einschalten. Ein
Schraubenschlüssel oder ein an einem
beweglichen T eil des Elektrowerkzeugs
angeschlossener Schlüssel können zu
V erletzungen führen.
5. Strecken Sie sich nicht zu stark. V erlieren
Sie nicht den Halt und behalten Sie das
Gleichgewicht. Sie haben dann in unerwarteten
Situationen eine bessere Kontrolle über das
Elektrowerkzeug.
6. T ragen Sie entsprechende Kleidung. T ragen
Sie keine weiten Kleidungsstücke oder
Schmuck. Halten Sie Haare und Kleidung von
beweglichen T eile fern. Lose Kleidungsstücke,
Schmuck oder lange Haare können sich in
beweglichen T eilen verfangen.
7. W enn Geräte für den Anschluss von Staub-
abzugs - und Staubsammlungseinrichtungen
bereitgestellt sind, stellen Sie sicher ,
dass sie richtig angeschlossen sind und
verwendet werden. Die V erwendung von
Staubsammlung kann mit Staub in Beziehung
stehende Gefahren verringern.
8. Umgehen oder ignorieren Sie die
Sicherheitshinweise und - vorkehrungen
nicht, selbst wenn Sie im häugen Umgang
mit dem Elektrowerkzeug vertraut sind. Eine
unvorsichtige Handlung kann innerhalb von
Sekundenbruchteilen zu schweren V erletzungen
führen.
IV . V erwendung und Pege vonElektrowerkzeugen
1. Üben Sie keine Gewalt auf das
Elektrowerkzeug aus. V erwenden Sie
das richtige Elektrowerkzeug für die
Arbeitsaufgabe. Das richtige Elektrowerkzeug
funktioniert besser mit dem Durchsatz, für den
es konzipiert ist ( ).
2. Setzen Sie das Elektrowerkzeug nicht
ein, wenn es nicht mit dem Schalter ein -
oder ausgeschaltet werden kann. Jedes
Elektrowerkzeug, das nicht mit dem Schalter
gesteuert werden kann, ist gefährlich und muss
repariert werden.
3. Ziehen Sie den Stecker aus der Steckdose
oder nehmen Sie den Akkupack aus dem
Elektrowerkzeug (sofern abnehmbar), bevor
Sie Einstellungen vornehmen, Zubehör
auswechseln oder das Elektrowerkzeug
aufbewahren. Solche vorbeugenden
Sicherheitsmaßnahmen verhindern, dass das
Elektrowerkzeug aus V ersehen eingeschaltet
wird.
4. Lagern Sie nicht verwendete Elektrowerk-
zeug außerhalb der Reichweite von Kindern.
Personen, die nicht mit dem Elektrowerkzeug
oder diesen Anweisungen vertraut sind, soll-
ten das Elektrowerkzeug nicht verwenden.
Elektrowerkzeuge sind in den Händen von nicht
geschulten Bedienern gefährlich.
5. W artung von Elektrowerkzeugen
und Zubehör . Prüfen Sie auf nicht
ausgeuchtete oder klemmende bewegliche
T eile, zerbrochene T eile oder , andere
4

Bedingungen, die sich auf den Betrieb
des Elektrowerkzeugs auswirken können.
Lassen Sie das Elektrowerkzeug, wenn
es beschädigt ist, vor der V erwendung
reparieren. V iele Unfälle werden von schlecht
gewarteten Elektrowerkzeugen verursacht.
6. Halten Sie Schneidwerkzeuge scharf und
sauber . Richtig gewartete Schneidwerkzeuge
mit scharfen Schnittkanten klemmen nicht und
sind leichter zu steuern.
7. V erwenden Sie das Elektrowerkzeug, das
Zubehör und die Einsätze usw . gemäß dieser
Anweisungen; berücksichtigen Sie die
Arbeitsbedingungen und die auszuführende
Arbeit. Die zweckentfremdende V erwenden
des Elektrowerkzeugs könnte zu gefährlichen
Situationen führen.
8. Halten Sie die Griffe und Griffoberächen
trocken, sauber sowie öl - und fettfrei.
Rutschige Griffe und Griffoberächen
ermöglichen keine sichere Handhabung und
Kontrolle des Elektrowerkzeugs in unerwarteten
Situationen
V . V erwendung und Pege vonakkubetriebenen W erkzeugen
1. V erwenden Sie nur das vom Hersteller
zugelassene Ladegerät. Ein Ladegerät, das
für einen T yp des Batteriepacks geeignet ist,
kann bei einem anderen Batteriepack zu einer
Brandgefahr führen.
2. V erwenden Sie Elektrowerkzeuge nur mit den
angegebenen Batteriepacks. Die V erwendung
von anderen Akkupacks kann zu möglichen
V erletzungen oder einem Brand führen.
3. Halten Sie einen nicht verwendeten
Akkupack von anderen Metallobjekten fern,
u. a. Briefklammern, Münzen, Schlüssel,
Nägel, Schrauben oder anderen kleinen
Metallobjekten, die einen Kurzschluss
zwischen den Polen herstellen können.
Ein Kurzschließen der Akkupole kann zu
V erbrennungen oder einem Brand führen.
4. Bei Missbrauch kann Flüssigkeit aus dem
Akku ausgestoßen werden; vermeiden
Sie einen Kontakt. Spülen Sie bei einem
versehentlichen Kontakt mit klarem
W asser . Falls die Flüssigkeit die Augen
berührt, suchen Sie einen Arzt auf. V om
Akku ausgestoßene Flüssigkeit kann zu
Hautreizungen oder V erbrennungen führen.
5. V erwenden Sie keine beschädigten oder
umgebauten Akkus oder W erkzeuge.
Beschädigte oder umgebaute Akkus können
unvorhergesehen reagieren und Brände
sowie Explosionen verursachen oder eine
V erletzungsgefahr darstellen.
6. Setzen Sie einen Akkupack oder ein
W erkzeug nicht Feuer oder übermäßigen
T emperaturen aus. Das Aussetzen gegenüber
Feuer oder T emperaturen über 130°C kann eine
Explosion verursachen.
7. Befolgen Sie alle Anweisungen zum
Auaden und laden Sie das Akkupack
oder W erkzeug nicht außerhalb des in der
Anweisung angegeben T emperaturbereichs.
Unsachgemäßes Auaden oder bei
T emperaturen außerhalb des angegebenen
Bereichs kann den Akku beschädigen und die
Brandgefahr erhöhen.
VI. W artung
1. Lassen Sie das Elektrowerkzeug von
einem qualizierten Mechaniker warten
und verwenden Sie nur identische
Ersatzteile. Dies gewährleistet die Sicherheit
des Elektrowerkzeugs.
2. W arten Sie niemals beschädigte Akkupacks.
Die W artung von Akkus sollte nur vom Hersteller
oder von autorisierten Serviceanbietern
durchgeführt werden
VII. Heckenschere – Sicherheitswarnungen
1. V erwenden Sie die Heckenschere nicht
bei schlechten W etterbedingungen,
insbesondere wenn Blitzgefahr besteht. Dies
verringert die Gefahr , vom Blitz getroffen zu
werden.
2. Halten Sie alle Netzkabel und - leitungen
vom Schnittbereich fern. Stromkabel oder
- leitungen können in Hecken oder Büschen
verborgen sein und können versehentlich vom
Messer durchtrennt werden.
3. T ragen Sie einen Gehörschutz. Angemessene
Schutzausrüstung verringert das Risiko von
Gehörschäden.
4. Halten Sie die Heckenschere nur an
den isolierten Griffoberächen, da das
Messer verborgene Kabel berühren kann.
Messer , die ein unter Strom stehendes Kabel
durchtrennen und /oder berühren, können
freiliegende Metallteile des Elektrowerkzeugs
unter Strom setzen und der Bediener kann einen
Stromschlag erleiden.
5. Halten Sie Körperteile stets vom Messer
fern. Entfernen Sie bei laufendem Messer
kein geschnittenes Material oder halten
Sie Material, das geschnitten werden
soll. Die Messer bewegen sich auch nach
dem Ausschalten des Schalters weiter . Eine
5

kurze Unaufmerksamkeit beim Einsatz der
Heckenschere kann zu schweren V erletzungen
führen.
6. W enn Sie eingeklemmtes Material entfernen
oder die Heckenschere warten, stellen Sie
sicher , dass alle Netzschalter ausgeschaltet
sind und der Akku entfernt oder abgeklemmt
ist. Unerwartetes Betätigen der Heckenschere
beim Räumen von eingeklemmtem Material
oder bei W artungsarbeiten kann zu schweren
V erletzungen führen.
7. T ragen Sie die Heckenschere bei gestopptem
Messer am Griff und achten Sie darauf, dass
Sie den Netzschalter nicht betätigen. Das
richtige T ragen der Heckenschere verringert das
Risiko eines unbeabsichtigten Starts und der
daraus resultierenden V erletzungen durch die
Messer .
8. Die Heckenschere immer mit aufgesetztem
Messerschutz transportieren oder
aufbewahren. Eine richtige Handhabung
der Heckenschere verringert die Gefahr von
V erletzungen durch die Messer .
BEW AHREN SIE DIESE
ANWEISUNGEN
6
Seite wird geladen ...
Seite wird geladen ...
Seite wird geladen ...
Seite wird geladen ...
Seite wird geladen ...
Seite wird geladen ...
Seite wird geladen ...
Seite wird geladen ...
Seite wird geladen ...
Seite wird geladen ...
Seite wird geladen ...
Seite wird geladen ...
Seite wird geladen ...
Seite wird geladen ...
Seite wird geladen ...
Seite wird geladen ...
Seite wird geladen ...
Seite wird geladen ...
Seite wird geladen ...
Seite wird geladen ...
Seite wird geladen ...
Seite wird geladen ...
Seite wird geladen ...
Seite wird geladen ...
Seite wird geladen ...
Seite wird geladen ...
Seite wird geladen ...
Seite wird geladen ...
Seite wird geladen ...
Seite wird geladen ...
Seite wird geladen ...
Seite wird geladen ...
Seite wird geladen ...
Seite wird geladen ...
Seite wird geladen ...
Seite wird geladen ...
Seite wird geladen ...
Seite wird geladen ...
Seite wird geladen ...
Seite wird geladen ...
Seite wird geladen ...
Seite wird geladen ...
Seite wird geladen ...
Seite wird geladen ...
Seite wird geladen ...
Seite wird geladen ...
Seite wird geladen ...
Seite wird geladen ...
Seite wird geladen ...
Seite wird geladen ...
Seite wird geladen ...
Seite wird geladen ...
Seite wird geladen ...
Seite wird geladen ...
Seite wird geladen ...
Seite wird geladen ...
Seite wird geladen ...
Seite wird geladen ...
Seite wird geladen ...
Seite wird geladen ...
Seite wird geladen ...
Seite wird geladen ...
Seite wird geladen ...
Seite wird geladen ...
Seite wird geladen ...
Seite wird geladen ...
Seite wird geladen ...
Seite wird geladen ...
Seite wird geladen ...
Seite wird geladen ...
Seite wird geladen ...
Seite wird geladen ...
Seite wird geladen ...
Seite wird geladen ...
Seite wird geladen ...
Seite wird geladen ...
Seite wird geladen ...
Seite wird geladen ...
Seite wird geladen ...
Seite wird geladen ...
Seite wird geladen ...
Seite wird geladen ...
Seite wird geladen ...
Seite wird geladen ...
Seite wird geladen ...
Seite wird geladen ...
Seite wird geladen ...
Seite wird geladen ...
Seite wird geladen ...
Seite wird geladen ...
Seite wird geladen ...
Seite wird geladen ...
Seite wird geladen ...
Seite wird geladen ...
Seite wird geladen ...
Seite wird geladen ...
Seite wird geladen ...
Seite wird geladen ...
Seite wird geladen ...
Seite wird geladen ...
Seite wird geladen ...
Seite wird geladen ...
Seite wird geladen ...
Seite wird geladen ...
-
 1
1
-
 2
2
-
 3
3
-
 4
4
-
 5
5
-
 6
6
-
 7
7
-
 8
8
-
 9
9
-
 10
10
-
 11
11
-
 12
12
-
 13
13
-
 14
14
-
 15
15
-
 16
16
-
 17
17
-
 18
18
-
 19
19
-
 20
20
-
 21
21
-
 22
22
-
 23
23
-
 24
24
-
 25
25
-
 26
26
-
 27
27
-
 28
28
-
 29
29
-
 30
30
-
 31
31
-
 32
32
-
 33
33
-
 34
34
-
 35
35
-
 36
36
-
 37
37
-
 38
38
-
 39
39
-
 40
40
-
 41
41
-
 42
42
-
 43
43
-
 44
44
-
 45
45
-
 46
46
-
 47
47
-
 48
48
-
 49
49
-
 50
50
-
 51
51
-
 52
52
-
 53
53
-
 54
54
-
 55
55
-
 56
56
-
 57
57
-
 58
58
-
 59
59
-
 60
60
-
 61
61
-
 62
62
-
 63
63
-
 64
64
-
 65
65
-
 66
66
-
 67
67
-
 68
68
-
 69
69
-
 70
70
-
 71
71
-
 72
72
-
 73
73
-
 74
74
-
 75
75
-
 76
76
-
 77
77
-
 78
78
-
 79
79
-
 80
80
-
 81
81
-
 82
82
-
 83
83
-
 84
84
-
 85
85
-
 86
86
-
 87
87
-
 88
88
-
 89
89
-
 90
90
-
 91
91
-
 92
92
-
 93
93
-
 94
94
-
 95
95
-
 96
96
-
 97
97
-
 98
98
-
 99
99
-
 100
100
-
 101
101
-
 102
102
-
 103
103
-
 104
104
-
 105
105
-
 106
106
-
 107
107
-
 108
108
-
 109
109
-
 110
110
-
 111
111
-
 112
112
-
 113
113
-
 114
114
-
 115
115
-
 116
116
-
 117
117
-
 118
118
-
 119
119
-
 120
120
-
 121
121
-
 122
122
-
 123
123
-
 124
124


Toro Cordless Hedge Trimmer 60V Flex-Force Power System 51855T - Tool Only Benutzerhandbuch
- Kategorie
- Elektrowerkzeuge
- Typ
- Benutzerhandbuch
in anderen Sprachen
- français: Toro Cordless Hedge Trimmer 60V Flex-Force Power System 51855T - Tool Only Manuel utilisateur
- español: Toro Cordless Hedge Trimmer 60V Flex-Force Power System 51855T - Tool Only Manual de usuario
- italiano: Toro Cordless Hedge Trimmer 60V Flex-Force Power System 51855T - Tool Only Manuale utente
- Nederlands: Toro Cordless Hedge Trimmer 60V Flex-Force Power System 51855T - Tool Only Handleiding
- dansk: Toro Cordless Hedge Trimmer 60V Flex-Force Power System 51855T - Tool Only Brugermanual
- polski: Toro Cordless Hedge Trimmer 60V Flex-Force Power System 51855T - Tool Only Instrukcja obsługi
- svenska: Toro Cordless Hedge Trimmer 60V Flex-Force Power System 51855T - Tool Only Användarmanual
Verwandte Artikel
-
Toro Flex-Force Power System 24in 60V Hedge Trimmer Benutzerhandbuch
-
Toro PowerPlex 61cm 40V MAX Hedge Trimmer Benutzerhandbuch
-
-
Toro 60V Cordless Power Shovel Benutzerhandbuch
-
-
-
Toro Flex-Force Power System 8.0Ah 60V MAX Battery Pack Benutzerhandbuch
