Seite wird geladen ...

Dual Link 2.5’’ Drive Kit
ADS Tech
website : www.adstech.com
Support : www.adstech.com/support/support.asp
English • German • French • Spanish
Dual Link 2.5’’ Drive Kit
Convert Your 2.5’’ Hard Drive To FireWire or USB 2.0

page 3

page 3
Verify that your Dual Link 2.5’’ Drive Kit includes the following:
• 2.5’’ Drive Enclosure
• 6-to-6 pin FireWire Cable
• 2.0 USB Cable
• 4-pin to 6-pin FireWire converter or 4-to-6 pin FireWire Cable
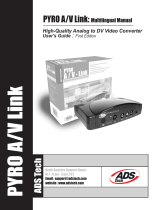
Installing a 2.5’’ Hard Drive in your Dual Link Drive Kit enclosure:
4
Open the drive enclosure
and remove the screw
pack inside.
Remove the back plate
and the green conversion
board from the case.
With the bottom of the 2.5’’
drive facing the smooth side
of the board, align the drive
socket & slide the 2.5’’ hard
drive into the pins of the green
conversion board. Make sure
the pins slide all the way back.
1
2
3
Turn board and hard drive upside
down. Screw together with short
screws on each corner.
Insert back plate, and drive
into base of enclosure.
Place top shell on the enclo-
sure. Carefully turn over.
5
6
Use remaining 4 long screws to
screw the enclosure together.
7
Installing on your computer
1. Turn on your computer.
2. Plug the 6 x 6 PIN rewire cable or USB Cable into the Computer’s
available rewire or USB 2.0 port. Then connect the other end to cor-
responding ports or your Dual Link 2.5’’ drive kit.
3. At this point, Windows might require you to insert the WINDOWS CD
and copy some drivers automatically.
4. For other versions of WINDOWS 2000 or WINDOWS XP, a drive letter
should appear under MY COMPUTER.
5. For other versions of WINDOWS, please refer to the next section to
nish installing Dual Link 2.5’’ Drive Kit.
6. If you have a MAC, then you don’t need to do anything. The drive will
automatically mount on your desktop.
English

page 4
page 5
Installing Hard Drives in WINDOWS:
Windows XP & 2000 hard drive installation notes:
Read this after you have installed your hard drive into the drive kit.
After you plug the drive kit into your computer and your hard drive does not show up as a
drive letter in My Computer, you would need to do the following:
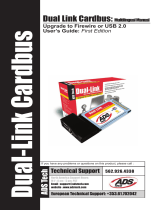
• Right click on My Computer
• Click on Manage
You will see the window pictured below:
• Click on disk management and this will show all the drives in your system.
• If prompted to initialize your drive, go ahead and do so.(For new hard drives only, for hard
drives with data in them, initializing it erases the data on that drive.)
You will now see the Dual Link drive in the list of drives in the lower right side of the window.
You may go ahead and right click on the drive, and click new partition, this will run a wizard
that allows you to partition the drive, format it and assign it a drive letter.
Windows 98SE & Me hard disk drive installation notes:
Read this after you have installed your hard drive into the drive kit. After you plug the
drive kit into your computer and your hard drive does not show up as a drive letter in My
Computer, you would need to do the following:
• Right click on My Computer
• Click on Properties you will see the window picture below:
• Click on Device Manager
• Click on Disk Drives
• Double click on the drive that you just plugged in
• Click on the settings tab
• Check the removeable box
• Assign a drive letter (Make sure you assign a drive letter
that is not in use, the start and ending drive letter should be the same letter also. So if you
typed in drive M, as the starting drive letter, it should also be the ending drive letter)
• Click ok and then restart the computer
• After restart, open up my computer, this will show the drive letter that you just assigned to
the Dual Link drive. If this is a new drive, you can double click the drive to format it.
FDISK
Fdisk is a DOS application that will allow you to partition new hard drives in the computer (eg: drive kit
w/hard drive).You must use Fdisk if you plan to upgrade the OS in your computer or plan to move the drive
kit to different computers from time to time. Fdisk is really hard to use and only intended for advanced
users. It can be accessed from the DOS Prompt by typing Fdisk. For more help on Fdisk, check out the
Microsoft website and search for help on Fdisk.
1. If you have a computer that comes with a 6 PIN connector (similar to the connector on our cable)
then the drive will automatically be powered by the 1394 PORT.
2. If you have a computer that has a PIN connector then you need to plug the enclosure USB POWER
CABLE. One end plugs into an available USB PORT, the other end plugs into your DRIVE KIT.
Also, since you have a 4 PIN connector on your computer, use the enclosure 6 PIN to 4 PIN
converter or the enclosed 6 PIN by 4 PIN cable.
English

page 4
page 5
Erst kontrollieren, ob Ihr 2,5” Dual Link-Laufwerk folgende Teile enthält
• 2.5’’ Laufwerkgehäuse
• FireWire-Anschlusskabel, 6 x 6 PINS
• USB-Kabel
• Fire Wire-Adapter, 4 PIN / 6 PIN, Firewire-Kabel , 4 PIN / 6 PIN
Einbau eines 2.5’’-Festplattenlaufwerks in das Dual Link-Gehäuse :
4
Laufwerkgehäuse öffnen
und das beigepackte
Schraubenpaket entfernen.
Rückwand und grüne
Umrüstplatine aus dem
Gehäuse nehmen.
2,5”-Laufwerk so anordnen,
dass seine Unterseite gegen
die glatte Seite der Platine
liegt, Laufwerkbuchse uchtend
ausrichten und dann das
2,5”-Festplattenlaufwerk auf die
Pins der grünen Umrüstplatine
schieben. Darauf achten, dass
alle Pins ganz eingeschoben sind.
1
2
3
Platine und Laufwerk auf den
Kopf stellen. Unter Verwendung
der kurzen Schrauben an den
Ecken zusammenschrauben.
Rückwand einsetzen,
dann das Laufwerk in den
Gehäusesockel schieben.
Obere Schale auf das Gehäuse
setzen. Vorsichtig wenden.
5
6
7
Mit den verbleibenden 4 langen
Schrauben das Gehäuse
zusammenschrauben.
Installation auf Ihrem Computer
1. Computer einschalten.
2. Das 6 x 6 FireWire-Kabel oder das USB-Kabel in eine freie FireWire-
oder USB 2.0-Steckbuchse stecken. Dann das andere Ende über die
entsprechenden Steckbuchsen des 2,5“ Dual Link-Laufwerks anschließen,
3. Windows fordert Sie jetzt zum Einlegen Ihrer WINDOWS CD auf und
kopiert automatisch einige Treiber.
4. Bei anderen Versionen von Windows 2000 oder Windows XP muss unter
ARBEITSPLATZ ein Laufwerkbuchstabe erscheinen.
5. Bei anderen WINDOWS-Versionen lesen Sie bitte den nachfolgenden
Abschnitt vor der endgültigen Installation des 2,5“ Dual Link-Laufwerks.
6. Wenn Sie einen MAC haben, dann brauchen Sie nichts zu unternehmen,
Das Laufwerk wird automatisch an Ihrem Arbeitsplatz installiert.
German

page 6
page 7
Installation von Festplatten unter WINDOWS:
Festplatten-Installationshinweise für Windows XP & Windows 2000:
Diese nach Installation der Festplatte in den Laufwerk-Bausatz unbedingt lesen.
Erscheint nach Anschluss des Laufwerk-Bausatzes kein Laufwerkbuchstabe unter
ARBEITSPLATZ, dann müssen Sie wie folgt vorgehen:
•
Klicken Sie rechts auf ARBEITSPLATZ
•
Klicken Sie Verwaltung
•
Klicken Sie Laufwerk-Verwaltung. Sie sehen dann alle Laufwerke in Ihrem System.
•
Werden Sie zur Initialisierung des Laufwerks aufgefordert, dann fahren sie fort. (Nur bei
neuen Laufwerken; bei Festplatten mit Datenbestand werden bei der Initialisierung die
Daten auf dem Laufwerk gelöscht.)
Sie sehen jetzt das Dual Drive-Laufwerk auf der Laufwerkliste unten auf der rechten
Fensterseite. Sie können jetzt das Laufwerk rechts klicken, dann Neue Partition. Damit
wird ein Assistent aufgerufen, der das Partitionieren der Festplatte und das Formatieren
ermöglicht und einen Laufwerkbuchstaben zuordnet.
Festplatten-Installationshinweise für Windows XP & Windows 2000:
•
Klicken Sie Verwaltung
•
Klicken Sie Laufwerke
•
Das gerade angeschlossene Laufwerk klicken
•
Register Einstellungen klicken
•
Das Kästchen Wechselmedium abhaken
•
Laufwerkbuchstaben zuordnen
•
Computer neu starten
•
Nach dem Neustart ARBEITSPLATZ öffnen. Sie sehen
jetzt den Laufwerkbuchstaben, den Sie gerade Ihrem Dual Link-Laufwerk zugeordnet haben.
Handelt es sich um ein neues Laufwerk, können Sie es zum Formatieren doppelt klicken.
FDISK
Fdisk ist eine DOS-Anwendung, die das Partitionieren neuer Festplattenlaufwerke des Computers
ermöglicht (z.B.: Laufwerk-Bausatz w/hard drive). Sie müssen Fdisk benutzen, wenn Sie ihren Computer
nachrüsten möchten, oder den Laufwerkbausatz zeitweilig an einen anderen Computer anschließen
wollen. Fdisk ist schwierig zu benutzen und nur für Fortgeschrittene gedacht. Zugang erhält man über den
DOS-Prompt, wo man Fdisk eingibt. Weitere Angaben über Fdisk nden Sie auf der Microsoft-Website
unter Hilfe, nach Eingabe von Fdisk.
1. Wenn Sie einen Computer haben, der einen Steckverbinder mit sechs PINS hat (wie der Verbinder
unseres Kabels) dann erfolgt die Stromversorgung automatisch über den 1394-er PORT.
2. Wenn Sie einen Computer mit einem PIN-Stecker haben, dann müssen Sie das USB POWER
CABLE stecken. Das eine Ende wird in den freien USB PORT gesteckt, das andere Ende in Ihren
Laufwerkbausatz. Und da Sie einen 4 PIN-Stecker an Ihrem Computer haben, müssen Sie den 6 PIN /
4 PIN-Adapter oder das beigepackte 6 PIN / 4 PIN-Kabel benutzen.
German

page 6
page 7
Véri ez que votre boîtier disque dur externe 2,5” à double connexion inclut ce qui suit :
• Boîtier disque dur 2,5’’
• Câble FireWire 6/6 broches
• Câble USB
• Adaptateur FireWire 4 à 6 broches ou câble FireWire 4/6 broches
Installation d’un disque dur de 2,5’’ dans votre boîtier externe à double connexion :
Ouvrez le boîtier externe
et enlevez le paquet de vis
se trouvant à l’intérieur.
Retirez du boîtier la plaque
arrière et le panneau de
conversion vert.
Le disque dur de 2,5” faisant
face au côté lisse du panneau,
alignez la prise du disque
avec les broches du panneau
de conversion vert et faites
glisser le disque dur dans ces
broches. Veillez à ce que la
prise soit bien enfoncée dans
les broches.
1
2
3
4
Mettez le panneau et le disque
dur à l’envers. Fixez-les à chaque
coin à l’aide de vis courtes.
Insérez la plaque arrière et
le disque dur au fond
du boîtier.
Placez le couvercle sur le
boîtier. Retournez le boîtier
avec soin.
5
6
Fixez le boîtier avec les 4 vis
longues restantes.
7
Installation sur votre ordinateur
1. Allumez votre ordinateur.
2. Branchez le câble FireWire 6/6 broches ou le câble USB au port
libre FireWire ou USB 2.0 de l’ordinateur. Puis branchez l’autre
extrémité au port correspondant sur votre boîtier de disque dur
2,5 « à double connexion.
3. Windows vous demandera peut-être d’insérer le CD de Windows
et copiera certains pilotes automatiquement.
4. Pour les versions WINDOWS 2000 ou WINDOWS XP, une lettre
de lecteur devrait apparaître sous le POSTE DE TRAVAIL.
5. Pour les autres versions de WINDOWS, veuillez consulter
la section suivante pour terminer l’installation du disque dur externe.
6. Si vous avez un ordinateur MAC, vous n’avez rien à faire car
le disque dur sera automatiquement installé sur votre
bureau électronique.
French

page 8
page 9
Installation des disques durs sous WINDOWS :
Notes d’installation du disque dur sous Windows XP & 2000 :
Lisez les instructions suivantes après l’installation du disque dur dans le boîtier externe.
Si, après le branchement du boîtier disque dur à l’ordinateur, le disque dur n’est pas
répertorié dans POSTE DE TRAVAIL sous une lettre de lecteur, veuillez effectuer les
opérations suivantes :
• Faites un clic droit sur POSTE DE TRAVAIL.
• Cliquez sur Gérer.
• Cliquez sur Gestion des disques pour consulter tous les disques durs répertoriés sur
votre système.
• Si l’ordinateur vous propose d’initialiser votre disque dur, faites-le, mais seulement pour
les nouveaux disques durs. En effet, toute initialisation d’un disque dur contenant des
données entraînera la suppression de ces données.
Le disque dur à double connexion devrait maintenant s’af cher dans la liste de disques
durs située en bas à droite de la fenêtre. Vous pouvez alors faire un clic droit sur le
disque dur et cliquer sur Nouvelle partition. Un assistant s’af chera pour vous permettre
de partitionner le disque dur, le formater et lui attribuer une lettre de lecteur.
Notes d’installation du disque dur sous Windows 98SE & Me :
• Cliquez sur Gestionnaire de périphériques.
• Cliquez sur Lecteurs de disque.
• Double-cliquez sur le disque que vous
venez de connecter à l’ordinateur.
• Cliquez sur l’onglet Paramètres.
• Cochez la case Amovible.
• Attribuez une lettre de lecteur au disque.
• Redémarrez l’ordinateur.
• Après le redémarrage, ouvrez Poste de travail pour y
voir la lettre de lecteur que vous venez d’attribuer au
disque dur externe. S’il s’agit d’un nouveau disque, vous pouvez double-cliquer dessus
pour le formater.
FDISK
Fdisk est une application DOS qui vous permettra de partitionner de nouveaux disques durs dans
un ordinateur (par exemple boîtier externe avec disque dur). Vous devez utiliser Fdisk si vous avez
l’intention de passer à un système d’exploitation plus puissant ou d’utiliser de temps à autre le disque
dur externe avec d’autres ordinateurs. Dif cile à utiliser, Fdisk est réservé aux utilisateurs expérimentés.
Vous pouvez y accéder par l’intermédiaire de l’invite du DOS en tapant Fdisk. Pour de plus amples
renseignements à ce sujet, rendez-vous sur le site Web Microsoft et recherchez une aide sur Fdisk.
1. Si votre ordinateur est équipé d’un connecteur à 6 broches (semblable au connecteur de notre câble),
le disque dur sera automatiquement alimenté par le port 1394.
2. Si votre ordinateur est équipé d’un connecteur à 4 broches, vous devrez brancher le câble
d’alimentation USB fourni. L’une des extrémités se branche à un port USB libre, tandis que l’autre se
branche au boîtier disque dur externe.
De plus, comme votre ordinateur est doté d’un connecteur à 4 broches, vous pouvez utiliser
l’adaptateur 6 à 4 broches ou le câble 6/4 broches, tous deux inclus.
French

page 8
page 9
Veri que que el Kit de la unidad Dual Link 2.5’’ incluya lo siguiente:
• Caja para la unidad 2.5’’
• Cable FireWire de 6 a 6 patillas
• Cable USB
• Conversor FireWire de 4 patillas a 6 patillas o cable FireWire de 4 patillas a 6 patillas
Instalar una unidad de disco duro 2.5’’ en la caja del Kit de la unidad Dual Link:
Abra la caja de la unidad
y saque el paquete de
tornillos del interior.
Retire la placa posterior
y la placa verde de
conversión de la caja.
Con la sección inferior de la
unidad 2.5’’ orientada hacia el
lado suave de la placa, alinee
la clavija de la unidad y deslice
la unidad de disco duro 2.5’’
en las clavijas de la placa de
conversión verde. Compruebe
que las patillas se introduzcan
bien hacia dentro.
1
2
3
Inserte la placa posterior e
introduzca el conjunto en el
fondo de la caja.
Coloque la carcasa superior
sobre la caja. Con cuidado
dé la vuelta al conjunto.
5
6
4
Utilice los 4 tornillos largos que
quedan para atornillar la caja.
7
Instalar en el ordenador
1. Encienda el ordenador.
2. Conecte el cable rewire de 6 x 6 patillas o el cable USB en el puerto
rewire o USB 2.0 disponible en el ordenador. A continuación, conecte
el otro extremo en los puertos correspondientes o en el kit de la unidad
Dual Link 2.5’’.
3. En este punto, es posible que Windows necesite que introduzca el CD
WINDOWS y copiar algunos controladores automáticamente.
4. Para otras versiones de WINDOWS 2000 o WINDOWS XP, la letra de
la unidad aparecerá en MI ORDENADOR.
5. Para otras versiones de WINDOWS, consulte por favor la siguiente
sección para nalizar la instalación del Kit de la unidad Dual Link 2.5’’.
6. Si tiene un MAC, no necesita hacer nada. La unidad se montará
automáticamente en el ordenador de escritorio.
Dé la vuelta a la placa y a la
unidad de disco duro. Atornillar
con los tornillos cortos en
cada esquina.
Spanish

page 10
page 11
Instalar las unidades de disco duro en WINDOWS:
Notas para la instalación de unidades de disco duro en Windows XP y 2000:
Lea esta información cuando haya instalado la unidad de disco duro en el kit de la unidad.
Después de conectar el kit de la unidad en el ordenador y la unidad de disco duro no
aparece identi cada con una letra en Mi Ordenador, necesitará hacer lo siguiente:
• Haga un clic con el botón derecho en Mi Ordenador
• Haga clic en Gestionar
• Haga clic en gestión de discos y esto mostrará todas las unidades instaladas en el sistema
• Si el ordenador le pide que inicialice la unidad, hágalo así. (Para discos duros nuevos
solamente, para discos duros que contienen datos, cuando se inicializan se borran los datos
contenidos en esa unidad.)
Ahora podrá ver la unidad Dual Link en la lista de unidades que aparece en la esquina
inferior derecha de la ventana. Puede hacer clic con el botón derecho en la unidad y hacer
clic en división nueva, esto pondrá en marcha un asistente que le permitirá dividir la unidad,
formatearla y asignar una letra a la unidad.
Notas para la instalación de unidades de disco duro en 98SE y Me:
• Haga clic en el Administrador de dispositivos
• Haga clic en Unidades de disco duro
• Haga un doble clic en la unidad que acaba de conectar
• Haga clic en la pestaña ajustes
• Marque el cuadro separable
• Asigne una letra a la unidad
• Reinicie el ordenador
• Después de reiniciar el ordenador, haga clic en Mi ordenador, esto le permitirá ver la letra
que acaba de asignar a la unidad Dual Link. Si es una unidad nueva, puede hacer un doble
clic en la unidad para formatearla.
FDISK
Fdisk es una aplicación de DOS que le permitirá dividir las unidades de disco duro nuevas en el
ordenador (p. ej. Kit de unidad con unidad de disco duro). Debe utilizar Fdisk si tiene pensado actualizar
el OS en el ordenador o si tiene pensado mover el kit de unidad a ordenadores diferentes de vez en
cuando. Fdisk es bastante difícil de utilizar y más que nada para el uso de usuarios avanzados. Puede
accederse desde el mensaje DOS escribiendo Fdisk. Para más ayuda sobre Fdisk, diríjase al sitio Web
de Microsoft y busque ayuda sobre Fdisk.
1. Si su ordenador incluye una conexión de 6 PATILLAS (similar a la conexión en nuestro cable) la unidad
se energizará automáticamente por el PUERTO 1394.
2. Si su ordenador incluye una conexión de PATILLAS necesita conectar el CABLE DE ALIMENTACIÓN
USB de la caja. Un extremo se conecta al PUERTO USB disponible, el otro extremo se conecta en el
KIT DE LA UNIDAD. Asimismo, puesto que usted tiene una conexión de 4 patillas en el ordenador,
utilice el conversor de 6 PATILLAS a 4 PATILLAS de la caja o el cable de 6 PATILLAS por 4 PATILLAS
que se incluye.
Spanish

page 10
page 11
Service and Warranty:
Service and Warranty:
If you require assistance with the installation, operation, or application of your ADS Technologies, Inc. product there are
several options available to you as described in the technical support section of this manual. Your primary source for infor-
mation and assistance is always your computer store or computer parts dealer. If your ADS product needs repair or replace-
ment, contact your dealer for on-site repair service.
The ADS Technologies technical support and customer service staff can aid in solving many problems. Our technical sup-
port department is available to repair any ADS Technologies product. You or your dealer must return products to our factory
for repair or warranty replacement.
Return/Replacement:
Return/Replacement:
If you need to return your ADS Technologies product you should return the product directly to the dealer or store where
you purchased the product. Each individual computer store or dealer sets product returns policies for their customers. ADS
Technologies, Inc. cannot be responsible for the actions or policies set by our dealers. If you desire to return the product for
a refund, you must get the refund from the dealer or store you purchased the product from. If you purchased the product
directly from ADS please see the “Terms and Conditions of Sale” on the reverse side of your sales invoice.
Returns to ADS Technologies, Inc. are for repair or warranty replacement only. If you need to return product to ADS Tech-
nologies, Inc. for repair or replacement you must follow these steps:
1. Call our Technical Support department at (562) 926-4338 in the USA or +353-61-702042 in Europe to obtain a Return
Merchandise Authorization (RMA) number.
2. The RMA number is valid for 30 days.
3. Ship the product to the ADS factory with the RMA number marked on the inside and outside of the package. If there is
no RMA number on the package or the RMA number has expired, the shipment will be refused. ADS will not be liable
for lost or mis-shipped products.
4. Replacement product cannot be shipped to you until the defective product has been received by ADS.
5. Once the product is received at the factory it will be tested and then repaired or replaced.
6. Turn around time is approximately one week. A repaired or replacement product will be shipped back to you.
Warranty:
Warranty:
This ADS Technologies, Inc. product comes with a One (1) year hardware warranty. ADS Technologies, Inc. (ADS) warrants this product against
defects in material and workmanship for a period of One (1) year from the date of original purchase from ADS or an authorized ADS dealer. This
warranty applies only to the original purchase of the product and is not transferable. This warranty does not cover any incompatibilities due to the
user’s computer, hardware, software or other related system configuration in which the product interfaces. Proof of
purchase will be required before any warranty consideration by ADS occurs.
This warranty does not cover any damage caused by negligence, non-authorized modifications, or parts installed without prior written permission
from ADS.
This warranty does not apply if the product has been damaged by accident, abuse, or misapplication, nor as a result of service to the product by
anyone other than ADS.
If your ADS product is not in working order, your only recourse is repair or warranty replacement, as described above. UNDER NO CIRCUMSTAN-
CES will ADS Technologies, Inc. be liable for consequential damages, including but not limited to any lost savings, lost profits, or any other dama-
ges, caused by the use of any ADS Technologies, Inc. product or inability to use the product, even if the dealer or ADS Technologies, Inc. has been
advised of such liability or other claims. This includes damage to property and, to the extent permitted by law, damages for personal injury. This
warranty is in lieu of all other warranties including implied warranties of merchantability and fitness for a particular purpose.
FCC Information
Federal communications Commission Radio Frequency Interference Statement
Note: This equipment has been tested and found to comply with the limits for a class B digital device, pursuant to Part 15
of the FCC Rules. These limits are designed to provide reasonable protection against harmful interference when the equip-
ment is operated in a residential installation. This equipment generates, uses and can radiate radio frequency energy and if
not installed and used in accordance with the instruction manual may cause harmful interference to radio communications.
However, there is no guarantee that interference will not occur in a particular installation. If this equipment does cause
harmful interference to radio or television reception, which can be determined by turning the equipment off and on, the user
is encouraged to try to correct the interference by one or more of the following measures:
• Reorient or relocate the receiving antenna
• Increase the separation between the equipment and receiver.
• Connect the equipment into an outlet on a circuit different from that to which the receiver is connected.
• Consult the dealer or an experienced radio TV technician for help.
Notice:
• The changes or modifications not expressly approved by the party responsible for compliance could void the user’s
authority to operate the equipment.
• Shielded interface cables and AC power cord, if any, must be used in order comply with the emission limits.

ADS Tech
North America Of ce
12627 Hidden Creek Way
Cerritos, CA, 90703
Phone:
562.926.1928
Fax:
562.926.0518
European Of ce
UNIT 1B BLOCK B
SHANNON FREE ZONE
COUNTY CLARE, IRELAND
Sales: +353.61.702042
Part No. 188-593
www.adstech.com
Tech
ADS Tech
Technical Support
562.926.4338
North America Support Hours:
M-F : 7 am - 6 pm, PST
website : www.adstech.com
European Technical Support: +353.61.702042
Tech
If you have any problems or questions on this product, please call :
Dual Link 2.5’’ Drive Kit
1/12