
41/18-74 XA Rev. 04
Stellungsregler TZIDC-110 für PROFIBUS PA
Inbetriebnahmeanleitung 41/18-74 XA
ABB Automation Products GmbH
Schillerstr. 72 · 32425 Minden, Deutschland
Tel: +49 551 905-534 · Fax: +49 551 905-555
ABB optimiert kontinuierlich ihre Produkte, deshalb sind Änderungen der
technischen Daten in diesem Dokument vorbehalten.
Printed in the Fed. Rep. of Germany (02.2009)
© ABB 2009
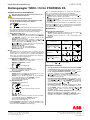
Vorgehensweise bei Inbetriebnahme
1. Pneumatische Hilfsenergie einspeisen
2. Den Bus mit beliebiger Polung (oder Hilfsenergie 9 V DC ...
32 V DC) an die Busanschlüsse anschließen;
wird angezeigt
Wenn das Emergency-Shutdown-Modul installiert ist, muss die
Versorgungsspannung für dieses Modul 24 V DC betragen
(Klemmen +85 / -86) und der Schalter in Mittelstellung stehen.
Andernfalls hat das Gerät keine pneumatische Funktion.
3. Anbau kontrollieren, hierzu:
-
M
ODE
und
E
NTER
gleichzeitig drücken und bis zum
Ablauf des Countdowns von 3 auf 0 halten. Dann
M
ODE
und
E
NTER
loslassen.
Das Gerät wechselt in die
Arbeitsebene, Betriebsart 1.x
-
MODE
drücken und halten; zusätzlich so oft oder
drücken, bis Betriebsart 1.3 (Handverstellung im Sensorbe-
reich) angezeigt wird, dann
MODE
loslassen
- oder drücken, um den Antrieb in die mechanischen
Endlage zu fahren, und Endlagen prüfen;
Empfohlener Bereich:
zwischen -28° und +28° für Linearantriebe
zwischen -57° und +57° für Schwenkantriebe
Mindestwinkel: 25°
Wichtig:
Der Anbau bzw. die Einstellung sollte so erfolgen, dass der
Arbeitsbereich des Positionssensors möglichst gleichmäßig
von der Mitte aus verläuft. Führen Sie die Einstellung dabei so
durch, dass ein möglichst großer Drehwinkel am Positionssen-
sor im Stellungsregler ausgenutzt wird.
4. In die Busebene zurückkehren:
-
M
ODE
und
E
NTER
zusammen drücken und bis zum
Ablauf des Countdowns von 3 auf 0 halten
-
M
ODE
und
E
NTER
loslassen
wird angezeigt
5. Standard-Selbstabgleich durchführen.
- Stellen Sie sicher, dass sich das Gerät in der
Busebene ("REMOTE") befindet.
für
Linearantriebe:
-
MODE
drücken und halten, bis der Countdown von 5 auf
0 abgelaufen ist, dann
MODE
loslassen
-
MODE
erneut
drücken und halten, bis der Countdown
von 3 auf 0 abgelaufen ist, dann
MODE
loslassen.
Der Standard-Selbstabgleich wird gestartet.
Der Fortschritt wird angezeigt.
für
Schwenkantriebe:
-
ENTER
drücken und halten
- wird angezeigt
-
ENTER
halten, bis die folgende Anzeige erscheint:
-
ENTER
loslassen
-
ENTER
erneut
drücken und halten, bis der Countdown
von 3 auf 0 abgelaufen ist,
ENTER
loslassen.
Der Standard-Selbstabgleich wird gestartet.
Der Fortschritt wird angezeigt.
Bei erfolgreichem Selbstabgleich werden die ermittelten Para-
meter automatisch gespeichert, und das Gerät kehrt in die
Busebene zurück ("REMOTE" wird angezeigt).
!
Beachten Sie immer alle Sicherheitshinweise in der
Betriebsanleitung zum Gerät.
conf
mA
%
C
¬
conf
mA
%
C
¬
conf
mA
%
C
¬
conf
mA
%
C
¬
Wird der Standard-Selbstabgleich mit Fehlercode 255 abgebro-
chen, wechselt das Gerät automatisch in die Konfigura-
tionsebene zum Parameter P1.1 Autoadjust. In diesem Fall:
-
MODE
drücken und halten. Zusätzlich mehrmals kurz oder
drücken bis P1.6 (EXIT) angezeigt wird.
-
MODE
loslassen. CANCEL wird angezeigt. Falls nicht, einmal
kurz oder drücken
-
ENTER
drücken und bis zum Ablauf des Countdowns von 3
auf 0 halten.
Der Stellungsregler kehrt automatisch in die Arbeitsebene zurück.
Zweimal kurz drücken, um in die Betriebsart 1.3 zu gelangen
und Anbau überprüfen. Ggf. nachjustieren (siehe Betriebsanlei-
tung) und Standard-Selbstabgleich wiederholen.
Betriebsarten
Anwahl aus der Arbeitsebene:
•
MODE
drücken und halten; zusätzlich so oft wie nötig kurz
drücken; gewählte Betriebsart wird angezeigt
•
MODE
loslassen; Position in % oder als Drehwinkel wird
angezeigt
Übersicht:
*) Positionierung ist nicht aktiv
**)Für Schnellgang:
und zusammen drücken
Busadresse einstellen
• Aus der Busebene in die Arbeitsebene wechseln:
MODE
und
ENTER
drücken und bis zum Ablauf des Countdowns
von 3 auf 0 halten.
MODE
und
ENTER
loslassen
• In die Konfigurationsebene wechseln: und drücken
und halten, zusätzlich einmal kurz
ENTER
drücken;
und unbedingt bis zum Ablauf des Countdowns von
3 auf 0 halten (ca. 3 Sek.) und erst dann loslassen. P1._
"STANDARD" wird angezeigt.
• Busadresse einstellen:
MODE
drücken und halten. Zusät-
zlich kurz oder drücken bis P1.5 "ADDRESS" angezeigt
wird.
M
ODE
loslassen. “126, ADDRESS” wird angezeigt
(Werkseinstellung). Mit oder die Busadresse auf
höheren/niedrigeren Wert setzen
• Busadresse speichern:
ENTER
drücken und bis Ablauf
des Countdowns von 3 auf 0 halten.
ENTER
loslassen.
Dann
MODE
drücken und halten. Zusätzlich oder
drücken bis P1.6 "EXIT" erscheint. Mit oder auf
NV_SAVE setzen.
• Zurück in die Arbeitsebene:
ENTER
drücken und bis zum
Ablauf des Countdowns von 3 auf 0 halten, loslassen.
• Zurück in die Busebene:
MODE
und
ENTER
drücken
und halten, Countdown von 3 auf 0 abwarten, loslassen.
Betriebsart
Betriebsart-
anzeige
Positions-
anzeige
1.1 Positionierung mit
festem Sollwert, Sollwert-
einstellung mit oder
möglich
1.2 Handverstellung * im
Arbeitsbereich. Mit oder
verstellen **
1.3 Handverstellung * im
Sensorbereich
Mit oder verstellen **
conf
mA
%
C
¬
conf
mA
%
C
¬
conf
mA
%
C
¬
conf
mA
%
C
¬
conf
mA
%
C
¬
conf
mA
%
C
¬

41/18-74 XA Rev. 04
Positioner TZIDC-110 for PROFIBUS PA
Commissioning Instructions 41/18-74 XA
ABB Automation Products GmbH
Schillerstr. 72 · 32425 Minden, Germany
Tel: +49 551 905-534 · Fax: +49 551 905-555
The company’s policy is one of continuous product improvement and the right
is reserved to modify the information contained herein without notice.
Printed in the Fed. Rep. of Germany (02.2009)
© ABB 2009
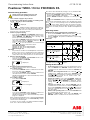
Commissioning procedure
1. Turn on the air supply to the positioner.
2. Connect the bus with arbitrary polarity (or auxiliary power
9 V DC ... 32 V DC) to the bus terminals.
is displayed
If the emergency shutdown module is installed, the supply vol-
tage for this module needs to be 24 V DC (terminals +85 / -86)
and the switch needs to be in its center position. Otherwise,
the device has no pneumatic function.
3. Check for proper mounting:
- Press and hold
M
ODE
and
E
NTER
simultaneously.
Wait until the countdown has run down from 3 to 0, then
release
M
ODE
and
E
NTER
. The operating level
(mode 1.x) is reached and indicated.
- Press and hold
MODE
. Additionally briefly press or
until mode 1.3 (manual adjustment within the sensor
range) is displayed. Release
MODE
.
- Press or to move the actuator to its mechanical limit
stops in both directions, and note the values.
Recommended range:
between -28° and +28° for linear actuators
between -57° and +57° for rotary actuators
Minimum angle: 25°
Important:
The positioner should be mounted/adjusted such that the
portions of the sensor’s operating range above and below
the center point are nearly identical. Use the rotation angle
of the position sensor in the positioner to its utmost extent.
4. Return to the remote level.
- Press and hold
MODE
and
ENTER
until the count-
down has run down from 3 to 0.
- Release
MODE
and
ENTER
.
is displayed.
5. Run the standard Autoadjust function.
- Make sure that the remote level is activated.
For a
linear actuator:
- Press and hold
MODE
until the countdown has run down
from 5 to 0, then release
MODE
.
- Press and hold
MODE
again until the countdown has
run down from 3 to 0, then release
MODE
.
Standard autoadjustment is started automatically, and the
progress is displayed.
For a
rotary actuator:
- Press and hold
ENTER
- is displayed
- Wait until the display has changed to
- Release
ENTER
.
- Press and hold
ENTER
again until the countdown has
run down from 3 to 0, then release
ENTER
.
Standard autoadjustment is started automatically, and the
progress is displayed.
When standard autoadjustment has completed successfully,
the determined parameters are saved automatically, and the
remote level is activated again.
If, however, an error should occur during standard autoadjust-
ment, error code 255 is briefly indicated.
!
Always observe all safety instructions and
precautions in the operating instructions.
conf
mA
%
C
¬
conf
mA
%
C
¬
conf
mA
%
C
¬
conf
mA
%
C
¬
The device then automatically changes over to parameter P1.1
Autoadjust at the configuration level. In this case:
- Press and hold
MODE
. Additionally, briefly press or seve-
ral times until P1.6 “EXIT” is displayed.
- Release
MODE
. CANCEL is displayed. If not, briefly press
or .
- Press and hold
ENTER
until the countdown has run down from
3 to 0.
The positioner automatically returns to the operating level. Briefly
press twice to reach operating mode 1.3 “Manual adjustment
within the sensor range” and then check the positioner-actuator
assembly for proper mounting. Re-adjust if required (see operating
instructions for details) and then start standard autoadjustment
again.
Operating modes
Prodecure for mode selection from operating level:
• Press and hold
MODE
. Additionally briefly press as often
as required. The selected operating mode is indicated.
• Release
MODE
.
The position is indicated as a percentage
or rotation angle
Overview:
*) Positioning is not active.
**)For quick motion: press
and together.
Setting the bus address
• From remote level: Change over to the operating level. Press
and hold
MODE
and
ENTER
simultaneously until the
countdown has run down from 3 to 0. Release
MODE
and
ENTER
.
• Switch to the configuration level: Press and hold and
simultaneously. Additionally, briefly press
ENTER
once.
Keep and pressed until the countdown from 3 to 0 is fin-
ished (approx. 3 seconds). Do not release earlier. P1._
"STANDARD" is displayed.
• Set the bus address: Press and hold
MODE
.
Additionally
briefly press or until P1.5 "ADDRESS" is displayed.
Release
M
ODE
. “126, ADDRESS” is displayed (factory
setting). Press or to increment or decrement this bus
address.
• Save the bus address: Press and hold
ENTER
until the
countdown has run down from 3 to 0. Release
ENTER
. Then
press and hold
MODE
. Additionally press or as often as
required to call P1.6 "EXIT". Press or to set this parame-
ter to NV_SAVE.
• Return to the operating level:
Press and hold
ENTER
until
the countdown has run down from 3 to 0.
• Return to remote level:
Press and hold
MODE
and
ENTER
until the countdown has run down, then release.
Mode Mode display Position display
1.1 Positioning with fixed
setpoint; setpoint adjust-
ment via or .
1.2 Manual adjustment *
within the operating range.
Press or to adjust. **
1.3 Manual adjustment *
within the sensor range.
Press or to adjust. **
conf
mA
%
C
¬
conf
mA
%
C
¬
conf
mA
%
C
¬
conf
mA
%
C
¬
conf
mA
%
C
¬
conf
mA
%
C
¬
-
 1
1
-
 2
2


in anderen Sprachen
- English: ABB TZIDC-110
Andere Dokumente
-
wtw TecnoLine LF 171 R/RS Bedienungsanleitung
-
Eurotherm Piccolo Schnellstartanleitung
-
-
-
JB-Lighting LICON FX Benutzerhandbuch
-
-
WIKA CPH6200 tag:model:CPT6200 Bedienungsanleitung
-
Samsung LE37B579A5S Benutzerhandbuch
-
-
AHT 376717 EL/0617 Schnellstartanleitung