
INSTRUCTION MANUAL
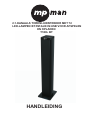
2.1CH BT TOWER SPEAKER With 72 LED LIGHT
/FM/AUX IN/USB FOR PLAYBACK AND CHARGING
T180L BT

Contents
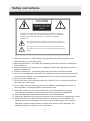
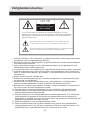
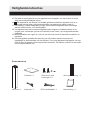
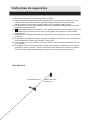
Please read and understand all the warnings given in the following and those marked on
the unit. This unit has been manufactured and designed to assure personal safety.
Only use the power by sign
on User Manual or system.
Keep the unit and power
plug away from water.
Avoid direct sunshine
and nearing heater.
Protect power cable: avoid
high pressure and stamp on;
do not pull & bend excessively.
Unplug the set from the
outlet when you do not
use it for a long time.
Never open the cover,
avoid metals dropping in,
e.g. needle, hairpin, coin.
Safety Information.................................................................................................2
Accessories...........................................................................................................3
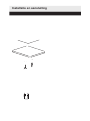
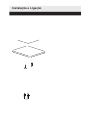
Installation and Connection...................................................................................4
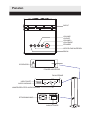
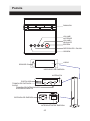
Panels...................................................................................................................5
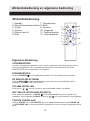
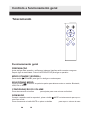
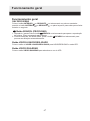
Remote control......................................................................................................6
General operation.................................................................................................6
Audio/USB/FM/Bluetooth operation......................................................................8
Trouble shooting and ...........................................................................................9
Specifications......................................................................................................10
1

Safety instructions
CAUTION
RISK OF ELECTRIC
SHOCK, DO NOT
OPEN
Caution: To reduce the risk of electric shock do not open
this device, there are not se
rviceable parts for customers.
personnel.
This sign means the existence of dangerous voltage at
the inside of the unit, which states a risk of electric shock.
This sign means that there are important instructions of
operation and handling in the manual that comes with this
device.
8. Do not install near any heat sources such as radiators, heat Registers, stoves, or
including amplifiers, that produce heat.other apparatus,
1. Read the Instructions - All the safety and operating instructions should be read
use the product.carefully before you
2. Keep the Instructions -The safety and operating instructions should be retained for
3. Heed all Warnings -All warnings on the appliance and in the operating instructions
adhered to.should be
4. Follow all instructions - All operating and use instructions should be followed.
5. Do not use this apparatus near water- The appliance should not be used near water
-for example, in a wet basement or near a swimming pool, and the like.or moisture
6. Clean only with a damp cloth.
7. Do not block any of the ventilation openings. Install the unit in accordance with the
instructions.manufacturer’s
9. Protect the power cord from being walked on or pinched particularly at plugs,
receptacles, and the point where they exit from the apparatus.convenience
10. Only use attachments/accessories specified by the manufacturer.
Please refer any maintenance or repair to qualified
future reference.
11. Unplug the apparatus during lightning storms or when unused for long periods of time.
12. Refer all serving to qualified service personnel. Servicing is required when the
damaged in any way, such as power-supply cord or plug is apparatus has been
objects have fallen into the apparatus, the damaged, liquid has been spilled or
apparatus has been exposed to rain or moisture.
2

Safety instructions
13. Please keep the unit in a good ventilation environment.
14. These servicing instructions are for use by qualified service personnel only. To reduce
electric shock, do not perform any servicing other than that contained in the risk of
unless you are qualified to do so.the operation instructions
15. The mains plug is used as disconnect device, the disconnect device shall remain
16. This equipment is a Class II or double insulated electrical appliance. It has been
such a way that it does not require a safety connection to electrical earth. designed in
17. The batteries (if included) shall not be exposed or excessive heat such as sunshine,
fire or the like.
18. The apparatus shall not be exposed to dripping or slashing and that no objects filled
such as vases, shall be placed on the apparatus. with liquids,
19. To reduce the risk of fire or electric shock, do not expose to rain or moisture.
readily operable.
20. The main operating voltage of this product is marked on a rating plate on the back of
the product. This means of disconnecting this appliance from the main supply is the
mains plug. This should be unobstructed and readily operable at all times.
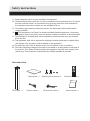
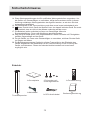
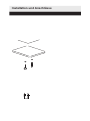
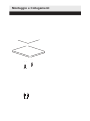
Screws with washers* 2
Accessories
Base plate *1
The tower *1
USER MANUAL
User manual *1 Power cable *1 RCA audio cable* 1
Remote control *1


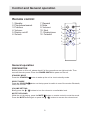
Control and General operation
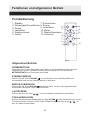
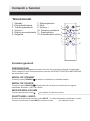
Remote control
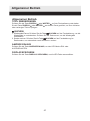
PREPARATION
Before power on this unit, please check if all the connections are right and safe. Then
connect the main power. Press the POWER SWITCH to power on the unit.
STANDBY MODE
Press the STANDBY button to wake up the unit or turn to standby mode.
SELECT MODE
Press the SOURCE button on the top panel to switch to one of the modes: Bluetooth,
USB, FM or Audio.
VOLUME SETTING
Briefly press the / buttons to turn the volume to a comfortable level.
MUTE THE SOUND
While the unit is playing, press the MUTE button on remote control to mute the sound.
Press the MUTE button again or press the / buttons to resume the volume level.
General operation
SEARCH
DISPLAY
ON/OFF
DISPLAY
/SA
VE
1
2
3
4
5
6
7
8
9
10
11
1. Standby
2. Play/pause/search
3. Previous
4. Volume-
5. Display on/off
6. Source
7. Reward
8. Mute
9. Volume+
10. Next
11. Display/save
12. Forward
12
6

General operation
SKIP TRACKS
Press the PREVIOUS or NEXT : button on remote control or press and hold the
PREVIOUS or NEXT on top panel to skip to the previous or next track.
/SEARCH button
1. Play/pause: Press the /SEARCH button on the remote control to pause music
playback. Press again to resume.
2. Search stations: In Radio mode, press the /SEARCH button on remote control to
search stations automatically.
DISPLAY ON/OFF button
Press the DISPLAY ON/OFF button to turn ON/OFF LED mode.
DISPLAY/SAVE button
Press the DISPLAY/ SAVE button to select the LED color.
General operation
7

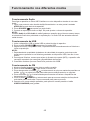
Operations in different modes
Audio operation
To connect the unit with Disc/ MP3 player/phone or other device via an audio cable.
1. Connect one end of the cable to the Mp3 player’s line output/headphone and the other
end to the AUDIO IN socket on the rear panel of the unit.
2. Press the SOURCE to enter audio mode.
3. Control the playback by your Mp3 player. You can only adjust the volume of the unit.
NOTE:
When Audio in and R/L Audio in are connected to music device at the same time, the
Audio in socket is prior to play, and the R/L Audio in sockets will have no sound output.
1. Insert the USB stick into the USB port on the rear panel of the unit.
2. Press the SOURCE button to enter USB mode.
3. Once the USB stick inserted, the unit will auto detect the files and start playing.
NOTE:
1. Depending on the amount of the data and media speed, it may take longer time for the
unit to read the files stored in the USB device, this is not a malfunction.
2. For some files, even though they are of the support format (MP3), the unit can not play
because of the format compatibility.
3. The maximum size of Flash Drive that can be connected is 32GB max.
USB operation
FM operation
1. Adjust the antenna direction to get the good reception.
2. Press the SOURCE button to enter FM mode.
3. Briefly press the / buttons on remote control or press and hold the / on the
main panel to skip to the previous or next stations.
4. Press the / buttons on remote control to increase or decrease the frequency in
0.1MHz increments.
5. Press /SEARCH button on remote control to search stations from low to high
frequency. Press again to stop searching.
6. When listening to your favorite radio station, you can press and hold the DISPLAY/ SAVE
button to save.
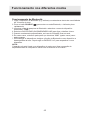
Bluetooth operation
1. Turn on the Bluetooth device (e.g. phone) and stay within 10 meters of the tower.
2. Press the SOURCE button to enter the Bluetooth mode, the indicator flashes quickly.
3. Enter the Bluetooth searching list, and select the found device name “T180L”.
4. Select OK/YES/PAIR to connect the phone with the tower.
5. When they are paired successfully, the indicator lights solid blue.
6. For rare cases, the phone may ask you to input “0000" (four zeros) as passwords.
7. To disconnect the devices: turn off the Bluetooth function on your device and unpair with
your tower. Then follow the STEPS 2-5 to pair with a new device.
NOTE:
The unit can only connect with one device at a time and please make the pairing operation
if the device is out of 10 meters range.
8

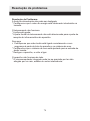
Trouble shooting
Trouble shooting
Power supply can not be turned on
* Make sure that the power cord is fully inserted in the power outlet.
The remote control does not work
* Battery is used up.
* The front end of the remote control is not aimed at the infrared reception part of the unit.
No sound
* Make sure that the audio cable is connected correctly and securely to the back of your
unit and to the sound system.
* Make sure that the sound system is set to the correct audio input.
* Turn your unit off, then back on.
The unit does not work at all
* The embedded microcomputer may have failed because of a lightning strike, static, or
other interference.
9

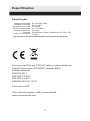
Specifications
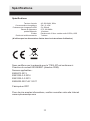
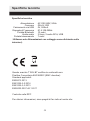
Specifications
Input voltage
Power consumption
USB charging power
Frequency range
Bluetooth range
Inputs
Remote control range
AC 220-240V, 50Hz
5W×2+10W
5V, 500mA
87.5-108.0MHz
10 meters
Audio input 3.5mm; Audio input 2*RCA; USB
7 meters
(Use only the power supplies listed in the instructions)

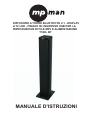
MANUEL D'INSTRUCTION
TOUR D'ENCEINTE BT 2.1 CANAUX avec 72 DEL/FM/
AUX IN/USB POUR LA LECTURE ET LE CHARGEMENT
T180L BT

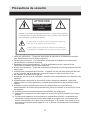
Veuillez lire et comprendre tous les avertissements présentés ci-dessous, ainsi que ceux

Précautions de sécurité
ATTENTION
Ce signe signifie qu’il existe une tension dangereuse à l'intérieur de
Ce signe signifie que des instrucitons importantes sur l’utilisation et
Attention: Pour réduire le risque d’électrochocs, n’ouvrez pas cet appareil,
il necontient aucune piéce réparable par le client. Veuillez confier l’entreien
ou la réparation à du personnel qualifié.
cette unité, ce qui signifie un risque d’électrochoc.
la manipulation sont détaillées dans ce manuel fourni avec l’appareil.
1. Lisez ces instructions - Toutes les instructions de sécurité et d'utilisation doivent être
lues attentivement avant d'utiliser ce produit.
2. Gardez ces instructions - Les instructions de sécurité et d'utilisation et doivent être
conservées pour référence ultérieure.
3. Respectez tous les avertissement - Tous les avertissements sur l'appareil et les
instructions d'utilisation doivent être respectés.
4. Suivez les instructions - Toutes les instructions d'utilisation et de fonctionnement doivent
être suivies.
5. N'utilisez pas cet appareil près de l'eau - L'appareil ne doit pas être utilisé près de l'eau
ou de l'humidité: par exemple dans une cave humide ou près d'une piscine; etc.
6. Ne nettoyez qu'à l'aide d'un linge sec.
7. N'obstruez aucune voie de ventilation. Installez l'unité conformément aux instructions du
fabricant.
8. N'installez pas à proximité de sources de chaleur telles que radiateurs, registre de
chaleur, poêle ou autres appareils (y compris les amplificateurs) qui produisent de la
chaleur.
9. Protégez le cordon d'alimentation contre les piétinements ou les pincements,
particulièrement au niveau des branchements, prises de courant, et du point d'où il sort
de l'appareil.
10. N'utilisez que les extensions/accessoires spécifiés par le fabricant.
11. Débranchez cet appareil lors des orages ou lorsqu'il est inutilisé pendant une longue
période.
12. Confiez toute réparation à du personnel de maintenance qualifié. La réparation est
nécessaire lorsque l'appareil a été endommagé de quelque sorte, par exemple si le
cordon d'alimentation ou la prise sont endommagés, si du liquide a été répandu ou si
des objets sont tombés dans l'appareil ou si ce dernier a été exposé aux moisissures
ou à la pluie.
RISQUE DE CHOC
ÉLECTRIQUE, NE PAS
OUVRIR
13

Précautions de sécurité
13. Veillez à maintenir l'unité dans un environnement bien ventilé.
14. Ces instructions concernant la réparation sont à utiliser par du personnel qualifié
uniquement. Pour réduire le risque de choc électrique, ne procédez à aucune
réparation autre que celles détaillées dans ces instructions d'utilisation a moins que
vous ne disposiez des qualifications.
15. L'alimentation principale sert de sectionneur, le sectionneur doit toujours rester en état
marche.
16. Cet équipement est un appareil électrique de classe II ou à double isolation. Il a été
conçu de telle manière qu'il ne nécessite pas de connexion sécurisée à une prise de
terre.
17. Les piles (si fournies) ne doivent pas être exposées à des chaleurs excessives telles
la lumière du soleil, le feu ou autres.
18. L'appareil ne doit pas être exposé aux gouttes ou aux éclaboussements et les objets
remplis de liquides, tels que des vases, ne doivent pas être placés près de l'appareil.
19. Pour réduire le risque d'incendie ou de choc électrique, n'exposez pas cet appareil à la
pluie ou l'humidité.
20. La tension de fonctionnement secteur de cette unité est marquée sur la plaque
signalétique à l'arrière de l'unité. Le moyen de déconnexion de cet appareil depuis le
secteur est la prise d'alimentation secteur. Elles ne doivent pas être bouchées et être
à tout moment.
de
que
prête
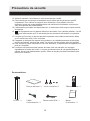
Vis et rondelles* 2
Accessoires
Plaque de base *1
La tour *1
USER MANUAL
Manel
d’utilisation *1
C
*1
âble
d’alimentation
C * 1âble audio RCA
T *1élécommande
SEARCH
DISPLAY
ON/OFF
DISPLAY
14


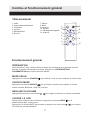
Contr et fonctionnement généralôle
Télécommande
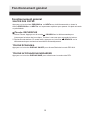
Fonctionnement général
PR PARATION
Avant d’allumer l’unit
STANDBY p
SOURCE
A
COUPER LE SON
É
é, veuillez vérifier si toutes les connexions sont correctes et sures.
Ensuite, connectez l'alimentation pricipale. Appuyez sur L'INTERRUPTEUR
D'ALIMENTATION pour mettre l'unité en marche.
MODE VEILLE
Appuyez sur la touche our allumer l'unité, ou pour la passer en mode veille.
CHOIX DU MODE
Appuyez sur la touche sur le panneau supérieur pour passer à l'un des
modes suivants: Bluetooth, USB, FM ou Audio.
REGLAGE DU VOLUME
ppuyez briévement sur les touches / pour régler le volume à un niveau confortable.
Pendant que l'unité est cours de lecture, appuyez sur la touche MUTE sur la
télécommande pour couper le son.
Appuyez sur la touche MUTE de nouveau ou appuyez sur les touches / pour revenir
au niveau de volume précédent.
SEARCH
DISPLA
Y
ON/OFF
DISPLA
Y
/SAVE
1
2
3
4
5
6
7
8
9
10
11
1. Veille
2. Lecture/pause/recherche
3. Pr
4. Volume-
5. A
6. Source
écédent
ffichage M/A
7. Retour
8. Muet
9. Volume+
10. Suivant
11. Affichage/sauvegarde
12. Avancer
12
17

Fonctionnement général
SAUTER DES PISTES
Appuyez sur les touches PREVIOUS9 NEXT:
PREVIOUS9 NEXT:
/Touche RECHERCHE
ou sur la télécommande ou tenez la
touche ou sur le panneau supérieur pour passer à la piste suivante
ou précédente.
1. Leture/ Pause: Appuyez sur la touche / SEARCH sur la télécommande pour
interrompre la lecture de la musique. Touchez à nouveau pour reprendre la lecture.
2. Recherche de stations: En mode radio, appuyez sur la touche /SEARCH sur la
télécommande pour rechercher les stations automatiquement.
TOUCHE ÉCRAN M/A
Appuyez sur la touche DISPLAY ON/OFF pour allumer/éteindre le mode DEL M/A.
TOUCHE AFFICHAGE/SAUVEGARDER
Appuyez sur la touche DISPLAY/SAVE pour sélectionner la couleur des DEL.
Fonctionnement général
18

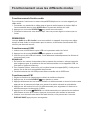
Fonctionnement sous les différents modes
Fonctionnement d'entrée audio
Pour connecter l’unit avec un lecteur disque/MP3/t l phone ou un autre appareil par
c
9: 9:
é é é
âble audio.
1. Connectez une extrémité du âble dans la ligne de sortie/casque du lecteur Mp3 et
l’autre extrémité dans la fente AUDIO IN sur le panneau arrière de l’unité.
2. Appuyez sur la touche SOURCE pour entrer en mode audio.
3. Contrôlez la lecture de votre lecteur Mp3. Vous ne pouvez régler le volume que sur
l'unité.
REMARQUE:
Lorsque Audio in et R/L Audio in sont connectés à un appareil de musique en même
temps, la fente Audio in est prioritaire pour la lecture, et les fentes d'entrée audio G/D
n'auront pas de sortie sonore.
Fonctionnement USB
1. Insérez une clé USB dans le port USB sur le panneau arrière de l'unité.
2. Appuyez sur la touche SOURCE pour passer en mode USB.
3. Une fois que la clé USB est insérée, l’unité détectera automatiquement les fichiers et
commencera à jouer.
REMARQUE:
1. En fonction du nombre de données et de la visesse des contenus, cela peut prendre
plus longtemps pour le système de lire les fichiers stockés sur les appareils USB, ce
n’est pas un dysfonctionnement.
2. Pour certains fichiers, même s’ils ont le même format de support(MP3), l’unité peut ne
pas les lire du fait de la compatibilité des formats.
3. La taille maximum de clé USB pouvant être connectée est de 32GB max.
Fonctionnement FM
1. Réglez la direction de l'antenue pour obtenir la meilleure réception.
2. Appuyez sur la touche SOURCE pour passer en mode.
3. Appuyez brièvement sur les touches / sur la télécommande ou tenez la touche /
appuyée sur le panneau principal pour passer à la station suivante ou précédente.
4. Appuyez sur les touches / sur la télécommande pour augmenter ou diminuer la
des fréquence par incrément de 0.1MHz.
5. Appuyez sur la touche /SEARCH sur a télécommande pour rechercher les stations
plus basses vers les plus hautes. Appuyez de nouveau pour arrêter la recherche.
6. Lorsque vous écoutez votre station de radio favorite, vous pouvez tenir la touche
DISPLAY/SAVE appuyée pour sauvegarder.
c
19
Seite wird geladen ...
Seite wird geladen ...
Seite wird geladen ...
Seite wird geladen ...
Seite wird geladen ...
Seite wird geladen ...
Seite wird geladen ...
Seite wird geladen ...
Seite wird geladen ...
Seite wird geladen ...
Seite wird geladen ...
Seite wird geladen ...
Seite wird geladen ...
Seite wird geladen ...
Seite wird geladen ...
Seite wird geladen ...
Seite wird geladen ...
Seite wird geladen ...
Seite wird geladen ...
Seite wird geladen ...
Seite wird geladen ...
Seite wird geladen ...
Seite wird geladen ...
Seite wird geladen ...
Seite wird geladen ...
Seite wird geladen ...
Seite wird geladen ...
Seite wird geladen ...
Seite wird geladen ...
Seite wird geladen ...
Seite wird geladen ...
Seite wird geladen ...
Seite wird geladen ...
Seite wird geladen ...
Seite wird geladen ...
Seite wird geladen ...
Seite wird geladen ...
Seite wird geladen ...
Seite wird geladen ...
Seite wird geladen ...
Seite wird geladen ...
Seite wird geladen ...
Seite wird geladen ...
Seite wird geladen ...
Seite wird geladen ...
Seite wird geladen ...
Seite wird geladen ...
Seite wird geladen ...
Seite wird geladen ...
Seite wird geladen ...
Seite wird geladen ...
Seite wird geladen ...
-
 1
1
-
 2
2
-
 3
3
-
 4
4
-
 5
5
-
 6
6
-
 7
7
-
 8
8
-
 9
9
-
 10
10
-
 11
11
-
 12
12
-
 13
13
-
 14
14
-
 15
15
-
 16
16
-
 17
17
-
 18
18
-
 19
19
-
 20
20
-
 21
21
-
 22
22
-
 23
23
-
 24
24
-
 25
25
-
 26
26
-
 27
27
-
 28
28
-
 29
29
-
 30
30
-
 31
31
-
 32
32
-
 33
33
-
 34
34
-
 35
35
-
 36
36
-
 37
37
-
 38
38
-
 39
39
-
 40
40
-
 41
41
-
 42
42
-
 43
43
-
 44
44
-
 45
45
-
 46
46
-
 47
47
-
 48
48
-
 49
49
-
 50
50
-
 51
51
-
 52
52
-
 53
53
-
 54
54
-
 55
55
-
 56
56
-
 57
57
-
 58
58
-
 59
59
-
 60
60
-
 61
61
-
 62
62
-
 63
63
-
 64
64
-
 65
65
-
 66
66
-
 67
67
-
 68
68
-
 69
69
-
 70
70
-
 71
71
-
 72
72


in anderen Sprachen
- English: MPMan T180LBT Owner's manual
- français: MPMan T180LBT Le manuel du propriétaire
- italiano: MPMan T180LBT Manuale del proprietario
- Nederlands: MPMan T180LBT de handleiding
- português: MPMan T180LBT Manual do proprietário
Verwandte Artikel
-
MPMan MINI300BT Bedienungsanleitung
-
-
-
-
-
-
-
-
-