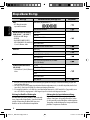
JVC KW-AVX720 Bedienungsanleitung
- Kategorie
- Auto-Medienempfänger
- Typ
- Bedienungsanleitung

ENGLISHDEUTSCH
Instructions DVD RECEIVER WITH MONITOR KW-AVX720
FRANÇAIS
NEDERLANDS
EN, GE, FR, NL
0209DTSMDTJEIN
© 2009 Victor Company of Japan, Limited
DVD RECEIVER WITH MONITOR
DVD-RECEIVER MIT MONITOR
RÉCEPTEUR DVD ET MONITEUR
DVD-RECEIVER MET MONITOR
INSTRUCTIONS
BEDIENUNGSANLEITUNG
MANUEL D’INSTRUCTIONS
GEBRUIKSAANWIJZING
GET0603-001A
[E]
For canceling the display demonstration, see page 12.
Zum Abbrechen der Displaydemonstration siehe Seite 12.
Pour annuler la démonstration des affichages, référez-vous à la page 12.
Zie bladzijde 12 voor het annuleren van de displaydemonstratie.
For installation and connections, refer to the separate manual.
Für den Einbau und die Anschlüsse siehe das eigenständige Handbuch.
Pour l’installation et les raccordements, se référer au manuel séparé.
Bijzonderheden over de installatie en aansluiting van het apparaat vindt u in de desbetreffende handleiding.
KW-AVX720
Having TROUBLE with operation?
Please reset your unit
Refer to page of How to reset your unit
Haben Sie PROBLEME mit dem Betrieb?
Bitte setzen Sie Ihr Gerät zurück
Siehe Seite Zurücksetzen des Geräts
Vous avez des PROBLÈMES de fonctionnement?
Réinitialisez votre appareil
Référez-vous à la page intitulée Comment réinitialiser votre appareil
Hebt u PROBLEMEN met de bediening?
Stel het apparaat terug
Zie de pagina met de paragraaf Het apparaat terugstellen
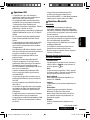
Dear Customer,
This apparatus is in conformance with the valid European
directives and standards regarding electromagnetic
compatibility and electrical safety.
European representative of Victor Company of Japan, Limited
is:
JVC Technical Services Europe GmbH
Postfach 10 05 04
61145 Friedberg
Germany
Sehr geehrter Kunde, sehr geehrte Kundin,
dieses Gerät stimmt mit den gültigen europäischen Richtlinien
und Normen bezüglich elektromagnetischer Verträglichkeit
und elektrischer Sicherheit überein.
Die europäische Vertretung für die Victor Company of Japan,
Limited ist:
JVC Technical Services Europe GmbH
Postfach 10 05 04
61145 Friedberg
Deutschland
Cher(e) client(e),
Cet appareil est conforme aux directives et normes
européennes en vigueur concernant la compatibilité
électromagnétique et à la sécurité électrique.
Représentant européen de la société Victor Company of Japan,
Limited :
JVC Technical Services Europe GmbH
Postfach 10 05 04
61145 Friedberg
Allemagne
Geachte klant,
Dit apparaat voldoet aan de geldende Europese normen en
richtlijnen inzake elektromagnetische compatibiliteit en
elektrische veiligheid.
De Europese vertegenwoordiger van Victor Company of Japan,
Limited is:
JVC Technical Services Europe GmbH
Postfach 10 05 04
61145 Friedberg
Duitsland
CoverRear_KW-AVX720_001A_f.indd 1CoverRear_KW-AVX720_001A_f.indd 1 2/11/09 12:02:22 PM2/11/09 12:02:22 PM

2
ENGLISH
Thank you for purchasing a JVC product.
Please read all instructions carefully before operation, to ensure your complete understanding and to obtain the best
possible performance from the unit.
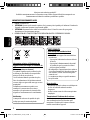
IMPORTANT FOR LASER PRODUCTS
1. CLASS 1 LASER PRODUCT
2. CAUTION: Do not open the top cover. There are no user serviceable parts inside the unit; leave all servicing to
qualified service personnel.
3. CAUTION: Visible and/or invisible class 1M laser radiation when open. Do not view directly with optical
instruments.
4. REPRODUCTION OF LABEL: CAUTION LABEL, PLACED OUTSIDE THE UNIT.
WARNINGS:
(To prevent accidents and damage)
• DO NOT install any unit or wire any cable in a
location where;
– it may obstruct the steering wheel and gearshift
lever operations.
– it may obstruct the operation of safety devices
such as air bags.
– it may obstruct visibility.
• DO NOT operate the unit while driving.
If you need to operate the unit while driving, be
sure to look around carefully.
• The driver must not watch the monitor while
driving.
For safety...
• Do not raise the volume level too much, as this will
block outside sounds, making driving dangerous.
• Stop the car before performing any complicated
operations.
Temperature inside the car...
If you have parked the car for a long time in hot or cold
weather, wait until the temperature in the car becomes
normal before operating the unit.
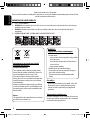
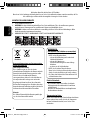
Information for Users on Disposal of Old
Equipment and Batteries
[European Union only]
These symbols indicate that the product and the
battery with this symbol should not be disposed as
general household waste at its end-of-life.
If you wish to dispose of this product and the
battery, please do so in accordance with applicable
national legislation or other rules in your country
and municipality.
By disposing of this product correctly, you will help
to conserve natural resources and will help prevent
potential negative effects on the environment and
human health.
Notice:
The sign Pb below the symbol for batteries indicates
that this battery contains lead.
Products
Battery
EN02-11_KW-AVX720_001A_2.indd 2EN02-11_KW-AVX720_001A_2.indd 2 1/2/09 1:00:53 PM1/2/09 1:00:53 PM

3
ENGLISH
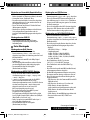
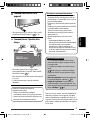
How to reset your unit
• Your preset adjustments will also be erased (except the
registered Bluetooth device). ( 28, 40)
How to forcibly eject a disc
• You can forcibly eject the loaded disc even if the disc is
locked. To lock/unlock the disc, 32.
• Be careful not to drop the disc when it ejects.
• If this does not work, reset your unit.
This unit is equipped with the steering wheel
remote control function.
• See the Installation/Connection Manual (separate
volume) for connection.
• Some of the operations might be different with
the steering wheel remote control function.
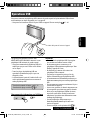
Cautions on the monitor:
• The monitor built in this unit has been produced
with high precision, but it may have some
ineffective dots. This is inevitable and is not
malfunction.
• Do not expose the monitor to direct sunlight.
• Do not operate the touch panel using a ball-point
pen or similar tool with the sharp tip.
Touch the buttons on the touch panel with your
finger directly (if you are wearing a glove, take it
off).
• When the temperature is very cold or very hot...
– Chemical changes occur inside, causing
malfunction.
– Pictures may not appear clearly or may move
slowly. Pictures may not be synchronized with
the sound or picture quality may decline in such
environments.
How to read this manual
• < > is used to indicate the variable screens/
menus/operations/settings that appear on the
touch panel.
• [ ] is used to indicate the buttons on the touch
panel.
• ( page number) is used to indicate the
reference page number of the related topics/
operations/settings.
• Operation index: To locate easily the desired
operations/functions. ( 65)
• Indication language: English indications
are used for the purpose of explanation. You
can select the indication language from the
<AV Menu>. ( 15)
For security reasons, a numbered ID card is provided
with this unit, and the same ID number is imprinted on
the unit’s chassis. Keep the card in a safe place, as it will
help the authorities to identify your unit if stolen.
Back
EN02-11_KW-AVX720_001A_2.indd 3EN02-11_KW-AVX720_001A_2.indd 3 1/2/09 1:00:54 PM1/2/09 1:00:54 PM

4
ENGLISH
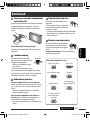
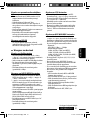
Caution for DualDisc playback
The Non-DVD side of a “DualDisc” does not comply with
the “Compact Disc Digital Audio” standard. Therefore,
the use of Non-DVD side of a DualDisc on this product
may not be recommended.
Caution on volume setting:
Digital devices (CD/USB) produce very little noise
compared with other sources. Lower the volume before
playing these digital sources to avoid damaging the
speakers by sudden increase of the output level.
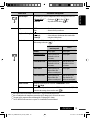
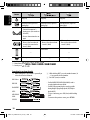
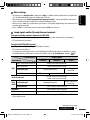
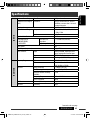
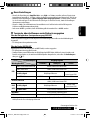
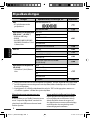
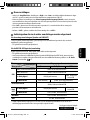
Playable disc type
Disc type Recording format, file type, etc Playable
DVD
• DTS sound cannot be
reproduced.
DVD-Video (Region Code: 2) *
1
DVD-Audio/DVD-ROM
DVD Recordable/Rewritable
(DVD-R/-RW *
2
, +R/+RW *
3
)
• DVD Video: UDF bridge
• DVD-VR
• DivX/MPEG1/MPEG2/JPEG/
MP3/WMA/WAV: ISO 9660 level
1, level 2, Romeo, Joliet
DVD-Video
DVD-VR
DivX/MPEG1/MPEG2
JPEG
MP3/WMA/WAV
AAC/MPEG4/DVD+VR/DVD-RAM
Dual Disc DVD side
Non-DVD side
CD/VCD Audio CD/CD Text (CD-DA)
VCD (Video CD)
DTS-CD/SVCD (Super Video CD)/CD-ROM/
CD-I (CD-I Ready)
CD Recordable/Rewritable
(CD-R/-RW)
• ISO 9660 level 1, level 2, Romeo,
Joliet
CD-DA
VCD (Video CD)
DivX/MPEG1/MPEG2
JPEG
MP3/WMA/WAV
AAC/MPEG4
*
1
If you insert a DVD Video disc of an incorrect Region Code, “Region code error” appears on the screen.
*
2
DVD-R recorded in multi-border format is also playable (except for dual layer discs). DVD-RW dual layer discs are not
playable.
*
3
It is possible to play back finalized +R/+RW (Video format only) discs. “DVD” is selected as its disc type when a
+R/+RW disc is loaded. +RW double layer discs are not playable.
EN02-11_KW-AVX720_001A_1.indd 4EN02-11_KW-AVX720_001A_1.indd 4 12/19/08 3:51:58 PM12/19/08 3:51:58 PM

5
ENGLISH
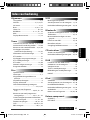
CONTENTS
How to read this manual .................................................................................................................... 3
How to reset your unit ....................................................................................................................... 3
How to forcibly eject a disc ................................................................................................................. 3
Playable disc type .............................................................................................................................. 4
INTRODUCTIONS
Basic operations ................................................................................................................................. 6
• Using the monitor panel/touch panel ........................................................................................................ 6
• Using the remote controller (RM-RK252) ................................................................................................... 9
Preparation ........................................................................................................................................ 12
AV MENU
AV Menu operations .......................................................................................................................... 13
OPERATIONS
Listening to the radio ......................................................................................................................... 30
Disc operations ................................................................................................................................... 32
• Operation buttons on the screen ............................................................................................................... 34
• Operations using the remote controller (RM-RK252) ................................................................................. 35
USB operations .................................................................................................................................. 39
EXTERNAL DEVICES
Using the Bluetooth® devices ............................................................................................................. 40
• Connecting a new Bluetooth device .......................................................................................................... 40
• Using the Bluetooth cellular phone ........................................................................................................... 41
• Using the Bluetooth audio player .............................................................................................................. 43
Listening to the CD changer ............................................................................................................... 43
Listening to the DAB tuner ................................................................................................................. 44
Listening to the iPod/iPhone ............................................................................................................. 45
• When connected with the USB cable ......................................................................................................... 45
• When connected with the interface adapter ............................................................................................. 46
Using other external components ...................................................................................................... 47
• AV-INPUT ................................................................................................................................................... 47
• EXT-INPUT ................................................................................................................................................. 48
REFERENCES
Maintenance ...................................................................................................................................... 49
More about this unit .......................................................................................................................... 50
Troubleshooting ................................................................................................................................. 59
Specifications ..................................................................................................................................... 63
Operation index ................................................................................................................................. 65
EN02-11_KW-AVX720_001A_1.indd 5EN02-11_KW-AVX720_001A_1.indd 5 12/19/08 5:50:13 PM12/19/08 5:50:13 PM

6
ENGLISH
FLAT
AM
3:00
MP3
01 01
0:02:26
SOURCE
CD
Track Title
File Name
Folder Name
Artist Name
Disc Title
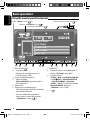
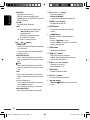
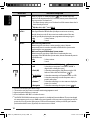
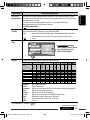
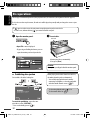
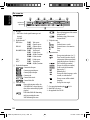
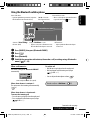
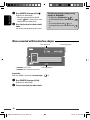
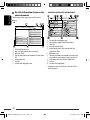
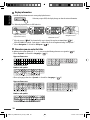
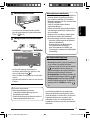
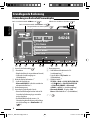
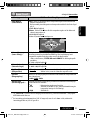
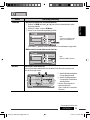
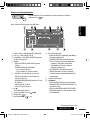
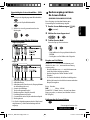
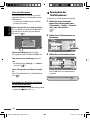
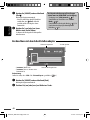
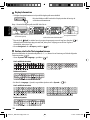
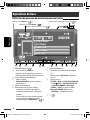
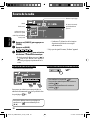
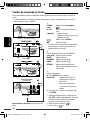
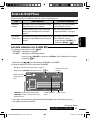
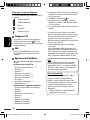
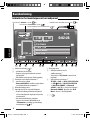
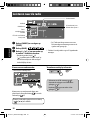
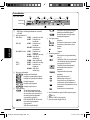
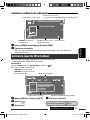
Basic operations
Using the monitor panel/touch panel
1 Resets the unit ( 3).
2 • Turns on the power.
• Attenuates the sound (if the power is on).
• Turns off the power. (Hold)
3 Changes the display information. *
1
4 • Adjusts the volume.
•
Bluetooth PHONE
: Adjusts the volume of
the incoming calls. *
2
5 Remote sensor
6 Touch panel (see the following pages).
• Most of the touch panel operations are explained
unless mentioned otherwise.
• The screen will turn off if no operation is
done for about 10 seconds (depends on the
<Illumination> setting). ( 19)
7 Motion sensor
8 • Activates/deactivates TA Standby Reception. *
3
• Displays <PTy Search> menu.
(Hold)
9 • Selects the source. *
4
TUNER
=
DAB
=
DISC (DVD/VCD/CD)
=
USB/
iPod
=
CD-CH/iPod/EXT-IN
=
Bluetooth PHONE
=
Bluetooth
AUDIO
=
AV-IN
= (back to the beginning)
•
Bluetooth PHONE
: Displays the
<Dial Menu> screen. *
5
(Hold)
*
1
–
*
5
: 7
Display <AV Menu> screen, ( 13)
Display the <Source Menu> screen, (
8)
Display/exit the Short Cut icons, (
8)
USB cable from the rear of the unit, (
39)
EN02-11_KW-AVX720_001A_1.indd 6EN02-11_KW-AVX720_001A_1.indd 6 12/19/08 3:51:59 PM12/19/08 3:51:59 PM

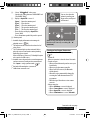
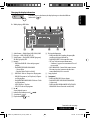
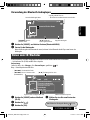
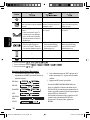
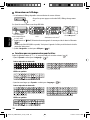
7INTRODUCTIONS
ENGLISH
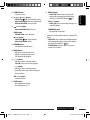
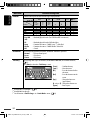
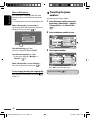
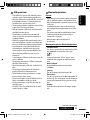
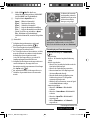
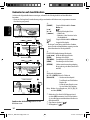
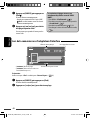
Continued on the next page
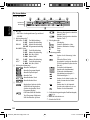
p • Selects “
USB/
iPod
” as the source.
• Switches the setting between “HEAD MODE” and
“iPod MODE”
(Hold)
q • Displays <Open/Tilt> screen. *
6
[Open] : Opens the monitor panel.
[Eject] : Ejects the disc.
[Close] : Closes the monitor panel.
[Tilt +] : Tilts open the monitor panel.
[Tilt –] : Tilts close the monitor panel.
• Ejects the disc and display <Open/Tilt>
screen. (Hold)
• Closes the monitor panel if the panel is opened.
w Monitor panel
*
1
Available display information varies among the
playback sources. ( 56)
*
2
This adjustment does not affect the volume level of
other sources.
*
3
The TP indicator lights up when activated; flashes
when the unit tune into another station providing
Radio Data System signals.
When a DAB tuner is connected, TA Standby Reception
also searches for DAB services.
*
4
Available sources depend on the external components
you have connected, media you have attached, and
the <Input> settings you have made. ( 18)
*
5
Only when Bluetooth phone is connected.
*
6
Shaded items cannot be used.
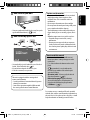
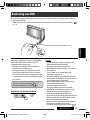
You can also adjust the
volume by moving your
finger on the touch panel
as illustrated.
Touch panel and button illumination
Dependable on the <Illumination> setting.
(
19)
• Turned off:
When no operation is done for about 10 seconds.
• Turned on again:
– When you touch the touch panel or move your
hand nearby.
– When you use the remote controller.
– When a call/SMS comes in (for Bluetooth
cellular phone).
– When the source automatically changed by
receiving the Traffic Announcement /PTY
programme.
– When the signal from the rear view camera
comes in.
• Always turned on:
– When <AV Menu> screen is displayed.
– When <Source Menu> screen is displayed.
– When <Open/Tilt> screen is displayed.
– When <Illumination> is set to <Normal>.
When you drag your finger on the touch panel, it
functions in the same way as touching [5 / ∞ /
4 / ¢].
EN02-11_KW-AVX720_001A_2.indd 7EN02-11_KW-AVX720_001A_2.indd 7 12/30/08 11:51:01 AM12/30/08 11:51:01 AM

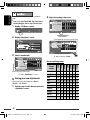
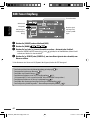
8
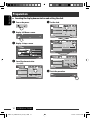
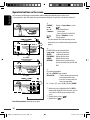
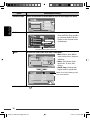
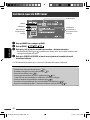
ENGLISH
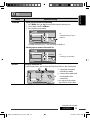
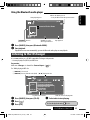
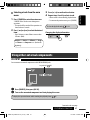
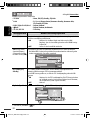
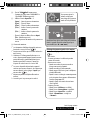
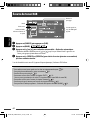
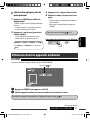
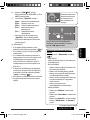
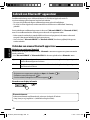
Press a Short Cut icon.
The corresponding screen is displayed.
FLAT
ST
BAND
AM
3:00
1FM1 87. 5 MHz
SOURCE
TUNER
Bayern Radio
Pop Music
Short Cut window appears.
• To exit from the window, press the button again.
FLAT
ST
BAND
AM
3:00
1FM1 87. 5 MHz
SOURCE
TUNER
Beep
Telephone Muting
Illumination
Motion Sensitiv.
Initialize
Normal
Proximity/Motion
Proxi/Motion-LCD
Touch Panel
Touch Panel - LCD
Back
Setup
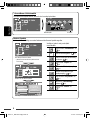
Short Cut icons
You can easily access some frequently used functions by using the Short Cut icons.
Available icons vary among the sources.
Displays <Illumination> menu.
( 19)
Changes the sound mode. ( 20)
Turns on or off Track/Chapter Repeat.
( 23)
Displays <Aspect> menu. ( 15)
Activates PTY Standby Reception.
( 22)
Activates Announcement Standby
Reception. ( 23)
Displays <PTy Search> menu.
( 31)
Activates <Voice Dialing> function.
( 27)
Displays <Redial> menu. ( 27)
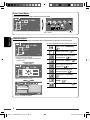
<Source Menu> screen
You can also select the source using the touch panel.
FLAT
ST
BAND
AM
3:00
1FM1 87. 5 MHz
SOURCE
TUNER
Bayern Radio
Pop Music
Source Menu
Current source Exit
EN02-11_KW-AVX720_001A_f.indd 8EN02-11_KW-AVX720_001A_f.indd 8 2/4/09 9:13:45 AM2/4/09 9:13:45 AM

9INTRODUCTIONS
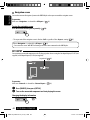
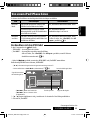
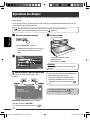
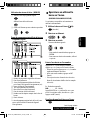
ENGLISH
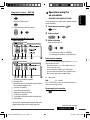
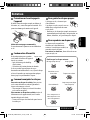
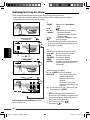
Installing the batteries
Insert the batteries into the remote controller by
matching the polarity (+ and –) correctly.
Caution:
• Danger of explosion if battery is incorrectly replaced.
Replace only with the same or equivalent type.
• Battery shall not be exposed to excessive heat such as
sunshine, fire, or the like.
If the effectiveness of the remote controller
decreases, replace the batteries.
Before using the remote controller:
• Aim the remote controller directly at the remote
sensor on the unit.
• DO NOT expose the remote sensor to bright light
(direct sunlight or artificial lighting).
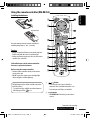
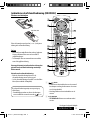
The following describes all the available operations
for all the sources.
• To easily locate the available operations between
different type of files, 35, 36.
R03/LR03/AAA
Continued on the next page
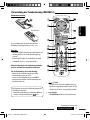
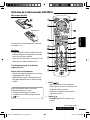
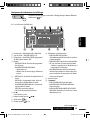
Using the remote controller (RM-RK252)
1 button
• Turns the power on if pressed briefly or
attenuates the sound when the power is on.
• Turns the power off if pressed and held.
2 5/∞ buttons
•
TUNER/DAB
: Selects the preset stations/
services.
EN02-11_KW-AVX720_001A_1.indd 9EN02-11_KW-AVX720_001A_1.indd 9 12/19/08 3:52:01 PM12/19/08 3:52:01 PM

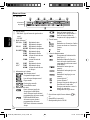
10
ENGLISH
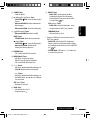
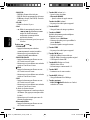
3 VOL (volume) + / – buttons
• Adjusts the volume level.
•
Bluetooth PHONE
:
– Adjusts the volume of the incoming calls.
2nd VOL (volume) buttons
• Not applicable for this unit.
4 * ASPECT button
• Changes the aspect ratio of the playback
pictures.
5 PHONE button
Applicable only when a Bluetooth phone is
connected.
• Displays <Dial Menu> screen.
• Displays <Redial> menu if pressed and held.
• Answers incoming calls.
6 * SETUP button
• Not applicable for this unit.
7 * TOP M (menu) button
• DVD-Video: Shows the disc menu.
• DVD-VR: Shows the Original Program screen.
• VCD: Resumes PBC playback.
8 OSD (on-screen display) button
• Shows the on-screen bar.
• Does not function as “
*
.”
9 SHIFT button
• Functions with other buttons.
p DISP (display) button
• Changes the display information.
q 1 / ¡ buttons
•
DISC/USB
/
iPod
: Reverse search/forward
search.
•
DISC/USB
:
– DVD-Video: Selects the title.
– DVD-VR: Selects the program/Playlist.
–
USB
/other discs (except VCD/CD): Selects the
folders if included.
•
CD-CH:
– Selects the folders if included.
•
iPod
:
– 5 : Enters the main menu (then 5 / ∞ /
4 / ¢ work as menu
selecting buttons.)
5 : Returns to the previous menu.
∞ : Confirms the selection.
– ∞ : Pauses or resumes playback.
4 / ¢ buttons
•
TUNER/DAB
:
– Searches for stations/ensembles automatically
if pressed briefly.
– Searches for stations/ensembles manually if
pressed and held.
•
DISC/USB/CD-CH
:
– Reverse skip/forward skip if pressed briefly.
– Reverse search/forward search if pressed and
held.
•
iPod
:
– Reverse skip/forward skip if pressed briefly.
– Reverse search/forward search if pressed and
held.
•
iPod
:
– Reverse skip/forward skip if pressed briefly.
– Reverse search/forward search if pressed and
held.
In menu selecting mode:
– Selects an item if pressed briefly. (Then, press
∞ to confirm the selection.)
– Skips 10 items at a time if pressed and held.
•
Bluetooth AUDIO
:
– Reverse skip/forward skip if pressed briefly.
EN02-11_KW-AVX720_001A_1.indd 10EN02-11_KW-AVX720_001A_1.indd 10 12/19/08 3:52:01 PM12/19/08 3:52:01 PM

11INTRODUCTIONS
ENGLISH
o DIRECT button
•
DISC/USB
: Enters direct search mode for
chapter/title/program/playlist/folder/track
when pressed with SHIFT button ( 36).
CLR (clear) button
•
DISC/USB
: Erases the misentry when pressed
with SHIFT button.
SURROUND button
• Not applicable for this unit.
* Functions as number buttons when pressed with SHIFT
button.
–
DISC/USB
: Enters chapter/title/program/playlist/
folder/track number after entering search mode by
pressing SHIFT and DIRECT. (
36)
–
TUNER/DAB
: (Number 1 to 6) : Enters preset
station/service number.
w SOURCE button
• Selects the source.
e 3 (play) / 8 (pause) button
•
DISC/USB
/
iPod
: Starts playback/pauses.
•
Bluetooth PHONE
: Answers incoming calls.
•
Bluetooth AUDIO
: Starts playback.
r (end call) button
•
Bluetooth PHONE
: Ends the call.
BAND button
•
TUNER/DAB
: Selects the bands.
7 (stop) button
•
DISC/USB
/
iPod
: Stops playback.
•
Bluetooth AUDIO
: Pauses.
t * RETURN button
• VCD: Returns to the PBC menu.
y * MENU button
• DVD-Video: Shows the disc menu.
• DVD-VR: Shows the Playlist screen.
• VCD: Resumes PBC playback.
u * % / fi buttons
• DVD-Video: Makes selection/settings.
•
CD-CH
: Changes discs in the magazine.
@ / # buttons
• DVD-Video: Makes selection/settings.
• DivX/MPEG Video: Skips back or forward by
about 5 minutes.
ENT (enter) button
• Confirms selection.
i DUAL button
• Not applicable for this unit.
• Does not function as “
#
.”
EN02-11_KW-AVX720_001A_1.indd 11EN02-11_KW-AVX720_001A_1.indd 11 12/19/08 3:52:02 PM12/19/08 3:52:02 PM

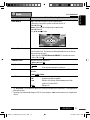
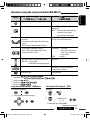
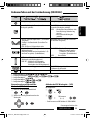
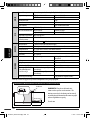
12 INTRODUCTIONS
ENGLISH
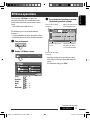
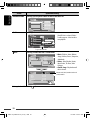
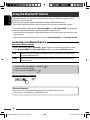
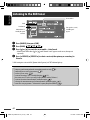
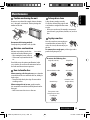
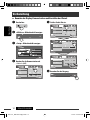
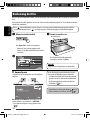
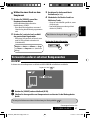
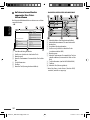
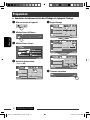
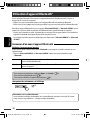
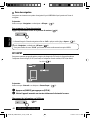
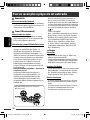
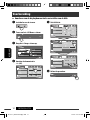
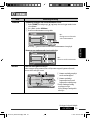
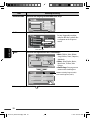
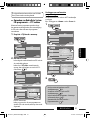
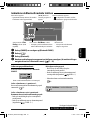
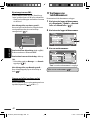
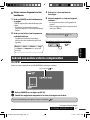
@ Set the clock.
¤ Finish the procedure.
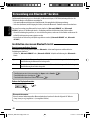
~ Turn on the power.
Ÿ Display <AV Menu> screen.
! Display <Setup> screen.
⁄ Cancel the demonstration.
Select [
Off
].
AV Menu
Setup
Demonstration
Wall Paper
Color
Scroll
Dimmer
Dimmer Time Set
Blue
Metal
Auto
AutoOnce
718
Back
Preparation
Canceling the display demonstration and setting the clock
Setup
Demonstration
Wall Paper
Color
Scroll
Dimmer
Dimmer Time Set
Blue
Bright
Auto
AutoOnce
7 AM6 PM
Setup
Time Set
Time Format
OSD Clock
Clock Adjust
Clock Adjust
1 : 00
AM
12Hours 24Hours
Off
Off Auto
Setup
Back
Time Format
OSD Clock
Time Set
Back
Back
Back
3 : 45
PM
Clock Adjust
BAND
Back
EN12-21_KW-AVX720_001A_3.indd 12EN12-21_KW-AVX720_001A_3.indd 12 1/16/09 2:29:21 PM1/16/09 2:29:21 PM

13AV MENU
ENGLISH
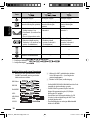
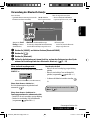
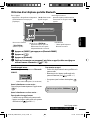
Continued on the next page
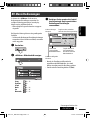
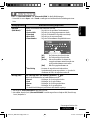
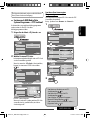
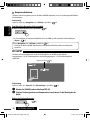
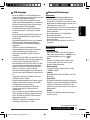
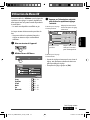
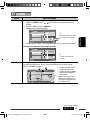
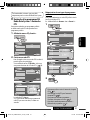
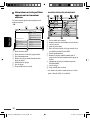
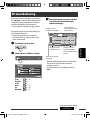
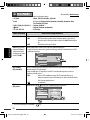
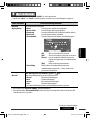
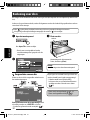
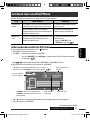
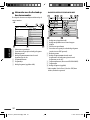
AV Menu operations
You can use the <AV Menu> for most of the
operations and settings. The available menu items
shown on the touch panel, depends on the selected
source.
• Non-available items will be shaded.
The following steps are one of the fundamental
procedures.
• You can perform the operations/change the settings
by following these steps unless mentioned otherwise.
~ Turn on the power.
Ÿ Display <AV Menu> screen.
Setup : 14 – 19
Equalizer : 20
Sound : 21
Mode : 22 – 24
List : 25 – 26
Bluetooth : 27 – 29
! Press the desired icon/item to perform
the desired operations/settings.
• Some of the settings do not open the sub-setting
screen, but just selecting an option will change the
setting.
• To exit from the setting, press [
Exit
].
AV Menu
Setup
Demonstration
Wall Paper
Color
Scroll
Dimmer
Dimmer Time Set
Blue
Bright
Auto
AutoOnce
718
Back
Returns to the previous
screen.
Indicates the remaining
time before the current
screen exit automatically.
Moves to the succeeding
menu page
Moves to the preceding
menu page
Indicates the next hierarchy
level/setting item exists
BAND
EN12-21_KW-AVX720_001A_3.indd 13EN12-21_KW-AVX720_001A_3.indd 13 1/16/09 2:29:23 PM1/16/09 2:29:23 PM

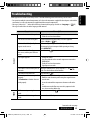
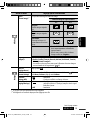
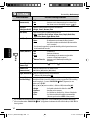
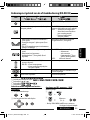
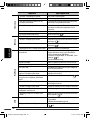
14
ENGLISH
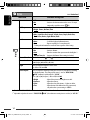
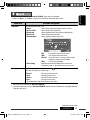
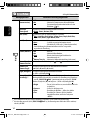
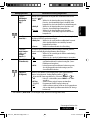
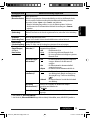
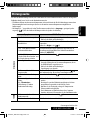
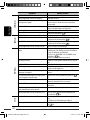
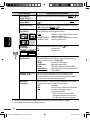
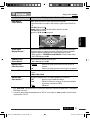
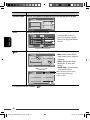
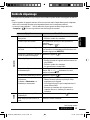
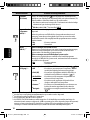
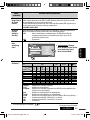
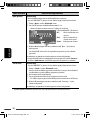
Menu item Selectable setting/item
Display
Demonstration
♦
Off
♦
On
: Cancels.
: Activates the demonstration on the screen. To stop it
temporarily, touch the screen. (
12)
Wall Paper You can select the background picture of the screen.
♦
Bright, Future, Horizon, Plain
Color You can select the color of the background picture.
♦
Blue, Light-Blue, Red, Orange, Yellow, Green, Purple, Dark-Blue,
Dark-Green, Brown, Light-Brown, Black
Scroll
♦
Off
♦
Once
♦
Auto
: Cancels.
: Scrolls the displayed information once.
: Repeats scrolling (at 5-second intervals).
• Touching the information bar scrolls the text regardless of the setting.
Dimmer
♦
Off
♦
On
♦
Auto
♦
Dimmer Time Set
: Cancels.
: Activates dimmer.
: Dims the monitor when you turn on the headlights. *
1
: Activates the Dimmer Time setting (see below).
Dimmer Time Set Sets the Dimmer On (
)/Off ( ) times.
Dimmer Level You can select the brightness for dimmer.
♦
01 (bright), 02 (middle), 03 (dark)
Bright You can adjust the brightness of the screen.
♦
–15 to +15; Initial 00
Picture Adjust *
2
You can adjust the following to make the screen clear and legible for watching
the playback picture. The setting will be stored—one for “
DISC/USB/
iPod
” (common) and the other for “
AV-IN
.”
Press [5] or [∞] to adjust. (–15 to +15; Initial 00)
♦
Bright
♦
Contrast
♦
Color
♦
Tint
: Adjust if the picture is too bright or too dark.
: Adjust the contrast.
: Adjust the color of the picture—lighter or darker.
: Adjust the tint if the human skin color is unnatural,
only when color system setting is <NTSC>.
*
1
The ILLUMINATION CONTROL lead connection is required. (See the Installation/Connection Manual.)
*
2
Adjustable only when the source is “
DISC/USB/ iPod
” (the media must contain pictures or videos) or “
AV-IN
.”
Initial: Underlined
EN12-21_KW-AVX720_001A_f.indd 14EN12-21_KW-AVX720_001A_f.indd 14 2/11/09 2:07:41 PM2/11/09 2:07:41 PM

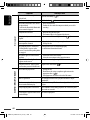
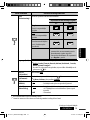
15AV MENU
ENGLISH
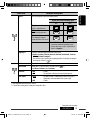
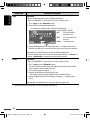
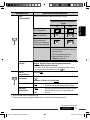
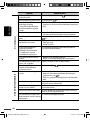
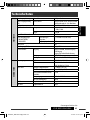
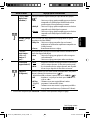
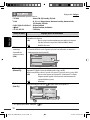
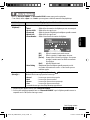
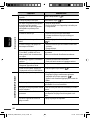
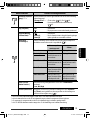
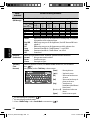
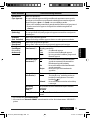
Menu item Selectable setting/item
Display
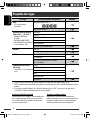
Aspect *
3
You can change the aspect ratio of the picture.
Aspect ratio of the incoming signal
4:3 16:9
Regular:
For 4:3 original pictures
Full:
For 16:9 original pictures
Panorama:
For viewing 4:3 pictures
naturally on the wide screen
Auto: • For “
DISC
”: Aspect ratio is automatically
selected to match the incoming signals.
• For the other video sources: Aspect ratio is
fixed to <Regular>.
Language *
4
Select the indication language shown on the screen.
♦
English, Español, Français, Deutsch, Italiano, Nederlands, Svenska,
Dansk, Руccĸий, Português
• The characters you can enter for assigning the titles also change according to
the language selected. ( 56)
Clock
Time Set Initial 0:00
Time Format
Select either 12-hour system or 24-hour system. (
12)
♦
12 Hours, 24 Hours; Initial 24 Hours
OSD Clock
♦
Off
♦
On
: Cancels.
: The clock time is displayed on the playback picture.
Clock Adjust
♦
Auto
♦
Off
: The built-in clock is automatically adjusted using the CT
(clock time) data in the Radio Data System signal.
: Cancels.
*
3
Not adjustable when no picture is shown.
*
4
Turn off then on the power so that your setting takes effect.
Continued on the next page
EN12-21_KW-AVX720_001A_f.indd 15EN12-21_KW-AVX720_001A_f.indd 15 2/4/09 9:15:08 AM2/4/09 9:15:08 AM

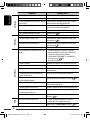
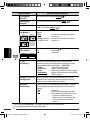
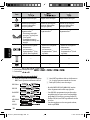
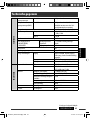
16
ENGLISH
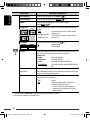
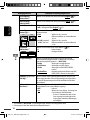
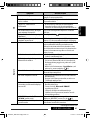
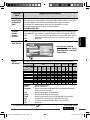
Menu item Selectable setting/item
Disc
Menu Language *
5
Select the menu language; Initial English ( 57)
Audio Language *
5
Select the audio language; Initial English ( 57)
Subtitle *
5
Select the subtitle language or erase the subtitle <Off>.;
Initial English ( 57)
Monitor Type *
5
16:9 4:3LB
4:3PS
Select the monitor type to watch a wide screen picture on the external
monitor.
♦
16:9
♦
4:3LB (Letterbox)/
4:3PS (Pan Scan)
: Select when the aspect ratio of the external
monitor is 16:9.
: Select when the aspect ratio of the external
monitor is 4:3.
OSD Position *
5
Select the position of the on-screen bar. ( 38)
♦
1
♦
2
: Higher position.
: Lower position.
File Type *
5
Select the playback file type when a disc/USB contains different types of
files. You can store this setting separately for each source—
“
DISC/USB
.”
♦
Audio
♦
Still Picture
♦
Video
♦
Audio&Video
: Plays back audio files.
: Plays back JPEG files.
: Plays back DivX/MPEG1/MPEG2 files.
: Plays back audio files and DivX/MPEG1/MPEG2
files.
DivX Regist.
(Registration) *
5
This unit has its own Registration Code. Once you have played back a file
with which the Registration Code recorded, this unit’s Registration Code
is overwritten for copyright protection.
iPod Artwork *
6
While playing back a track (in “HEAD MODE”), Artwork recorded for the
track is displayed on the monitor.
♦
Off
♦
On
: Cancels.
: Activates Artwork display. To display the
artwork, press DISP repeatedly.
• It takes 5 seconds or more to display an
Artwork and no operations are available
while loading it.
*
5
Selectable only for “
DISC/USB
.” (Playback stops when you change the setting.)
*
6
Skip the track so that your setting takes effect.
EN12-21_KW-AVX720_001A_1.indd 16EN12-21_KW-AVX720_001A_1.indd 16 12/19/08 3:49:09 PM12/19/08 3:49:09 PM

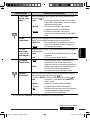
17AV MENU
ENGLISH
Continued on the next page
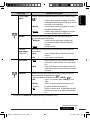
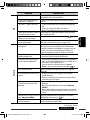
Menu item Selectable setting/item
Disc
D. (Digital) Audio
Output *
7
Select the signal format emitted through the DIGITAL OUT (optical) terminal.
( 55)
♦
PCM
♦
Dolby D
♦
Stream
: Select this when connecting an amplifier or a decoder
incompatible with Dolby Digital or MPEG Audio, or when
connecting to a recording device.
: Select this when connecting an amplifier or a decoder
compatible with Dolby Digital.
: Select this when connecting an amplifier or a decoder
compatible with Dolby Digital or MPEG Audio.
Down Mix *
7
When playing back a multi-channel disc, this setting affects the signals
reproduced through the LINE OUT jacks.
♦
Dolby Surr.
♦
Stereo
: Select this to enjoy multi-channel surround audio
by connecting an amplifier compatible with Dolby
Surround.
: Normally select this.
D. (Dynamic)
Range Compres.
(Compression) *
7
You can enjoy a powerful sound at a low volume level while playing Dolby
Digital software.
♦
Auto
♦
On
: Select to apply the effect to multi-channel encoded
software.
: Select to always use this function.
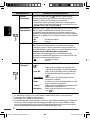
Tuner
IF Band Width
♦
Auto
♦
Wide
: Increases the tuner selectivity to reduce interference
noises between adjacent stations. (Stereo effect may be
lost.)
: Subject to the interference from adjacent stations, but
sound quality will not be degraded and the stereo effect
will remain.
AF Regional When the received signals from the current station become weak, you can
change the Network-Tracking Reception. (
50)
• When the DAB tuner is connected, refer also to <DAB AF>, 18.
♦
Off
♦
AF Reg.
(Regional)
♦
AF
: Cancels—not selectable when <DAB AF> is set to
<On>.
: Switches to another station broadcasting the same
programme. The REG indicator lights up.
: Switches to another station. The programme may differ
from the one currently received (the AF indicator lights
up).
*
7
Selectable only for “
DISC/USB
.” (Playback stops when you change the setting.)
EN12-21_KW-AVX720_001A_1.indd 17EN12-21_KW-AVX720_001A_1.indd 17 12/19/08 3:49:10 PM12/19/08 3:49:10 PM

18
ENGLISH
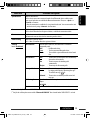
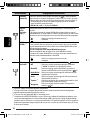
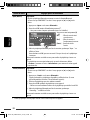
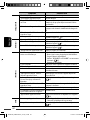
Menu item Selectable setting/item
Tuner
TA Volume
When you activate TA Standby Reception (
6), the unit will temporarily
switch to Traffic Announcement (TA) if available, from any source other than AM.
You can preset the TA volume level.
• The volume changes to the preset TA volume level if the current volume level is
lower than the preset level.
♦
VOL 00 to 30 (or 50) *
8
; Initial VOL 15
Program
Search *
9
Usually when you select preset stations, the preset station is tuned in.
If the signals from the FM Radio Data System preset station are not strong
enough, this unit uses the AF data to tune in to another station of the same
network, possibly broadcasting the same programme with stronger signals.
♦
On
♦
Off
: Select to activate.
: Cancels.
DAB AF *
10
While receiving a DAB service:
When driving in an area where a service cannot be received, this unit
automatically tunes in to another ensemble or FM Radio Data System station
broadcasting the same programme.
While receiving an FM Radio Data System station:
When driving in an area where a DAB service is broadcasting the same
programme as the FM Radio Data System station, this unit automatically tunes in
to the DAB service.
♦
On
♦
Off
: Select to activate.
: Cancels.
Input
AV Input *
11
You can determine the use of LINE IN and VIDEO IN jacks. ( 47)
♦
Off
♦
iPod (Off)
♦
Audio&Video
♦
Audio
♦
Camera *
12
♦
Navigation
: Select when no component is connected (“
AV-IN
” is
skipped while selecting the source).
: Select when connecting the iPod/iPhone using the USB
Audio and Video cable for iPod/iPhone. (
45)
: Select when connecting an AV component such as a VCR.
: Select when connecting an audio component such as a
portable audio player.
: Select when connecting a rear view camera to display the
picture (as it is taken).
: Select when connecting a Navigation System. ( 48)
*
8
Depends on the amplifier gain control settings.
*
9
The unit takes some time to tune in to another station using programme search.
*
10
Appears only when DAB tuner is connected.
*
11
Not selectable when “
AV-IN
” is selected as the source.
*
12
The REVERSE GEAR SIGNAL lead connection is required. See Installation/Connection Manual. The rear view through
the camera appears on the screen in <Full> aspect ratio (regardless of the aspect ratio setting) when you shift the
gear to the reverse (R) position. When you press DISP on the monitor panel, or when you shift the gear to another
position other than the reverse (R) position, the rear view screen is cleared.
EN12-21_KW-AVX720_001A_3.indd 18EN12-21_KW-AVX720_001A_3.indd 18 1/16/09 2:31:10 PM1/16/09 2:31:10 PM

19AV MENU
ENGLISH
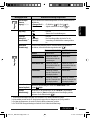
Menu item Selectable setting/item
Input
External Input *
13,
*
14
For connecting an external component to the CD changer jack on the rear.
♦
Changer/iPod *
15
♦
External
: CD changer, (
43), iPod, ( 46).
: Any other than the above, ( 48).
Others
Beep
♦
Off
♦
On
: Cancels.
: Activates the key-touch tone.
Telephone Muting *
16
♦
Off
♦
Muting1,
Muting2
: Cancels.
: Select either one which mutes the sounds while
using the cellular phone.
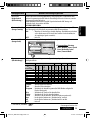
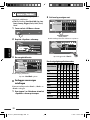
Illumination You can turn off the screen and the light of the buttons on the monitor panel
while turning on the unit.
( 7)
Buttons on the
monitor panel
Screen
Normal: Always lights. Always lights.
Proximity/Motion: Lights up when your
hand moves close to
the buttons.
Always lights.
Proxi/Motion-LCD: Lights up when your
hand moves close to
the buttons.
Lights up when your
hand moves close to
the buttons.
Touch Panel: Lights up when your
finger touches the
buttons or touch panel.
Always lights.
Touch Panel-LCD: Lights up when your
finger touches the
buttons or touch panel.
Lights up when your
finger touches the
buttons or touch panel.
Motion Sensitiv. Change the sensitivity of the sensor for <Illumination> above.
♦
Low, Mid, High
Initialize Initialize all settings you have made in <AV Menu>. Press and hold [Enter]
to initialize the settings, then reset the unit. (
3)
*
13
Not required for Bluetooth adapter and DAB tuner. They are automatically detected.
*
14
Not selectable when the component connected to the CD changer jack is selected as the source.
*
15
The name of the component detected through the CD changer jack is shown.
*
16
The TEL MUTING lead connection is required. See Installation/Connection Manual.
EN12-21_KW-AVX720_001A_f.indd 19EN12-21_KW-AVX720_001A_f.indd 19 2/11/09 11:51:48 AM2/11/09 11:51:48 AM

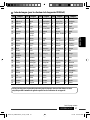
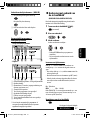
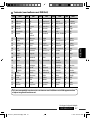
20
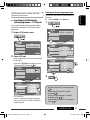
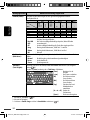
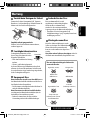
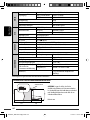
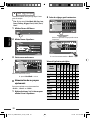
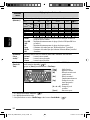
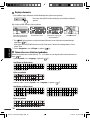
ENGLISH
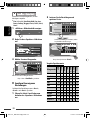
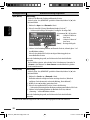
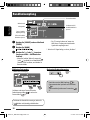
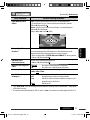
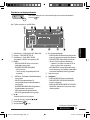
Selects a preset sound mode suitable to the music
genre.
♦
Flat (Initial), Hard Rock, R&B, Pop, Jazz, Dance,
Country, Reggae, Classic, User1, User2, User3
1 Display <AV Menu> screen.
2 Display <Equalizer> screen.
3 Select a sound mode.
Storing your own adjustments
You can store your adjustments into <User1>,
<User2>, and <User3>.
1 Perform steps 1 and 2 above to enter the
<Equalizer> screen.
Moves to the other 6 sound modes.
2 Adjust the settings, then store.
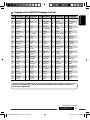
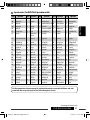
Preset equalizing values
Sound
mode
60 Hz
150 Hz
400 Hz
1 kHz
2.5 kHz
6.3 kHz
15 kHz
Flat 00 00 00 00 00 00 00
Hard Rock +03 +03 +01 00 00 +02 +01
R&B +03 +02 +02 00 +01 +01 +03
Pop 00 +02 00 00 +01 +01 +02
Jazz +03 +02 +01 +01 +01 +03 +02
Dance +04 +02 00 –02 –01 +01 +01
Country +02 +01 00 00 00 +01 +02
Reggae +03 00 00 +01 +02 +02 +03
Classic +02 +03 +01 00 00 +02 00
User1/2/3 00 00 00 00 00 00 00
AV Menu
Equalizer
Back Edit
User Store
Back
User1
User2
User3
Equalizer
Back Edit
Make adjustments by moving each bar directly.
Ex.: When storing into <
User2>.
BAND
Ex.: When <Hard Rock> is selected
EN12-21_KW-AVX720_001A_1.indd 20EN12-21_KW-AVX720_001A_1.indd 20 12/19/08 3:49:12 PM12/19/08 3:49:12 PM
Seite wird geladen ...
Seite wird geladen ...
Seite wird geladen ...
Seite wird geladen ...
Seite wird geladen ...
Seite wird geladen ...
Seite wird geladen ...
Seite wird geladen ...
Seite wird geladen ...
Seite wird geladen ...
Seite wird geladen ...
Seite wird geladen ...
Seite wird geladen ...
Seite wird geladen ...
Seite wird geladen ...
Seite wird geladen ...
Seite wird geladen ...
Seite wird geladen ...
Seite wird geladen ...
Seite wird geladen ...
Seite wird geladen ...
Seite wird geladen ...
Seite wird geladen ...
Seite wird geladen ...
Seite wird geladen ...
Seite wird geladen ...
Seite wird geladen ...
Seite wird geladen ...
Seite wird geladen ...
Seite wird geladen ...
Seite wird geladen ...
Seite wird geladen ...
Seite wird geladen ...
Seite wird geladen ...
Seite wird geladen ...
Seite wird geladen ...
Seite wird geladen ...
Seite wird geladen ...
Seite wird geladen ...
Seite wird geladen ...
Seite wird geladen ...
Seite wird geladen ...
Seite wird geladen ...
Seite wird geladen ...
Seite wird geladen ...
Seite wird geladen ...
Seite wird geladen ...
Seite wird geladen ...
Seite wird geladen ...
Seite wird geladen ...
Seite wird geladen ...
Seite wird geladen ...
Seite wird geladen ...
Seite wird geladen ...
Seite wird geladen ...
Seite wird geladen ...
Seite wird geladen ...
Seite wird geladen ...
Seite wird geladen ...
Seite wird geladen ...
Seite wird geladen ...
Seite wird geladen ...
Seite wird geladen ...
Seite wird geladen ...
Seite wird geladen ...
Seite wird geladen ...
Seite wird geladen ...
Seite wird geladen ...
Seite wird geladen ...
Seite wird geladen ...
Seite wird geladen ...
Seite wird geladen ...
Seite wird geladen ...
Seite wird geladen ...
Seite wird geladen ...
Seite wird geladen ...
Seite wird geladen ...
Seite wird geladen ...
Seite wird geladen ...
Seite wird geladen ...
Seite wird geladen ...
Seite wird geladen ...
Seite wird geladen ...
Seite wird geladen ...
Seite wird geladen ...
Seite wird geladen ...
Seite wird geladen ...
Seite wird geladen ...
Seite wird geladen ...
Seite wird geladen ...
Seite wird geladen ...
Seite wird geladen ...
Seite wird geladen ...
Seite wird geladen ...
Seite wird geladen ...
Seite wird geladen ...
Seite wird geladen ...
Seite wird geladen ...
Seite wird geladen ...
Seite wird geladen ...
Seite wird geladen ...
Seite wird geladen ...
Seite wird geladen ...
Seite wird geladen ...
Seite wird geladen ...
Seite wird geladen ...
Seite wird geladen ...
Seite wird geladen ...
Seite wird geladen ...
Seite wird geladen ...
Seite wird geladen ...
Seite wird geladen ...
Seite wird geladen ...
Seite wird geladen ...
Seite wird geladen ...
Seite wird geladen ...
Seite wird geladen ...
Seite wird geladen ...
Seite wird geladen ...
Seite wird geladen ...
Seite wird geladen ...
Seite wird geladen ...
Seite wird geladen ...
Seite wird geladen ...
Seite wird geladen ...
Seite wird geladen ...
Seite wird geladen ...
Seite wird geladen ...
Seite wird geladen ...
Seite wird geladen ...
Seite wird geladen ...
Seite wird geladen ...
Seite wird geladen ...
Seite wird geladen ...
Seite wird geladen ...
Seite wird geladen ...
Seite wird geladen ...
Seite wird geladen ...
Seite wird geladen ...
Seite wird geladen ...
Seite wird geladen ...
Seite wird geladen ...
Seite wird geladen ...
Seite wird geladen ...
Seite wird geladen ...
Seite wird geladen ...
Seite wird geladen ...
Seite wird geladen ...
Seite wird geladen ...
Seite wird geladen ...
Seite wird geladen ...
Seite wird geladen ...
Seite wird geladen ...
Seite wird geladen ...
Seite wird geladen ...
Seite wird geladen ...
Seite wird geladen ...
Seite wird geladen ...
Seite wird geladen ...
Seite wird geladen ...
Seite wird geladen ...
Seite wird geladen ...
Seite wird geladen ...
Seite wird geladen ...
Seite wird geladen ...
Seite wird geladen ...
Seite wird geladen ...
Seite wird geladen ...
Seite wird geladen ...
Seite wird geladen ...
Seite wird geladen ...
Seite wird geladen ...
Seite wird geladen ...
Seite wird geladen ...
Seite wird geladen ...
Seite wird geladen ...
Seite wird geladen ...
Seite wird geladen ...
Seite wird geladen ...
Seite wird geladen ...
Seite wird geladen ...
Seite wird geladen ...
Seite wird geladen ...
Seite wird geladen ...
Seite wird geladen ...
Seite wird geladen ...
Seite wird geladen ...
Seite wird geladen ...
Seite wird geladen ...
Seite wird geladen ...
Seite wird geladen ...
Seite wird geladen ...
Seite wird geladen ...
Seite wird geladen ...
Seite wird geladen ...
Seite wird geladen ...
Seite wird geladen ...
Seite wird geladen ...
Seite wird geladen ...
Seite wird geladen ...
Seite wird geladen ...
Seite wird geladen ...
Seite wird geladen ...
Seite wird geladen ...
Seite wird geladen ...
Seite wird geladen ...
Seite wird geladen ...
Seite wird geladen ...
Seite wird geladen ...
Seite wird geladen ...
Seite wird geladen ...
Seite wird geladen ...
Seite wird geladen ...
Seite wird geladen ...
Seite wird geladen ...
Seite wird geladen ...
Seite wird geladen ...
Seite wird geladen ...
Seite wird geladen ...
Seite wird geladen ...
Seite wird geladen ...
Seite wird geladen ...
Seite wird geladen ...
Seite wird geladen ...
Seite wird geladen ...
Seite wird geladen ...
Seite wird geladen ...
Seite wird geladen ...
Seite wird geladen ...
Seite wird geladen ...
Seite wird geladen ...
Seite wird geladen ...
Seite wird geladen ...
Seite wird geladen ...
Seite wird geladen ...
Seite wird geladen ...
Seite wird geladen ...
-
 1
1
-
 2
2
-
 3
3
-
 4
4
-
 5
5
-
 6
6
-
 7
7
-
 8
8
-
 9
9
-
 10
10
-
 11
11
-
 12
12
-
 13
13
-
 14
14
-
 15
15
-
 16
16
-
 17
17
-
 18
18
-
 19
19
-
 20
20
-
 21
21
-
 22
22
-
 23
23
-
 24
24
-
 25
25
-
 26
26
-
 27
27
-
 28
28
-
 29
29
-
 30
30
-
 31
31
-
 32
32
-
 33
33
-
 34
34
-
 35
35
-
 36
36
-
 37
37
-
 38
38
-
 39
39
-
 40
40
-
 41
41
-
 42
42
-
 43
43
-
 44
44
-
 45
45
-
 46
46
-
 47
47
-
 48
48
-
 49
49
-
 50
50
-
 51
51
-
 52
52
-
 53
53
-
 54
54
-
 55
55
-
 56
56
-
 57
57
-
 58
58
-
 59
59
-
 60
60
-
 61
61
-
 62
62
-
 63
63
-
 64
64
-
 65
65
-
 66
66
-
 67
67
-
 68
68
-
 69
69
-
 70
70
-
 71
71
-
 72
72
-
 73
73
-
 74
74
-
 75
75
-
 76
76
-
 77
77
-
 78
78
-
 79
79
-
 80
80
-
 81
81
-
 82
82
-
 83
83
-
 84
84
-
 85
85
-
 86
86
-
 87
87
-
 88
88
-
 89
89
-
 90
90
-
 91
91
-
 92
92
-
 93
93
-
 94
94
-
 95
95
-
 96
96
-
 97
97
-
 98
98
-
 99
99
-
 100
100
-
 101
101
-
 102
102
-
 103
103
-
 104
104
-
 105
105
-
 106
106
-
 107
107
-
 108
108
-
 109
109
-
 110
110
-
 111
111
-
 112
112
-
 113
113
-
 114
114
-
 115
115
-
 116
116
-
 117
117
-
 118
118
-
 119
119
-
 120
120
-
 121
121
-
 122
122
-
 123
123
-
 124
124
-
 125
125
-
 126
126
-
 127
127
-
 128
128
-
 129
129
-
 130
130
-
 131
131
-
 132
132
-
 133
133
-
 134
134
-
 135
135
-
 136
136
-
 137
137
-
 138
138
-
 139
139
-
 140
140
-
 141
141
-
 142
142
-
 143
143
-
 144
144
-
 145
145
-
 146
146
-
 147
147
-
 148
148
-
 149
149
-
 150
150
-
 151
151
-
 152
152
-
 153
153
-
 154
154
-
 155
155
-
 156
156
-
 157
157
-
 158
158
-
 159
159
-
 160
160
-
 161
161
-
 162
162
-
 163
163
-
 164
164
-
 165
165
-
 166
166
-
 167
167
-
 168
168
-
 169
169
-
 170
170
-
 171
171
-
 172
172
-
 173
173
-
 174
174
-
 175
175
-
 176
176
-
 177
177
-
 178
178
-
 179
179
-
 180
180
-
 181
181
-
 182
182
-
 183
183
-
 184
184
-
 185
185
-
 186
186
-
 187
187
-
 188
188
-
 189
189
-
 190
190
-
 191
191
-
 192
192
-
 193
193
-
 194
194
-
 195
195
-
 196
196
-
 197
197
-
 198
198
-
 199
199
-
 200
200
-
 201
201
-
 202
202
-
 203
203
-
 204
204
-
 205
205
-
 206
206
-
 207
207
-
 208
208
-
 209
209
-
 210
210
-
 211
211
-
 212
212
-
 213
213
-
 214
214
-
 215
215
-
 216
216
-
 217
217
-
 218
218
-
 219
219
-
 220
220
-
 221
221
-
 222
222
-
 223
223
-
 224
224
-
 225
225
-
 226
226
-
 227
227
-
 228
228
-
 229
229
-
 230
230
-
 231
231
-
 232
232
-
 233
233
-
 234
234
-
 235
235
-
 236
236
-
 237
237
-
 238
238
-
 239
239
-
 240
240
-
 241
241
-
 242
242
-
 243
243
-
 244
244
-
 245
245
-
 246
246
-
 247
247
-
 248
248
-
 249
249
-
 250
250
-
 251
251
-
 252
252
-
 253
253
-
 254
254
-
 255
255
-
 256
256
-
 257
257


JVC KW-AVX720 Bedienungsanleitung
- Kategorie
- Auto-Medienempfänger
- Typ
- Bedienungsanleitung
in anderen Sprachen
- English: JVC KW-AVX720 Owner's manual
- français: JVC KW-AVX720 Le manuel du propriétaire
- Nederlands: JVC KW-AVX720 de handleiding
Verwandte Artikel
-
JVC KD-DV4401 Benutzerhandbuch
-
-
JVC KD-AVX11 - EXAD - DVD Player Instructions Manual
-
JVC KD-7402 Benutzerhandbuch
-
-
-
-
JVC kd-dv6202 Benutzerhandbuch
-
JVC KD-DB52 Bedienungsanleitung
-
Andere Dokumente
-
Samsung MM-J320 Benutzerhandbuch
-
Yamaha MCR-840 Bedienungsanleitung
-
Yamaha MCR-840 Pianocraft Bedienungsanleitung
-
Panasonic CQRX400N Bedienungsanleitung
-
Intenso Video Rocker Bedienungsanleitung
-
-
Lexibook DMP20 SP, DMP23 SP Benutzerhandbuch
-
-
Panasonic CQHX1083N Bedienungsanleitung
-
Rega Apollo Benutzerhandbuch