
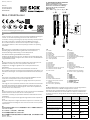
SICK AG
Erwin-Sick-Straße 1
D-79183 Waldkirch
www.sick.com
8023955 // 30.09.2019
QUICKSTART
MLG-2 WebChecker
en
These instructions are only valid in connection with the 8024643 operating inst-
ructions. You can nd the operating instructions under www.sick.com.
Connection, mounting, and setting may only be performed by trained specialists.
Not a safety component in accordance with the EU Machinery Directive.
Do not install the device at locations that are exposed to direct sunlight or
other weather inuences, unless this is expressly permitted in the operating
instructions.
de
Diese Anleitung ist ausschließlich in Verbindung mit der Betriebsanleitung
8024514 gültig. Die Betriebsanleitung nden Sie unter www.sick.com.
Anschluss, Montage und Einstellung nur durch Fachpersonal.
Kein Sicherheitsbauteil gemäß EU-Maschinenrichtlinie.
Installieren Sie das Gerät nicht an Orten, die direkter Sonneneinstrahlung oder
sonstigen Wettereinüssen ausgesetzt sind, ausser dies ist in der Betriebsanlei-
tung ausdrücklich erlaubt.
it
Le presenti istruzioni sono valide solo in abbinamento alle istruzioni per l‘uso
8024643. Le istruzioni per l‘uso sono reperibili su www.sick.com.
Collegamento, montaggio e regolazione solo a cura di personale tecnico
specializzato.
Nessun componente di sicurezza ai sensi della direttiva macchine UE.
Non installare il dispositivo in luoghi esposti all’irraggiamento solare diretto o ad
altri inussi meteorologici, se non espressamente consentito nelle istruzioni per
l’uso.
fr
Cette notice n‘est valable qu‘avec la notice d‘instruction 8024643. La notice
d‘instruction est disponible sur le site Internet www.sick.com.
Coner le raccordement, le montage et le réglage uniquement au personnel
qualié.
Il ne s‘agit pas d‘un composant de sécurité au sens de la directive machines CE.
N’installez pas l’appareil à des endroits directement exposées aux rayons du
soleil ou à d’autres conditions météorologiques, sauf si cela est explicitement
autorisé dans la notice d‘instruction.
es
Estas instrucciones solo son válidas junto con las instrucciones de uso 8024643.
Puede encontrar las instrucciones de uso en www.mysick.com.
La conexión, el montaje y el ajuste deben efectuarlos exclusivamente técnicos
especialistas.
No se trata de un componente de seguridad según la Directiva de máquinas de
la UE.
No instale el dispositivo en lugares directamente expuestos a la radiación solar
o a otras inuencias climatológicas, salvo si las instrucciones de uso lo permiten
expresamente.
zh
本说明书仅在结合使用 8024643 操作指南情况下有效。查看操作指南可访问
www.sick.com 网页。
仅允许由专业人员进行接线、安装和设置。
本设备非欧盟机械指令中定义的安全部件。
请勿将传感器安装在阳光直射或受其它气候影响的位置,除非操作指南中明确
允许这一行为。
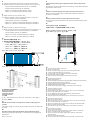
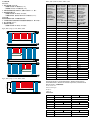
1 Operating and status indicators
Bedien- und Anzeigeelemente
Elementi di comando e di visualizzazione
Éléments de commande et d‘achage
Elementos de mando y visualización
操作及显示元件
Fig. 1 / Abb. 1 / Fig. 1 / Ill. 1 / Fig. 1 / 图 1
1
rs
3
5
4
8
6
Teach
Alignment
link/data
RS485
7
2
yel
red
grn
yel
red
grn
5
en
1 Sender
2 Receiver
3 Sender LED
4 Receiver LED
5 Status LEDs
6 Control panel on rear side of receiver
7 Control panel LEDs
8 “Teach” pushbutton
de
1 Sender
2 Empfänger
3 Sende-LED
4 Empfänger-LED
5 Anzeige-LEDs Status
6 Bedienfeld Rückseite Empfänger
7 LEDs Bedienfeld
8 Taste „Teach“
it
1 Emettitore
2 Ricevitore
3 LED emettitore
4 LED ricevitore
5 LED di stato
6 Pannello di controllo retro ricevitore
7 Pannello di controllo del LED
8 Tasto “Teach”
fr
1 Émetteur
2 Récepteur
3 LED émettrice
4 LED réceptrice
5 Etat des LED d’achage
6 Récepteur au dos du panneau de
commande
7 LED de panneau de commande
8 Touche « Teach » (Apprentissage)
es
1 Emisor
2 Receptor
3 LED emisor
4 LED receptor
5 Estado de LED indicadores
6 Panel de control parte trasera de
receptor
7 LED del panel de control
8 Tecla “Teach” (Aprendizaje)
zh
1 发射器
2 接收器
3 发射器 LED
4 接收器 LED
5 状态指示灯 LED
6 接收器背面操作面板
7 操作面板 LED
8 “Teach” (示教) 按键
en
The MLG-2 WebChecker is designed for optical and non-contact edge detection
and width measurement of exible and rigid sheets of material.
Providing no object is located between the sender and receiver, the light beams
from the sender LEDs will hit the receiver LEDs. If an object is located between
the sender and receiver, the light beams will be interrupted, depending on the size
of the object.
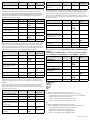
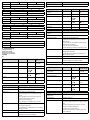
Meaning Sender LED Receiver LED Control panel
LED
Supply voltage on
Green O Green O
–
Alignment aid active –
Yellow Ö 3 Hz +
Green O
–
Alignment poor –
Yellow Ö 3 Hz Alignment O
Alignment good/sensor teach-in
good/material teach-in good
–
Yellow o Alignment o
Teach-in active –
Yellow Ö 1 Hz
Alignment
Ö 1 Hz
At least one light beam interrupted –
Yellow O +
Green O
Alignment O
8023955 // 30.09.2019
8024514:UL Environmental Rating: Enclosure Type 1
2006/42/EC
NO
SAFETY

MLG-2 WebChecker | SICK
Meaning Sender LED Receiver LED Control panel
LED
No light beam interrupted –
Green O Alignment o
de
Der MLG-2 WebChecker ist für die optische und berührungslose Kantenerkennung
und Breitenmessung von exiblen und starren Materialbahnen vorgesehen.
Solange sich kein Objekt zwischen Sender und Empfänger bendet, treen die
Lichtstrahlen der Sende-LEDs auf die Empfänger-LEDs. Bendet sich ein Objekt
zwischen Sender und Empfänger, werden in Abhängigkeit von der Größe des
Objekts Lichtstrahlen unterbrochen.
Bedeutung LED Sender LED Empfänger LED Bedienfeld
Versorgungsspannung an
Grün O Grün O
–
Ausrichthilfe aktiv –
Gelb Ö 3 Hz +
Grün O
–
Ausrichtung schlecht –
Gelb Ö 3 Hz Alignment O
Ausrichtung gut / Sensor-Teach-in
gut / Material-Teach-in gut
–
Gelb o Alignment o
Teach-in aktiv –
Gelb Ö 1 Hz
Alignment
Ö 1 Hz
Min. ein Lichtstrahl unterbrochen –
Gelb O +
Grün O
Alignment O
Kein Lichtstrahl unterbrochen –
Grün O Alignment o
it
MLG-2 WebChecker è previsto per il riconoscimento ottico e senza contatto degli
spigoli e per la misurazione della larghezza di nastri materiale essibili e rigidi.
Se nessun oggetto si trova tra emettitore e ricevitore, i raggi ottici dell LED emetti-
tore incontrano il LED ricevitore. Se un oggetto si trova tra emettitore e ricevitore, i
raggi ottici vengono interrotti in funzione della grandezza dell’oggetto.
Signicato Emettitore LED Ricevitore LED Pannello di
controllo del LED
Tensione di alimentazione
presente
Verde O Verde O
–
Dispositivo di allineamento attivo –
Giallo Ö 3 Hz +
Verde O
–
Allineamento non corretto –
Giallo Ö 3 Hz Alignment O
Allineamento corretto / sensore
teach-in corretto / materiale
teach-in corretto
–
Giallo o Alignment o
Teach-in attivo –
Giallo Ö 1 Hz Alignment Ö
1 Hz
Min. un raggio ottico interrotto –
Giallo O +
Verde O
Alignment O
Raggio ottico ininterrotto –
Verde O Alignment o
fr
Le WebChecker MLG-2 est prévu pour assurer une détection des bords et une
mesure de la largeur optique et sans contact des bandes de matériaux exibles
et rigides.
Tant qu’aucun objet ne se trouve entre l’émetteur et le récepteur, les faisceaux
lumineux de la LED émettrice croisent ceux de la LED réceptrice. S’il existe un
objet entre l’émetteur et le récepteur, les faisceaux lumineux sont interrompus en
fonction de la taille de l’objet.
Description LED émettrice LED réceptrice LED de panneau
de commande
Tension d'alimentation activée
Vert O Vert O
–
Outil d'alignement actif –
Jaune Ö 3 Hz +
Vert O
–
Mauvais alignement –
Jaune Ö 3 Hz Alignment O
Bon alignement / bon apprentis-
sage du capteur / bon apprentis-
sage du matériel
–
Jaune o Alignment o
Apprentissage (Teach-in) actif –
Jaune Ö 1 Hz
Alignment
Ö 1 Hz
Au moins un faisceau lumineux
interrompu
–
Jaune O +
Vert O
Alignment O
Description LED émettrice LED réceptrice LED de panneau
de commande
Aucun faisceau lumineux
interrompu
–
Vert O Alignment o
es
El MLG-2 WebChecker está diseñado para la detección de bordes óptica sin con-
tacto y para la medición de anchuras de bandas de materiales exibles y rígidas.
Siempre que no se interponga ningún objeto entre el emisor y el receptor, los
haces de luz de los LED emisores inciden en los LED receptores. Si se interpone
un objeto entre el emisor y el receptor, los haces de luz se interrumpen en función
del tamaño del objeto.
Signicado LED emisor LED receptor LED del panel de
control
Con tensión de alimentación
Verde O Verde O
–
Herramienta de alineación activa –
Amarillo Ö
3 Hz +
verde O
–
Mala alineación –
Amarillo Ö
3 Hz
Alignment O
Alineación correcta / sensor de
aprendizaje correcto / aprendizaje
de material correcto
–
Amarillo o Alignment o
Aprendizaje activo –
Amarillo Ö
1 Hz
Alignment
Ö 1 Hz
Al menos un haz de luz
interrumpido
–
Amarillo O +
verde O
Alignment O
Ningún haz de luz interrumpido –
Verde O Alignment o
zh
MLG-2 WebChecker 设计用于柔性和刚性材料轨道的光学和非接触边缘检测和
宽度测量。
只要没有物体位于发射器和接收器之间,则发射 LED 的光束就会到达接收器
LED。如果有物体位于发射器和接收器之间,则会根据物体尺寸使光束中断。
含义 发射器 LED 接收器 LED 操作面板
LED
工作电压接通
绿色 O 绿色 O
–
校准辅助激活 –
黄色 Ö
3 Hz +
绿色 O
–
校准不佳 –
黄色 Ö 3 Hz Alignment O
校准良好/发射器示教良好/
材料示教良好
–
黄色 o Alignment o
示教功能激活 –
黄色 Ö 1 Hz
Alignment
Ö 1 Hz
至少一个光束已中断 –
黄色 O +
绿色 O
Alignment O
无光束中断 –
绿色 O Alignment o
2 Mounting
Montage
Montaggio
Montage
Montaje
安装
en
1 Align the sender and receiver with each other. Fig. 2.
2 Mount the sender and receiver using the bracket. 5 to 6 Nm. Fig. 3.
– QuickFix bracket (included in the scope of delivery, part no. 2066048)
– FlexFix bracket (optional, part no. 2066614)
– MLG-2 ≤ 2 m: Senders 2 pieces. Receivers 2 pieces.
– MLG-2 > 2 m: Senders 3 pieces. Receivers 3 pieces.
de
1 Sender und Empfänger zueinander ausrichten. Abb. 2.
2 Sender und Empfänger mittels Halterung montieren. 5 bis 6 Nm. Abb. 3.
– QuickFix-Halterung (Lieferumfang) (Art.-Nr. 2066048)
– FlexFix-Halterung (optional) (Art.-Nr. 2066614)
– MLG-2 ≤ 2 m: Sender 2 Stück. Empfänger 2 Stück.
– MLG-2 > 2 m: Sender 3 Stück. Empfänger 3 Stück.
Seite wird geladen ...
Seite wird geladen ...

8023955 // 30.09.2019
2. Sensor-Teach-in
Alignment war erfolgreich.
1 Taste Teach zwischen 1 s und 5 s drücken.
– Gelbe LED am Empfänger blinkt langsam (1 Hz).
– LED Alignment am Bedienfeld blinkt langsam (1 Hz).
2 Wenn sich zwischen Sender und Empfänger ein Objekt bendet, alle Lichts-
trahlen einmal freilegen. Abb. 5.
3 Solange warten, bis der Sensor-Teach-in abgeschlossen ist.
– Gelbe LED am Empfänger und LED Alignment sind aus.
– Fehler Sensor-Teach-in: Rote LED am Empfänger blinkt schnell (10 Hz).
3. Material-Teach-in
Sender und Empfänger ausgerichtet. Sensor-Teach-in war erfolgreich.
1 Alle zu erfassende Objekte im korrekten Abstand zwischen Sender und Emp-
fänger platzieren. Abb. 6 und Tab. 1.
2 Taste Teach kürzer als 1 s drücken.
3 Solange warten, bis der Material-Teach-in abgeschlossen ist.
– Gelbe LED am Empfänger und LED Alignment sind aus.
it
Consigliamo di mettere in esercizio MLG-2 WebChecker con l’aiuto del software
di congurazione SOPAS Engineering Tool (ET) (www.sick.com). Di seguito viene
descritta la messa in servizio tramite il tasto Teach.
Il dispositivo di allineamento per MLG-2 è a disposizione una sola volta per la
prima messa in servizio. Se MLG-2 dovesse venire nuovamente allineato, questa
operazione andrà eseguita con l’aiuto di SOPAS ET.
1. Allineamento
Nessun oggetto tra emettitore e ricevitore.
Il dispositivo di allineamento è attivo. Il LED giallo del ricevitore lampeggia veloce-
mente (3 Hz).
1 Allineare il ricevitore all’emettitore.
– Allineamento non corretto: il LED giallo del ricevitore lampeggia veloce-
mente. Il LED Alignment nel pannello di controllo è acceso.
– Allineamento non corretto: il LED giallo del ricevitore e il LED Alignment
sono spenti.
2 Fissare emettitore e ricevitore.
2. Sensore teach-in
Allineamento riuscito.
1 Premere da 1 s a 5 s il tasto Teach.
– Il LED giallo del ricevitore lampeggia lentamente (1 Hz).
– Il LED Alignment nel pannello di controllo lampeggia lentamente (1 Hz).
2 Se tra emettitore e ricevitore si trova un oggetto, liberare tutti i raggi ottici.
Fig. 5.
3 Attendere no a che il sensore teach-in non abbia concluso.
– Il LED giallo del ricevitore e il LED Alignment sono spenti.
– Errore del sensore teach-in: il LED rosso del ricevitore lampeggia veloce-
mente (10 Hz).
3. Materiale teach-in
Emettitore e ricevitore allineati. Sensore teach-in riuscito.
1 Posizionare tutti gli oggetti da rilevare alla distanza corretta tra emettitore e
ricevitore. Fig. 6 e tab. 1.
2 Premere il tasto teach per meno di 1 s.
3 Attendere no a che il materiale teach-in non sia pronto.
– Il LED giallo del ricevitore e il LED Alignment sono spenti.
fr
Nous recommandons la mise en service du WebChecker MLG-2 à l’aide du logiciel
de conguration SOPAS Engineering Tool (ET) (www.sick.com). La mise en service
à l’aide de la touche Teach est décrite ci-après.
L’outil d’alignement du MLG-2 n’est disponible qu’une fois, lors de la mise en
service initiale. S’il devait être nécessaire de procéder à un nouvel alignement du
MLG-2, cet alignement devrait être réalisé à l’aide du SOPAS ET.
1. Alignement
Pas d’objet entre l’émetteur et le récepteur.
L’aide à l’alignement est active. La LED jaune du récepteur clignote rapidement
(3 Hz).
1 Aligner le récepteur sur l’émetteur.
– Mauvais alignement : la LED jaune du récepteur clignote rapidement. La
LED Alignment du panneau de commande est allumée.
– Bon alignement : la LED jaune du récepteur et la LED Alignment sont
éteintes.
2 Fixer l’émetteur et le récepteur.
2. Apprentissage du capteur
L’alignement a réussi.
1 Appuyer sur la touche Teach entre 1 et 5 s :
– La LED jaune du récepteur clignote lentement (1 Hz).
– La LED Alignment du panneau de commande clignote lentement (1 Hz).
2 Dégager tous les faisceaux lumineux en présence d’un objet entre l’émetteur
et le récepteur. Ill. 5.
3 Patienter jusqu’à ce que l’apprentissage du capteur soit terminé.
– La LED jaune du récepteur et la LED Alignment sont éteintes.
– Erreur d’apprentissage du capteur : la LED rouge du récepteur clignote
rapidement (10 Hz).
3. Apprentissage du matériel
Emetteur et récepteur alignés. L’apprentissage du capteur a réussi.
1 Tous les objets à saisir sont placés en respectant la distance correcte entre
l’émetteur et le récepteur. Ill. 6 et Tab. 1
2 Appuyer sur la touche Teach pendant moins d’une seconde.
3 Patienter jusqu’à ce que l’apprentissage du matériel soit terminé.
– La LED jaune du récepteur et la LED Alignment sont éteintes.
es
Recomendamos efectuar la puesta en servicio del MLG-2 WebChecker con ayuda
del software de conguración SOPAS Engineering Tool (ET) (www.sick.com). A
continuación se describe la puesta en servicio desde la tecla Teach.
La herramienta de alineación del MLG-2 solo puede utilizarse una vez para la
primera puesta en servicio. Si fuera necesario alinear de nuevo el MLG-2, debe
hacerlo con ayuda del SOPAS ET.
1. Alineación
Ningún objeto entre el emisor y el receptor.
La herramienta de alineación está activa. El LED amarillo en el receptor parpadea
rápidamente (3 Hz).
1 Alinee el receptor con el emisor.
– Alineación incorrecta: el LED amarillo del receptor parpadea rápido. LED
Teach en el panel de control encendido.
– Alineación correcta: el LED amarillo del receptor y el LED Alignment están
apagados.
2 Fije el emisor y el receptor.
2. Aprendizaje del sensor
Alineación realizada correctamente.
1 Mantenga pulsada la tecla Teach entre 1 s y 5 s.
– El LED amarillo en el receptor parpadea lentamente (1 Hz).
– El LED Teach en el panel de control parpadea lentamente (1 Hz).
2 Si se encuentra un objeto entre el emisor y el receptor, deje libres antes todos
los haces de luz. Fig. 5.
3 Espere hasta que el aprendizaje del sensor haya concluido.
– El LED amarillo en el receptor y el LED Teach están apagados.
– Error en el aprendizaje del sensor: el LED rojo en el receptor parpadea
rápidamente (10 Hz).
3. Aprendizaje del material
Emisor y receptor alineados. Aprendizaje del sensor realizado correctamente.
1 Coloque todos los objetos que se van a detectar a la distancia correcta entre
el emisor y el receptor. Fig. 6. y tab. 1
2 Pulse la tecla Teach durante menos de 1 s.
3 Espere hasta que el aprendizaje del material haya concluido.
– El LED amarillo en el receptor y el LED Alignment están apagados.
zh
我们建议借助配置软件 SOPAS Engineering Tool (ET) 运行 MLG-2
WebChecker (www.sick.com)。下面说明通过示教按键进行的调试。
MLG-2 上的校准辅助仅可以用于首次调试一次。如果必须重新校准 MLG-2,
则必须使用 SOPAS ET 校准 MLG-2。
1. 校准
发射器与接收器之间无物体。
校准辅助已激活。接收器上的黄色 LED 快速闪烁 (3 Hz)。
1 校准接收器与发射器。
– 校准不佳:接收器上的黄色 LED 快速闪烁操作面板上的对齐 LED 亮
起。
– 校准良好:接收器上的黄色 LED 和对齐 LED 熄灭。
2 固定发射器与接收器。
Seite wird geladen ...

8023955 // 30.09.2019
Byte 12 13 14 15
Name Output Function 7 Output Function 8
Type UInt16 UInt16
Byte 16 17 18 19
Name Output Function 9 Output Function 10
Type UInt16 UInt16
Byte 20 21 22 23
Name Output Function 11 Output Function 12
Type UInt16 UInt16
Byte 24 25 26 27
Name Output Function 13 Output Function 14
Type UInt16 UInt16
Byte 28 29 30 31
Name Output Function 15 Output Function 16
Type UInt16 UInt16
Process Data Out
Byte 0
Name Process Data Out
Type UInt16
5 Troubleshooting
Störungsbehebung
Eliminazione difetti
Élimination des défauts
Resolución de problemas
故障排除
en
Meaning Sender LED Receiver LED Control panel
LED
Supply voltage o or too low
All o All o
RS-485 /
IO-Link o
Hardware error
Red O Red O
–
Sensor teach-in error –
Red Ö 10 Hz
+ Yellow O +
Green O
–
Contamination warning –
Yellow Ö 3 Hz +
Green O
Alignment
Ö 3 Hz
Syn error –
Red O + Yellow
O
–
Short-circuit –
Red O + Green
O
–
Meaning Measure
Supply voltage o or too low Check the supply voltage.
Hardware error Contact Service.
Teach-in error Check that the front screens are clean.
Ensure that all light beams are unobstructed during
teach-in.
Check the alignment of the sender and receiver with
each other. Perform alignment again.
Perform sensor teach-in again.
Check “Blanking” in the SOPAS settings in the menu.
Material teach-in error No material is located between the sender and receiver.
The material is transparent.
Check “Blanking” and “Material teach-in” in the SOPAS
settings in the menu.
Contamination warning Clean the front screens.
Syn error Check the electrical connection.
Check the electrical cables for breakage.
Meaning Measure
Short-circuit Contact Service. Replace the device.
de
Bedeutung LED Sender LED Empfänger LED Bedienfeld
Versorgungsspannung aus oder
zu gering
Alle o Alle o
RS-485/IO-Link
o
Hardwarefehler
Rot O Rot O
–
Sensor-Teach-in-Fehler –
Rot Ö 10 Hz
+ Gelb O +
Grün O
–
Verschmutzungswarnung –
Gelb Ö 3 Hz +
Grün O
Alignment
Ö 3 Hz
Syn-Fehler –
Rot O + Gelb O
–
Kurzschluss –
Rot O + Grün O
–
Bedeutung Maßnahme
Versorgungsspannung aus oder
zu gering
Versorgungsspannung prüfen.
Hardwarefehler Service kontaktieren.
Sensor-Teach-in-Fehler Frontscheiben auf Sauberkeit prüfen.
Sicherstellen, dass während dem Teach-in alle Lichts-
trahlen frei sind.
Ausrichtung Sender und Empfänger zueinander prüfen.
Alignment erneut durchführen.
Sensor-Teach-in erneut durchführen.
In SOPAS Einstellungen im Menü „Ausblendung“ prüfen.
Material-Teach-in-Fehler Zwischen Sender und Empfänger liegt kein Material.
Das Material ist transparent.
In SOPAS Einstellungen im Menü „Ausblendung“ und
„Material-Teach-in“ prüfen.
Verschmutzungswarnung Fronstscheiben reinigen.
Syn-Fehler Elektrischen Anschluss prüfen.
Elektrische Leitungen auf Kabelbruch prüfen.
Kurzschluss Service kontaktieren. Gerät ersetzen.
it
Signicato Emettitore LED Ricevitore LED Pannello di
controllo del LED
Tensione di alimentazione assente
o troppo bassa
Tutti o Tutti o
RS-485 /
IO-Link o
Difetto hardware
Rosso O Rosso O
–
Errore sensore teach-in –
Rosso Ö 10 Hz
+ Giallo O +
Verde O
–
Avviso di contaminazione –
Giallo Ö 3 Hz +
Verde O
Alignment Ö
3 Hz
Errore di sincronizzazione –
Rosso O +
Giallo O
–
Corto circuito –
Rosso O +
Verde O
–
Signicato Provvedimento
Tensione di alimentazione assente
o troppo bassa
Controllare la tensione di alimentazione.
Difetto hardware Contattare l’assistenza.
Errore teach-in Accertarsi della pulizia del frontalino.
Accertarsi che durante il teach-in tutti i raggi ottici siano
liberi.
Controllare l’allineamento tra emettitore e ricevitore.
Eseguire nuovamente l’allineamento.
Eseguire di nuovo il sensore teach-in.
Controllare nelle impostazioni SOPAS nel menù “scher-
matura” (Blanking).
Seite wird geladen ...
-
 1
1
-
 2
2
-
 3
3
-
 4
4
-
 5
5
-
 6
6
-
 7
7
-
 8
8


in anderen Sprachen
- English: SICK MLG-2 WebChecker
- français: SICK MLG-2 WebChecker
- español: SICK MLG-2 WebChecker
- italiano: SICK MLG-2 WebChecker
Verwandte Artikel
-
SICK MLG-2 ProNet FBM Quickstart
-
-
-
-
-
-
-
-
-
