
1. Verwendung des Anbausatzes
Der Anbausatz “Oesenknopf-Klammer” ist für
Knopfannähautomaten der Klasse 530 und 531 vorgesehen.
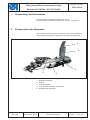
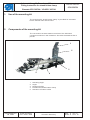
2. Komponenten des Bausatzes
Der Umbausatz 0531 36 0744 besteht aus den in der Abbildung
dargestellten Einzelteilen. Siehe auch beiliegende Stückliste.
1 Betätigungswinkel
2Winkel
3 Sechskanthalter
4 vormontierte Oesenknopf-Klammer
5 Betätigung Knopfhalter
Anbauanleitung für Oesenknopf-Klammer
Fitting Instruction for shank button clamp
Bausatz 0531 360744 / Kit 0531 360744
Teile-Nr./ Part-No.:
0791 530701
Änderungsindex
Rev. index: 00.0
Ausgabe/Edition:
06.2008
Printed in Germany
Blatt: 1 von 10
Sheet: 1 from 10
1
3
5
4
2

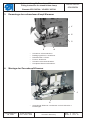
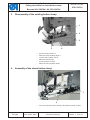
3. Demontage der vorhandenen Knopf-Klammer
– Schrauben 2 herausdrehen.
– Betätigungswinkel 1 abnehmen.
– Rändelmuttern 5 lösen.
– Feder 4 abnehmen.
– Schraube 3 herausschrauben.
– Komplette Klammer abnehmen.
4. Montage der Oesenknopf-Klammer
–
Oesenknopf-Klammer 2 aufsetzen und mit Schraube 1
befestiegen.
Anbauanleitung für Oesenknopf-Klammer
Fitting Instruction for shank button clamp
Bausatz 0531 360744 / Kit 0531 360744
Teile-Nr./ Part-No.:
0791 530701
Blatt: 2 von 10
Sheet: 2 from 10
Ausgabe/Edition:
06. 2008
Änderungsindex
Rev. index: 00.0
Printed in Germany
1
2
3
54
2
1

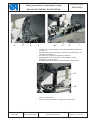
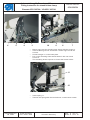
–
Winkel 3 mit den Schrauben 4 an die Oesenknopf-Klammer
montieren.
– Betätigungshebel 6 einsetzen und mit den Schrauben 5 am
Winkel 3 befestiegen.
– Sechskant 7 auf die Grundplatte schrauben.
– Betätigungsblech 9 aufsetzen und mit Mutter 8 und
Schraube 10 befestiegen.
Betätigungsblech 9 öffnet und schließt den Knopfhalter.
–
Feder 11 einsetzen.
–
Feder mit Rändelmuttern 12 spannen und kontern.
Anbauanleitung für Oesenknopf-Klammer
Fitting Instruction for shank button clamp
Bausatz 0531 360744 / Kit 0531 360744
Teile-Nr./ Part-No.:
0791 530701
Änderungsindex
Rev. index: 00.0
Ausgabe/Edition:
06.2008
Printed in Germany
Blatt: 3 von 10
Sheet: 3 from 10
6 543
11
12
10 9 8 7

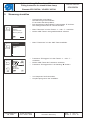
5. Steuerung einstellen
–
Hauptschalter einschalten.
Die Steuerung wird initialisiert.
Es erscheint das Haupt-Menü.
–
Bei angezeigtem Haupt-Menü Funktionstaste “F” drücken.
Die Anzeige wechselt zum Technikermodus.
–
Menü "Benutzer" mit den Tasten “ñ “ oder “ò “ anwählen.
–
Mit der “OK”-Taste in das gewählte Menü schalten.
–
Menü "Parameter" mit der “OK”-Taste anwählen.
– Parameter "Einlegepos" mit den Tasten “ñ “ oder “ò “
anwählen.
– Mit der “OK”-Taste den Parameter anwählen.
– Parameter "Einlegeposition" auf Stellung "B" ändern.
–
Ins Hauptmenü zurückschalten.
–
Knopflochprogramm "26" anwählen.
Anbauanleitung für Oesenknopf-Klammer
Fitting Instruction for shank button clamp
Bausatz 0531 360744 / Kit 0531 360744
Teile-Nr./ Part-No.:
0791 530701
Blatt: 4 von 10
Sheet: 4 from 10
Ausgabe/Edition:
06. 2008
Änderungsindex
Rev. index: 00.0
Printed in Germany
Benutzer
Service
Freie Konturen
Memory-Dongle
Maschine
Softstart
Einrichtung
Zeiten
Parameter

4
5
4
5
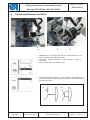
6. Oesenknopfklammer einstellen
– Nadelstange so weit herunterdrehen, bis die Nadel kurz vor
dem Draht des Oesenknopfes steht.
– Untermenü "Nähmusteroffset" mit den Tasten “ñ “ oder “ò “
anwählen.
– Mit der “OK”-Taste das Menü öffnen.
–
Mit den Parametern "Offset X" und "Offset Y" die Klammer so
verstellen. das die Nadel 4 genau mittig über dem Drahtbügel 5
des Knopfes steht.
Anbauanleitung für Oesenknopf-Klammer
Fitting Instruction for shank button clamp
Bausatz 0531 360744 / Kit 0531 360744
Teile-Nr./ Part-No.:
0791 530701
Änderungsindex
Rev. index: 00.0
Ausgabe/Edition:
06.2008
Printed in Germany
Blatt: 5 von 10
Sheet: 5 from 10
1
32

1. Use of the mounting kit
The mounting kit “shank button clamp” is provided for automatic
button sewers class 530 and 531.
2. Components of the mounting kit
The conversion set 0531 360744 consists of the individual
components shown in the ilustration. See also the attached list of
pieces.
1 Actuating angle
2 Angle
3 Hexagon holder
4 Premounted shank button clamp
5 Actuation of button holder
Anbauanleitung für Oesenknopf-Klammer
Fitting Instruction for shank button clamp
Bausatz 0531 360744 / Kit 0531 360744
Teile-Nr./ Part-No.:
0791 530701
Blatt: 6 von 10
Sheet: 6 from 10
Ausgabe/Edition:
06. 2008
Änderungsindex
Rev. index: 00.0
Printed in Germany
1
3
5
4
2

3. Disassembly of the existing button clamp
– Screw off the screws 2.
– Remove the actuating angle 1.
– Loosen the knurled nuts 5.
– Removethespring4.
– Screw out the screw 3.
– Remove the complete clamp.
4. Assembly of the shank button clamp
–
Put on the shank button clamp 2 and fasten it with screw 1.
Anbauanleitung für Oesenknopf-Klammer
Fitting Instruction for shank button clamp
Bausatz 0531 360744 / Kit 0531 360744
Teile-Nr./ Part-No.:
0791 530701
Änderungsindex
Rev. index: 00.0
Ausgabe/Edition:
06.2008
Printed in Germany
Blatt: 7 von 10
Sheet: 7 from 10
1
2
3
54
2
1

–
Mount angle 3 at the shank button clamp with the screws 4.
– Insert actuating lever 6 and fasten it at the angle 3 with the
screw 5.
– Screw hexagon 7 on the base plate.
– Put on the actuating sheet 9 and fasten it with nut 8 and
screw 10.
The actuating sheet 9 opens an closes the button holder.
–
Insert spring 11.
–
Tension the spring with the knurled nuts 12 and conter-rotate.
Anbauanleitung für Oesenknopf-Klammer
Fitting Instruction for shank button clamp
Bausatz 0531 360744 / Kit 0531 360744
Teile-Nr./ Part-No.:
0791 530701
Blatt: 8 von 10
Sheet: 8 from 10
Ausgabe/Edition:
06. 2008
Änderungsindex
Rev. index: 00.0
Printed in Germany
6 543
10 9 8 7
11
12

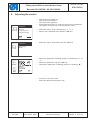
5. Adjusting the control
–
Switchthemainswitchon.
The control is initialized.
The main menu appears.
–
Press thefunction key “F” when the main menu is indicated.
The display changes over to the technician mode.
–
Select the menu “User” with the keys “ñ “or“ò“.
–
Switch to the selected menu with the “OK”key.
–
Select the menu “Parameter” with the “OK”key.
– Select the parameter “Feeding position” with the keys “ñ“or
“ò“.
– Select the parameter with the “OK”key.
– Change the parameter “Feedding position” to position “B”.
–
Go back to the main menu.
–
Select the buttonhole program “26".
Anbauanleitung für Oesenknopf-Klammer
Fitting Instruction for shank button clamp
Bausatz 0531 360744 / Kit 0531 360744
Teile-Nr./ Part-No.:
0791 530701
Änderungsindex
Rev. index: 00.0
Ausgabe/Edition:
06.2008
Printed in Germany
Blatt: 9 von 10
Sheet: 9 from 10
Benutzer
Service
Freie Konturen
Memory-Dongle
Maschine
Softstart
Einrichtung
Zeiten
Parameter

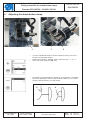
6. Adjusting the shank button clamp
– Turn the needle bar down until the needle is nearly in front of
the wire of the shank button.
– Select the submenu “Pattern offset” with the keys “ñ “or“ò“.
– Open the menu with the “OK ”key.
–
By means of the parameters “Offset X” and “Offset Y” the clamp
has to be adjusted in such a way that the needle 4 is in central
position above the wire 5 of the button.
Anbauanleitung für Oesenknopf-Klammer
Fitting Instruction for shank button clamp
Bausatz 0531 360744 / Kit 0531 360744
Teile-Nr./ Part-No.:
0791 530701
Blatt: 10 von 10
Sheet: 10 from 10
Ausgabe/Edition:
06. 2008
Änderungsindex
Rev. index: 00.0
Printed in Germany
4
5
4
5
1
32
-
 1
1
-
 2
2
-
 3
3
-
 4
4
-
 5
5
-
 6
6
-
 7
7
-
 8
8
-
 9
9
-
 10
10


in anderen Sprachen
- English: DURKOPP ADLER 530 User manual
Verwandte Artikel
-
DURKOPP ADLER 511 Benutzerhandbuch
-
-
-
-
-
-
-
-
DURKOPP ADLER 175 Benutzerhandbuch
-
DURKOPP ADLER 281 Benutzerhandbuch
