Seite wird geladen ...

Ausgabe/Edition:
10.2007
Printed in Germany
Änderungsindex
Rev. index: 00.0
1. Komponenten des Bausatzes
Der Teilesatz 0281 590044 besteht aus folgenden Komponenten.
– 1 x Nähfußhubmagnet
– 1 x Befestigungswinkel
– 2 x Inbusschrauben M5 x 10
– 1 x Druckstange
– 1 x Montagehilfe
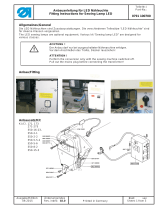
2. Anbau des Nähfußhubmagneten
–
Handrad 3, Abdeckung 2 und Deckel 1 abschrauben.
–
Feder 4 aushängen.
–
Schrauben 6 entfernen und Befestigungsflansch 5 herausnehmen.
Anbauanleitung für Nähfußhubmagnet
Teilesatz 0281 590044
Fitting Instruction for sewing foot lifting solenoid
Kit 0281 590044
Teile-Nr./ Part-No.:
0791 281700
Blatt: von
Sheet: 1 from 4
32 1
654

– Halter 4 mit den beiliegenden Schrauben 3 am Magneten 2
festschrauben.
– Druckstange 1 auf den Magneten aufstecken.
– Den demontierten Befestigungsflansch 5 mit einer der beiden
Schrauben 6 am Halter 4 anschrauben.
– Nähmaschinenoberteil umklappen.
– Schraube 9 herausdrehen.
– Den vormontierten Nähfußhubmagneten mit der Montagehilfe 8
so nach oben einsetzen, dass die Druckstange in die obere
Führungsbohrung 13 greift.
–
Montagehilfe 8 mit Schraube 9 befestigen.
–
Gewindestift 11 herausdrehen.
–
Alle Kabel nach links hinter den Schaft 10 des Gewindestiftes
drücken und Gewindestift 11 wieder festdrehen.
Anbauanleitung für Nähfußhubmagnet
Teilesatz 0281 590044
Fitting Instruction for sewing foot lifting solenoid
Kit 0281 590044
Teile-Nr./ Part-No.:
0791 281700
Blatt: von
Sheet: 2 from 4
Ausgabe/Edition:
10.2007
Änderungsindex
Rev. index: 00.0
Printed in Germany
1
65
98 2 11 10 13
2
3
4
5
6
4

– Nähmaschinenoberteil zurückklappen.
– Halter 4 mit einer der beiden Schrauben 6 am Gehäuse
festschrauben.
– Schraube 6a herausdrehen und in die zweite
Befestigungsbohrung des Halters 4 schrauben.
– Nähmaschinenoberteil umklappen.
– Schraube 9 herausdrehen, Montagehilfe 8 abnehmen und
Schraube 9 wieder festdrehen.
– Nähmaschinenoberteil zurückklappen.
– Feder 10 wieder einhängen.
3. Elektrischer Anschluss
–
Anschlussleitung des Nähfußhubmagneten an einer der
Klemmen 1 bis 3 und an die Klemme 5 anschließen.
Anbauanleitung für Nähfußhubmagnet
Teilesatz 0281 590044
Fitting Instruction for sewing foot lifting solenoid
Kit 0281 590044
Teile-Nr./ Part-No.:
0791 281700
Blatt: von
Sheet: 3 from 4
Ausgabe/Edition:
10.2007
Printed in Germany
Änderungsindex
Rev. index: 00.0
4 6 6a 10 98
1-3
5

4. Aktivierung des Nähfußhubmagneten
Der Nähfußhubmagnet ist eine optionale Baugruppe und muss in
der Steuerung angemeldet werden.
Die Einstellung ist in der Anleitung des Motorherstellers
beschrieben.
Im Auslieferungszustand steht der Parameter 70 in Stellung “ON”.
– Taste P drücken und halten und gleichzeitig
Taste [Power on] am Hauptschalter drücken.
Im Display 1 erscheint [047.MAC]
– Taste P mehrfach betätigen bis Parameter “070.HHC" angezeigt
wird.
– Taste S drücken und mit Taste D/v “OFF” einstellen.
– Parameter 70 auf Stellung “ON” stellen.
– Taste S drücken.
Die Einstellung ist gespeichert.
Anbauanleitung für Nähfußhubmagnet
Teilesatz 0281 590044
Fitting Instruction for sewing foot lifting solenoid
Kit 0281 590044
Teile-Nr./ Part-No.:
0791 281700
Blatt: von
Sheet: 4 from 4
Ausgabe/Edition:
10.2007
Änderungsindex
Rev. index: 00.0
Printed in Germany

Ausgabe/Edition:
10.2007
Printed in Germany
Änderungsindex
Rev. index: 00.0
1. Scope of delivery
The kit with the order no.: 0281 590044 consists of the following
components.
– 1 x Sewing foot lifting solenoid
– 1 x Holder
– 2xAllenscrewsM5x10
– 1 x Pressure bar
– 1 x Mounting aid
2. Mounting the sewing foot lifting solenoid
–
Unscrew the handwheel 3, covering 2 and cover 1.
–
Unclamp the spring 4.
–
Loosen the screws 6 and remove the flange 5.
Anbauanleitung für Nähfußhubmagnet
Teilesatz 0281 590044
Fitting Instruction for sewing foot lifting solenoid
Kit 0281 590044
Teile-Nr./ Part-No.:
0791 281700
Blatt: von
Sheet: 1 from 4
32 1
654

– Screw the holder 4 to the solenoid 2 using the included
screws 3.
– Fit the rod 1 to the solenoid.
– Screw the flange 5 that has been removed to the holder 4 using
one of the screws 6.
– Tilt the machine head backwards.
– Loosen screw 9.
– Using the mounting aid, push the pre-assembled sewing foot
lifting solenoid upwards in a way that the pressure bar gets
engaged in the hole 13.
–
Fasten the mounting aid 8 with the screw 9.
–
Unscrew the threaded pin 11.
–
Push all the cables to the left of the shaft 10 of the threaded pin
and fasten the threaded pin 11 again.
Anbauanleitung für Nähfußhubmagnet
Teilesatz 0281 590044
Fitting Instruction for sewing foot lifting solenoid
Kit 0281 590044
Teile-Nr./ Part-No.:
0791 281700
Blatt: von
Sheet: 2 from 4
Ausgabe/Edition:
10.2007
Änderungsindex
Rev. index: 00.0
Printed in Germany
1
65
98 2 11 10 13
2
3
4
5
6
4

– Tilt the machine head to the front.
– Screw the holder 4 to the housing using the screws 6.
– Loosen the screw 6a and screw it into the second mounting hole
of the holder 4.
– Tilt the machine head backwards.
– Loosen the screw 9, remove the mounting aid and fasten the
screw 9 again.
– Tilt the machine head to the front again.
– Put in the spring 10.
3. Electrical connection
–
Connect the cable of the sewing foot lifting solenoid to the
terminal blocks, one wire to one of the terminal from 1 to 3 and
the second one to the terminal 5.
Anbauanleitung für Nähfußhubmagnet
Teilesatz 0281 590044
Fitting Instruction for sewing foot lifting solenoid
Kit 0281 590044
Teile-Nr./ Part-No.:
0791 281700
Blatt: von
Sheet: 3 from 4
Ausgabe/Edition:
10.2007
Printed in Germany
Änderungsindex
Rev. index: 00.0
4 6 6a 10 98
1-3
5

4. Activating the sewing foot lifting solenoid
The sewing foot lifting solenoid is an optional equipment and must
be registered in the control unit.
The setting is described in the manual of the motor manufacturer.
Upon delivery the parameter 70 is set to “OFF”.
– Keep key P pressed and simultaneously press the key
[Power on] on the main switch.
The display 1 reads [176.VDN]
– Change over to the parameter “70".
– Switch the parameter 70 to the setting “ON”.
– Press key S.
The setting is memorized.
Anbauanleitung für Nähfußhubmagnet
Teilesatz 0281 590044
Fitting Instruction for sewing foot lifting solenoid
Kit 0281 590044
Teile-Nr./ Part-No.:
0791 281700
Blatt: von
Sheet: 4 from 4
Ausgabe/Edition:
10.2007
Änderungsindex
Rev. index: 00.0
Printed in Germany
1/8