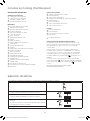
Kenwood KCC9048S Bedienungsanleitung
- Kategorie
- Mischer
- Typ
- Bedienungsanleitung
Dieses Handbuch eignet sich auch für

2 3 4
HEAD OFFICE: Kenwood Limited, 1-3 Kenwood Business Park, New Lane, Havant, Hampshire PO9 2NH
5720000723/2
TYPE KCC90
instructions
English 2 - 25
Français 26 - 49
Deutsch 50 - 73
Italiano 74 - 97
Español 98 - 121
5720000723 Iss 2 KCC90 Eng_Fre_Ger_Ital_Sp.A4..indd 1-4 23/11/2016 09:06

5
6
8
s
7
t
s
dk
3
3 4
2
9 k
4
q
d
dl
d
dt
d d ddq ds
k l
q
l
t
k
l
1
1 2 3
10
54
6/7
9
13
1211
8
1
4
2
2
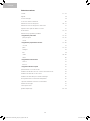
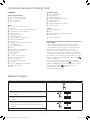
English
contents
safety 3 – 4
key 5
language selection 5
the bowl tools and some of their uses 6
to use your Cooking Chef 6 – 7
to use your Cooking Chef as a mixer 7
display screen symbols explained 8
manual mode 9 – 10
using the pre-set programmes 11
Savoury programmes 11 – 12
main meals 11
sauce 12
Sweet programmes 13 – 16
chocolate tempering 13
doughs 13 – 14
meringue 14
compote 15
sauces 15 – 16
others 16
Slow cook programmes 17
high 17
low 17
Steam programme 18
adjusting the bowl tools 19
to fit and use your splashguard assembly 20
to remove and fit outlet covers 21
to fit and remove your stir assist clip 21
assembling the high temperature creaming beater 21
maximum capacities and recommended speeds 22
care and cleaning 23
service and customer care 23
troubleshooting guide 24 – 25
1
3
5720000723 Iss 2 KCC90 Eng_Fre_Ger_Ital_Sp.A4..indd 5-8 23/11/2016 09:06

3
l
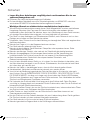
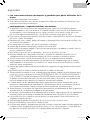
Read these instructions carefully and retain for future reference.
l
Remove all packaging and any labels.
l
If the cord is damaged it must, for safety reasons, be replaced by KENWOOD or an
authorised KENWOOD repairer.
important note - electronic medical implants
l
Like all induction heating products, this appliance generates short-range magnetic fields.
If any user or person in close proximity has a pacemaker or other active implants, please
consult a doctor before use, concerning any possible incompatibility to prevent any risk to
health.
l
Switch off and unplug the appliance before fitting or removing tools/attachments, after use
and before cleaning.
l
Keep body parts, hair, jewellery and loose clothing away from moving parts and fitted
attachments.
l
Never put your fingers etc., into the hinge mechanism.
l
Never leave the appliance on unattended.
l
Never use a damaged appliance. Get it checked or repaired: see ‘service and customer
care’.
l
Never use an unauthorised attachment or more than one attachment at once.
l
Never exceed the maximum capacities and when using the induction heater never exceed the
3 litre maximum fill level marked on the inside of the bowl.
l
When using an attachment, read the safety and usage instructions that come with it.
l
Take care when lifting this appliance as it is heavy. Ensure the head is locked and that the
bowl, tools, outlet covers and cord are secure before lifting.
l
Never let the cord hang down where a child could grab it.
l
Never let the power unit, cord or plug get wet.
l
Be careful when handling or touching any part of the appliance when being used in the cook
mode or after cooking, IN PARTICULAR THE BOWL, SPLASHGUARD AND TOOLS as they
will remain HOT long after the appliance has been switched off. Use the handles to remove
and carry the bowl. Use oven gloves when handling the hot bowl and hot mixing tools.
l
The underside of the bowl will remain hot long after the heating has stopped. Use caution
when handling and use the work surface protection mat when placing the bowl on heat
sensitive surfaces.
l
Be careful of steam escaping from the mixer bowl particularly when opening the lid in the
splashguard or when raising the mixer head.
l
If transferring hot food from the mixer to the blender, always allow the ingredients to cool to
room temperature before placing in the blender.
l
Only use the bowl and tools supplied with this appliance. Never use the bowl with any other
heat source.
l
Never operate the appliance in the cook mode with the bowl empty.
l
Never insert anything through the air vents.
l
When using this appliance ensure it is positioned on a level surface away from the edge.
Make sure it is at least 10 cm from walls and ensure that the vents are not blocked. Do not
position below overhanging cupboards.
l
For the correct and safe operation of the induction cooker ensure that the bowl base and
temperature sensors are clean and dry before cooking.
l
As with all induction cooking appliances do not place credit cards, magnetic media or
sensitive electronic equipment near to the appliance when in use.
safety
English
5720000723 Iss 2 KCC90 Eng_Fre_Ger_Ital_Sp.A4..indd 3 23/11/2016 09:07

4
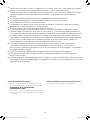
l
Do not use the appliance for deep frying foods.
l
Always ensure food is thoroughly cooked before eating.
l
Do not exceed 250ml when cooking with oil.
l
Food should be eaten shortly after cooking or allowed to cool quickly and then refrigerated
as soon as possible.
l
Misuse of your appliance can result in injury.
l
The power-supply cord is used to reduce risk resulting from becoming entangled in or
tripping. Extension cords may be used if care is exercised in their use. If an extension cord
is used: 1) The marked electrical rating of the extension cord should be at least as great
as the electrical rating of the appliance; and 2) The cord should be arranged so that it will
not drape over the countertop or tabletop where it can be pulled on by children or tripped
over unintentionally. If the appliance is of the earthed type, the extension cord should be a
earthing-type 3-wire cord. The electrical rating of the appliance is listed on the bottom of the
unit.
l
Appliances can be used by persons with reduced physical, sensory or mental capabilities
or lack of experience and knowledge if they have been given supervision or instruction
concerning use of the appliance in a safe way and if they understand the hazards involved.
l
Children should be supervised to ensure that they do not play with the appliance.
l
This appliance shall not be used by children. Keep the appliance and its cord out of reach of
children.
l
Only use the appliance for its intended domestic use. Kenwood will not accept any liability if
the appliance is subject to improper use, or failure to comply with these instructions.
before plugging in
• Make sure your electricity supply is the same as the one
shown on
the underside of the appliance.
• WARNING: THIS APPLIANCE MUST BE EARTHED.
• This appliance conforms to EC Regulation 1935/2004 on
materials and articles intended to come into contact with
food.
before using for the first time
• Wash the parts: see ‘care and cleaning’.
5720000723 Iss 2 KCC90 Eng_Fre_Ger_Ital_Sp.A4..indd 4 23/11/2016 09:07

5
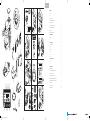
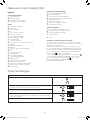
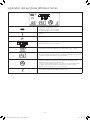
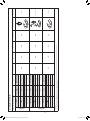
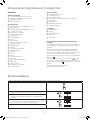
Key
Attachment outlets
1
high speed outlet (HSO)
2
slow speed outlet (SSO)
3
bowl tool socket
4
stir tool socket
Mixer
5
high speed outlet cover
6
mixer head
7
slow speed outlet cover
8
cooking chef bowl
9
head - lift lever
k
speed control
l
standby button
display dial/enter button
display screen
drain hole
bowl pedestal/induction area
q
air vents
temperature sensors
s
K beater
t
high temperature creaming beater
k
power whisk
l
dough hook
stir tool
stir assist clip
high temperature spatula
heat shield
q
rubber seal (removable)
splashguard
s
feed chute lid
t
work surface protection mat
dk
spanner
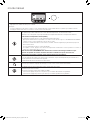
Display screen graphics
dl
hot temperature warning
d
programme phase
d
temperature selection
d
high speed high temperature warning
d
text display
dq
time selection
d
stir delay selection
ds
power selection
Display panel
dt
temperature button
k
time button
l
stir setting button
menu button
dough scraper
Note: Slow Speed outlet attachments
The slow speed outlet on your Kitchen Machine model features
the Twist Connection System. It is designed to accept Twist
Connection System attachments.
When purchasing new attachments for the slow speed outlet you
should check compatibility with your Kitchen Machine. All Twist
Connection System attachments can be identified by the product
code which starts with KAX and also by the Twist logo
which
is visible on packaging.
If you own attachments featuring the Bar Connection System
you will need to use the KAT002ME adaptor to connect these to
the Twist Connection System
on your Kitchen Machine.
For more information visit www.kenwoodworld.com/twist.
know your Kenwood Cooking Chef
When turning on your Cooking Chef for the first time, the display screen language will default to “English”.
1 To change language press the menu button.
2 Use the display dial/enter button to select “SETTINGS” and press
the display dial/enter button to confirm.
3 Use the display dial/enter button to select “LANGUAGES” and
press the display dial/enter button to confirm.
4 Use the display dial/enter button to select the required language.
Once the required language is selected, press the display dial/
enter button to confirm.
5 To change the language again, repeat the process.
language selection
5720000723 Iss 2 KCC90 Eng_Fre_Ger_Ital_Sp.A4..indd 5 23/11/2016 09:07

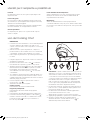
6
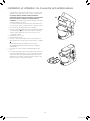
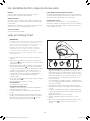
IMPORTANT
• Make sure the induction area, temperature sensors and
external surface of the bowl base are clean. Failure to do
this will affect the heat sensor, resulting in poor cooking
performance.
• Check that all the outlet covers including the heat shield are
fitted. If they are not correctly fitted the heating function will
not operate.
• Always use oven gloves to remove the bowl and tools after
cooking.
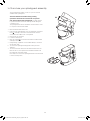
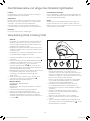
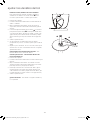
1 Connect the machine to the power supply. The display screen
will illuminate.
2 Turn the head-lift lever clockwise
1
and raise the mixer head
until it locks.
3 Push the heat shield
upwards onto the underside of the
mixer head
2
until fully located. The heat shield must never
be used without the rubber seal
q
fitted correctly.
• If using the Cooking Chef without heat, it is not necessary to
fit the heat shield unless using the splashguard. Refer to ‘to fit
and use your splashguard assembly’ section.
4 Fit the bowl to the base – press down and turn clockwise
3
.
5 Select one of the following options:
Manual Cooking.
Refer to manual mode section.
Pre-set Programmes:
Refer to ‘using the pre-set programmes’ section for usage
information.
• Refer to the Quick Start Guide for more recipe ideas.
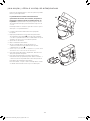
6 Place the required tool in the bowl tool socket
3
or stir tool
socket
4
if using the stir tool, locating the pin in the groove
and then turn to lock into position
4
.
stir tool – when using the stir tool the stir assist clip can also
be used to assist the mixing action, see ‘to fit and use your
stir assist clip'. The stir tool can also be used with the whisk,
e.g. making meringues. Do not use the stir tool with the
dough hook.
Note: If the K-beater, whisk or creaming beater are not picking
up ingredients from the bottom of the bowl refer to the “Tool
Adjustment” section.
• To remove a tool, reverse step 6 above. (Always use oven
gloves to remove tools after cooking).
7 To lower the mixer head, raise it slightly, then turn the head lift
lever clockwise.
Lower into the locked position.
8 Add the relevant ingredients to be cooked/mixed.
9 Turn the speed control to the desired setting. Turn the speed
control to
to use the stir settings.
to use your Cooking Chef
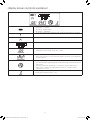
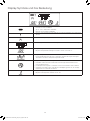
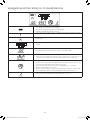
K-beater
For making cakes, biscuits, pastry, icing, fillings, éclairs and
mashed potato.
Whisk
For eggs, cream, soufflés. Do not use the whisk for heavy
mixtures (e.g. creaming fat and sugar) - you could damage it.
Suitable to combine with the stir tool when whisking with heat,
e.g. Italian and Swiss meringues.
Dough Hook
For yeast mixtures only.
High temperature creaming beater
Suitable for creaming butter and sugar, choux pastry and polenta. Ideal
for scraping mixes both hot and cold from the sides of the bowl during
mixing.
Stir tool
Suitable to use during cooking to maintain the texture of food e.g.
chicken, fish, vegetables and fruit. Ideal for browning meat. Also
suitable for risottos, sauces and melting chocolate.
the bowl tools and some of their uses
5720000723 Iss 2 KCC90 Eng_Fre_Ger_Ital_Sp.A4..indd 6 23/11/2016 09:07

7
• If the bowl temperature exceeds 60°C, for safety reasons
the speed is automatically limited even if a higher speed has
been selected. The speed will not automatically increase when
the temperature drops below 60°C. The speed control must
be turned to the off 'O' position first and the desired speed
reselected.
See 'Manual Mode' section for how to use high speed high
temperature (HSHT) mode.
10 Once a programme has finished, the unit will beep 3 times.
• Note: If no time has been set, the heating and stirring
processes will automatically end once the timer has reached 8
hours.
11 To stop or pause the mixing process, return the speed control
to the off ‘O’ position. To resume operation select a speed.
IMPORTANT
• Heating will continue when the mixing process is
stopped or paused.
12 To stop the heating process, change the temperature to ‘OFF’.
Alternatively, press the standby button.
Important – If at any time the mixer head is raised during an
operation, the heating process will pause. The bowl tool will
stop and will not restart when the mixer head is lowered, to
re-start the mixer turn the speed control to the off ‘O’ position
and then re-select a speed.
after cooking
• Be careful when handling or touching any part of the mixer
when being used in the cook mode or after cooking, IN
PARTICULAR THE BOWL, SPLASHGUARD AND TOOLS
as they will remain HOT long after the appliance has been
switched off. Use the handles to remove and carry the bowl.
Use oven gloves when handling the hot bowl and hot mixing
tools.
• The underside of the bowl will remain hot long after the
heating has stopped. Use caution when handling and use the
work surface protection mat provided to protect heat sensitive
surfaces.
hints
• Some recipes, in particular those with a high water content,
will not be able to reach a cooking temperature above 100°C
(as this is the boiling point of water).
• When adding ingredients to the bowl during cooking, turn the
speed down and add the ingredients slowly and evenly.
• To heat sauces quickly use a continuous stir setting.
• If using the splashguard during cooking, always remove
it before lifting the mixer head. Be aware of condensation
formed on the splashguard and heat shield.
• When lifting the mixer head lift it slowly to allow any liquid on
the underside of the heat shield to flow back into the bowl.
• Ten stir delay functions are available which enable you to
select the appropriate amount of stirring for individual recipes.
Some recipes will require constant stirring to stop ingredients
from sticking to the bottom of the bowl, whereas others will
benefit from intermittent stirring to maintain the texture of the
food.
Assemble the mixer as described previously in 'to use your
Cooking Chef'. Turn the speed control to the desired setting.
The speed can be changed at any time whilst the mixer is
operating. Stop the mixer by returning the speed control to
the off ‘O’ position.
Use the pulse (P) position for short bursts of maximum speed.
general hints
• Stop mixing and scrape down the bowl with the spatula
frequently.
• Eggs at room temperature are best for whisking.
• Before whisking egg whites, make sure there is no grease or
egg yolk on the whisk or bowl.
• Use cold ingredients for pastry unless your recipe says
otherwise.
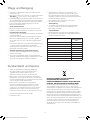
points for bread making
important
• Never exceed the maximum capacities stated - you will
overload the machine.
• If you hear the machine labouring, switch off, remove half the
dough and do each half separately.
• The ingredients mix best if you put the liquid in first.
recipe
chilli marinade
200g cold clear runny honey (refrigerated
overnight)
1 chilli (whole)
5ml (1tsp) crunchy peanut butter
Seasoning
1 Place all the ingredients into the mini chopper/mill.
2 Fit the attachment to the Kitchen Machine and allow the
ingredients to settle around the blade.
3 Switch to pulse for 10 seconds.
4 Use as required.
to use your Cooking Chef as a mixer
5720000723 Iss 2 KCC90 Eng_Fre_Ger_Ital_Sp.A4..indd 7 23/11/2016 09:07

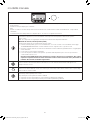
8
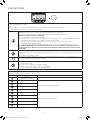
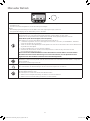
Hot warning indicator
Below 40°C - no red bar
40°C-60°C - flashing red bar
Above 60°C - solid red bar
Shows when mixer is being operated in high speed high temperature mode (HSHT).
Shows current phase of a programme when using the pre-set programmes.
Text display shows status information, programme information and error messages.
Shows the selected temperature.
Temperature can be set from, “OFF”, 20°C - 180°C.
Shows the time selected in hours, minutes and seconds.
Time can be set from 5 seconds 8 hours and will count down once a temperature
has been selected.
Shows the stir setting selected, ranging from 0 9.
• The outer bars will progressively light up to indicate the length of time before the next
stirring action.
• The inner stir arrow will start flashing 3 seconds before the next stirring action.
• At the start of a stirring action, there may be a brief boost in speed in order to
separate pieces of food.
Shows the power setting selected.
Power settings range from Auto, 1 7.
display screen symbols explained
5720000723 Iss 2 KCC90 Eng_Fre_Ger_Ital_Sp.A4..indd 8 23/11/2016 09:07

9
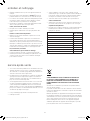
• Press the setting you wish to alter and use the display dial to adjust the setting.
• Press the display dial to confirm.
Note:
• When a setting is selected, the bar underneath the corresponding display screen symbol will illuminate.
• The setting will time out after 4 seconds if no action is taken.
Temperature can be set from 20°C - 180°C in 1°C increments.
Alternatively, the unit can be used without setting a temperature by selecting “OFF”.
Note: The Cooking Chef will not achieve a temperature lower than the ambient temperature.
High speed, high temperature mode (HSHT)
To mix at high speed at temperatures above 60°C:
• Press and hold for 3 seconds. The red ! will illuminate on the display screen and “CAUTION HSHT MODE” will be
displayed. The mixer will also make a beeping sound every 30 seconds.
• Turn the speed control to the desired speed, the mixer will slowly increase to the selected speed.
• You can reduce the speed as normal.
• To exit this mode, press and hold the temperature button for 5 seconds or return the speed control to 'O'.
This function MUST ONLY be used with the whisk and/or stir tool. You should not exceed the maximum
cooking capacity of 3 litres and you must ensure the splashguard is fitted. The machine must not be left
unattended.
The timer can be used in cooking mode.
If a countdown time is not selected, the timer will automatically count up in 1 second intervals whilst the machine is in
operation.
The maximum running time is 8 hours.
There are ten stir delay settings. These are most suitable when the mixer is used in the cook mode. Please note, to
use the stir settings all outlet covers must be fitted.
Power settings can be adjusted through the menu button.
Power will default to Auto.
The power can be adjusted to from 250W to 1500W.
• Choose a lower power setting to gently heat ingredients.
• Choose a higher power setting to heat ingredients quickly.
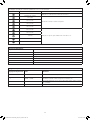
stir delay settings
The stirring settings are ideal to use with the stir tool.
Speed Delay intervals Uses
No delay
(Continuous stirring)
Continuous stirring for sauces and risottos.
5 seconds
Browning meat and sautéing vegetables.
10 seconds
20 seconds
30 seconds
40 seconds
Stirring stews, casseroles, broths, etc.
50 seconds
1 minute
2 minutes
5 minutes
manual mode
5720000723 Iss 2 KCC90 Eng_Fre_Ger_Ital_Sp.A4..indd 9 23/11/2016 09:07

10
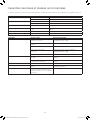
temperature settings
Temperature Uses
50°C Chocolate tempering
72°C - 82°C Poaching
98°C - 99°C Simmering
100°C Boiling, steaming
130°C - 140°C Sautéing vegetables
180°C Browning meat
power settings
Power settings Watts Uses
A Auto Power input varies to optimise temperature setting
1 - 2 1500W - 1200W Browning meat, sautéing vegetables, boiling water
3 - 5 1000W - 500W Melting butter, dairy-based sauces, simmering, heated whisking
6 - 7 375W - 250W Proofing doughs
5720000723 Iss 2 KCC90 Eng_Fre_Ger_Ital_Sp.A4..indd 10 23/11/2016 09:07

11
using the pre-set programmes
Select the programme
1 Press the menu button.
2 Turn the display dial/enter button to select “Programmes”.
3 Press the display dial/enter button to confirm.
4 Turn the display dial/enter button to select either “Savoury”, “Sweet”, “Slow Cook” or “Steam” programmes. See the tables below for sub-programme options.
5 Press the display dial/enter button to confirm.
6 Follow the instructions on the display screen.
Note: If no action is taken between phases, the machine will time out after 15 minutes.
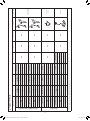
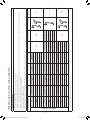
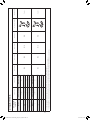
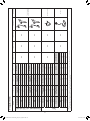
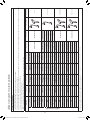
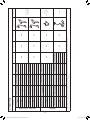
SAVOURY
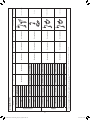
Phase 1 (P1) Phase 2 (P2) Phase 3 (P3) Phase 4 (P4) Phase 5 (P5) Phase 6 (P6) Tools used Recipe ideas
main meals
Wok Add oil
Add meat & veg
Add avourings Additional ingredients
N/A N/A
Stir fry
°C 140°C 180°C 160°C 120°C
– 3 2 2
W Auto Auto 1500W 1500W
Heating stage
✓ ✓ ✓ ✗
Cooking time
✗
3 ½mins 2mins 45 secs
Risotto Add oil
Add veg & meat
Add rice Add wine Add liquid Keep warm
Chicken risotto
°C 130°C
100°C100°C 130°C130°C
140°C
99°C99°C
75°C
–
24 02
0
01
0
W 1200W
1000W
1500W
1200W1500W
1500W
1500W
1200W
Auto
Heating stage
✓ ✗ ✓ ✓ ✓ ✗
Cooking time
✗
2mins3mins 1min3mins
1min
3mins10mins
5mins
Ragout Add oil Add meat
Add veg
Add liquid Keep warm
N/A
Beef casserole
°C 140°C
180°C180°C
140°C 95°C 80°C
–
01
4 9 9
W 1200W
1500W1500W
1500W Auto Auto
Heating stage
✓ ✓ ✓ ✓ ✗
Cooking time
✗
2mins3½mins
10mins 4hrs 30mins
Broth Add oil
Add veg
Add liquid Add meat/sh Keep warm
N/A
Salmon broth
°C 140°C
130°C
130°C
99°C 98°C 80°C
-
24
9 – 9
W 1200W
1200W
1500W
Auto Auto Auto
Heating stage
✓ ✓ ✓ ✓ ✗
Cooking time
✗
1min5mins
10mins 20mins 30mins
Note:
• Some programme phases have heating stages that allow ingredients to reach the specified temperature before the phase starts.
• HSHT (as displayed on screen) = High Speed, High Temperature mode
5720000723 Iss 2 KCC90 Eng_Fre_Ger_Ital_Sp.A4..indd 11 23/11/2016 09:07

12
programmes
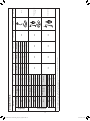
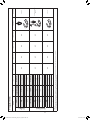
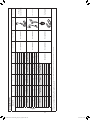
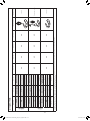
SAVOURY
Phase 1 (P1) Phase 2 (P2) Phase 3 (P3) Phase 4 (P4) Phase 5 (P5) Phase 6 (P6) Tools used Recipe ideas
sauce
Béchamel Add butter Add our Add liquid Keep warm
N/A N/A
Béchamel sauce,
cheese sauce,
parsley sauce
°C
80°C80°C 110°C110°C
99°C 85°C
– 0
HSHT 6HSHT 6
HSHT 6 HSHT 6
W
750W750W 1000W750W
750W 500W
Heating stage
✓ ✓ ✓ ✗
Cooking time
1min15secs 1min4mins
15mins 30mins
Traditional Add oil Add veg
Add liquid
Keep warm
N/A N/A
Tomato pasta sauce
°C 120°C 120°C
110°C98°C
80°C
– 3
22
9
W Auto
Auto
1500W1500W
Auto
Heating stage
✓ ✓ ✓ ✗
Cooking time
✗
10mins
4mins15mins
30mins
Hollandaise
Melt butter and
remove
Add yolks & liquid
Slowly add melted
butter
N/A N/A N/A
Béarnaise sauce,
Hollandaise
sauce
°C 60°C 72°C 72°C
2 HSHT 6 HSHT 6
W Auto
750W
750W
Heating stage
✓ ✓ ✗
Cooking time 10mins 4mins 2mins
Note:
• Some programme phases have heating stages that allow ingredients to reach the specified temperature before the phase starts.
• HSHT (as displayed on screen) = High Speed, High Temperature mode
5720000723 Iss 2 KCC90 Eng_Fre_Ger_Ital_Sp.A4..indd 12 23/11/2016 09:07

13
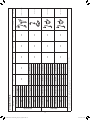
programmes
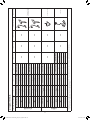
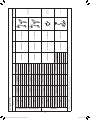
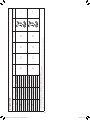
SWEET
Phase 1 (P1) Phase 2 (P2) Phase 3 (P3) Phase 4 (P4) Phase 5 (P5) Phase 6 (P6) Tools used Recipe ideas
chocolate tempering
White/Milk chocolate
Add
chocolate 1
Add
chocolate 2
Keep warm
N/A N/A N/A
Coating truffles,
cake decorating
°C
42°C42°C 42°COFF31°C
31°C
94 444
0
W
Auto
Auto
Auto
AutoAuto
1000W
Heating stage
✓ ✗ ✗
Cooking time
10mins20mins
–
–
10mins
2hrs
Plain chocolate Add chocolate 1 Add chocolate 2
Keep warm
N/A N/A N/A
°C
47°C47°C 47°COFF31°C
31°C
94 444
0
W
Auto
Auto
Auto
Auto
Auto
1000W
Heating stage
✓ ✗ ✗
Cooking time
10mins20mins
–
–
10mins
2hrs
doughs
Choux pastry Add water & butter Add our Add eggs
N/A N/A N/A
Profiteroles,
eclairs
°C 90°C OFF OFF
2 0 Speed 4
W
Auto Auto Auto
Heating stage
✓ ✗ ✗
Cooking time 1min – –
Standard Doughs
Add liquid, our &
yeast
–
Proong Knocking back
N/A N/A
White bread
°C OFF OFF 28°C OFF
0 Speed 1 OFF 0
W OFF
OFF
250W OFF
Heating stage
✗ ✗ ✗ ✗
Mixing time
2mins
8mins 1hr 1min
Note:
• Some programme phases have heating stages that allow ingredients to reach the specified temperature before the phase starts.
• HSHT (as displayed on screen) = High Speed, High Temperature mode
5720000723 Iss 2 KCC90 Eng_Fre_Ger_Ital_Sp.A4..indd 13 23/11/2016 09:07

14
programmes
SWEET
Phase 1 (P1) Phase 2 (P2) Phase 3 (P3) Phase 4 (P4) Phase 5 (P5) Phase 6 (P6) Tools used Recipe ideas
chocolate tempering
White/Milk chocolate
Add
chocolate 1
Add
chocolate 2
Keep warm
N/A N/A N/A
Coating truffles,
cake decorating
°C
42°C42°C 42°COFF31°C
31°C
94 444
0
W
Auto
Auto
Auto
AutoAuto
1000W
Heating stage
✓ ✗ ✗
Cooking time
10mins20mins
–
–
10mins
2hrs
Plain chocolate Add chocolate 1 Add chocolate 2
Keep warm
N/A N/A N/A
°C
47°C47°C 47°COFF31°C
31°C
94 444
0
W
Auto
Auto
Auto
Auto
Auto
1000W
Heating stage
✓ ✗ ✗
Cooking time
10mins20mins
–
–
10mins
2hrs
doughs
Choux pastry Add water & butter Add our Add eggs
N/A N/A N/A
Profiteroles,
eclairs
°C 90°C OFF OFF
2 0 Speed 4
W
Auto Auto Auto
Heating stage
✓ ✗ ✗
Cooking time 1min – –
Standard Doughs
Add liquid, our &
yeast
–
Proong Knocking back
N/A N/A
White bread
°C OFF OFF 28°C OFF
0 Speed 1 OFF 0
W OFF
OFF
250W OFF
Heating stage
✗ ✗ ✗ ✗
Mixing time
2mins
8mins 1hr 1min
Note:
• Some programme phases have heating stages that allow ingredients to reach the specified temperature before the phase starts.
• HSHT (as displayed on screen) = High Speed, High Temperature mode
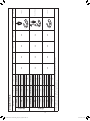
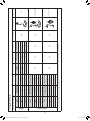
programmes
SWEET
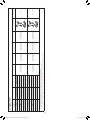
Phase 1 (P1) Phase 2 (P2) Phase 3 (P3) Phase 4 (P4) Phase 5 (P5) Phase 6 (P6) Tools used Recipe ideas
doughs
Enriched doughs
Add liquid, our &
yeast
–
Add butter
Proong Knocking back
N/A
Brioche
°C OFF OFF OFF 28°C OFF
0 Speed 1 Speed 1 OFF 0
W OFF
OFF
OFF 350W OFF
Heating stage
✓ ✗ ✗ ✗ ✗
Mixing time
2mins
8mins 5mins 1hr 1min
meringue
Italian
Add egg whites, sugar
& water
Keep warm
N/A N/A N/A N/A
Baked Alaska, cake
Frosting
°C
118°COFF
OFF
HSHT 6HSHT 6
HSHT 6
W
750W
Auto
750W
Heating stage
✓ ✗
Cooking time
1min10mins
10mins
Swiss
Add egg whites, sug-
ar & water
Keep warm
N/A N/A N/A N/A
Buttercream frostings
°C
45°COFF
OFF
Speed 6Speed 6
Speed 6
W
750WAuto
750W
Heating stage
✓ ✗
Cooking time
1min
10mins
10mins
Note:
• Some programme phases have heating stages that allow ingredients to reach the specified temperature before the phase starts.
• HSHT (as displayed on screen) = High Speed, High Temperature mode
5720000723 Iss 2 KCC90 Eng_Fre_Ger_Ital_Sp.A4..indd 14 23/11/2016 09:07

15
programmes
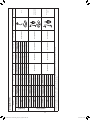
SWEET
Phase 1 (P1) Phase 2 (P2) Phase 3 (P3) Phase 4 (P4) Phase 5 (P5) Phase 6 (P6) Tools used Recipe ideas
compote
Fruit compote
Add fruit, pectin &
sugar
N/A N/A N/A N/A N/A
Strawberry compote
°C
104°COFF
20
W
750WAuto
Heating stage
✓
Cooking time
10mins10mins
Pate de Fruit
Add puree, sugar &
pectin
Add sugar & glucose Add citric acid
N/A N/A N/A
Pâte de fruit
°C 100°C 107°C
100°C70°C
HSHT 3 HSHT 3 HSHT 3
W Auto Auto Auto
Heating stage
✓ ✓ ✓
Cooking time 2mins 10mins
2mins-
sauces
Crème Patisserie Add egg & sugar Add liquid
Keep warm
N/A N/A N/A
Profiterole filling
°C OFF
101°C70°C
70°C
Speed 2
00
0
W –
AutoAuto
Auto
Heating stage
✗ ✓ ✗
Cooking time
2mins
5mins-
30mins
Crème Anglaise Add egg & sugar
Add liquid
Keep warm
N/A N/A N/A
Crème Anglaise
°C OFF 87°C 80°C
Speed 2 0 0
W OFF Auto Auto
Heating stage
✗ ✓ ✗
Cooking time 3mins 12mins 30mins
Note:
• Some programme phases have heating stages that allow ingredients to reach the specified temperature before the phase starts.
• HSHT (as displayed on screen) = High Speed, High Temperature mode
5720000723 Iss 2 KCC90 Eng_Fre_Ger_Ital_Sp.A4..indd 15 23/11/2016 09:07

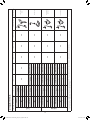
16
programmes
SWEET
Phase 1 (P1) Phase 2 (P2) Phase 3 (P3) Phase 4 (P4) Phase 5 (P5) Phase 6 (P6) Tools used Recipe ideas
sauces
Sabayon
Add egg, sugar &
liquid
Keep warm
N/A N/A N/A N/A
Sabayon
°C
74°COFF
50°C
HSHT Max
HSHT Max
HSHT Max
W
750WAuto
500W
Heating stage
✓ ✗
Cooking time
2mins
–
15mins
others
Pate de Bombe Add eggs & sugar Keep warm
N/A N/A N/A N/A
Base for mousses
°C
OFF 118°COFF
OFF
HSHT 6 HSHT 6
W 500W 500W
Heating stage
✓ ✗
Cooking time
2
1
–
10mins
Popcorn Add oil Add popcorn kernals
N/A N/A N/A N/A
Popcorn
°C 180°C 180°C
– –
W Auto Auto
Heating stage
✓ ✗
Cooking time
✗
10mins
Note:
• Some programme phases have heating stages that allow ingredients to reach the specified temperature before the phase starts.
• HSHT (as displayed on screen) = High Speed, High Temperature mode
5720000723 Iss 2 KCC90 Eng_Fre_Ger_Ital_Sp.A4..indd 16 23/11/2016 09:07

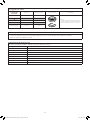
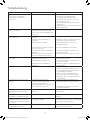
17
programmes
SLOW COOK
Phase 1 (P1) Phase 2 (P2) Phase 3 (P3) Phase 4 (P4) Phase 5 (P5) Phase 6 (P6) Tools used Recipe ideas
High Add ingredients Keep warm
N/A N/A N/A N/A
Casseroles
°C
98°C 95°C
80°C
09
–
W
1500W
1000W
Auto
Heating stage
✓ ✗
Cooking time
20mins2hrs
30mins
Low Add ingredients Keep warm
N/A N/A N/A N/A
Casseroles
°C
98°C 85°C
80°C
09
9
W
1500W
1000W
Auto
Heating stage
✓ ✗
Cooking/mixing time
10mins7hrs
30mins
Note:
• High slow cook operates at 95°C and is ideal for slow cooking tougher meats.
• Low slow cook operates at 85°C and is ideal for slow cooking meats such as chicken and vegetables.
• Some programme phases have heating stages that allow ingredients to reach the specified temperature before the phase starts.
5720000723 Iss 2 KCC90 Eng_Fre_Ger_Ital_Sp.A4..indd 17 23/11/2016 09:07

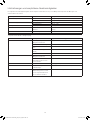
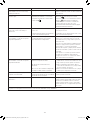
18
programmes
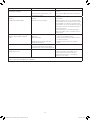
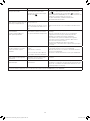
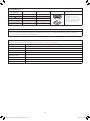
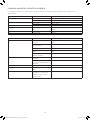
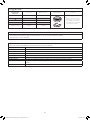
STEAM
Phase 1 (P1) Keep Warm Tools used Comments
°C 102°C 65°C
Note:
• Refer to steamer basket instruction
manual for recommended quantities
and times – adjust the cooking time
as required.
– –
W Auto Auto
Heating stage
✓ ✗
Cooking time 10mins 30mins
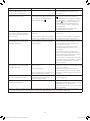
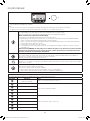
how to skip programme phases
1 Press and hold the display dial for 5 seconds. “RECIPE PHASES” will appear on the display screen.
2 Turn the display dial to choose the desired phase (P1, P2, P3, etc.) and press the dial to confirm.
3 Follow the instructions on the display screen.
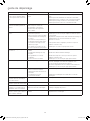
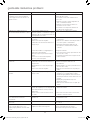
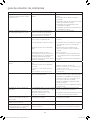
Display screen text explained
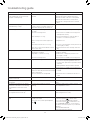
During the pre-set programmes, various messages will appear on the display screen.
Message Description
COOLING DOWN The bowl is cooling to a set temperature.
HEATING The bowl is getting up to temperature.
HSHT MODE High Speed High Temperature mode.
KNEADING A process in bread making when the dough is stretched.
KNOCK BACK Knocking back removes large pockets of air bubbles to create an even texture.
PROOFING A stage in bread making where the dough is allowed to rise.
TEMPERING Accurately controlling the temperature of chocolate to obtain a smooth, glossy finish.
PROCESSING Part of a programme where the Cooking Chef is mixing without heating.
5720000723 Iss 2 KCC90 Eng_Fre_Ger_Ital_Sp.A4..indd 18 23/11/2016 09:07

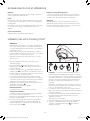
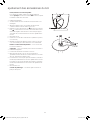
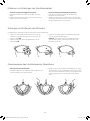
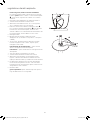
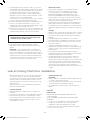
19
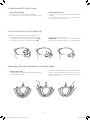
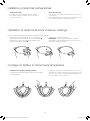
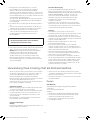
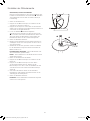
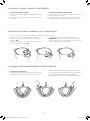
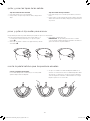
whisk, stainless steel K beater
For best performance the whisk and K beater should be
almost touching the bottom of the bowl
5
. If necessary
adjust the height using the spanner provided.
1 Unplug the appliance.
2 Raise the mixer head and insert the whisk or beater.
3 Lower the mixer head. If the clearance needs to be adjusted,
raise the mixer head and remove the tool.
4 Using the spanner provided loosen the nut
6
sufficiently
to allow adjustment of the shaft
7
. To lower the tool closer
to the bottom of the bowl, turn the shaft anti-clockwise. To
raise the tool away from the bottom of the bowl turn the shaft
clockwise.
5 Re-tighten the nut.
6 Fit the tool to the mixer and lower the mixer head. (Check its
position see points above).
7 Repeat the above steps as necessary until the tool is set
correctly. Once this is achieved tighten the nut securely.
high temperature creaming beater - this tool should just
touch the bottom of the bowl.
stir tool - this tool should just touch the bottom of the bowl.
1 Unplug the appliance.
2 Raise the mixer head and insert the stir tool.
3 Lower the mixer head. If the tool needs adjustment, raise the
mixer head and use the spanner to loosen the nut, then lower
the mixer head.
4 To lower the tool closer to the bottom of the bowl, turn the
adjustment wheel clockwise. To raise the tool away from the
bottom of the bowl, turn the adjustment wheel anti-clockwise.
5 Re-tighten the nut.
dough hook - this tool is set at factory and is not adjustable.
adjusting the height of the tools
5
6
7
5720000723 Iss 2 KCC90 Eng_Fre_Ger_Ital_Sp.A4..indd 19 23/11/2016 09:07

20
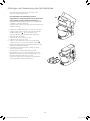
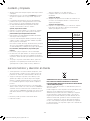
The splashguard assembly consists of 2 pieces: the heat
shield and the splashguard.
The heat shield must be fitted during cooking
operations otherwise the machine will not operate
and "Fit heat shield" will be displayed. The heat shield is
to protect the mixer head from steam produced during the
cooking process.
The splashguard should not be fitted to the bowl unless used
in conjunction with the heat shield.
1 Raise the mixer head until it locks.
2 Push the heat shield upwards onto the underside of the mixer
head
8
until fully located. The heat shield must never be
used without the rubber seal correctly fitted.
3 Fit the bowl onto the base.
4 Lower the mixer head.
5 Rest the splashguard on the bowl rim and then slide forward
until fully located
9
.
• During mixing, ingredients can be added directly to the bowl
via the feed chute.
6 To remove the splashguard simply slide it away from the
appliance.
7 To remove the heat shield, raise the mixer head until it locks.
Remove the tool, then pull the heat shield downwards from
the underside of the mixer head.
Note: Only fit or remove the splashguard when the mixer head
is in the locked position.
to fit and use your splashguard assembly
8
9
5720000723 Iss 2 KCC90 Eng_Fre_Ger_Ital_Sp.A4..indd 20 23/11/2016 09:07
Seite wird geladen ...
Seite wird geladen ...
Seite wird geladen ...
Seite wird geladen ...
Seite wird geladen ...
Seite wird geladen ...
Seite wird geladen ...
Seite wird geladen ...
Seite wird geladen ...
Seite wird geladen ...
Seite wird geladen ...
Seite wird geladen ...
Seite wird geladen ...
Seite wird geladen ...
Seite wird geladen ...
Seite wird geladen ...
Seite wird geladen ...
Seite wird geladen ...
Seite wird geladen ...
Seite wird geladen ...
Seite wird geladen ...
Seite wird geladen ...
Seite wird geladen ...
Seite wird geladen ...
Seite wird geladen ...
Seite wird geladen ...
Seite wird geladen ...
Seite wird geladen ...
Seite wird geladen ...
Seite wird geladen ...
Seite wird geladen ...
Seite wird geladen ...
Seite wird geladen ...
Seite wird geladen ...
Seite wird geladen ...
Seite wird geladen ...
Seite wird geladen ...
Seite wird geladen ...
Seite wird geladen ...
Seite wird geladen ...
Seite wird geladen ...
Seite wird geladen ...
Seite wird geladen ...
Seite wird geladen ...
Seite wird geladen ...
Seite wird geladen ...
Seite wird geladen ...
Seite wird geladen ...
Seite wird geladen ...
Seite wird geladen ...
Seite wird geladen ...
Seite wird geladen ...
Seite wird geladen ...
Seite wird geladen ...
Seite wird geladen ...
Seite wird geladen ...
Seite wird geladen ...
Seite wird geladen ...
Seite wird geladen ...
Seite wird geladen ...
Seite wird geladen ...
Seite wird geladen ...
Seite wird geladen ...
Seite wird geladen ...
Seite wird geladen ...
Seite wird geladen ...
Seite wird geladen ...
Seite wird geladen ...
Seite wird geladen ...
Seite wird geladen ...
Seite wird geladen ...
Seite wird geladen ...
Seite wird geladen ...
Seite wird geladen ...
Seite wird geladen ...
Seite wird geladen ...
Seite wird geladen ...
Seite wird geladen ...
Seite wird geladen ...
Seite wird geladen ...
Seite wird geladen ...
Seite wird geladen ...
Seite wird geladen ...
Seite wird geladen ...
Seite wird geladen ...
Seite wird geladen ...
Seite wird geladen ...
Seite wird geladen ...
Seite wird geladen ...
Seite wird geladen ...
Seite wird geladen ...
Seite wird geladen ...
Seite wird geladen ...
Seite wird geladen ...
Seite wird geladen ...
Seite wird geladen ...
Seite wird geladen ...
Seite wird geladen ...
Seite wird geladen ...
Seite wird geladen ...
Seite wird geladen ...
Seite wird geladen ...
-
 1
1
-
 2
2
-
 3
3
-
 4
4
-
 5
5
-
 6
6
-
 7
7
-
 8
8
-
 9
9
-
 10
10
-
 11
11
-
 12
12
-
 13
13
-
 14
14
-
 15
15
-
 16
16
-
 17
17
-
 18
18
-
 19
19
-
 20
20
-
 21
21
-
 22
22
-
 23
23
-
 24
24
-
 25
25
-
 26
26
-
 27
27
-
 28
28
-
 29
29
-
 30
30
-
 31
31
-
 32
32
-
 33
33
-
 34
34
-
 35
35
-
 36
36
-
 37
37
-
 38
38
-
 39
39
-
 40
40
-
 41
41
-
 42
42
-
 43
43
-
 44
44
-
 45
45
-
 46
46
-
 47
47
-
 48
48
-
 49
49
-
 50
50
-
 51
51
-
 52
52
-
 53
53
-
 54
54
-
 55
55
-
 56
56
-
 57
57
-
 58
58
-
 59
59
-
 60
60
-
 61
61
-
 62
62
-
 63
63
-
 64
64
-
 65
65
-
 66
66
-
 67
67
-
 68
68
-
 69
69
-
 70
70
-
 71
71
-
 72
72
-
 73
73
-
 74
74
-
 75
75
-
 76
76
-
 77
77
-
 78
78
-
 79
79
-
 80
80
-
 81
81
-
 82
82
-
 83
83
-
 84
84
-
 85
85
-
 86
86
-
 87
87
-
 88
88
-
 89
89
-
 90
90
-
 91
91
-
 92
92
-
 93
93
-
 94
94
-
 95
95
-
 96
96
-
 97
97
-
 98
98
-
 99
99
-
 100
100
-
 101
101
-
 102
102
-
 103
103
-
 104
104
-
 105
105
-
 106
106
-
 107
107
-
 108
108
-
 109
109
-
 110
110
-
 111
111
-
 112
112
-
 113
113
-
 114
114
-
 115
115
-
 116
116
-
 117
117
-
 118
118
-
 119
119
-
 120
120
-
 121
121
-
 122
122


Kenwood KCC9048S Bedienungsanleitung
- Kategorie
- Mischer
- Typ
- Bedienungsanleitung
- Dieses Handbuch eignet sich auch für
in anderen Sprachen
Verwandte Artikel
-
Kenwood KWL90 124SI TITANIUM CHEF Bedienungsanleitung
-
Kenwood KMM040 Bedienungsanleitung
-
Kenwood KAT911SS COOKING CHEF GOURMET Bedienungsanleitung
-
Kenwood KCL95.424SI COOKING CHEF XL Bedienungsanleitung
-
-
Kenwood KCC9060S Bedienungsanleitung
-
-
Kenwood KVC85 Bedienungsanleitung
-
-
Kenwood KM080 Bedienungsanleitung
Andere Dokumente
-
KitchenAid 5KSM45AOB Benutzerhandbuch
-
 Yoo Digital COOKYOO7000 Bedienungsanleitung
-
Camry CR 4211 Bedienungsanleitung
-
-
 NewCook Masterful Bedienungsanleitung
-
Turmix CX 910 Benutzerhandbuch
-
 Kistler 4049B Bedienungsanleitung
-
Kiwi KMC-6940 Benutzerhandbuch
-
 Caso Design KM 1200 Chef Bedienungsanleitung
-
GGM Gastro RMS7 Bedienungsanleitung


