Lenco MC-250BK Bedienungsanleitung
- Kategorie
- Radios
- Typ
- Bedienungsanleitung

Model: MC-250
USER MANUAL Micro set with SMART radio (internet, DAB+, FM), CD player
and Bluetooth
HANDLEIDING Microset met SMART radio (internet, DAB+, FM), cd-speler
en Bluetooth
BEDIENUNGSANLEITUNG Mikroanlage mit SMART-Radio (Internet, DAB+, FM),
CD-Player und Bluetooth
MODE D’EMPLOI Mini-chaîne avec radio SMART (Internet, DAB +, FM),
lecteur CD et Bluetooth
MANUAL DEL USUARIO Micro equipo con radio SMART (internet, DAB+, FM),
reproductor de CD y Bluetooth

2
Index:
English
.........................................................................................................................................
3
Nederlands
................................................................................................................................
37
Deutsch
.....................................................................................................................................
80
Français
...................................................................................................................................
126
Español
....................................................................................................................................
170
Version : 1.0

3
English
MC-250
CAUTION:
Usage of controls or adjustments or performance of procedures other than those specified
herein may result in hazardous radiation exposure.
This unit should not be adjusted or repaired by anyone except qualified service personnel.
PRECAUTIONS BEFORE USE
KEEP THESE INSTRUCTIONS IN MIND:
1. Do not use this device near water.
2. Clean only with a slightly damp cloth.
3. Do not cover or block any ventilation openings. When placing the device on a shelf,
leave 5 cm (2”) free space around the whole device.
4. Install in accordance with the supplied user manual.
5. * Don’t step on or pinch the power adaptor. Be very careful, particularly near the plugs
and the cable’s exit point. Do not place heavy items on the power adaptor, which may
damage it. Keep the entire device out of children’s reach! When playing with the power
cable, they can seriously injure themselves.
6. * Unplug this device during lightning storms or when unused for a long period.
7. Keep the device away from heat sources such as radiators, heaters, stoves, candles and
other heat-generating products or naked flame.
8. Avoid using the device near strong magnetic fields.
9. Electrostatic discharge can disturb normal usage of this device. If so, simply reset and
restart the device following the instruction manual. During file transmission, please
handle with care and operate in a static-free environment.
10. Warning! Never insert an object into the product through the vents or openings. High
voltage flows through the product and inserting an object can cause electric shock
and/or short circuit internal parts. For the same reason, do not spill water or liquid on
the product.
11. Do not use in wet or moist areas such as bathrooms, steamy kitchens or near swimming
pools.
12. Do not use this device when condensation may occur.
13. Although this device is manufactured with the utmost care and checked several times
before leaving the factory, it is still possible that problems may occur, as with all
electrical appliances. If you notice smoke, an excessive build-up of heat or any other
unexpected phenomena, you should disconnect the plug from the main power socket
immediately.
14. This device must operate on a power source as specified on the specification label. If
you are not sure of the type of power supply used in your home, consult your dealer or
local power company.
15. * The socket outlet must be installed near the equipment and must be easily accessible.

4
16. * Do not overload ac outlets or extension cords. Overloading can cause fire or electric
shock.
17. * Devices with class 1 construction should be connected to a main socket outlet with a
protective earthed connection.
18. * Devices with class 2 construction do not require a earthed connection.
19. Keep away from rodents. Rodents enjoy biting on power cords.
20. * Always hold the plug when pulling it out of the main supply socket. Do not pull the
power cord. This can cause a short circuit.
21. Avoid placing the device on any surfaces that may be subject to vibrations or shocks.
22. To clean the device, use a soft dry cloth. Do not use solvents or petrol based fluids. To
remove severe stains, you may use a damp cloth with dilute detergent.
23. The supplier is not responsible for damage or lost data caused by malfunction, misuse,
modification of the device or battery replacement.
24. Do not interrupt the connection when the device is formatting or transferring files.
Otherwise, data may be corrupted or lost.
25. If the unit has USB playback function, the usb memory stick should be plugged into the
unit directly. Don’t use an usb extension cable because it can cause interference
resulting in failing of data.
26. The apparatus shall not be exposed to dripping or splashing and make sure that no
objects filled with liquids, such as vases, are placed on or near the apparatus.
27. * To completely disconnect the power input, the mains plug of the apparatus shall be
disconnected from the mains, as the disconnect device is the mains plug of apparatus.
28. If the unit works with battery, Battery shall not be exposed to excessive heat such as
sunshine, fire or the like.
29. Attention should be drawn to the environmental aspects of battery disposal.
30. The apparatus can only be used in moderate extremely cold or climates warm
environments should be avoided.
31. The rating label has been marked on the bottom or back panel of the apparatus.
32. This device is not intended for use by people (including children) with physical, sensory
or mental disabilities, or a lack of experience and knowledge, unless they’re under
supervision or have received instructions about the correct use of the device by the
person who is responsible for their safety.
33. This product is intended for non professional use only and not for commercial or
industrial use.
34. Make sure the unit is adjusted to a stable position. Damage caused by using this
product in an unstable position or by failure to follow any other warning or precaution
contained within this user manual will not be covered by warranty.
35. Never remove the casing of this apparatus.
36. Never place this apparatus on other electrical equipment.

5
37. Do not use or store this product in a place where it is subject to direct sunlight, heat,
excessive dust or vibration.
38. Do not allow children access to plastic bags.
39. Only use attachments/accessories specified by the manufacturer.
40. Refer all servicing to qualified service personnel. Servicing is required when the
apparatus has been damaged in any way, such as the power supply cord or the plug,
when liquid has been spilled or objects have fallen into the apparatus, when the
apparatus has been exposed to rain or moisture, does not operate normally, or has
been dropped.
41. *Do not use a damaged power cord or plug or a loose outlet. Doing so may result in fire
or electric shock.
42. Prolonged exposure to loud sounds from personal music players may lead to temporary
or permanent hearing loss.
43. If the product contains or is delivered with a remote control containing coin / cell
batteries:
Warning :
“Do not ingest battery, Chemical Burn Hazard” or equivalent working.
[The remote control supplied with] This product contains a coin / button cell
battery is swallowed, it can cause severe internal burns in just 2 hours and can
lead to death.
Keep new and used batteries away from children.
If the battery compartment does not close securely, stop using the product and
keep it away from children.
If you think batteries might have been swallowed or placed inside any part of the
body, seek immediate medical attention.
INSTALLATION
●
Unpack all parts and remove protective material.
●
*Do not connect the unit to the mains before checking the mains voltage and before all
other connections have been made.
*Those instructions are related only to products using power cable or AC power adaptor.
Accessories:
User manual

6
Power adaptor
Remote control
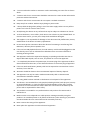
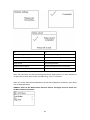
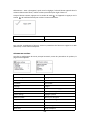
1. LCD Display (TFT2.8’’)
2. Remote Control Receiver
3. Earphone Jack
4. USB Port for Playback
5. Power and Mode Button
6. Scan Button
7. Info/Menu Button
8. Back Button
9. Memory Button
10. Prev Button
11. Stop Button
12. Next Button
13. Volume/Play/pause/OK Button

7
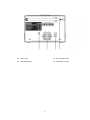
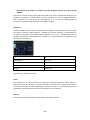
14. Aux in jack 15. R/L speaker output
16. DC IN (12V/2.5A) 17. Telescopic antenna

8
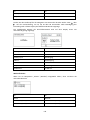
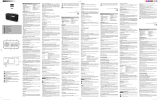
1.
Standby button
2.
Switch speaker ON/OFF
3.
Menu-Main menu and Info
4.
Preset-saved stations, Favorites, etc.
5.
Scan-DAB/FM scan
6.
Sleep button
7.
Go back one track
8.
Play/Pause
9.
Go forward one track
10.
Stop play button
11.
Mode button
12.
EQ-Set tone
13.
Up cursor button
14.
Left cursor button
15.
OK Confirm selection
16.
Right Cursor button
17.
Down cursor button
18.
V- Decrease volume
19.
V+ Increase volume
20.
0.....9 Call up favorites/Memory;
input
letters and numbers
21.
Prog for USB/CD
22.
Rep. for USB/CD

9
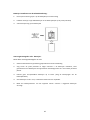
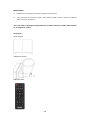
Battery installation for remote control:
1. Push on the ‘open’ marking of the battery cover and slide it downwards
2. Install two (2) x AAA size batteries into the battery compartment (check the correct
polarity)
3. slide the battery cover back
Battery Precautions:
Follow these precautions:
1. Use only the type of battery specified in this manual.
2. Be sure to follow the correct polarity when installing the battery as indicated in the
battery compartment. A battery which is inserted in the wrong way may cause damage
to the device.
3. Do not try to recharge single use batteries. (Follow the battery manufacturer’s
directions.)
4. Do not throw batteries into fire because they may explode.
5. Clean the battery contacts of the device prior to replacing empty batteries.

10
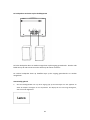
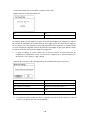
Connecting the speakers to the main unit
The left speaker has to be connected to the Jack marked with L. Connect the red cable to the
red connector jack and the black one to the black connector jack.
The right speaker has to be connected the same way on the Jack marked with R.

11
2. Wait for about 20 seconds, the display will appear as below. Press the ‘OK’ knob on the
unit’s front pane or the remote control to select “Yes” then press the “OK” button on
the unit’s front panel or the remote control to continue with the setup wizard.
3. The display will appear as below. Press the ‘OK’ knob on the unit or remote control to
highlight the desired hour format and press the “OK” knob on the unit or remote
control to continue.
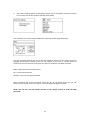
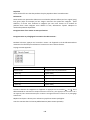
4. The time and date auto update page will appear as below.
Explanation of the options:
Update from DAB: The time and date will be synchronized from a DAB signal
Update from FM: The time and date will be synchronized from a FM signal
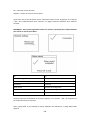
First use
1. Connect the power plug to the DC in (16) on the back of the main unit and then plug the
Adapter into the wall outlet. The display will show the Lenco logo as below

12
Update from Network: The time will be synchronized from the Internet/network signal
No update: Time and date have to be set manually
Turn the navigation knob on the unit or use the navigation buttons on the remote control to
highlight one of the options
If ‘Update from network’ is selected:
Set the local time zone and set the Daylight savings to ON or OFF.
If ‘No update’ is selected:
Set the date and time manually.
The day number will flash, turn the navigation knob on the unit or using the navigation
buttons on the remote control to set the desired day, then press the ‘OK’ button on the unit
or the remote control to confirm. Now the month number will flash. Use the same procedure
as setting the day, then do the same to set the year and time. Go ahead to next setup page.
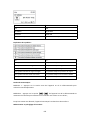
5. The Network settings page will appear as below. Turn the navigation knob on the unit
or using the navigation buttons on the remote control to select ‘YES’ or ‘NO’.
Press the “OK” knob on the unit or remote control to continue.

13
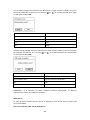
6. The screen will be as below. In SSID page, choose one of the wireless networks from the
list or choose one of the network with the prefix [WPS]…
If for example. the wireless network ABC123 is selected, the Key page will pop up.
Turn the navigation knob on the unit or use the navigation buttons on the remote control to
highlight the character needed, press the ‘OK’ button on the unit or remote control to
continue to the next character and repeat the above to complete your WIFI password.
BKSP = delete the last entered character
OK = confirm the password
CANCEL = cancel entering the password
After completing the correct password, select the OK on the display and press the ‘OK’
button on the remote control to continue. The next pages will appear as below.
NOTE: You can also use the number buttons on the remote control to enter the WIFI
password.

14
When setup wizard is completed, press the ‘OK’ button on the unit or remote control to exit
In the SSID page, If for example the network [WPS]123 is selected, the WPS Menu page will
appear.
NOTE: to use the WPS function you will need a WPS compatible WIFI router!
If "Push Button" is selected, the below page will appear. Press the WPS connect button on
your router and then press the OK knob on the unit or the remote control.

15
If “Pin” is selected,
the unit generates an 8-digit code number which you have to enter in your wireless
router/accesspoint configuration menu. (check the manual of your router if you need help)
When "Skip WPS" is selected, the below page will appear. Enter your WIFI network passkey
Turn the navigation knob on the unit or use the navigation buttons on the remote control to
highlight the character needed, press the ‘OK’ button on the unit or remote control to
continue to the next character and repeat the above to complete your WIFI password
BKSP = delete the last entered character
OK = confirm the password
CANCEL = cancel entering the password
After completing the correct password, select the OK on the display and press the ‘OK’
button on the remote control to continue.
NOTE: You can also use the number buttons on the remote control to enter the WIFI
password.
Main Menu
After setup is completed, the unit will enter the main menu. The following page will appear.
Turn the navigation knob on the unit or press the or button on the remote control to
navigate through the items in main menu list.

16
INTERNET RADIO
Select internet radio from the main menu or press ‘mode’ on the remote control until
internet radio is selected.
The Lenco MC-250 internet radio can play thousands of radio stations and podcasts from
around the world through a broadband internet connection. When you select Internet radio
mode, it contacts the solution provider Internet radio portal to get a list of stations,
organized into different categories like Country and Popular. Once you select a station, radio
connects directly to that station.
The common local controls for sound volume, mute, play/stop and Presets are available.
Note: The station list menu is provided from the Internet radio portal, so it is only
accessible when radio is connected to the Internet. Station lists and submenus will change
from time to time.
The station list is organized into various categories and search facilities:
UK (this can be another country. Depends on the country you are using this device)
Presents a sub-menu to search for stations using a variety of categories, for example, local
stations, BBC stations, Genres or stations from a specific city. Choose the required category
and either a further list of sub categories is shown, or (if there is no further sub-categories)
the available stations for the chosen category are listed.

17
History
When Internet radio mode restarts, the last-listened station is selected. To select another
recently used station, select Menu > Station list > History then one of the stations listed.
Most recent stations appear at the top of the list.
Search
You can also search through Internet broadcasts for stations with particular keywords in their
title. To search, select Menu > Station list > Search. Enter a keyword by selecting characters in
turn, then OK. The search entry screens are similar in operation to the Wi-Fi passphrase
entry screen.
Select a broadcast from the list.

18
Location
To select an Internet broadcast from a particular location, select Menu > Station list >
Location >. Select a continent from the menu and a list of countries available is presented,
select a country and the available internet radio stations are presented. Choose a radio
station from the list to tune to that station.
Popular
Presents a list of the most popular internet stations from around the world.
Discover
Allows you to select from a list of stations defined by either their origin (Country), Genre
(style of music) or language. Navigate through the category options; once you have made
your selection a screen confirms your selected category and the number stations within that
category. To see the list, select the option showing the number of available stations.
Now playing information
While the stream is playing, the screen shows its name and description. If artist and track
information is available, this is also shown. To view further information, press Info. Each time
you press Info, another set of information is displayed, cycling through the following details:
Slogan (default; where available)
Language/Location
Codec and sampling rate
Playback buffer
Today’s Date
Podcasts
This Radio can play podcasts from around the world through a broadband internet
connection. When you select Podcast mode, radio contacts the solution provider portal to
get a list of available podcasts. Once you select a podcast, radio connects directly to that
podcast source. To enter Podcast mode, either press Mode to cycle through the listening
modes until Podcasts is displayed or select Menu > Main menu > Podcasts. The common
local controls for sound volume, mute, play/pause and Presets are available.
Note: The podcast menu is provided from the Podcast portal, so it is only accessible when
radio is connected to the Internet. Podcast lists and submenus will change from time to
time.
UK
Search
Popular
Location
Discover

19
UK (this can be another country. Depends on the country you are using this device)
Presents a sub-menu to search for podcasts using a variety of categories, for example,
comedy of the week, books and authors, popular, etc. Choose your favorite category and
either a further list of sub categories is shown, or (if there is no further sub-categories) the
available podcasts for the chosen category are listed.
Search
You can also search through podcasts with particular keywords in their title. To search, select
Menu > Podcast list > Search. Enter a keyword by selecting characters in turn, then OK. The
search entry screens are similar in operation to the Wi-Fi pass phrase entry screen.
Select a broadcast from the list.
Location
To select a Podcast from a particular location, select Menu > Podcast list > Location >. Select
a continent from the menu and a list of countries available is presented, select a country and
the available podcasts are presented. Choose a podcast from the list to tune to that podcast.
Popular
Presents a list of the most popular podcasts from around the world.
Discover
Allows you to select from a list of podcasts defined by either their origin (Country), Genre
(style of music) or language. Navigate through the category options; once you have made
your selection a screen confirms your selected category and the number podcasts within
that category. To see the list, select the option showing the number of available podcasts.
Storing a station as a favorite
Internet Radio Station storing or preset:
During play, press and hold the ´Preset´ button on the unit or remote control to store the
current station as a favorite.

20
The following page will appear:
Turn the navigation knob on the unit or press the or buttons on the remote control
and select your desired location, press the ‘OK’ button on the unit /remote control to
confirm storing the station on the selected preset.
Repeat the above steps to store up to 10 preset stations.
You will find them in My Added Stations list.
Recall a stored preset
Press the ‘PRESET’ button on the unit or remote control to recall a stored station, Turn the
navigation knob on the unit or press the or buttons on the remote control and select
your desired station, press ‘OK’ and listen to the selected station.
Station information:
Press the ‘INFO’ button on the remote control repeatedly to check the available station
information.
Press the button to pause and press it again to resume play.
Press the MENU button on the unit or press the Menu button on remote control to return
back to internet radio menu.
Explanation of symbol on playing page:
USB mode:
Insert a USB memory stick with MP3 music into the USB port on the front panel.
Press mode until ‘USB’ is selected. The radio will start to read the contents of the USB
memory stick and will start automatically.
Seite wird geladen ...
Seite wird geladen ...
Seite wird geladen ...
Seite wird geladen ...
Seite wird geladen ...
Seite wird geladen ...
Seite wird geladen ...
Seite wird geladen ...
Seite wird geladen ...
Seite wird geladen ...
Seite wird geladen ...
Seite wird geladen ...
Seite wird geladen ...
Seite wird geladen ...
Seite wird geladen ...
Seite wird geladen ...
Seite wird geladen ...
Seite wird geladen ...
Seite wird geladen ...
Seite wird geladen ...
Seite wird geladen ...
Seite wird geladen ...
Seite wird geladen ...
Seite wird geladen ...
Seite wird geladen ...
Seite wird geladen ...
Seite wird geladen ...
Seite wird geladen ...
Seite wird geladen ...
Seite wird geladen ...
Seite wird geladen ...
Seite wird geladen ...
Seite wird geladen ...
Seite wird geladen ...
Seite wird geladen ...
Seite wird geladen ...
Seite wird geladen ...
Seite wird geladen ...
Seite wird geladen ...
Seite wird geladen ...
Seite wird geladen ...
Seite wird geladen ...
Seite wird geladen ...
Seite wird geladen ...
Seite wird geladen ...
Seite wird geladen ...
Seite wird geladen ...
Seite wird geladen ...
Seite wird geladen ...
Seite wird geladen ...
Seite wird geladen ...
Seite wird geladen ...
Seite wird geladen ...
Seite wird geladen ...
Seite wird geladen ...
Seite wird geladen ...
Seite wird geladen ...
Seite wird geladen ...
Seite wird geladen ...
Seite wird geladen ...
Seite wird geladen ...
Seite wird geladen ...
Seite wird geladen ...
Seite wird geladen ...
Seite wird geladen ...
Seite wird geladen ...
Seite wird geladen ...
Seite wird geladen ...
Seite wird geladen ...
Seite wird geladen ...
Seite wird geladen ...
Seite wird geladen ...
Seite wird geladen ...
Seite wird geladen ...
Seite wird geladen ...
Seite wird geladen ...
Seite wird geladen ...
Seite wird geladen ...
Seite wird geladen ...
Seite wird geladen ...
Seite wird geladen ...
Seite wird geladen ...
Seite wird geladen ...
Seite wird geladen ...
Seite wird geladen ...
Seite wird geladen ...
Seite wird geladen ...
Seite wird geladen ...
Seite wird geladen ...
Seite wird geladen ...
Seite wird geladen ...
Seite wird geladen ...
Seite wird geladen ...
Seite wird geladen ...
Seite wird geladen ...
Seite wird geladen ...
Seite wird geladen ...
Seite wird geladen ...
Seite wird geladen ...
Seite wird geladen ...
Seite wird geladen ...
Seite wird geladen ...
Seite wird geladen ...
Seite wird geladen ...
Seite wird geladen ...
Seite wird geladen ...
Seite wird geladen ...
Seite wird geladen ...
Seite wird geladen ...
Seite wird geladen ...
Seite wird geladen ...
Seite wird geladen ...
Seite wird geladen ...
Seite wird geladen ...
Seite wird geladen ...
Seite wird geladen ...
Seite wird geladen ...
Seite wird geladen ...
Seite wird geladen ...
Seite wird geladen ...
Seite wird geladen ...
Seite wird geladen ...
Seite wird geladen ...
Seite wird geladen ...
Seite wird geladen ...
Seite wird geladen ...
Seite wird geladen ...
Seite wird geladen ...
Seite wird geladen ...
Seite wird geladen ...
Seite wird geladen ...
Seite wird geladen ...
Seite wird geladen ...
Seite wird geladen ...
Seite wird geladen ...
Seite wird geladen ...
Seite wird geladen ...
Seite wird geladen ...
Seite wird geladen ...
Seite wird geladen ...
Seite wird geladen ...
Seite wird geladen ...
Seite wird geladen ...
Seite wird geladen ...
Seite wird geladen ...
Seite wird geladen ...
Seite wird geladen ...
Seite wird geladen ...
Seite wird geladen ...
Seite wird geladen ...
Seite wird geladen ...
Seite wird geladen ...
Seite wird geladen ...
Seite wird geladen ...
Seite wird geladen ...
Seite wird geladen ...
Seite wird geladen ...
Seite wird geladen ...
Seite wird geladen ...
Seite wird geladen ...
Seite wird geladen ...
Seite wird geladen ...
Seite wird geladen ...
Seite wird geladen ...
Seite wird geladen ...
Seite wird geladen ...
Seite wird geladen ...
Seite wird geladen ...
Seite wird geladen ...
Seite wird geladen ...
Seite wird geladen ...
Seite wird geladen ...
Seite wird geladen ...
Seite wird geladen ...
Seite wird geladen ...
Seite wird geladen ...
Seite wird geladen ...
Seite wird geladen ...
Seite wird geladen ...
Seite wird geladen ...
Seite wird geladen ...
Seite wird geladen ...
Seite wird geladen ...
Seite wird geladen ...
Seite wird geladen ...
Seite wird geladen ...
Seite wird geladen ...
Seite wird geladen ...
Seite wird geladen ...
Seite wird geladen ...
Seite wird geladen ...
Seite wird geladen ...
-
 1
1
-
 2
2
-
 3
3
-
 4
4
-
 5
5
-
 6
6
-
 7
7
-
 8
8
-
 9
9
-
 10
10
-
 11
11
-
 12
12
-
 13
13
-
 14
14
-
 15
15
-
 16
16
-
 17
17
-
 18
18
-
 19
19
-
 20
20
-
 21
21
-
 22
22
-
 23
23
-
 24
24
-
 25
25
-
 26
26
-
 27
27
-
 28
28
-
 29
29
-
 30
30
-
 31
31
-
 32
32
-
 33
33
-
 34
34
-
 35
35
-
 36
36
-
 37
37
-
 38
38
-
 39
39
-
 40
40
-
 41
41
-
 42
42
-
 43
43
-
 44
44
-
 45
45
-
 46
46
-
 47
47
-
 48
48
-
 49
49
-
 50
50
-
 51
51
-
 52
52
-
 53
53
-
 54
54
-
 55
55
-
 56
56
-
 57
57
-
 58
58
-
 59
59
-
 60
60
-
 61
61
-
 62
62
-
 63
63
-
 64
64
-
 65
65
-
 66
66
-
 67
67
-
 68
68
-
 69
69
-
 70
70
-
 71
71
-
 72
72
-
 73
73
-
 74
74
-
 75
75
-
 76
76
-
 77
77
-
 78
78
-
 79
79
-
 80
80
-
 81
81
-
 82
82
-
 83
83
-
 84
84
-
 85
85
-
 86
86
-
 87
87
-
 88
88
-
 89
89
-
 90
90
-
 91
91
-
 92
92
-
 93
93
-
 94
94
-
 95
95
-
 96
96
-
 97
97
-
 98
98
-
 99
99
-
 100
100
-
 101
101
-
 102
102
-
 103
103
-
 104
104
-
 105
105
-
 106
106
-
 107
107
-
 108
108
-
 109
109
-
 110
110
-
 111
111
-
 112
112
-
 113
113
-
 114
114
-
 115
115
-
 116
116
-
 117
117
-
 118
118
-
 119
119
-
 120
120
-
 121
121
-
 122
122
-
 123
123
-
 124
124
-
 125
125
-
 126
126
-
 127
127
-
 128
128
-
 129
129
-
 130
130
-
 131
131
-
 132
132
-
 133
133
-
 134
134
-
 135
135
-
 136
136
-
 137
137
-
 138
138
-
 139
139
-
 140
140
-
 141
141
-
 142
142
-
 143
143
-
 144
144
-
 145
145
-
 146
146
-
 147
147
-
 148
148
-
 149
149
-
 150
150
-
 151
151
-
 152
152
-
 153
153
-
 154
154
-
 155
155
-
 156
156
-
 157
157
-
 158
158
-
 159
159
-
 160
160
-
 161
161
-
 162
162
-
 163
163
-
 164
164
-
 165
165
-
 166
166
-
 167
167
-
 168
168
-
 169
169
-
 170
170
-
 171
171
-
 172
172
-
 173
173
-
 174
174
-
 175
175
-
 176
176
-
 177
177
-
 178
178
-
 179
179
-
 180
180
-
 181
181
-
 182
182
-
 183
183
-
 184
184
-
 185
185
-
 186
186
-
 187
187
-
 188
188
-
 189
189
-
 190
190
-
 191
191
-
 192
192
-
 193
193
-
 194
194
-
 195
195
-
 196
196
-
 197
197
-
 198
198
-
 199
199
-
 200
200
-
 201
201
-
 202
202
-
 203
203
-
 204
204
-
 205
205
-
 206
206
-
 207
207
-
 208
208
-
 209
209
-
 210
210
-
 211
211
-
 212
212


Lenco MC-250BK Bedienungsanleitung
- Kategorie
- Radios
- Typ
- Bedienungsanleitung
in anderen Sprachen
- English: Lenco MC-250BK Owner's manual
- français: Lenco MC-250BK Le manuel du propriétaire
- español: Lenco MC-250BK El manual del propietario
- Nederlands: Lenco MC-250BK de handleiding
Verwandte Artikel
-
Lenco DIR-260BK Bedienungsanleitung
-
Lenco DAR-040 Bedienungsanleitung
-
-
-
Lenco DAR-051 Benutzerhandbuch
-
-
-
-
-
Lenco PDR-015BK Bedienungsanleitung
Andere Dokumente
-
Tangent ALIO BAZE MONO CD/DAB+/FM/BT Walnut Benutzerhandbuch
-
-
 NEW ONE R250 Bedienungsanleitung
-
Sharp DR-450(BK) Bedienungsanleitung
-
audizio Brescia Internet Receiver Bedienungsanleitung
-
 Power Dynamics PDC40 Bedienungsanleitung
-
Schwaiger DAB 650 Benutzerhandbuch
-
-
Albrecht DR 890 CD, DAB+/UKW/Internet/CD, Walnuss Bedienungsanleitung
-
 RuarkAudio R7 Benutzerhandbuch


