audizio Brescia Internet Receiver Bedienungsanleitung
- Kategorie
- Radios
- Typ
- Bedienungsanleitung
Dieses Handbuch ist auch geeignet für

Ref. nr.: 102.270 / 102.272
INSTRUCTION MANUAL
GEBRUIKSAANWIJZING
BEDIENUNGSANLEITUNG
MANUAL DE INSTRUCCIONES
MANUEL D'INSTRUCTIONS
V1.2

2

3
INDEX
ENGLISH ................................................................................................................................................................................. 5
UNPACKING INSTRUCTION .................................................................................................................................................................................... 6
POWERSUPPLY ........................................................................................................................................................................................................ 6
CONTROLS ................................................................................................................................................................................................................ 6
REMOTE CONTROL .................................................................................................................................................................................................. 7
BEFORE YOU START ................................................................................................................................................................................................ 7
GETTING STARTED................................................................................................................................................................................................... 7
MODE SELECTION ................................................................................................................................................................................................... 7
AUDIO PLAYBACK .................................................................................................................................................................................................... 7
MENU NAVIGATION ................................................................................................................................................................................................. 7
PRESETS ..................................................................................................................................................................................................................... 7
SETTINGS ................................................................................................................................................................................................................... 8
INTERNET RADIO ..................................................................................................................................................................................................... 9
PODCASTS ............................................................................................................................................................................................................. 10
DAB RADIO............................................................................................................................................................................................................. 10
FM RADIO ............................................................................................................................................................................................................... 11
CD ............................................................................................................................................................................................................................ 12
USB .......................................................................................................................................................................................................................... 12
AUXILIARY .............................................................................................................................................................................................................. 12
BT STREAMING AUDIO......................................................................................................................................................................................... 12
OPTICAL (TOSLINK) .............................................................................................................................................................................................. 13
COAXIAL ................................................................................................................................................................................................................. 13
ALARM & SLEEP TIMER ........................................................................................................................................................................................ 13
SPOTIFY CONNECT ............................................................................................................................................................................................... 13
NEDERLANDS ........................................................................................................................................................................ 14
UITPAKKEN ............................................................................................................................................................................................................ 15
AANSLUITSPANNING ........................................................................................................................................................................................... 15
BEDIENING ............................................................................................................................................................................................................. 15
AFSTANDSBEDIENING ......................................................................................................................................................................................... 16
VOORDAT JE BEGINT ........................................................................................................................................................................................... 16
AAN DE SLAG ......................................................................................................................................................................................................... 16
MODUS SELECTIE ................................................................................................................................................................................................. 16
AUDIO AFSPELEN ................................................................................................................................................................................................. 16
MENUNAVIGATIE .................................................................................................................................................................................................. 16
PRESETS .................................................................................................................................................................................................................. 17
INSTELLINGEN ....................................................................................................................................................................................................... 17
INTERNET RADIO .................................................................................................................................................................................................. 19
PODCASTS ............................................................................................................................................................................................................. 19
DAB RADIO............................................................................................................................................................................................................. 20
FM RADIO ............................................................................................................................................................................................................... 20
CD ............................................................................................................................................................................................................................ 21
USB .......................................................................................................................................................................................................................... 21
AUXILIARY .............................................................................................................................................................................................................. 22
BT STREAMING AUDIO......................................................................................................................................................................................... 22
OPTICAL (TOSLINK) .............................................................................................................................................................................................. 22
COAXIAL ................................................................................................................................................................................................................. 22
ALARM & SLAAPTIMER ........................................................................................................................................................................................ 22
SPOTIFY CONNECT ............................................................................................................................................................................................... 23
DEUTSCH .............................................................................................................................................................................. 24
AUSPACKEN ........................................................................................................................................................................................................... 25
NETZANSCHLUSS ................................................................................................................................................................................................. 25
BEDIENUNG ........................................................................................................................................................................................................... 25
FERNBEDIENUNG .................................................................................................................................................................................................. 26
BEVOR SIE BEGINNEN .......................................................................................................................................................................................... 26
ERSTE SCHRITTE ................................................................................................................................................................................................... 26
MODUSAUSWAHL ................................................................................................................................................................................................ 26
AUDIO ABSPIELEN ................................................................................................................................................................................................ 26
MENUNAVIGATION............................................................................................................................................................................................... 26
PRESETS .................................................................................................................................................................................................................. 27
EINSTELLUNGEN ................................................................................................................................................................................................... 27
INTERNET RADIO .................................................................................................................................................................................................. 29
PODCASTS ............................................................................................................................................................................................................. 29
DAB RADIO............................................................................................................................................................................................................. 30
FM RADIO ............................................................................................................................................................................................................... 31
CD ............................................................................................................................................................................................................................ 31
USB .......................................................................................................................................................................................................................... 32
AUXILIARY .............................................................................................................................................................................................................. 32

4
BT STREAMING AUDIO......................................................................................................................................................................................... 32
OPTICAL (TOSLINK) .............................................................................................................................................................................................. 32
COAXIAL ................................................................................................................................................................................................................. 32
WECKER & SLEEP-TIMER .................................................................................................................................................................................... 33
SPOTIFY CONNECT ............................................................................................................................................................................................... 33
ESPAÑOL .............................................................................................................................................................................. 34
INSTRUCCIONES DE DESEMBALAJE ................................................................................................................................................................. 35
FUENTE DE ALIMENTACIÓN................................................................................................................................................................................ 35
CONTROLES ........................................................................................................................................................................................................... 35
CONTROL REMOTO .............................................................................................................................................................................................. 36
ANTES DE EMPEZAR ............................................................................................................................................................................................. 36
CÓMO EMPEZAR ................................................................................................................................................................................................... 36
SELECCIÓN DE MODO ......................................................................................................................................................................................... 36
REPRODUCCIÓN DE AUDIO................................................................................................................................................................................ 36
NAVEGACIÓN DEL MENÚ .................................................................................................................................................................................... 36
PRESETS .................................................................................................................................................................................................................. 36
CONFIGURACIÓN .................................................................................................................................................................................................. 37
RADIO INTERNET .................................................................................................................................................................................................. 38
PODCASTS ............................................................................................................................................................................................................. 39
RADIO DAB............................................................................................................................................................................................................. 39
RADIO FM ............................................................................................................................................................................................................... 40
CD ............................................................................................................................................................................................................................ 41
USB .......................................................................................................................................................................................................................... 41
AUXILIARY .............................................................................................................................................................................................................. 42
BT STREAMING AUDIO......................................................................................................................................................................................... 42
OPTICAL (TOSLINK) .............................................................................................................................................................................................. 42
COAXIAL ................................................................................................................................................................................................................. 42
ALARM & SLEEP TIMER ........................................................................................................................................................................................ 42
SPOTIFY CONNECT ............................................................................................................................................................................................... 43
FRANÇAIS ............................................................................................................................................................................. 44
DEBALLAGE ............................................................................................................................................................................................................ 45
ALIMENTATION ..................................................................................................................................................................................................... 45
OPÉRATION ............................................................................................................................................................................................................ 45
TÉLÉCOMMANDE .................................................................................................................................................................................................. 46
AVANT DE COMMENCER ..................................................................................................................................................................................... 46
COMMENCER ......................................................................................................................................................................................................... 46
SÉLECTION DU MODE .......................................................................................................................................................................................... 46
LECTURE AUDIO .................................................................................................................................................................................................... 46
NAVIGATION DE MENU ....................................................................................................................................................................................... 46
PRESETS .................................................................................................................................................................................................................. 47
PARAMÈTRES ......................................................................................................................................................................................................... 47
RADIO INTERNET .................................................................................................................................................................................................. 49
PODCASTS ............................................................................................................................................................................................................. 49
DAB RADIO............................................................................................................................................................................................................. 50
FM RADIO ............................................................................................................................................................................................................... 50
CD ............................................................................................................................................................................................................................ 51
USB .......................................................................................................................................................................................................................... 51
AUXILIARY .............................................................................................................................................................................................................. 52
BT STREAMING AUDIO......................................................................................................................................................................................... 52
OPTICAL (TOSLINK) .............................................................................................................................................................................................. 52
COAXIAL ................................................................................................................................................................................................................. 52
ALARM & SLEEP TIMER ........................................................................................................................................................................................ 52
SPOTIFY CONNECT ............................................................................................................................................................................................... 53
TECHNICAL SPECIFICATION / TECHNISCHE SPECIFICATIE / TECHNISCHE DATEN / SPECIFICACIONES TÉCNICAS / SPÉCIFICATIONS
TECHNIQUES......................................................................................................................................................................... 54

5
Congratulations to the purchase of this Audizio product. Please read this manual thoroughly prior to using the unit in order to
benefit fully from all features.
Read the manual prior to using the unit. Follow the instructions in order not to invalidate the warranty. Take all precautions to
avoid fire and/or electrical shock. Repairs must only be carried out by a qualified technician in order to avoid electrical shock.
Keep the manual for future reference.
- Prior to using the unit, please ask advice from a
specialist. When the unit is switched on for the first
time, some smell may occur. This is normal and will
disappear after a while.
- The unit contains voltage carrying parts. Therefore, do
NOT open the housing.
- Do not place metal objects or pour liquids into the unit
This may cause electrical shock and malfunction.
- Do not place the unit near heat sources such as
radiators, etc. Do not place the unit on a vibrating
surface. Do not cover the ventilation holes.
- The unit is not suitable for continuous use.
- Be careful with the mains lead and do not damage it. A
faulty or damaged mains lead can cause electrical shock
and malfunction.
- When unplugging the unit from a mains outlet, always
pull the plug, never the lead.
- Do not plug or unplug the unit with wet hands.
- If the plug and/or the mains lead are damaged, they
need to be replaced by a qualified technician.
- If the unit is damaged to such an extent that internal
parts are visible, do NOT plug the unit into a mains
outlet and DO NOT switch the unit on. Contact your
dealer. Do NOT connect the unit to a rheostat or
dimmer.
- To avoid fire and shock hazard, do not expose the unit
to rain and moisture.
- All repairs should be carried out by a qualified
technician only.
- Connect the unit to an earthed mains outlet (220-
240Vac/50Hz) protected by a 10-16A fuse.
- During a thunderstorm or if the unit will not be used for
a longer period of time, unplug it from the mains. The
rule is: Unplug it from the mains when not in use.
- If the unit has not been used for a longer period of time,
condensation may occur. Let the unit reach room
temperature before you switch it on. Never use the unit
in humid rooms or outdoors.
- To prevent accidents in companies, you must follow the
applicable guidelines and follow the instructions.
- Do not repeatedly switch the fixture on and off. This
shortens the lifetime.
- Keep the unit out of the reach of children. Do not leave
the unit unattended.
- Do not use cleaning sprays to clean switches. The
residues of these sprays cause deposits of dust and
grease. In case of malfunction, always seek advice from
a specialist.
- Do not force the controls.
- This unit is with speaker inside which can cause
magnetic field. Keep this unit at least 60cm away from
computer or TV.
- If this product has a built-in lead-acid rechargeable
battery. Please recharge the battery every 3 months if
you are not going to use the product for a long period of
time. Otherwise the battery may be permanently
damaged.
- If the battery is damaged, please replace with same
specifications battery. And dispose the damaged
battery environment friendly.
- If the unit has fallen, always have it checked by a
qualified technician before you switch the unit on
again.
- Do not use chemicals to clean the unit. They damage
the varnish. Only clean the unit with a dry cloth.
- Keep away from electronic equipment that may cause
interference.
- Only use original spares for repairs, otherwise serious
damage and/or dangerous radiation may occur.
- Switch the unit off prior to unplugging it from the mains
and/or other equipment. Unplug all leads and cables
prior to moving the unit.
- Make sure that the mains lead cannot be damaged when
people walk on it. Check the mains lead before every
use for damages and faults!
- The mains voltage is 220-240Vac/50Hz. Check if power
outlet match. If you travel, make sure that the mains
voltage of the country is suitable for this unit.
- Keep the original packing material so that you can
transport the unit in safe conditions.
This mark attracts the attention of the user to high voltages that are present inside the housing and that are of
sufficient magnitude to cause a shock hazard.
This mark attracts the attention of the user to important instructions that are contained in the manual and that he
should read and adhere to.
The unit has been certified CE. It is prohibited to make any changes to the unit. They would invalidate the CE certificate and
their guarantee!
NOTE: To make sure that the unit will function normally, it must be used in rooms with a temperature between 5°C/41°F and
35°C/95°F.
Electric products must not be put into household waste. Please bring them to a recycling centre. Ask your local authorities or your
dealer about the way to proceed. The specifications are typical. The actual values can slightly change from one unit to the other.
Specifications can be changed without prior notice.
Do not attempt to make any repairs yourself. This would invalid your warranty. Do not make any changes to the unit. This would also invalid
your warranty. The warranty is not applicable in case of accidents or damages caused by inappropriate use or disrespect of the warnings
contained in this manual. Audizio cannot be held responsible for personal injuries caused by a disrespect of the safety recommendations and
warnings. This is also applicable to all damages in whatever form.

6
CAUTION! Immediately upon receiving the product, carefully unpack the carton, check the contents to ensure that all parts
are present, and have been received in good condition. Notify the shipper immediately and retain packing material for
inspection if any parts appear damage from shipping or the package itself shows signs of mishandling. Save the package and
all packing materials. In the event that the product must be returned to the factory, it is important that the product be
returned in the original factory box and packing. If the device has been exposed to drastic temperature fluctuation (e.g. after
transportation), do not switch it on immediately. The arising condensation water might damage your device. Leave the device
switched off until it has reached room temperature.
On the label on the backside of the product is indicated on this type of power supply must be connected. Check that the
mains voltage corresponds to this, all other voltages than specified, the light effect can be irreparably damaged. The product
must also be directly connected to the mains and may be used. No dimmer or adjustable power supply.
Always connect the device to a protected circuit (circuit breaker or fuse). Make sure the device has an appropriate
electrical ground to avoid the risk of electrocution or fire.
1. Volume control/◼
Rotate to adjust the volume level. Press to stop CD playback
2. Navigation/OK
Rotate to navigate the menus. Press to confirm (OK)
3. Back
Press to go to previous menu level
4. Headphone jack 3.5 mm
5. USB port (for playback only)
6. Favorite
Press and hold until the display shows the Save to Preset screen to store the current station as a preset. Press briefly to
select one of the listed preset stations
7. Display
8. Eject
Press to eject the CD disk
9. Next
Press to change to the next station on the list/next track on media sources
10. Play/pause
Press to play/pause playback
11. Previous
Press to change to the previous station on the list/previous track on media sources
12. Menu/info
Press to enter the menu or to cycle through different sets of information while playing a channel
13. Mode
Press to change modes
14. Standby
Press to change between “on” and “standby” mode
15. On/off
Switch to power on/off the device
16. WIFI antenna
17. Speaker output connectors
18. Pre out & AUX IN RCA connectors
19. Optical input (Toslink)
20. Coaxial input
21. DAB/FM antenna

7
: Press to toggle between Standby and Operation
: Press to eject the CD disk
EQ: Equalizer
Dimmer: Access the Dimmer menu to adjust the brightness of the display
Sleep: Sleep timer
Prog: Program
: Previous station on the list/previous track on media sources
◼: Press to stop playback
: Next station on the list/next track on media sources
Info: Cycle through different sets of information while playing a channel
Mode: Switch between radio modes
Menu/back: Press to go to menu or go back
▲: Cursor up
◄: Cursor left
►: Cursor right
▼: Cursor down
OK / Play/pause: Press to confirm, or play/pause playback
Vol-: Volume down
Vol+: Volume up
0-9: Input index numbers / input characters for WiFi password
FAV: Preset the current playing station to favorites
: Mute
Please ensure the following is ready: You have a broadband internet connection. A wireless broadband router is connected to
the internet successfully. The radio supports Wireless B, G and N connection (Wireless N router can also be used with the
setting on B or G). You know the Wired Equivalent Privacy (WEP) or Wi-Fi Protected Access (WPA) data encryption
code/password. You need to key in the correct code when the radio is connected to the wireless router for network
connection. If you do not know the code/password, please contact the person/technician who set up the router/network for
you. The radio can work via Wireless network connection (Wi-Fi connection).
• Remove internet radio from the package box.
• Plug in the power lead and switch the Power on/off switch (on the rear cabinet) to ON.
Note: Before starting, please make sure that the voltage mentioned on the power supply is corresponds to the voltage used in
your local area. Only use the supplied mains VDE plug to connect the device to a household mains socket.
When it is the first time booting up the device, the setup wizard is launched automatically.
From the Main Menu, select a mode and press [OK]. Alternatively, use the navigation knob to switch to different modes. After
just a moment, the radio switches to that mode. The last used station or track previously used in that mode is selected. If this
is not possible, radio scans for relevant stations, networks, or prompts the user for input.
The common controls for audio playback are identical across all playback modes:
Turn the volume rotary control to increase or decrease the volume level. The general track controls are [PLAY/PAUSE] to start
and pause tracks and the [NEXT] and [PREVIOUS] buttons to skip to the next or previous track in the current playlist.
The main control for moving through menus and options is the navigation knob. Rotate the knob to move up or down a menu.
Once the required option or value is highlighted press the knob to confirm and enter the highlighted sub-menu. All menus
and lists act as loops, meaning that turning the control to go beyond the first or last entry in a menu or list takes you to the
opposite end of the menu or list. To enter the menu tree in a particular mode press and hold [MENU]. To move back a menu
level press [BACK]. Each mode has a unique menu structure, with options specific to that mode. For example, the FM mode
menu has two mode specific options: Scan setting and Audio setting.
The System setting menu presents system setting functions to allow the user to setup how the unit functions. This includes
network, time, language, and software parameters.
In DAB-, FM- and Internet radio mode, up to 40 preset stations can be stored and recalled. To store the current station as a
preset, press and hold [FAV] until the display shows the Save to Preset screen. Select one of the 40 preset numbers to save
the currently playing station and press [OK] to confirm. To select a preset, press [FAV], then select one of the listed preset
stations. When a preset station is playing, its preset store number + Star icon are shown in the bottom of the screen.

8
All the settings parameters for radio are available on the System settings menu.
Equaliser
Several predefined EQ settings are available, including a custom, user-defined setting. To choose an EQ setting, select Menu >
System settings > Equaliser. You can then choose from a variety of predefined settings and My EQ. The last option ‘My EQ
profile setup’ allows you to define your own settings for the ‘My EQ’ option, with custom bass and treble settings.
Network
Network wizard
This guides you through the necessary steps to join a network. This is also automatically run as part of the Setup
wizard. The screens and options presented will depend on the type of network and network protection used.
Selecting a network
When the Network wizard is chosen, the device automatically scans for available wireless networks and presents a
list of SSID’s (Service Set Identifier) for the networks. The device remembers login details for the last four wireless
networks it has connected to and will automatically connect to them when they are available. If connection to a
network is temporarily lost, the device will automatically reconnect.
Open network
If the network is open (non-encrypted), the device connects, and no further input is required.
Standard encrypted network
If the wireless network is protected the next screen presents options to enter the network key or
password/phrase.
On completion
The device connects to the selected network. If connecting fails, the device returns to a previous screen to
try again. To exit the process, use the [BACK/MENU] button. If the network connection is lost, the device
reconnects automatically.
PBC Wlan setup (Wi-Fi Protected Setup)
The device prompts you to press the connect button on the router and then press the select control. For more
information on setting up a PBC Wlan encrypted network, please refer to your PBC Wlan router’s instructions.
View settings
Displays the settings details for the current network setup, including:
Active connections
MAC address
Wlan region
DHCP
SSID
IP Address
Subnet mask
Gateway address
Primary DNS
Secondary DNS
Manual settings
Choose to enable/disable DHCP.
NetRemote PIN setup
Allows you to setup a PIN number to be entered before being able to connect to the device remotely over a network.
Network profile
This displays a list of the networks remembered by radio (up to a maximum of 4). You can see the list of registered
networks through Menu > System settings > Network > Network profile>. Here, you can delete unwanted networks
by selecting them and pressing [OK], confirm deleting by selecting Yes.
Clear network settings
This option allows for clearing current network settings, allowing you to join an alternative network more easily.
Keep network connected
Choose to keep network connected or not.
Time/Date
Set Time/Date
The date and time are displayed as dd-mm-yyyy with the first value (dd) flashing. Adjust each value with the
navigation knob. As each value is set, press the navigation knob to confirm the value. The next value will flash, ready
for adjustment.

9
Auto-update (from DAB, FM or Network)
Auto-update works with data sent over DAB, FM or the Internet. DAB and FM use time signal broadcast with radio
transmissions. Network uses a time signal sent from the internet radio portal when in any network-connected mode.
1. Select “Update from DAB”, “Update from FM”, “Update from Network” or “No update”.
2. When updating from the network: set your time zone.
3. If your country uses daylight saving time (DST), the automatically updated time from the network may be wrong.
When daylight saving adjustments is in effect, such as British Summer Time (BST), turn on the Daylight savings
option to compensate.
Note: if you are updating the time from DAB or FM, the daylight savings option has no effect on the displayed time.
The device will auto-update from the selected source if time information is available.
Set format
Allows you to change between 12 and 24 hour display.
Language
The default language is English. To change, navigate to Menu > System settings > Languages > to select your
preferred language.
Factory reset
Reset all user settings to default values. Time/date, network configuration and presets are lost. However, the radio’s current
software version is maintained. To perform a factory reset, select Menu > System settings > Factory reset. Confirm by
selecting Proceed > Yes.
Software update
From time to time, software updates with bug fixes and/or additional features become available. You can either check
manually or set the device to check periodically automatically (this is default setting). If the device detects that newer
software is available, it asks if you want to proceed with updating. If so, the new software is then downloaded and installed.
After a software update, all user settings are maintained.
CAUTION: Before starting a software update, ensure that radio is plugged into a stable mains power connection.
Disconnecting power during software update may permanently damage the unit.
Setup wizard
This allows you to run the Setup wizard at any time.
Info
Shows details of the current system including software version number, Radio ID and the name by which the radio is
identified on a network.
Privacy Policy
Displays a privacy notice guiding you to our website for full details of the Frontier Smart Technologies Privacy policy.
Backlight
The display can be set to dim when in Standby mode or after a timeout period. This option allows you to set the timeout
period and the brightness settings before (On/Bright level) and after (Dim level) the customized time period.
For the On level, High, Medium and Low are available.
For the Dim level, High, Medium, Low and Off are available.
Line output setup
For Line output, choose to allow line output or not.
For Local speaker, choose to turn on the sound output or not.
This device can play thousands of radio stations from around the world via a broadband internet connection. Once a station
has been selected, the device connects directly to that station.
To enter Internet Radio mode, either press [MODE] and rotate the navigation knob to cycle through the modes until Internet
Radio is displayed, or select Mode > Internet Radio.
Note: The station list menu is provided from the Internet radio portal, so it is only accessible when radio is connected to the
Internet. Station lists and submenus can change from time to time.
LOCAL
Sub-menu to search for stations using a variety of categories, for example: local stations, BBC stations, genres or stations
from a specific city. Choose the required category and either a further list of sub-categories is shown, or (if there is no further
sub-category) the available stations for the chosen category are listed.
LAST LISTENED
When the internet radio mode (re)starts, the last-listened station is selected. To select another recently used station, select
Last listened, then select the station on the last listened list. Most recent stations appear at the top of the list.

10
SEARCH
You can also search for stations with particular keywords in their title. To search, select Menu > Station list > Search and
enter a keyword. Select a broadcast from the list.
LOCATION
To select an internet broadcast from a particular location, select Menu > Station list > Location >. Select a continent from the
menu and a list of countries available is presented, select a country and the available internet radio stations are presented.
Choose a radio station from the list to tune to that station.
POPULAR
Presents a list of the most popular internet stations from around the world.
DISCOVER
Allows you to select from a list of stations defined by either their origin (country), genre or language. Navigate through the
category options. Once you have made your selection a screen confirms your selected category and the number of stations
within that category. To see the list, select the option showing the number of available stations.
NOW PLAYING INFORMATION
While the stream is playing, the display shows its name and description. If any artist and/or track information is available, this
is also displayed. To view further information, press [INFO]. Each time you press, another set of information is displayed,
cycling through the following details:
Slogan (default; where available)
Language/Location
Codec and sampling rate
Playback buffer
Date info
This device can play thousands of podcasts from around the world via a broadband internet connection. Once a podcast has
been selected, the device connects directly to that station.
To enter Podcast mode, either press [MODE] and rotate the navigation knob to cycle through the modes until Podcasts is
displayed, or select Mode > Podcasts.
Note: The podcast menu is provided from the Podcast portal, so it is only accessible when radio is connected to the Internet.
Podcast lists and submenus can change from time to time.
LOCAL
Presents a sub-menu to search for podcasts using a variety of categories, for example, comedy of the week, authors, popular,
etc. Choose the required category and either a further list of sub-categories is shown, or (if there is no further sub-category)
the available podcasts for the chosen category are listed.
SEARCH
You can also search for podcasts with particular keywords in their title. To search, select Menu > Podcast list > Search and
enter a keyword. Select a broadcast from the list.
LOCATION
To select a Podcast from a particular location, select Menu > Podcast list > Location >. Select a continent from the menu and a
list of countries available is presented, select a country and the available podcasts are presented. Choose a podcast from the
list to tune to that podcast.
DISCOVER
Allows you to select from a list of podcasts defined by either their origin (country), genre or language. Navigate through the
category options. Once you have made your selection a screen confirms your selected category and the number of podcasts
within that category. To see the list, select the option showing the number of available podcasts.
To enter DAB mode, either press [MODE] and rotate the navigation knob to cycle through the listening modes until DAB Radio
is displayed, or select Menu > Main menu > DAB.
STATION LIST
The first time you select DAB radio mode (or if the station list is empty), the device automatically initiates a full scan to see
what stations are available.
A station marked with a question mark indicates that this station is currently unavailable. Depending on the cause of the loss
of signal this may be only temporary. Stations that unlikely to be available again can be removed from the station list.
Scan for stations
To start a scan manually, select Menu > Scan. Once the scan is complete, the radio shows a list of available stations.
The manual tune menu option allows the user to select a particular channel and display the signal strength of that
channel.

11
Remove stations from list
To remove stations that a listed but unavailable, select Menu > Prune invalid.
Selecting stations
To listen to- or change a station, select Menu > Station List and press [OK]. Select the station you want to listen to by
scrolling the navigation control. Stations marked with a ‘?’ are not available. Once selected, the station starts playing
and the screen shows information about the station, track or show broadcast by the station. Alternatively, pressing
either the left and right keys, it jumps to the next station up or down in the station list.
‘NOW PLAYING’ INFORMATION
While the stream is playing, the screen shows its name and DLS (Dynamic Label Segment) information, giving real-time
information such as program name, track title and other details. Stereo broadcasts are indicated with an icon at the top of the
screen. To view further information, press [INFO]. Each time you press, another set of information is displayed.
SLIDESHOW
When slideshow is available (dependent on the broadcasted signal), the images are displayed on the left side of the screen.
To cycle through the different display options (thumbnail, slide with DLS text and full screen slide) press the knob control.
SETTINGS
Dynamic Range Compression (DRC)
Some DAB broadcasts offer Dynamic Range Compression (DRC). This feature allows radios to compress the dynamic
range of the output audio stream, so that the volume of quiet sounds is increased, and the volume of loud sounds is
reduced. This can be useful if you are listening to music with a high dynamic range in a noisy environment (for
example, classical music while centering). To change the DRC setting for this device, select Menu > DRC, and then
choose between DRC high, DRC low or DRC off.
Note: The DRC setting does not have any effect if DRC data is not included in the broadcast.
Station order
You can choose the order of the DAB station list to be either Alphanumeric or Ensemble. Ensemble lists groups of
stations that are broadcasted together on the same ensemble. Valid lists valid stations first, alphanumerically, then
off-air stations. To change station order, select Menu > Station order >, then Alphanumeric or Ensemble.
To enter FM Radio mode, either press [MODE] and rotate the navigation knob until FM Radio is displayed, or select Menu >
Main menu > FM.
Manual search
To search manually, press the navigation knob and then rotate knob clockwise to scan “upwards” or counter-
clockwise to scan “downwards”.
Auto search
To initiate the auto search procedure, press and hold the navigation knob. The radio starts to scan the entire
frequency band. It will stop automatically when a strong enough station has been found.
SELECTING STATIONS
To find a station, press [OK]. The display shows a running frequency graphic while the device scans the FM band.
Alternatively, you can scan up or down by pressing and holding [PREVIOUS] or [NEXT] buttons or tune manually with short
presses.
Note: Scanning can be set to search for strong signals only.
‘NOW PLAYING’ INFORMATION
While a FM station is playing, the display shows one of the two following sets data:
• If RDS information is available, the service name (i.e. station name) is displayed by default. You can cycle through
further RDS information by pressing [INFO]. Each time you press [INFO], another set of information is displayed.
• If no RDS information is available, the current frequency is shown.
SETTINGS
Scan settings
By default, FM scans stop at any available station. This may result in a poor signal from weak stations. To only stop at
strong stations with good signal strength, select Menu > Scan setting > Strong stations only? > Yes.
Audio settings
By default, all stereo stations are reproduced in stereo automatically. For weak stations, this may result in a poor
signal. To play weak stations in mono, select Menu > Audio setting > FM weak reception: Listen in mono only > Yes.

12
To enter CD mode, either press [MODE] and rotate the navigation knob until CD is displayed, or select Menu > Main menu >
CD. The display will show “Loading…” followed by “Reading “,“No Disc”. Insert your CD, the drive will take in the CD
automatically. The first track on the CD will now start playback, the play time will be displayed.
If the song is ID3-format, Press the [INFO] button on the remote control repeatedly or press the [OK] button on the device.
Additional info (date, file, folder, album, artist, title) will be displayed.
CD functions
To skip between tracks, use the [PREVIOUS] or [NEXT] buttons on the radio or the remote. Press [PAUSE/PLAY] using
the button on the device or remote control to play or pause.
To rewind/fast forward within the current track, press and hold the [PREVIOUS] or [NEXT] buttons on the remote
control and release when you wish to resume playback.
To eject the CD, press [EJECT] on the device or remote control.
Arrange a CD song program
It’s possible to program the device to play CD tracks in a particular order. When playing a CD, press [STOP].
Simply follow up by pressing [PROGRAM] on the remote control to initiate programming mode. The star icon is
displayed.
Once in program settings, the display will show “T001” to display the first track on the CD as P01. You can now
choose what track you would like as program number P01 by using the [<<] and [>>] buttons to scroll through to the
track you would like to select. Once on the selected track for P01, press [PROGRAM]. The device will proceed to
allow you to select your next programmable track. For the next track, the display will show T002. Now use the [<<]
and [>>] buttons to again scroll through to the track you would like to select now. Once on the selected track for P02,
press [PROGRAM]. The device will proceed to allow you to select your next programmable track.
After you have finished programming your track selection, press [PAUSE/PLAY] to play the songs which have been
programmed. When the program mode is activated, press [STOP] to exit the program playback mode and return to
regular CD playing.
USB mode plays audio from an external source such as an MP3 player.
To enter USB mode, either press [MODE] and rotate the navigation knob until USB is displayed, or select Menu > Main menu >
USB.
USB functions
To skip between tracks, use the [PREVIOUS] or [NEXT] buttons on the radio or the remote. Press [PAUSE/PLAY] using
the button on the device or remote control to play or pause.
To rewind/fast forward within the current track, press and hold the [PREVIOUS] or [NEXT] buttons on the remote
control and release when you wish to resume playback.
Arrange a USB song program
It’s possible to program the device to play USB tracks in a particular order. When playing via USB, press [STOP].
Simply follow up by pressing [PROGRAM] on the remote control to initiate programming mode. The star icon is
displayed.
Once in program settings, the display will show “T001” to display the first track on USB as P01. You can now choose
what track you would like as program number P01 by using the [<<] and [>>] buttons to scroll through to the track
you would like to select. Once on the selected track for P01, press [PROGRAM]. The device will proceed to allow you
to select your next programmable track. For the next track, the display will show T002. Now use the [<<] and [>>]
buttons to again scroll through to the track you would like to select now. Once on the selected track for P02, press
[PROGRAM]. The device will proceed to allow you to select your next programmable track.
After you have finished programming your track selection, press [PAUSE/PLAY] to play the songs which have been
programmed.
AUX IN mode plays audio from an external source such as MP3 players.
To avoid sudden loud volume, turn the volume down on both this device and, if adjustable, the source device.
Connect the external audio source to the AUX IN L and R connectors.
To enter AUX IN mode, either press [MODE] and rotate the navigation knob until “Aux in” is displayed, or select Menu > Main
menu > Aux in.
Adjust the volume of this device (and, if necessary, the audio source device) as required.
BT streaming audio mode allows BT capable devices to pair with this device to stream music. To enter BT streaming audio
mode, either press [MODE] and rotate the knob until BT Audio is displayed, or select Menu > Main menu > BT.

13
To pair a BT device with the radio
Enter Menu > BT, which makes this device discoverable. On your BT capable smart device, make sure your BT is
activated and scan for devices. Select “Audizio Brescia” from the list of available BT devices.
Control from radio
While in BT mode you can pause, play and jump to next/previous tracks using the designated buttons available on
the radio.
Optical mode plays audio from an external source such as MP3 players.
To avoid sudden loud volume, turn the volume down on both this device and, if adjustable, the source device.
Connect the external audio source to the optical connector.
To enter optical mode, either press [MODE] and rotate the navigation knob until “Optical” is displayed or select Menu > Main
menu > Optical.
Adjust the volume of this device (and, if necessary, the audio source device) as required.
Coaxial mode plays audio from an external source such as MP3 players.
To avoid sudden loud volume, turn the volume down on both this device and, if adjustable, the source device.
Connect the external audio source to the coaxial connector.
To enter coaxial mode, either press [MODE] and rotate the navigation knob until “Coaxial” is displayed or select Menu > Main
menu > Coaxial.
Adjust the volume of this device (and, if necessary, the audio source device) as required.
There are two different wake-up alarms with snooze functionality and a sleep timer function to turn the system off after a
custom set period/time. Each alarm can be set to start in a particular playback mode.
SLEEP TIMER
To set the sleep timer, press [SLEEP] on remote control repeatedly to cycle through the sleep time options: OFF, 15 min, 30
min, 45 min, 60 min, 90 min or 120 min. Stop the input when the required time is displayed, after a moment the screen
returns to the screen used before the sleep function was selected. On the now playing screen, the remaining sleep time is
displayed at the bottom of the display. Alternatively select Menu > Main menu > Sleep and choose the desired sleep time
option. Once you have selected a sleep time period, the system returns to the main menu. Press and hold [MENU] to return to
the “now playing” screen. To cancel a selected sleep timer, select Sleep OFF from the sleep options using either of the above
methods.
Note: A sleep timer is automatically cancelled in case this device is put into standby mode.
ALARM
To set or change an alarm, navigate to Menu > Main menu > Alarms. Select the alarm number (1 or 2), then configure the
following parameters:
Enable: Off, Daily, Once, Weekends or Weekdays
Time: 12:00AM (adjust as desired)
Date: (adjust as desired – this option is only visible if ‘Once’ is selected in the “Enable” field).
Mode: Buzz, Internet radio, DAB or FM.
Preset: Last listened or 1-40
Volume: 0- 32
To save these settings and set the alarm, scroll down and select save.
Note: If you press [BACK] or [MENU] to exit the alarm settings without saving, a dialogue screen is displayed asking if you
wish to save the changes. The “now playing” screen shows active alarms with an icon at the bottom left of the display. At the
set time, the alarm will sound. To temporarily silence it, press [OK]. Pressing [OK] repeatedly cycles through the available
snooze periods: 5 min, 10 min, 15 min, and 30 min. The radio returns to standby for the set period, with the silenced alarm
icon flashing and a countdown of the remaining snooze period. After the set snooze time the alarm will sound again. To
change the snooze time during a snooze period, press [OK] to select a new snooze time. Any remaining snooze time is reset
to the selected time period. To cancel a sounding alarm, or an alarm in snooze, press [STANDBY].
Use your phone, tablet or computer as a remote control for Spotify.
Go to spotify.com/connect to learn how.
Licenses
The Spotify Software is subject to third party licenses found here:
http://www.spotify.com/connect/third-party-licenses.

14
Hartelijk dank voor de aanschaf van dit Audizio product. Neemt u a.u.b. een paar momenten de tijd om deze handleiding
zorgvuldig te lezen, aangezien wij graag willen dat u onze producten snel en volledig gebruikt.
Lees deze handleiding eerst door alvorens het product te gebruiken. Volg de instructies op anders zou de garantie wel eens
kunnen vervallen. Neem ook altijd alle veiligheidsmaatregelen om brand en/of een elektrische schok te voorkomen. Tevens
is het ook raadzaam om reparaties / modificaties e.d. over te laten aan gekwalificeerd personeel om een elektrische schok te
voorkomen. Bewaar deze handleiding ook voor toekomstig gebruik.
- Bewaar de verpakking zodat u indien het apparaat defect is,
dit in de originele verpakking kunt opsturen om
beschadigingen te voorkomen.
- Voordat het apparaat in werking wordt gesteld, altijd eerst
een deskundige raadplegen. Bij het voor de eerste keer
inschakelen kan een bepaalde reuk optreden. Dit is normaal
en verdwijnt na een poos.
- In het apparaat bevinden zich onder spanning staande
onderdelen; open daarom NOOIT dit apparaat.
- Plaats geen metalen objecten en mors geen vloeistof in het
effect. Dit kan leiden tot elektrische schokken of defecten.
- Toestel niet opstellen in de buurt van warmtebronnen zoals
radiatoren etc. en niet op een vibrerende onder- grond
plaatsen. Dek ventilatieopeningen nooit af.
- Het apparaat is niet geschikt voor continu gebruik.
- Wees voorzichtig met het netsnoer en beschadig deze niet.
Als het snoer kapot of beschadigd is, kan dit leiden tot
elektrische schokken of defecten.
- Als u de stekker uit het stopcontact neemt, trek dan niet aan
het snoer, maar aan de stekker.
- Om brand of elektrische schok te voorkomen, dient u dit
apparaat niet bloot te stellen aan regen of vocht.
- Verwijder of plaats een stekker nooit met natte handen
resp. uit en in het stopcontact.
- Indien zowel de stekker en/of netsnoer als snoeringang in
het apparaat beschadigd zijn dient dit door een vakman
hersteld te worden.
- Indien het apparaat zo beschadigd is dat inwendige
(onder)delen zichtbaar zijn mag de stekker NOOIT in het
stopcontact worden geplaatst en het apparaat NOOIT
worden ingeschakeld. Neem in dit geval contact op met de
dealer.
- Sluit het apparaat nooit op een dimmer aan.
- Reparatie aan het apparaat dient te geschieden door een
vakman of een deskundige.
- Sluit het apparaat alleen aan op een 220-240VAC / 50Hz
(geaard) stopcontact, verbonden met een 10-16A
meterkastgroep.
- Bij onweer altijd de stekker uit het stopcontact halen, zo ook
wanneer het apparaat voor een langere tijd niet gebruikt
wordt. Stelregel: Bij geen gebruik stekker verwijderen.
- Als u het apparaat lang niet gebruikt heeft en het weer wil
gebruiken kan er condens ontstaan; laat het apparaat eerst
op kamertemperatuur komen alvorens het weer in
werking te stellen.
- Apparaat nooit in vochtige ruimten en buiten gebruiken.
- Om ongevallen in bedrijven te voorkomen moet rekening
worden gehouden met de daarvoor geldende richtlijnen
en moeten de aanwijzingen/waarschuwingen worden
gevolgd.
- Het apparaat buiten bereik van kinderen houden.
Bovendien mag het apparaat nooit onbeheerd gelaten
worden.
- Gebruik geen schoonmaakspray om de schakelaars te
reinigen. Restanten van deze spray zorgen ervoor dat
smeer en stof ophopen. Raadpleeg bij storing te allen
tijde een deskundige.
- Gebruik geen overmatige kracht bij het bedienen van het
apparaat.
- Dit apparaat kan magnetisch veld veroorzaken. Houd dit
apparaat ten minste 60 cm afstand van de computer of tv.
- Indien dit apparaat beschikt over een loodaccu, dient deze
tenminste elke 3 maanden opgeladen te worden indien
deze voor een langere periode niet wordt gebruikt anders
bestaat de kans dat de accu permanent beschadigd.
- Bij een ongeval met dit product altijd eerst een des-
kundige raadplegen alvorens opnieuw te gebruiken.
- Tracht het apparaat niet schoon te maken met chemische
oplossingen. Dit kan de lak beschadigen. Gebruik een
droge doek om schoon te maken.
- Blijf uit de buurt van elektronische apparatuur die
bromstoringen zouden kunnen veroorzaken.
- Bij reparatie dienen altijd originele onderdelen te worden
gebruikt om onherstelbare beschadigingen en/of
ontoelaatbare straling te voorkomen.
- Schakel eerst het toestel uit voordat u het netsnoer
verwijdert. Verwijder netsnoer en aansluitsnoeren
voordat u dit product gaat verplaatsen.
- Zorg ervoor dat het netsnoer niet beschadigd/defect kan
raken wanneer mensen erover heen lopen. Het netsnoer
vóór ieder gebruik controleren op breuken/defecten!
- In Nederland/België is de netspanning 220-240Vac/50Hz.
Indien u reist (en u neemt het apparaat mee) informeer
dan naar de netspanning in het land waar u verblijft.
Deze markering wordt weergegeven om u erop attent te maken dat een levensgevaarlijke spanning in het product
aanwezig is en dat bij aanraking van deze delen een elektrische schok wordt verkregen.
Deze instructiemarkering wordt weergegeven om u erop te wijzen dat de instructie zeer belangrijk is om te lezen
en/of op te volgen.
OPMERKING: Om zeker te zijn van een correcte werking, dient u dit apparaat in een ruimte te gebruiken waar de temperatuur
tussen de 5°C/41°F en 35°C/95°F ligt.
Raadpleeg eventueel www.wecycle.nl en/of www.vrom.nl v.w.b. het afdanken van elektronische apparaten in het kader van de
WEEE-regeling. Vele artikelen kunnen worden gerecycled, gooi ze daarom niet bij het huisvuil maar lever ze in bij een gemeentelijk
depot of uw dealer. Lever ook afgedankte batterijen in bij uw gemeentelijk depot of bij de dealer, zie www.stibat.nl
Alle (defecte) artikelen dienen gedurende de garantieperiode altijd retour te worden gezonden in de originele verpakking. Voer zelf geen reparaties uit aan het
toestel; in élk geval vervalt de totale garantie. Ook mag het toestel niet eigenmachtig worden gemodificeerd, ook in dit geval vervalt de totale garantie. Ook
vervalt de garantie bij ongevallen en beschadigingen in élke vorm t.g.v. onoordeelkundig gebruik en het niet in achtnemen van het gestelde in deze
gebruiksaanwijzing. Tevens aanvaardt Audizio geen enkele aansprakelijkheid in geval van persoonlijke ongelukken als gevolg van het niet naleven van
veiligheidsinstructies en waarschuwingen. Dit geldt ook voor gevolgschade in wélke vorm dan ook.

15
LET OP! Onmiddellijk na ontvangst, zorgvuldig uitpakken van de doos, controleer de inhoud om ervoor te zorgen dat alle
onderdelen aanwezig zijn en zijn in goede staat zijn ontvangen. Bij transportschade of ontbreken van onderdelen
onmiddellijk de verkopende partij inlichten. Bewaar de verpakking en het verpakkingsmateriaal. Indien het product moet
worden teruggestuurd, is het belangrijk dat het product in originele verpakking wordt geretourneerd.
Als het apparaat is blootgesteld aan drastische temperatuurverschillen (bv. na het transport), schakel het apparaat niet
onmiddellijk in. De ontstane condensatie kan het apparaat beschadigen. Zorg ervoor dat het apparaat op kamertemperatuur
komt en steek vervolgens de voeding stekker in het stopcontact/wandcontactdoos.
Op het label aan de achterzijde van het product staat aangegeven op welke netspanning deze moet worden aangesloten.
Controleer of de netspanning hiermee overeenkomt, bij alle andere netspanningen dan aangegeven kan het apparaat
onherstelbaar worden beschadigd. Tevens moet het apparaat direct op de netspanning worden aangesloten en mag géén
dimmer of regelbare voeding worden gebruikt.
Sluit het apparaat altijd aan op een beschermd circuit (aardlekschakelaar of zekering). Zorg ervoor dat het apparaat
voldoende elektrisch is geaard om het risico op elektrocutie of brand te vermijden.
1. Volumeregelaar/◼
Draai aan deze knop om het volume te regelen. Indrukken om de CD weergave te stoppen
2. Navigation/OK
Draaien om door de menu's te navigeren. Indrukken om te bevestigen (OK)
3. Back
Indrukken om naar het vorige menuniveau te gaan
4. Hoofdtelefoonaansluiting 3,5 mm
5. USB-poort (alleen voor weergave)
6. Favoriet
Ingedrukt houden tot het display “Save to Preset” weergeeft om de huidige zender als een voorkeurszender op te slaan.
Drukken om een van de in de lijst opgenomen voorkeuzezenders te selecteren
7. Display
8. Eject
Druk hierop om de CD uit te werpen
9. Volgende
Druk hierop om naar de volgende zender op de lijst/het volgende nummer op mediabronnen te gaan
10. Afspelen/pauzeren
Druk om af te spelen/te pauzeren
11. Vorige
Druk hierop om naar de vorige zender op de lijst/het vorige nummer op mediabronnen te gaan
12. Menu/info
Druk hierop om het menu te openen of om tijdens de weergave van een kanaal door de verschillende informatiereeksen
te bladeren
13. Mode
Drukken om van modus te veranderen
14. Standby
Indrukken om te schakelen tussen "aan" en "standby" modus
15. On/off
Schakelaar om het toestel aan/uit te zetten
16. WIFI antenne
17. Luidspreker uitgangconnectoren
18. Pre out & AUX IN RCA connectoren
19. Optical ingang (Toslink)
20. Coaxial ingang
21. DAB/FM antenne

16
: Indrukken om te schakelen tussen standby en aan
: Druk hierop om de CD uit te werpen
EQ: Equalizer
Dimmer: Ga naar het Dimmer-menu om de helderheid van het scherm aan te passen
Sleep: Slaaptimer
Prog: Programmeren
: Drukken om naar de vorige zender op de lijst/het vorige nummer op mediabronnen te gaan
◼: Druk om de weergave te stoppen
: Drukken om naar de volgende zender op de lijst/het volgende nummer op mediabronnen te gaan
Info: Blader door verschillende informatiereeksen terwijl u een kanaal afspeelt
Mode: Omschakelen tussen radiomodi
Menu/back: Druk om naar het menu te gaan of terug te gaan
▲: Cursor omhoog
◄: Cursor links
►: Cursor rechts
▼: Cursor omlaag
OK / Afspelen/pauzeren: Druk om te bevestigen, of om af te spelen/pauzeren
Vol-: Volume lager
Vol+: Volume hoger
0-9: Invoer index nummers / invoer tekens voor WiFi wachtwoord
FAV: Huidige zender opslaan onder favorieten
: Mute
Zorg ervoor dat het volgende voorhanden is: U hebt een breedband internetverbinding. Een draadloze breedband router is
succesvol verbonden met het internet. De radio ondersteunt Wireless B, G en N verbinding (Wireless N router kan ook
gebruikt worden met de instelling op B of G). Je kent de Wired Equivalent Privacy (WEP) of Wi-Fi Protected Access (WPA)
data-encryptie code/wachtwoord. U moet de juiste code intoetsen wanneer de radio is verbonden met de draadloze router
voor de netwerkverbinding. Als u de code/het wachtwoord niet weet, neem dan contact op met de persoon/technicus die de
router/het netwerk voor u heeft ingesteld.
• Haal de internetradio uit de verpakking.
• Steek de stekker in het stopcontact en zet de aan/uit-schakelaar (achterkant apparaat) op ON.
Opmerking: Controleer voor u begint of de spanning die op de voeding vermeld staat, overeenkomt met de spanning die in
uw woongebied wordt gebruikt. Gebruik uitsluitend de meegeleverde VDE-stekker om het apparaat op een huishoudelijk
stopcontact aan te sluiten.
Als het apparaat voor de eerste keer wordt opgestart, wordt automatisch de setup-wizard gestart.
Selecteer een modus in het hoofdmenu en druk op [OK]. U kunt ook de navigatieknop gebruiken om naar een andere modus
over te schakelen. Na slechts een ogenblik schakelt de radio over naar die modus. De laatst gebruikte zender of track die
eerder in die modus werd gebruikt, wordt geselecteerd. Als dit niet mogelijk is, scant de radio naar relevante zenders of
netwerken, of vraagt de gebruiker om invoer.
De gemeenschappelijke bedieningselementen voor audioweergave zijn identiek voor alle afspeelmodi:
Draai aan de volumedraaiknop om het volumeniveau te verhogen of te verlagen. De algemene trackbedieningsknoppen zijn
[AFSPELEN/PAUZEREN] om tracks te starten en te pauzeren en de knoppen [VOLGENDE] en [VORIGE] om naar de volgende of
vorige track in de huidige afspeellijst te gaan.
De belangrijkste knop om door menu's en opties te bewegen is de navigatieknop. Draai aan de knop om in een menu omhoog
of omlaag te gaan. Zodra de gewenste optie of waarde is gemarkeerd, drukt u op de knop om te bevestigen en naar het
gemarkeerde submenu te gaan. Alle menu's en lijsten werken als lussen, wat betekent dat wanneer u aan de knop draait om
verder te gaan dan het eerste of laatste item in een menu of lijst, u naar het tegenoverliggende einde van het menu of de lijst
gaat. Om de menustructuur in een bepaalde modus te openen, houdt u [MENU] ingedrukt. Om een menuniveau terug te gaan
drukt u op [BACK]. Elke modus heeft een unieke menustructuur, met opties die specifiek zijn voor die modus. Het menu van
de FM-functie heeft bijvoorbeeld twee opties die specifiek zijn voor die functie: Scan instelling en Audio-instelling.
Het menu Systeeminstellingen bevat systeeminstellingsfuncties waarmee de gebruiker kan instellen hoe het toestel
functioneert. Dit omvat netwerk, tijd, taal en softwareparameters.

17
In de DAB-, FM- en Internetradiomodus kunnen maximaal 40 voorkeurszenders worden opgeslagen en opgeroepen. Om de
huidige zender als voorkeurszender op te slaan, houdt u [FAV] ingedrukt tot het display het scherm “Save to Preset”
weergeeft. Kies een van de 40 preset-nummers om de momenteel spelende zender op te slaan en druk op [OK] om te
bevestigen. Om een voorkeurszender te selecteren, drukt u op [FAV] en selecteert u vervolgens een van de voorkeurszenders
in de lijst. Wanneer een voorkeurszender wordt afgespeeld, worden het ster-icoon + preset-nummer onder in het scherm
weergegeven.
Alle instellingsparameters voor de radio zijn beschikbaar in het menu Systeeminstellingen.
Equalizer
Er zijn verschillende voorgedefinieerde EQ-instellingen beschikbaar, waaronder een aangepaste, door de gebruiker
gedefinieerde, instelling. Om een EQ-instelling te kiezen, selecteert u Menu > Systeeminstellingen > Equalizer. U kunt dan
kiezen uit een aantal voorgedefinieerde instellingen en My EQ. Met de laatste optie 'My EQ profile setup' kunt u uw eigen
instellingen voor de optie 'My EQ' definiëren, met aangepaste instellingen voor lage en hoge tonen.
Netwerk
Netwerk wizard
Dit leidt u door de nodige stappen om u bij een netwerk aan te sluiten. Dit wordt ook automatisch uitgevoerd als
onderdeel van de Setup wizard. De schermen en opties die worden weergegeven, zijn afhankelijk van het type
netwerk en de gebruikte netwerkbeveiliging.
Netwerk selecteren
Wanneer u de netwerkwizard kiest, scant het toestel automatisch naar beschikbare draadloze netwerken en
presenteert een lijst met SSID's (Service Set Identifier) voor de netwerken. Het toestel onthoudt inloggegevens voor
de laatste vier draadloze netwerken waarmee het verbinding heeft gemaakt en zal automatisch verbinding maken
met deze netwerken wanneer ze beschikbaar zijn. Als de verbinding met een netwerk tijdelijk wordt verbroken,
maakt het toestel automatisch opnieuw verbinding.
Open netwerk
Als het netwerk open is (niet-gecodeerd), maakt het apparaat verbinding en is geen verdere invoer vereist.
Standaard gecodeerd netwerk
Als het draadloze netwerk beveiligd is, biedt het volgende scherm opties om de netwerksleutel of het
wachtwoord/de zinsnede in te voeren.
Bij voltooiing
Het apparaat maakt verbinding met het geselecteerde netwerk. Als het verbinden mislukt, keert het
apparaat terug naar een vorig scherm om het opnieuw te proberen. Om het proces af te sluiten, gebruikt u
de [BACK/MENU] knop. Als de netwerkverbinding wordt verbroken, maakt het toestel automatisch opnieuw
verbinding.
PBC Wlan setup (Wi-Fi Protected Setup)
Het apparaat vraagt u om op de verbindingstoets van de router te drukken en vervolgens op de selectieknop. Voor
meer informatie over het opzetten van een PBC Wlan versleuteld netwerk, raadpleeg de handleiding van uw PBC
Wlan router.
View settings
Toont de details van de instellingen voor de huidige netwerk setup, inclusief:
Actieve verbindingen
MAC-adres
Wlan regio
DHCP
SSID
IP Adres
Subnet mask
Gateway adres
Primary DNS
Secondary DNS
Handmatige instellingen
Kies om DHCP in/uit te schakelen.
NetRemote PIN instelling
Hiermee kunt u een PIN-nummer instellen dat moet worden ingevoerd voordat via een netwerk op afstand
verbinding kan worden gemaakt met het apparaat.

18
Netwerkprofiel
Dit geeft een lijst weer van de netwerken die door de radio worden onthouden (maximaal 4). U kunt de lijst met
geregistreerde netwerken bekijken via Menu > System settings > Network > Network profile>. Hier kunt u
ongewenste netwerken verwijderen door ze te selecteren en op [OK] te drukken, bevestig het verwijderen door Yes
te selecteren.
Netwerkinstellingen wissen
Met deze optie kunnen de huidige netwerkinstellingen worden gewist, zodat u gemakkelijker toegang krijgt tot een
alternatief netwerk.
Netwerk aangesloten houden
Kies om het netwerk verbonden te houden of niet.
Tijd/Datum
Tijd/Datum instellen
De datum en tijd worden weergegeven als dd-mm-jjjj, waarbij de eerste waarde (dd) knippert. Pas elke waarde aan
met de navigatieknop. Druk tijdens het instellen van elke waarde op de navigatieknop om de waarde te bevestigen.
De volgende waarde knippert, klaar voor aanpassing.
Automatische update (via DAB, FM of Netwerk)
Auto-update werkt met gegevens die via DAB, FM of het internet worden verzonden. DAB en FM gebruiken een
tijdsignaal dat met radio-uitzendingen wordt meegezonden. Netwerk gebruikt een tijdsignaal dat wordt uitgezonden
door het internetradioportaal wanneer een netwerkverbinding tot stand is gebracht.
1. Selecteer "Update from DAB", "Update from FM", "Update from Network" of "No update".
2. Bij updaten vanaf het netwerk: stel uw tijdzone in.
3. Als uw land zomertijd (DST) gebruikt, kan de automatisch bijgewerkte tijd van het netwerk verkeerd zijn. Wanneer
de zomertijd wordt aangepast, zoals de Britse zomertijd (BST), schakelt u de zomertijdoptie in om te compenseren.
Opmerking: als u de tijd bijwerkt vanaf DAB of FM, heeft de zomertijdoptie geen effect op de weergegeven tijd. Het
toestel zal automatisch de tijd bijwerken van de geselecteerde bron als er tijdinformatie beschikbaar is.
Stel tijdweergave in
Hiermee kunt u schakelen tussen 12- en 24-uurs weergave.
Taal
De standaardtaal is Engels. Om te wijzigen, ga naar Menu > System settings > Languages > om uw voorkeurstaal te
selecteren.
Fabrieksreset
Reset alle gebruikersinstellingen naar de standaardwaarden. Tijd/datum, netwerkconfiguratie en voorinstellingen gaan
verloren. De huidige softwareversie van de radio blijft echter behouden. Om een fabrieksreset uit te voeren, selecteert u
Menu > System settings > Factory reset. Bevestig door te kiezen voor Proceed > Yes.
Software update
Van tijd tot tijd komen er software-updates met bugfixes en/of extra functies beschikbaar. U kunt dit handmatig controleren
of het apparaat zo instellen dat het regelmatig automatisch controleert (dit is de standaardinstelling). Als het apparaat
detecteert dat er nieuwere software beschikbaar is, vraagt het of u wilt doorgaan met updaten. Zo ja, dan wordt de nieuwe
software gedownload en geïnstalleerd. Na een software-update blijven alle gebruikersinstellingen behouden.
WAARSCHUWING: Zorg ervoor dat de radio is aangesloten op een stabiele netstroomverbinding voordat u een software-
update start. De stroom uitschakelen tijdens de software update kan het toestel permanent beschadigen.
Instelling wizard
Hiermee kunt u de Setup-wizard op elk gewenst moment uitvoeren.
Info
Toont details van het huidige systeem inclusief software versienummer, Radio ID en de naam waarmee de radio wordt
geïdentificeerd op een netwerk.
Privacy Policy
Toont een privacy mededeling die u naar onze website leidt voor alle details van het Frontier Smart Technologies Privacy
beleid.
Backlight
Het display kan zo worden ingesteld dat het wordt gedimd wanneer het in stand-by staat of na een time-outperiode. Met
deze optie kunt u de time-outperiode en de helderheidsinstellingen vóór (niveau Aan/helder) en na (niveau Gedimd) de
aangepaste tijdsperiode instellen.
Voor het Aan-niveau zijn Hoog, Middel en Laag beschikbaar.
Voor het Dim-niveau zijn Hoog, Middel, Laag en Uit beschikbaar.
Lijnuitgang instellen
Voor Lijnuitvoer, kies om lijnuitvoer toe te staan of niet. Voor Lokale luidspreker, kies om de geluidsweergave aan te zetten
of niet.

19
Dit toestel kan duizenden radiozenders van over de hele wereld afspelen via een breedband internetverbinding. Zodra een
zender is geselecteerd, maakt het toestel rechtstreeks verbinding met die zender.
Om de Internetradiomodus te activeren, drukt u op [MODE] en draait u de navigatieknop om door de modi te bladeren tot
Internetradio wordt weergegeven, of selecteert u Mode > Internet Radio.
Opmerking: Het zenderlijstmenu wordt aangeboden vanuit het internetradioportaal, en is dus alleen toegankelijk als de radio
met het internet is verbonden. Zenderlijsten en submenu's kunnen van tijd tot tijd veranderen.
LOCAL
Submenu voor het zoeken naar zenders in verschillende categorieën, bijvoorbeeld: lokale zenders, BBC-zenders, genres of
zenders uit een bepaalde stad. Kies de gewenste categorie en ofwel wordt een verdere lijst van subcategorieën getoond,
ofwel (indien er geen verdere subcategorie is) worden de beschikbare stations voor de gekozen categorie opgesomd.
LAATST BELUISTERD
Wanneer de internetradiomodus (opnieuw) start, wordt de laatst beluisterde zender geselecteerd. Om een andere recent
gebruikte zender te selecteren, selecteert u Last listened en vervolgens de zender in de lijst met laatst beluisterde zenders.
De meest recente zenders verschijnen bovenaan in de lijst.
ZOEKEN
U kunt ook zoeken naar zenders met bepaalde trefwoorden in hun titel. Om te zoeken, selecteert u Menu > Station list >
Search en voert u een trefwoord in. Selecteer een uitzending uit de lijst.
LOCATIE
Om een internetuitzending van een bepaalde locatie te selecteren, selecteert u Menu > Station list > Location >. Selecteer
een continent in het menu en een lijst met beschikbare landen wordt weergegeven, selecteer een land en de beschikbare
internetradiozenders worden weergegeven. Kies een radiozender uit de lijst om op die zender af te stemmen.
POPULAIR
Presenteert een lijst van de populairste internetstations uit de hele wereld.
ONTDEK
Stelt u in staat te kiezen uit een lijst van stations gedefinieerd door hun oorsprong (land), genre of taal. Navigeer door de
categorie-opties. Zodra u uw keuze hebt gemaakt, bevestigt een scherm de door u gekozen categorie en het aantal zenders
binnen die categorie. Om de lijst te zien, selecteert u de optie die het aantal beschikbare stations weergeeft.
INFORMATIE
Terwijl de stream speelt, toont het scherm zijn naam en beschrijving. Als er informatie over de artiest en/of het nummer
beschikbaar is, wordt dit ook weergegeven. Druk op [INFO] om meer informatie weer te geven. Telkens wanneer u op drukt,
wordt een andere set informatie weergegeven, die door de volgende details heenloopt:
Slogan (standaard; indien beschikbaar)
Taal/Locatie
Codec en sampling rate
Buffer
Datum info
Dit toestel kan duizenden podcasts van over de hele wereld afspelen via een breedband internetverbinding. Zodra een
podcast is geselecteerd, maakt het toestel rechtstreeks verbinding met dat station.
Om de Podcast-modus te activeren, drukt u op [MODE] en draait u aan de navigatieknop om door de modi te bladeren tot
Podcasts wordt weergegeven, of selecteert u Mode > Podcasts.
Opmerking: Het podcast-menu wordt aangeboden vanuit het Podcast-portaal, en is dus alleen toegankelijk wanneer de radio
is verbonden met het Internet. Podcastlijsten en submenu's kunnen van tijd tot tijd veranderen.
LOCAL
Submenu voor het zoeken naar podcast in verschillende categorieën, bijvoorbeeld: comedy of the week, authors, popular,
etc. Kies de gewenste categorie en ofwel wordt een verdere lijst van subcategorieën getoond, ofwel (indien er geen verdere
subcategorie is) worden de beschikbare podcasts voor de gekozen categorie opgesomd.
ZOEKEN
U kunt ook zoeken naar podcasts met bepaalde trefwoorden in hun titel. Om te zoeken, selecteert u Menu > Podcast list >
Search en voert u een trefwoord in. Selecteer een uitzending uit de lijst.
LOCATION
Om een podcastuitzending van een bepaalde locatie te selecteren, selecteert u Menu > Podcast list > Location >. Selecteer
een continent in het menu en een lijst met beschikbare landen wordt weergegeven, selecteer een land en de beschikbare
podcasts worden weergegeven. Kies een podcast uit de lijst om erop af te stemmen.

20
ONTDEK
Stelt u in staat te kiezen uit een lijst van podcasts gedefinieerd door hun oorsprong (land), genre of taal. Navigeer door de
categorie-opties. Zodra u uw keuze hebt gemaakt, bevestigt een scherm de door u gekozen categorie en toont het aantal
podcasts binnen die categorie. Om de lijst te zien, selecteert u de optie die het aantal beschikbare podcasts weergeeft.
Om de DAB-modus in te schakelen, drukt u op [MODE] en draait u de navigatieknop om door de luistermodi te bladeren tot
DAB Radio wordt weergegeven, of selecteert u Menu > Main menu > DAB.
ZENDERLIJST
De eerste keer dat u de DAB-radiomodus selecteert (of als de zenderlijst leeg is), start het toestel automatisch een volledige
scan om te zien welke zenders beschikbaar zijn.
Een zender gemarkeerd met een vraagteken geeft aan dat deze zender momenteel niet beschikbaar is. Afhankelijk van de
oorzaak van het wegvallen van het signaal kan dit slechts tijdelijk zijn. Zenders waarvan het onwaarschijnlijk is dat ze weer
beschikbaar zullen zijn, kunnen uit de zenderlijst worden verwijderd.
Zenderscan
Om handmatig een scan te starten, selecteert u Menu > Scan. Zodra de scan is voltooid, toont de radio een lijst met
beschikbare zenders. Met de menuoptie Handmatig afstemmen kan de gebruiker een bepaald kanaal selecteren en
de signaalsterkte van dat kanaal weergeven.
Zenders uit lijst verwijderen
Om zenders te verwijderen die in de lijst zijn opgenomen maar niet beschikbaar zijn, selecteert u Menu > Prune
invalid.
Zenders selecteren
Om een zender te beluisteren of te wijzigen, selecteert u Menu > Station List en drukt u op [OK]. Selecteer de zender
waarnaar u wilt luisteren door met de navigatiebesturing te scrollen. Zenders gemarkeerd met een '?' zijn niet
beschikbaar. Eenmaal geselecteerd begint de zender te spelen en toont het scherm informatie over de zender, het
nummer of de show die door de zender wordt uitgezonden. U kunt ook op de toetsen links en rechts drukken om
naar de volgende zender in de zenderlijst te gaan.
INFORMATIE
Terwijl de stream speelt, toont het scherm de naam en DLS (Dynamic Label Segment) informatie, die real-time informatie
geeft zoals programmanaam, titel van het nummer en andere details. Stereo-uitzendingen worden aangegeven met een
pictogram boven aan het scherm. Om meer informatie te bekijken, drukt u op [INFO]. Telkens wanneer u op drukt, wordt een
andere reeks informatie weergegeven.
SLIDESHOW
Wanneer een diashow beschikbaar is (afhankelijk van het uitgezonden signaal), worden de beelden aan de linkerkant van het
scherm weergegeven. Om door de verschillende weergave-opties te bladeren (miniatuur, dia met DLS-tekst en dia op
volledig scherm) drukt u op de draaiknop.
INSTELLINGEN
Dynamic Range Compression (DRC)
Sommige DAB-uitzendingen bieden Dynamic Range Compression (DRC) aan. Met deze functie kunnen radio's het
dynamisch bereik van de uitgaande audiostream comprimeren, zodat het volume van rustige geluiden wordt
verhoogd en het volume van harde geluiden wordt verlaagd. Dit kan nuttig zijn als u naar muziek met een groot
dynamisch bereik luistert in een lawaaierige omgeving (bijvoorbeeld klassieke muziek tijdens het centreren). Om de
DRC-instelling voor dit apparaat te wijzigen, selecteert u Menu > DRC en kiest u vervolgens tussen DRC high, DRC
low of DRC off.
Opmerking: De DRC-instelling heeft geen effect als DRC-gegevens niet in de uitzending zijn opgenomen.
Zendervolgorde
U kunt de volgorde van de DAB-zenderlijst kiezen tussen Alfanumeriek of Ensemble. Ensemble geeft groepen
zenders weer die samen op hetzelfde ensemble worden uitgezonden. Valid geeft eerst de geldige zenders weer,
alfanumeriek, en daarna de zenders die niet in de ether zijn. Om de volgorde van de zenders te wijzigen, selecteert u
Menu > Station order > en vervolgens Alfanumeriek of Ensemble.
Om de FM-radiomodus te activeren, drukt u op [MODE] en draait u de navigatieknop tot FM Radio wordt weergegeven, of
selecteert u Menu > Main menu > FM.
Handmatig zoeken
Om handmatig te zoeken, drukt u op de navigatieknop en draait u de knop met de klok mee om "omhoog" te scannen
of tegen de klok in om "omlaag" te scannen.
Seite laden ...
Seite laden ...
Seite laden ...
Seite laden ...
Seite laden ...
Seite laden ...
Seite laden ...
Seite laden ...
Seite laden ...
Seite laden ...
Seite laden ...
Seite laden ...
Seite laden ...
Seite laden ...
Seite laden ...
Seite laden ...
Seite laden ...
Seite laden ...
Seite laden ...
Seite laden ...
Seite laden ...
Seite laden ...
Seite laden ...
Seite laden ...
Seite laden ...
Seite laden ...
Seite laden ...
Seite laden ...
Seite laden ...
Seite laden ...
Seite laden ...
Seite laden ...
Seite laden ...
Seite laden ...
Seite laden ...
Seite laden ...
-
 1
1
-
 2
2
-
 3
3
-
 4
4
-
 5
5
-
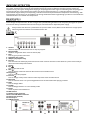 6
6
-
 7
7
-
 8
8
-
 9
9
-
 10
10
-
 11
11
-
 12
12
-
 13
13
-
 14
14
-
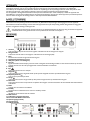 15
15
-
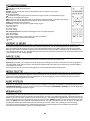 16
16
-
 17
17
-
 18
18
-
 19
19
-
 20
20
-
 21
21
-
 22
22
-
 23
23
-
 24
24
-
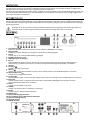 25
25
-
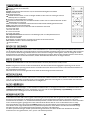 26
26
-
 27
27
-
 28
28
-
 29
29
-
 30
30
-
 31
31
-
 32
32
-
 33
33
-
 34
34
-
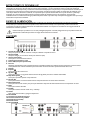 35
35
-
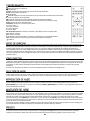 36
36
-
 37
37
-
 38
38
-
 39
39
-
 40
40
-
 41
41
-
 42
42
-
 43
43
-
 44
44
-
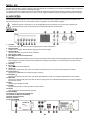 45
45
-
 46
46
-
 47
47
-
 48
48
-
 49
49
-
 50
50
-
 51
51
-
 52
52
-
 53
53
-
 54
54
-
 55
55
-
 56
56


audizio Brescia Internet Receiver Bedienungsanleitung
- Kategorie
- Radios
- Typ
- Bedienungsanleitung
- Dieses Handbuch ist auch geeignet für