CAME XDHDXXXXH Installationsanleitung
- Kategorie
- Digitale Videorecorder (DVR)
- Typ
- Installationsanleitung

English
EN
Deutsch
DE
Italiano
IT
Français
FR
FA00744M04
MANUALE DI CONFIGURAZIONE E USO
XDHD2704H - XDHD2708H - XDHD2716H
VIDEOREGISTRATORI DIGITALI

CVBSAUDIO IN
ALARM OUT ALARM IN
AUDIO
OUT DC12V
USB
L A N
V G A B A
4
3
2
1
V IDE O IN
16 812 4 2
1
15 711 3
14 610
13 59
GND
GND
1
CO M
NO
2
3
4
RS485
ALARM OUT ALARM IN
CV B S DC12V
USB
L A N
V G A B A
A UDIO IN
4
3
2
1
V IDE O IN
842
1
7 3
6
5
A UDIO O UT
GND
GND
1
CO M
NO
2
3
4RS485
A UDIO
OUT
CV B S
DC12V
USB
L A N
V G A 485
B
A UDIO IN
A
V IDE O I N
4 3 21
4 3 2 1
1
2
3
4
GND
GND
COM
NO
RS
ALARM OUT
ALARM IN
Pag. 2 - Manuale: FA00744-IT - ver. 1 - 04/2017 - © CAME S.p.A. - I contenuti del manuale sono da ritenersi suscettibili di modifica in qualsiasi momento senza obbligo di preavviso.
AVVERTENZE GENERALI
• Importanti istruzioni per la sicurezza delle persone: LEGGERE ATTENTAMENTE!
• L’installazione, la programmazione, la messa in servizio e la manutenzione devono essere eettuate da personale qualificato ed esperto e nel
pieno rispetto delle normative vigenti.
• Togliere sempre l’alimentazione elettrica durante le operazioni di pulizia o di manutenzione.
• Il prodotto deve essere destinato solo all’uso per il quale è stato espressamente studiato.
• Il costruttore non può comunque essere considerato responsabile per eventuali danni derivanti da usi impropri, erronei ed irragionevoli.
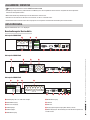
DESCRIZIONE
Videoregistratore digitale a 4, 8, 16 ingressi.
Descrizione delle parti
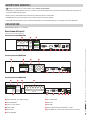
Pannello posteriore XDHD2704H
❶ Ingressi video HD - TVI - AHD o analogici,
❷ Uscita video CVBS,
❸ Ingressi e uscite allarme,
❹ Ingressi audio,
❺ Uscita audio,
❻ Uscita video VGA,
❼ Uscita video HDMI,
❽ Porta LAN,
❾ Porta USB,
❿ Ingresso alimentazione da alimentatore 12 V DC,
⓫ Uscita RS485 per la connessione di telecamere PTZ e tastiera.
Pannello posteriore XDHD2708H
Pannello posteriore XDHD2716H
❶❹❸ ❷
❶❹❸
❷
❶❷❸
❹ ❺
❺ ❻❼ ❽ ❾ ❿ ⓫
❺ ❻❼ ❽ ❾ ❿ ⓫
❻ ❼ ❽ ❾ ❿ ⓫

Pag. 3 - Manuale: FA00744-IT - ver. 1 - 04/2017 - © CAME S.p.A. - II contenuti del manuale sono da ritenersi suscettibili di modifica in qualsiasi momento senza obbligo di preavviso.
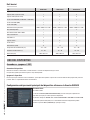
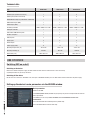
Dati tecnici
Tipo XDHD2704H XDHD2708H XDHD2716H
Ingressi video BNC (TVI/AHD2.0 1080P, 720P, WD1) 4 8 16
Ingressi video IP (numero canali) 1 1 4
Ingressi audio (numero canali) 4 4 4
Uscite video HDMI/VGA (1920x1080 / 1280x1024) 1 1 1
Uscite video CVBS (BNC) 1 1 1
Uscite audio (RCA) 1 1 1
Risoluzione della registrazione 1080P / 1080P Lite / 720P 1080P / 1080P Lite / 720P 1080P / 1080P Lite / 720P
Porte SATA disponibili 1 1 2
Porte Ethernet RJ45 10M / 100M 1 1 1
Porte seriali RS-485 1 1 1
Porte USB 2.0 2 2 2
Ingressi allarme 4 4 4
Uscite allarme 1 1 1
Alimentazione (V DC) 12 12 12
Temperatura di funzionamento (°C) -10 ~ +50 -10 ~ +50 -10 ~ +50
Umidità di funzionamento (%) 10 ~ 90 10 ~ 90 10 ~ 90
Dimensioni (mm) 300 x 248 x 52 300 x 248 x 52 380 x 268 x 52
USO DEL DISPOSITIVO
Accendere e spegnere il DVR
Accendere il dispositivo
Connettere il monitor e l’alimentatore; il led blu frontale si accende ed il dispositivo esegue l’avvio.
Una procedura guidata permette di eseguire il setup del dispositivo.
Spegnere il dispositivo
Dal menù principale selezionare l’icona “Shutdown”; questa operazione provoca l’apertura di una finestra dedicata allo spegnimento; premere il
pulsante “OK” e in seguito disconnettere l’alimentazione.
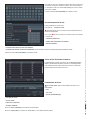
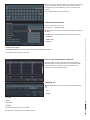
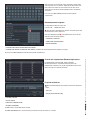
Configurazione dei parametri principali del dispositivo attraverso la finestra WIZARD
Parametri base
Accendere il DVR.
La finestra di WIZARD (CONFIGURAZIONE GUIDATA) permette di eseguire rapidamente le
operazioni principali per rendere operativo il dispositivo.
È possibile configurare: ORARIO, RETE, TIPO DI REGISTRAZIONE e GESTIONE DEL DISCO FISSO.
Premendo il pulsante EXIT (ESCI) si esce immediatamente dalla configurazione guidata.
Premere il pulsante NEXT (PROSSIMO) per prosegure il setup.

Pag. 4 - Manuale: FA00744-IT - ver. 1 - 04/2017 - © CAME S.p.A. - I contenuti del manuale sono da ritenersi suscettibili di modifica in qualsiasi momento senza obbligo di preavviso.
Cliccando nei campi che richiedono l’inserimento di testi o numeri viene
visualizzata una tastiera; selezionare le lettere e/o i numeri desiderati
per comporre il testo; usare il tasto SHIFT (SHIFT) per inserire le lettere
maiuscole e i simboli.
Premere il pulsante NEXT (PROSSIMO) per prosegure il setup.
Inserimento parametri di rete
I valori predefiniti per le porte sono:
HTTP port: 80 SERVER port: 6036
❶ Spuntando questa casella, il sistema assegna automaticamente un
indirizzo IP al dispositivo.
Se la casella ❶ non viene spuntata è necessario inserire manualmente
i seguenti dati:
- IP ADDRESS (INDIRIZZO IP)
- SUBNET MASK (MASCHERA DI SOTTORETE)
- GATEWAY (GATEWAY)
- PREFERRED DNS SERVER (SERVER DNS PRIMARIO)
- ALTERNATE DNS SERVER (SERVER DNS SECONDARIO): questa selezione permette l’utilizzo/visualizzazione del DVR da remoto.
Premere il pulsante NEXT (PROSSIMO) per proseguire il setup.
Scelta del tipo di telecamere connesse
Il videoregistratore supporta telecamere con tecnologia AHD, HDTVI e
CVBS. La configurazione di fabbrica prevede che il videoregistratore
rilevi automaticamente il tipo di telecamera connessa; è comunque
possibile eettuare manualmente la scelta.
Formattazione del disco
Se il DISCO FISSO è appena stato installato, procedere con la
formattazione.
- ID (ID)
- TYPE (TIPO)
- SIZE [GB] (DIMENSIONI [GB])
- FREE (GB) (GB LIBERI)
- STATUS (STATO)
- PROPERTIES (PROPRIETÀ)
- SOURCES (SORGENTI)
Cliccare su NEXT (PROSSIMO) per visualizzare lo stato del DVR.
Cliccare su FINISH (FINE) per terminare la configurazione e uscire dalla procedura guidata.
❶

Pag. 5 - Manuale: FA00744-IT - ver. 1 - 04/2017 - © CAME S.p.A. - II contenuti del manuale sono da ritenersi suscettibili di modifica in qualsiasi momento senza obbligo di preavviso.
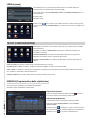
LOGIN (accesso)
Facendo doppio click in un punto qualunque dello schermo o cercando di svolgere una
qualunque azione, al primo avvio appare la finestra di login.
Inserire negli appositi campi USERNAME (NOME UTENTE) e PASSWORD (PASSWORD) che per il
primo avvio sono:
Username: admin
Password: 123456
Premere l’icona posta in basso a sinistra dello schermo per accedere al menu generale,
premere il pulsante SETUP (CONFIGURAZIONE) per accedere alla schermata che raccoglie le voci
di setup.
BASIC (BASE): per impostare il sistema video, la lingua del menu, l’audio, l’orario e il controllo
delle autorizzazioni.
LIVE (LIVE): per impostare il NOME/ORARIO da visualizzare, il colore delle immagini e per
nascondere le telecamere.
RECORD (REGISTRAZIONE): per impostare la qualità della registrazione, la frequenza dei
fotogrammi, la risoluzione, l’orario e le opzioni di sovrascrittura.
SCHEDULE (SCHEDULAZIONE): per schedulare le registrazioni, il rilevamento dei movimenti,
l’allarme.
ALARM (ALLARME): per impostare il tipo di sensore, l’attivazione dell’allarme e il buzzer.
NETWORK (RETE): per abilitare la funzione , configurare l’indirizzo IP, il DDNS e i parametri di trasmissione video.
USERS (UTENTI): per aggiungere, eliminare utenti o modificarne le autorizzazioni. Tale operazione può essere eettuata solo dall’amministratore.
P.T.Z.: panoramica, inclinazione e zoom della telecamera.
ADVANCED (AVANZATA): per riavviare il DVR, importare o esportare dati da/su dischi esterni.
SETUP (CONFIGURAZIONE)
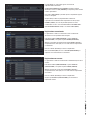
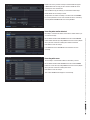
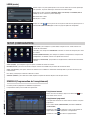
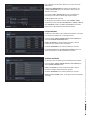
SCHEDULE (Programmazione della registrazione)
La finestra permette di programmare la modalità di registrazione.
Si possono scegliere 4 modi diversi di registrazione.
Registrazione manuale
Può essere avviata/interrotta premendo il tasto REC posto sulla
barra strumenti posta sulla parte bassa dello schermo.
Registrazione programmata
La registrazione inizia e termina agli orari e giorni prestabiliti.
Dalla finestra SETUP (CONFIGURAZIONE) scegliere SCHEDULE
(SCHEDULAZIONE).
Selezionare l’icona ed evidenziare le caselle che rappresentano le
fasce orarie durante le quali si desidera programmare la registrazione.
Selezionare l’icona per cancellare la programmazione.

Pag. 6 - Manuale: FA00744-IT - ver. 1 - 04/2017 - © CAME S.p.A. - I contenuti del manuale sono da ritenersi suscettibili di modifica in qualsiasi momento senza obbligo di preavviso.
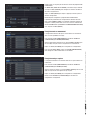
Facendo doppio clic sulla griglia, appare una finestra di
programmazione settimanale.
Su WEEK DAYS (GIORNI DELLA SETTIMANA) selezionare il giorno
desiderato e cliccare su ADD (AGGIUNGI) per impostare gli orari di inizio
e di fine registrazione.
Cliccando su COPY (COPIA) è possibile copiare le impostazioni appena
inserite su altri giorni.
Scegliere OK per salvare la programmazione settimanale.
L’operazione di schedulazione delle registrazioni va fatta per ogni
CHANNEL (CANALE), ma è anche possibile impostare la stessa
schedulazione su tutti i canali selezionando APPLY SETTINGS TO ALL
(APPLICA IMPOSTAZIONI SU TUTTI) e cliccando su COPY (COPIA).
Registrazione su movimento
La registrazione si attiva se la telecamera rileva un movimento
all’interno di un’area predefinita dell’immagine.
Dalla finestra SETUP (CONFIGURAZIONE) scegliere SCHEDULE
(SCHEDULAZIONE) e in seguito scegliere MOTION (MOVIMENTO).
Abilitare la rilevazione del movimento spuntando ENABLE (ABILITA) in
corrispondenza del canale (CH) su cui si vuole attivare la registrazione
su movimento.
Cliccare su APPLY (APPLICA) per salvare le impostazioni.
Nella casella AREA (AREA) cliccare su SETTING (IMPOSTAZIONI) per
impostare l’area di rilevamento e la sensibilità.
Registrazione con sensore
La registrazione si attiva al rilevamento di un movimento da parte di un
sensore.
Dalla finestra SETUP (CONFIGURAZIONE) scegliere SCHEDULE
(SCHEDULAZIONE) e in seguito scegliere SENSOR (SENSORE).
Abilitare l’allarme del sensore spuntando ENABLE (ABILITA) in
corrispondenza del canale (CH) su cui si vuole attivare la registrazione
con sensore.
Cliccare su APPLY (APPLICA) per salvare le impostazioni.
Scegliere poi SCHEDULE (SCHEDULAZIONE) per visualizzare le
impostazioni salvate.

Pag. 7 - Manuale: FA00744-IT - ver. 1 - 04/2017 - © CAME S.p.A. - II contenuti del manuale sono da ritenersi suscettibili di modifica in qualsiasi momento senza obbligo di preavviso.
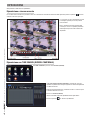
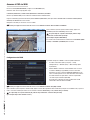
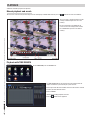
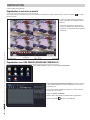
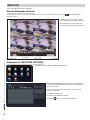
RIPRODUZIONE
Sono possibili 4 modi diversi di riproduzione.
Riproduzione e ricerca manuale
Per accedere alla schermata che permette di ricercare e visualizzare manualmente materiale video registrato, permere il pulsante presente
sulla barra del menu principale.
La schermata che viene visualizzata presenta
le immagini registrate più recenti presenti
nella memoria.
Usare i comandi nella parte inferiore dello
schermo per cercare e riprodurre porzioni di
video registrati presenti nella memoria del
dispositivo.
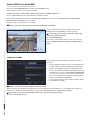
Riproduzione con TIME SEARCH (RICERCA TEMPORALE)
Dal MENU PRINCIPALE premere l’icona SEARCH (RICERCA).
Il tab TIME SEARCH (RICERCA TEMPORALE), permette di ricercare e
riprodurre rapidamente le immagini registrate un determiato giorno ad
una determinata ora.
Sulla parte destra della finestra, selezionare la data e i canali nei quali
si desidera eettuare la ricerca.
Cliccare su SEARCH (RICERCA).
Indicare l’orario di inizio della riproduzione della registrazione.
Cliccare il pulsante per avviare la riproduzione.

Pag. 8 - Manuale: FA00744-IT - ver. 1 - 04/2017 - © CAME S.p.A. - I contenuti del manuale sono da ritenersi suscettibili di modifica in qualsiasi momento senza obbligo di preavviso.
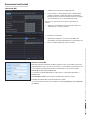
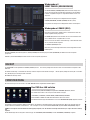
Riproduzione con
EVENT SEARCH (RICERCA EVENTI)
Il tab EVENT SEARCH (RICERCA EVENTI), permette di ricercare e
riprodurre rapidamente le immagini registrate in occasione di un
determinato evento rilevato da un sensore o dalla telecamera stessa
mediante la funzione motion.
Specificare il tipo di evento desiderato scegliendo:
MOTION (MOVIMENTO), SENSOR (SENSORE) oppure ALL (TUTTI).
Selezionare l’evento desiderato con un doppio clic per avviare la
riproduzione.
Riproduzione con
IMAGE (IMMAGINE)
Al verificarsi di un allarme “motion” viene registrato il fotogramma sul
quale è stato rilevato l’allarme.
Il tab IMAGE (IMMAGINE), permette di eettuare una ricerca che dà
come risultato i fotogrammi che hanno scatenato l’allarme “motion” in
un dato periodo di tempo.
Sulla parte destra della finestra, indicare data e ora di inizio e fine della
ricerca e canali da esaminare.
Cliccare su SEARCH (RICERCA).
BACKUP (BACKUP)
Dal MENU PRINCIPALE premere l’icona BACKUP (BACKUP). Il Backup può essere eseguito collegando un hard disk alla porta USB.
È possibile impostare l’orario di inizio e di fine del backup ed i canali coinvolti. La funzione ALL (TUTTO) esegue il backup di tutto l’hard disk.
Premere il tasto START per avviare il back-up.
CONTROLLO DA REMOTO
Il controllo da remoto è possibile solo se il DVR è collegato alla LAN/WAN.
Accesso al DVR via LAN
Dal menu, SETUP (CONFIGURAZIONE), scegliere l’icona NETWORK (rete).
Immettere i dati richiesti negli appositi campi:
IP ADDRESS (INDIRIZZO IP), SUBNET MASK (MASCHERA DI SOTTORETE), GATEWAY.
Utilizzare il protocollo DHCP èer fare indirizzare automaticamente il DVR dal router.
Le impostazioni di rete del DVR possono essere rilevate dalla finestra INFORMATION
(INFORMAZIONI).
Una volta individuata l’immagine ricercata, avviare la riproduzione facendo doppio clic sull’immagine.
DELETE (ELIMINA) elimina l’immagine, LOCK (BLOCCA) blocca l’immagine, SAVE (SALVA), salva l’immagine sul disco fisso.
SAVE ALL (SALVA TUTTE), tutte le immagini vengono salvate sul disco fisso.
Aprire un browser (internet explorer, mozilla firefox), inserire l’indirizzo IP del DVR e premere invio, quando richiesto, scaricare ed installare il plugin
ActiveX necessario per la visualizzazione. L’accesso da remoto può avvenire anche mediante il software NVMS1000 (per PC) o NVMS1200 (per
MAC OS).
Se la porta http non è quella di default (80), indicare dopo l’indirizzo IP il numero della porta http (per esempio: http://192.168.1.100:81).
Per accedere alla visualizzazione da remoto inserire USERNAME (NOME UTENTE) e PASSWORD (PASSWORD) dove richiesto.

Pag. 9 - Manuale: FA00744-IT - ver. 1 - 04/2017 - © CAME S.p.A. - II contenuti del manuale sono da ritenersi suscettibili di modifica in qualsiasi momento senza obbligo di preavviso.
Accesso al DVR via WAN
Dal menu, SETUP (CONFIGURAZIONE), scegliere l’icona NETWORK (rete).
Immettere i dati richiesti negli appositi campi:
IP ADDRESS (INDIRIZZO IP), SUBNET MASK (MASCHERA DI SOTTORETE), GATEWAY.
Utilizzare il protocollo DHCP per fare indirizzare automaticamente il DVR dal router.
Eseguire il forwarding (trasferimento dei dati) dell’IP ADDRESS (INDIRIZZO IP), delle porte HTTP e SERVER PORT sul VIRTUAL SERVER (SERVER
VIRTUALE) del ROUTER o del server virtuale.
Configurare il firewall per consentire l’accesso al DVR.
Questo passaggio non è necessario nel caso in cui sia abilitata la funzione UPnP nel DVR e nel ROUTER.
È possibile configurare il DDNS in caso di IP pubblico dinamico.
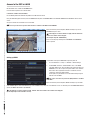
1. Accedere a Main Menu (Menu principale) ⇨ Setup
(Configurazione) ⇨ Network (Rete) ⇨ Other Settings (Altre
impostazioni).
2. Abilitare DDNS e selezionare “www.autoddns.com” nel menu
a tendina di DDNS Type (Tipo DDNS). Inserire il nome Host
desiderato e premere il pulsante REGISTER (REGISTRA) se non
viene accettato riprovare con un altro nome Host meno comune.
Una volta eettuata la registrazione, salvare le impostazioni
cliccando sul pulsante APPLY (APPLICA).
A questo punto, è possibile accedere remotamente al DVR
utilizzando il nome del dominio via WAN.
Questo passaggio non è necessario nel caso in cui sia abilitata la funzione P2P (NAT) nel DVR.
Aprire il browser (internet explorer, mozilla firefox), digitare il nome Host seguito dal nome del dominio (esempio: came.autoddns.com) e premere
invio. L’accesso da remoto può avvenire anche mediante il software NVMS1000 (per PC) o NVMS1200 (per MAC OS).
Se la porta http non è quella di default (80), indicare dopo l’indirizzo IP il numero della porta http
(per esempio: http://came.autoddns.com:81).
Configurazione del DDNS
Aprire il browser (internet explorer, mozilla firefox), digitare l’IP
ADDRESS (indirizzo IP PUBBLICO) premere invio.
Se la porta http non è quella di default (80), indicare dopo
l’indirizzo IP il numero della porta http
(per esempio: http://IP PUBBLICO:81).
Per accedere alla visualizzazione da remoto inserire USERNAME (NOME
UTENTE) e PASSWORD (PASSWORD) dove richiesto.

Pag. 10 - Manuale: FA00744-IT - ver. 1 - 04/2 017 - © CAME S.p.A. - I contenuti del manuale sono da ritenersi suscettibili di modifica in qualsiasi momento senza obbligo di preavviso.
4. Selezionare la scheda NAT.
5. Abilitare NAT e compilare se necessario i campi NAT Server
(Server NAT) il valore di default di NAT Server è www.autonat.com.
6. Cliccare su APPLY (APPLICA) per salvare i parametri.
Accesso al server NAT
Dopo aver terminato le impostazioni del NAT, è possibile accedere al server NAT sul PC (inserire
http://www.autonat.com per accedere al client IE). Se si accede al NAT per la prima volta, la rete
scarica automaticamente ActiveX. Dopo aver installato ActiveX, si apre la finestra di login:
Serial No (N. di serie): indirizzo MAC del DVR
Per visualizzare l’indirizzo MAC del DVR, accedere a Menu ⇨ Information (Informazioni) ⇨
Network (Rete) ).
User Name (Nome utente): nome dell’utente del DVR (il nome di default è admin).
Password: password del DVR (la password di default è 123456).
L’accesso da remoto può avvenire anche mediante il software NVMS1000 (per PC) o NVMS1200
(per MAC OS).
Connessione tramite cloud
Impostazioni NAT
1. Il DVR deve essere alimentato e collegato alla rete.
2. Accedere a Menu ⇨ Setup (Configurazione) ⇨ Network (Rete).
IP address (Indirizzo IP), Subnet Mask (Maschera di sottorete) e
Gateway possono essere ottenuti automaticamente ma è possibile
inserirli manualmente in base alla configurazione del PC.
Verificare che il segmento di rete sia uguale a quello della rete
utilizzata.
3. Impostare il server DNS preferenziale o alternativo. Cliccare su
“Apply (Applica)” per salvare i parametri.

Pag. 11 - Manuale: FA00744-IT - ver. 1 - 04/2017 - © CAME S.p.A. - II contenuti del manuale sono da ritenersi suscettibili di modifica in qualsiasi momento senza obbligo di preavviso.
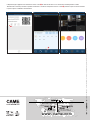
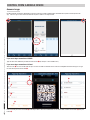
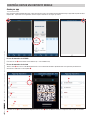
CONTROLLO DA UN DISPOSITIVO MOBILE
Accesso mediante app
Per smartphone iOS o Android scaricare l’applicazione Superlive PLUS; per tablet iOS o Android scaricare l’applicazione Superlive PLUS oppure
Superlive HD. Una volta avviata l’applicazione, seguire la sequenza illustrata nelle immagini che seguono.
Se si utilizza la connessione tramite DDNS
Scrivere all’interno della casella ❶ il nome Host seguito dal dominio (per esempio: came.autoddns.com).
Se si utilizza la connessione tramite cloud
Toccare l’icona ❷ e scansionare il QR code che si può trovare al menù informazioni del DVR alla voce QR code. In alternativa è possibile scrivere
direttamente il codice nella casella Dispositivo ❸.
Nella casella ❹ inserire un nome a piacere che identifica il dispositivo. Nelle caselle ❺ inserire le credenziali di accesso al videoregistratore e
premere il pulsante ❻.
❶❸
❹
❻
❺
❷

www. came.com
CAME S.p.A.
Via Martiri Della Libertà, 15 Via Cornia, 1/b - 1/c
31030 Dosson di Casier
Treviso - Italy
33079 Sesto al Reghena
Pordenone - Italy
(+39) 0422 4940
(+39) 0422 4941
(+39) 0434 698111
(+39) 0434 698434
Pag. 12 - Manuale: FA00744-IT - ver. 1 - 04/2 017 - © CAME S.p.A. - I contenuti del manuale sono da ritenersi suscettibili di modifica in qualsiasi momento senza obbligo di preavviso.
Il dispositivo appena aggiunto viene mostrato in elenco; l’icona ❼ di colore verde indica che la connessione al videoregistratore è attiva.
Tornando nella schermata precedente è possibile visualizzare e selezionare i dispositivi connessi. L’icona ❽ permette di aprire la finestra mediante
la quale scegliere la modalità di visualizzazione.
❽
❼

English
EN
SETUP AND USER MANUAL
XDHD2704H - XDHD2708H - XDHD2716H
DIGITAL VIDEO RECORDERS
FA00744-EN

CVBSAUDIO IN
ALARM OUT ALARM IN
AUDIO
OUT DC12V
USB
L A N
V G A B A
4
3
2
1
V IDE O IN
16 812 4 2
1
15 711 3
14 610
13 59
GND
GND
1
CO M
NO
2
3
4
RS485
ALARM OUT ALARM IN
CV B S DC12V
USB
L A N
V G A B A
A UDIO IN
4
3
2
1
V IDE O IN
842
1
7 3
6
5
A UDIO O UT
GND
GND
1
CO M
NO
2
3
4RS485
A UDIO
OUT
CV B S
DC12V
USB
L A N
V G A 485
B
A UDIO IN
A
V IDE O I N
4 3 21
4 3 2 1
1
2
3
4
GND
GND
COM
NO
RS
ALARM OUT
ALARM IN
Page 2 - Manual: FA00744-EN - ver. 1 - 04/2017 - © CAME S.p.A. - The data and information shown in this manual are to be considered subject to change at any time and without the need for any advance warning.
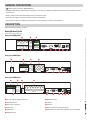
Rear panel XDHD2716H
Rear panel XDHD2708H
❶ HD - TVI - AHD or analogue video inputs,
❷ CVBS video output,
❸ Alarm inputs and outputs,
❹ Audio inputs,
❺ Audio output,
❻ VGA video output,
❼ HDMI video output,
❽ LAN port,
❾ USB port,
❿ Power input from 12 V DC power supply,
⓫ RS485 output for connection of PTZ video camera and keypad.
GENERAL PRECAUTIONS
• Important safety instructions: READ CAREFULLY
• Installation, programming, commissioning and maintenance must only be carried out by qualified, expert sta and in full compliance with the
applicable law.
• Always cut o the mains power when doing cleaning and maintenance jobs.
• This product must only be used for the purpose for which it was designed.
• The manufacturer declines all liability for any damage as a result of improper, incorrect or unreasonable use.
DESCRIPTION
Digital video recorder with 4, 8, 16 inputs.
Description of parts
Rear panel XDHD2704H
❶❹❸ ❷
❶❹❸
❷
❶❷❸
❹ ❺
❺ ❻❼ ❽ ❾ ❿ ⓫
❺ ❻❼ ❽ ❾ ❿ ⓫
❻ ❼ ❽ ❾ ❿ ⓫

Page 3 - Manual: FA00744-EN - ver. 1 - 04/2017 - © CAME S.p.A. - The data and information shown in this manual are to be considered subject to change at any time and without the need for any advance warning.
Basic parameters
Switch on the DVR.
The WIZARD (GUIDED SETUP) window lets you quickly carry out the main operations to make the
device operational.
The following can be set up: TIMES, NETWORK, TYPE OF RECORDING and HARD DISK
MANAGEMENT.
Press the EXIT button to immediately exit the guided setup.
Press the NEXT button to continue with setup.
USE OF DEVICE
Switching DVR on and o
Switching on the device
Connect the monitor and power supply; the blue LED on the front comes on and the device carries out startup.
A guided procedure lets you set up the device.
Switching o the device
On the main menu select the "Shutdown" icon; this opens a Shutdown window; press the "OK" button and then disconnect the power supply.
Setting up the device's main parameters via the WIZARD window
Technical data
Type XDHD2704H XDHD2708H XDHD2716H
BNC video inputs (TVI/AHD2.0 1080P, 720P, WD1) 4 8 16
IP video inputs (number of channels) 1 1 4
Audio inputs (number of channels) 4 4 4
HDMI/VGA video outputs (1920x1080 / 1280x1024) 1 1 1
CVBS video outputs (BNC) 1 1 1
Audio outputs (RCA) 1 1 1
Recording resolution 1080P / 1080P Lite / 720P 1080P / 1080P Lite / 720P 1080P / 1080P Lite / 720P
SATA ports available 1 1 2
RJ45 10M / 100M Ethernet ports 1 1 1
RS-485 serial ports 1 1 1
USB 2.0 ports 2 2 2
Alarm inputs 4 4 4
Alarm outputs 1 1 1
Power supply (V DC) 12 12 12
Operating temperature (°C) -10 to +50 -10 to +50 -10 to +50
Operating humidity (%) 10 to 90 10 to 90 10 to 90
Dimensions (mm) 300 x 248 x 52 300 x 248 x 52 380 x 268 x 52

Page 4 - Manual: FA00744-EN - ver. 1 - 04/2017 - © CAME S.p.A. - The data and information shown in this manual are to be considered subject to change at any time and without the need for any advance warning.
- FREE [GB]
- STATUS
- PROPERTIES
- SOURCES
Click on NEXT to display the status of the DVR.
Click on EXIT to end setup and exit the guided procedure.
Formatting disk
If the HARD DISK has just been installed, proceed with formatting.
- ID
- TYPE
- SIZE [GB]
Choice of type of video cameras connected
The video recorder supports video cameras with AHD, HDTVI and
CVBS technology. The factory settings mean that the video recorder
automatically detects the type of video camera connected; this
selection can be made manually, however.
- PREFERRED DNS SERVER
- ALTERNATE DNS SERVER: this selection allows the DVR to be used/displayed remotely.
Press the NEXT button to continue with setup.
Entering network parameters
The pre-set values for the ports are:
HTTP port: 80 SERVER port: 6036
❶ Tick this box for the system to automatically assign an IP address to
the device.
If box ❶ is not ticked the following data must be entered manually:
- IP ADDRESS
- SUBNET MASK
- GATEWAY
When you click on the fields that require text or numbers to be entered,
a keypad is displayed; select the letters and/or numbers required
to compose the text; use the SHIFT key to enter capital letters and
symbols.
Press the NEXT button to continue with setup.
❶

Page 5 - Manual: FA00744-EN - ver. 1 - 04/2017 - © CAME S.p.A. - The data and information shown in this manual are to be considered subject to change at any time and without the need for any advance warning.
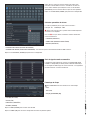
Manual recording
Can be started/paused by pressing the REC key on the tool bar at
the bottom of the screen.
Programmed recording
The recording starts and ends at the times and on the days pre-set.
On the SETUP window choose SCHEDULE.
Select the icon and highlight the boxes that represent the time
slots during which you want to schedule recording.
Select the icon to cancel programming.
The window lets you programme the recording mode.
You can choose 4 dierent methods of recording.
SCHEDULE (Programming recording)
SETUP
parameters.
USERS: to add and delete users or change their authorisations. This operation can only be carried out by the administrator.
P.T.Z.: pan, tilt and zoom of the video camera.
ADVANCED: to restart the DVR, import or export data from/to external disks.
BASIC: to set the video system, menu language, audio, time and authorisations check.
LIVE: to set the NAME/TIME to be displayed and the colour of the images and to hide the video
cameras.
RECORD: to set the recording quality, frame frequency, resolution, times and overwriting options.
SCHEDULE: to schedule recordings, motion detection, alarm.
ALARM: to set the type of sensor, the activation of the alarm and the buzzer.
NETWORK: to enable the function, set the IP address, the DDNS and the video transmission
Press icon on the bottom left of the screen to access the general menu, press SETUP to
access the screen containing all the setup menu items.
If you double-click on any point on the screen or try to carry out any action at first startup, the
log-in window appears.
Enter USERNAME and PASSWORD in the relevant fields; at first startup these are:
Username: admin
Password: 123456
LOGIN

Page 6 - Manual: FA00744-EN - ver. 1 - 04/2017 - © CAME S.p.A. - The data and information shown in this manual are to be considered subject to change at any time and without the need for any advance warning.
Recording with sensor
The recording is activated when motion is detected by a sensor.
On the SETUP window choose SCHEDULE and then choose SENSOR.
Enable the sensor alarm by ticking ENABLE next to the channel (CH) on
which you want to activate recording with sensor.
Click APPLY to save the settings.
Then choose SCHEDULE to display the saved settings.
Recording when motion detected
Recording is activated if the video camera detects motion within a pre-
set area of the image.
On the SETUP window choose SCHEDULE and then choose MOTION.
Enable motion detection by ticking ENABLE next to the channel (CH) on
which you want to activate recording when motion is detected.
Click APPLY to save the settings.
In the AREA box click on SETTING to set the detection area and
sensitivity.
Double-click on the grid and a weekly schedule window will appear.
In WEEK DAYS select the day you want and click on ADD to set the
recording start time and end time.
Click on COPY to copy the settings just entered over to other days.
Choose OK to save the weekly schedule.
The operation to schedule recording is carried out for each CHANNEL,
but it is also possible to set the same schedule for all the channels by
selecting APPLY SETTINGS TO ALL and clicking on COPY.

Page 7 - Manual: FA00744-EN - ver. 1 - 04/2017 - © CAME S.p.A. - The data and information shown in this manual are to be considered subject to change at any time and without the need for any advance warning.
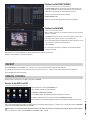
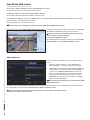
The TIME SEARCH tab lets you quickly search for and play back the
images recorded on a particular day at a particular time.
On the right-hand side of the window, select the date and the channels
on which you want to do the search.
Click on SEARCH.
Indicate the recording playback start time.
Click the button to start playback.
On the MAIN MENU press the SEARCH icon.
Playback with TIME SEARCH
The screen that is displayed shows the most
recently recorded images there are in the
memory.
Use the commands on the bottom of the
screen to search for and play back sections
of recorded videos present in the device's
memory.
PLAYBACK
4 dierent methods of playback are possible.
Manual playback and search
To access the screen that lets you manually search for and display recorded video material, press the button on the main menu tool bar.

Page 8 - Manual: FA00744-EN - ver. 1 - 04/2017 - © CAME S.p.A. - The data and information shown in this manual are to be considered subject to change at any time and without the need for any advance warning.
when requested, download and install the ActiveX plugin that is needed for display purposes. Remote access can also take place via NVMS1000
software (for PC) or NVMS1200 software (for MAC OS).
If the http port is not the default one (80), indicate after the IP address the number of the http port (for example: http://192.168.1.100:81).
To access the display remotely enter USERNAME and PASSWORD where required.
DELETE deletes the image, LOCK locks the image, SAVE saves the image on the hard disk.
SAVE ALL all the images are saved on the hard disk.
On the SETUP menu, choose the NETWORK icon.
Insert the data required in the relevant fields:
IP ADDRESS, SUBNET MASK, GATEWAY.
Use the DHCP protocol to automatically address the DVR from the router.
The DVR's network settings can be detected from the INFORMATION window.
Open a browser (Internet Explorer, Mozilla Firefox), enter the DVR's IP address and press send,
BACKUP
On the MAIN MENU press the BACKUP icon. Backup can be carried out by connecting a hard disk to the USB port.
It is possible to set the backup start and end times and the channels concerned. The ALL function backs up the whole of the hard disk.
Press the START key to start the backup.
REMOTE CONTROL
Remote control is possible only if the DVR is connected to LAN/WAN.
Access to the DVR via LAN
Playback with IMAGE
When a "motion" alarm occurs, the frame on which the alarm has been
detected is recorded.
The IMAGE tab lets you carry out a search which finds the frames that
have triggered the "motion" alarm in a given period of time.
On the right-hand side of the window, give the date and time the search
is to start and end and the channels to examine.
Click on SEARCH.
Once the image searched for is identified, start playback by double-
clicking on the image.
Playback with EVENT SEARCH
The EVENT SEARCH tab lets you quickly search for and play back the
images recorded when a particular event, detected by a sensor or the
video camera itself through the motion function, occurred.
Specify the time of event you want by choosing:
MOTION, SENSOR or ALL.
Select the event you want by double-clicking to start playback.
Seite wird geladen ...
Seite wird geladen ...
Seite wird geladen ...
Seite wird geladen ...
Seite wird geladen ...
Seite wird geladen ...
Seite wird geladen ...
Seite wird geladen ...
Seite wird geladen ...
Seite wird geladen ...
Seite wird geladen ...
Seite wird geladen ...
Seite wird geladen ...
Seite wird geladen ...
Seite wird geladen ...
Seite wird geladen ...
Seite wird geladen ...
Seite wird geladen ...
Seite wird geladen ...
Seite wird geladen ...
Seite wird geladen ...
Seite wird geladen ...
Seite wird geladen ...
Seite wird geladen ...
Seite wird geladen ...
Seite wird geladen ...
Seite wird geladen ...
Seite wird geladen ...
-
 1
1
-
 2
2
-
 3
3
-
 4
4
-
 5
5
-
 6
6
-
 7
7
-
 8
8
-
 9
9
-
 10
10
-
 11
11
-
 12
12
-
 13
13
-
 14
14
-
 15
15
-
 16
16
-
 17
17
-
 18
18
-
 19
19
-
 20
20
-
 21
21
-
 22
22
-
 23
23
-
 24
24
-
 25
25
-
 26
26
-
 27
27
-
 28
28
-
 29
29
-
 30
30
-
 31
31
-
 32
32
-
 33
33
-
 34
34
-
 35
35
-
 36
36
-
 37
37
-
 38
38
-
 39
39
-
 40
40
-
 41
41
-
 42
42
-
 43
43
-
 44
44
-
 45
45
-
 46
46
-
 47
47
-
 48
48


CAME XDHDXXXXH Installationsanleitung
- Kategorie
- Digitale Videorecorder (DVR)
- Typ
- Installationsanleitung
in anderen Sprachen
- English: CAME XDHDXXXXH Installation guide
- français: CAME XDHDXXXXH Guide d'installation
- italiano: CAME XDHDXXXXH Guida d'installazione
Verwandte Artikel
-
CAME XDTVI23 Installationsanleitung
-
-
-
-
-
-
-
-
-