
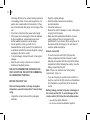
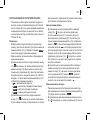
Instruction manual
Инструкция по эксплуатации
Air purifier BR4900
Очиститель воздуха BR4900
brayer.ru

СОДЕРЖАНИЕ
EN ......................................................................................................................................3
DE ....................................................................................................................................14
RU ...................................................................................................................................24
KZ ....................................................................................................................................35

3
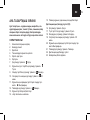
EN
AIR PURIFIER BR4900
An air purier is an appliance intended for cleaning
the air from dust, microbes, pet hair, tobacco
smoke as well as allergens, bacteria and unpleasant
odours.
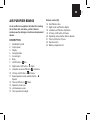
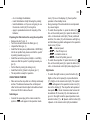
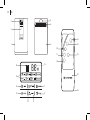
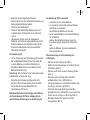
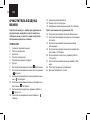
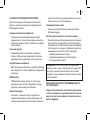
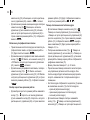
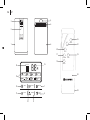
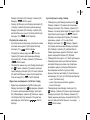
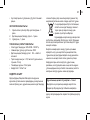
DESCRIPTION
1. Detachable front lid
2. Control panel
3. Display
4. Carrying handle
5. Air outlet grid
6. Body
7. On/O button « On»
8. Night mode on/o button « Night»
9. Ionization mode on/o button « Ionization»
10. UV lamp on/o button « UV lamp»
11. Speed operation mode selection button «
Speed»
12. Timer on/o button « Timer»
13. Operation mode icons
14. «Air cleanness» scale
15. Timer operation time digits
EN
Remote control (22)
16. On/o button «On»
17. Night mode on/o button «Night»
18. Ionization on/o button «Ionization»
19. UV lamp on/o buttot «UV lamp»
20. Operating mode selection button «Speed»
21. Timer on/o button «Timer»
22. Remote control
23. Battery compartment lid

4
EN
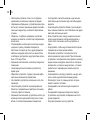
Ч
ТАЙМЕР
СКОРОСТЬ
УФ ЛАМПА ВКЛЮЧЕНИЕ
НОЧНОЙ
РЕЖИМ
ИОНИЗАЦИЯ
УФ ЛАМПА ИОНИЗАЦИЯ ВКЛЮЧЕНИЕ
НОЧНОЙ
РЕЖИМ
ТАЙМЕР
КАЧЕСТВО ВОЗДУХА
ANION
STERILIZE
POWER
SPEED
TIMER
SLEEP
1
2
34
6
16
21
19
22
23
18
14 15
7
8
10 9
12
11
13
17
5
20

5
EN
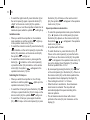
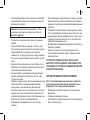
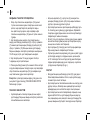
Рiс. 1
Рiс. 5 Рiс. 6
Рiс. 2
Рiс. 7
Рiс. 3
Рiс. 8
Рiс. 4

6
EN
AIR PURIFIER FEATURES
Filters, an air ionizer and an antibacterial UV lamp are
used to clean the indoor air.
Cold catalytic lter:
• The cold catalytic lter lters harmful gases and such
compounds as formaldehyde, ammonia and benzol,
decomposing them into water and carbon dioxide.
Coal lter:
• Activated carbon absorbs unpleasant odors and
tobacco smoke, holds allergens, keeps pollen of
plants and animal hair.
Antibacterial lter:
• The lter is aimed at ghting bacteria and viruses, it
also eectively holds allergens.
НЕРА lter:
• The HEPA lter cleans the air from dust particles
with a diameter of less than 2.5 microns, holds plant
pollen, dangerous viruses and bacteria.
Air ionizer:
• The ionizer saturates the air with negatively charged
ions, which are necessary for the normal life of
people, animals and plants. In the ionization mode
you feel clean, almost mountain air.
UV lamp:
• The UV lamp emission destroys bacteria and viruses.
«Air cleanness» smart sensor:
The smart sensor automatically sets the speed
operating mode of the air purier based on the indoor
air pollution. The air cleanness level is indicated by
color indication on the scale (14) «Air cleanness»:
- red (polluted air);
- orange (normal air composition);
- green (clean air).
ATTENTION! The air purier does not retain such
gases as carbonic oxide (CO) or radon (Rn) and
it cannot be used for air purifying in case of re or
dangerous chemical release.
SAFETY MEASURES AND OPERATION
RECOMMENDATIONS
Read the operation instructions carefully before using
the air purier, after reading keep them for future
reference.
• Use the unit for its intended purpose only, as it is
stated in this manual.
• Mishandling the unit can lead to its breakage and
cause harm to the user or damage to the user’s
property, which is not covered by warranty.
• Make sure that operating voltage of the unit indicated
on the label corresponds to your home mains
voltage.

7
EN
• Place and use the air purier on a at dry and steady
surface. The distance between the unit body and
other furniture and interior objects should be at least
20 cm and 30-50 cm above the unit.
• Do not use the air purier outdoors.
• It is recommended not to use the unit during lightning
storms.
• Protect the unit from impacts, falling, vibrations and
other mechanical stress.
• Never leave the unit connected to the mains
unattended.
• Do not use the unit near heating appliances, heat
sources or open ame.
• Do not use the unit in places where aerosols are
used or sprayed, and in proximity to inammable
liquids.
• Do not immerse the air purier, the power cord or the
power plug into water or any other liquids.
• Do not use the unit in proximity to the kitchen sink, in
bathrooms, near swimming pools or other containers
lled with water.
• If the unit is dropped into water, unplug it
immediately, and only then you can take the unit out
of water.
• Do not let the power cord touch hot surfaces and
sharp edges of furniture.
• Unplug the unit after usage or before cleaning. When
unplugging the unit, hold the power plug and carefully
remove it from the mains socket, do not pull the
power cord, as this can lead to its damage and cause
a short circuit.
• Do not touch the unit body, the power cord and the
power plug with wet hands.
• Use only the removable parts supplied with the unit.
• Do not cover the air purier during the operation.
• Do not cover the air inlets on the unit body and avoid
getting of foreign objects inside them.
• Clean the unit regularly.
• For child safety reasons do not leave polyethylene
bags used as packaging unattended.
Attention! Do not allow children to play with
polyethylene bags or packaging lm. Danger of
suocation!
• The unit is not intended for usage by children.
• Do not leave children unattended to prevent using
the unit as a toy.
• Do not allow children to touch the operating surface,
the unit body, the power cord or the power plug
during operation of the unit.
• Be especially careful if children or disabled persons
are near the operating unit.
• During the unit operation and breaks between
operation cycles, place the unit out of reach of
children.
• The unit is not intended for usage by physically,
sensory, psychically or mentally disabled persons

8
EN
(including children) or by persons lacking experience
or knowledge if they are not under supervision of a
person who is responsible for their safety or if they
are not instructed by this person on the usage of the
unit.
• From time to time check the power cord integrity.
• If the power cord is damaged, it should be replaced
by the manufacturer, a maintenance service or
similar qualied personnel to avoid danger.
• Do not repair the unit by yourself. Do not
disassemble the unit by yourself, if any malfunction
is detected, and after the unit was dropped, unplug it
and apply to the service center.
• To avoid damages, transport the unit in the original
package.
• Keep the unit in a dry cool place out of reach of
children and disabled persons.
THE UNIT IS INTENDED FOR HOUSEHOLD USE
ONLY, DO NOT USE THE UNIT FOR COMMERCIAL
OR LABORATORY PURPOSES.
BEFORE THE FIRST USE
After unit transportation or storage at negative
temperature, unpack it and wait for 3 hours before
using.
• Unpack the unit and remove all the packaging
materials.
• Keep the original package.
• Read the safety measures and operating
recommendations.
• Check the delivery set.
• Examine the unit for damages, in case of damage do
not plug it into the mains.
• Make sure that specied specications of power
supply voltage of the unit correspond to the
specications of your mains. When using the unit in
the mains with 60 Hz frequency, the unit does not
need any additional settings.
Remote control (22)
• To use the remote control (RC) (22) open the
battery compartment lid (23) and insert 2 »AAA”
batteries (not supplied with the unit) into the battery
compartment strictly following the polarity, close the
battery compartment lid (23).
Note: if there is an isolation insert in the battery
compartment, remove it.
• If you are not going to use the remote control for a
long time, open the lid (23) and remove the batteries
from the battery compartment (22) of the remote
control.
Battery leakage can lead to injuries or damages of
the remote control (22). To avoid damages of the
remote control (22), follow the instructions below:
- use only the «AAA» batteries;
- do not use old and new batteries together;

9
EN
- do not recharge the batteries;
- insert the batteries strictly following the polarity;
- take the batteries out if you are not going to use
the remote control (22) for a long time;
- apply to specialized centers for recycling of the
batteries;
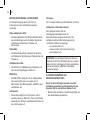
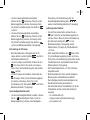
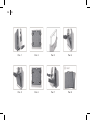
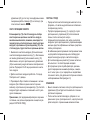
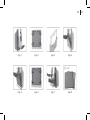
Preparing the lters before the using the air purier
• Remove the lid (1) (pic. 1).
• Turn the locks and remove the lters (pic. 2).
• Unpack the lters (pic. 3).
• Install the rst two-piece (antibacterial + HEPA lter)
into the air purier body, make sure that the »puller”
is pointing towards you (pic. 4).
• Install the second two-piece (catalytic + coal lter),
make sure that the »puller” is pointing towards you
(pic. 5).
• Fix the lters by turning the locks (pic. 6).
• Install the front lid (1) back to its place (pic. 7).
• The air purier is ready for operation.
USING THE AIR PURIFIER
• Place and use the air purier on a at dry and steady
surface. The distance between the unit body and
other furniture and interior objects should be at least
20 cm and 30-50 cm above the unit.
Switching on
• Connect the power plug to the mains socket, the
symbol « » will appear in the operation mode
icons (13) row on the display (3), the air purier
operates in the standby mode.
• Every pressing of the active button is accompanied
by a sound signal.
• To switch the air purier on, press the button (7) «
On» on the control panel (2) or press the button (16)
«On» on the remote control (22). The air purier will
switch on, the scale (14) «Air cleanness» will light up
and the following symbols will appear in the operation
mode icons (13) row:
- «» - maximal speed;
- «» - the UF lamp is on;
- «» - ionization mode on;
- « » - the on/o symbol goes out.
• To switch the air purier o, press the button (7) «
On» on the control panel (2) or press the button (16)
«On» on the remote control (22) and unplug the unit.
Night mode
• To switch the night mode on, press the button (8) «
Night» on the control panel (2) or press the button
(17) «Night» on the remote control (22). The symbol
«» will appear in the operation mode icons (13)
row on the display (3). The air purier will operate at
low speed « », the air cleanness smart sensor will
be switched o, the scale (14) «Air cleanness» will
go out. In the night mode the speed operation mode
selection button (11) « Speed» and the button (20)
«Speed» on the remote control (22) are disabled.

10
EN
• To switch the night mode o, press the button (8) on
the control panel (2) again or press the button (17)
»Night” on the remote control (22), the symbol «
» will go out, and the air purier will switch on at
maximum speed, while the symbol « » will light up.
Ionization mode
• When you switch the air purier on, the ionization
mode switches on and the symbol « » lights up
in the operation mode icons (13) row.
• To switch the ionization mode o, press the button (9)
« Ionization» on the control panel (2) or press the
button (18) «Ionization» on the remote control (22),
the symbol « » will go out.
• To switch the ionization mode on, press again the
button (9) « Ionization» on the control panel (2)
or press the button (18) «Ionization» on the remote
control (22), the symbol « » will appear in the
operation mode icons (13) row.
Switching the UV lamp on
• When you switch the air purier on, the UV lamp
switches on and the symbol « » lights up in the
operation mode icons (13) row.
• To switch the UV lamp o, press the button (10) «
UV lamp» or press the button (19) «UV lamp» on the
remote control (22), the symbol « » will go out.
• To switch the UV lamp on, press again the button
(10) « UV lamp» on the control panel (2) or press
the button (19) «UV lamp» on the remote control
(22), the symbol « » will appear in the operation
mode icons (13) row.
Speed operation mode selection
• To select the speed operation mode, press the button
(11) « Speed» on the control panel (2) or press
the button (20) «Speed» on the remote control (22),
the symbols « » will appear in the operation
mode icons (13) row.
• Air purier switch o timer
• To switch the timer on, press the button (12) «
Timer» on the control panel (2) or press the button
(21) «Timer» on the remote control (22), the symbol
« » will appear in the operation mode icons (13)
row on the display (3) and the digits (15) will show
the timer operation time «1.0 h».
• By consequently pressing the button (12) » Timer”
on the control panel (2) or the button (21) «Timer» on
the remote control (22), set the timer operation time,
the operation time is displayed by the digits (15).
• Timer setting time is from 1 to 12 hours.
• When the timer is switched on, the air cleanness
smart sensor is activated. The air purier will
automatically adjust the speed according to the
indoor air pollution.
• The air cleanness level is shown with colored
symbols on the scale (14) «Air cleanness» on the
display (3):

11
EN
• - red (polluted air);
• - orange (normal air composition);
• - green (clean air).
• To switch the timer o, repeatedly press the button
(12) » Timer” on the control panel (2), or the button
(21) »Timer” on the remote control (22) until the timer
operation time digits (15) go out, and the symbol »
” goes out.
MEMORY FUNCTION RESET
• If the indicator (14) «Air cleanness» is displayed in
red and the air purier suddenly switches o, you
may have to reboot the air smart sensor, otherwise
the indicator (14) «Air cleanness» will glow red.
1. Switch the air purier o. To switch the air purier o,
press the button (7) « On» on the control panel (2) or
press the button (16) «On» on the remote control (22)
and unplug the unit. Wait for 15-20 seconds and switch
the air purier on.
2. Let the air purier operate for 15 seconds. Repeat the
step 1 twice.
3. Reset the memory in a room with clean air (no
tobacco smoke or other odors), otherwise the indicator
(14) «Air cleanness» will incorrectly show the air
cleanness level in the room.
Note: to keep the lters in good condition, they must be
cleaned periodically (see the chapter CLEANING AND
MAINTENANCE).
CLEANING AND MAINTENANCE
• Before cleaning the air purier switch it o and make
sure that the power plug is not inserted into the
mains socket.
• Wipe the front lid (1), the unit body (6) and the
remote control (22) with a slightly damp cloth and
then wipe dry.
• Do not use liquid detergents, abrasive cleaners and
any solvents to clean the air purier and the remote
control.
• To avoid the risk of electric shock provide that no
water or other liquid gets into the air purier body.
• To clean the air grids (5), use a vacuum cleaner with
a corresponding attachment.
• To extend the service life of the lters, it is
recommended to periodically remove the lters, clean
them from dust, lint, etc. and expose them to sunlight
to remove odors and neutralize bacteria (pic. 8).
STORAGE
• Take the batteries out if you are not going to use the
remote control (22) for a long time
• After cleaning put the air purier away for storage
in a dry cool place away from children and disabled
persons.
• Before using the air purier next time, it is
recommended to check the unit operability and
integrity of the power cord isolation and the power
cord plug.
• Carry the air purier by the handle (4).

12
EN
DELIVERY SET
1. Air purier with installed lters - 1 pc.
2. Remote control – 1 pc.
3. Instruction manual – 1 pc.
TECHNICAL SPECIFICATIONS
• Power supply: 220-240 V, ~ 50/60 Hz
• Rated input power: 40 W
• Remote control: 3 V - 2 «AAA» batteries
Negative ion output: ≥ 10,0 mln/cm³ (in 10 cm from
the air outlet grid)
• Room area: to 18 m²
• Productivity: 160 m³/hour
RECYCLING
To prevent possible damage to the
environment or harm to the health of
people by uncontrolled waste disposal,
after expiration of the service life of the unit
or the batteries (if included), do not discard
them with usual household waste, take the
unit and the batteries to specialized stations for further
recycling.
The waste generated during the disposal of products
is subject to mandatory collection and consequent
disposal in the prescribed manner.
For further information about recycling of this product
apply to a local municipal administration, a household
waste disposal service or to the shop where you
purchased this product.
The manufacturer reserves the right to change the
design, structure and speci-cations not aecting
general operation principles of the unit, without prior
notice.
The unit operating life is 3 years
The manufacturing date is specied in the serial
number.
In case of any malfunctions, it is necessary to apply
promptly to the authorized service center.

13
DE
LUFTREINIGER BR4900
Der Luftreiniger ist ein Gerät zum Entfernen von Staub,
Mikroben, Tierhaar, Tabakrauch und damit Allergenen,
Bakterien und unangenehmen Gerüchen aus der Luft.
BESCHREIBUNG
1. Abnehmbarer Vorderdeckel
2. Bedienungsplatte
3. Bildschirm
4. Tragegri
5. Luftauslassgitter
6. Gehäuse
7. Ein-/Ausschaltaste « Ein»
8. Ein-/Ausschaltaste des Nachtbetriebs « Nacht»
9. Ein-/Ausschalttaste des Ionisierungsbetriebs «
Ionisierung»
10. Ein-/Ausschalttaste der UV-Lampe « UV-
Lampe»
11. Geschwindigkeitsbetriebswahltaste «
Geschwindigkeit»
12. Ein-/Ausschalttaste des Timers « Timer»
13. Betriebssymbole
14. «Luftreinheit»-Skala
15. Timerbetriebszahlensymbole
DE
Fernbedienung (22)
16. Ein-/Ausschaltaste «Ein»
17. Ein-/Ausschaltaste des Nachtbetriebs «Nacht»
18. Ein-/Ausschalttaste des Ionisierungsbetriebs
«Ionisierung»
19. Ein-/Ausschalttaste der UV-Lampe «UV-Lampe»
20. Geschwindigkeitsbetriebswahltaste
«Geschwindigkeit»
21. 21. Ein-/Ausschalttaste des Timers «Timer»
22. Fernbedienung
23. Batteriefachdeckel

14
DE
Ч
ТАЙМЕР
СКОРОСТЬ
УФ ЛАМПА ВКЛЮЧЕНИЕ
НОЧНОЙ
РЕЖИМ
ИОНИЗАЦИЯ
УФ ЛАМПА ИОНИЗАЦИЯ ВКЛЮЧЕНИЕ
НОЧНОЙ
РЕЖИМ
ТАЙМЕР
КАЧЕСТВО ВОЗДУХА
ANION
STERILIZE
POWER
SPEED
TIMER
SLEEP
1
2
34
6
16
21
19
22
23
18
14 15
7
8
10 9
12
11
13
17
5
20

15
DE
Abb. 1
Abb. 5 Abb. 6
Abb. 2
Abb. 7
Abb. 3
Abb. 8
Abb. 4

16
DE
BESONDERHEITEN DES LUFTREINIGERS
Zur Raumluftreinigung werden die Filter, ein
Luftionisator und eine UV-Entkeimungslampe
verwendet.
Kaltes katalytisches Filter:
• Das kalte katalytische Filter ltriert schädliche Gase
sowie Verbindungen wie Formaldehyd, Ammoniak
und Benzol und zersetzt sie in Wasser und
Kohlendioxid.
Kohlenlter:
• Die Aktivkohle absorbiert unangenehme Gerüche
und Tabakrauch, fängt Allergene, Panzenpollen und
Tierhaar ein.
Antibakterielles Filter:
• Das Filter dient zur Bekämpfung von Bakterien und
Viren ab und fängt Allergene eektiv ein.
HEPA-Filter:
• Das HEPA-Filter reinigt die Luft von Staubpartikeln
mit einem Durchmesser von weniger als 2,5
Mikrometern, fängt Panzenpollen, gefährliche Viren
und Bakterien ein.
Luftionisator:
• Der Ionisator sättigt die Luft mit Anionen, die für
normales Leben von Menschen, Tieren und Panzen
notwendig sind. Mit dem Ionisationsbetrieb fühlen Sie
reine, fast bergige Luft.
UV-Lampe:
Die UV-Lampe-Strahlung zerstört Bakterien und Viren.
Intelligenter «Luftreinheit»-Sensor:
Der intelligente Sensor stellt die
Luftreinigergeschwindigkeit nach der
Raumluftverschmutzung automatisch ein. Die
Luftreinheit wird durch die Farbanzeige auf der
«Luftreinheit»-Skala (14) angezeigt:
- rot (verschmutzte Luft);
- orange (normale Luftzusammensetzung);
- grün (saubere Luft).
ACHTUNG! Der Luftreiniger fängt keine Gase wie
Kohlenmonoxid (CO) oder Radon (Rn) ein und kann
daher nicht zur Luftreinigung im Falle eines Brandes
oder einer Emission gefährlicher Chemikalien
verwendet werden.
SICHERHEITSHINWEISE UND
BEDIENUNGSANLEITUNG
Bevor Sie den Luftreiniger benutzen, lesen Sie
die Bedienungsanleitung aufmerksam durch und
bewahren Sie sie zum späteren Gebrauch auf.
• Benutzen Sie das Gerät nur bestimmungsmäßig und
laut dieser Bedienungsanleitung.

17
DE
• Tauchen Sie den Luftreiniger, das Netzkabel oder
den Netzstecker ins Wasser oder jegliche andere
Flüssigkeiten nicht ein.
• Benutzen Sie das Gerät in der Nähe von Spülbecken,
in Badezimmern und neben Wasserbecken oder
anderen mit Wasser gefüllten Behältern nicht.
• Falls das Gerät ins Wasser gefallen ist, ziehen Sie
den Netzstecker aus der Steckdose sofort heraus,
erst danach holen Sie das Gerät aus dem Wasser
heraus.
• Achten Sie darauf, dass das Netzkabel heiße
Oberächen und scharfe Möbelkanten nicht berührt.
• Trennen Sie das Gerät nach dem Gebrauch oder
vor der Reinigung vom Stromnetz ab. Wenn Sie
das Gerät vom Stromnetz abtrennen, halten Sie
den Netzstecker fest und ziehen Sie ihn aus der
Steckdose vorsichtig heraus; ziehen Sie das
Netzkabel nicht, da es zu seiner Beschädigung und
einem Kurzschluss führen kann.
• Berühren Sie das Gerätegehäuse, das Netzkabel
und den Netzstecker mit nassen Händen nicht.
• Benutzen Sie nur die mitgelieferten abnehmbaren
Teile.
• Decken Sie den Luftreiniger während des Betriebs
nicht ab.
• Sperren Sie die Luftlöcher am Gerätegehäuse
nicht und achten Sie darauf, dass keine fremden
Gegenstände darin gelangen.
• Reinigen Sie das Gerät regelmäßig.
• Missbrauch des Geräts kann zu seiner Störung
führen, den Benutzer oder sein Eigentum
beschädigen und ist kein Garantiefall.
• Vergewissern Sie sich, dass die auf dem
Bezeichnungszettel angegebene Betriebsspannung
und die Netzspannung übereinstimmen.
• Stellen Sie den Luftreiniger auf einer ebenen,
trockenen und standfesten Oberäche auf und
benutzen Sie ihn ebenda. Der Abstand zwischen
dem Gerätegehäuse und Wänden, anderen Möbeln
und Einrichtungsgegenständen soll mindestens 20
cm betragen, und der Freiraum darüber soll 30 cm
bis 50 cm machen.
• Es ist nicht gestattet, den Luftreiniger draußen zu
benutzen.
• Es ist nicht empfohlen, das Gerät bei Gewitter zu
benutzen.
• Schützen Sie das Gerät vor Stößen, Stürzen,
Vibrationen und anderen mechanischen
Einwirkungen.
• Lassen Sie das ans Stromnetz angeschlossene
Gerät nie unbeaufsichtigt.
• Benutzen Sie das Gerät in direkter Nähe von
Heizgeräten, Wärmequellen oder oenem Feuer
nicht.
• Es ist verboten, das Gerät an den Orten, wo
Sprays verwendet werden, sowie in der Nähe von
leichtentzündbaren Flüssigkeiten zu benutzen.

18
DE
• Aus Kindersicherheitsgründen lassen Sie die als
Verpackung verwendeten Plastiktüten nie ohne
Aufsicht.
• Wenn das Netzkabel beschädigt ist, soll es vom
Hersteller, vom Kundendienst oder von ähnlich
qualiziertem Personal ersetzt werden, um Gefahren
zu vermeiden.
• Es ist nicht gestattet, das Gerät selbständig zu
reparieren. Nehmen Sie das Gerät selbständig
nicht auseinander; bei der Feststellung jeglicher
Beschädigungen, sowie im Sturzfall, trennen Sie das
Gerät vom Stromnetz ab und wenden Sie sich an
einen Kundendienst.
• Um Beschädigungen zu vermeiden, transportieren
Sie das Gerät nur in der Fabrikverpackung.
• Bewahren Sie das Gerät an einem trockenen,
kühlen und für Kinder und behinderte Personen
unzugänglichen Ort auf.
DAS GERÄT IST NUR FÜR DEN GEBRAUCH IM
HAUSHALT GEEIGNET, ES IST VERBOTEN, DAS
GERÄT ZU GESCHÄFTS- ODER LABORZWECKEN
ZU BENUTZEN.
VOR DER ERSTEN VERWENDUNG
Packen Sie das Gerät aus und warten Sie
mindestens 3 Stunden ab, nachdem es bei einer
negativen Temperatur transportiert oder aufbewahrt
worden ist.
• Packen Sie das Gerät aus und entfernen Sie alle
Verpackungsmaterialien.
Achtung! Lassen Sie Kinder mit Plastiktüten oder
Verpackungsfolien nicht spielen. Erstickungsgefahr!
• Das Gerät ist nicht für Kinder bestimmt.
• Beaufsichtigen Sie Kinder, damit sie das Gerät als
Spielzeug nicht benutzen.
• Lassen Sie Kinder die Arbeitsäche, das
Gerätegehäuse, das Netzkabel oder den Netzstecker
während des Gerätebetriebs nicht berühren.
• Besondere Vorsichtsmaßnahmen sind in den
Fällen angesagt, wenn sich Kinder oder behinderte
Personen während des Gerätebetriebs in der Nähe
aufhalten.
• Während des Betriebs und der Pausen zwischen
den Betriebszyklen stellen Sie das Gerät an einen für
Kinder unzugänglichen Ort auf.
• Das Gerät ist für Personen (darunter Kinder)
mit Körper-, Nerven- oder Geistesstörungen
oder Personen ohne ausreichende Erfahrung
und Kenntnisse nicht geeignet, wenn sie sich
unter Aufsicht der Person, die für ihre Sicherheit
verantwortlich ist, nicht benden oder entsprechende
Anweisungen über die Gerätenutzung nicht
bekommen haben.
• Prüfen Sie die Unversehrtheit des Netzkabels
periodisch.

19
DE
• Bewahren Sie die Originalverpackung auf.
• Machen Sie sich mit den Sicherheitsmaßnahmen und
Bedienungsempfehlungen bekannt.
• Prüfen Sie die Vollständigkeit.
• Prüfen Sie das Gerät auf Beschädigungen; wenn
es beschädigt ist, schließen Sie es ans Stromnetz
nicht an.
• Vergewissern Sie sich, dass die angegebenen
Parameter der Geräteversorgungsspannung und die
Stromnetzparameter übereinstimmen. Beim 60-Hz-
Stromnetz-Gerätebetrieb sind keine zusätzlichen
Maßnahmen erforderlich.
Fernbedienung (22)
• Vor der Verwendung der Fernbedienung (22) machen
Sie den Batteriefachdeckel (23) auf und setzen Sie
2 «AAA»-Batterien unter strikter Einhaltung der
Polarität ins Batteriefach ein und machen Sie den
Batteriefachdeckel (23) zu.
Anmerkung: beim Vorhanden einer Isolierzwischenlage
im Batteriefach entfernen Sie diese.
• Wenn Sie die Fernbedienung längere Zeit nicht
benutzen, önen Sie den Deckel (23) und nehmen
Sie die Batterien aus dem Batteriefach der
Fernbedienung (22) heraus.
Batterieauslauf kann zu Verletzungen oder Störung
der Fernbedienung (22) führen, befolgen Sie die
nachstehenden Anweisungen, um die Störung der
Fernbedienung (22) zu vermeiden:
- verwenden Sie nur «AAA»-Batterien;
- es ist verboten, gebrauchte und neue Batterien
gleichzeitig zu verwenden;
- das Auaden der Batterien ist verboten;
- setzen Sie die Batterien unter strikter Einhaltung
der Polarität ein;
- nehmen Sie die Batterien heraus, wenn die
Fernbedienung (22) längere Zeit nicht benutzt
wird;
- geben der Batterien bei einer spezialisierten
Entsorgungsstelle ab;
Filtervorbereitung vor der Verwendung des
Luftreinigers
• Nehmen Sie den Deckel (1) ab (Abb. 1).
• Drehen Sie die Verriegelungen und nehmen Sie die
Filter heraus (Abb. 2).
• Nehmen Sie die Filter aus der Verpackung heraus
(Abb. 3).
• Setzen Sie das erste Zweikomponentenlter
(antibakterielles Filter + HEPA-Filter) ins
Luftreinigergehäuse ein und achten Sie darauf, dass
die «Zunge» zu Ihnen zeigt (Abb. 4).
• Setzen Sie das zweite Zweikomponentenlter
(katalytisches Filter + Kohlenlter) ein und achten Sie
darauf, dass die «Zunge» zu Ihnen zeigt (Abb. 5).
• Befestigen Sie die Filter durchs Drehen der
Verriegelungen (Abb. 6).

20
DE
• Stellen Sie den Vorderdeckel (1) zurück auf (Abb. 7).
• Der Luftreiniger ist betriebsbereit.
VERWENDUNG DES LUFTREINIGERS
• Stellen Sie den Luftreiniger auf einer ebenen,
trockenen und standfesten Oberäche auf und
benutzen Sie ihn ebenda. Der Abstand zwischen
dem Gerätegehäuse und Wänden, anderen Möbeln
und Einrichtungsgegenständen soll mindestens 20
cm betragen, und der Freiraum darüber soll 30 cm
bis 50 cm machen.
Einschaltung
• Stecken Sie den Netzstecker in eine Steckdose ein,
auf dem Bildschirm (3) in der Betriebssymbolzeile
(13) wird das Symbol « » angezeigt, der
Luftreiniger ist im Wartebetrieb.
• Bei jedem Drücken der aktiven Taste ertönt ein
Tonsignal.
• Um den Luftreiniger einzuschalten, drücken Sie
die « Ein»-Taste (7) auf der Bedienungsplatte
(2) oder drücken Sie die «Ein»-Taste (16) auf
der Fernbedienung (22), dabei schaltet sich der
Luftreiniger ein, die «Luftreinheit»-Skala (14)
leuchtet, in der Betriebssymbolzeile (13) werden
folgende Symbole angezeigt:
- «» - maximale Geschwindigkeit;
- «» - die UV-Lampe wird aktiviert;
- «» - der Ionisierungsbetrieb wird aktiviert;
- «» - das Ein-Symbol erlischt.
• Um den Luftreiniger auszuschalten, drücken Sie
die « Ein»-Taste (7) auf der Bedienungsplatte
(2) oder drücken Sie die «Ein»-Taste (16) auf der
Fernbedienung (22) und ziehen Sie den Netzstecker
aus der Steckdose heraus.
Nachtbetrieb
• Um den Nachtbetrieb zu aktivieren, drücken Sie «
Nacht»-Taste (8) auf der Bedienungsplatte (2) oder
die «Nacht»-Taste (17) auf der Fernbedienung (22).
Auf dem Bildschirm (3) in der Betriebssymbolzeile
(13) wird das Symbol « » angezeigt. Der
Luftreiniger wird mit niedriger Geschwindigkeit «
» betrieben, der intelligente Luftreinheitssensor wird
deaktiviert, die «Luftreinheit»-Skala (14) erlischt. Im
Nachtbetrieb sind die Geschwindigkeitseinstelltaste
(11) « Geschwindigkeit» und die
«Geschwindigkeit»-Taste (20) auf der Fernbedienung
(22) inaktiv.
• Um den Nachtbetrieb auszuschalten, drücken Sie
erneut die Taste (8) auf der Bedienungsplatte (2)
oder die «Nacht»-Taste (17) auf der Fernbedienung
(22), das Symbol « » erlischt, und der
Luftreiniger startet mit maximaler Geschwindigkeit,
dabei leuchtet das Symbol « ».
Luftionisierungsbetrieb
• Beim Einschalten des Luftreinigers wird der
Ionisierungsbetrieb aktiviert, und das Symbol « »
leuchtet in der Betriebssymbolzeile (13).
Seite wird geladen ...
Seite wird geladen ...
Seite wird geladen ...
Seite wird geladen ...
Seite wird geladen ...
Seite wird geladen ...
Seite wird geladen ...
Seite wird geladen ...
Seite wird geladen ...
Seite wird geladen ...
Seite wird geladen ...
Seite wird geladen ...
Seite wird geladen ...
Seite wird geladen ...
Seite wird geladen ...
Seite wird geladen ...
Seite wird geladen ...
Seite wird geladen ...
Seite wird geladen ...
Seite wird geladen ...
Seite wird geladen ...
Seite wird geladen ...
Seite wird geladen ...
Seite wird geladen ...
Seite wird geladen ...
Seite wird geladen ...
Seite wird geladen ...
Seite wird geladen ...
-
 1
1
-
 2
2
-
 3
3
-
 4
4
-
 5
5
-
 6
6
-
 7
7
-
 8
8
-
 9
9
-
 10
10
-
 11
11
-
 12
12
-
 13
13
-
 14
14
-
 15
15
-
 16
16
-
 17
17
-
 18
18
-
 19
19
-
 20
20
-
 21
21
-
 22
22
-
 23
23
-
 24
24
-
 25
25
-
 26
26
-
 27
27
-
 28
28
-
 29
29
-
 30
30
-
 31
31
-
 32
32
-
 33
33
-
 34
34
-
 35
35
-
 36
36
-
 37
37
-
 38
38
-
 39
39
-
 40
40
-
 41
41
-
 42
42
-
 43
43
-
 44
44
-
 45
45
-
 46
46
-
 47
47
-
 48
48


Verwandte Artikel
-
Brayer BR4930 Bedienungsanleitung
-
Brayer BR4902 Benutzerhandbuch
-
-
 Brayer BR4901 Bedienungsanleitung
-
 Brayer BR4950 Bedienungsanleitung
-
-
 Brayer BR4804 Bedienungsanleitung
-
 Brayer BR4951 Bedienungsanleitung
-
 Brayer BR4971 Bedienungsanleitung
-
 Brayer BR4803 Bedienungsanleitung


