Brayer BR4902 Benutzerhandbuch
- Kategorie
- Luftreiniger
- Typ
- Benutzerhandbuch

Instruction manual
Инструкция по эксплуатации
Air purifier BR4902
Очиститель воздуха BR4902
brayer.ru

СОДЕРЖАНИЕ
EN ......................................................................................................................................3
DE ....................................................................................................................................13
RU ...................................................................................................................................24
KZ ....................................................................................................................................35

3
EN
AIR PURIFIER BR4902
An air purier is an appliance intended for cleaning
the air from dust, microbes, pet hair, tobacco
smoke as well as allergens, bacteria and unpleasant
odours.
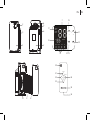
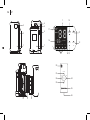
DESCRIPTION
1. Detachable front lid
2. Control/indication panel
3. Air intake grid (on both sides of the body)
4. Carrying handle
5. Air outlet grid
6. Air purity sensor
7. Body
8. Prelter
9. Carbon lter
10. HEPA lter
Control/indication panel (2)
11. «ON/OFF» button
12. Selection button for the high-speed operating mode
/ switching on the night operating mode «Speed»
13. Timer on/o button «Timer»
14. Ionization mode symbol « »
15. Speed operation mode symbol « »
16. Timer operation symbol / digital symbols of timer
operation time « »
EN
17. Indicator of the need to clean / replace the lters «
»
18. Air purity symbol « » / digital symbols for
air purity
19. Button for on / o turning of the ionization mode
«Ionization» / resetting the lter operation time
Remote control (26)
20. «ON/OFF» button
21. Ionization mode on/o button «Ionization»
22. Selection button for the high-speed operating mode
/ switching on the night operating mode «Speed»
23. Button for resetting of the lter operation time
«RESET»
24. Timer on/o button «Timer»
25. Remote control
26. Battery holder

4
EN
BK-05
Anion ON/OFF
Tim er Fan Speeds
ON/OFF
ANION
SPEED
RESET
TIMING
1
10 9 8
7
18 19
36
17
11
12
131415
16
20
21
22 24
25
26
23
25
4

5EN
Рiс. 1
Рiс. 3 Рiс. 4
Рiс. 7
Рiс. 5
Рiс. 8
Рiс. 6
Рiс. 2
8 9 10

6
EN
AIR PURIFIER FEATURES
Use lters and the air ionizer to clean the air in the room
(pic. 1).
Prelter (8):
• The ltering mesh retains dust particles which are >
0.2 mm, the lter is easy to clean and it can be used
multiple times.
Coal lter (9):
• Activated carbon absorbs unpleasant odors and
tobacco smoke, holds allergens, keeps pollen of
plants and animal hair.
НЕРА lter (10):
• The HEPA lter cleans the air from dust particles
with a diameter of less than 2.5 microns, holds plant
pollen, dangerous viruses and bacteria.
Air ionizer:
• The ionizer saturates the air with negatively charged
ions, which are necessary for the normal life of
people, animals and plants. In the ionization mode
you feel clean, almost mountain air.
«Air cleanness» smart sensor:
The smart sensor automatically sets the speed
operating mode of the air purier based on the indoor
air pollution. The state of air purity is indicated by the
indication « » and digital symbols:
- less than 19
- 20-29
- more than 30
ATTENTION! The air purier does not retain such
gases as carbonic oxide (CO) or radon (Rn) and
it cannot be used for air purifying in case of re or
dangerous chemical release.
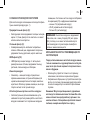
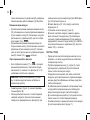
SAFETY MEASURES AND OPERATION
RECOMMENDATIONS
Read the operation instructions carefully before using
the air purier, after reading keep them for future
reference.
• Use the unit for its intended purpose only, as it is
stated in this manual.
• Mishandling the unit can lead to its breakage and
cause harm to the user or damage to the user»s
property, which is not covered by warranty.
Attention! A lithium battery is used in the remote
control. To avoid danger, do not allow children to
play with the battery. If your child has swallowed a
battery, immediately see a doctor.
• Make sure that operating voltage of the unit indicated
on the label corresponds to your home mains
voltage.

7
EN
• Do not connect the unit to external timers or remote
control mains sockets.
• Place and use the air purier on a at dry and steady
surface. The distance between the unit body and
other furniture and interior objects should be at least
20 cm and 30-50 cm above the unit.
• Do not use the air purier outdoors.
• It is recommended not to use the unit during lightning
storms.
• Protect the unit from impacts, falling, vibrations and
other mechanical stress.
• Never leave the unit connected to the mains
unattended.
• Do not use the unit near heating appliances, heat
sources or open ame.
• Do not use the unit in places where aerosols are
used or sprayed, and in proximity to inammable
liquids.
• Do not immerse the air purier, the power cord or the
power plug into water or any other liquids.
• Do not use the unit in proximity to the kitchen sink, in
bathrooms, near swimming pools or other containers
lled with water.
• If the unit is dropped into water, unplug it
immediately, and only then you can take the unit out
of water.
• Do not let the power cord touch hot surfaces and
sharp edges of furniture.
• Unplug the unit after usage or before cleaning. When
unplugging the unit, hold the power plug and carefully
remove it from the mains socket, do not pull the
power cord, as this can lead to its damage and cause
a short circuit.
• Do not touch the unit body, the power cord and the
power plug with wet hands.
• Use only the removable parts supplied with the unit.
• Do not cover the air purier during the operation.
• Do not cover the air inlets on the unit body and avoid
getting of foreign objects inside them.
• Clean the unit regularly.
• For child safety reasons do not leave polyethylene
bags used as packaging unattended.
Attention! Do not allow children to play with
polyethylene bags or packaging lm. Danger of
suocation!
• The unit is not intended for usage by children.
• Do not leave children unattended to prevent using
the unit as a toy.
• Do not allow children to touch the operating surface,
the unit body, the power cord or the power plug
during operation of the unit.
• Be especially careful if children or disabled persons
are near the operating unit.
• During the unit operation and breaks between
operation cycles, place the unit out of reach of
children.

8
EN
• The unit is not intended for usage by physically,
sensory, psychically or mentally disabled persons
(including children) or by persons lacking experience
or knowledge if they are not under supervision of a
person who is responsible for their safety or if they
are not instructed by this person on the usage of the
unit.
• From time to time check the power cord integrity.
• If the power cord is damaged, it should be replaced
by the manufacturer, a maintenance service or
similar qualied personnel to avoid danger.
• Do not repair the unit by yourself. Do not
disassemble the unit by yourself, if any malfunction
is detected, and after the unit was dropped, unplug it
and apply to the service center.
• To avoid damages, transport the unit in the original
package.
• Keep the unit in a dry cool place out of reach of
children and disabled persons.
THE UNIT IS INTENDED FOR HOUSEHOLD USE
ONLY, DO NOT USE THE UNIT FOR COMMERCIAL
OR LABORATORY PURPOSES.
BEFORE THE FIRST USE
After unit transportation or storage at negative
temperature, unpack it and wait for 3 hours before
using.
• Unpack the unit and remove all the packaging
materials.
• Keep the original package.
• Read the safety measures and operating
recommendations.
• Check the delivery set.
• Examine the unit for damages, in case of damage do
not plug it into the mains.
• Make sure that specied specications of power
supply voltage of the unit correspond to the
specications of your mains.
Remote control (25)
Attention! A lithium battery is used in the remote
control. To avoid danger, do not allow children to play
with the battery. If your child has swallowed a battery,
immediately see a doctor.
Battery installation/replacing (pic. 2)
• Press on the clamp and remove the battery holder
(26) from the remote control (25) body, insert a
CR2025 battery (supplied with the unit) into the
holder, strictly following the polarity.
• Install the battery holder (26) into the remote control
(25).
Notes:
- if there is an isolation insert, remove it.
- replace the battery in time;
- do not recharge the lithium battery;

9
EN
- remove the battery if you are not planning to use
the unit for a long time;
- remove the used battery from the remote control
(25) and dispose of it.
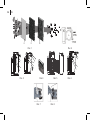
Preparing the lters before the using the air purier
• Remove the lid (1) (pic. 3).
• Remove the lters from the air purier»s body.
• Unpack the lters (pic. 4).
• Install the HEPA lter (10) into the air purier body
(pic. 5).
• Install the second two-piece (catalytic + coal lter),
make sure that the »puller» is pointing towards you
(pic. 5).
• Install the prelter (8) (g. 5).
• Install the front lid (1) back to its place (pic. 6).
• The air purier is ready for operation.
USING THE AIR PURIFIER
• Place and use the air purier on a at dry and steady
surface. The distance between the unit body and
other furniture and interior objects should be at least
20 cm and 30-50 cm above the unit.
Switching on
• Insert the power plug into the mains socket and a
beep will sound on the control / indication panel
(2) for the self-test, all symbols will be displayed
alternately, and then all symbols will ash and go out
- the air purier is in standby mode.
• Every pressing of the active button is accompanied
by a sound signal.
• To turn on the air purier, press the «On / O» button
(11) on the control / indication panel (2) or press the
«On / O» button (20) on the remote control (25) and
the air purier will start up.
• Numerical symbols (18) will show the air condition in
the room:
- less than 19 (polluted air);
- 20-29 (normal air composition);
- more than 30 (clean air).
• To turn o the air purier, press and hold the «On /
O» button (11) on the control / indication panel (2)
for 3 seconds or press and hold the «On / O» button
(20) for 3 seconds on the remote control (25) and
disconnect the power plug from the mains socket.
Speed operation mode selection
• To select a high-speed operating mode, press the
«Speed» button (12) on the control / indication panel
(2) or press the «Speed» button (22) on the remote
control (25) and the operating mode indicators (15)
will light up:
- « » maximum speed
- « » medium speed;
- « » low speed (night mode)
- « » automatic operation mode, high-
speed operation mode of the air purier is set
automatically depending on the air purity in the
room.

10
EN
Night mode
• To turn the night mode on, press and hold the
«Speed» button (12) on the control / indication panel
(2) for 3 seconds or press and hold the «Speed»
button (22) on the remote control (25) for 3 seconds.
• In night mode, the air purier will turn on at low speed
«» and all symbols will go out.
• To turn the night mode o - press any button on the
control / indication panel (2) or press any button on
the remote control (25).
Air purier switch o timer
• By consequently pressing the button (13) «Timer»
on the control/indication panel (2) or the button (24)
«Timer» on the remote control (25), set the timer
operation time, the operation time is displayed by the
digits (16).
• Timer setting time is from 1 to 24 hours.
• To turn the timer o, press and hold the «Timer»
button (13) on the control / indication panel (2) for 3
seconds or press and hold the «Timer» button (24)
on the remote control (5) and the digital symbols of
timer operation time(16) will be reset.
Ionization mode
• To switch the ionization mode on, press the «
Ionization» button (19) on the control/indication
panel (2) or press the «Ionization» button (21) on the
remote control (25) and the symbol (14) « » will
light up.
• To switch the ionization mode o, press the
«Ionization» button (19) on the control/indication
panel (2) or press the «Ionization» button (21) on the
remote control (25) and the symbol (14) « » will
go out.
Resetting the lter operation time
• If the symbol (17) « » is displayed, you will
heat a long beep sound and the air purier will be
switched o, this means that the lters (8, 9, 10) need to
be cleaned or replaced.
ATTENTION! Before removing the lid (1), make sure
that the power plug is not inserted into the mains
socket.
• Remove the cover (1) (g. 3) and take out the prelter
(8).
• Using a household vacuum cleaner with an
appropriate attachment, carefully vacuum the outer
surface of the prelter (8), if there is dust on the
charcoal lter (9) and the HEPA lter (10), vacuum them
too.
• Insert lters (10, 9, 8) into the air purier body (g. 5).
• Install the lid (1) back to its place (g. 6).
• Turn on the air purier, press and hold the «Ionization»
button (19) on the control / indication panel (2) for 3
seconds or press and hold the «RESET» button (23) on
the remote control (25) for 3 seconds and the symbol
(18) « » will go out.

11
EN
CLEANING AND MAINTENANCE
• Before cleaning the air purier switch it o and make
sure that the power plug is not inserted into the
mains socket.
• Wipe the front lid (1), the unit body (7) and the
remote control (25) with a slightly damp cloth and
then wipe dry.
• Do not use liquid detergents, abrasive cleaners and
any solvents to clean the air purier and the remote
control.
• To avoid the risk of electric shock provide that no
water or other liquid gets into the air purier body.
• To clean the air grids (3 and 5), use a vacuum
cleaner with a corresponding attachment.
• Clean the grid and the air purity sensor lid (6) using a
soft brush (g. 7).
• Press the lid clamp and remove it (g. 8), use a wet
cotton swab to clean the air purity sensor, then wipe
the sensor with a dry cotton swab.
• Replace the protective lid of the air purity sensor.
• To extend the service life of the lters, it is
recommended to periodically remove the lters, clean
them from dust, lint, etc.
STORAGE
• Take the batteries out if you are not going to use the
remote control (25) for a long time
• After cleaning put the air purier away for storage
in a dry cool place away from children and disabled
persons.
• Before using the air purier next time, it is
recommended to check the unit operability and
integrity of the power cord isolation and the power
cord plug.
• Carry the air purier by the handle (4).
DELIVERY SET
1. Air purier with installed lters - 1 pc.
2. Remote control – 1 pc.
3. Instruction manual – 1 pc.
TECHNICAL SPECIFICATIONS
• Power supply: 220-240 V, ~ 50 Hz
• Rated input power: 60 W
• Remote control: 3 V - «CR2025» battery
(supplied with the unit)
• Negative ion output: ≥ 10,0 mln/cm³ (in 10 cm from
the air outlet grid)
• Room area: to 38 m²
• Productivity: 277 m³/hour
RECYCLING
To prevent possible damage to the
environment or harm to the health of
people by uncontrolled waste disposal,
after expiration of the service life of the
unit or the batteries (if included), do not
discard them with usual household waste,
take the unit and the batteries to specialized stations for
further recycling.

12
EN
The waste generated during the disposal of products
is subject to mandatory collection and consequent
disposal in the prescribed manner.
For further information about recycling of this product
apply to a local municipal administration, a household
waste disposal service or to the shop where you
purchased this product.
The manufacturer reserves the right to change the
design, structure and speci-cations not aecting
general operation principles of the unit, without prior
notice.
The unit operating life is 3 years
The manufacturing date is specied in the serial
number.
In case of any malfunctions, it is necessary to apply
promptly to the authorized service center.

13
DE
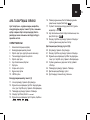
LUFTREINIGER BR4902
Der Luftreiniger ist ein Gerät zum Entfernen von Staub,
Mikroben, Tierhaar, Tabakrauch und damit Allergenen,
Bakterien und unangenehmen Gerüchen aus der Luft.
BESCHREIBUNG
1. Abnehmbarer Vorderdeckel
2. Bedienungs-/Anzeigeplatte
3. Ansaugluftgitter (auf beiden Seiten des Gehäuses)
4. Tragegri
5. Abluftgitter
6. Luftreinheitssensor
7. Gehäuse
8. Vorlter
9. Kohlenlter
10. HEPA-Filter
Bedienungs-/Anzeigeplatte (2)
11. Ein-/Ausschalttaste «Ein/Aus».
12. Taste zur Geschwindigkeitsanwahl / Einschalten
des Nachtbetriebs «Geschwindigkeit»
13. Ein-/Ausschalttaste des Timers «Timer»
14. Zeichen des Ionisierungsbetriebs « »
15. Zeichen der Geschwindigkeitsbetriebe «
»
16. Zeichen des Timerbetriebs / digitale Zeichen der
Timerbetriebszeit « »
DE
17. Indikator für Reinigung/Filterwechsel « »
18. Zeichen der Luftreinheit « » / digitale
Zeichen der Luftreinheit
19. Ein-/Ausschalttaste des Ionisierungsbetriebs
«Ionisierung» / Zurücksetzen der Filterbetriebszeit.
Fernbedienung (26)
20. Ein-/Ausschalttaste «Ein/Aus».
21. Ein-/Ausschalttaste des Ionisierungsbetriebs
«Ionisierung»
22. Taste zur Geschwindigkeitsanwahl / Einschalten
des Nachtbetriebs «Geschwindigkeit»
23. «Zurücksetzen»-Taste zum Zurücksetzen der Filter-
Betriebszeit
24. Ein-/Ausschalttaste des Timers „Timer«
25. Fernbedienung
26. Batteriehalter

14
DE
BK-05
Anion ON/OFF
Tim er Fan Speeds
ON/OFF
ANION
SPEED
RESET
TIMING
1
10 9 8
7
18 19
36
17
11
12
131415
16
20
21
22 24
25
26
23
25
4

15DE
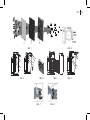
Abb. 1
Abb. 3 Abb. 4
Abb. 7
Abb. 5
Abb. 8
Abb. 6
Abb. 2
8 9 10

16
DE
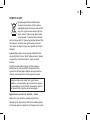
BESONDERHEITEN DES LUFTREINIGERS
Bei der Luftreinigung in Innenräumen werden Filter und
Luftionisator verwendet (Abb. 1).
Vorlter (8):
• Das Filtersieb hält Staubpartikel > 0,2 mm zurück,
der Filter ist leicht zu reinigen und kann wiederholt
verwendet werden.
Kohlenlter (9):
• Die Aktivkohle absorbiert unangenehme Gerüche
und Tabakrauch, fängt Allergene, Panzenpollen und
Tierhaar ein.
HEPA-Filter (10):
• Das HEPA-Filter reinigt die Luft von Staubpartikeln
mit einem Durchmesser von weniger als 2,5
Mikrometern, fängt Panzenpollen, gefährliche Viren
und Bakterien ein.
Luftionisator:
• Der Ionisator sättigt die Luft mit Anionen, die für
normales Leben von Menschen, Tieren und Panzen
notwendig sind. Mit dem Ionisationsbetrieb fühlen Sie
reine, fast bergige Luft.
Intelligenter «Luftreinheit»-Sensor:
Der intelligente Sensor stellt die
Luftreinigergeschwindigkeit nach der
Raumluftverschmutzung automatisch ein. Der
Luftreinheitszustand wird durch Abbildung (18) «
» und digitale Zeichen angezeigt:
- unter 19
- 20-29
- über 30
ACHTUNG! Der Luftreiniger fängt keine Gase wie
Kohlenmonoxid (CO) oder Radon (Rn) ein und kann
daher nicht zur Luftreinigung im Falle eines Brandes
oder einer Emission gefährlicher Chemikalien
verwendet werden.
SICHERHEITSHINWEISE UND
BEDIENUNGSANLEITUNG
Bevor Sie den Luftreiniger benutzen, lesen Sie
die Bedienungsanleitung aufmerksam durch und
bewahren Sie sie zum späteren Gebrauch auf.
• Benutzen Sie das Gerät nur bestimmungsmäßig und
laut dieser Bedienungsanleitung.
• Missbrauch des Geräts kann zu seiner Störung
führen, den Benutzer oder sein Eigentum
beschädigen und ist kein Garantiefall.
Achtung! Die Fernbedienung wird durch eine
Lithiumbatterie betrieben. Lassen Sie die Kinder
nicht mit der Batterie spielen, um Gefahren zu
vermeiden. Wenn das Kind eine Batterie verschluckt
hat, wenden Sie sich sofort an einen Arzt.

17
DE
• Benutzen Sie das Gerät in der Nähe von Spülbecken,
in Badezimmern und neben Wasserbecken oder
anderen mit Wasser gefüllten Behältern nicht.
• Falls das Gerät ins Wasser gefallen ist, ziehen Sie
den Netzstecker aus der Steckdose sofort heraus,
erst danach holen Sie das Gerät aus dem Wasser
heraus.
• Achten Sie darauf, dass das Netzkabel heiße
Oberächen und scharfe Möbelkanten nicht berührt.
• Trennen Sie das Gerät nach dem Gebrauch oder
vor der Reinigung vom Stromnetz ab. Wenn Sie
das Gerät vom Stromnetz abtrennen, halten Sie
den Netzstecker fest und ziehen Sie ihn aus der
Steckdose vorsichtig heraus; ziehen Sie das
Netzkabel nicht, da es zu seiner Beschädigung und
einem Kurzschluss führen kann.
• Berühren Sie das Gerätegehäuse, das Netzkabel
und den Netzstecker mit nassen Händen nicht.
• Benutzen Sie nur die mitgelieferten abnehmbaren
Teile.
• Decken Sie den Luftreiniger während des Betriebs
nicht ab.
• Sperren Sie die Luftlöcher am Gerätegehäuse
nicht und achten Sie darauf, dass keine fremden
Gegenstände darin gelangen.
• Reinigen Sie das Gerät regelmäßig.
• Aus Kindersicherheitsgründen lassen Sie die als
Verpackung verwendeten Plastiktüten nie ohne
Aufsicht.
• Vergewissern Sie sich, dass die auf dem
Bezeichnungszettel angegebene Betriebsspannung
und die Netzspannung übereinstimmen.
• Schließen Sie das Gerät an keine externen Timer
oder elektrischen Steckdosen mit Fernbedienung an.
• Stellen Sie den Luftreiniger auf einer ebenen,
trockenen und standfesten Oberäche auf und
benutzen Sie ihn ebenda. Der Abstand zwischen
dem Gerätegehäuse und Wänden, anderen Möbeln
und Einrichtungsgegenständen soll mindestens 20
cm betragen, und der Freiraum darüber soll 30 cm
bis 50 cm machen.
• Es ist nicht gestattet, den Luftreiniger draußen zu
benutzen.
• Es ist nicht empfohlen, das Gerät bei Gewitter zu
benutzen.
• Schützen Sie das Gerät vor Stößen, Stürzen,
Vibrationen und anderen mechanischen
Einwirkungen.
• Lassen Sie das ans Stromnetz angeschlossene
Gerät nie unbeaufsichtigt.
• Benutzen Sie das Gerät in direkter Nähe von
Heizgeräten, Wärmequellen oder oenem Feuer
nicht.
• Es ist verboten, das Gerät an den Orten, wo
Sprays verwendet werden, sowie in der Nähe von
leichtentzündbaren Flüssigkeiten zu benutzen.
• Tauchen Sie den Luftreiniger, das Netzkabel oder
den Netzstecker ins Wasser oder jegliche andere
Flüssigkeiten nicht ein.

18
DE
Achtung! Lassen Sie Kinder mit Plastiktüten oder
Verpackungsfolien nicht spielen. Erstickungsgefahr!
• Es ist nicht gestattet, das Gerät selbständig zu
reparieren. Nehmen Sie das Gerät selbständig
nicht auseinander; bei der Feststellung jeglicher
Beschädigungen, sowie im Sturzfall, trennen Sie das
Gerät vom Stromnetz ab und wenden Sie sich an
einen Kundendienst.
• Um Beschädigungen zu vermeiden, transportieren
Sie das Gerät nur in der Fabrikverpackung.
• Bewahren Sie das Gerät an einem trockenen,
kühlen und für Kinder und behinderte Personen
unzugänglichen Ort auf.
DAS GERÄT IST NUR FÜR DEN GEBRAUCH IM
HAUSHALT GEEIGNET, ES IST VERBOTEN, DAS
GERÄT ZU GESCHÄFTS- ODER LABORZWECKEN
ZU BENUTZEN.
VOR DER ERSTEN VERWENDUNG
Packen Sie das Gerät aus und warten Sie
mindestens 3 Stunden ab, nachdem es bei einer
negativen Temperatur transportiert oder aufbewahrt
worden ist.
• Packen Sie das Gerät aus und entfernen Sie alle
Verpackungsmaterialien.
• Bewahren Sie die Originalverpackung auf.
• Machen Sie sich mit den Sicherheitsmaßnahmen und
Bedienungsempfehlungen bekannt.
• Prüfen Sie die Vollständigkeit.
• Das Gerät ist nicht für Kinder bestimmt.
• Beaufsichtigen Sie Kinder, damit sie das Gerät als
Spielzeug nicht benutzen.
• Lassen Sie Kinder die Arbeitsäche, das
Gerätegehäuse, das Netzkabel oder den Netzstecker
während des Gerätebetriebs nicht berühren.
• Besondere Vorsichtsmaßnahmen sind in den
Fällen angesagt, wenn sich Kinder oder behinderte
Personen während des Gerätebetriebs in der Nähe
aufhalten.
• Während des Betriebs und der Pausen zwischen
den Betriebszyklen stellen Sie das Gerät an einen für
Kinder unzugänglichen Ort auf.
• Das Gerät ist für Personen (darunter Kinder)
mit Körper-, Nerven- oder Geistesstörungen
oder Personen ohne ausreichende Erfahrung
und Kenntnisse nicht geeignet, wenn sie sich
unter Aufsicht der Person, die für ihre Sicherheit
verantwortlich ist, nicht benden oder entsprechende
Anweisungen über die Gerätenutzung nicht
bekommen haben.
• Prüfen Sie die Unversehrtheit des Netzkabels
periodisch.
• Wenn das Netzkabel beschädigt ist, soll es vom
Hersteller, vom Kundendienst oder von ähnlich
qualiziertem Personal ersetzt werden, um Gefahren
zu vermeiden.

19
DE
• Prüfen Sie das Gerät auf Beschädigungen; wenn
es beschädigt ist, schließen Sie es ans Stromnetz
nicht an.
• Vergewissern Sie sich, dass die angegebenen
Parameter der Geräteversorgungsspannung und die
Stromnetzparameter übereinstimmen.
Fernbedienung (25)
Achtung! Die Fernbedienung funktioniert mit einer
Lithiumbatterie. Lassen Sie die Kinder nicht mit der
Batterie spielen, um Gefahren zu vermeiden. Wenn
das Kind eine Batterie verschluckt hat, wenden Sie
sich sofort an einen Arzt.
• Einsetzen bzw. Ersetzen einer Batterie (Abb. 2)
• Drücken Sie die Verriegelung und nehmen Sie den
Batteriehalter (26) aus der Fernbedienung (25)
heraus, setzen Sie eine (mitgelieferte) CR2025-
Batterie ein, achten Sie dabei strikt auf die Polarität.
• Setzen Sie den Batteriehalter (26) in die
Fernbedienung (25) ein.
Anmerkungen:
- nehmen Sie die evtl. vorhandene Isoliereinlage
heraus.
- die Batterie muss rechtzeitig ersetzt werden;
- laden Sie die Lithiumbatterie nicht wieder auf;
- nehmen Sie die Batterie heraus, wenn das Gerät
längere Zeit nicht benutzt wird;
- die verbrauchte Batterie ist aus der Fernbedienung
(25) herauszunehmen und zu entsorgen.
Filtervorbereitung vor der Verwendung des
Luftreinigers
• Nehmen Sie den Deckel (1) ab (Abb. 3).
• Nehmen Sie die Filter aus dem Luftreinigergehäuse
heraus.
• Nehmen Sie die Filter aus der Verpackung heraus
(Abb. 4).
• Setzen Sie das erste HEPA-Filter (10) ins
Luftreinigergehäuse ein und achten Sie darauf (Abb.
5).
• Setzen Sie das zweite Kohlenlter (9) ein und achten
Sie darauf, dass die «Zunge» zu Ihnen zeigt (Abb. 5).
• Installieren Sie den Vorlter (8) (Abb. 5).
• Stellen Sie den Vorderdeckel (1) zurück auf (Abb. 6).
• Der Luftreiniger ist betriebsbereit.
VERWENDUNG DES LUFTREINIGERS
• Stellen Sie den Luftreiniger auf einer ebenen,
trockenen und standfesten Oberäche auf und
benutzen Sie ihn ebenda. Der Abstand zwischen
dem Gerätegehäuse und Wänden, anderen Möbeln
und Einrichtungsgegenständen soll mindestens 20
cm betragen, und der Freiraum darüber soll 30 cm
bis 50 cm machen.

20
DE
Einschaltung
• Stecken Sie das Netzkabel in eine Steckdose und
dabei hören Sie einen Tonsignal, die Bedienungs-/
Anzeigeplatte (2) zeigt zum Selbsttest alle Zeichen
abwechselnd an, dann blinken alle Zeichen und
erlöschen, der Luftreiniger ist im Bereitschaftsbetrieb.
• Bei jedem Drücken der aktiven Taste ertönt ein
Tonsignal.
• Um den Luftreiniger einzuschalten, drücken Sie
die Ein-/Ausschalttaste «Ein/Aus»(11) auf der
Bedienungs-/Anzeigeplatte (2) oder drücken Sie die
Taste (20) «Ein/Aus» auf der Fernbedienung (25),
der Luftreiniger schaltet sich ein.
• Digitale Zeichen (18) zeigen den Luftzustand im
Raum an:
- unter 19 (verschmutzte Luft)
- 20-29 (normaler Luftzustand);
- über 30 (reine Luft).
• Um den Luftreiniger auszuschalten, halten Sie
die «Ein/Aus» Taste (11) auf der Bedienungs-/
Anzeigeplatte (2) 3 Sekunden lang gedrückt
oder halten Sie die «Ein/Aus»-Taste (20) auf der
Fernbedienung (25) 3 Sekunden lang gedrückt und
ziehen Sie das Netzkabel aus der Steckdose.
Geschwindigkeitsbetriebswahl
• Um den Geschwindigkeitsbetrieb zu wählen, drücken
Sie die Taste (12) «Geschwindigkeit» auf der
Bedienungs-/Anzeigeplatte (2) oder drücken Sie die
Taste (22) «Geschwindigkeit» auf der Fernbedienung
(25), dann leuchten die Anzeigen des Betriebs (15):
- « » Höchstgeschwindigkeit
- « » - mittlere Geschwindigkeit
- « » niedrige Geschwindigkeit (Nachtbetrieb)
- « » Autobetrieb, Geschwindigkeit des
Luftreinigers wird automatisch in Abhängigkeit von
der Luftreinheit im Raum eingestellt.
Nachtbetrieb
• Um den Nachtbetrieb zu aktivieren, halten Sie die
Taste (12) «Geschwindigkeit» auf der Bedienungs-/
Anzeigeplatte (2) 3 Sekunden lang gedrückt oder
drücken Sie die Taste (22) «Geschwindigkeit» auf der
Fernbedienung (25) 3 Sekunden lang.
• Im Nachtbetrieb wird der Luftreiniger mit niedriger
Geschwindigkeit « » eingeschaltet und alle
Zeichen erlöschen.
• Zum Ausschalten des Nachtbetriebs drücken Sie eine
beliebige Taste auf der Bedienungs-/Anzeigeplatte
(2) oder drücken Sie eine beliebige Taste auf der
Fernbedienung (25).
Luftreiniger-Abschalttimer
• Durch wiederholtes Drücken der «Timer»-Taste
(13) auf der Bedienungs-/Anzeigeplatte (2) oder
der «Timer»-Taste (24) auf der Fernbedienung (25)
stellen Sie die Timerbetriebszeit ein, die Betriebszeit
wird mit den Zahlensymbolen (16) angezeigt.
• Die Timerbetriebszeit kann von 1 bis 12 Stunden
eingestellt werden.
Seite wird geladen ...
Seite wird geladen ...
Seite wird geladen ...
Seite wird geladen ...
Seite wird geladen ...
Seite wird geladen ...
Seite wird geladen ...
Seite wird geladen ...
Seite wird geladen ...
Seite wird geladen ...
Seite wird geladen ...
Seite wird geladen ...
Seite wird geladen ...
Seite wird geladen ...
Seite wird geladen ...
Seite wird geladen ...
Seite wird geladen ...
Seite wird geladen ...
Seite wird geladen ...
Seite wird geladen ...
Seite wird geladen ...
Seite wird geladen ...
Seite wird geladen ...
Seite wird geladen ...
Seite wird geladen ...
Seite wird geladen ...
Seite wird geladen ...
Seite wird geladen ...
-
 1
1
-
 2
2
-
 3
3
-
 4
4
-
 5
5
-
 6
6
-
 7
7
-
 8
8
-
 9
9
-
 10
10
-
 11
11
-
 12
12
-
 13
13
-
 14
14
-
 15
15
-
 16
16
-
 17
17
-
 18
18
-
 19
19
-
 20
20
-
 21
21
-
 22
22
-
 23
23
-
 24
24
-
 25
25
-
 26
26
-
 27
27
-
 28
28
-
 29
29
-
 30
30
-
 31
31
-
 32
32
-
 33
33
-
 34
34
-
 35
35
-
 36
36
-
 37
37
-
 38
38
-
 39
39
-
 40
40
-
 41
41
-
 42
42
-
 43
43
-
 44
44
-
 45
45
-
 46
46
-
 47
47
-
 48
48


